M1 - Dashcam Thinkware - Free user manual and instructions
Find the device manual for free M1 Thinkware in PDF.

| Product type | Motorcycle dashcam |
| Brand | Thinkware |
| Model | M1 |
| Front camera dimensions | 75.3 x 36.6 x 36.6 mm |
| Front camera weight | 167.2 g |
| Rear camera dimensions | 75.3 x 36.6 x 36.6 mm |
| Rear camera weight | 102.6 g |
| Main unit dimensions | 118 x 73 x 26 mm |
| Main unit weight (with remote control) | 254.3 g |
| Memory | microSD memory card (Class 10) |
| Power supply | 12 V DC, power consumption 5.3 W |
| Auxiliary power device | Supercapacitor |
| Operating temperature | -10 °C to 60 °C |
| Storage temperature | -20 °C to 70 °C |
| Viewing angle (lens) | Approx. 140° (diagonal) |
| Video resolution | FHD (1920 x 1080), MP4 format |
| Frame rate | 30 frames/second max. |
| Audio | HE-AAC with built-in microphone |
| GPS | Built-in |
| Wi-Fi | 802.11b/g/n |
| Recording modes | Continuous, manual, video stabilization, Super night vision |
| Camera sensor | 2.1 MP CMOS 1/2.8 inch (IMX291) |
| Warranty (main unit) | 1 year |
| Warranty (microSD card) | 6 months |
| Maintenance and cleaning | Clean with a soft, dry cloth. Format the memory card every 3 months. |
| Important safety instructions | Do not use while driving. Securely attach to the motorcycle. Avoid extreme temperatures and humidity. |
Frequently Asked Questions - M1 Thinkware
User questions about M1 Thinkware
0 question about this device. Answer the ones you know or ask your own.
Ask a new question about this device
Download the instructions for your Dashcam in PDF format for free! Find your manual M1 - Thinkware and take your electronic device back in hand. On this page are published all the documents necessary for the use of your device. M1 by Thinkware.
USER MANUAL M1 Thinkware
natural_image
Line drawing of a Thinkware USB flash drive with no text or symbols on the bodyEnglish 2
Français 18
Deutsch 36
Espa-ol 54
Italiano 72
Русский 90
ภาษาไทย 157
Quick Start Guide & Warranty
English
Before using the product
This product records videos while the motorcycle is operating. Use this product only for reference when investigating incidents or road accidents. This product is not guaranteed to record ALL events. The device may not properly record accidents with small impacts that are too minor to activate the impact sensor or accidents with massive impacts that cause the motorcycle's battery voltage to deviate.
Video recording does not begin until the product is completely turned on (booted up). To ensure that all motorcycle events are recorded, wait until the product is completely booted up after turning it on, and then begin operating the motorcycle.
THINKWARE is not responsible for any loss caused by an accident, nor is it responsible for providing any support regarding the outcome of an accident.
FCC Statement
This device complies with Part 15 of the FCC Rules. Operation is subject to the following two conditions: (1) this device may not cause harmful interference, and (2) this device must accept any interference received, including interference that may cause undesired operation.
This equipment has been tested and found to comply with the limits for a Class B digital device, pursuant to Part 15 of the FCC Rules. These limits are designed to provide reasonable protection against harmful interference in a residential installation. This equipment generates, uses and can radiate radio frequency energy and, if not installed and used in accordance with the instructions, may cause harmful interference to radio communications. However, there is no guarantee that interference will not occur in a particular installation. If this equipment does cause harmful interference to radio or television reception, which can be determined by turning the equipment off and on, the user is encouraged to try to correct the interference by one or more of the following measures:
- Reorient or relocate the receiving antenna.
- Increase the separation between the equipment and receiver.
- Connect the equipment to an outlet on a circuit different from that to which the receiver is connected.
- Consult the dealer or an experienced radio/TV technician for help.
- This appliance and its antenna must not be co-located or operation in conjunction with any other antenna or transmitter.
FCC CAUTION: Any changes or modifications to the equipment not expressly approved by the party responsible for compliance could void your authority to operate the equipment.
FCC ID: 2ADTG-M1
Information to user : RSS-247
This device complies with Industry Canada's licence-exempt RSSs.
Please be cautioned the changes or modifications not expressly approved by the party responsible for compliance could void the user's authority to operate the equipment.
Notice: Operation is subject to the following two conditions: (1) this device may not cause interference, and (2) this device must accept any interference, including interference that may cause undesired operation of the device.
This Class B digital apparatus complies with Canadian ICES-003.
IC: 12594A-M1
United States Representative
Company Name: Thinkware Systems USA Inc.
Address: 18021, Sky Park Circle, STE J2, Irvine, CA, 92614, USA
Telephone Number: +1-949-553-0530
E-mail: support@thinkware.com
Read the following safety information to properly use the product.
Safety symbols in this guide

"Warning" – Indicates a potential hazard, which, if not avoided, may result in injury or death.

"Caution" – Indicates a potential hazard, which, if not avoided, may result in minor injury or property damage.

"Note" - Provides useful information to help users better utilize the product's features.
During use of the product

- Do not operate the product while driving a motorcycle. Distraction while driving may cause accidents and result in injury or death.
- Firmly install the product to the motorcycle. The product may fall during motorcycle operation if it is not properly mounted. Improper mounting may lead to accidents that result in injury or death.
- Do not install the product in a place exposed to flammable gas. Doing so may result in fire or an explosion.
- Do not use the product in a place with high humidity or temperature. It may cause malfunction of the product, explosion, or fire.

- Ensure that the product is out of the reach of children and pets. If the product breaks, it may result in fatal damage.
- Do not leave the product exposed to direct sunlight. Failure to do so may result in malfunction of the internal electronic circuit or a lens.
- Do not fully submerge the product in water. Doing so may damage the product.
- Do not disassemble the product or subject the product to impact. Doing so may damage the product. Unauthorized disassembly of the product voids the product warranty.
- Do not apply excessive force or use a sharp object when pressing the buttons. Doing so may damage the buttons.
- Do not clean the product with chemicals or detergent. Doing so may damage the product. Clean the product using a clean, soft, dry fabric.
- Ensure that the memory card is in the correct direction before inserting it into the product. The memory card slot or the memory card may be damaged if it is inserted incorrectly.
- Do not use the product outside for a prolonged period of time when it is raining. Doing so may cause water damage to the product.
- Use the product at a temperature between 14°F and 140°F (-10°C to 60°C) and store the product at a temperature between -4°F and 158°F (-20°C to 70°C). The product may not function as designed and some permanent physical damages may result if it is operated or stored out of the specified temperature ranges. Such damages are not covered by the warranty.
- Frequently check the product for the proper installation position. Impact caused by extreme road conditions may alter the installation position. Ensure that the product is positioned as instructed in this guide.
Product overview
Ensure that all the items are included in the product box when you open it. The standard items may change without prior notice.
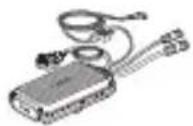
Main unit/integrated remote control (power cable included)
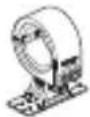
Mount
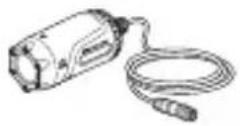
Front camera Rear camera
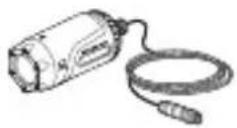

Quick start guide & Warranty / CS information

microSD memory card

Check the thickness of each cable to identify the front camera and the rear camera. The front camera cable is thicker than the rear camera cable.
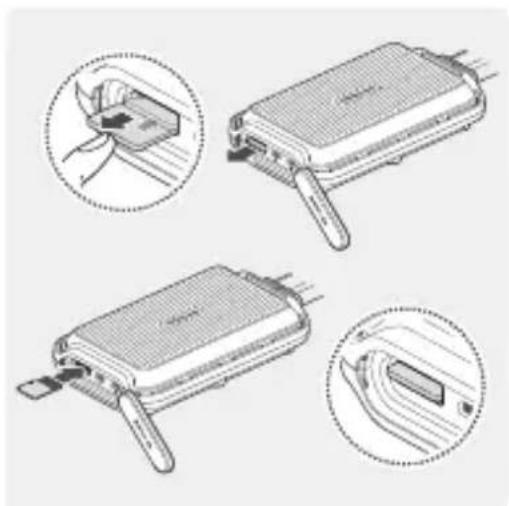
Removing and inserting the memory card
natural_image
Illustration of a handheld electronic device with four views showing internal components (no text or symbols)Removing the memory card
1 Ensure that the product is turned off, and then gently push the memory card into the slot with the tip of your finger. The memory card will be partially ejected from the product.
2 Remove it from the product.
Inserting the memory card
Insert the memory card into the memory card slot, paying attention to the direction of the memory card, and then push the memory card into the slot until you hear a click. Before inserting the memory card, ensure that the metal contacts on the memory card are facing toward the buttons of the product.

- Ensure that the product is turned off before removing the memory card. The recorded video files may be corrupted or lost if you remove the memory card while the product is on.
- Ensure that the memory card is in the correct direction before inserting it into the product. The memory card slot or the memory card may be damaged if it is inserted incorrectly.
- Use only authentic memory cards from THINKWARE. THINKWARE does not warrant the compatibility and normal operation of third-party memory cards.
- The memory card is covered by warranty against malfunctions for 6 (six) months from the purchase date. If the memory card fails to work after the warranty period, purchase a new one from THINKWARE or its authorized retailers.

- To prevent loss of recorded video files, periodically back up the video files on a separate storage device.
- For the best recording performance, format the memory card quarterly.
Part names
The product design may change without prior notice.
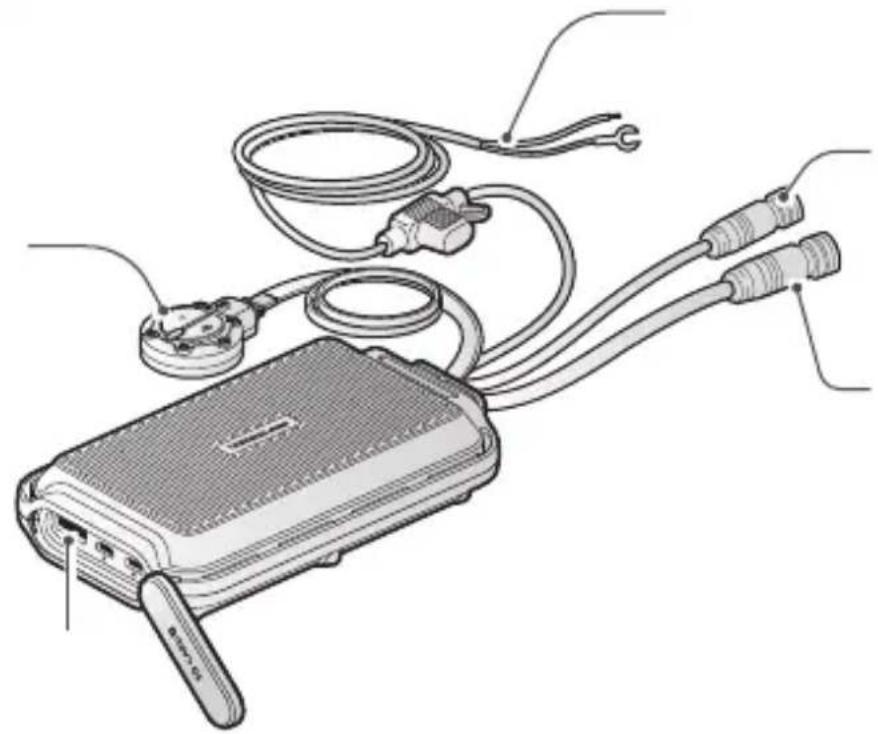
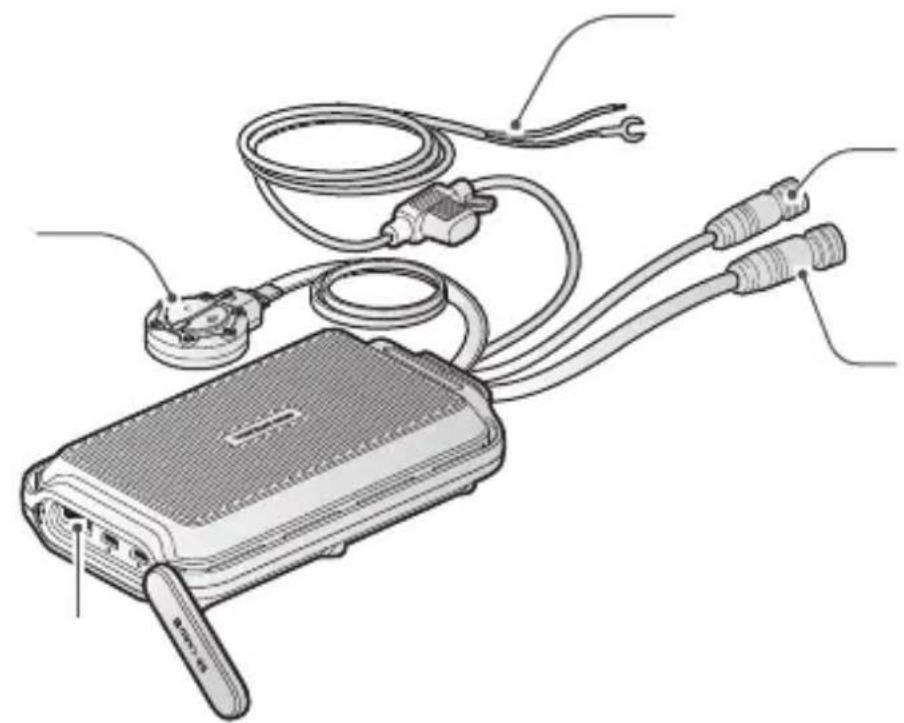
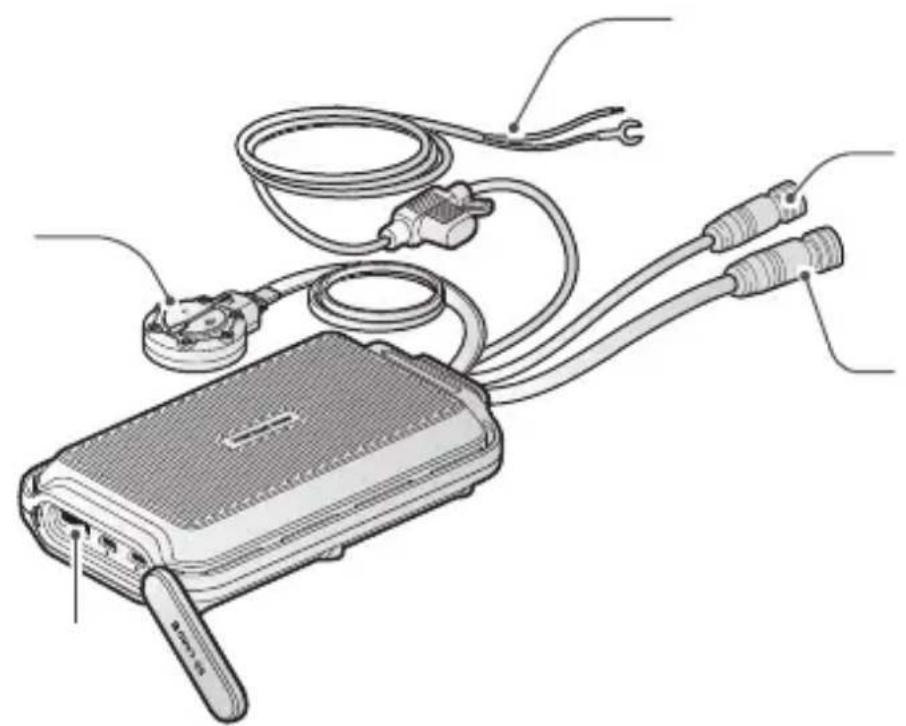
Main unit

text_image
Power cable Connect each wire (ACC, GND) to your motorcycle's battery. Rear camera port Used to connect the product to the rear camera. (thin cable) Front camera port Used to connect the product to the front camera. (thick cable) Remote control Used to control the product. Memory card slot Insert a memory card to save recordings.
Check the thickness of each cable to identify the front camera and the rear camera. The front camera cable is thicker than the rear camera cable.
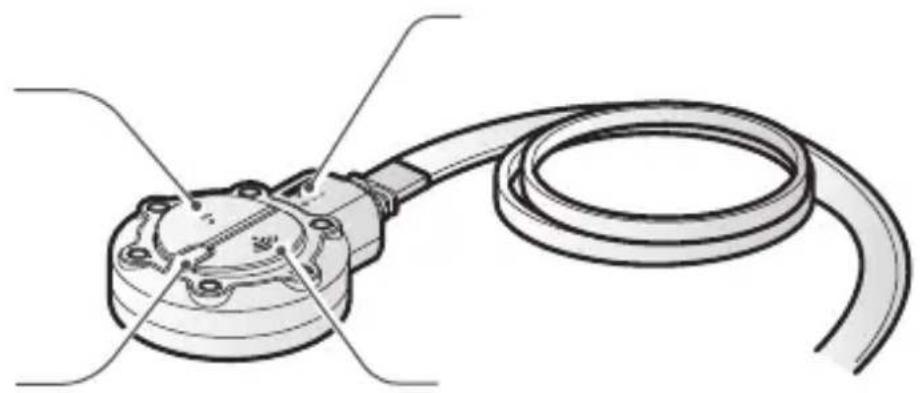
Remote control
Manual recording button
Press to start manual recording.
Status LED
Indicates the product status.
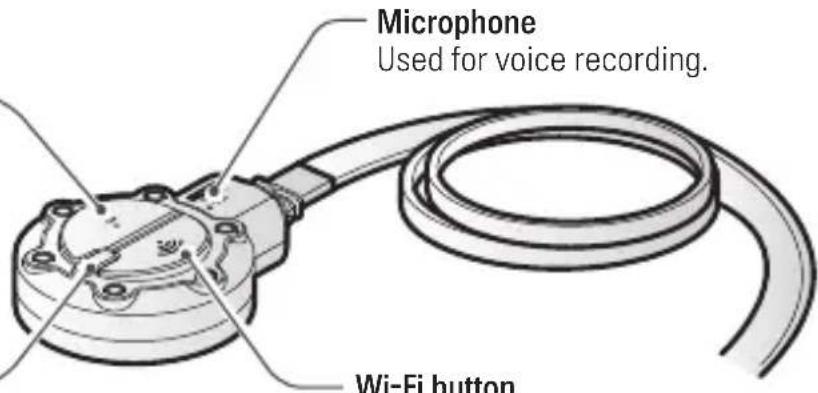
text_image
Microphone Used for voice recording. Wi-Fi buttonMicrophone
Used for voice recording.
Wi-Fi button
Press to turn on the AP mode* that connects the product to a smartphone via Wi-Fi network.
* The AP mode allows the product to operate as a router (HUB).
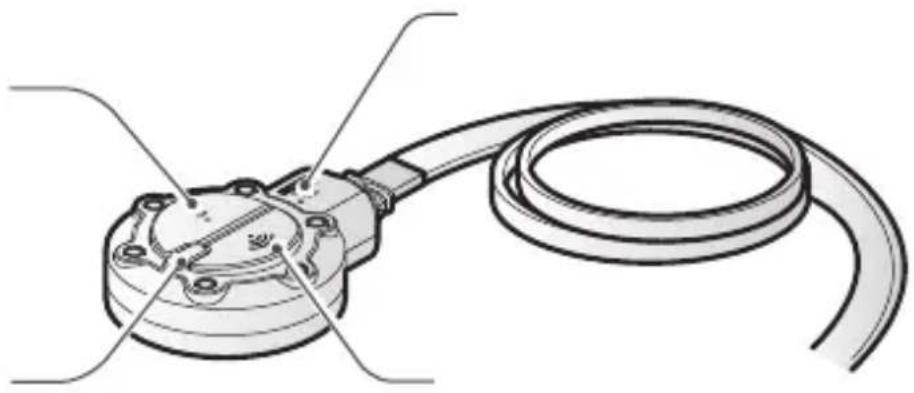
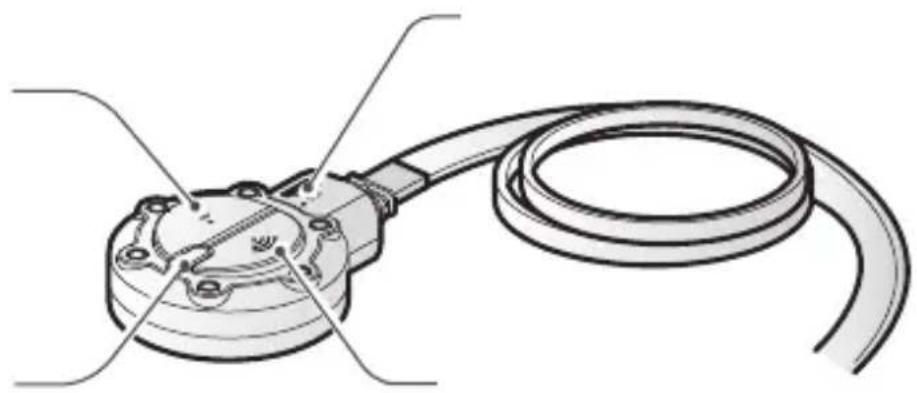
Front/Rear camera
Horizontal reference point Attach the product to the mount based on the marked point (◀).
Front/Rear camera lens Records the front view.

text_image
Camera cableConnect to the main unit's camera port.

Check the thickness of each cable to identify the front camera and the rear camera. The front camera cable is thicker than the rear camera cable.
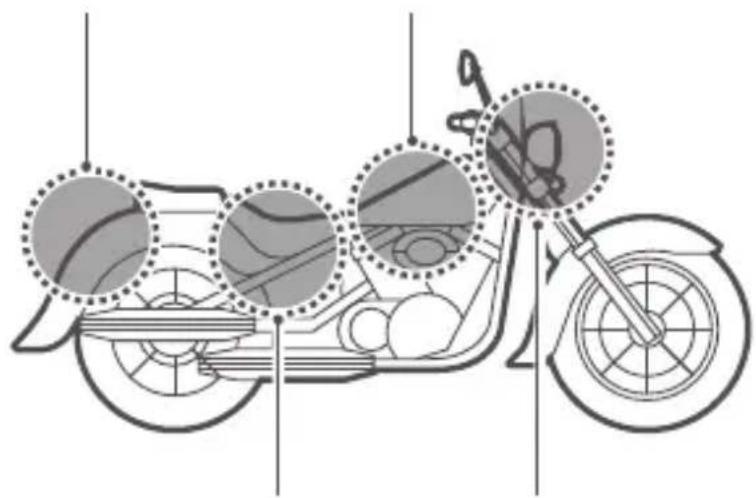
Installing the product
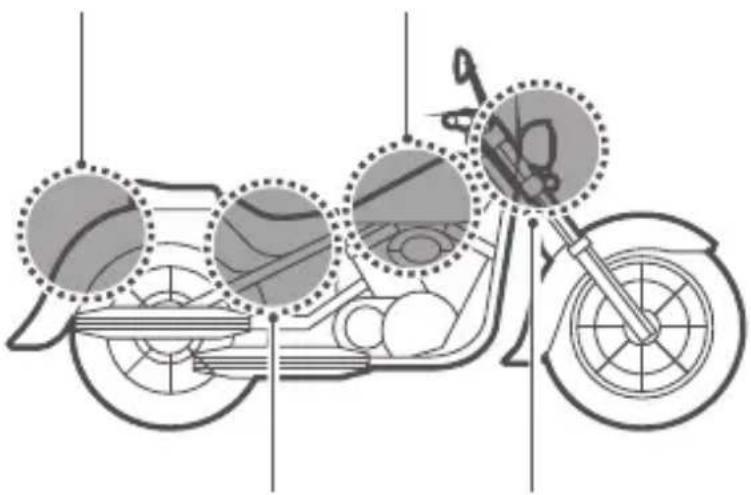
The following illustration shows the proper installation locations on a motorcycle for each part of the product. Select the appropriate installation locations and follow the instructions to properly install the each part of the product.
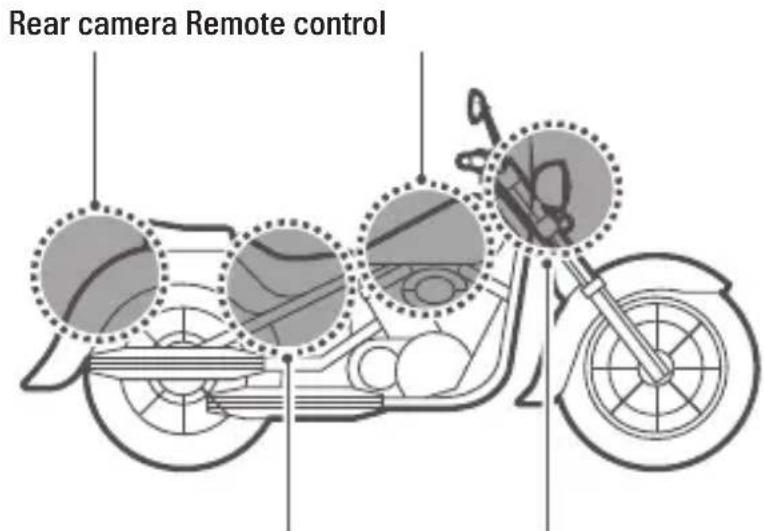
text_image
Rear camera Remote controlMain unit Front camera

The hardwiring cable must be professionally installed on the motorcycle by a trained mechanic. It may result in fire or electric shock if the product is installed incorrectly.
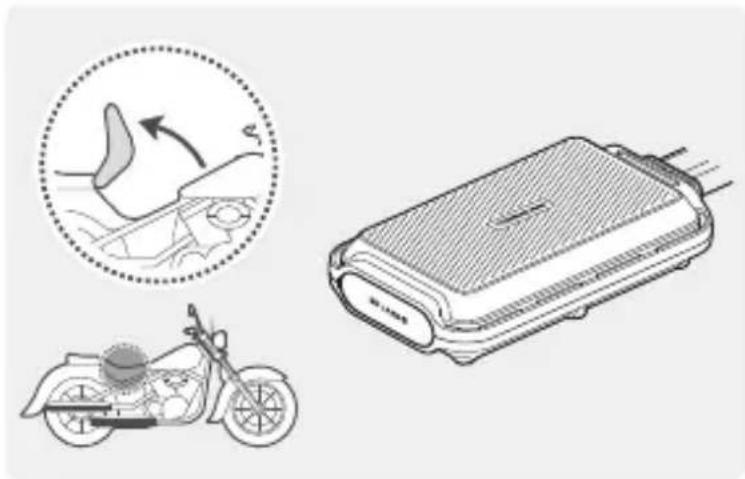
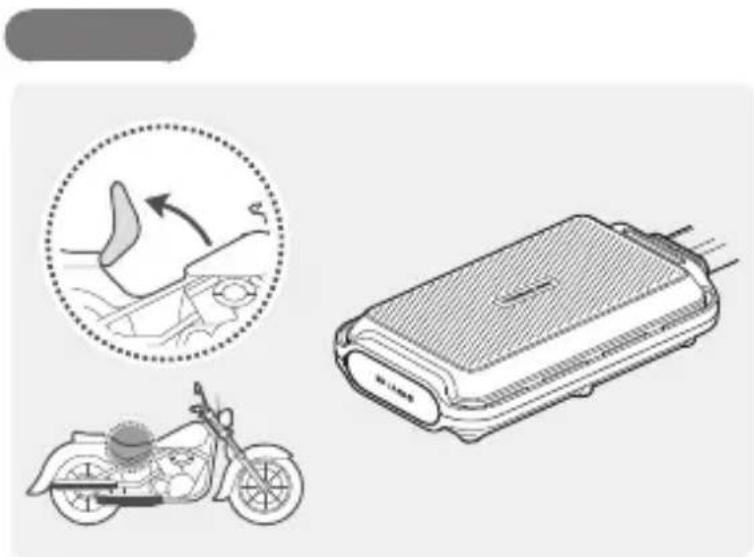
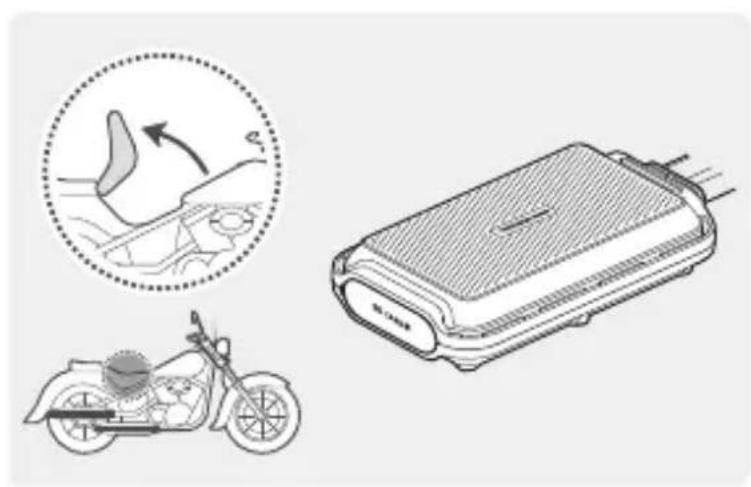
Attaching the main unit
natural_image
Illustration of a motorcycle, gear shift, and battery pack (no text or symbols)Attach the main unit to the inner part of the motorcycle, such as the inside of the seat.

Firmly attach the product to the motorcycle. The product may become detached while driving if it is not firmly attached.
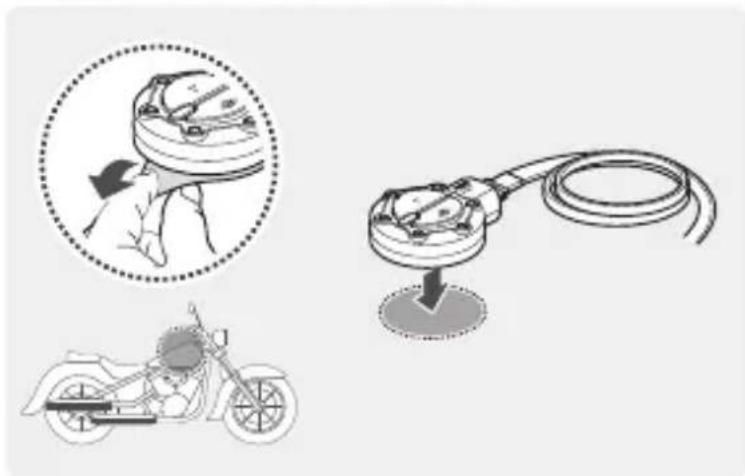
Attaching the remote control
text_image
Diagram illustrating a motorcyclist's electrical circuit, showing hand positioning and wiring connection to a motorcyclist.Remove the protective film from the remote control, and attach it where it can be used easily without obstructing vehicle operation.

For safe driving, arrange the cables to prevent the driver's vision from being obstructed or from interfering with driving.

Before attaching the product, wipe the installation surface of the windshield with a dry cloth. If foreign objects remain on the surface and the product cannot be attached firmly, it may become detached from the installation location while driving.
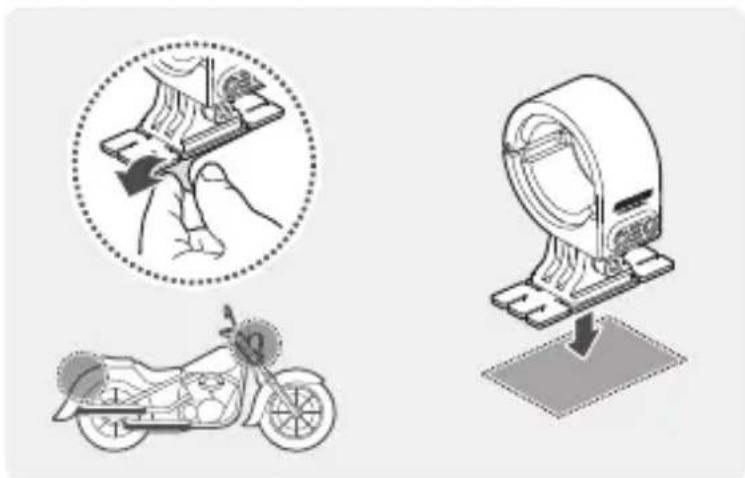
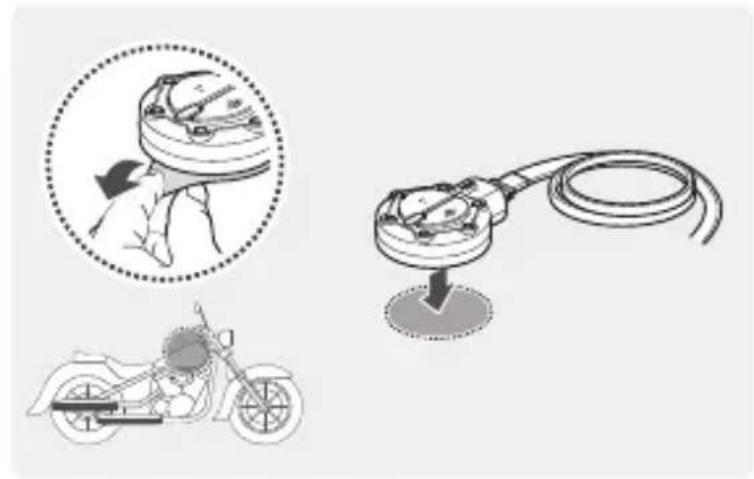
Installing the front/rear camera
text_image
Diagram illustrating a hand operating a camera with a magnified circular view and a motorcycle, alongside a magnified mechanical device.1 Remove the protective film from the mount and attach it to a place where the cameras can record both front and rearview.

Before attaching the product, wipe the installation surface of the windshield with a dry cloth. If foreign objects remain on the surface and the product cannot be attached firmly, it may become detached from the installation location while driving.

natural_image
Illustration of a mechanical device with two circular insets showing close-ups of the component (no text or symbols visible)2 Attach the camera to the mount as indicated by the horizontal reference point, and firmly tighten the screws using a wrench.

Tighten the bolts firmly to fix the front/rear camera to the mount. The camera may become detached from the mount while driving if the screws are not firmly tightened.

To adjust the angle of the front/rear camera, appropriately tighten the screws attached to the mount.
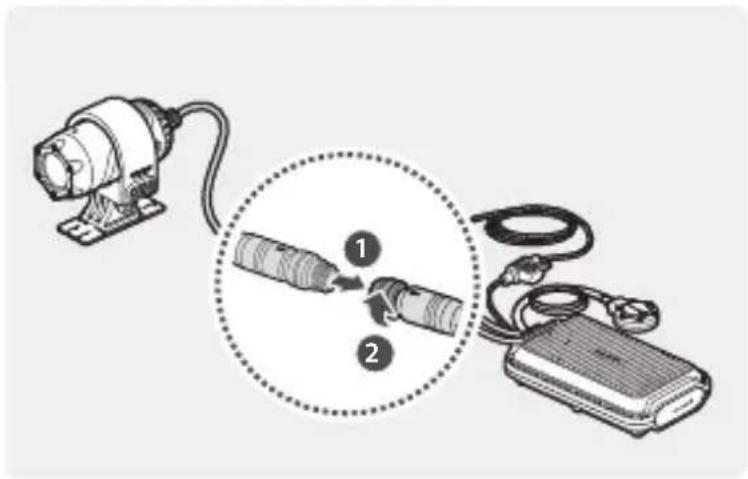
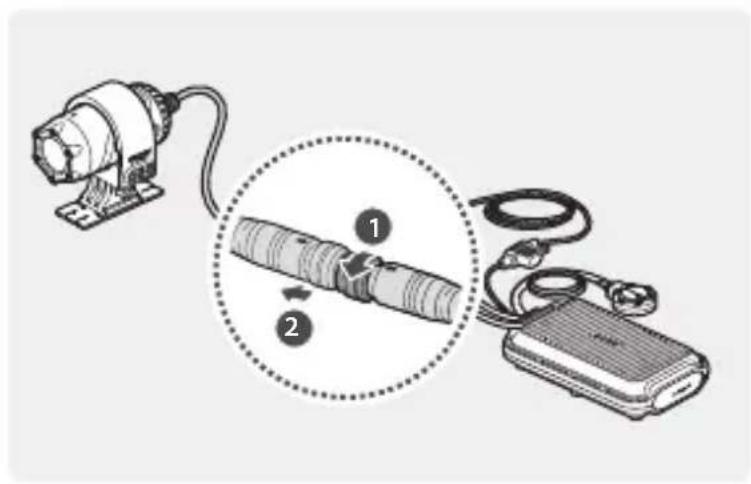
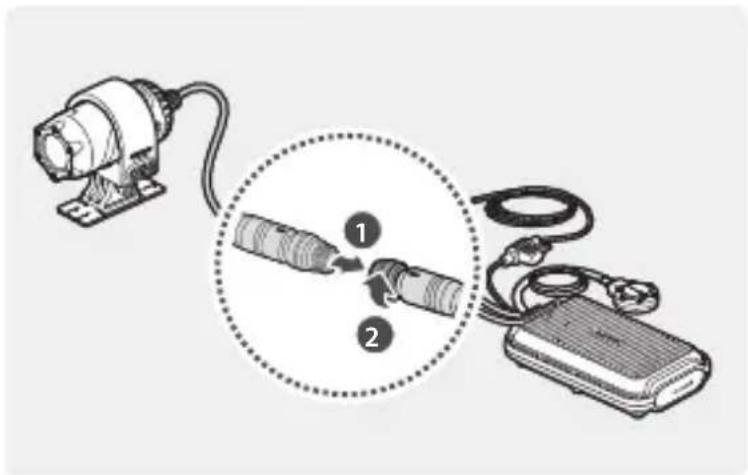
Connecting the camera cable
text_image
Diagram showing a motor connected to a device via cable and cable-stayed connections, with numbered instructions for each component.Insert the camera cable into the camera port by lining up the guide marks (←) on the camera cable and the port. Rotate the port clockwise until it is tight to secure the connection.
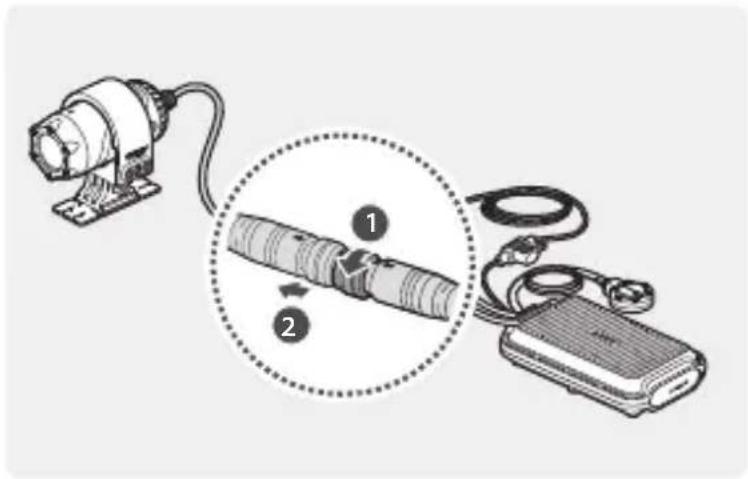
text_image
Diagram showing a motor connected to a device via cable, with numbered instructions for each component.To disconnect the camera cable from the camera port, rotate the port counterclockwise until it is loose, and then pull the connectors apart.

For safe driving, arrange the cables to prevent the driver's vision from being obstructed or from interfering with driving.
Connecting the power cable
Connect the power cable (ACC, GND) to the motorcycle key-on wiring.

- The hardwiring cable must be professionally installed on the motorcycle by a trained mechanic. It may result in fire or electric shock if the product is installed incorrectly.
- Ensure the wiring is completed correctly after connecting the power cable (ACC, GND) to the motorcycle key-on wiring. Failure to do so may damage the product or the motorcycle.
Turning the product on or off
The product turns on automatically and continuous recording starts when you turn on the ACC or start the engine. To turn off the product, turn off the ACC or stop the engine. The product will turn off automatically.
Using the continuous recording feature
The continuous recording starts when the product is turned on. During continuous recording, the product operates as follows.
| Operation description Status LED | |
| During driving, videos are recorded in 1 minute segments and stored in the "cont_rec" folder. | Blue (light on) |

- Wait until the product is fully ready to operate after turning it on, and then start driving. Video recording does not start until the product is completely turned on.
- Park your motorcycle in a safe location before using or configuring product settings.
- The product will stop recording while configuring settings on the THINKWARE CLOUD application.
- Check the recorded video on the application or PC only. If you insert the memory card directly into a smart device, such as a smartphone or a tablet PC, and play the recorded videos, the video files may be lost.

Videos are stored in the following folders, according to their recording mode.
| On the application Continuous recording Manual recording | |
| In the memory card cont_rec manual_rec |
Recording manually
You can record a scene you want to capture while driving and store it as a separate file.
| Operation description Status LED | |
| When you press the manual recording (REC) button, a video will be recorded for 1 minute, from 10 seconds before to 50 seconds after pressing the button, and stored in the "manual_rec" folder. | Blue (flickers) |
Checking the status LED
Refer to the following table to check the status LED.
| Operation status Status LED | |
| Recording continuously | Blue (light on) |
| Recording manually | Blue (flickers) |
| Searching for the application to connect | Green (light on) |
| The product is connected to the application | Green (flickers) |
| Upgrading firmware through the application | Red (light on) |
| • An error occurred with the connection between the front/rear camera and the main unit• An error occurred with the connection between the memory card and the main unit | Red (flickers) |
| Turning on the product | Blue + Green + Red (flickers) |
Using the THINKWARE CLOUD application
You can view and manage recorded videos and configure various product features with your smartphone. Download the “THINKWARE CLOUD” application via the Google Play Store or Apple App Store and install it on your smartphone.

THINKWARE CLOUD application does not support cloud service for this model.
Connecting the application to the product
Connecting via Wi-Fi
1 Turn on the motorcycle or start the engine to turn on the product, and launch the THINKWARE CLOUD application on your smartphone.

2 Tap Dash cam connection is required. at the bottom of the screen.
3 Press the Wi-Fi(💡) button on the remote control and tap connect in the Wi-Fi connection area at the top of the screen.
4 Tap Next on the Wi-Fi activating screen.
5 Tap Wi-Fi Settings on the Wi-Fi Connecting screen. The Wi-Fi Settings screen will appear.
6 From the network list, select the Wi-Fi network starting with "Thinkware" and enter "123456789" in the Password field. For security purposes, change the Wi-Fi password after the Wi-Fi network is connected.
7 Return to the THINKWARE CLOUD application and check Dash cam is connected via Wi-Fi at the bottom of the main screen. The product is now connected to the application.

- To disconnect the product from the application, tap Dash cam is connected via Wi-Fi at the bottom of the main screen, and tap Confirm on the disconnection pop-up message. The product is now disconnected from the application.
- If you disconnect the product and the application after you connect them for the first time, you can reconnect them by tapping Connect Hotspot in the Quick Connect window and following the instructions on the application.
- To connect a new smartphone to the product, press the Wi-Fi( 📤 ) button on the remote control.
Connecting via hotspot
1 Turn on the motorcycle or start the engine to turn on the product, and launch the THINKWARE CLOUD application on your smartphone.

2 Tap Dash cam connection is required. at the bottom of the screen.
3 Press the Wi-Fi(💡) button on the remote control and tap connect on the Hotspot connection area at the bottom of the screen and tap Configure New Connection.
4 Tap Next on the Wi-Fi activating screen.
5 Tap Wi-Fi Settings on the Wi-Fi Connecting screen. The Wi-Fi Settings screen will appear.
6 From the network list, select the Wi-Fi network starting with "Thinkware" and enter "123456789" in the Password field. For security purposes, change the Wi-Fi password after the Wi-Fi network is connected.
7 Return to the THINKWARE CLOUD application, enter your smartphone hotspot SSID and password, and tap Next.
8 Tap Turn on hotspot on the hotspot activation screen.
9 Allow the THINKWARE CLOUD application to access on your smartphone settings.
10 Return to the THINKWARE CLOUD application and tap Turn on hotspot on the hotspot activation screen.
11 Wait until the product is connected with your smartphone. You can see Dashcam is connected via hotspot. on the screen when the product is connected with your smartphone.

- To disconnect the product from the application, tap Dash cam is connected via Wi-Fi at the bottom of the main screen, and tap Confirm in the disconnection pop-up message. The product is now disconnected from the application.
- If you disconnect the product and the application after you connect them for the first time, you can reconnect them by tapping Connect Hotspot in the Quick Connect window and following the instructions on the application.
- To connect a new smartphone to the product, press the Wi-Fi( 📤 ) button on the remote control.
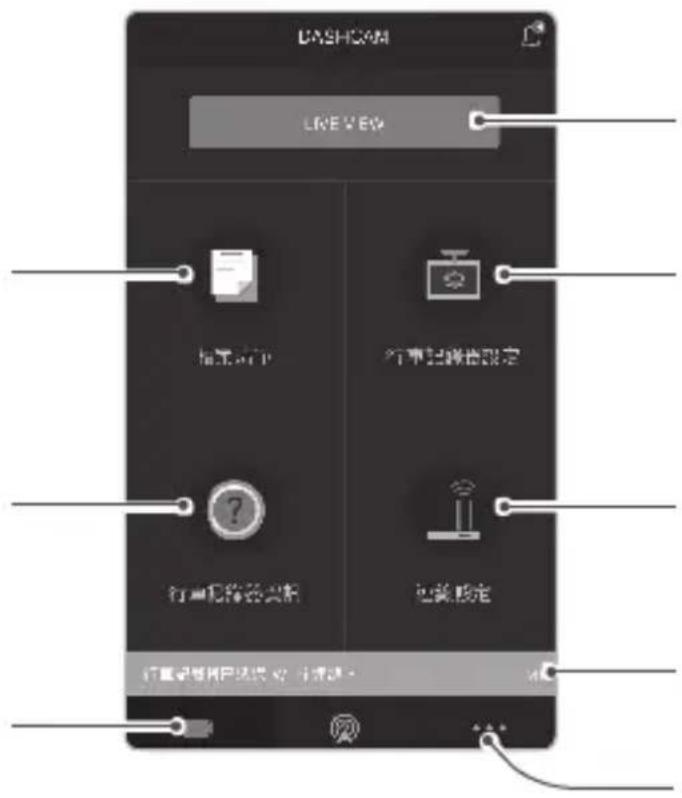
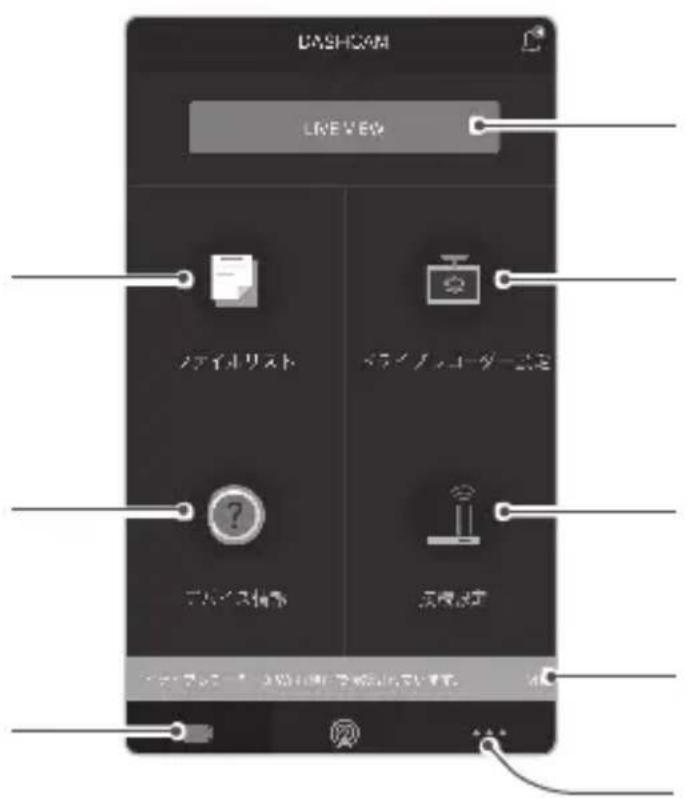
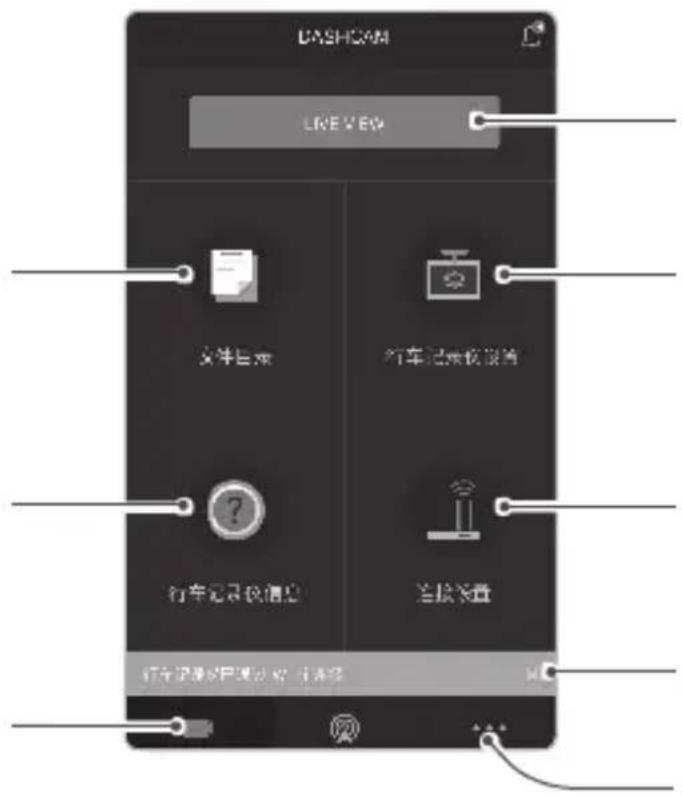
THINKWARE CLOUD application screen
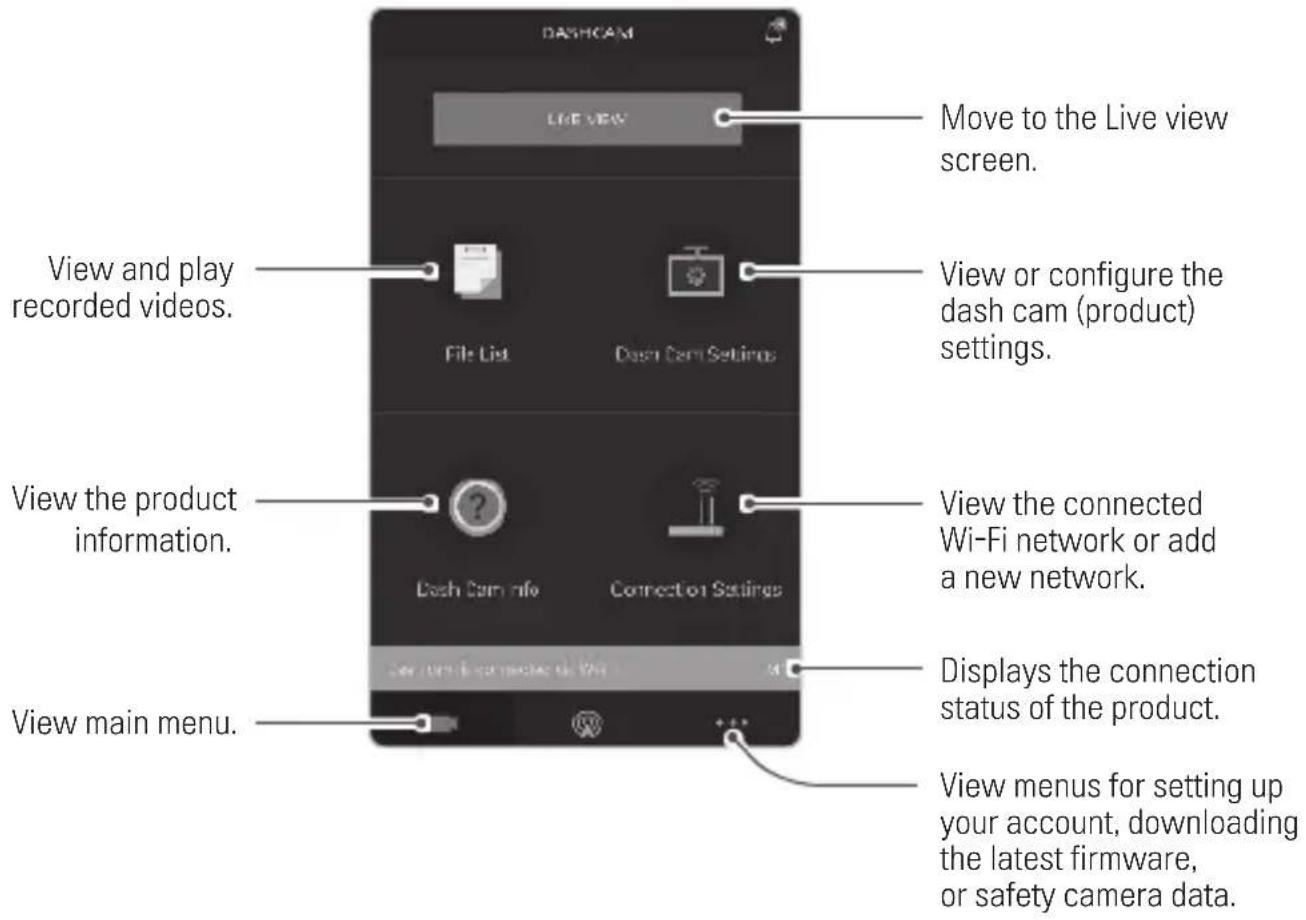
text_image
DASHCAM Live view Move to the Live view screen. View and play recorded videos. File List Dash Cam Settings View or configure the dash cam (product) settings. View the product information. Dash Cam info Connection Settings View main menu. Displays the connection status of the product. View menus for setting up your account, downloading the latest firmware, or safety camera data.Settings
1 Connect the product and the THINKWARE CLOUD application and tap Dash Cam Settings on the application.
2 You can set the product features based on your needs and preferences.
| Options Description | |
| Memory card Managing | Format the memory cardPartition the memory cardConfigure the video overwriting feature |
| Camera settings | Set the brightness of the front/rear cameraReverse the rear view upside down |
| Recording features settings | Turn the Super Night Vision feature* and the Daytime Video Stabilization* on/off. |
| System settings Select a language to display on the application. | |
* You can record bright, high-resolution videos at night if you activate the Super Night Vision feature.
** Stabilize the videos recorded during the day. Except for during the daytime, normal recording is performed.
Checking recorded images and videos
Follow the instructions to check recorded images and videos.
1 Connect the product and the application and tap File List on the application.
2 Choose the recording mode (Continuous/Manual recording) of the recorded video and play the video you want.

- Park your motorcycle in a safe location before checking the video.
- The product will stop recording while checking the file list or playing the video.
- Check the recorded video on the application or PC only. If you insert the memory card directly into a smart device, such as a smartphone or a tablet PC, and play the recorded video, the file may be lost.
- Vehicle identification numbers may be difficult to identify depending on the relative speed of the vehicle and the lighting conditions of the road.
Specifications
| Items Specification | |
| Model name M1 | |
| Front camera Dimensions / Weight | 75.3 x 36.6 x 36.6 mm / 167.2 g |
| Rear camera Dimensions / Weight | 75.3 x 36.6 x 36.6 mm / 102.6 g |
| Main unit Dimensions / Weight | 118 x 73 x 26 mm / 254.3 g(Including remote control (50.1 x 40 x 16.1 mm)) |
| Memory microSD memory card (Class10) | |
| Recording mode | Continuous recording/Manual recording/Video stabilization/Super night vision |
| Camera sensor 2.1M Pixels, 1/2.8" CMOS, 1080p (Front camera: 6-axis gyro sensor) | |
| Image sensor IMX291 | |
| Angle of view (Lens) Approximately 140° (diagonally) | |
| Video FHD (1920 x 1080) / H.264 / file extension: MP4 | |
| Frame rate Maximum 30 fps | |
| Audio High-Efficiency Advanced Audio Coding, HE-AAC | |
| GPS Embedded GPS | |
| Wi-Fi 802.11b/g/n | |
| Power input DC 12 V | |
| Power consumption 5.3 W (2CH, Fully charged supercapacitor) | |
| Auxiliary power unit Supercapacitor | |
| LED indicator Remote control: 3 colors LED (Status/Recording LED) | |
| Operating/Storage temperature | 14 – 140°F/-10 – 60°C |
THINKWARE warrants to the original purchaser for the following period from your purchasing date against deficiencies in material and workmanship under normal use. Should this unit fail to operate in a satisfactory manner within the warranty period, THINKWARE will at its discretion, replace or repair the product. We may use functionally equivalent, similar (if model is discontinued or out of stock), reconditioned, refurbished, remanufactured, pre-owned or new products or parts.
MicroSD Card: 6 months
Main Dash Cam unit and all Accessories in Box: 1 Year
If service is required
Should this unit fail to operate in a satisfactory manner, it is best to first check with the store where it was originally purchased. Should this fail to resolve the matter and if you believe your unit meets the criteria for warranty replacement or repair, please contact us at www.thinkware.com/Support.
What this warranty does not cover
This limited warranty does not cover:
- If the device was not purchased from THINKWARE or its authorized retailers.
- Device malfunction due to the normal wear and tear, misuse, lack of maintenance, accidents, modification, alteration or repairs by an unauthorized person or entity.
- Products that are operated in combination with ancillary or peripheral equipment not furnished or otherwise certified by THINKWARE for use with the product or any damage to the products or ancillary equipment as a result of such uses.
- THINKWARE is not liable for any damages (properties, business, and/or indirect damages), loss or corruption of data for any reason, product damage or personal injuries that occur due to accidents or natural disasters.
- THINKWARE Dash Cam records and saves video of vehicle accidents. It does not however guarantee to record all accidents. Accidents with light impact that is not enough to activate the impact detection sensor may not be recorded.
♦ LIMITED WARRANTY AND DISCLAIMERS
THINKWARE warrants that the product will be free from defects in materials or workmanship under normal use for one (1) year starting from original date of purchase. You may be required to provide proof of purchase as a condition of receiving warranty service.
The obligations of THINKWARE and the right of the purchaser under this warranty is limited to repair or replacement at the option of THINKWARE authorized dealer. The purchaser must provide notice of any defect within (1) year from the date of purchase and the defective product must be returned to the store where it was originally purchased or THINKWARE authorized dealers, at your expense.
Where permitted by local law, THINKWARE Products and any replacement products or parts may be either new or refurbished to be functionally equivalent to new in performance and
reliability. Replacement products or parts will have functionality at least equal to that of the product or part being replaced. Replacement products and parts are warranted to be free from defects in materials or workmanship for 90 days, or for the remainder of the warranty period for the THINKWARE Product which they are replacing or in which they are installed, whichever is longer.
This Limited Warranty extends only to the original retail or wholesale Buyer.
This Limited Warranty does not cover cosmetic damage or damage resulting from (a) accident, abuse, misuse, natural disaster, insufficient or excessive electrical supply, abnormal environmental conditions or other external causes; (b) repair, replacement, modification, unauthorized disassembly or service by anyone other than THINKWARE or THINKWARE authorized service provider; or (c) modification or conversion conducted at user's discretion, carelessness, or negligence.
EXCEPT AS EXPRESSLY SET FORTH IN THIS LIMITED WARRANTY, THERE ARE NO OTHER WARRANTIES, EXPRESS OR IMPLIED, FOR YOUR THINKWARE PRODUCT. ALL IMPLIED WARRANTIES OF MERCHANTABILITY OR FITNESS FOR A PARTICULAR PURPOSE IMPOSED BY LAW ARE LIMITED IN DURATION TO THE APPLICABLE WARRANTY PERIOD. THINKWARE DISCLAIMS ALL OTHER WARRANTIES INCLUDING ANY IMPLIED WARRANTIES.
This Limited Warranty gives you specific legal rights, and it is governed by the laws of the jurisdiction in which your THINKWARE Product was purchased. Some jurisdictions do not allow any limitation on how long a limited warranty will last or the exclusion or limitation of incidental or consequential damages in which case, the exclusions or limitations stated in this Limited Warranty may not apply to you. You may also have other rights that vary by jurisdiction.
To the extent allowed by local law, the remedies provided in this Limited Warranty are your sole and exclusive remedies. These terms and conditions supersede any prior agreements or representations, including statements made in sales literature or advice given in connection with your purchase. TO THE EXTENT ALLOWED BY LOCAL LAW, AND EXCEPT AS SPECIFICALLY SET FORTH IN THIS LIMITED WARRANTY, IN NO EVENT SHALL THINKWARE OR ANY THINKWARE-AUTHORIZED SERVICE PROVIDER BE LIABLE FOR (1) ANY DAMAGES CAUSED BY THE PRODUCT OR THE FAILURE OF THE PRODUCT TO PERFORM, (2) ANY DAMAGES RESULTING FROM LOSS DATA, OR (3) ANY INCIDENTAL, CONSEQUENTIAL, CONTINGENT OR SPECIAL DAMAGES WHATSOEVER, (4) ANY OBLIGATIONS ARISING FROM TORT OR ANY OTHER LEGAL THEORY, AND WHETHER OR NOT ADVISED OF THE POSSIBILITY OF SUCH DAMAGES. THINKWARE MAKES NO OTHER WARRANTIES.
- Limited 6 Month Warranty:
Product carrying a 6 month warranty against defects in materials and workmanship include THINKWARE MicroSD card included in the product package.
In the event of a product defect that requires support during the warranty period, please contact THINKWARE Customer Support (www.thinkware.com) for assistance.
natural_image
Illustration of a battery pack with three close-up views showing internal components (no text or symbols)natural_image
Technical diagram of a mechanical device with coiled cable and housing (no text or symbols)Bouton Wi-Fi
natural_image
Diagram of a motorcycle showing internal components and cross-sections (no text or labels)natural_image
Illustration showing a motorcyclist, gear shift, and battery pack (no text or symbols)text_image
Diagram illustrating a motorcyclist's electrical circuit, showing hand positioning and wiring installation steps.natural_image
Illustration showing a hand holding a tool, a motorcycle, and a mounted device with a downward arrow (no text or symbols)
natural_image
Illustration of a mechanical device with two circular insets showing close-ups of the top and bottom views (no text or symbols present)text_image
Diagram showing a motor connected to a battery via cable, with labeled parts 1 and 2 indicating components.text_image
Diagram showing a device connected to a battery pack via cable routing, with numbered instructions for each component.natural_image
Illustration of a battery pack with four views of its internal structure (no text or symbols)natural_image
Diagram of a motorcycle showing internal components and parts, with no visible text or symbols.natural_image
Illustration showing a motorcycle, gear shift, and battery pack (no text or symbols)text_image
Diagram illustrating a motorcyclist's electrical circuit, showing hand positioning and wiring connection to motorcyclist.natural_image
Illustration showing a hand operating a device, a motorcycle, and a medical imaging scanner (no text or symbols present)
natural_image
Illustration of a mechanical device with two circular insets showing a close-up of the component (no text or symbols present)text_image
Diagram showing two connected devices with labeled parts, including a motor and a battery pack.text_image
Diagram showing a device connected to a battery via cable, with labeled components and a magnified view of the cable being inserted.natural_image
Illustration of a battery pack with four close-up views showing internal components (no text or symbols)natural_image
Diagram of a motorcycle showing internal components and structural details (no text or labels)natural_image
Illustration of a motorcycle, gear shift, and battery pack with no visible text or symbolstext_image
Diagram illustrating a motorcyclist's electrical circuit, showing hand positioning and wiring installation steps.text_image
Diagram illustrating a hand operating a device, showing hand positioning and motor control mechanism with Chinese labels.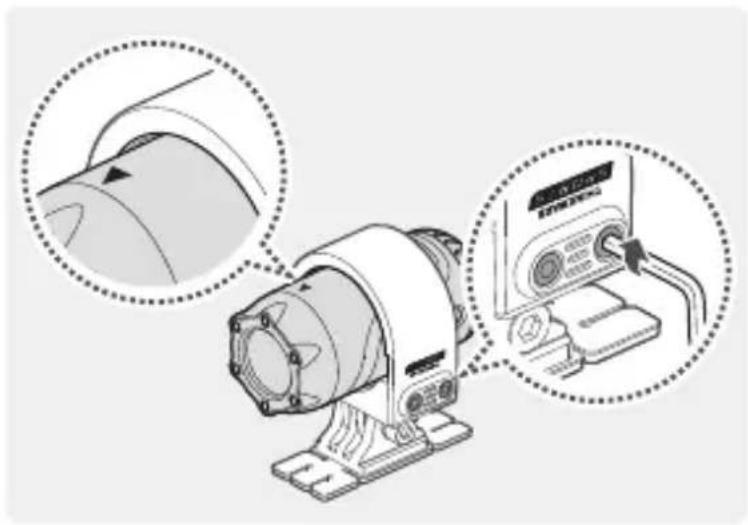
natural_image
Diagram showing a motor with two circular insets highlighting the components (no text or symbols present)text_image
Diagram showing a motor connected to a battery via cable, with labeled components and wiring diagramtext_image
Diagram showing a device connected to a battery via cable, with labeled parts 1 and 2 indicating components.natural_image
Illustration of a battery pack with four views of its internal structure (no text or symbols)natural_image
Illustration showing a motorcyclist, battery pack, and scooter (no text or symbols)text_image
Diagram illustrating a motorcyclist's electrical circuit, showing hand positioning and wiring installation steps.natural_image
Illustration showing three different mechanical or electrical components: a hand holding a tool, a motorcycle with a magnified view, and a mounted device (no text or symbols present)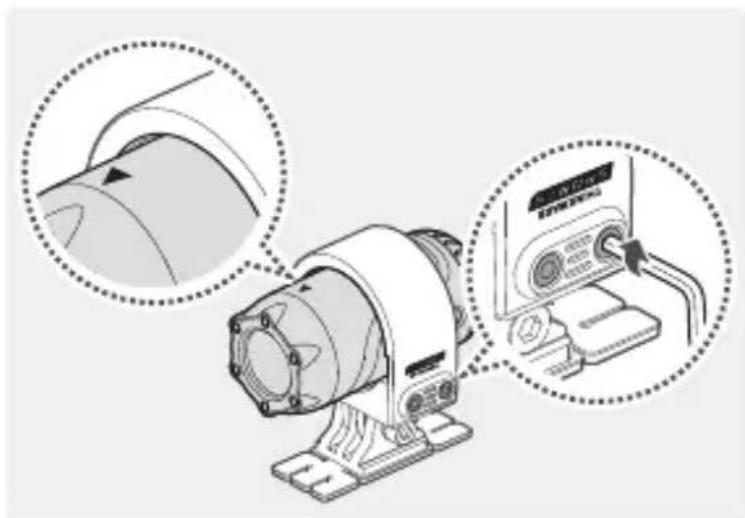
natural_image
Diagram of a motor with two circular insets showing the blade and control panel (no text or symbols present)text_image
Diagram showing a motor connected to a battery via cable and cable to a charging device, with numbered instructions for each component.text_image
Diagram showing a device connected to a battery via cable, with labeled parts 1 and 2 indicating components.natural_image
Illustration of a battery pack with three close-up views showing internal components (no text or symbols)natural_image
Illustration of a motorcycle, gear shift, and battery pack (no text or symbols)text_image
Diagram illustrating a motorcyclist's cable installation process, showing hand positioning and motor speed control.natural_image
Illustration showing a hand holding a device, a motorcycle, and a medical imaging scanner (no text or symbols present)natural_image
Diagram of a mechanical device with two circular insets showing a rotary knob and a close-up view of its internal components (no text or symbols present)text_image
Diagram showing a device connected to a battery via cable, with numbered instructions for each component.text_image
Diagram showing a device connected to a battery via cable, with labeled parts 1 and 2 indicating components.natural_image
Illustration of a battery pack with four views showing internal components (no text or symbols)


natural_image
Diagram of a portable electronic device with coiled cable, connector, and two connected probes (no text or symbols)
natural_image
Technical line drawing of a mechanical component with coiled cable and mounting flange (no text or symbols)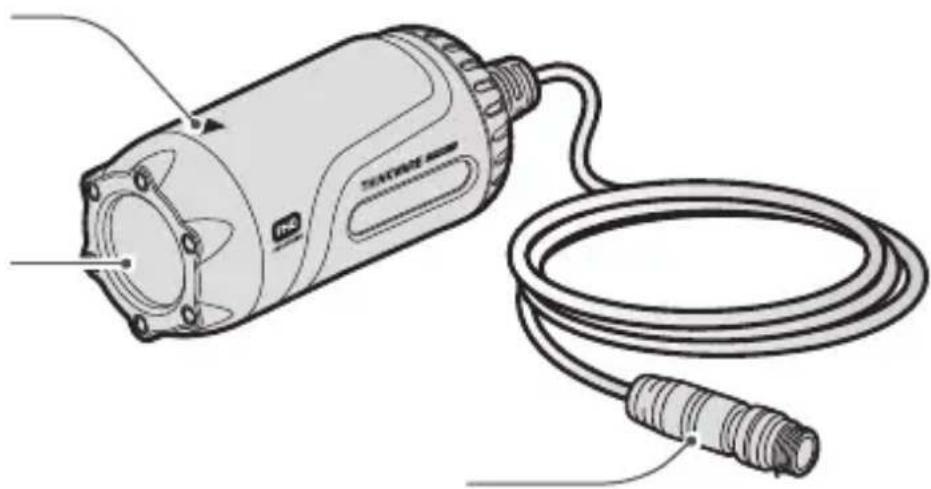
natural_image
Line drawing of a mechanical device with a coiled cable and connector (no text or symbols)
natural_image
Diagram of a motorcycle showing internal components and structural details (no text or labels)

natural_image
Illustration of a motorcycle, gear shift, and battery pack with no visible text or symbols
text_image
Diagram illustrating a motorcyclist's electrical circuit, showing hand positioning and cable installation steps.
text_image
Two gray rectangular buttons with warning symbols: one warning triangle and one document icon with a pen.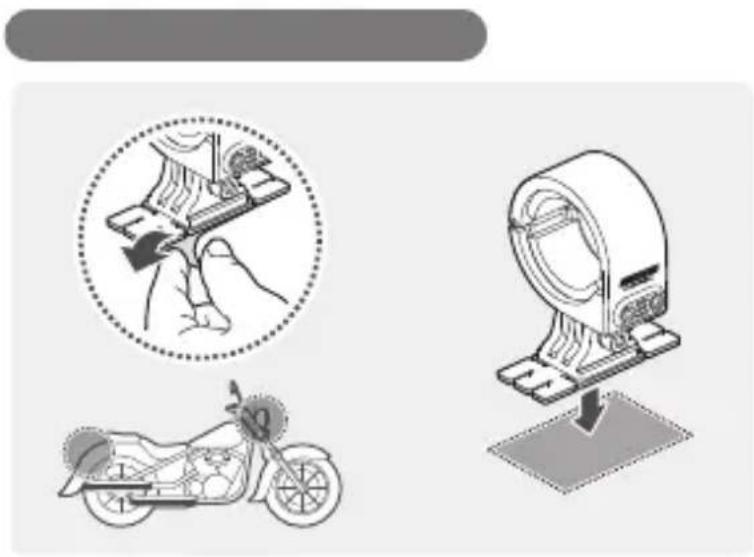
natural_image
Illustration showing a hand holding a device, a circular diagram with a hand, and a motorcycle on a base (no text or symbols)
natural_image
Blank document icon with a pen, no text or symbols present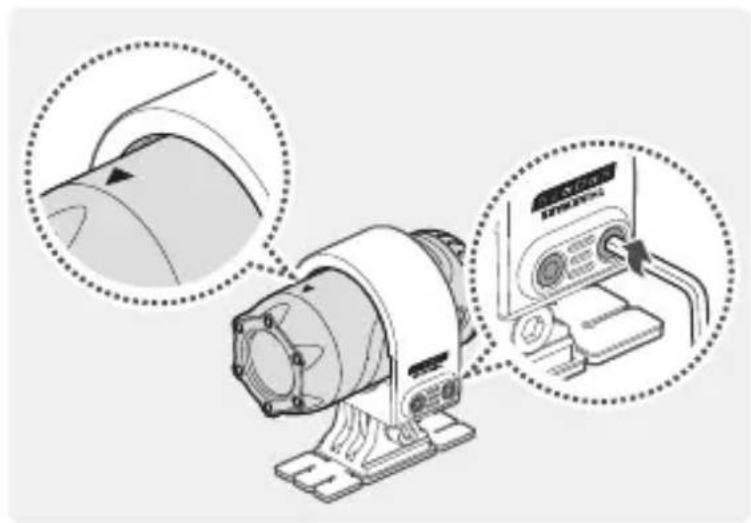
natural_image
Illustration of a mechanical device with two circular insets showing close-ups of the top and bottom views (no text or symbols present)
text_image
Two gray document icons: a warning triangle and a document with a pen, likely indicating error or warning about file or document.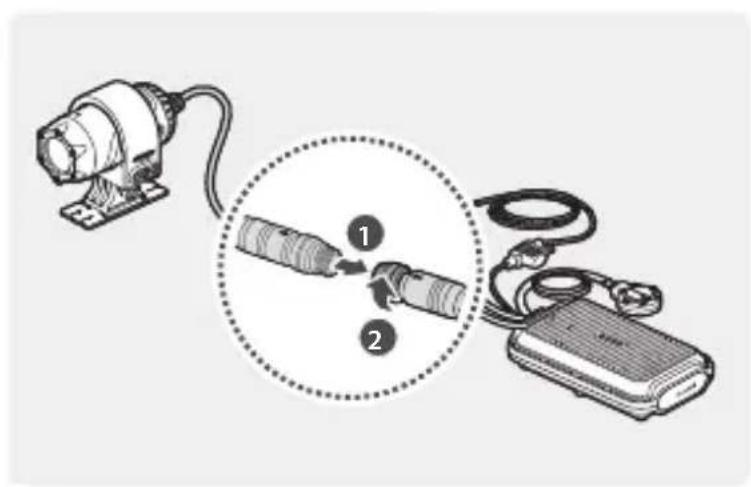
text_image
Diagram showing a device connected to a battery via cable, with numbered instructions indicating the process.
text_image
Diagram showing a motor connected to a device via cable, with numbered instructions for each component.


| REC |


natural_image
Illustration of a handheld electronic device with three views of its internal structure (no text or symbols)

natural_image
Illustration of a portable electronic device with coiled cables and connectors (no text or symbols)
natural_image
Technical line drawing of a mechanical component with a coiled cable and mounting bracket (no text or symbols)
natural_image
Line drawing of a portable electric motor connected to a coiled cable (no text or symbols)
text_image
Diagram of a motorcycle's internal components with labeled parts and cross-sectional views
natural_image
Illustration of a motorcycle, gear shift, and battery pack (no text or symbols)
natural_image
Generic document icon with a pencil, no text or symbols present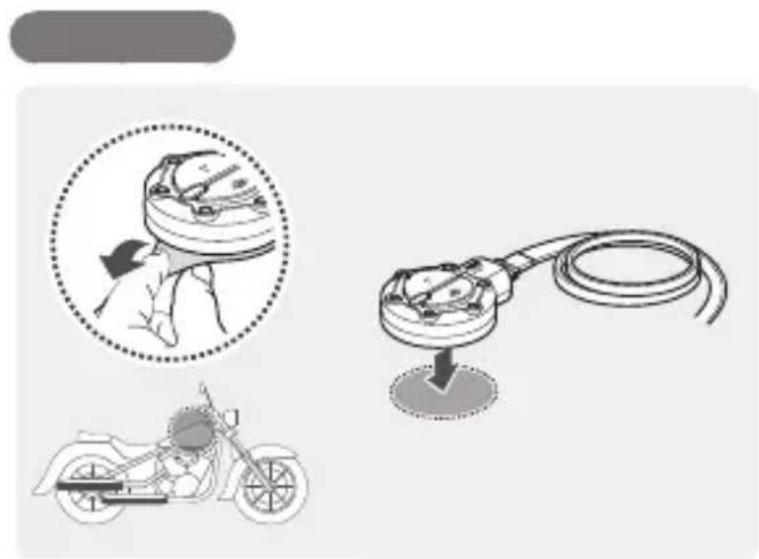
text_image
Diagram illustrating a motorcyclist's electrical cable installation process, showing hand positioning and wiring connection.
text_image
Two gray icons: a warning triangle and a document with a pen, likely representing error alerts or documentation.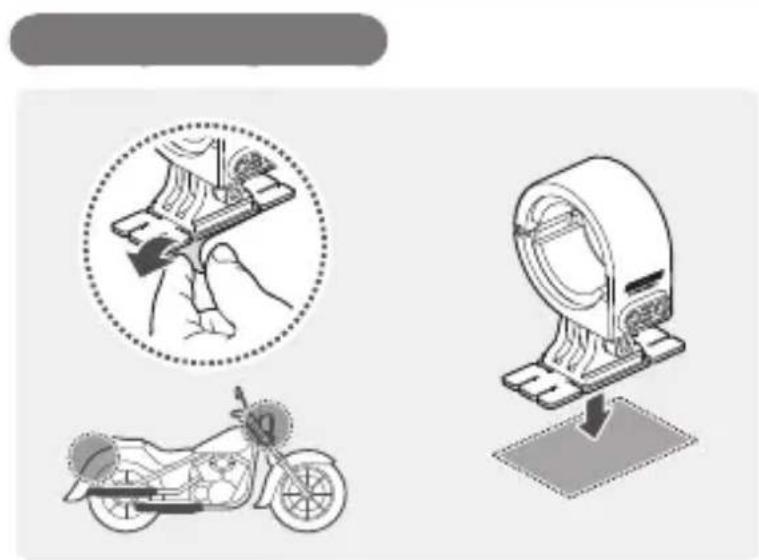
natural_image
Illustration showing three different medical or mechanical setups: a hand holding a device, a motorcycle with a labeled part, and a scanner mounted on a stand (no text or symbols present)
natural_image
Generic document icon with a pen, no text or symbols present
natural_image
Diagram of a mechanical device with two circular insets showing close-up views of the component (no text or symbols present)


text_image
Diagram showing a device connected to a battery via two labeled components, with numbered callouts indicating sequence.

text_image
Diagram showing a device connected to a battery via cable, with labeled parts 1 and 2 indicating components.


| REC |


natural_image
Illustration of a portable electronic device with four views showing internal components (no text or symbols)

natural_image
Illustration of a portable electronic device with coiled cable, plug, and connectors (no text or symbols)
natural_image
Technical line drawing of a mechanical component with a coiled cable and housing (no text or symbols)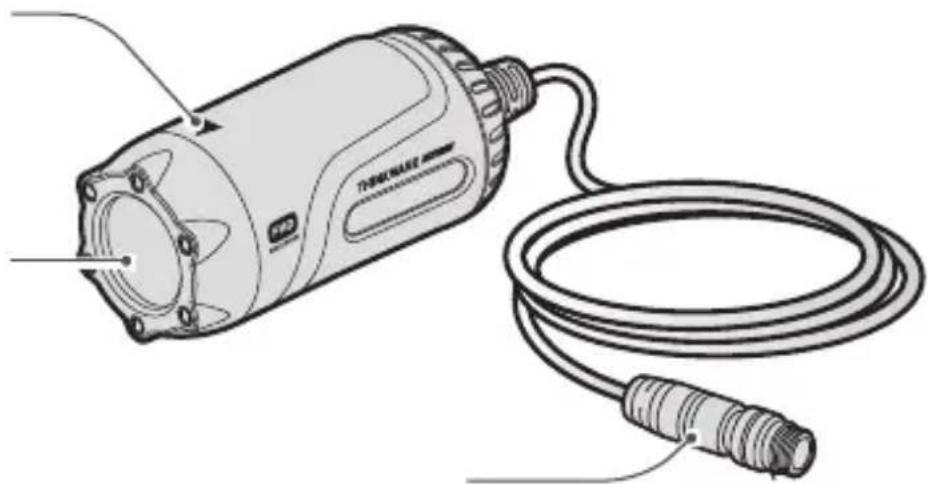
natural_image
Line drawing of a handheld electric motor connected to a coiled cable (no text or symbols)

text_image
Diagram of a motorcycle's internal components with labeled parts and cross-sectional views
natural_image
Illustration of a motorcycle, hand panel, and battery pack with no visible text or symbols
natural_image
Generic document icon with a checkmark, no text or symbols present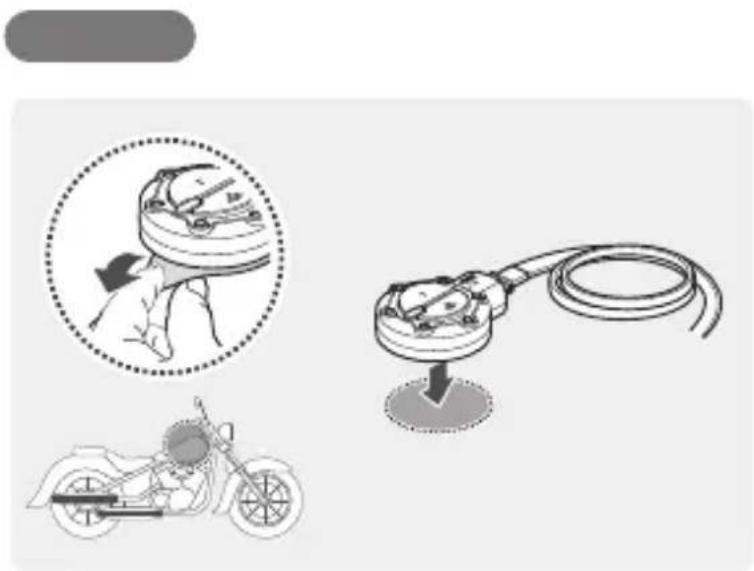
text_image
Diagram illustrating a motorcyclist's electrical circuit, showing hand positioning and wiring installation steps.
text_image
Two gray icons: a warning triangle and a document with a pen, likely representing error alerts or documentation errors.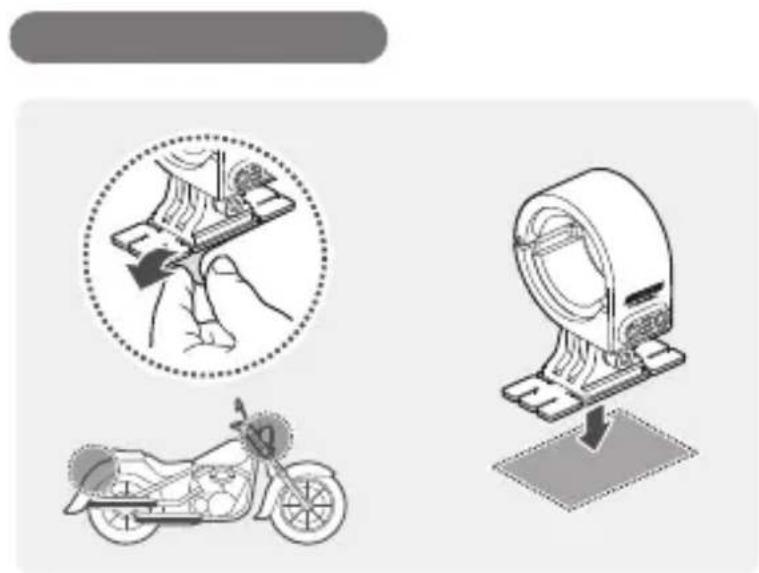
natural_image
Illustration showing a hand operating a device with a magnified circular view of the tool, and a motorcycle on a stand (no text or symbols)
natural_image
Generic document icon with a pen, no text or symbols present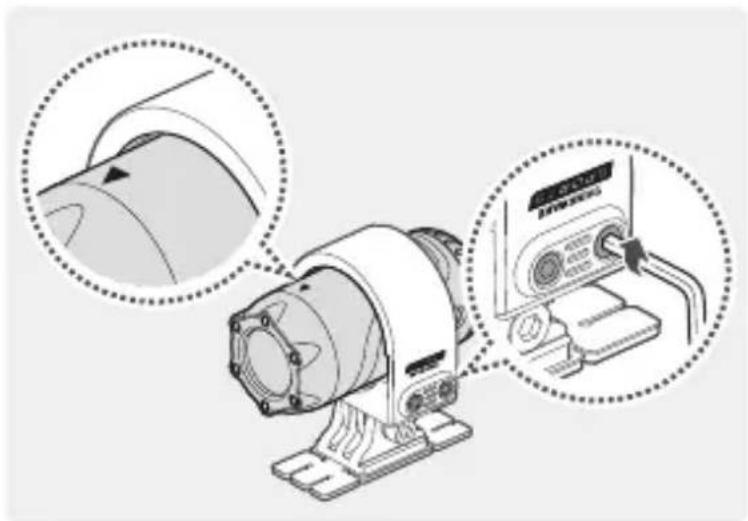
natural_image
Diagram of a mechanical device with two circular insets showing close-ups of the component (no text or symbols present)


text_image
Diagram showing a device connected to a battery via two labeled components, with numbered callouts indicating sequence.

text_image
Diagram showing a device connected to a battery via cable, with labeled parts 1 and 2 highlighting internal components.


| REC |