BLUE VENT MUMU - Autres appareils de cuisine Thinkware - Free user manual and instructions
Find the device manual for free BLUE VENT MUMU Thinkware in PDF.

| Product Type | Kitchen Ventilation Hood |
| Brand | Thinkware |
| Model | BLUE VENT MUMU |
| Dimensions (W x D x H) | 30 x 20 x 10 inches (76 x 51 x 25 cm) |
| Weight | 15 lbs (6.8 kg) |
| Power Supply | 120V AC, 60 Hz |
| Power Consumption | 150 Watts |
| Airflow Capacity | 400 CFM |
| Noise Level | 55 dB (low speed), 65 dB (high speed) |
| Main Functions | Exhaust, recirculation, LED lighting, 3-speed fan |
| Filter Type | Aluminum mesh grease filter (dishwasher safe) |
| Control Type | Touch button panel |
| Installation Type | Under cabinet, wall mount |
| Ducting Requirements | 6-inch round duct (optional for recirculation) |
| Maintenance | Clean grease filter monthly; replace charcoal filter every 6 months |
| Safety Features | Auto shut-off timer, overheat protection |
| Spare Parts | Grease filter, charcoal filter, LED bulb |
| Repairability | Filters and bulbs user-replaceable; motor service by professional |
| Warranty | 1 year limited |
| Color | Stainless steel with blue accent |
Frequently Asked Questions - BLUE VENT MUMU Thinkware
User questions about BLUE VENT MUMU Thinkware
0 question about this device. Answer the ones you know or ask your own.
Ask a new question about this device
Download the instructions for your Autres appareils de cuisine in PDF format for free! Find your manual BLUE VENT MUMU - Thinkware and take your electronic device back in hand. On this page are published all the documents necessary for the use of your device. BLUE VENT MUMU by Thinkware.
USER MANUAL BLUE VENT MUMU Thinkware
Smart Food Composter FG-ADM240N User Guide
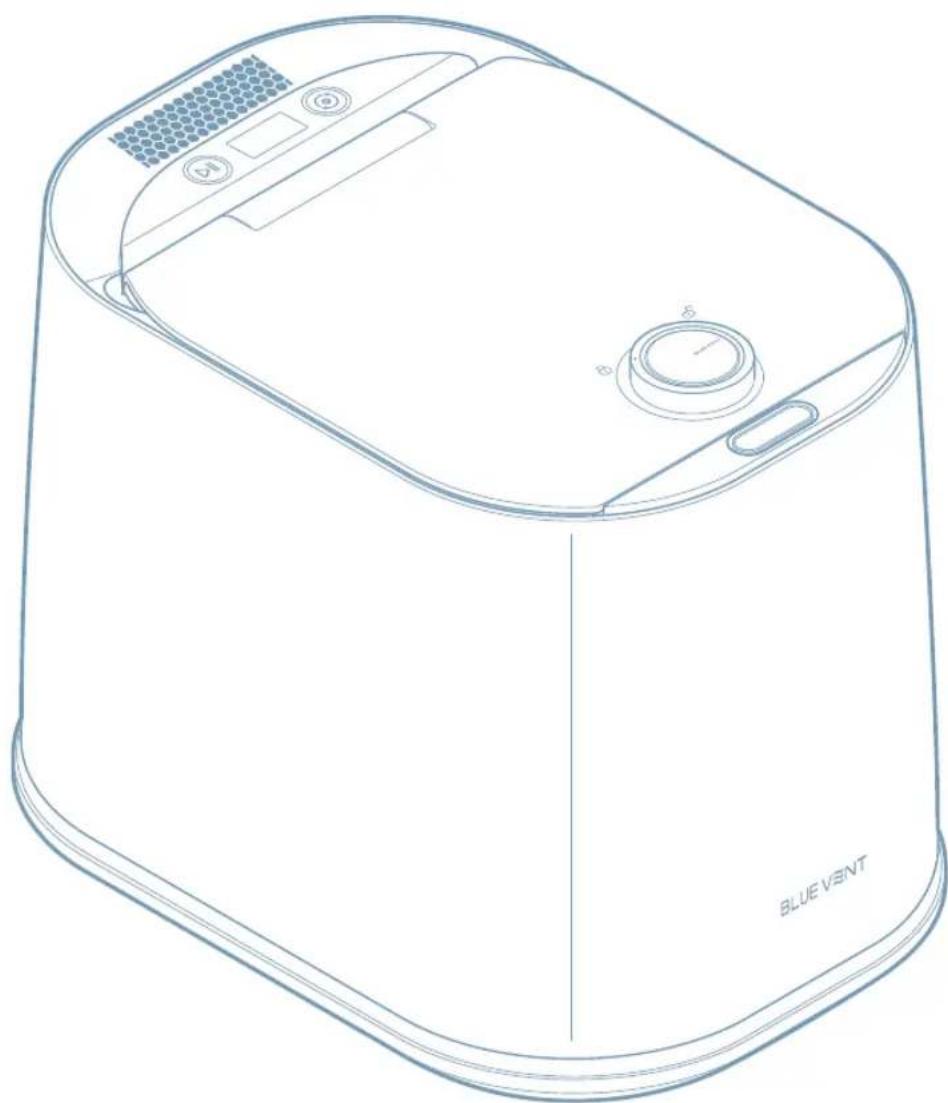
natural_image
Line drawing of a blue vent appliance with control panel and ventilation slots (no text or symbols on the device itself)Guide
Important safety instructions 03
Save these instructions 03
Precautions when using the product 04
Safety symbols in this guide 04
Product placement 04
Power supply 05
Usage and care 05
1 Usage and care 07
1.1 Checking the components 07
1.2 Name and role of each part 07
1.2.1 Front view 07
1.2.2 Back view 08
1.2.3 Interior view 08
Instructions
2 Choosing an appropriate location 09
3 Getting started 10
4 Using the product 11
4.1 Connecting the product to power 11
4.2 Opening and locking the lid 11
4.2.1 Opening the lid 11
4.2.2 Locking the lid 11
4.3 Understanding the display 12
4.3.1 Standby mode (before food input) 12
4.3.2 Storage mode 12
4.3.3 Processing and cleaning progress 12
4.3.4 Processing completed 12
4.4 Guidelines for food waste disposal 13
4.4.1 Types of food not suitable for disposal 13
4.4.2 Types of food that require caution 13
4.5 Using AI mode 14
4.6 Using Normal mode 16
4.7 Using Green mode 16
4.8 Using Cleaning mode 18
4.9 Useful features 19
4.9.1 Turning the voice guidance function on and off 19
4.9.2 Using the empty bucket/empty food detection feature 19
4.9.3 Understanding the power saving feature 19
Management Methods
5 Troubleshooting 20
6 Product care and maintenance 21
6.1 Replacing the activated carbon 21
6.2 Cleaning the stainless steel cover 24
7 Product FAQs 25
7.1 Power and electrical usage 25
7.2 Product usage 25
8 Specifications 26
Important safety instructions

When using electric disposers, basic precautions are always to be followed, including the following:
- Read all the instructions before using the disposer.
• To reduce the risk of injury, close supervision is required when a disposer is used near children. - Do not put fingers or hands into a disposer.
- Turn the power switch to the off position before attempting to clear a jam or remove an object from the disposer.
- When attempting to loosen a jam in a disposer, use a long wooden object such as a wooden spoon or the wooden handle of a broom or mop.
- When attempting to remove objects from a disposer use long-handled tongs or pliers. For a disposer that is magnetically actuated, use nonmagnetic tools.
-
To reduce the risk of injury by materials that are expellable by a disposer, do not put the following into a disposer:
-
Clam or oyster shells
- Caustic drain cleaners or similar products
- Glass, china, or plastic
- Large whole bones
- Metal, such as bottle caps, tin cans, or utensils
- Hot grease or other hot liquids
- When not operating a disposer, leave the drain cover in place to reduce the risk of objects falling into the disposer.
Save these instructions

- Improper connection of the equipment-grounding conductor can result in a risk of electric shock. Check with a qualified electrician or serviceman if you are in doubt as to whether the composter is properly grounded.
- If the plug provided with the disposer does not fit the outlet, do not modify the plug or attempt to force the plug into the outlet.
- Use a proper outlet installed by a qualified electrician.
- The appliance is not to be used by persons (including children) with reduced physical, sensory or mental capabilities, or lack of experience and knowledge, unless they have been given supervision or instruction children being supervised not to play with the appliance.
Precautions when using the product
Read the following safety information to properly use the product.
Safety symbols in this guide

"Warning" - Indicates a potential hazard which, if not avoided, may result in injury or death.

"Caution" - Indicates a potential hazard which, if not avoided, may result in minor injury or property damage.

"Note" - Provides useful information to help users better utilize the product's features.
Product placement

- Do not place the product in areas where flammable gases are leaking or may potentially leak. Doing so may result in an explosion or electrical fire.
- Place the product away from direct sunlight and heat sources, especially in dry areas. Failure to do may result in an electric shock or impaired product performance.
- Install the product in a location where the power plug can be easily disconnected from the electrical outlet. Failure to do may result in an electrical fire or electric shock due to electrical leakage.

- When connecting the power plug to the product, do not tilt the product excessively. Doing so may cause the contents inside to spill out.
• Install the product on a flat surface. Failure to do may result in vibrations and noises, leading to product malfunction.
• Install the product on a flat and dry location. When using the product, maintain a distance of at least 15 cm (5.9 in) between the back of the product and the wall, and a minimum height clearance of 60 cm (23.6 in) or more from the top of the product. If there is limited space or the product is close to surrounding objects or walls, poor ventilation can hinder the flow of steam and impair the performance of the product.

- Do not connect the product's power to a power strip with multiple power cords. Doing so may result in an electrical fire or electric shock.
- Do not connect the power plug to loose sockets. Doing so may result in an electrical fire due to overheating.
- Do not use the product for purposes other than those specified in the user manual. Doing so may damage the product or result in injury.
- Use only the genuine power cable (AC 120 V, 60 Hz) supplied with the product. Failure to do may result in an electrical fire or electric shock.
- Do not use a transformer. Doing so may result in an electrical fire or electric shock.
- Do not use the product in environments where the voltage, current, frequency, or other conditions deviate from the rated specifications. Doing so may result in an electrical fire or electric shock.
- Do not modify the length of the power plug arbitrarily. Doing so may result in an electrical fire or electric shock.
- If foreign objects, such as dust or water, come into contact with the power plug and power terminals, wipe them off with a dry cloth. Using the product with foreign objects on the terminals may result in an electrical fire or electric shock.
- If the power plug is damaged, do not replace or repair it on your own. To prevent accidents, please contact customer support for a replacement.
- Disconnect the power plug from the electrical outlet when not using the product for an extended period of time or during thunder and lightning. Failure to do may result in an electrical fire due to electrical leakage.

This product is designed for AC 120 V, 60 Hz only. Using a voltage that does not match the specifications may damage the product. Please use a dedicated AC 120 V, 60 Hz outlet with a rated capacity of 15 A or higher.
Usage and care

- Do not touch the power plug with wet hands. Doing so may result in an electric shock.
- Do not disconnect the power plug by pulling on the wires with your hands. Doing so may result in an electrical fire or electric shock.
- Do not twist or tie the power plug. Doing so may result in an electrical fire or electric shock.
- Prevent the wire from being pinched, twisted, or crushed by the product. Failure to do may result in an electrical fire or electric shock.
- If you hear any strange sounds, detect unusual odors, or see smoke coming from the product, immediately disconnect the power plug from the product and contact customer support. Doing so may result in an electrical fire or electric shock.
- People who lack physical sensation or mental abilities, or those who do not have sufficient experience and knowledge to use the device safely without supervision or instruction (including children), require caution and should not operate or use the product.
- Do not touch the inside of the product immediately after use, as it may be hot. Doing so may cause a burn.
- Do not open the lid while the product is in operation. Doing so can cause a burn due to the high temperatures inside the product.
- If the product is submerged, disconnect the power plug from the product and contact customer support. Doing so may result in an electrical fire or electric shock.
- Be careful not to drop the bucket when carrying it. Doing so may damage the bucket or result in injury.
- If water comes into contact with the power terminal of the product, disconnect the power plug from the product and contact customer support. Doing so may result in an electrical fire or electric shock.
- Do not put flammable substances, hot water, oil, or any other combustible materials inside the product. Doing so may result in an electrical fire.

- Do not open the lid or put your hands inside the bucket while it is operating. Doing so may cause a burn or injury.
- Keep children and pets away from the product and its packaging materials. Damage to the product may result in serious injury to children or pets.
- Disconnect the power plug from the product when cleaning it. Doing so may result in an electrical fire or electric shock.
- Do not spray water or use benzene, thinner, alcohol, acetone, or any other solvents to clean the product. Doing so may result in deterioration of the product's surface, electrical fire, or electric shock.

- Prevent children from leaning on or climbing on the product. Failure to do may result in serious injury.
- Do not exceed the fill line when disposing of food waste. Doing so may damage the product.
- When disposing of high-starch, sugary, or fatty foods, mix them with other food items. Processing them alone may cause clumping and inadequate treatment.
- Do not put bones, shellfish shells (such as crab or shrimp), or nutshells in the bucket. Doing so may damage the product.
- Do not put inedible minerals into the bucket. Doing so may damage the product or impair its performance.
- Do not forcibly cut off the power while the product is operating. Doing so may result in product malfunction.
- Do not store food waste inside the product for an extended period when the power is turned off. The contents may decay and produce unpleasant odors.
- Do not tilt the product excessively when carrying the product. Doing so may cause water to spill inside the product and result in product malfunction.
- Do not subject the bucket to excessive impact. Deformation of the body or handle may damage the product or impair its performance.
- Do not climb on top of the product or place heavy objects on it. Doing so may damage or deform the product.
- Do not disassemble or repair the product on your own. Doing so may damage the product or result in product malfunction.
- Do not put in any hard materials such as glass or metal into the product. Doing so may damage the product.
- Do not put any non-food waste into the bucket. Doing so may damage the product.
- Do not use the product if it is damaged. Doing so may result in injury or property damage.
- Do not manually rotate the mixing blades inside the bucket. Doing so may damage the bucket or result in injury.

- The maximum food waste capacity that can be processed in a single operation is 4 liters (1.05 gal).
- If there is a significant temperature difference between the outdoor temperature and the interior of the product, water may accumulate under the filter, shortening its lifespan. Please use the product indoors.
1 Usage and care
1.1 Checking the components
Open the product's box and make sure the following components are included.
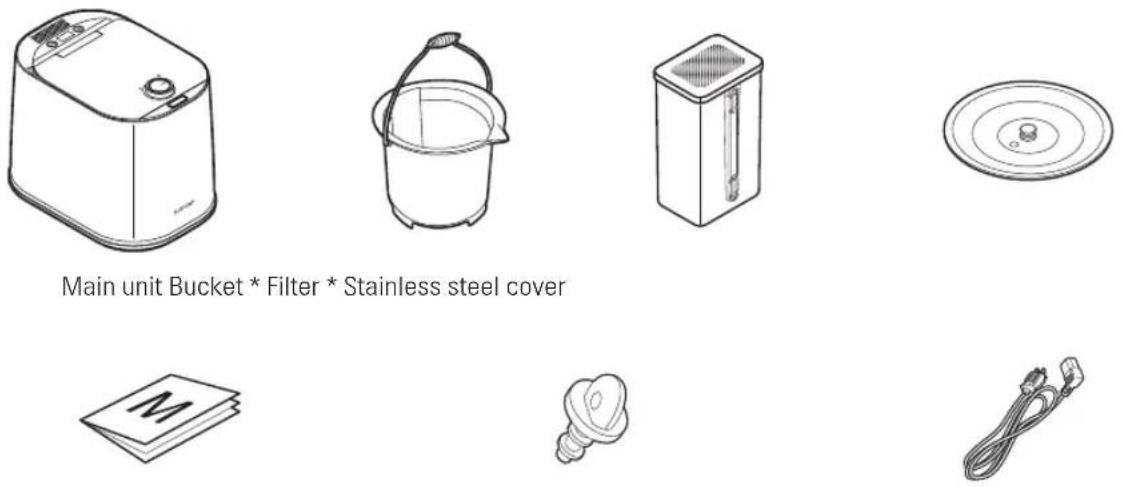
Main unit Bucket * Filter * Stainless steel cover
Quick start guide Drain plug (Filter valve) Power cable

- The components may be subject to change without prior notice for the purpose of improving the performance or quality of the product.
- The bucket and filter (including activated carbon) are consumable parts.
1.2 Name and role of each part
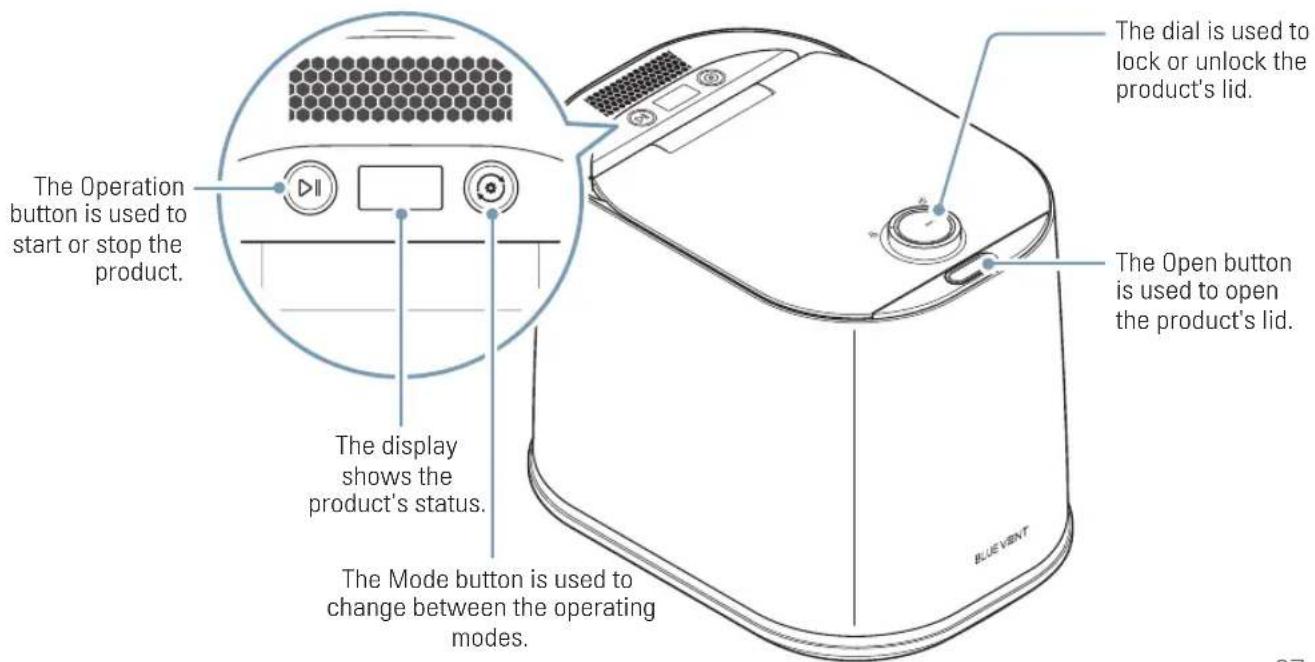
1.2.1 Front view
text_image
The Operation button is used to start or stop the product. The display shows the product's status. The Mode button is used to change between the operating modes. The dial is used to lock or unlock the product's lid. The Open button is used to open the product's lid. BLUE VENT1.2.2 Back view
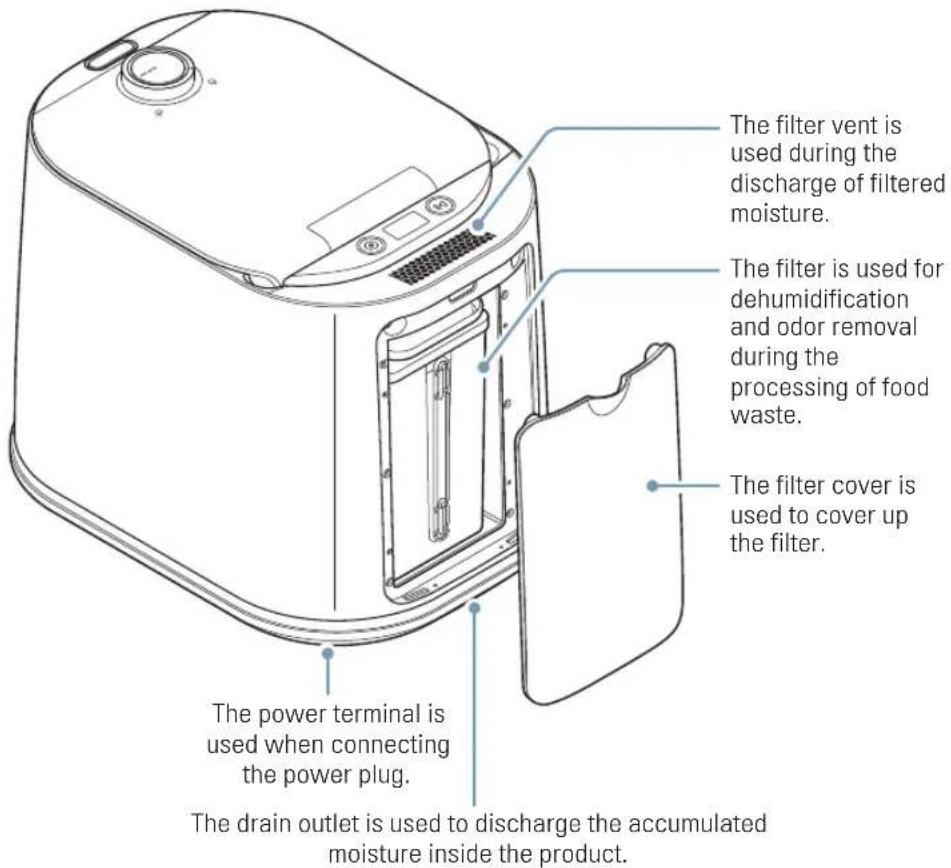
text_image
The filter vent is used during the discharge of filtered moisture. The filter is used for dehumidification and odor removal during the processing of food waste. The filter cover is used to cover up the filter. The power terminal is used when connecting the power plug. The drain outlet is used to discharge the accumulated moisture inside the product.1.2.3 Interior view
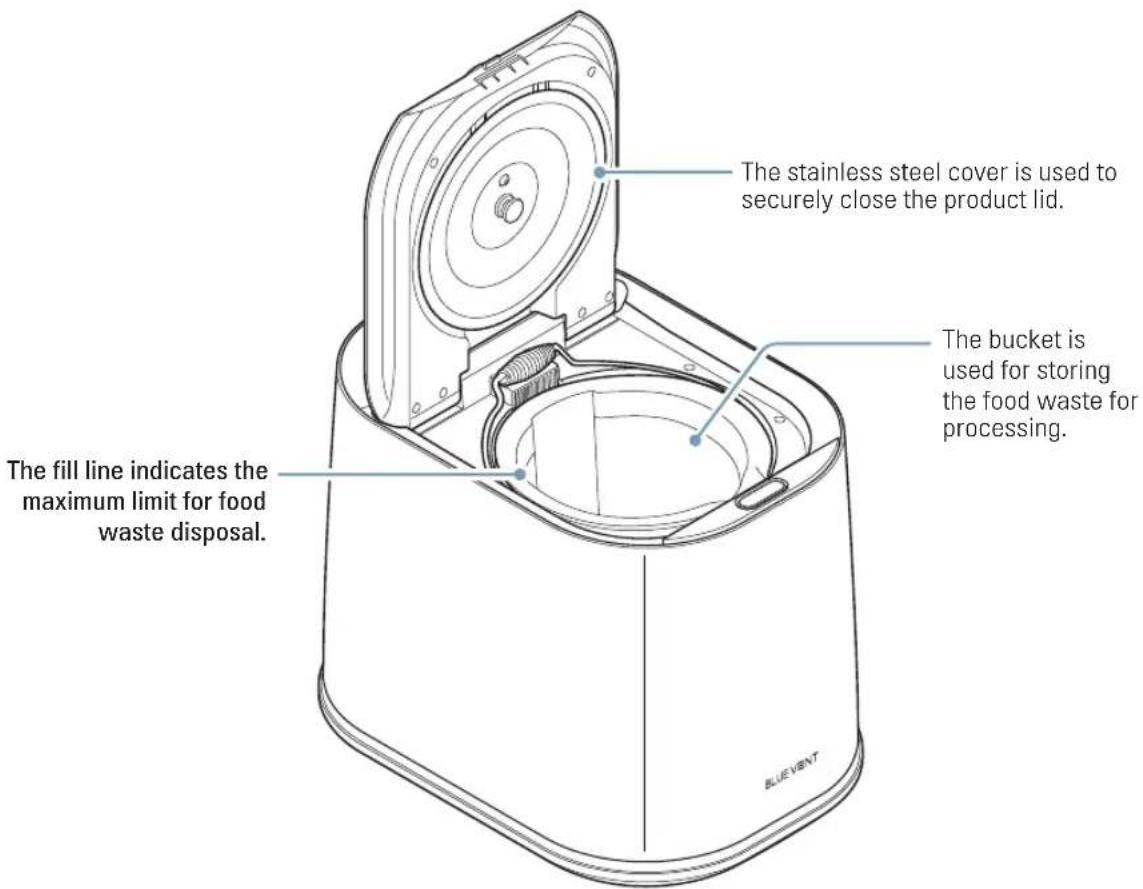
text_image
The stainless steel cover is used to securely close the product lid. The bucket is used for storing the food waste for processing. The fill line indicates the maximum limit for food waste disposal. BLUE VENT2 Choosing an appropriate location
For proper operation, install the product on a flat, dry surface. When using the product, maintain a distance of at least 15 cm (5.9 in) between the back of the product and the wall, and a minimum height clearance of 60 cm (23.6 in) or more from the top of the product.
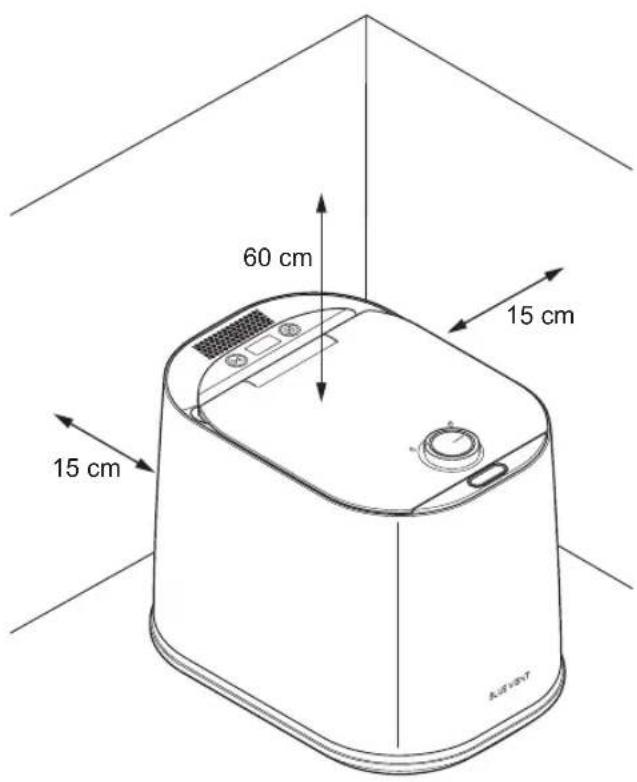
text_image
60 cm 15 cm 15 cm AirTay
Please follow the guidelines below to avoid any degradation in performance or electrical hazards with the product:
- Do not place the product in a location where it can be exposed to rain or high humidity.
- If placing the product on a countertop, avoid using it in areas with low upper cabinets, as moisture may accumulate due to steam.
- Avoid locations with extreme temperature differences and use the product in well-ventilated indoor spaces.
- Install the product on a sturdy, flat surface. If installed on an uneven surface, vibrations and noise may occur, leading to product malfunction.
3 Getting started
Before using the product, please follow the instructions below to prepare the product for usage.
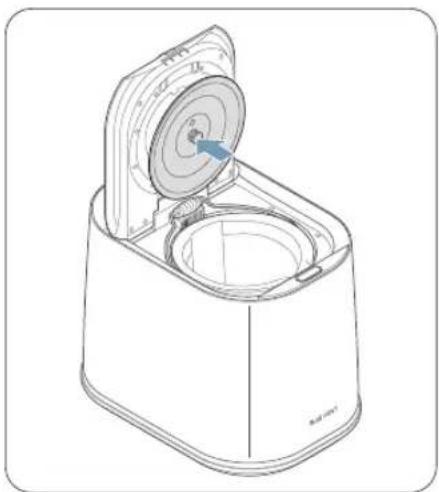
natural_image
Illustration of a hand placing a component into a cylindrical container with a blue arrow indicating rotation (no text or symbols)01
Please remove the protective sticker from the bottom surface of the bucket.
text_image
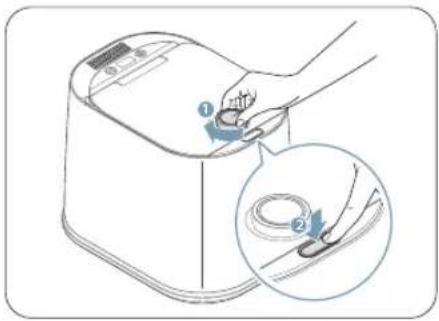
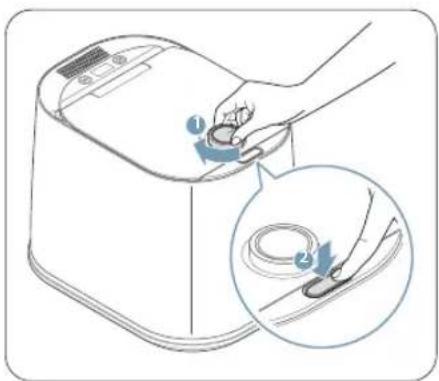
Diagram showing a hand pressing down on a device with labeled parts and an inset magnified view of the cable being inserted.02
Turn the dial clockwise, and then press the Open button. The lid will open slowly.

Please refer to "4.2 Opening and locking the lid" for detailed instructions on how to open and close the lid of the product.
natural_image
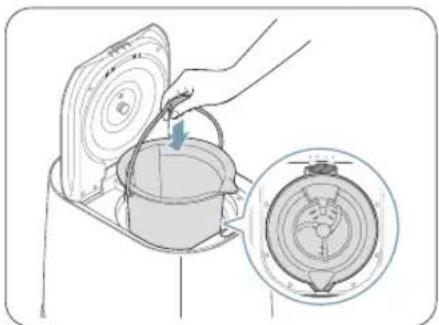
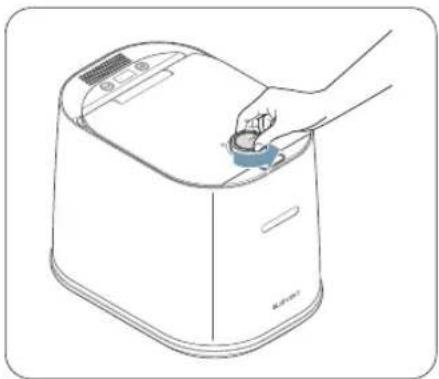
Illustration of a hand pouring liquid into a container with a magnified inset showing the same container (no text or symbols)03
Insert the bucket into the product, ensuring that the bottom and side of the bucket align precisely with the grooves on the main body.
04
Remove the caution label attached to the filter outlet on the top of the product.
natural_image
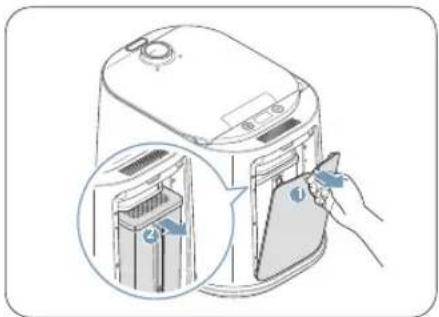
Illustration of a microwave oven with a hand inserting a card into the air gap (no text or symbols)05
Open the filter cover on the back of the product and detach the integrated filter from the inside of the product. Remove all the packaging materials attached to the filter.

Please make sure to remove all packaging materials before using the product. Using the product with packaging materials still attached can cause damage to the product.
natural_image
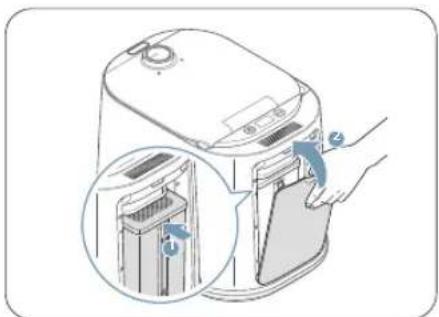
Illustration of a kitchen appliance with a hand inserting a device into its side panel (no text or symbols present)06
Align the top part of the filter with the back of the product, and press the filter downward to insert it. Then, close the filter cover.

Before using the product, please make sure that the drain outlet at the bottom of the back of the product is covered by the drain plug. Using the product without the drain plug may cause leakage of condensation, posing a risk of electric shock and/or product malfunction.
4 Using the product
Please follow the instructions below to use the product safely.
4.1 Connecting the product to power
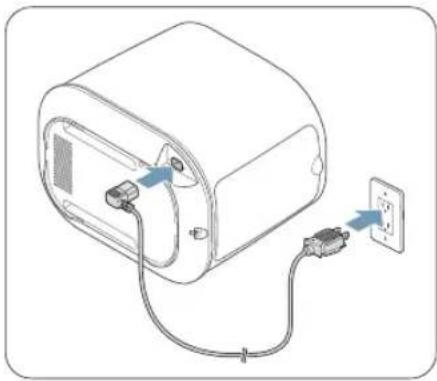
natural_image
Line drawing of a device with two connectors and an electrical outlet, no text or symbols presentWith the product on its side, connect the power plug to the power terminal located on the bottom of the product, and then connect the power plug to the power outlet.

This product is for AC 120 V, 60 Hz use only. Using voltage that is not compatible with the capacity may result in a product malfunction.

Please use a dedicated outlet rated for 15 A or higher.
4.2 Opening and locking the lid
4.2.1 Opening the lid
text_image
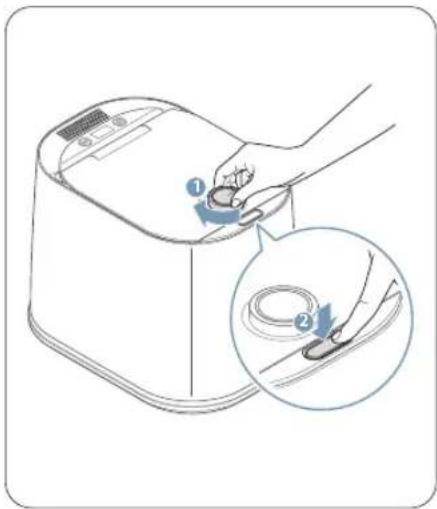
Diagram showing a hand using a device to press or install a cable, with labeled parts and magnified detail view.To open the lid, turn the dial clockwise and then press the Open button. The lid will open slowly.

The product will not operate when the lid is unlocked.
4.2.2 Locking the lid
natural_image
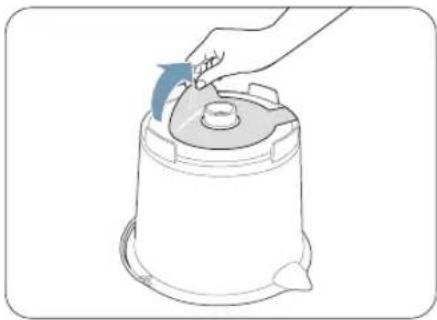
Line drawing of a hand placing a small component into a device (no text or symbols)To lock the lid, rotate the dial counterclockwise while the lid is closed. The lid will lock, and Storage mode will be activated.
4.3 Understanding the display
You can check the operating status of the product through the display located at the top of the appliance.
4.3.1 Standby mode (before food input)
When the power is turned on, the display will show the "BLUE VENT" logo, indicating that the product is in Standby mode. The product will also enter Standby mode when the food processing or cleaning process is stopped or after the cleaning process is complete.

flowchart
graph TD
    A["Blue V≡NT"] --> B["Padlock"]
    B --> C["Padlock"]
Lid Unlocked Lid Locked
4.3.2 Storage mode
When food waste is deposited into the product, the display will show the pre-processing weight and the current operating mode.

flowchart
graph LR
    A["Before 1.2kg"] --> B["AI Storage"]
Displays the pre-processing weight
Displays the current operating mode. When in AI mode, it will display "AI Storage Mode", and when it is in Normal mode, it will display "Storage Mode."
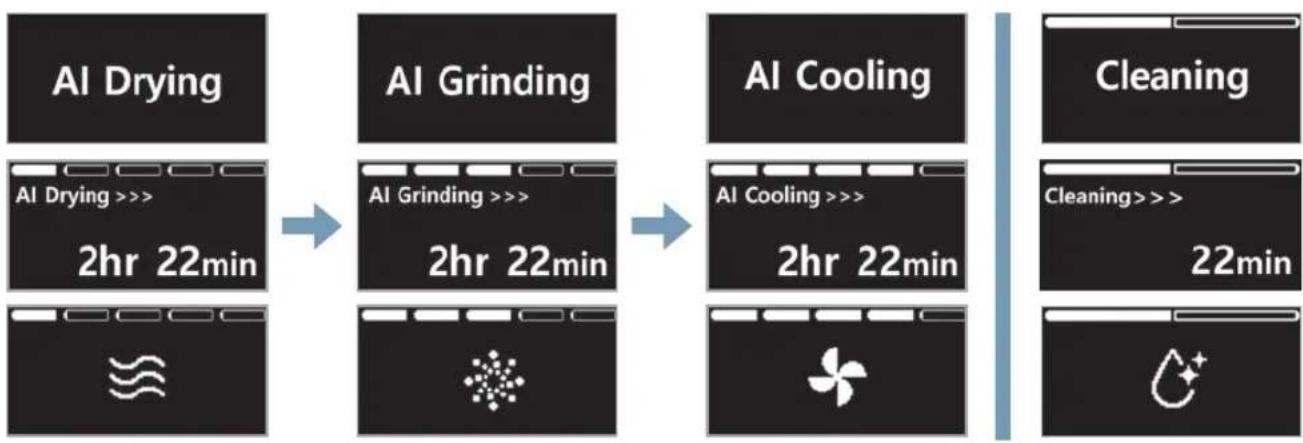
4.3.3 Processing and cleaning progress
During food waste processing, the product's operating status ("AI Drying> AI Grinding > AI Cooling" or "Cleaning") will be shown on the display with the corresponding icons.
flowchart
graph LR
    A["AI Drying"] --> B["AI Grinding"]
    B --> C["AI Cooling"]
    C --> D["Cleaning"]

    subgraph AI Drying
        E["2hr 22min"]
    end

    subgraph AI Grinding
        F["2hr 22min"]
    end

    subgraph AI Cooling
        G["2hr 22min"]
    end

    subgraph Cleaning
        H["22min"]
    end

    I["Image icon"] --> J["Icon symbol"]
    J --> K["Green fan icon"]
4.3.4 Processing completed
After food waste processing is complete, the display will show the weight before and after processing, as well as the total reduced carbon emissions.

flowchart
graph LR
    A["Complete"] --> B["Before 1.2kg After 0.2kg"]
    B --> C["It displays the weight before and after processing."]
    C --> D["Down 80% CO2 0.2kg"]
    D --> E["It displays the reduced carbon emissions after processing."]

- The display may be subject to change without prior notice to enhance the performance or quality of the product.
- A minimum of 300g (0.6lbs) of food waste is needed in the bucket for the product to detect and display the pre-processing weight.
4.4.1 Types of food not suitable for disposal
Please only input food waste that falls under the category of organic kitchen waste. The product cannot process materials that are not suitable for consumption by humans or animals.
Do not dispose of the following types of food waste in the product. Instead, dispose of them as regular trash.
| Type Example | |
| Vegetables | Roots of chives, green onions, water parsley, pepper seeds, onion peels, garlic, ginger, etc. |
| Fruits | Hard shells, such as walnuts, chestnuts, peanuts, acorns, etc. Seeds of stone fruits, such as peaches |
| Grains | Chaff (outer rice bran) |
| Meats | The hair or bones of animal products. |
| Shellfish | Shells of shellfish, conchs, abalone, sea squirts, oysters, shells of crustaceans, such as crabs and crayfish, and thick fish bones |
| Etc. | Non-food waste, such as eggshells, tea leaves, oriental medicine dregs, bottle caps, wooden chopsticks, etc. |

You are responsible for service and repair costs of any product damage or failure due to the disposal of inappropriate food waste. Please check the type and condition of the food before processing.
4.4.2 Types of food that require caution
When disposing a large amount of specific types of food waste at once or when inserting solid food waste, the product may be damaged.
Refer to the following table for pre-treatment solutions for certain types of food waste.
| Type Example Solution | ||
| Solid fibrous food waste | Fruit peels (banana, orange, apple, etc.), cabbage, lettuce, dried starches (bread, cereals, oats and other grains), etc. | To prevent food waste from getting tangled during processing, cut the food waste into approximately 3 cm pieces. |
| Sticky food waste | Rice, pasta, noodles, sauces and syrups, cheese, mashed potatoes, peanut butter, butter, cooked potatoes, etc. | Mix with other food waste before inserting it into the product. |
| Greasy food waste | Soft bones or skin from meat, fried food, pizza, etc. | |

To prevent product damage, make sure to thoroughly wash food waste and remove as much moisture as possible before inserting it into the product. Additionally, for food waste that is not easily decomposable or is hard in texture, it is advisable to cut it into smaller pieces before inserting it into the product.
4.5 Using AI mode
When you connect the product to power, it operates in AI mode (default setting). In AI mode, the product automatically starts processing the stored food waste when it reaches a certain weight. Depending on your usage, you can select between the 2-person AI mode, 3-person AI mode, or 4-person AI mode.

- Press the Mode button (in Standby mode to select the appropriate AI mode for your usage. The modes will change in the following order: 2-person AI mode > 3-person AI mode > 4-person AI mode > Normal mode.
- You can add additional food waste before the product starts processing food waste.
| Display AI mode Weight | ||
 | 2-person AI mode 1.3lbs (0.6kg) | |
 | 3-person AI mode 2lbs (0.9kg) | |
 | 4-person AI mode 2.7lbs (1.2kg) | |
text_image
Diagram showing a hand using a digital kitchen appliance to press a cable, with labeled parts and magnified detail view.01
Turn the dial clockwise and press the Open button to open the lid.
natural_image
Line drawing of a microwave oven with a hand inserting a cable into the lid, showing internal components and a magnified inset (no text or symbols)02
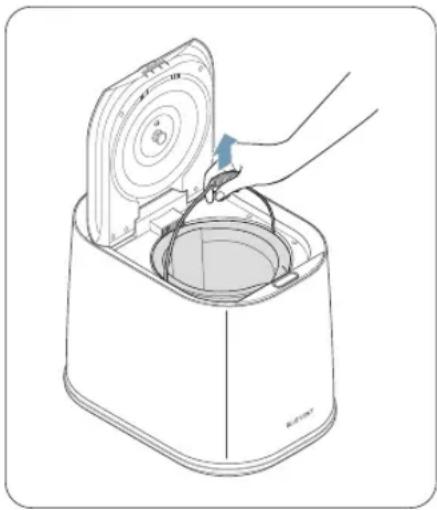
Separate the bucket from the product and place the food waste inside.

Please do not exceed the maximum fill line when disposing of food waste. Doing so may damage the product, cause malfunctions, and block the opening mechanism of the lid.
natural_image
Illustration of a hand pouring liquid into a container with a magnified inset showing internal components (no text or symbols)03
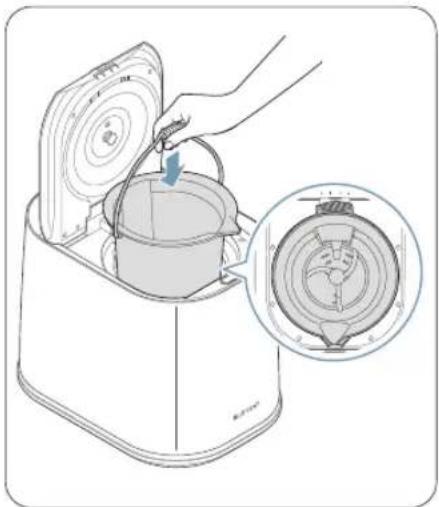
Insert the bucket into the product, ensuring that the bottom and side align with the grooves on the main unit. Then, wet the handle of the bucket.

If the handle of the bucket is facing towards the front of the product, you will not be able to close the lid.
natural_image
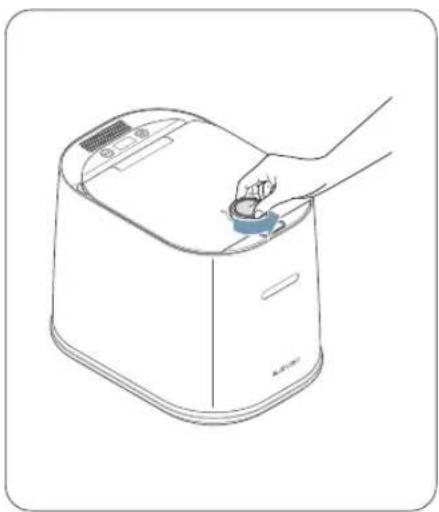
Line drawing of a hand placing a small blue object into a white rectangular device (no text or symbols)04
Close the lid and turn the dial counterclockwise to the lock position. Once the lid is locked, the product will enter AI mode where it will automatically start processing the food waste once the weight is reached.

- When in AI mode, press the Operation button (if you want to process the food waste immediately.
- Once processing starts, the estimated operation time will be shown on the display. Please note that the actual operation time may differ from the estimated time.
- If additional processing is needed, the display will show the message "Additional processing," and the product will continue to operate.
- The product will not operate in Al mode when the lid is open.
natural_image
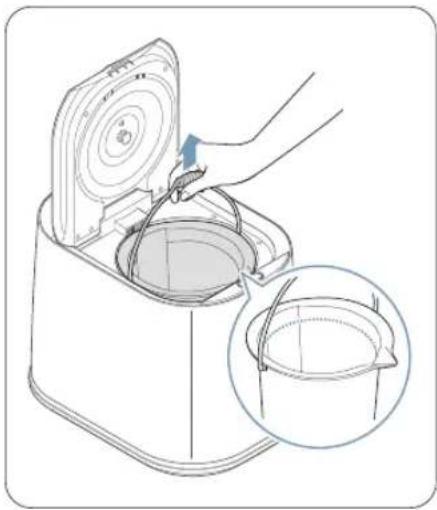
Line drawing of a device with an open lid and handle, showing internal components (no text or symbols)05
After food waste processing is complete, remove the bucket from the product and dispose of the contents.

The interior of the product will be hot after operating. To avoid burns, allow the interior of the product to cool for at least 20 minutes before removing the bucket.
4.6 Using Normal mode
When Normal mode is selected, press the Operation button (☐) no immediately start the food waste processing. When in Stand-by mode, press the Mode button (☐) until you reach Normal mode. The product will provide voice guidance as you toggle between the modes.

When you press the Mode button (in Standby mode, the modes will change in the following order: 2-person AI mode >3-person AI mode >4-person AI mode >Normal mode.
4.7 Using Green mode
When using Green Mode, food waste is processed at a low temperature, resulting in compost that can be used as fertilizer for your plants. After processing is complete, store the compost separately and use it as fertilizer in places such as your backyard garden.

- To generate high-quality compost from food waste, only insert uncooked food waste.
- Choose food waste with low moisture, salt, and oil content.
- Keep in mind that when Green Mode is activated, the food waste is processed at a low temperature, which may result in longer processing times.

natural_image
Line drawing of a kitchen appliance with a hand inserting a bucket into a sink, showing a magnified inset (no text or symbols)01
Place the food waste into the bucket.

Please do not exceed the maximum fill line when disposing of food waste. Doing so may damage the product, cause malfunctions, and block the opening mechanism of the lid.

natural_image
Line drawing of a hand placing a small blue object into a white rectangular device (no text or symbols)02
After closing the lid, turn the dial counterclockwise to the lock position. Once the lid is locked, the product will enter Storage mode.

The product will not operate in Storage mode when the lid is open.
03
To enter Green Mode, press and hold the Operation button (☐) for more than 3 seconds while the product is in Standby mode.

When you press and hold the Operation button (For more than 3 seconds in Standby mode, the modes will change in the following order: AI mode/Normal mode > Green mode > Cleaning mode.
04
Press the Operation button (☐) to enter Green mode.

- Once processing starts, the estimated operating time will be shown on the display. Please note the actual operating time may differ from the estimated time.
- If additional processing is needed, the display will show the message "Additional processing," and the product will continue to operate.
05
After food waste processing is complete, remove the bucket from the product and store the compost separately and use it as fertilizer in places such as your backyard garden.

The interior of the product will be hot after operating. To avoid burns, allow the interior of the product to cool for at least 20 minutes before removing the bucket.
When food waste is stuck or becomes too difficult to clean with water, use Cleaning mode to thoroughly clean the bucket.

To manually clean the bucket, soak the bucket in hot water mixed with a neutral detergent to loosen dried food particles. After, use a soft sponge or cloth to gently wipe it clean. Avoid using abrasive materials like scouring pads, as they can damage the coating of the bucket.
natural_image
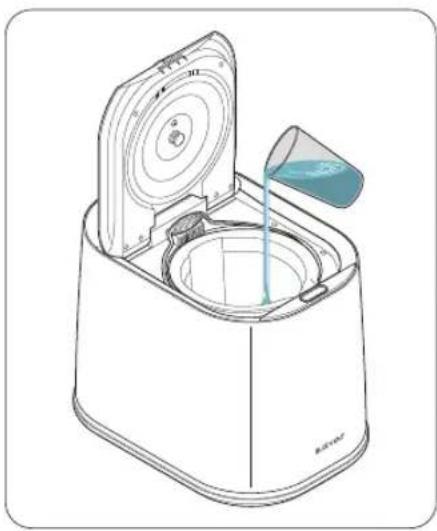
Line drawing of a microwave oven with a lid and water droplet being poured into it (no text or symbols)01
Fill the bucket halfway with water.
natural_image
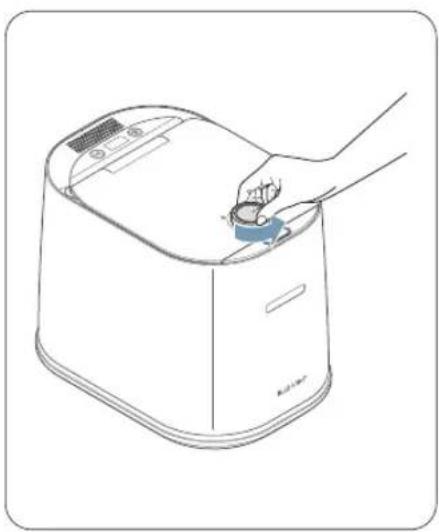
Line drawing of a hand placing a small object into a device (no text or symbols)02
Close the lid and turn the dial counterclockwise to the lock position.
03
To enter Cleaning mode, press and hold the Operation button (☐) for 3 or more seconds while in Standby mode.

When you press and hold the Operation button (○for 3 or more seconds in Standby mode, the modes will change in the following order: AI mode/Normal mode > Green mode > Cleaning mode.
04
Press the Operation button (☐) to start cleaning. The cleaning will begin with voice guidance.

When the product starts the cleaning process, the estimated operating time will be shown on the display. Please note the actual operating time may differ from the estimated time.
05
After the cleaning is complete, open the lid and dispose of the cleaning water.

The interior of the product will be hot after operating. To avoid burns, allow the interior of the product to cool for at least 20 minutes before removing the bucket.
4.9.1 Turning the voice guidance function on and off
When you supply power to the appliance, the voice guidance function will turn on by default. To turn off voice guidance, press and hold the Mode button (◎) for 4 or more seconds while in Standby mode. You will hear the voice guidance saying "Voice guidance disabled" and see the voice guidance OFF icon (×), and the appliance may provide corresponding sound effects depending on its status.
To turn on the voice guidance function, press and hold the Mode button Ⓤ) for 4 or more seconds while in Standby mode. You will hear the voice guidance saying "Voice guidance enabled" and see the voice guidance ON icon ⚙), and the appliance may provide voice guidance depending on its status.

If the following voice guidance occurs during use, please check the status of the product.
| Voice Guidance Problem Troubleshooting | ||
| The bucket is not installed.Please check. | Bucket detectionabnormality | When the bucket is not properly attached to the product,a voice guidance message will play. Please check the status of the bucket on the product. |
| No food waste detected.Please check the bucket. | Food waste detectionabnormality | When there is little to no food waste in the bucket, a voice guidance message will play. Please check the presence of food waste in the bucket. |
4.9.2 Using the empty bucket/empty food detection feature
You can check the status of the bucket by pressing the Operation button (→) while in Standby mode. If the bucket is not attached or if there is no food waste inside the bucket, you will receive a voice guidance message. Follow the voice guidance and reinsert the bucket or check if food waste is inside the bucket.
4.9.3 Understanding the power saving feature
When processing is complete, the product will automatically shut down and enter Standby mode with very low power consumption.
5 Troubleshooting
If an issue occurs with the product, a Check Code will be displayed on the screen, and a voice guidance message will play. Please refer to the following table to determine the appropriate troubleshooting steps for each Check Code.

- When a Check Code occurs, the voice guidance will repeat each time you press the Operation button (回)
- If a Check Code with a number other than those mentioned in the following table occurs, please contact customer support at 1-844-865-9273 or www.thinkware.com. Write down the Check Code and provide it to the agent during the call to expedite the troubleshooting process.
| Check Code Problem Troubleshooting | ||
 | Motor overload | When there is hardened or clumped food waste inside the bucket, this message will be displayed. Please check the bucket and remove any remaining residue. |
 | Impeller blockage detected | When there is non-food waste detected inside the bucket, this message will be displayed. Please check the bucket for any non-food waste and remove it if necessary. |
 | Water overflow detected | When moisture accumulates at the bottom of the filter during food waste processing, this message will be displayed. Please detach the drain plug located at the bottom of the back of the product and remove the moisture. |

- To reset the Check Code after performing the troubleshooting steps, press and hold the Mode button (for 4 or more seconds, or disconnect the power cord from the outlet and reconnect it after 10 seconds. The product will reset and should operate normally after.
- If the Check Code continues to appear even after resetting the product, please contact customer support at 1-844-865-9273 or www.thinkware.com. Additionally, remove any remaining food waste inside the product before requesting assistance.
6 Product care and maintenance
To maintain the optimal performance of the product, regularly replace the activated carbon inside the filter and clean the stainless steel cover.
6.1 Replacing the activated carbon
To maintain the optimal performance of the product, it is recommended to regularly replace the activated carbon inside the filter. The replacement interval for the activated carbon is generally every 2 to 3 months, based on an average usage of two times per week. However, the replacement frequency may vary depending on the type and quantity of food waste processed.

To purchase replacement filters, scan the QR code on the label attached to the side of the product using your smartphone.

text_image
QR code image containing encoded data, no visible human-readable text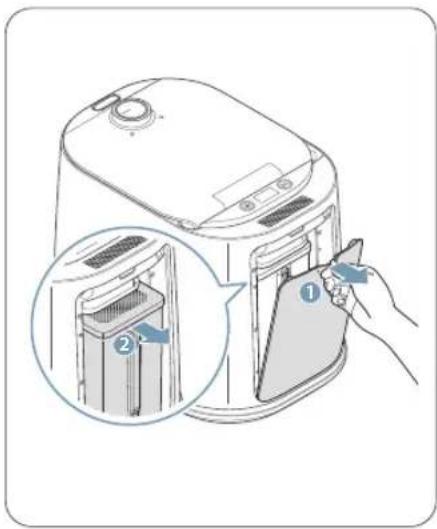
text_image
Diagram showing a hand inserting a device into a microwave oven, with labeled parts and magnified view of the interior.01
Turn off the power of the product before removing the cover located on the back of the product. Once the cover is removed, you can remove the filter.
natural_image
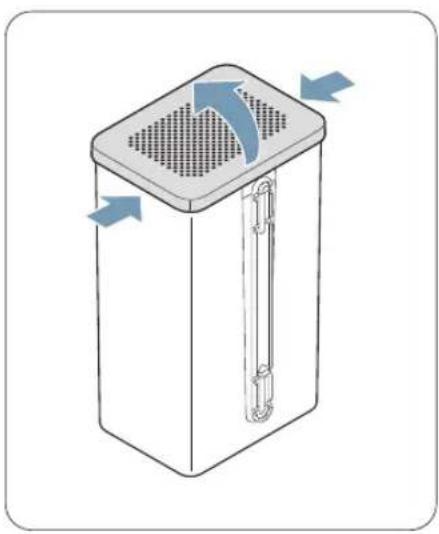
Diagram of a rectangular device with a perforated top and side arm, showing airflow direction arrows (no text or symbols)02
Insert your fingers into the slots located on the sides of the filter lid and open the filter lid.
natural_image
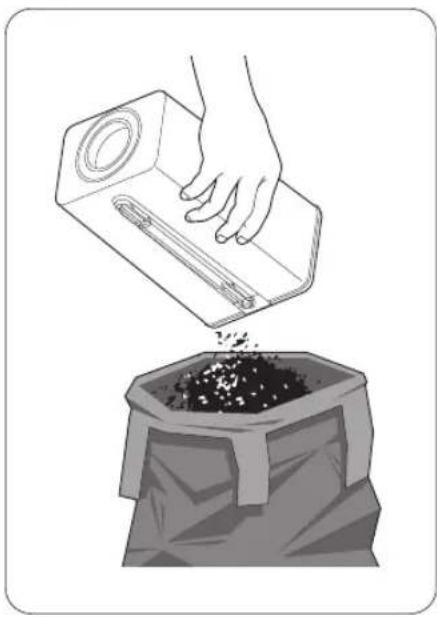
Illustration of a hand pouring granular material into a bag (no text or symbols)03
Dispose of the filter's activated carbon in the garbage.

Used activated carbon is considered general waste.
natural_image
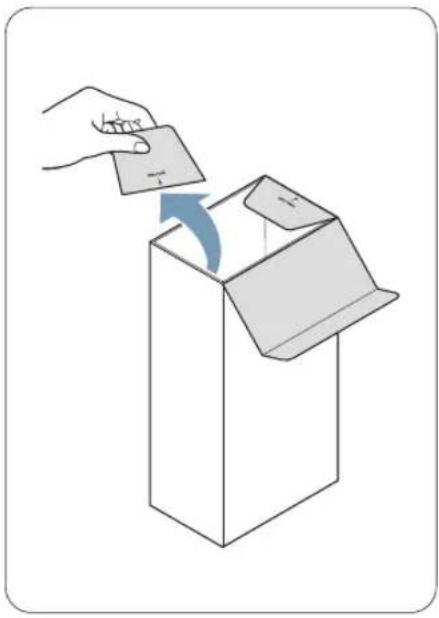
Illustration of a hand inserting a card into a box with an arrow indicating the process (no text or symbols present)04
After removing the packaging film and label seal from the replacement filter box, remove the top of the box along the perforated line.
natural_image
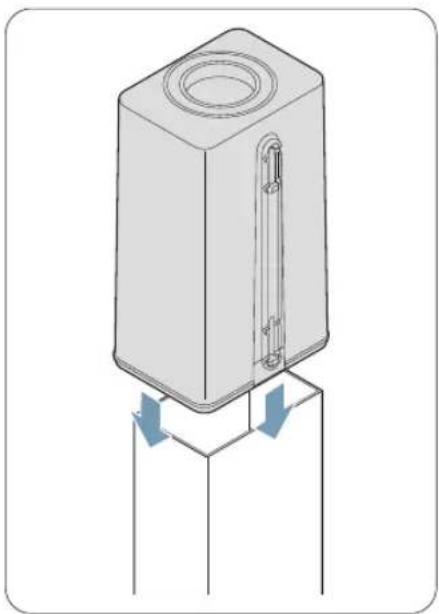
Technical illustration of a cylindrical electronic component with two arrows indicating flow or movement (no text or symbols)05
Place the filter case upside down on top of the replacement filter box and push it down completely until it is securely attached.
text_image
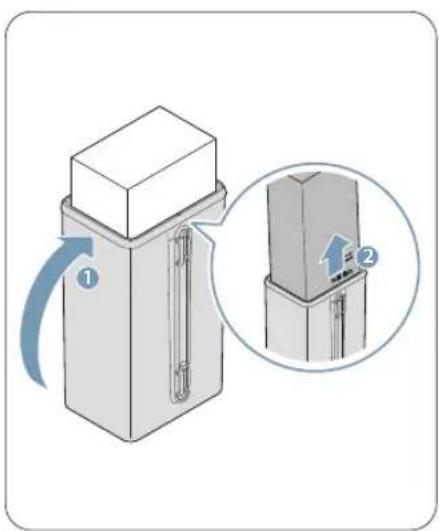
Diagram showing a mechanical device with labeled parts and a magnified inset highlighting a section view.06
After flipping the combined filter back over, gently shake it from side to side to prevent the activated carbon layer from mixing. Then, pull up on the box and fill the filter with activated carbon.

- Gently shake the box to prevent the activated carbon from spilling.
- The activated carbon is layered for optimal deodorizing effectiveness. When flipping the filter, be careful not to mix the layers of activated carbon.
natural_image
Line drawing of a rectangular device with a lid and ventilation grille (no text or symbols)07
Close the filter lid.

text_image
Diagram showing a hand inserting a device into a rack, with labeled parts and an inset view of the rack interior.08
Align the top of the filter with the back of the product and press the filter downward to insert it. Then, close the filter cover.
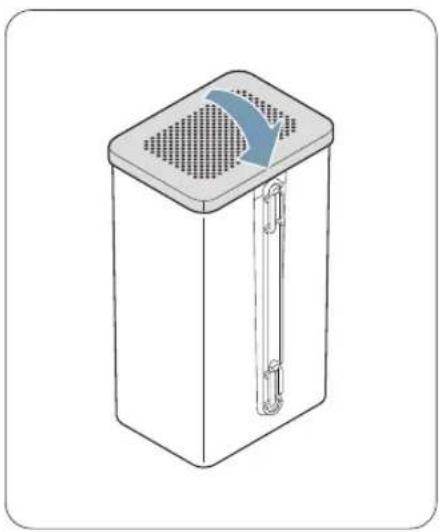
During food waste processing, residue may accumulate on the stainless steel cover. To maintain product cleanliness, it is recommended to regularly check and clean the stainless steel cover.
text_image
Diagram showing a hand using a tool to press or adjust a product, with an inset magnified view highlighting the process.01
After turning the dial clockwise, press the Open button to unlock the lid and open it.
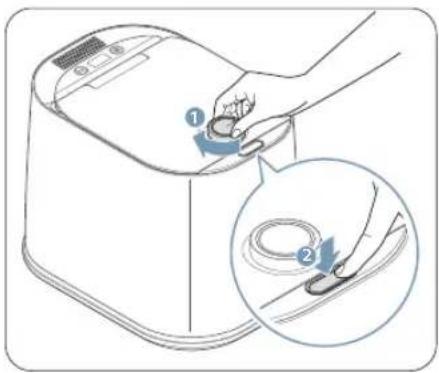
natural_image
Line drawing of a mechanical device with a lid and base plate (no text or symbols)02
Hold the knob of the stainless steel cover and pull it towards you to detach it from the lid.

The interior of the product will be hot after operating. To avoid burns, allow the interior of the product to cool for at least 20 minutes before removing the cover.
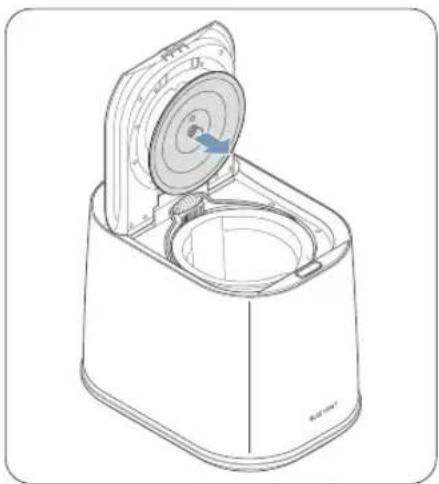
natural_image
Illustration of a hand washing a water tap with liquid, showing water release from the drain (no text or symbols)03
Please use warm water and a neutral detergent to clean the stainless steel cover. Be sure to use a soft cloth or sponge to avoid scratching the surface.

Avoid using abrasive materials like scouring pads, as they can damage the coating of the cover.
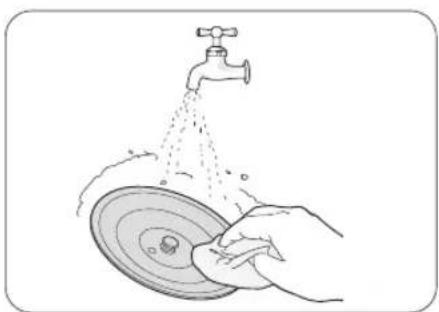
natural_image
Line drawing of a microwave oven with lid and base, showing internal components (no text or symbols)04
Align the thoroughly dried stainless steel cover with the cover groove on the lid and firmly attach it to the lid to ensure a secure fit.
7 Product FAQs
Please refer to the following table for answers to frequently asked questions about the product.
7.1 Power and electrical usage
| Q. A. | |
| Do I need to keep the power on continuously? | It is recommended to keep the power on for the use of AI Storage Mode/Storage Mode. AI Storage Mode/Storage Mode is a function designed to prevent food waste from spoiling and to remove odors inside the bucket.When using AI Storage Mode/Storage Mode, the electricity consumption is approximately 2 kWh per month. |
7.2 Product usage
| Q. A. | |
| What is the food waste processing capacity? | It can process up to 4 liters (1.05 gallons) of food waste at a time.[BXKG] Please do not exceed the maximum fill line when disposing of food waste.Doing so may damage the product. |
| Is it normal for steam to be generated during product usage? | ·When food waste is dried out, it can generate steam. This is a normal phenomenon.The steam will gradually dissipate over time.·Steam can be generated due to the difference in temperature between the air coming out of the filter and the external air.·If there is limited space or is close to surrounding objects or walls, poor ventilation can hinder the flow of steam and impair the performance of the product.·Ensure that there is sufficient space around the product for proper steam discharge.For more details, please refer to "2 Choosing an appropriate location." |
| Why is the compost not a powder? | ·The end result of the compost can vary depending on the type of food waste that was input.- Fish and cooked vegetables: Fine powder form- Raw vegetables: Small cereal like particles·Starchy foods, such as rice or dough, can be discharged in clumps the size of red beans. |
| How should the processed waste be disposed of? | According to current regulations, dried processed waste is classified as food waste.Please dispose of the dried waste in a food waste bag or collection bin. The volume of the waste will be significantly reduced compared to before processing. Also, there will be no foul odor. It is recommended to have a separate storage container to collect the waste and dispose of it all at once. |
| To request product after-sales service, what should I do? | To request product after-sales service, please contact our customer support at 1-844-865-9273. Additionally, remove any remaining food waste inside the product before requesting assistance. |
8 Specifications
Please refer to the following table to check the specifications of the product.
| Item Specifications | |
| Product name Smart food composter | |
| Brand name BLUE VENT | |
| Model name FG-ADM240N | |
| Rated voltage AC 120V, 60Hz | |
| Power consumption 0.7kW | |
| Processing method Dry crushing | |
| Reduction rate Up to 95% | |
| Installation method Freestanding | |
| Deodorization method Composite deodorization filter | |
| Processing capacity | Maximum 4L(1.05gal) |
| Weight | 26lbs(11.8kg) |
| Dimensions 320 X 450 X 383.7mm | |
Product Warranty
The bucket and filter (including activated carbon) are consumable parts.
Thank you very much for purchasing a BLUE VENT product. To receive customer support, please provide the product warranty certificate indicating the purchase date.
| Model Name Name | ||
| Date of purchase Address | ||
| Place of purchase Phone Number |
Thinkware Mobile provides a warranty for the product in accordance with the Consumer Protection Act and the standards for consumer dispute resolution (Federal Trade Commission Act).
Thinkware Mobile is not responsible for repair, replacement, or refund in cases where the product has been returned without a malfunction.
Thinkware Mobile only provides normal service on genuine products.
(Service cannot be provided on non-genuine products).
Product exchanges will be made for the same type of item. If an exchange for the exact same product is not possible, a similar product will be provided.
This product warranty certificate and the product's serial number will not be reissued, so please store them safely.
The warranty period for the product begins on the date of purchase, be sure to have your invoice/receipt at the time of purchase ready when requesting for customer support.

text_image
Warranty PolicyThinkware Mobile North America provides a warranty to the original purchaser for the following period from your date of purchase against deficiencies in material and workmanship under normal use. Should this unit fail to operate in a satisfactory manner within the warranty period, Thinkware Mobile will replace or repair the product at its discretion. We may use functionally equivalent, similar (if model is discontinued or out of stock), reconditioned, refurbished, remanufactured, pre-owned or new products or parts.
Main Smart Food Composter unit in box: 12 months
The smart food composter unit's warranty is tracked via the original purchase receipt. Shipping fees for returned items back to Mondo System, including warranty items, are the responsibility of the customer. All returns and warranty shipments must include a tracking number as we are not responsible for damaged or lost returns.
If service is required:
Should this unit fail to operate in a satisfactory manner, it is best to first check with the store where it was originally purchased. Should this fail to resolve the matter and if you believe your unit meets the criteria for warranty replacement or repair, please contact us by email at support@thinkware.com or phone at 1-844-865-9273 (Monday – Friday from 8 AM to 5 PM, and Saturday from 9 AM to 5 PM PST).
This limited warranty does not cover:
- Devices was not purchased from an authorized Thinkware Mobile retailer.
- Device malfunctions due to the normal wear and tear, misuse, lack of maintenance, accidents, modification, alteration or repairs by an unauthorized person or entity.
- Ducts that are operated in combination with ancillary and/or peripheral equipment not furnished or otherwise certified by Thinkware Mobile for use with the product or any damage to the product or ancillary and/or peripheral equipment as a result of such use.