HTM2 Diamond - Speaker BOWERS & WILKINS - Free user manual and instructions
Find the device manual for free HTM2 Diamond BOWERS & WILKINS in PDF.
User questions about HTM2 Diamond BOWERS & WILKINS
0 question about this device. Answer the ones you know or ask your own.
Ask a new question about this device
Download the instructions for your Speaker in PDF format for free! Find your manual HTM2 Diamond - BOWERS & WILKINS and take your electronic device back in hand. On this page are published all the documents necessary for the use of your device. HTM2 Diamond by BOWERS & WILKINS.
USER MANUAL HTM2 Diamond BOWERS & WILKINS
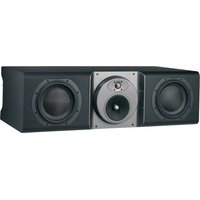
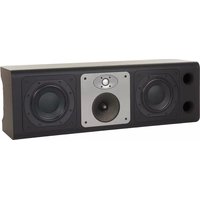
HTM2 Diamond HTM4 Diamond
Welcome and thank you for choosing
Bowers & Wilkins. Our founder, John Bowers, believed that imaginative design, innovative engineering and advanced technology were keys that could unlock the enjoyment of audio in the home. His belief is one that we continue to share and inspires every product we design
The 800 Series Diamond speakers are very high performance products that reward thoughtful installation, so we would suggest that you take some time to read this manual before you begin the installation process. Continue to page 4 →
text_image
Bell Towers' Nikke Zepelin and Zeppelin mini The best thing to happen to your job? A year's supply of super high- quality downloads for only $13.95 > We have a good deal with you, just a new brand that is easy to help me to use the best deal with you. We have a good deal with you, just a new brand that is easy to help me to use the best deal with you.
text_image
B&R Business/Williams View the complete B&R range Plancanana Business for the Spapers speakers B&R business providers, major brands, and market leaders. See the complete B&R range. The company is a major brand. B&R business providers, major brands, and market leaders. See the complete B&R range. B&R business providers, major brands, and market leaders. See the complete B&R range. B&R business providers, major brands, and market leaders. See the complete B&R range. B&R business providers, major brands, and market leaders. See the complete B&R range. B&R business providers, major brands, and market leaders. See the complete B&R range. B&R business providers, major brands, and market leaders. See the complete B&R scale. B&R business providers, major brands, and market leaders. See the complete B&R scale. B&R business providers, major brands, and market leaders. See the complete B&R scale. B&R business providers, major brands, and market leaders. See the complete B&R scale. B&R business providers, major brands, and market leaders. See the complete B&R scale. B&R business providers, major brands, and market leaders. See the complete B&R scaling. B&R business providers, major brands, and market leaders. See the complete B&R scaling. B&R business providers, major brands, and market leaders. See the complete B&R scaling. B&R business providers, major brands, and market leaders. See the complete B&R scaling. B&R business providers, major brands, and market leaders. See the complete B&R scaling. B&R business providers, major brands, and market leaders. See the complete B&R scale. B&R business providers, major brands, and market leaders. See the complete B&R scale. B&R business providers, major brands, and market leaders. See the complete B&R scale. B&R business providers, major brands, and market leaders. See the complete B&R scale. B&R business providers, major brands, and market leaders. See the complete B&R scales. B&R business providers, major brands, and market leaders. See the complete B&R scales. B&R business providers, major brands, and market leaders. See the complete B&R scales. B&R business providers, major brands, and market leaders. See the complete B&R scales. B&R business providers, major brands, and market leaders. See the complete B&R scales. B&R business providers, major brands, and market leaders. See the complete B&R scale. B&R business providers, major brands, and market leaders. See the complete B&R scale. B&R business providers, major brands, and market leaders. See the complete B&R scale. B&R business providers, major brands, and market leaders. See the complete B&R scale. B&R business providers, major brands, and market leaders. See the complete B&R-scale scale. B&R business providers, major brands, and market leaders. See the complete B&R-scale scale. B&R business providers, major brands, and market leaders. See the complete B&R-scale scale. B&R business providers, major brands, and market leaders. See the complete B&R-scale scale. B&R business providers, major brands, and market leaders. See the complete B&R-scale scale. B&R business providers, major brands, and market leaders. see the complete B&R scale. B&R business providers, major brands, and market leaders. B&R business providers, major brands, and market leaders. B&R business providers, major brands, and market leaders. B&R business providers, major brands, and market leaders. B&R business providers, major brands, and market leaders. B&R business providers, major brands, and market leaders. B&R business providers, major brands, and market leaders. B&R business providers, major brands, and market leaders. B&R business providers, major brands, and market leaders. B&R businesses B&R Business/Williams www.bsr.com B&R Business/Williams www.bsr.com B&R Business/Williams www.bsr.com B&R Business/Williams www.bsr.com B&R Business/Williams www.bsr.com B&R Business/Williams www.bsr.com B&R Business/Williams www.bsr.com B&R Business/Williams www.bsr.com B&R Business/Williams www.bsr.com B&F Business/Williams www.bsr.com B&F Business/Williams www.bsr.com B&F Business/Williams www.bsr.com B&F Business/Williams www.bsr.com B&F Business/Williams www.bsr.com B&F Business/Williams www.bsr.com B&F Business/Williams www.bsr.com B&F Business/Williams www.bsr.com B&F Business/Williams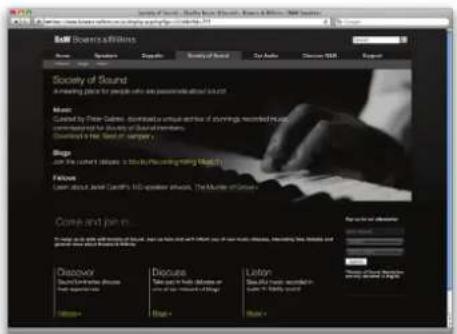
text_image
Society of Sound A meeting point for people who are password about local art. Music Created by Their's Games, Dominates urban areas of soundings, recorded music announced by Society of Global Markets. Countored in the Tour of Sports Blogs Join the concert ticket: 100% (Pricinging Writing) Book Folkers Learn about Javer Cantón's 100-speaker avilions, The Master of Science Come and join in Discover Recognized by Music To improve the story Discuss Take a book to discuss or to the new book of the Game Listen Read the music, created in see it to help you? Music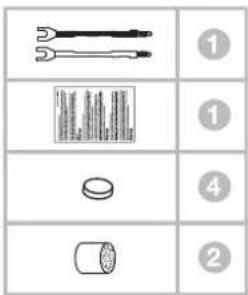
text_image
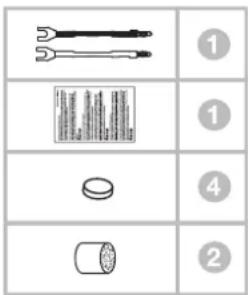
1 1 4 2Your HTM Diamond speaker is heavy and we strongly suggest that it is unpacked in the room in which it is to be used. It is also a sensible precaution to remove jewellery to negate the risk of scratching the speaker's surface finish.
The table above illustrates the component parts that are packed with the HTM2 Diamond and HTM4 Diamond. In the unlikely event that anything is missing please contact the retailer from whom you purchased the speakers.
All grilles attach magnetically. The heavier bass/midrange grille is packed in a separate compartment to prevent movement in transit.
Tweeter diaphragms are very delicate and easily damaged. Any mishandling of the tweeter grille close to the unit may result in the grille being attracted into the diaphragm. For this reason, the tweeter grille is supplied ready fitted and we recommend that you leave it in place.
- Positioning HTM Diamond Series Speakers1. Unpacking
flowchart
graph TD
    A["Power Supply"] --> B["Vertical Line"]
    B --> C["Container"]
    C --> D["Bottom Box"]
    style A fill:#f9f,stroke:#333
    style C fill:#ccf,stroke:#333
Environmental Information
All Powers & Wilkins products are designed to comply with international directives on the Restriction of Hazardous Substances (RoHS) in electrical and electronic equipment and the disposal of Waste Electrical and Electronic Equipment (WEEE). These symbols indicate compliance and that the products must be appropriately recycled or processed in accordance with these directives. Consult your local waste disposal authority for guidance.
General Guidelines
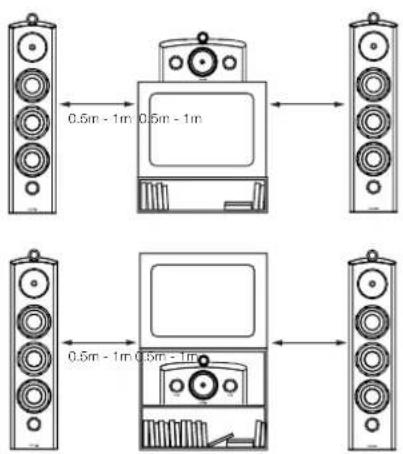
If using a projection television with an acoustically transparent screen, position your HTM Diamond speaker behind the centre of the screen. Otherwise, position it either directly below the screen on a floor-stand or within a furniture unit, or directly above the screen on a wall shelf. Align the front of the speaker approximately level with the screen. The diagrams above and right illustrate the position of a HTM Diamond centre channel speaker within a multi-channel audio-visual system.
If a floor-stand is to be used, we recommend the FS-HTM. It is important for both safety and performance that the floor-stand assembly instructions are followed.
If a wall-shelf or furniture unit is used, ensure that it is strong enough securely to support the weight of the speaker. If you have any doubt about the strength of a supporting structure you should seek specialist help.
Note: Four adhesive plastic feet are supplied with HTM Diamond speakers for use when one is placed on a shelf or within a furniture unit. Remove the backing from the adhesive feet and apply them to the underside of the speaker.
3. Connecting
text_image
0.5m - 1m 0.5m - 1m 0.5m - 1m 0.5m - 1mStray Magnetic Fields
The speaker drive units create stray magnetic fields that extend beyond the boundaries of the cabinet. These centre speakers are therefore not suitable for use close to old-fashioned CRT televisions and computer monitors. We also recommend you keep other magnetically sensitive articles (computer discs, audio and video tapes, swipe cards and the like) at least 0.5m from the speaker. Modern plasma, LCD and OLED screens are not affected by magnetic fields and CRT projectors are too far from the speaker to be affected.
All connections should be made with the audio equipment switched off.
HTM Diamond speaker terminals accept a variety of cable terminations: 4mm banana plugs, 6mm and 8mm (1/4 in and 5/16 in) spades, or bare wires up to 4mm (5/32 in) diameter.
Important Safety Notice
In certain countries, notably those in Europe, the use of 4mm banana plugs is considered a potential safety hazard, because they may be inserted into the holes of unshuttered mains supply sockets. In order to comply with European CENELEC safety regulations, the 4mm holes in the ends of the terminals are blocked by plastic pins. If you are using the products in any country where these conditions apply, you should ensure that any banana plugs cannot be used in an unsafe manner by children or other uninformed persons.
Ask your dealer for advice when selecting speaker cable. Keep its total impedance below the maximum recommended in the speaker specification and use a low inductance cable to avoid attenuation of high frequencies.
natural_image
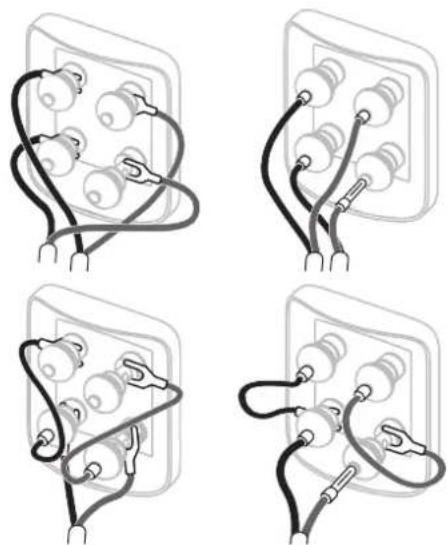
Four-panel diagram showing electrical socket connections with stethoscope (no text or symbols)There are two pairs of terminals at the back of each speaker that enable bi-wiring (top). For conventional, single wire connection, fit the supplied link wires to join the like polarity terminals together.
Ensure that the positive terminals on the speaker (marked + and coloured red) are connected to the positive output terminal on the amplifier and the negative terminals on the speaker (marked - and coloured black) are always connected to the negative output terminal on the amplifier. Incorrect connection will not result in damage but will cause poor audio imaging. Always screw the terminal caps down fully to prevent rattles.
Note: Bi-wiring separates the signal paths to each section of the speaker and can improve both stereo imaging and detail resolution. It also enables the use of different types of cable for each frequency band.
- Fine Tuning 5. Running-In 6. Aftercare
Before fine tuning, double check that all the connections in the installation are correct and secure.
Moving speakers further from the walls will reduce the general level of bass. Space behind speakers also helps to create an impression of depth. Conversely, moving speakers closer to the walls will increase the level of bass and potentially reduce the impression of depth.
If you want to reduce the volume of bass without moving the speakers further from the wall, fit the foam plugs or, for less severe bass reduction, the foam rings in the port tubes. Fitting a foam plug or ring in a port tube is illustrated above.
If the sound is too harsh, increase the amount of soft furnishing in the room (for example, use heavier curtains), or reduce it if the sound is dull and lifeless. Test for flutter echoes by clapping your hands and listening for rapid repetitions. Reduce flutter echoes by the use of irregular shaped surfaces such as bookshelves and large pieces of furniture.
For the most discerning listening, remove the bass/midrange grilles by gripping around their edges and gently pulling them away from the cabinet.
The performance of your speaker may change subtly during the initial listening period. If it has been stored in a cold environment, the damping compounds and suspension materials of the drive units will take some time to recover their correct mechanical properties. The drive unit suspension will also loosen up during the first hours of use. The time taken for the speaker to achieve its intended performance will vary depending on previous storage conditions and how it is used. As a guide, allow up to a week for the temperature effects to stabilise and 15 hours of average use for the mechanical parts to attain their intended design characteristics.
800 Series Diamond cabinet surfaces will usually only require dusting. We recommend you use the cloth supplied with the product. If you wish to use an aerosol or other cleaner, apply the cleaner onto the cloth, not directly onto the product and test a small area first, as some cleaning products may damage some of the surfaces. Avoid products that are abrasive, or contain acid, alkali or anti-bacterial agents. Do not use cleaning agents on the drive units. Avoid touching the drive units as damage may result.
Whenever Bowers & Wilkins speakers are finished in real wood, the finest veneers are selected and treated with an ultra-violet resistant lacquer to minimise changes in colour over time. Nevertheless, like all natural materials, the veneer will respond to its environment and a degree of colour change is to be expected. Colour differences may be rectified by exposing all the veneer surfaces equally and evenly to sunlight until the colour is uniform. This process can take several days or even weeks, but may be accelerated by careful use of an ultra-violet lamp. Wood veneered surface should also be kept away from direct sources of heat such as radiators and warm air vents in order to minimise the possibility of the wood veneer cracking.
text_image
Image displaying four labeled icons: two wrenches, one with a barcode, one circular object, and one cylindrical tube, arranged in a 2x2 grid.flowchart
graph TD
    A["Power Supply"] --> B["Vertical Line"]
    B --> C["Vertical Column"]
    C --> D["Bar with Top Section"]
Règles générales
text_image
0.5m - 1m 0.5m - 1m 0.5m - 1m 0.5m - 1mChamps magnétiques
natural_image
Four-panel diagram showing stethoscope installation on an electrical socket (no text or symbols)text_image
Technical diagram showing mechanical components with corresponding frequency response graphs and waveform graphstext_image
Diagram showing four labeled components with corresponding icons, numbered 1 to 2.flowchart
graph TD
    A["Power Supply"] --> B["Vertical Line"]
    B --> C["Vertical Column"]
    C --> D["Bar with Top Section"]
Allgemeine Hinweise
text_image
0.5m - 1m 0.5m - 1m 0.5m - 1m 0.5m - 1mnatural_image
Four-panel diagram showing stethoscope installation in different electrical socket configurations (no text or symbols)text_image
Diagram showing four labeled components: two wrenches, one with a barcode, one circular object, and one cylindrical tube, each marked with a numbered circle.flowchart
graph TD
    A["Power Supply"] --> B["Vertical Line"]
    B --> C["Vertical Column"]
    C --> D["Bar with Top Section"]
Directrices Generales
text_image
0.5m - 1m 0.5m - 1m 0.5m - 1m 0.5m - 1mnatural_image
Four-panel diagram showing stethoscope installation on an electrical socket (no text or symbols)text_image
Diagram showing four labeled mechanical parts with numbered circles, likely for assembly or identification purposes.flowchart
graph TD
    A["Power Supply"] --> B["Vertical Line"]
    B --> C["Vertical Column"]
    C --> D["Bar with Top Section"]
Linee guida
text_image
0.5m - 1m 0.5m - 1m 0.5m - 1m 0.5m - 1mCampi magnetici dispersi
natural_image
Four-panel diagram showing stethoscope installation in different electrical socket layouts (no text or symbols)text_image
Diagram showing four labeled components: two wrenches, one with a barcode, one circular object, and one cylindrical tube, each marked with a numbered circle.flowchart
graph TD
    A["Power Supply"] --> B["Vertical Line"]
    B --> C["Vertical Column"]
    C --> D["Bar with Top Section"]
Algemeen
text_image
0.5m - 1m 0.5m - 1m 0.5m - 1m 0.5m - 1mnatural_image
Four-panel diagram showing electrical plug connections with stethoscope (no text or symbols)text_image
Diagram showing four labeled components with corresponding icons, numbered 1 to 2.flowchart
graph TD
    A["Power Supply"] --> B["Vertical Line"]
    B --> C["Vertical Column"]
    C --> D["Bar with Top Section"]
Общие соображения
text_image
0.5m - 1m 0.5m - 1m 0.5m - 1m 0.5m - 1mnatural_image
Four-panel illustration of a wall socket with black wires and connectors, showing different installation states (no text or symbols)text_image
Diagram showing four labeled components: two wrenches, one with a barcode, one circular object, and one cylindrical tube, each marked with a numbered circle.flowchart
graph TD
    A["Power Supply"] --> B["Vertical Line"]
    A --> C["Vertical Column"]
    B --> D["Stacked Battery Stack"]
环保信息
text_image
0.5m - 1m 0.5m - 1m 0.5m - 1m 0.5m - 1m 0.5m - 1m杂散磁场
natural_image
Four-panel diagram showing stethoscope installation in different electrical socket configurations (no text or symbols)text_image
Technical diagram showing mechanical components with corresponding frequency response graphs and schematic diagrams.text_image
0.5m - 1m 0.5m - 1m 0.5m - 1m 0.5m - 1m漏洩磁束
natural_image
Four-panel diagram showing stethoscope installation in different electrical socket configurations (no text or symbols)EU DECLARATION OF CONFORMITY
We,
B&W Group Ltd.
whose registered office is situated at
Dale Road, Worthing, West Sussex, BN11 2BH, United Kingdom
declare under our sole responsibility that the products:
HTM2 Diamond and HTM4 Diamond
comply with the EU Electro-Magnetic Compatibility (EMC) Directive 89/336/EEC, in pursuance of which the following standards have been applied:
EN 61000-6-1 : 2007
EN 61000-6-3 : 2001
EN 55020 : 2002
EN 55013 : 2001
and comply with the EU General Product Safety 2001/95/EC, in pursuance of which the following standard has been applied:
EN 60065 : 2002
This declaration attests that the manufacturing process quality control and product documentation accord with the need to assure continued compliance.
The attention of the user is drawn to any special measures regarding the use of this equipment that may be detailed in the owner's manual.
Signed:

G Edwards
Executive Vice President, Operations
B&W Group Ltd.
Bowers & Wilkins
B&W Group Ltd
Dale Road
Worthing West Sussex
BN11 2BH England
T +44 (0) 1903 221 800
F +44 (0) 1903 221 801
info@bwgroup.com
www.bowers-wilkins.com
B&W Group (UK Sales)
T+44 (0) 1903 221 500
E uksales@bwgroup.com
B&W Group North America
T +1 978 664 2870
E marketing@bwgroupusa.com
B&W Group Asia Ltd
T +852 3 472 9300
E info@bwgroup.hk
Copyright © B&W Group Ltd. E&OE
Printed in England