— Radio — Mode d'emploi PDF")
LIFE P66550 (MD 44550) - Radio MEDION - Free user manual and instructions
Find the device manual for free LIFE P66550 (MD 44550) MEDION in PDF.
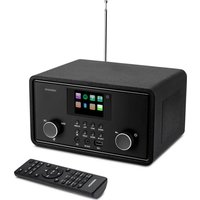
| Product type | Clock radio with Bluetooth, FM/DAB, integrated lighting |
| Brand | Medion |
| Model | LIFE P66550 (MD 44550) |
| Dimensions (W x H x D) | 272 x 48 x 130 mm (stand included) |
| Weight | 744 g |
| Power supply | Power adapter 5.9 V DC, 1.5 A, 230 V ~ 50 Hz |
| Output power | 2 x 3 W RMS |
| FM frequency range | 87.5 to 108 MHz |
| DAB frequency range | 174.928 to 239.2 MHz |
| Station memory presets | 30 FM / 30 DAB |
| Bluetooth | Version 4.2, profiles A2DP, AVRCP, HSP, HFP, class 2, range up to 10 m |
| Main functions | FM/DAB radio, Bluetooth, dual alarm, timer, LED lighting, hands-free |
| Care and cleaning | Disconnect before cleaning, use a soft dry cloth, avoid solvents |
| Safety | Use indoors, do not open, keep out of reach of children, avoid moisture |
| Spare parts and repairability | Specific power adapter (model K12S059150G), repair by an authorized specialist |
| General information | Under-cabinet mounting, RDS clock, multiple display languages |
Frequently Asked Questions - LIFE P66550 (MD 44550) MEDION
User questions about LIFE P66550 (MD 44550) MEDION
0 question about this device. Answer the ones you know or ask your own.
Ask a new question about this device
Download the instructions for your Radio in PDF format for free! Find your manual LIFE P66550 (MD 44550) - MEDION and take your electronic device back in hand. On this page are published all the documents necessary for the use of your device. LIFE P66550 (MD 44550) by MEDION.
USER MANUAL LIFE P66550 (MD 44550) MEDION
1. Information about these operating instructions .... 151
1.1. Key to symbols.... 151
FR
-
Proper use
-
EU declaration of conformity 153
-
Safety information IT
4.1. Dangers for children and people with reduced ability to operate devices 154
ES
4.2. Operating safety....154
4.3. Power supply 156
4.4. Installation location/surroundings
4.5. Repairs....159
4.6. Cleaning the device 159
-
Package contents
-
Device overview
-
Mounting the device 162
7.1. Adjusting the aerial 163
7.2. Mains connection 163
-
Volume 163
-
Lighting 163
-
Setting the date/time 163
10.1. Manual setting 164
- Using the alarm 164
11.1. Setting/activating the alarm 164
11.2. Deactivating the alarm.... 165
11.3. Stopping the alarm / activating the snooze function 165
11.4. Timer....165
- Radio.... 166
12.1. Switching the radio on/off.... 166
12.2. Radio operation in FM mode 166
12.3. Storing and selecting stations.... 166
12.4. Radio operation in DAB mode.... 168
12.5. Storing and selecting stations.... 168
12.6. Advanced station information 170
- Bluetooth mode.... 171
13.1. Connecting Bluetooth devices.... 171
13.2. Control 171
-
Troubleshooting 172
-
Cleaning 173
-
Storing the device when not in use.... 173
-
Disposal.... 173
EN
- Technical data 174
18.1. Trademark information 174 - Service information 175
- Legal Notice.... 176
1. Information about these operating instructions

Thank you for choosing our product. We hope you enjoy using this device.
Read the safety instructions carefully before using the device for the first time. Note the warnings on the device and in the operating instructions.
Always keep the operating instructions close to hand. If you sell the device or give it away, please ensure that you also pass on these operating instructions. They are an essential component of the product.
1.1. Key to symbols
If a block of text is marked with one of the warning symbols listed below, the hazard described in that text must be avoided to prevent the potential consequences described there from occurring.
 | DANGER!Warning: risk of fatal injury! |
 | WARNING!Warning: risk of possible fatal injury and/or serious irreversible injuries! |
 | CAUTION!Warning: risk of minor and/or moderate injuries! |
 | NOTICE!Comply with these notes to prevent damage to the device! |
 | More detailed information about using the device. |
 | Comply with the notes in the operating instructions. |
| • Bullet | point/information on steps when the device is in use |
| ▶ Instruction to be carried out | |
 | Declaration of Conformity (see "Declaration of Conformity" section): Products that feature this symbol meet the requirements of the EC directives. |
 | Protection class IIElectrical devices in protection class II are devices that have double and/or reinforced insulation throughout, and do not have the option of connecting a protective earth. The housing of an electrical device in protection class II, with surrounding insulating material, may either form all of the additional or reinforced insulation, or part of it. |
 | Indoor useDevices with this symbol are intended solely for indoor use. |
 | Symbol for direct current |
 | Symbol for AC current |
2. Proper use
The device is designed for the reception of radio programmes, sounding an alarm as a wake-up call and displaying the time.
The device is only intended for private use and not for industrial/commercial use.
Note that no liability will be accepted if the device is not used for its intended purpose:
- Do not modify the device without our express agreement and do not use any accessories that have not been supplied or approved by us.
- Only use replacement parts or accessories that we have supplied or approved.
- Comply with all the information in these operating instructions, especially the safety information. Any other use is considered improper and can cause personal injury or property damage.
- Do not use the device in extreme environmental conditions.
3. EU declaration of conformity
MEDION AG hereby declares that this device complies with the fundamental requirements and the other relevant provisions of:
• RE Directive 2014/53/EU
• Ecodesign Directive 2009/125/EC
• RoHS Directive 2011/65/EU.
You can download the complete EU Declaration of Conformity at www.medion.com/conformity.
CE
4. Safety information
4.1. Dangers for children and people with reduced ability to operate devices
- This device is not intended for use by people (including children) with reduced physical, sensory or mental abilities or by those without experience and/or knowledge, unless they are supervised by a person responsible for their safety or they have been instructed in its use by that person. Children must be supervised to ensure they do not play with this device.
- Cleaning and user maintenance may not be carried out by children unless they are supervised.
- Keep the device and its accessories out of the reach of children.

DANGER!
Risk of choking and suffocation!
The packaging material is not a toy! There is a risk of suffocation from breathing in or swallowing plastic film or small parts.
▶ Keep packaging away from children.
4.2. Operating safety
- Before using the device for the first time, check the device for damage. A defective or damaged device may not be operated.

DANGER!
Risk of electric shock!
Risk of injury from electric shock due to live parts. They pose a risk of electric shock or fire if an unintentional short circuit occurs.
Do not place containers filled with liquid, e.g. vases, on or near the product, and protect all the parts from drips or splashes. Such containers could tip over and the liquid could impair the electrical safety of the device.
▶ Never open the product housing or power supply housing and do not push objects inside the product through the slots and openings
▶ If the mains adapter, connection cable or device is damaged, immediately unplug the mains adapter from the socket.
▶ If liquid or foreign bodies get into the device, unplug the network adapter from the socket immediately.
▶ Unplug the mains adapter from the socket if you are away for a long period or there is a thunder storm.
4.3. Power supply

DANGER!
Risk of electric shock!
Risk of injury from electric shock due to live parts.
▶ Only connect the mains adapter to a properly installed earthed mains socket (230 V \~ 50 Hz) that is easy to reach and close to the place where you have set up the device. Always keep the socket free of obstructions so that the power supply can be disconnected easily.
In order to disconnect the power to your device or to completely isolate the device from voltage sources, remove the mains adapter from the socket.
When disconnecting the connection cable from the mains supply, always pull on the mains adapter rather than on the cable.
Remove the mains adapter from the socket if the device or power supply produces unusual noises or smoke.
- Please note that the device continues to use power when in standby mode.
4.3.1. Mains adapter
▶ Use only the mains adapter supplied.
If the housing of the mains adapter or the connection cable is damaged, the mains adapter must be disposed of and replaced with a new mains adapter of the same type.
The mains adapter may only be used in dry rooms.
4.4. Installation location/surroundings
In the first few hours of use, new products may give off a typical, unavoidable but totally harmless smell which will wear off with time. We recommend you ventilate the room regularly to help dissipate this odour. We have taken appropriate measures during the development of this product to ensure that levels are well below legal limits.

DANGER!
Risk of electric shock!
Major changes in temperature or fluctuations in humidity can cause moisture to build up within the device due to condensation – this can cause an electrical short circuit.
▶ After transporting the device, wait until it has reached ambient temperature before switching it on.

NOTICE!
Risk of damage to the device!
Unsuitable environmental conditions could cause damage to the device.
▶ Use the device only in dry rooms.
To prevent the device from falling, only install and operate it and its components on a sturdy, level and vibration-free surface.
When setting up the device, make sure that
- there is a sufficient gap in relation to other objects, and that the ventilation slots are not covered in order to ensure that there is always sufficient ventilation;
–the device and mains adapter are not exposed to direct sources of heat (e.g. radiators);
—the device and the mains adapter are not left in direct sun-light;
- contact with moisture, water, droplets or splashes is avoided, and no liquid-filled objects – for example, vases – are placed on or near the device;
–the device is not placed close to magnetic fields (e.g. television sets or other loudspeakers);
-no naked flames, such as lit candles, are placed near the device;
–the connection cable is not taut or bent.
4.4.1. Mounting
The device can be fitted below a horizontal mounting plate, e.g. under a wall cupboard.

WARNING!
Risk of fire/short circuit!
Rising steam or heat can pose a risk of electric shock or fire if a short circuit occurs.
▶ Never mount the device above a hob or any other heat or steam source (for example, electric kettles, etc.).
▶ Never allow the connection cable to hang over a cooker hob or other heat source.
4.5. Repairs

DANGER!
Risk of electric shock!
There is a risk of electric shock due to live parts.
▶ Check the device and the connection cable for damage before using the device for the first time, and after each use.
DE
FR
NL
IT
ES
EN
▶ Do not use the device if the device or mains adapte show visible signs of damage.
If you discover any damage or experience any technical problems, have the device repaired exclusively by a qualified technician.
If a repair must be carried out, please contact only our authorised service partners.
4.6. Cleaning the device

DANGER!
Risk of electric shock!
Risk of injury from electric shock due to live parts.
Before cleaning, pull the mains adapter out of the socket.

NOTICE!
Possible material damage!
Improper handling of sensitive surfaces can damage the device.
▶ Use a soft, dry cloth to clean the device.
- Avoid the use of chemical solutions and cleaning products because these may damage the device surface and/or markings.
5. Package contents
Please check your purchase to ensure that all items are included. If anything is missing, please contact us within 14 days of purchase. The following items are supplied with your device:
• Under-cabinet radio
- Mains adapter
- Fastening materials
- Documentation

DANGER!
Risk of choking and suffocation!
Packaging film can be swallowed or used improperly, creating a risk of choking and suffocation.
- Keep packaging material such as plastic film or plastic bags away from children.
6. Device overview
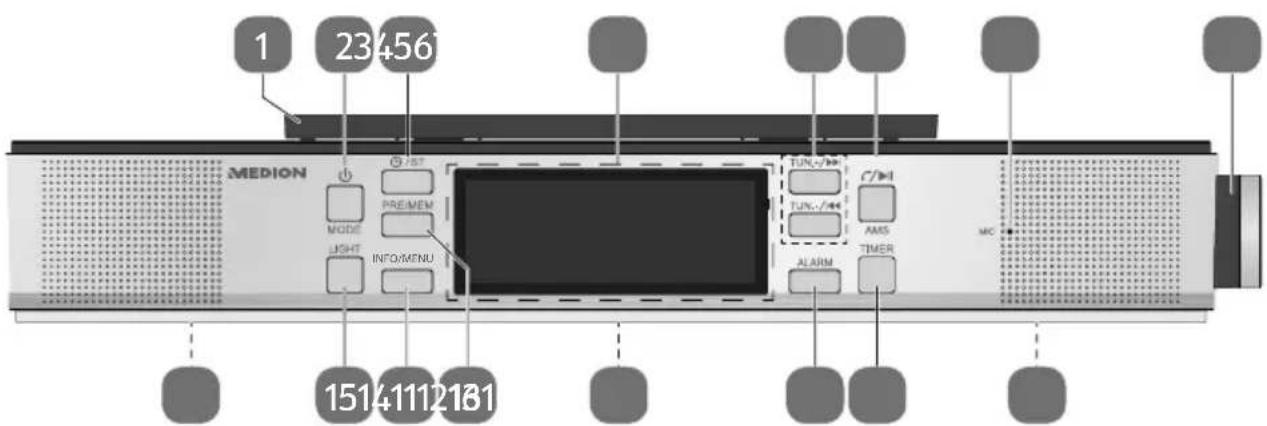
1) Mounting plate for wall cupboards
2) ⏻ / MODE– Switch radio on/off / switch between FM radio, DAB radio and Bluetooth mode
3) - Settime manually / ST - mono/stereo reception
4) Display
5) TUN-/+ - Select frequency / search for radio station
◀◀ / ▶▶ - Fast forward/rewind / previous/next track / navigate in the menu
6) - Accept/end call / redial
▶ II - Start/stop playback / navigate in the menu
AMS - Automatically store stations
7) MIC - Microphone
8) -/+ - Loudspeaker's volume control / adjusting controller / confirm input
SNOOZE - Snooze function
9) Loudspeaker (on the underside)
10) TIMER – Timer function
11) ALARM – Set/activate/deactivate alarm
12) DC IN 5.9V---1.5A - mains adapter connection (on the back)
13) PRE/MEM – Select stored radio station / store station
14) INFO/MENU – Retrieve information / select menu
15) LIGHT – Switch lighting on/off
16) Lighting (on the underside)
7. Mounting the device
The device is designed to be mounted on the underside of a wall cupboard or shelf unit. You will need the four supplied screws to mount the device.
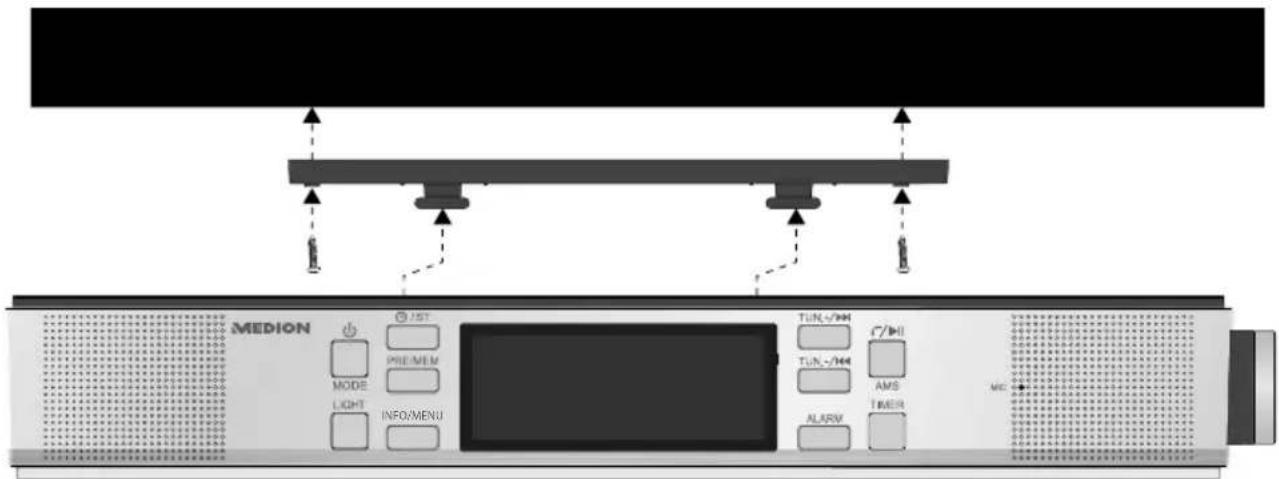
▶ Select a space close to a mains power socket.
Remove the bracket from the device by pulling it to the rear.
▶ Use the bracket to mark the drill holes.
▶ Check that the position is correct using the device.
Drill four holes where you made your markings on the underside of the shelf unit in order to fix the screws.
Screw the mounting bracket to the bottom of the cupboard or shelf.
Now place the device onto the mounting bracket retaining pins and carefully push it back until it stops.

WARNING!
Risk of fire/short circuit!
Rising steam or heat can pose a risk of electric shock or fire if a short circuit occurs.
▶ Never mount the device above a hob or any other heat or steam source (for example, electric kettles, etc.).
▶ Never allow the mains cable to hang over a cooker hob or other heat source.
7.1. Adjusting the aerial
The device is fitted with a telescopic aerial for the radio reception. Pull this out completely and arrange it for optimum reception.
7.2. Mains connection
Connect the mains adapter.
To do this, place the connection cable plug in the socket DC IN 5.9 V=1.5 A and the mains adapter into a properly installed 230V \~ 50 Hz earthed power socket which is accessible at all times.
8. Volume
▶ Turn the control knob on the side of the device -/+ to set the volume. The current volume is shown in the display.
9. Lighting
- Pressing the LIGHT button switches the integrated lighting on the underside of the device on or off.

This light is only designed for the presentation of food-stuffs and not for room lighting.
10. Setting the date/time
The device is equipped with the Radio Data System that sets the time automatically. Once the device is connected to the mains, the correct time and date are synchronised.
In some cases, the time cannot be set if the radio signal is too weak. In this case, 00:00 is shown on the display and the time must be set manually.
10.1. Manual setting
In DAB and Bluetooth ^® mode, you can set the date and time manually using the ⏻ button.
▶ When the device is switched on, press the button. The current date now appears on the display.
The first item flashes (day) and can only be edited using the ◀◀ / ▶▶ buttons or the -/+ controller.
▶ Confirm using the ▶ II button or by pressing the -/+ controller. The next item then flashes (month) and can be edited in the same way.
▶ Once you have set the date, the time appears. Set the hours and minutes in the same way.
As soon as you have set the last item (minutes) and pressed the ▶ II button or the -/+ controller, the new settings are stored. The menu is then closed.
The time is now set.

In FM mode, you must use the FM menu to make settings manually, because the ⏻ button has another function here. Please read section "12.3.4. FM menu" on page 167 for more information.
11. Using the alarm
The device has two alarm functions, using either an alarm tone or the radio as a wake-up call.
11.1. Setting/activating the alarm
If you wish to be woken by the radio, first select a radio frequency (as described in "12. Radio" on page 166).
▶ Press the ALARM button once, to make settings for alarm 1 (ALARM 1 SETUP). Press the button twice to set alarm 2 (ALARM 2 SETUP).
▶ Then press the ▶ II button or the. -/+ controller to proceed and specify the alarm time (ALARM 1/2 WIZARD).
The hour flashes. Select the desired hour using the ◀◀ / ▶▶ buttons or the -/+ controller. Confirm using the ▶ II button or by pressing the -/+ controller. The next item then flashes (minute) and can be edited in the same way.
▶ Set the duration of the alarm in the same way (15, 30, 45, 60 or 90 minutes).
▶ Finally, set the type of alarm signal (BUZZER, FM (radio) or DAB (radio)).
Now specify which days the alarm is to be activated (DAILY, WEEKDAYS, WEEKENDS, ONCE). In the DAILY setting, you must still then specify the date.
▶ Next, specify the volume of the signal.
▶ Then activate the alarm by choosing the ALARM ON setting.
- Pressing the ▶ II button or the -/+ controller several times stores the setting and the alarm is active. If you have previously selected the ALARM OFF setting, the settings are not stored.
11.2. Deactivating the alarm
▶ Press the ALARM button and select the desired alarm (ALARM 1 or 2) by pressing the button several times.
▶ Press and hold the ALARM button until ALARM OFF appears on the display.
11.3. Stopping the alarm / activating the snooze function
When the alarm sounds, you can:
▶ Press the ALARM button to stop the alarm or press the controller to activate the snooze function. After approx. 9 minutes, the alarm sounds again. This can be repeated up to three times.
If the alarm is sounded using the radio, you can switch it off by pressing ⏻. The snooze function is not possible.
11.4. Timer
You can set a timer to start in up to 300 minutes.
▶ Press the TIMER button. The timer menu appears on the display to set the timer time.
▶ Select the duration until the timer start by turning the -/+ controller or by pressing the ◀◀ / ▶◀ buttons.
▶ Press the TIMER button to confirm.
Once the set period of time has expired, the alarm will start to sound with the volume increasing steadily.
▶ Press the TIMER button to stop the alarm.
If you wish to cancel the timer, proceed as follows:
▶ Press the TIMER button. The current timer setting appears on the display.
▶ Turn the controller to select the duration 000.
▶ Press the TIMER button again. The timer menu is then closed.
12. Radio
12.1. Switching the radio on/off
▶ Press the button to switch the radio on/off.
You can receive analogue FM radio with this device. Adjust the aerial to get optimal FM reception.
When the device is switched on, press the ⏻ / MODE button several times to select the operating mode. Select FM MODE for analogue radio and DAB MODE for digital radio.
12.2. Radio operation in FM mode
In analogue radio mode, the current station name and the stereo/mono setting (ST or M) are shown in the display. If available, additional information regarding the current station is provided underneath (radio text).
12.2.1. Setting/searching for stations
▶ Press the TUN- or TUN+ button to set a station manually.
▶ Press and hold the TUN- or TUN+ button to search for stations. The search stops automatically at the next station found.
12.2.2. Stereo/mono
If a radio signal is not sufficient, you can improve the reception, if necessary, by switching the radio station to mono.
When the device is in use, press the ST button. If the device is in stereo mode, it is then switched directly to mono mode. MONO M appears in the display.
▶ Press the button again to switch back to stereo mode. STEREO ST appears in the display.
12.3. Storing and selecting stations
The radio has 30 memory slots where you can save your favourite stations. To perform the functions described below, first switch on the radio.
12.3.1. Automatic storage
▶ Press and hold the AMS button until the station search starts automatically. All stations found are stored successively.
12.3.2. Manual storage
To store a preset station, press and hold the PRE/MEM button to select the memory slot.
Now use the TUN- or TUN+ buttons or turn the -/+ controller to select the desired memory slot P01-P30.
▶ Then press the ▶ II button to store the current station in the selected slot.
12.3.3. Selecting station slots
To select a preset station, press the PRE/MEM button and then use the TUN- or TUN+ buttons or turn the -/+ controller to select the desired memory slot P01-P30.
▶ Press the ▶ II button to select the desired station.
12.3.4. FM menu
To navigate to the FM menu, press and hold the MENU button in FM mode. Use the ◀/▶I buttons or the -/+ controller to select the option. Use the ▶ II buttons or press the -/+ controller to select this. The following options can be edited here:
SCAN SETTING
You can use this option to start a new station search. Select whether the search is for all stations (ALL STATIONS) or only for stations with a strong signal (STRONG STATIONS ONLY) here. Start the search with the ▶ II button.
AUDIO SETTING
Select whether you wish to use the device in mono (FORCED MONO) or stereo (STEREO ALLOWED) operation here. When the device is in use, the same can be achieved using the ST button.
SYSTEM
This menu contains further sub-menus that you can edit.
- SET SLEEP TIME
Select the sleep timer (15, 30, 45, 60 or 90 minutes) here. Once this time has elapsed, the device automatically switches off if it is no longer operated. Select the SLEEP OFF setting if you wish to deactivate the sleep timer.
• TIME
Set the date and time manually here. After ending editing, press the ▶ II button to store the settings.
- BACKLIGHT
Use the following sub-menus to adjust the lighting settings:
- TIMEOUT: Select the time, after which the light is to be switched off automatically (10, 20, 30, 45, 60, 90 or 120 seconds) here. The timeout is deactivated in the ON setting.
- ON LEVEL: Select the light brightness (LOW, MEDIUM or HIGH) here.
- LANGUAGE
Select the desired display language here.
- FACTORY RESET
You can restore the device to factory settings here. After you have pressed the ▶ II X button, answer the following prompt with YES.
- SW VERSION
Displays the current software version.
12.4. Radio operation in DAB mode
In digital radio mode, the current station name is shown in the display. If available, additional information regarding the current station is provided underneath (radio text).
12.4.1. Setting/searching for stations
As soon as the radio is switched on for the first time and switched to DAB mode, the digital station search starts automatically. The first station then is selected from the resulting list of stations.
12.5. Storing and selecting stations
The radio has 30 memory slots where you can save your favourite stations. To perform the functions described below, first switch on the radio.
12.5.1. Automatic storage
To start a new station search, press and hold the AMS button until the station search starts automatically. All stations found are stored successively.
12.5.2. Manual storage
To store a station in a particular slot, press and hold the PRE/MEM button to select the memory slot.
Now use the TUN- or TUN+ buttons or turn the -/+ controller to select the desired memory slot P01-P30.
▶ Then press the ▶ II button to store the current station in the selected slot.
12.5.3. Selecting station slots
To retrieve a set station, press the PRE/MEM button (or alternatively the TUN- or TUN+ buttons) to retrieve the list of stations.
Now use TUN- or TUN+ or turn the -/+ controller to select the desired memory slot P01-P30.
▶ Press the ▶ II button to select the desired station.
12.5.4. DAB menu
To navigate to the DAB menu, press and hold the MENU button in DAB mode. Use the ◀/▶ buttons or the -/+ controller to select the option. Use the ▶ II buttons or press the -/+ controller to select this. The following options can be edited here:
FULL SCAN
You can use this option to start a new station search. Start the search with the ▶ II X button.
MANUAL TUNE
You can manually set the radio frequencies here.
▶ Press the TUN- or TUN+ button to set a station manually.
▶ Press and hold the TUN- or TUN+ button to quickly move through the station frequencies.
DRC
Activate (LOW, HIGH) and deactivate (OFF) the DRC function (dynamic range control) here. This function compensates for large frequency fluctuations in the radio signal.
PRUNE
You can delete old stations, which are no longer available, from the list of stations here.
▶ After you have pressed the ▶ II button, answer the following prompt with YES.
SYSTEM
This menu contains further sub-menus that you can edit.
- SET SLEEP TIME
Select the sleep timer (15, 30, 45, 60 or 90 minutes) here. Once this time has elapsed, the device automatically switches off if it is no longer operated. Select the SLEEP OFF setting if you wish to deactivate the sleep timer.
• TIME
Set the date and time manually here. After ending editing, press the ▶ II button to store the settings.
- BACKLIGHT
Use the following sub-menus to adjust the lighting settings:
- TIMEOUT: Select the time, after which the light is to be switched off automatically (10, 20, 30, 45, 60, 90 or 120 seconds) here. The timeout is deactivated in the ON setting.
- ON LEVEL: Select the light brightness (LOW, MEDIUM or HIGH) here.
- LANGUAGE
Select the desired display language here.
• FACTORY RESET
You can restore the device to factory settings here. After you have pressed the ▶ II button, answer the following prompt with YES.
- SW VERSION
Displays the current software version.
12.6. Advanced station information
The radio offers you the option of displaying advanced station information.
▶ Press the INFO button several times to display the following information:
DAB:
• Radio text (dynamic label segment)
• Current track/performer
• Station name/home page
- Signal strength
- Programme type/programme name
• Multiplex number/frequency
- Signal fault
- Audio bit rate
- Time/date
FM:
- Radio text
- Signal strength
- Program type
- Frequency
- Audio type
- Time/date
13. Bluetooth mode
You can use Bluetooth to play tracks wirelessly from external devices such as MP3 players or mobile phones with Bluetooth on this device. Furthermore, you can also make phone calls using the hands-free function.
When the device is switched on, press the MODE button several times until BT appears in the display.
13.1. Connecting Bluetooth devices
Switch on Bluetooth mode as described above. Enable the Bluetooth function on your external device and carry out the pairing process. Refer to the instructions for your external device for more information. The audio system's name is "MD 44550".
The pairing process is now complete and the external device can now be used with the kitchen radio.
If you want to stop data transfer via Bluetooth, either switch off the Bluetooth function on the external device or press MODE to return to radio mode.
13.2. Control
You can control how tracks are played, the volume and a range of special functions on your external device and on the kitchen radio. What functions are available is dependent on your external device and the software that you use. In principle, these buttons on the device are intended for control via Bluetooth:
| -/+ (controller) | Reduce/increase volume |
| ◀/▶ | Previous track/next track |
| ▶ II | Start/pause playback |
| Ongoing callLong press: decline callShort press: accept, end call, without phone callPress twice: repeat selection of the last phone number |
14. Troubleshooting
If a fault occurs, first see whether you can resolve the problem yourself. You might find this overview useful.

CAUTION!
Risk of injury!
Opening the device can cause injuries.
▶ Never attempt to repair the device yourself. If a repair is necessary, please contact our Service Center or a suitable authorised repair workshop.
| Fault Possible cause/action | |
| No function If the device has been disrupted by a thunderstorm, a static charge or another external factor, follow this procedure to resolve the problem: Disconnect the mains adapter and then plug it in again. | |
| No sound The volume may be set too low.In Bluetooth mode: Set the volume of the external device to the maximum and then control the volume using the kitchen radio. | |
| No radio signal for the time/no radio reception | If necessary, select another location to improve the radio signal for the time. Adjust the wire antenna to optimise the radio reception. |
| No Bluetooth® connection | Take care to ensure that all settings have been made correctly on all devices. The Bluetooth® function may be deactivated on the external device. Activate this, if necessary. Check whether the device to be connected is switched on and is in search mode. |
15. Cleaning
Always pull the mains adapter out from the socket before cleaning the device. Only use a dry, soft cloth to clean the device. Do not use chemical solutions or cleaning products because these may damage the device's surface and/or inscriptions.
16. Storing the device when not in use
If you do not intend to use the device over a longer period of time, store it in a cool, dry place and make sure that it is protected from dust and extreme temperature fluctuations.
17. Disposal

Packaging
Your device has been packaged to protect it from damage in transit. The packaging is made of materials that can be recycled in an environmentally friendly manner.

Device
The adjacent symbol of a crossed out wheelie bin means that the device is subject to Directive 2012/19/EU. Do not dispose of old devices in normal household waste. In accordance with Directive 2012/19/EU, the device must be properly disposed of at the end of its service life. This involves separating the materials in the device for the purpose of recycling and minimising the environmental impact. Take old devices to a collection point for electrical scrap or a recycling centre. Before doing so, remove the batteries from the device and take them to a separate collection point for used batteries. Contact your local waste disposal company or your local authority for more information on this subject.
18. Technical data
| Mains adapter | |
| Manufacturer DONGGUAN GUANJIN ELECTRONICSTECHNOLOGY CO., Ltd. | |
| Model K12S059150G | |
| Input voltage AC 100–240 V ~ 50/60 Hz 0.35 A | |
| Output voltage DC 5.9 V 1.5 A | —— |

| Power supply DC 5.9 V 1.5 A | —— |
| Output power 2 x 3 W RMS | |
| FM frequency band 87.5 to 108 MHz | |
| DAB frequency range 174.928 to 239.2 MHz | |
| Station memory 30 (FM) / 30 (DAB) | |
| Connection Mains adapter connection | |
| Dimensions (W x H x D) 272 x 48 x 130 mm ( | (ncl. bracket) |
| Weight 744 g | |
| Humidity (operating condition) | 40–85 % |
| Ambient temperature (operating condition) | 10 °C – 40 °C |
| Humidity (storing) | 40–85 % |
| Ambient temperature (storing) | 0 °C – 65 °C |
Bluetooth
| Version | 4.2 |
| Profile A2DP, AVRCP, HSP, HFP | |
| Class | 2, up to 10 metre radius |
| Frequency | 2402 MHz to 2480 MHz |
| Transmission power | 4.6 dBm |
CE
18.1. Trademark information
The Bluetooth ^® word mark and logos are registered trademarks of Bluetooth SIG, Inc. and are used by MEDION under licence.
Other trademarks are the property of their respective owners.
19. Service information
Please contact our Customer Service team if your device ever stops working the way you want or expect it to. There are several ways for you to contact us:
- In our Service Community, you can meet other users, as well as our staff, and you can exchange your experiences and pass on your knowledge there.
You will find our Service Community at http://community.medion.com.
• Alternatively, use our contact form at www.medion.com/contact.
- You can also contact our Service team via our hotline or by post.
| Opening times Hotline number UK | |
| Mon – Fri: 08.00 – 20.00Sat – Sun: 10.00 – 16.00 | 0333 3213106 |
| Hotline number Ireland | |
| 1 800 992508 | |
Service address
MEDION Electronics Ltd. 120 Faraday Park, Faraday Road, Dorcan Swindon SN3 5JF, Wiltshire United Kingdom

You can download this and many other sets of operating instructions from our service portal at www.medion.com/gb/service/start/.
You will also find drivers and other software for a wide range of devices there.
You can also scan the QR code on the side of the screen, to download the operating instructions onto your mobile device from the service portal.
20. Legal Notice
Copyright © 2018
Date: 12.10.2018
All rights reserved.
These operating instructions are protected by copyright.
Mechanical, electronic and any other forms of reproduction are prohibited without the written permission of the manufacturer.
Copyright is owned by the company:
MEDION AG
Am Zehnthof 77
45307 Essen
Germany
Please note that you cannot use the address above for returns. Please always contact our Customer Service team first.