
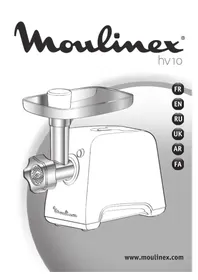
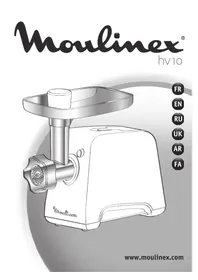
ME682832 - Meat Grinder MOULINEX - Free user manual and instructions
Find the device manual for free ME682832 MOULINEX in PDF.



| Product type | Electric meat grinder |
| Brand | Moulinex |
| Model | ME682832 |
| Body material | Die-cast aluminum |
| Knife material | Self-sharpening stainless steel |
| Included grinding plates | 3 plates: very fine, fine, coarse (depending on model) |
| Removable tray | Plastic or aluminum (depending on model) |
| Meat pusher | Included |
| Accessories | Sausage, biscuit, kibbeh, vegetable cutter (cones/drums), puree |
| Reverse function | Yes, to unclog |
| Power | Approximately 1200 W |
| Power supply | 220-240 V, 50/60 Hz |
| Dimensions (approx.) | 30 x 15 x 30 cm |
| Weight (approx.) | 4 kg |
| Tray capacity | Approximately 1 kg |
| Cleaning | Accessories washable with soapy water |
| Knife/plate maintenance | Oil after cleaning |
| Safety | Reverse button, head locking |
| Spare parts available | Yes, all accessories |
| Warranty | 2 years (standard Moulinex) |
| Manual available | PDF 41 pages in multiple languages |
Frequently Asked Questions - ME682832 MOULINEX
User questions about ME682832 MOULINEX
0 question about this device. Answer the ones you know or ask your own.
Ask a new question about this device
Download the instructions for your Meat Grinder in PDF format for free! Find your manual ME682832 - MOULINEX and take your electronic device back in hand. On this page are published all the documents necessary for the use of your device. ME682832 by MOULINEX.
USER MANUAL ME682832 MOULINEX
Rus. 6-8 UK. 9-11 Ks 12-14 AR,17-15 FA 20-18 EN:21-23 FR. 24-26 ES. 27-29 P5.30-32 13. 33-35 EL: 36-38
RU UK KK AR FA EN FR ES PT IT EL
11 11111111111111111111111111111111111111111111111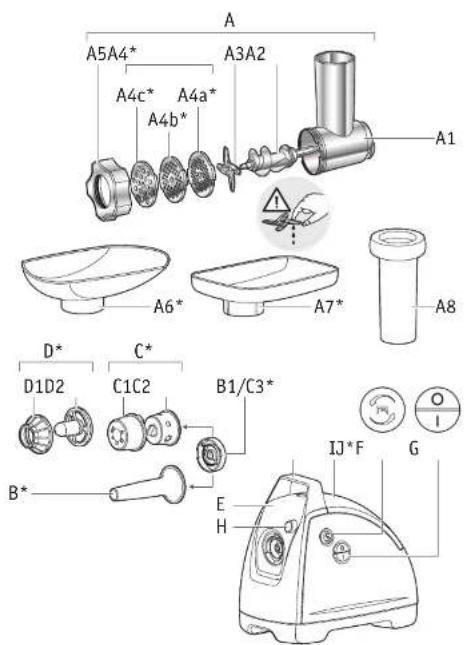
* Depending on model - depending on model - depending on model - depending on model - depending on model - depending on model - depending on model - depending on model - depending on model - depending on model - depending on model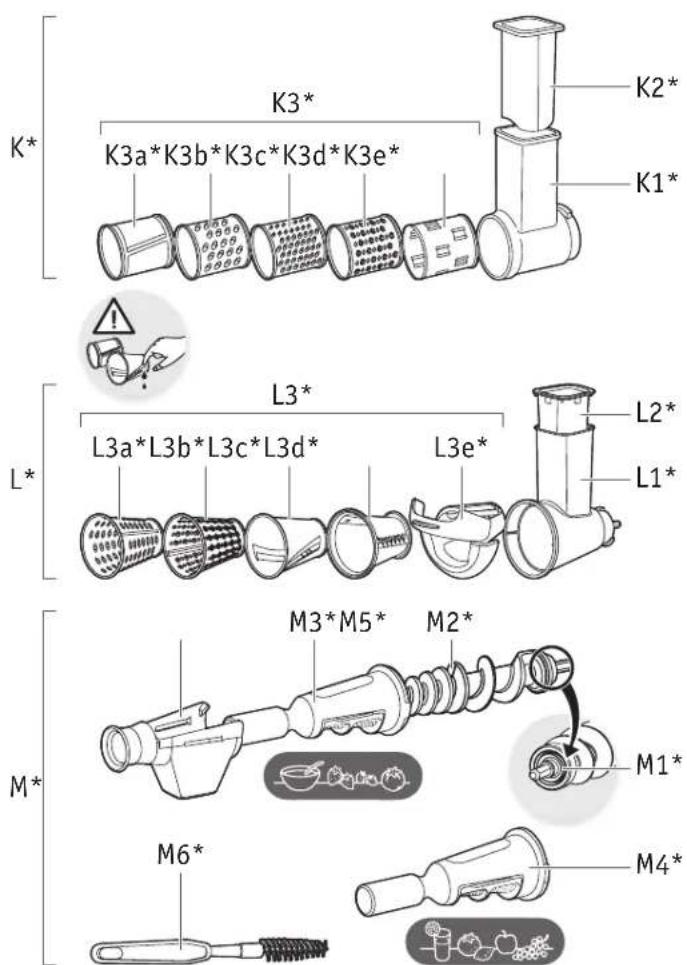
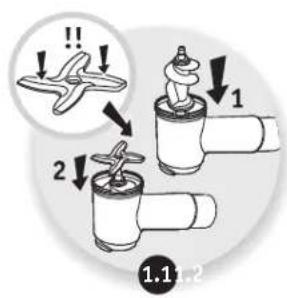
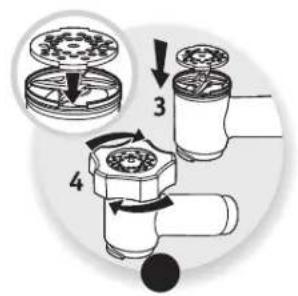
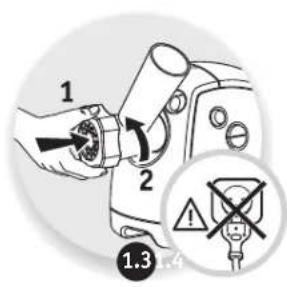


* Depending on model - depending on model - depending on model - - - depending on model - selon modele - segun modelos - de accordo com o modelos - a seconda del modello - depending on model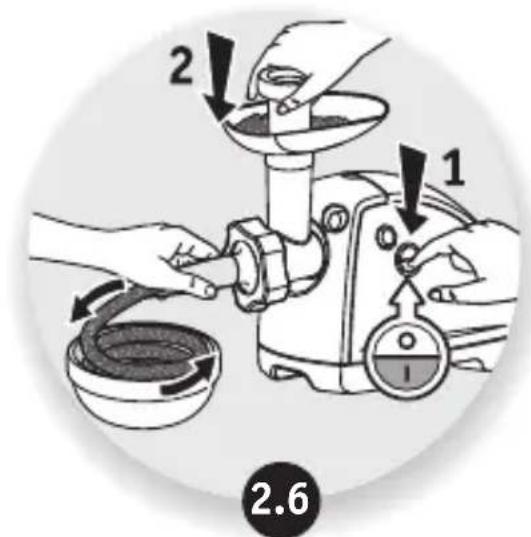
* Depending on model - depending on model - depending on model - - - depending on model - selon modele - segun modelos - de accordo com o modelos - a seconda del modello - depending on model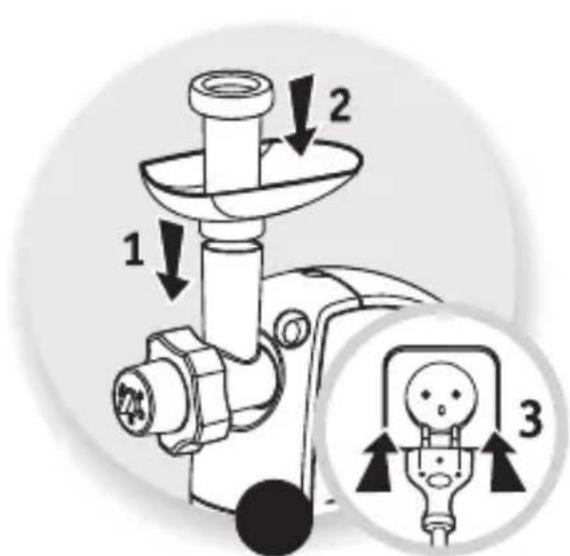
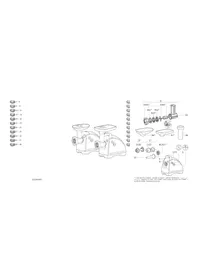
A Removable grinding disc
A1 Aluminum housing
A2 Screw
A3 Self-locking stainless steel screw
A4 Grates (depending on model)
A4a Grate with small holes (for very fine grinding)
A4b Grate with medium holes (for fine grinding) A4c Grate with large holes (for coarse grinding)
A5 Aluminum cap A6 Plastic supply A7 Aluminum supply A8 Meat pusher
B Accessories for sausage (depending on model)
B1 Centrator
C Nozzle (depending on model)
C1 Support C2 Shape C3 Centrator
D Accessory cable (depending on model)
D1 Sector tip D2 Comb
E Motor unit block F "Reverse" button (instant reverse) G On/Off button and unlocking button for the upper part of the housing Accessory storage compartment
J Handle (depending on model) K Trimmer (depending on model)
K1 Nozzle opening / throat K2 Pusher
K3 Nozzles (depending on model)
K3a Nozzle for slicing with slices K3b Nozzle for coarse grating K3c Nozzle for fine grating K3d Nozzle for grating cheese
K3e Nozzle for shredding
L Trimmer (depending on model)
L1 Attachment for cone-shaped nozzles / throat L2 Pusher L3 Cone-shaped nozzles (depending on model)
L3a Cone grater L3b Cone for scraping L3c Cone for cutting with thin slices L3d Cone for scraping L3e Nozzle for cutting into cubes
A4c Sieve with large holes (coarse puree)
A5 Aluminum tube
A6 Winter plastic nozzle
A7 Winter aluminum nozzle
A8 Head
B Sausage attachment (depending on model)
B1 Strainer
C Flat nozzle (depending on model)
C1 Support
C2 Shape
C3 Strainer
D Kebab attachment (depending on model)
D1 Sector tip
D2 Ring
E Electrical block
F "Reverse" button (reverse switch)
Knob for adjusting the upper part of the meat grinder
Removing the storage compartment
J Handle (depending on model)
K Cover (depending on model)
K1 Nozzle/grinder attachment
K2 Pusher
K3 Drum (depending on model)
K3a Drum for fine grinding with fine blades
K3b Drum for coarse grinding
K3c Drum for medium grinding
K3d Drum for fine grinding
K3e Drum for coarse grinding
L Cover (depending on model)
L3d Cone for grinding with cubes
L3e HacaKa dJa Hapi3aHnHa Ky6nKamn
M DoataKobHa cadaKa dna niope (B 3aIexKHOCTi BiMD MoDeni)
M1FepMeTnHn yuINbHIOBaU
M2ΓBnHT
M3 ΦiNbTp 3 OTBopamn pi3HOI BENUHHI DЯ npNroTyBaHNa COyCy
M4 ΦínbTp 3 MaJIeHbKIMN OTBopA Mn ДЯприroToyBaHHЯ COkIB
M5 3JIbHn HOCNK JIA COKy
M6 LITouka dny uHnueHHa

Ybara! Do umboro npuna dy odaetbca iHctpykci i3 npabnilamn texhikn 6e3nekn LS-123456.
Ipeed nepuim BnKOpncTahm npnilady yBaXHo npouHToTe iHctpyKci 3 ekCnlyaTaCi Ta 36epejItb ix.
IOPAIN3 EKCNJYATAU
Ipeed nepuim BnKOpncTahnM npomnte hacadKn B mInbHi Bodi. Iicra zboRo peTeNbHO npononoitb i BnTpItb ix.
Pewitka Ta HIX NOBHHI 3aIIuataCJ KInpHmN. 3MaCTiB ix OJIeIO.
BVKOPNUCTAHHBAPEXHA YACTUHA M'ARCOPYBUKN (INB.PNC.1.1-1.6)
IiDroTyIe Bci iHrpeDiEHTn IJn noPi6HeHHa, BuJaIb KICTK, xpaI ta Jnn. NopixTe M'acO Ha 1MaTOUKN (npu6n.2X2cm).
Kopncnnapada:nicn npdi6henna moxha nponycnttn kInbka smatkib xni6a, 0o6 yce BnIwno 3 M'acopy6kn.
Ioo po6ntuB pa3i 3akynopobanHa?
- 3yinnHItb M'acopy6ky, HATnCHyBUn Ha noloxHeHH «0» KhoNkN 3aNyCKy/3ynHKn (G).
- Notim HaTnCHiB i yTpMnyTe KjIbKa CeKyHd KHONky «PeBepc» (F), 106 BvBInbHHTn npOdykTN. HaTnchItb noJoxHeHHa I'KHOKN 3ynnHKn/3anycky (G), 0o6 npOdoBxutn noDipi6HeHHa.
BVKOPNUCTAHHЯ HACADKAДЛЯ KOBBACN (ДИВ.PMC.2.1-2.6)
Baxnbo! Cey akcescyap npn3haeHn IJy BnKOpncTaHH TInbKn 3 M'acHm fapweM, Kdy ndoahi Bci npnPabn.
Cymiш мас 6ут ni do6pe nepemiшан дя nprirotybaHHЯ.пicя зamoyubaHHЯ KOb6aCHOI obolONkN B TePliB WDi, uO6 BiHOBHTn ii eJactuHicTb, HadrHITb II Ha HacaKy, zannuBwN KHeCb DoBXInHOIO 6Ibwe 5 cm (aKni BN 3aB'jXeTe Ha By30J). YbIMKHITb npnilad, 3aBaHTaXTe φapw y M'rcopy6Ky Ta CTexTe 3a ZanOBHeHHm M'acHOI obolOnKn.
Ipnmitka. LIO pO6OTy Ierwe BnKOHyBaTn BdBox: OdnH 3a6e3neyu nOauy fapuy, iHsN CTexKtB 3a 3anOBHeHHm 06oJOhKn
Hadaite notpi6Hy doBXnHy KO6aci, HATNCKaOUn Ta cKpyuOUn o6oJohky. 06 otPImatn Ykichy KO6acy, He donyckaIte nOTpannHn NOBITpN iD uac 3anOBHeHH N p6iTB KO6acy DOBXnHO BID 10 do 15 cm (BiOKpeMIOte KO6ackn, 3a'B3yOUn By3nKn).
BANKOPUCTAHHЯ HACADKA ДЛЯ KEББ (ДИВ. PИС. 3.1-3.3)
PpakTuHa npopa:
Ioo6 otpimatn odhopidny macy dny Ke6be a6o keftn, nponycitb M'co 2-3 pa3n uepe3 M'acopy6ky dny doocrHenn6 baxaHOi KOHCnCTeHci.
BVKOPNUCTAHHЯ HACADKAДЛЯ ПECHINA (ДИВ.PUC.4.1-4.3)

PnroTyte ticTo. Bn otpmaete kpaizi pe3yntaTn, kkuo ticTo 6yde tpox m'kaKm. Bn6epitb MaHIOK, ictabuBwn cTpiKy 3 Bn6paHOO oOpMOIO.
BukopncToByte, nOKn He OTPmaeTe nOTpi6Hy KInbKiCTb neuBa.
APPLICATION OF THE NOZZLE (SEE FIG. 5.1-5.10)
Procedure for obtaining the best results:
It is recommended to use quality ingredients to obtain the desired result and avoid accumulation of ingredients in the drum body.
Do not use the nozzle for filling or grinding solid products, especially large pieces of meat.
APPLICATION OF THE NOZZLE FOR PUREE (SEE FIG. 6)
Usage: Place one unit for collecting juice under the juice outlet spout and another under the filter for collecting the pulp. When preparing the juice, use only fresh fruits. Depending on the season and the quality of the fruits, it is advisable to pass the pulp through the mincer again to obtain the maximum amount of juice.
L Accessories (optional)
L1 Cone for citrus fruits / L2 Grater L3 Cone for citrus fruits (optional) L3a Large cone L3b Small cone L3c Cone for fine grating L3d Cone for coarse grating L3e Cone for shredding
M Accessories for preparing minced meat (optional)
M1 Blade for grinding M2 Grinding plate M3 Plate with large holes for preparing minced meat M4 Plate with small holes for preparing minced meat M5 Blade for mincing M6 Grating for mincing
Attention! Before using the device, read the instructions carefully.
Read the instructions carefully before using the device and keep them for future use.
CLEANING AND MAINTENANCE

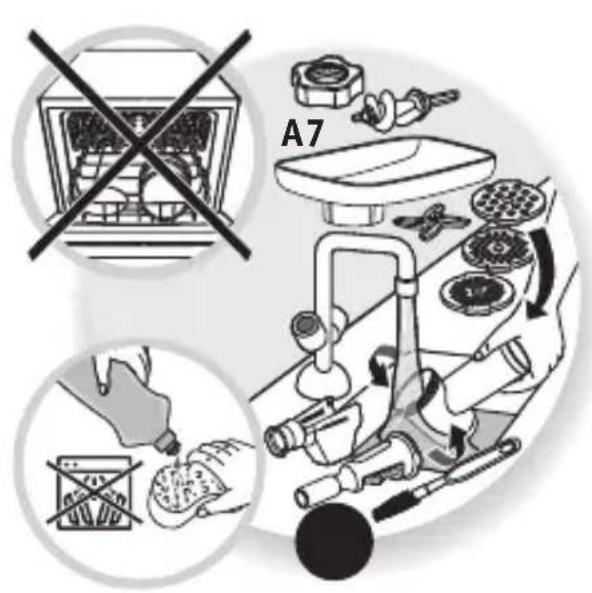
Before cleaning, make sure all parts are disconnected. Clean them with warm water and mild detergent.
Do not immerse the motor unit in water. Clean it with a damp cloth.
GENERAL SAFETY INSTRUCTIONS (1.1 AND 1.6 PAGES)
We are not responsible for damage to products, tools, equipment, and devices. We are not liable for any injuries (up to 2 cm x 2 cm).
Advice: If the device is used for its intended purpose, consult a doctor before using it.
What to do if the device is damaged or does not work?
To stop the device, press the switch (G) to position «0» and disconnect the device from the power supply. - To reset the settings, press the «Reverse» (F) button and hold for a few seconds. - To start the device, press the switch (G) to position «I» and hold for a few seconds.
DEVICE DESCRIPTION AND SPECIFICATIONS (2.1 AND 2.6 PAGES)
Note! This device is intended only for use with the accessories included in the package.
The device must be well cleaned. To prevent contamination, the device should be wiped with a damp cloth, and the cloth should be at least 5 cm away from the device (to avoid damage). Do not use abrasive cleaners. After cleaning, wipe the device dry.
Advice: If the device is used for its intended purpose, it is recommended to clean it after each use.
To clean the device, use a soft cloth. Do not use sharp objects or solvents. Wipe the device with a cloth dampened with water and a mild detergent, then dry it.
DEVICE OPERATION (3.1 AND 3.3 PAGES)

Operating instructions:
To obtain a homogeneous mixture, mix the contents of the device 2-3 times before use.
DEVICE MAINTENANCE (4.1 AND 4.3 PAGES)
Do not immerse the device in water. If the device gets wet, dry it thoroughly before using it again.
Keep the device clean, use only the recommended cleaning agents.
We will not be responsible for damage caused by improper use.
CONNECTION TO THE WATER SUPPLY (see sections 5.1 and 5.10)
Recommendations for connecting to the water supply:
To prevent damage to the device and to ensure safe operation, the connection must be made by a qualified technician.
The technician must follow all safety regulations, including those for electrical and water connections.
PREPARATION FOR USE OR CONNECTION (see section 6)
Usage: Place the device on a flat, stable surface, away from heat sources and flammable materials. For cleaning or maintenance, disconnect the device from the power supply. To clean the device, use a soft, damp cloth and mild detergent, then dry it thoroughly.
Water: Use only clean water.
For cleaning: Use a soft, damp cloth.
MAINTENANCE (see sections 7.1 and 7.4)
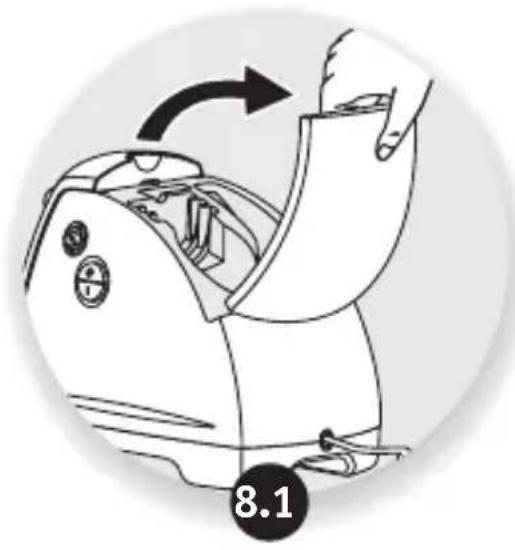
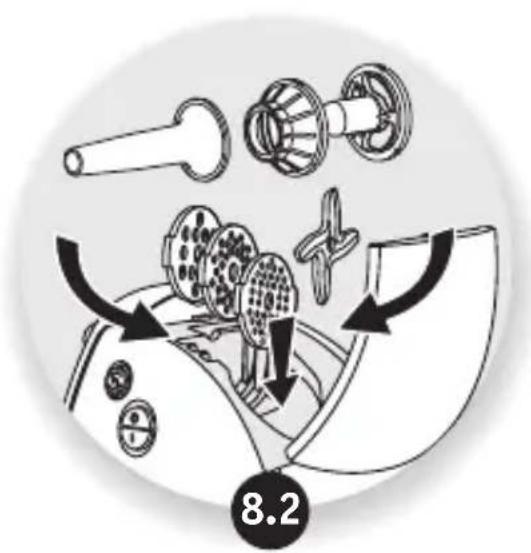
STORAGE OF ACCESSORIES (see sections 8.1 and 8.2)
(see sections 4.3 and 4.1)
.
.1
(5.10 5.1)
AR
:J L J 1
J 1 J 1 J 1 J 1 J 1 J 1 J 1 J 1 J 1 J 1 J 1 J 1 J 1 J 1 J 1 J 1 J 1 J 1 J 1 J 1 J 1 J 1 J 1 J 1 J 1 J 1 J 1 J 1 J 1 J 1 J 1 J 1 J 1 J 1 J
.1 1 1 1 1 1 1 1 1 1 1 1 1 1 1 1 1 1 1 1 1 1 1 1 1 1 1 1 1 1 1 1 1 1 1 1 1 1 1 1 1
(g)
(3.3 1 3.1 k)
:adosdouai
aegslll j 1 1 1 1 1 1 1 1 1 1 1 1 1 1 1 1 1 1
1j
()
paiu/21j
K2
M1w
M3:
M3
xueo 0xgao g jilM4
M5
M6
A
A1 pssbJ 0
A2
A3 aaiu
A4 (J)
A4b (pcl) p
A4c (j)
A5
Therefore, y = kx + b
Mountain
()
(4.3 4.1)
: 15 kJ 15 J 15 J 15 J 15 J 15
(6)
g 100000000000000000000000000000000000000000000000000000
.
L4 jj:
L3 j1:
(7.4 7.1)
(8.2 8.1)
.0g 123456-LS gj
J 1
oL
. 1
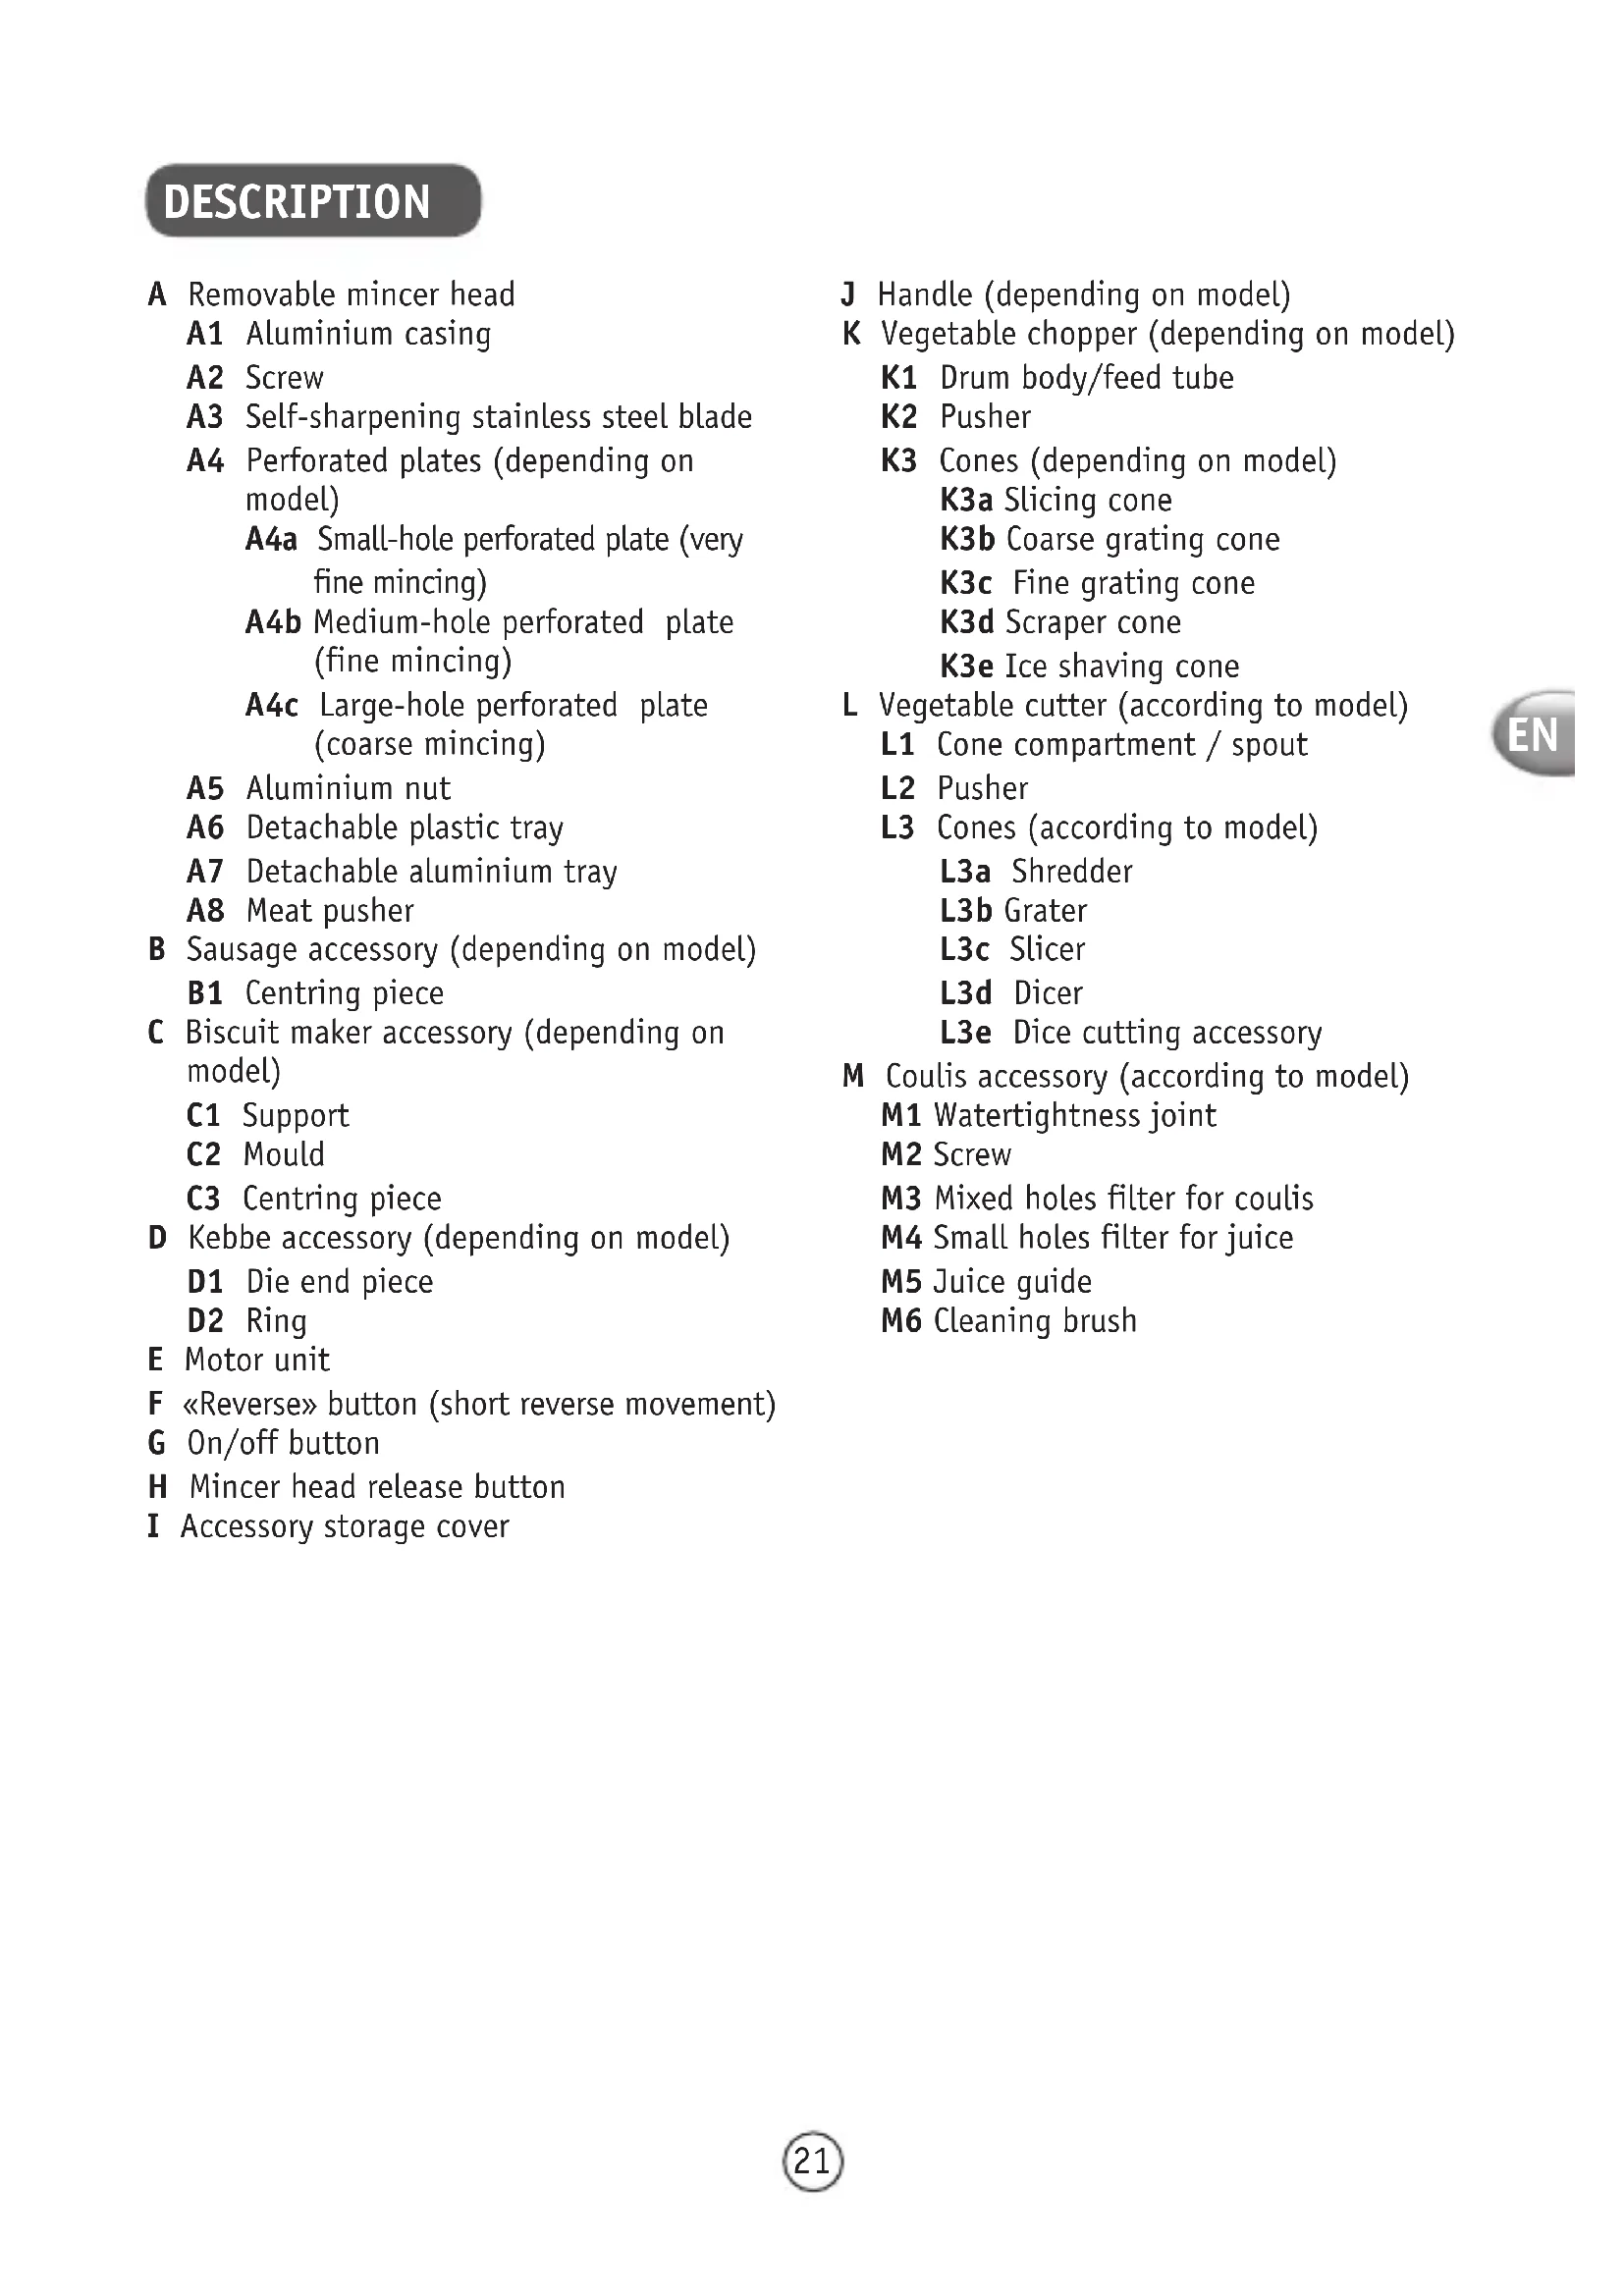
A Removable mincer head
A1 Aluminium casing A2 Screw A3 Self-sharpening stainless steel blade A4 Perforated plates (depending on model)
A4a Small-hole perforated plate (very fine mincing) A4b Medium-hole perforated plate (fine mincing) A4c Large-hole perforated plate (coarse mincing)
A5 Aluminium nut A6 Detachable plastic tray A7 Detachable aluminium tray A8 Meat pusher
B Sausage accessory (depending on model) B1 Centring piece C Biscuit maker accessory (depending on model) C1 Support C2 Mould C3 Centring piece
D Kebbe accessory (depending on model)
D1 Die end piece D2 Ring
E Motor unit F «Reverse» button (short reverse movement) G On/off button H Mincer head release button I Accessory storage cover
J Handle (depending on model) K Vegetable chopper (depending on model)
K1 Drum body/feed tube K2 Pusher
K3 Cones (depending on model)
K3a Slicing cone K3b Coarse grating cone K3c Fine grating cone K3d Scaper cone K3e Ice shaving cone
L Vegetable cutter (according to model)
L1 Cone compartment / spout L2 Pusher L3 Cones (according to model)
L3a Shredder L3b Grater L3c Slicer L3d Dicer L3e Dice cutting accessory
M Coulis accessory (according to model)
M1 Watertightness joint M2 Screw M3 Mixed holes filter for coulis M4 Small holes filter for juice M5 Juice guide M6 Cleaning brush
EN
Note: Safety instruction booklet LS-123456 is supplied with the appliance.
Before using your appliance for the first time, read the booklet carefully and keep it in a safe place.
BEFORE FIRST USE
- Wash all accessories in warm water and washing up liquid. Rinse, and carefully dry them straight away.
- The perforated plate and the cutter must remain greased. Coat them with cooking oil.
- Do not switch on the appliance when it is empty or if the mincer plates are not greased.
ATTENTION: The blades of the cones are extremely sharp; handle the cones with great care, always holding them by the plastic parts.
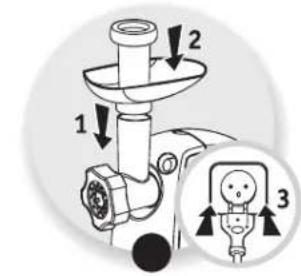
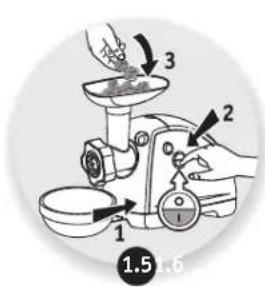
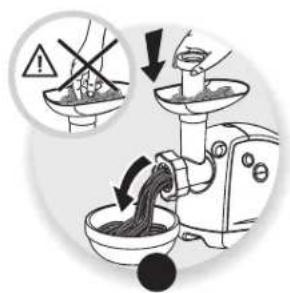
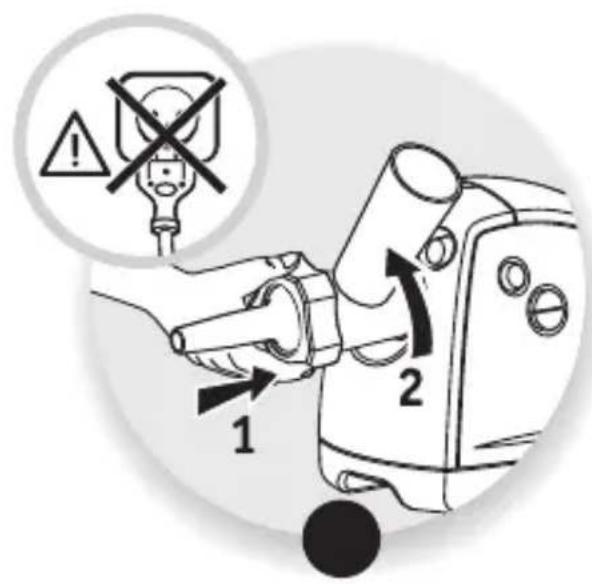
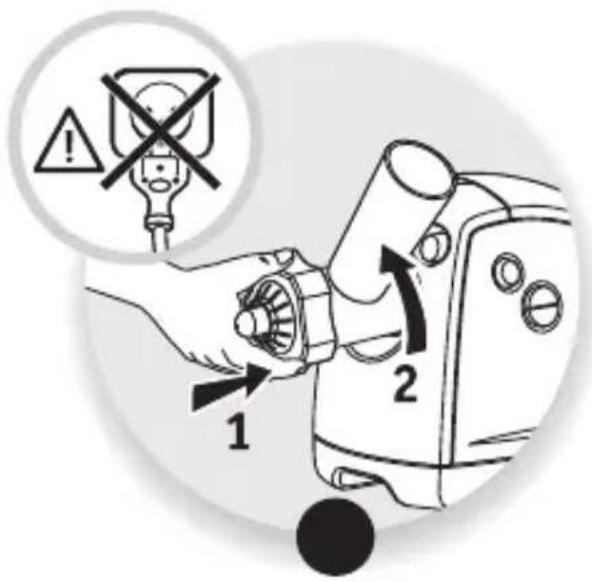
USE: MEAT GRINDER HEAD (FIG. 1.1 TO 1.6)
Prepare the entire quantity of food to be minced, remove any bones, gristle and tendons. Cut the meat into pieces. (approx. 2 cm x 2 cm)
Tip: At the end of operation, you can pass a few pieces of bread through the grinder in order to extract all the ground meat.
Notes:
- Only use your appliance for mincing raw meat. Do not mince cooked meat.
- Do not use your appliance for more than 14 minutes.
What should you do if the machine is clogged?
- Stop the mincer by pressing position "0" of the On/Off button (G).
- Then press the "Reverse" button (F) for a few seconds to release the jam.
- Press position "I" of the On/Off button (G) to continue mincing.
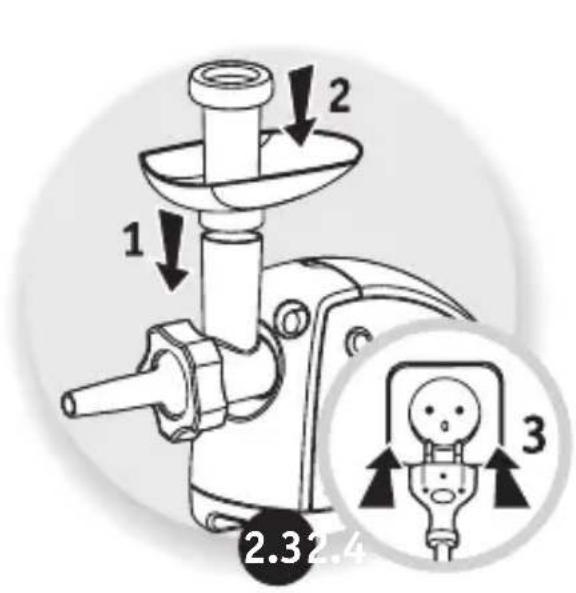
USE: SAUSAGE ACCESSORY (FIG. 2.1 TO 2.6)
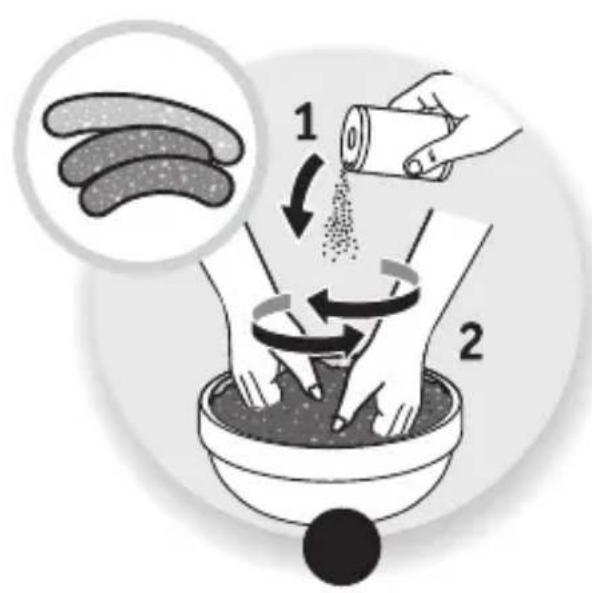
Important: this accessory can only be used after the meat has been minced, seasoned and the preparation has been well mixed.
After leaving the skin to soak in warm water to regain its elasticity, slide it onto the funnel and let it overhang by around 5 cm (which you will seal by tying a knot with a link). Start the appliance, feed the mince through the mincer, following the skin as it fills.
Note: this work will be done more easily with two people, one to feed the mince through and the other to take care of filling the skin.
Give the sausages the required length by clamping and twisting the skin. For a quality sausage, take care to avoid trapping air during filling and make sausages that are 10 to 15 cm long (separate the sausages by making a link and tying a knot with the link).
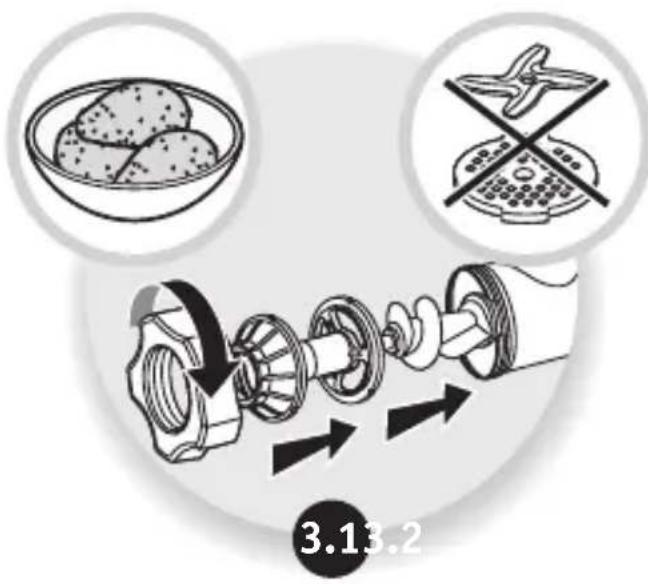
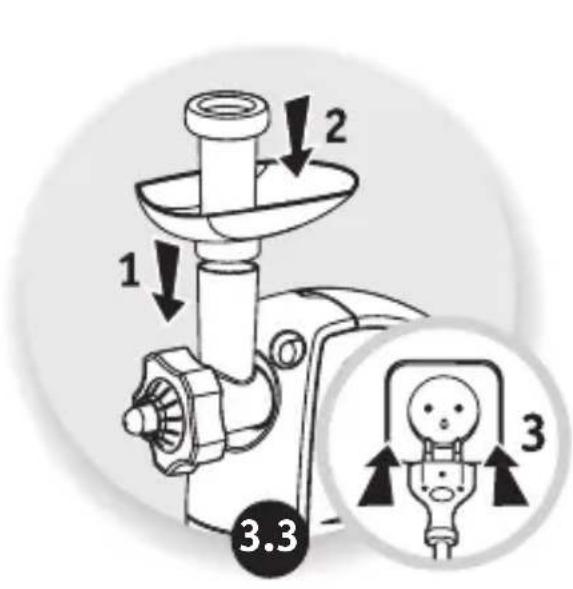
USE: KEBBE ACCESSORY (FIG. 3.1 TO 3.3)
Practical tip:
To make a fine Kebbe or Kefta paste, run the meat through the mincer two or three times until you obtain the desired smoothness.
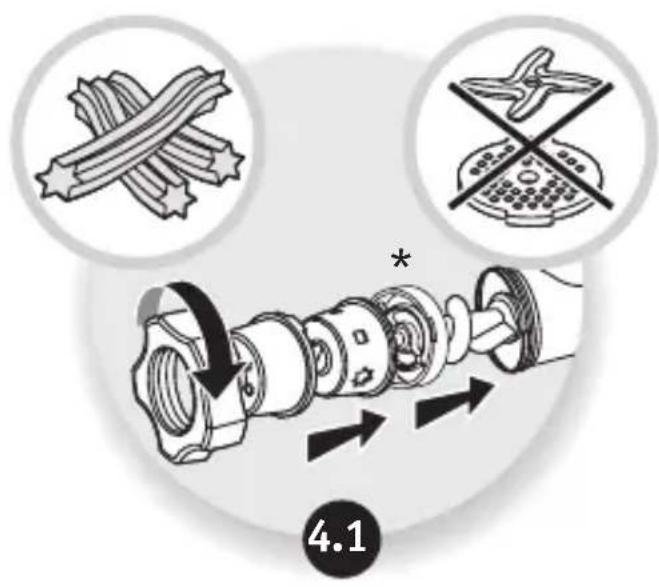
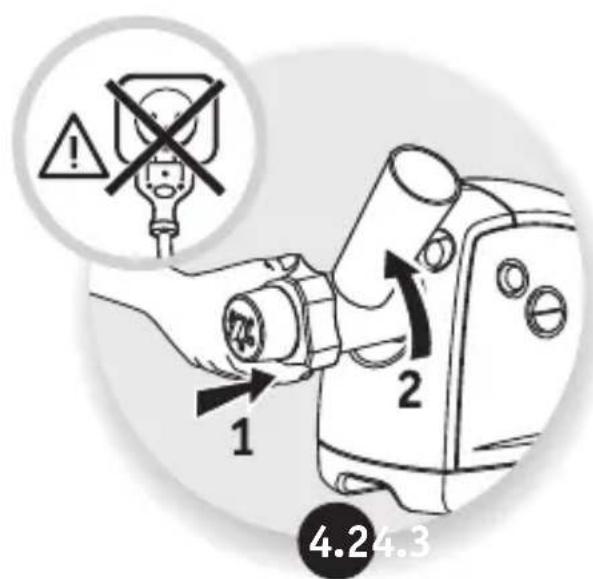
USE: BISCUIT ACCESSORY (FIG. 4.1 TO 4.3)
Prepare the dough. For best results, use a soft dough.
Choose the design by aligning it with the arrow.
Repeat the process until you have obtained the desired amount of biscuits.
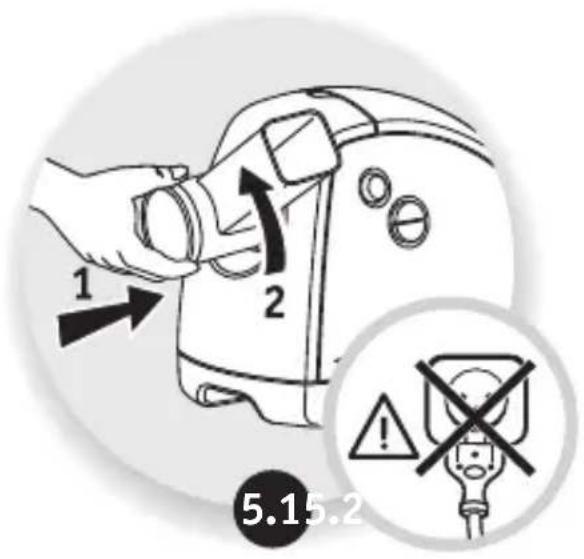
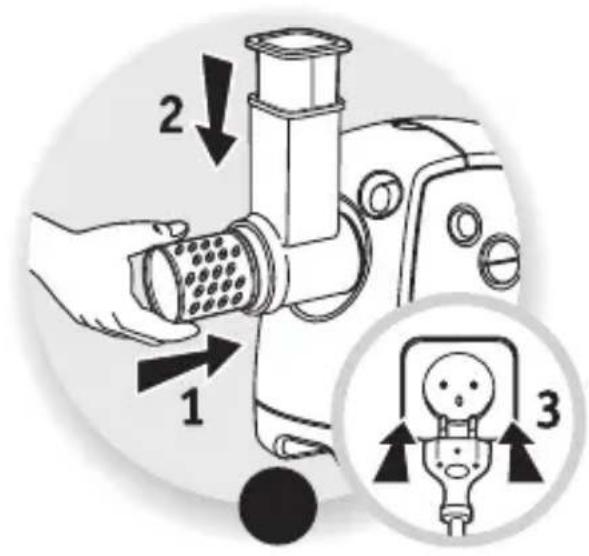
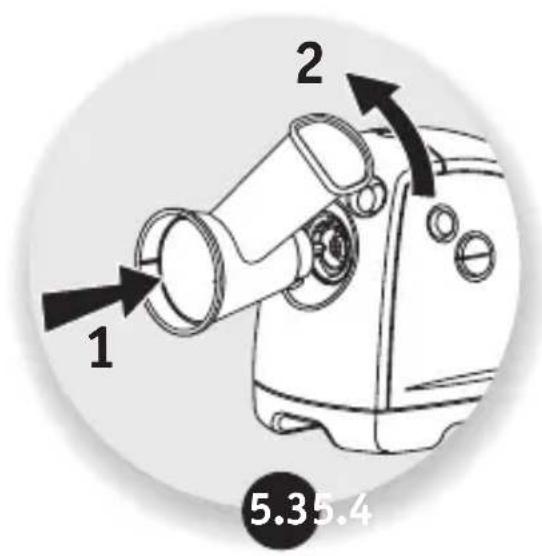
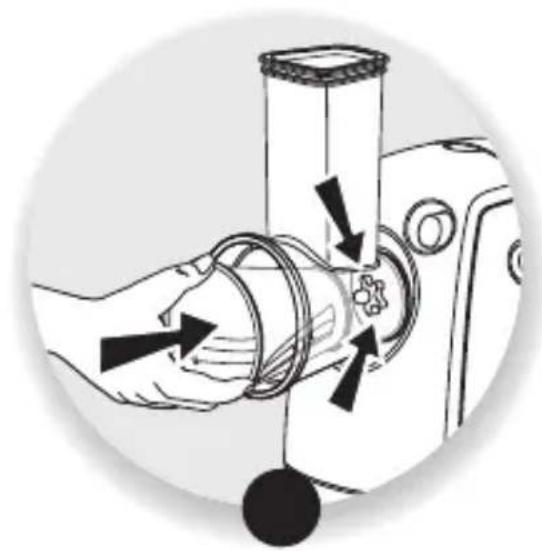
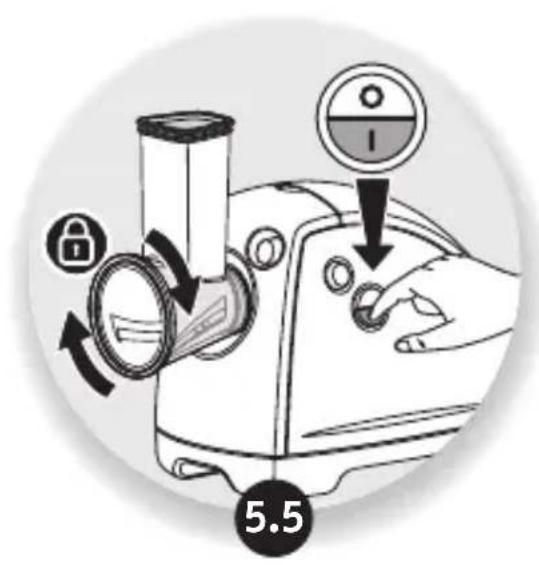
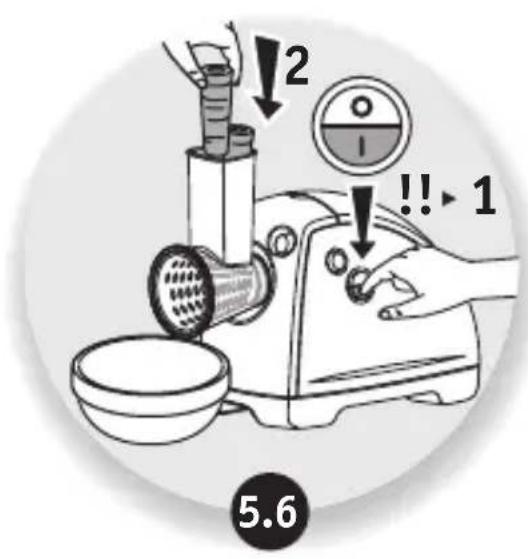
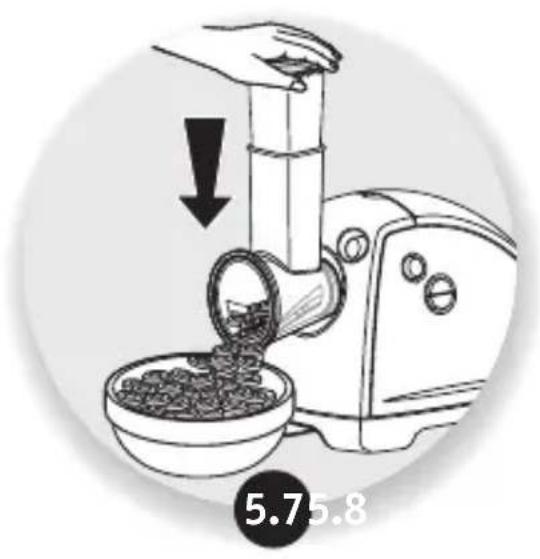
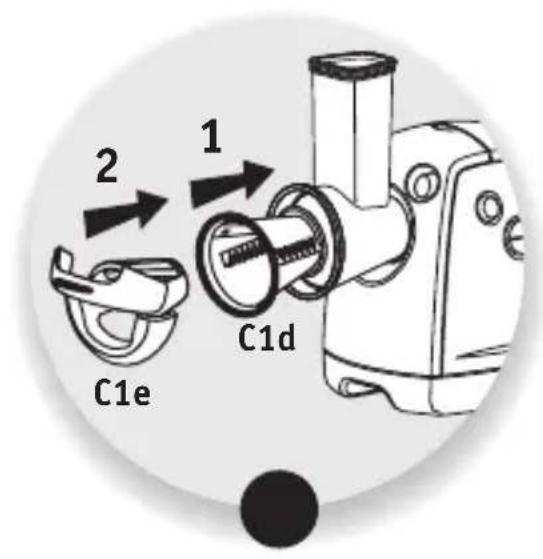
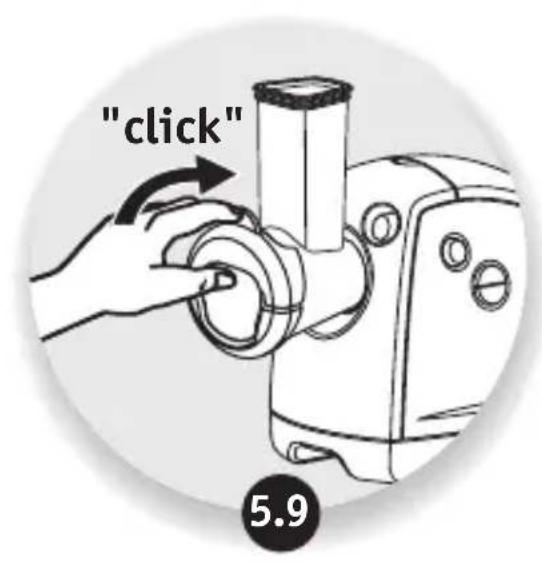
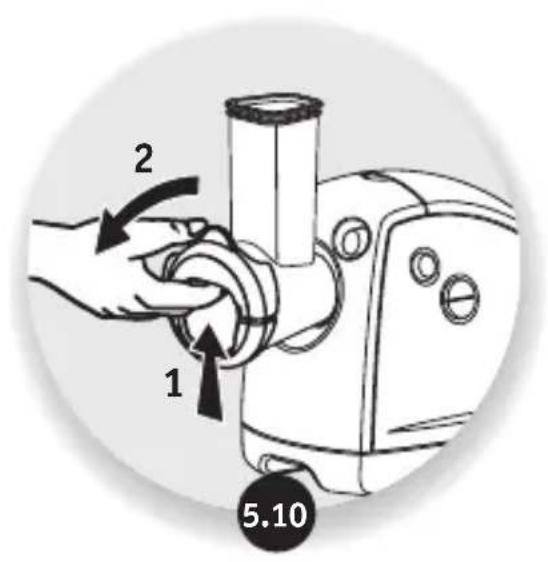
USE: VEGETABLE CHOPPER (FIG. 5.1 TO 5.10)
Useful tips for best results:
The ingredients that you use must be firm to obtain satisfactory results and to avoid the accumulation of food in the compartment.
Do not use the appliance to grate or cut food products that are too hard, such as sugar cubes or pieces of meat.
USE: COULIS ACCESSORY (FIG. 6)
Use: Place a container under the juice groove (K5) to collect the juice and another one at the end of the filter to collect any residues. If you wish to make coulis or juice, using fresh fruits only is an imperative. According to the season and to the quality of your fruits, we recommend that you run the pulp through a second time to extract the maximum possible amount of coulis or juice.
Juice: Use filter L4
Coulis: Use filter L3
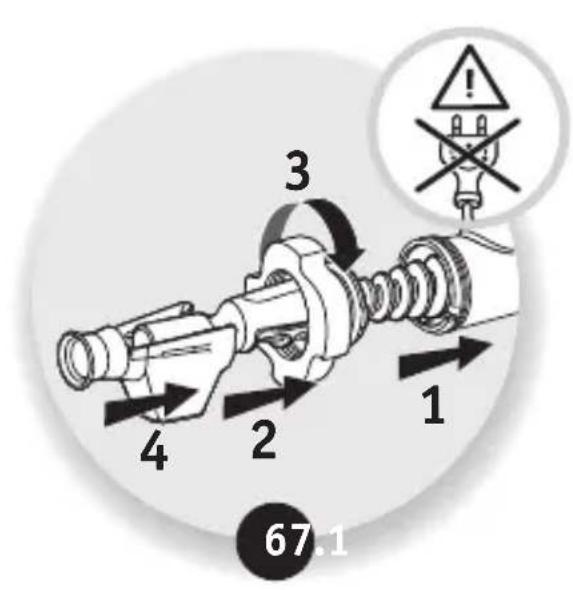
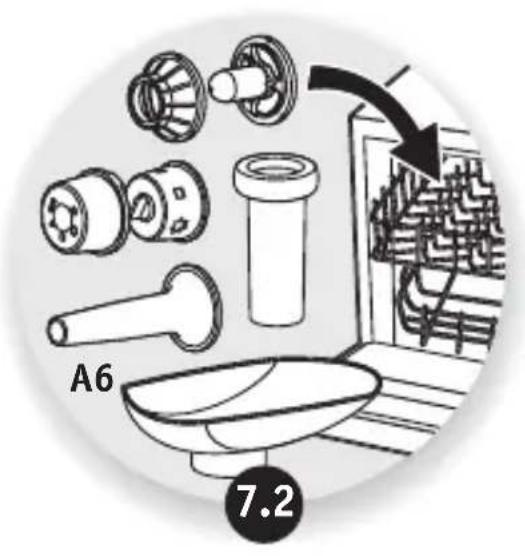
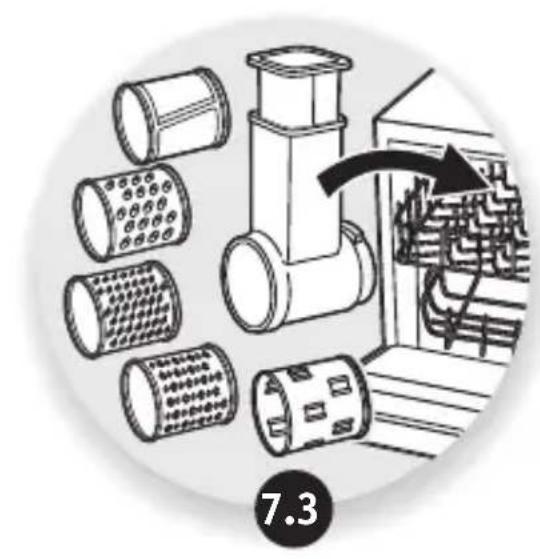
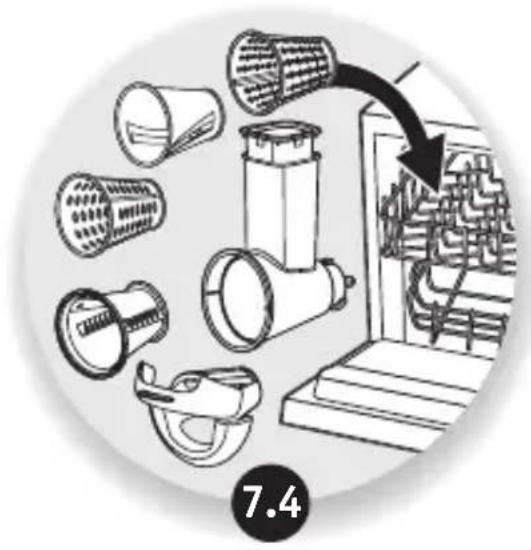
CLEANING (FIG. 7.1 TO 7.4)
STORAGE OF ACCESSORIES (FIG. 8.1 TO 8.2)
DESCRIPTION
A Removable grinder head
USE: COULIS ACCESSORY (FIG. 6)
USE: BISCUIT ACCESSORY (IMAGES 4.1 TO 4.3)
CLEANING (IMAGES 7.1 TO 7.4)
STORAGE OF ACCESSORIES (IMAGES 8.1 TO 8.2)
DESCRIPTION
A Removable meat grinder accessory
ACCESSORY HOLDER (FIG. 8.1 - 8.2)
IPEPIPAPH
A Aluminum bowl A1 Aluminum lid A2 Screw A3 Self-sharpening blade A4 Disc for slicing (depending on model) A4a Disc for fine shredding (fine grating disc) A4b Disc for medium shredding (medium grating disc) A4c Disc for coarse shredding (coarse grating disc) A5 Aluminum pusher A6 Plastic pusher (depending on model) A7 Aluminum pusher (depending on model) A8 Meat grinder attachment B Attachment for sausages (depending on model) B1 Centering ring C Attachment for cookies (depending on model) C1 Spring C2 Button C3 Centering ring D Attachment for kibbeh/meatballs D1 Cutting blade D2 Forming ring E Motor unit F Reverse button (instant reverse operation) G On/off switch
Manufactured in France by GROUPE SEB
Complies with requirements:

- IOPAIN3 EKCNJYATAU
- BVKOPNUCTAHHBAPEXHA YACTUHA M'ARCOPYBUKN (INB.PNC.1.1-1.6)
- IOO PO6NTUB PA3I 3AKYNOPOBANHA
- BVKOPNUCTAHHЯ HACADKAДЛЯ KOBBACN (ДИВ.PMC.2.1-2.6)
- BANKOPUCTAHHЯ HACADKA ДЛЯ KEББ (ДИВ. PИС. 3.1-3.3)
- PPAKTUHA NPOPA
- BVKOPNUCTAHHЯ HACADKAДЛЯ ПECHINA (ДИВ.PUC.4.1-4.3)
- APPLICATION OF THE NOZZLE (SEE FIG. 5.1-5.10)
- PROCEDURE FOR OBTAINING THE BEST RESULTS
- APPLICATION OF THE NOZZLE FOR PUREE (SEE FIG. 6)
- CLEANING AND MAINTENANCE
- GENERAL SAFETY INSTRUCTIONS (1.1 AND 1.6 PAGES)
- WHAT TO DO IF THE DEVICE IS DAMAGED OR DOES NOT WORK
- DEVICE DESCRIPTION AND SPECIFICATIONS (2.1 AND 2.6 PAGES)
- DEVICE OPERATION (3.1 AND 3.3 PAGES)
- OPERATING INSTRUCTIONS
- DEVICE MAINTENANCE (4.1 AND 4.3 PAGES)
- CONNECTION TO THE WATER SUPPLY (SEE SECTIONS 5.1 AND 5.10)
- RECOMMENDATIONS FOR CONNECTING TO THE WATER SUPPLY
- PREPARATION FOR USE OR CONNECTION (SEE SECTION 6)
- MAINTENANCE (SEE SECTIONS 7.1 AND 7.4)
- STORAGE OF ACCESSORIES (SEE SECTIONS 8.1 AND 8.2)
- (SEE SECTIONS 4.3 AND 4.1)
- (5.10 5.1)
- AR
- (3.3 1 3.1 K)
- J
- (4.3 4.1)
- (6)
- BEFORE FIRST USE
- USE: MEAT GRINDER HEAD (FIG. 1.1 TO 1.6)
- NOTES
- WHAT SHOULD YOU DO IF THE MACHINE IS CLOGGED
- USE: SAUSAGE ACCESSORY (FIG. 2.1 TO 2.6)
- USE: KEBBE ACCESSORY (FIG. 3.1 TO 3.3)
- PRACTICAL TIP
- USE: BISCUIT ACCESSORY (FIG. 4.1 TO 4.3)
- USE: VEGETABLE CHOPPER (FIG. 5.1 TO 5.10)
- USEFUL TIPS FOR BEST RESULTS
- USE: COULIS ACCESSORY (FIG. 6)
- CLEANING (FIG. 7.1 TO 7.4)
- DESCRIPTION
- USE: BISCUIT ACCESSORY (IMAGES 4.1 TO 4.3)
- CLEANING (IMAGES 7.1 TO 7.4)
- STORAGE OF ACCESSORIES (IMAGES 8.1 TO 8.2)
- ACCESSORY HOLDER (FIG. 8.1 - 8.2)
- IPEPIPAPH
Brand : MOULINEX
Model : ME682832
Category : Meat Grinder