HV10 ME850D27 - Meat Grinder MOULINEX - Free user manual and instructions
Find the device manual for free HV10 ME850D27 MOULINEX in PDF.
| Product type | Meat grinder |
| Brand | Moulinex |
| Model | HV10 ME850D27 |
| Head material | Aluminum |
| Number of grinding plates | 3 (very fine 2.4/3mm, fine 4.7mm, coarse 8/7.5mm) |
| Knife | Stainless steel self-sharpening |
| Kibbeh accessory | Included (die tip and ring) |
| Cookie accessory | Included depending on model (holder and mold) |
| Sausage funnel | Included |
| Removable tray | Aluminum |
| Meat pusher | Plastic |
| Storage cap | Included |
| On/Off button | Yes (0-1) |
| Reverse button | Yes (momentary reverse) |
| Head unlocking | Unlocking button |
| Grinder head maintenance | Do not wash in dishwasher |
| Other accessories maintenance | Dishwasher safe |
Frequently Asked Questions - HV10 ME850D27 MOULINEX
User questions about HV10 ME850D27 MOULINEX
0 question about this device. Answer the ones you know or ask your own.
Ask a new question about this device
Download the instructions for your Meat Grinder in PDF format for free! Find your manual HV10 ME850D27 - MOULINEX and take your electronic device back in hand. On this page are published all the documents necessary for the use of your device. HV10 ME850D27 by MOULINEX.
USER MANUAL HV10 ME850D27 MOULINEX
ACCESSIONA KEBBE (I)
Montage (schéma 4):
ENTONNOIR A SAUCISSE (L)
Caution : safety instruction booklet LS- 123456 is supplied with the appliance.
Before using your appliance for the first time, read the booklet carefully and keep it in a safe place.
Thank you for choosing an appliance from the Moulinex range.
DESCRIPTION
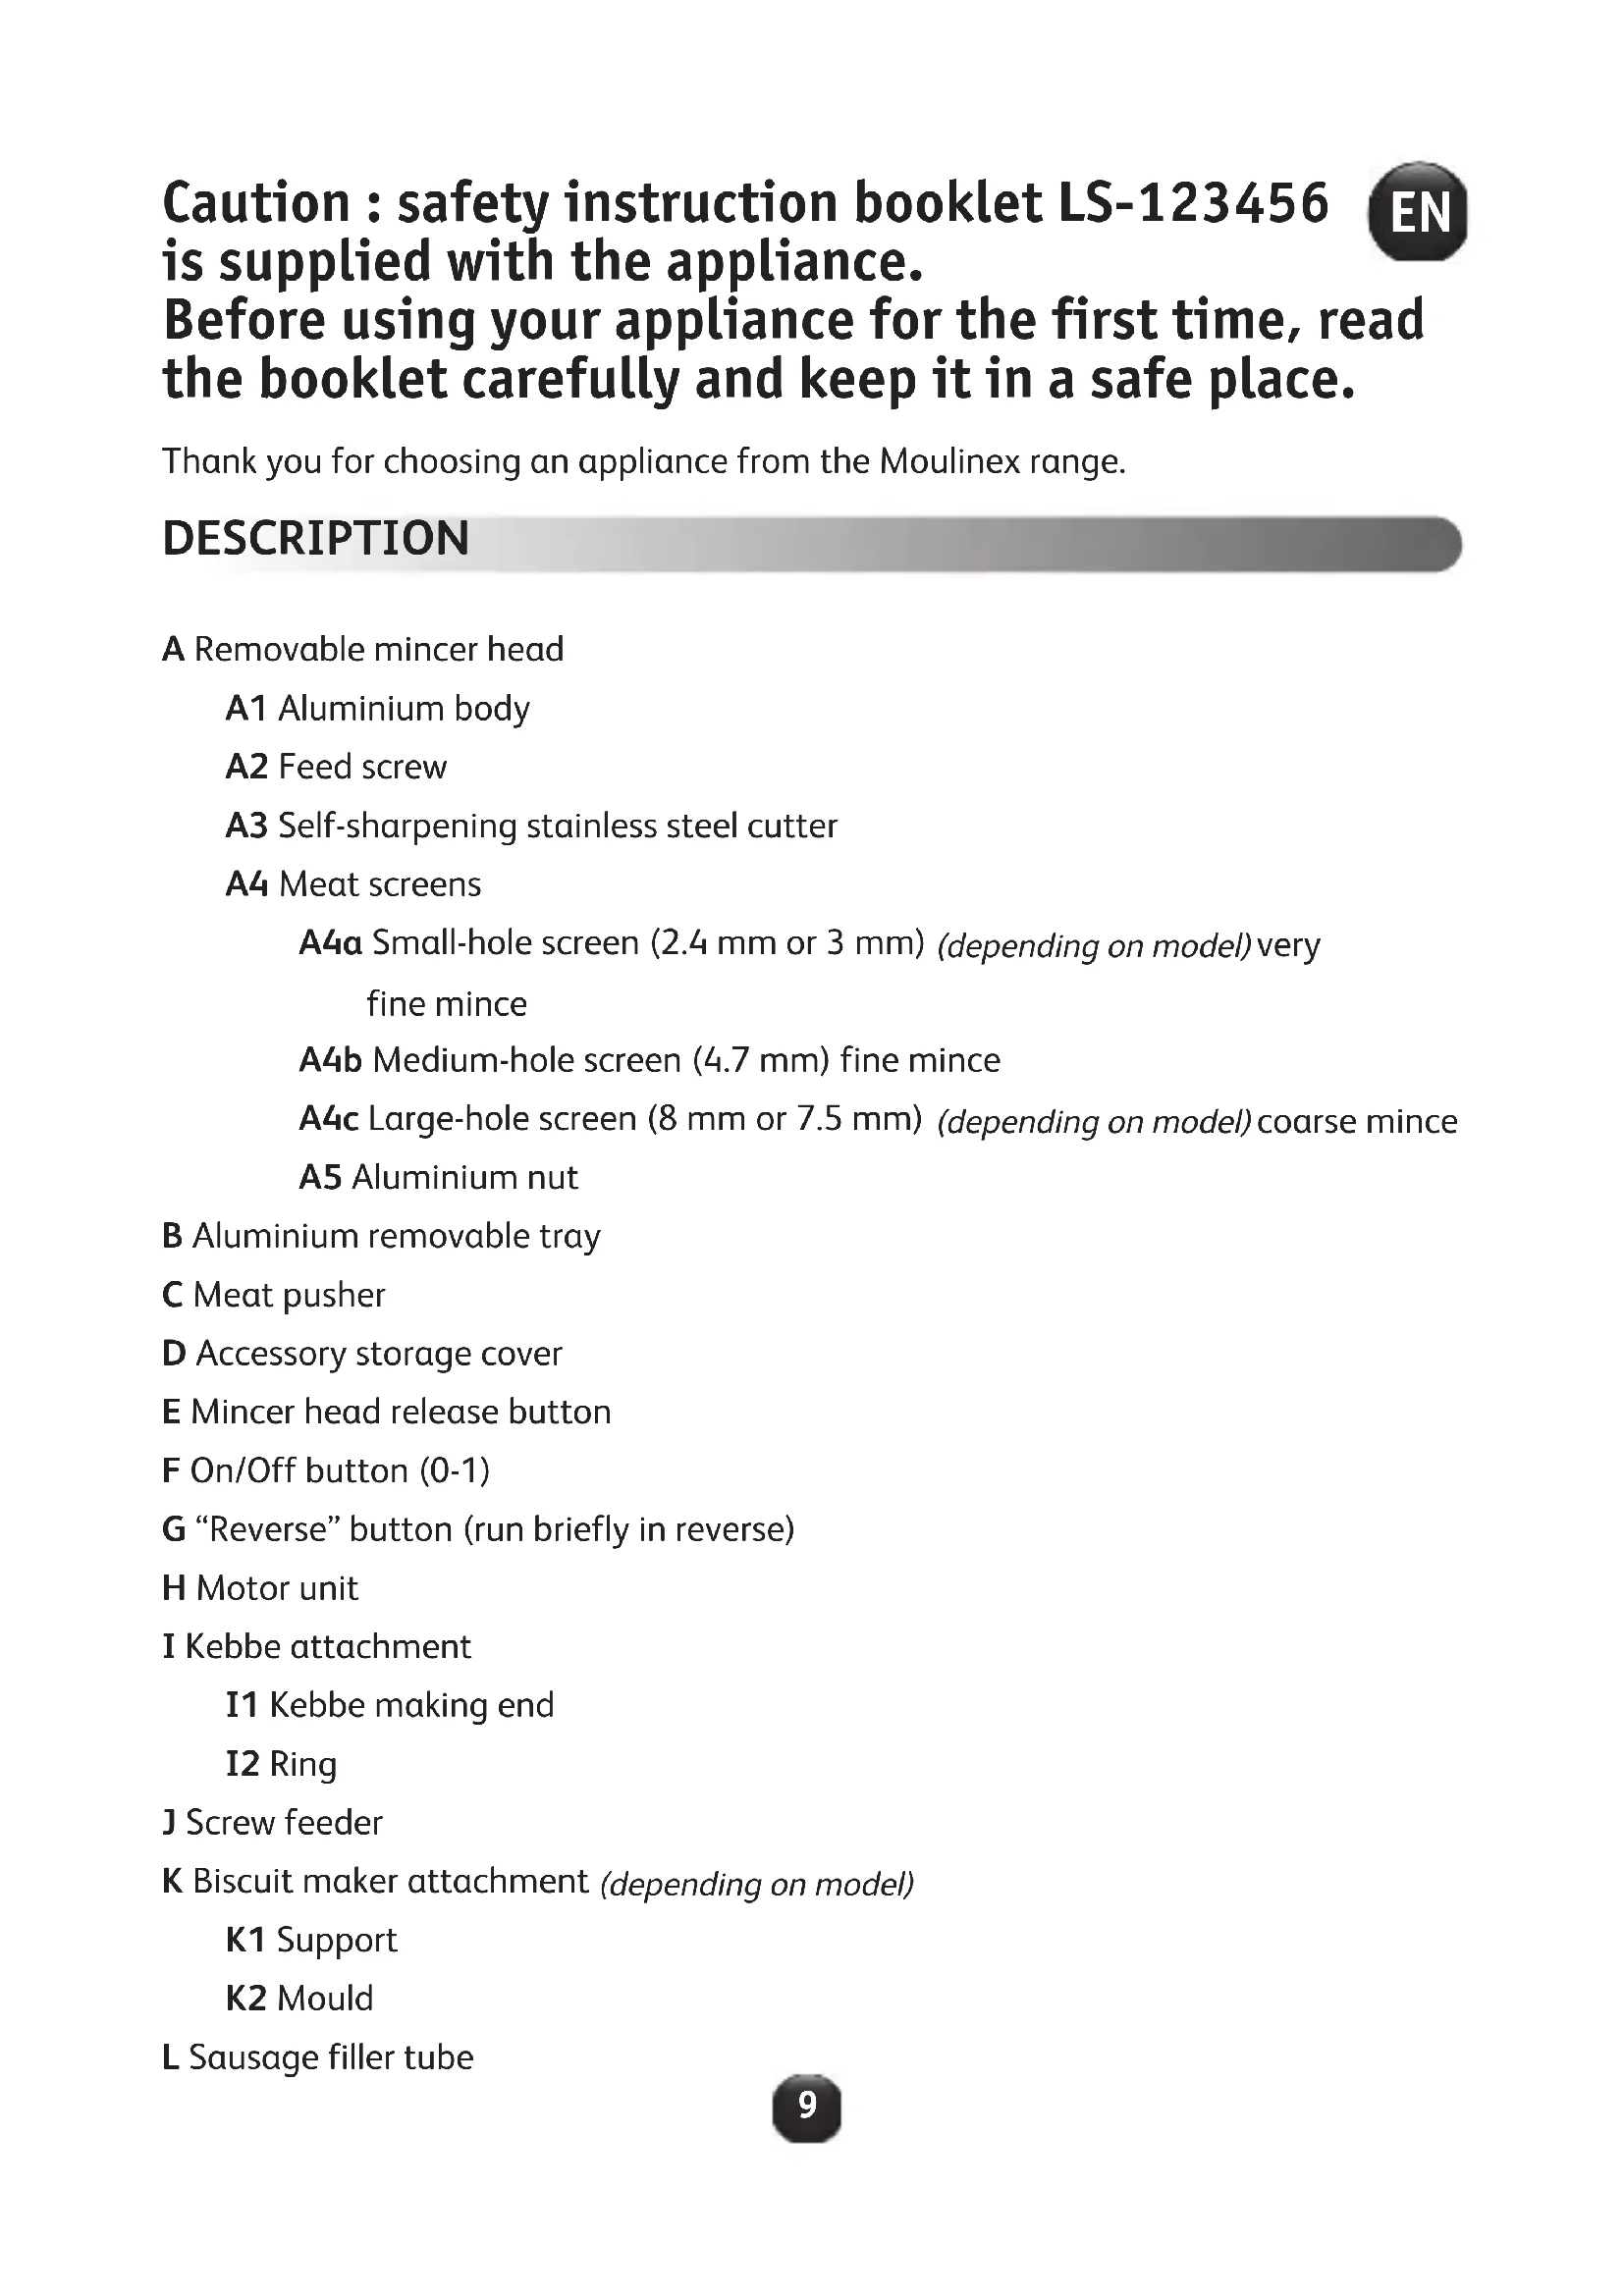
A Removable mincer head
A1 Aluminium body
A2 Feed screw
A3 Self-sharpening stainless steel cutter
A4 Meat screens
A4a Small-hole screen (2.4 mm or 3 mm) (depending on model) very fine mince
A4b Medium-hole screen (4.7mm) fine mince
A4c Large-hole screen (8 mm or 7.5 mm) (depending on model) coarse mince
A5 Aluminium nut
B Aluminium removable tray
C Meat pusher
D Accessory storage cover
E Mincer head release button
F On/Off button (0-1)
G "Reverse" button (run briefly in reverse)
H Motor unit
I Kebbe attachment
I1 Kebbe making end
12 Ring
J Screw feeder
K Biscuit maker attachment (depending on model)
K1 Support
K2 Mould
L Sausage filler tube
BEFORE FIRST USE
Wash all accessories in soapy water. Rinse, and carefully dry them straight away.
The screen and the cutter need to be kept oiled. Coat them with oil. Do not use your appliance empty, if the screens are not oiled.
USING YOUR APPLIANCE FOR THE FIRST TIME
MINCER HEAD (A):
Assembling the mincer head (diagrams 1.1 and 1.2)
Take the body A1 by the feed tube, holding the wider opening uppermost. Then insert the feed screw A2 (long shaft first) into the body A1.
Fit the stainless steel cutter A3 onto the short shaft that protrudes from the feed screw A2 with the cutting edges facing outside. Fit the chosen screen on the cutter A3, locating the lug in the notch on the body A1.
Screw the nut A5 home (without locking it).
Fitting the mincer head onto the appliance (diagram 2):
Facing the motor unit H which should be disconnected, insert the mincer head with the feed tube inclined to the right. Line up the two pins of the mincer head with the two notches on the motor unit.
Push the mincer head fully into the motor unit H and then turn the feed tube to the left until it comes to a stop (the feed tube should be vertical at this point).
Engage the removable tray B onto the mincer head feed tube. Plug in the appliance; it is ready for use.
Using
Prepare all of the foodstuffs to be minced. Remove bones, cartilage and gristle. Cut the meat into pieces (2 cm x 2 cm approximately). Place a container under the mincer head. Press the position "I" of the On/Off button F to run the appliance. Place the pieces of meat on the tray B and push them one by one down the feed tube using the pusher C.
Never push food into the feed tube with your fingers or another utensil.
To make a fine paste for Kebbe or Kefta, run the meat 2 to 3 times in the mincer head until the desired fineness.
Tip:
You can follow up the meat with a few small pieces of bread to clear any meat remaining in the machine.
What should you do if the machine is clogged? (diagram 3)
Stop the mincer by pressing position "0" of the On/Off button F.
Then press the "Reverse" button G for a few seconds to release the jam.
Press position "I" of the On/Off button F to continue mincing.
Important: wait until the appliance has stopped completely before pressing the "On" F or "Reverse" G button.
KEBBE ATTACHMENT (I)
Assembly (diagram 4):
Insert the feed screw A2 into the body A1 of the mincer head. Fit the kebbe making end I1, locating the lug in the notch on the body A1. Fit the ring I2 over the kebbe making end and then screw by the nut A5 fully.
Fit the assembled mincer head on the motor unit H.
Note: this attachment is used without meat screen or cutter.
BISCUIT MAKER ATTACHMENT (K)(depending on model)
Assembly (diagram 5):
Insert the feed screw A2 into the body A1 of the mincer head. Place the screw feeder J locating up the lug in the notch on the body A1 Fit the mould K2 in the support K1 and place it on the screw feeder J. Screw the nut A5 home on the body A1 . Fit the assembled mincer head on the motor unit H.
Note: this attachment is used without meat screen or cutter. The screw feeder maintains the screw in position when you are preparing the recipe.
Using
Prepare the dough: You will obtain the best results with a slightly soft dough.
Choose the shape by lining up the arrow with the chosen shape. Keep feeding dough until you have obtained the desired number of biscuits.
SAUSAGE FILLER TUBE (L)
This attachment, which can be fitted on the mincer head, enables you to make all sorts of sausages that you can season to your taste.
Assembly (diagram 6)
Insert the feed screw A2 into the body A1 of the mincer head.
Place the screw feeder J locating the lug in the notch on the body A1.
Place the filler tube L and then the nut A5 and tighten it fully. Fit the assembled mincer head on the motor unit H.
Using
Important: this attachment should only be used after you have minced the meat, added the seasoning and thoroughly mixed the filling.
After soaking the sausage skin in tepid water to make it supple, thread it onto the filler tube L leaving about 5 cm hanging over the end.
Fill the feed tube of the body A1 of the mincer head A with your prepared sausage meat; start the appliance and press down with the pusher C until the meat shows at the end of the filler tube. Stop the appliance.
Make a knot in the 5 cm overhanging end of the sausage skin. Push the knot up against the end of the filler tube to avoid any air being trapped in the sausage skin.
Start the appliance again and keep up the supply of sausage meat. The sausage skin will fill with meat. To avoid overstretching the sausage skin, do not make your sausages too fat.
Note: This job is more easily done by two people, one to feed the meat and the other to support and control the sausage skin.
Set the length of your sausages by pinching and twisting the skin at the desired intervals.
To make a good quality sausage, take care to avoid trapping air when filling and make the sausages 10 to 15 cm long (separate the sausages by using a tie to make a knot).
RECIPES
N. B.: For recipes requiring high power, do not use the appliance for more than 20 seconds at a time.
Example recipe (with medium-hole screen 4.7 mm A4b):
KIBBE BI LABAN
(kibbe meatballs with yoghurt)
Serves 6 - Preparation: 1 h Rest: 1 hr in refrigerator
Ingredients for the kibbe dough:
600 g meat - 300 g bulgur (cracked wheat) - salt
Ingredients for the sauce:
1 kg yoghurt - 1 bunch of coriander - 4 cloves of garlic - 3 tablespoon corn flour - salt, pepper
- Cut the meat in 4 pieces. Fit the 4.7mm screen to the mincer. Mince the meat, at the same time adding the bulgur. Add salt and then leave the dough to stand in the refrigerator for 1 hour.
- To form the kibbe meatballs: fit the kibbe attachment to the meat mincer. Feed the mixture through the mincer, closing the meatball by sealing the ends with a little water.
- To prepare the sauce: wash the bunch of coriander, sponge it dry with kitchen paper and remove the leaves. Peel and crush the garlic. Brown the garlic and coriander leaves in a frying pan for 1 to 2 minutes on low heat. Set aside.
- Beat the yoghurt and corn flour together and season with salt and pepper. Pour the yoghurt and corn flour mix into a saucepan through a fine sieve. Bring the mixture to the boil and reduce the heat. Cook carefully, stirring so that the yoghurt does not stick.
- Add the garlic and coriander. Poach the kibbe meatballs for 10 minutes.
Variant: You can also stuff the meatballs (with a mixture of onion and minced meat, browned in a little oil with a few pine nuts.)
BRIOUATS
Serves 4 - Preparation: 40 min Cooking time: 35 min
Ingredients:
250 g puff pastry - 350 g beef - 1 onion - 2 eggs - paprika - cinnamon and ginger powder - parsley - coriander - chervil - sugar - 60 g butter - olive oil.
- Fit the 4.7mm screen to the mincer. Cut the onion in 8, then mince it with the mincer head. Heat 4 tablespoons of olive oil in a frying pan, then add the onion. Allow it to sweat on a low heat without browning. Set aside.
- Mince the beef. Brown it on a low heat with the onion for 10 minutes. Set to one side.
- Chop the herbs with the mincing head. Then add them to the frying pan with salt and pepper, half a teaspoon of paprika, a pinch of ginger and a small teaspoon of cinnamon.
-
Next incorporate the beaten eggs, stir and remove from the heat.
-
Roll out the puff pastry quite thinly. Cut into 10 cm squares. Butter the edge of each square.
- Put a little spoonful of stuffing on each square. Roll them up, pinching the ends.
- Fry the briouats in boiling oil. Once fried, leave them to stand for a little while on kitchen paper. Sprinkle them with sugar and cinnamon. Serve very hot.
Variant:
Fit the 4.7mm screen to the mincer. Mince a little meat. Cut the onion in 8, then mince it with the mincer head.
Mince a little more meat, then the herbs, then the rest of the meat. Beat the eggs, and incorporate them into the stuffing with salt and pepper, half a teaspoon of paprika, a pinch of ginger and a small teaspoon of cinnamon. Mix well. Repeat steps 5 to 7.
PIROJKI
(small fish pastries)
Serves 4 - Preparation: 25 min Cooking time: 10-15 min.
Ingredients:
250 g puff pastry - 300 g cooked fish or smoked salmon - 2 hard boiled eggs -
1 bunch of dill - 2 onions - 100g salted butter, in small cubes - Oil
- Fit the 4.7mm screen to the mincer. Cut the onions into 8 and mince them with the mincer head. Brown them on a low heat in a frying pan with a little oil. Set to one side.
- Mince a little fish, then the cooked onion, butter and dill, and finally the rest of the fish.
- Roll out the puff pastry quite thinly, and cut out discs with a glass or small bowl of the desired size.
- Preheat the oven to 210^ (mark 6).
- Place a little stuffing on each pastry disc and fold the pastry over, sealing the edges.
- Cook for 10 to 15 minutes in the oven until golden brown.
BEEF MEATBALLS
Serves 4 - Preparation 20 min. Cooking time: 10-15 min.
Ingredients:
1 kg beef - 1 onion - 1 garlic clove - 2 slices of black bread soaked in milk - 2 eggs - 1 potato - flour - salt, pepper.
- For this recipe, select a cut of beef with a low fat content. Feed the meat into the mincer with the slices of bread.
- Slice the onion finely and grate the garlic and potato.
- Mix the minced meat with the bread, sliced onion, garlic and potato.
- Add the eggs, the freshly ground black pepper and the salt, and form into balls.
- Roll the meatballs in the flour and fry them in oil.
BAKED POTATO PUDDING
Serves 4 - Preparation 30 min. Cooking time: 45 min
Ingredients:
400 g minced meat - 1 kg potatoes - 2 eggs - 2 glasses of milk - 1 garlic clove - 1.5 tablespoons butter - 2 tablespoons oil - salt, pepper.
- Clean, wash and dry the potatoes. Slice the potatoes into rounds.
- Mince the beef with the mincer head and fry it in oil in a frying pan for 5 minutes.
- Rub the inside of an oven-proof dish with garlic, then grease it with a little of the butter.
- Arrange two-thirds of the potatoes and the minced meat in alternating layers. Season, then add the remaining potatoes.
- Beat the eggs with the warm milk and pour the resulting mixture over the potatoes. Add the rest of the butter. Cook in the oven for 45 minutes at medium temperature.
CLEANING
- Always disconnect the appliance before cleaning the motor unit H.
- Do not submerge the motor unit, nor put it under running water. Clean the motor unit with a damp cloth. Dry it carefully.
Meat mincer attachments:
- Unlock the head by pressing the button E.
- Turn the mincer head A to the right and pull it towards you to remove it from the motor unit H.
- To dismantle the mincer head A, remove the pusher C and the tray B, unscrew the nut A5, remove the screen A4, the cutter A3 and the screw A2.
- Handle cutting parts with care.
- Wash all parts with hot soapy water, rinse and wipe carefully.
- Do not put the mincer head A in the dishwasher; this applies to the body A1, the feed screw A2, the nut A5, the cutter A3 and the meat screens A4.
All the other accessories are dishwasher-safe.
STORAGE
The meat screens, the cutter, the screw feeder, the Kebbe and sausage attachments (II, I2, J and L) can be stored on the rear of the appliance (storage cover D).
WHAT TO DO IF YOUR APPLIANCE DOES NOT WORK
Check the electrical connection.
Your appliance still does not work? In this case, contact a Moulinex approved service centre (see the list in the service booklet).
He nCnoJb3yIte np6op BxOIoocTyIO, ecn peSeTKn He cMa3aHbl.
ПЕРBOЕ ИСПОЛьЗOBAHNE
ГОЛOBКМЯСCOPYБКN(A):
C6opka roJIOBkn mAcopy6kn (cxembl 1.1 n 1.2)
Bo3bMnTe Kopnyc A1 3a 3arpy3oHyIO Tpy6y IInpOKIM OTBepCTnEM BBepx. 3aTeM BCTaBbTe IHeK A2 (dnnHNO OcbIO BnpeI) B Kopnyc A1.
YcTaHOBnTe HOx n3 HepXaBeIOUeI CTaJI N A3 Ha KopoTkyIO Ocb, BbIXoJyUO n3 UHeKa A2,pejUzIMN KpaAMn HApJyK. IObepx HOxA3 NaDeHbTe BbIbpaHHyIO peWetKy, COBMeCTINB BbICTyn C COOTBETCTBYUOM Na30M Ha Kopnyce A1.
HaBnHTnte raIky A5 (6e3 0nkcaun).
YcTaHOBka roJIOBkn Mrcopy6Kn B npn6Op (cxema 2)
IodHeCInTe rOIOBky Mrcopy6Kn K OTCoeINHeHHomy OT 3JIeKTPocEtN 6JIOky MOTopa H n yCTaHOBnTe ee, HAKIoHnB 3arpy3OHyU Tpy6y Bnpabo.
CoBMeCTIe DBa 6aHHeTHbIX COeINHeHnHa rOJOBKe Mrcopy6Kn C DByMn Na3Amn Ha 6JIOKe MOTopa.
BCTaBbTe roNoBky mAcopy6Kn B 6Iok motopa H kaK moXHo rIy6Ke, 3aTeM NOBepHnte 3arpy3OuHyTO py6y BJIeBO Do yNopa (B 3TOT MOMENT 3arpy3OuHa Tpy6a DOJxHa 6bITb paCnoIooKeHa BepTnKaJIbHO).
YcTaHOBnTe CbemHbI NToK B Ha 3aRpy3OHyIO Tpy6y rOJOBKn MmCopy6Kn.
PiOnCoeDInHtpe np6op K aJIeKtpocetN. OH rOtOB K pa6ote.
IcnoJb3ObaHne
IodroToBbTe Bce npOdykTbI, KOtOpblc Tpe6yeTcN3MeJbUHTb. YdaJInte KocTn I XpAun.
Hapekte MraCo Ha KysKn (npn6n3ntbNo 2x2cm). NocTaBbTe noI roIOBkoM mAcopy6Kn emKocTb dJa qapwa. Haxmnte ceKTop "I" KHOJKN BKn/BbIK F dJa 3anycka npnbopa.
IomeCTnte Kyckn McaHa IOTOK B n npotaKNaIe INx NO ODHOMy B 3aRpy3OuHyTOpy6y C NOMoUbTOJkAteJIaC.
3anpezaetc npotaJKNBaTb npOdyKtB 3arpy30uHyU Tpy6y naIbcaMn IJI NocTopoHHmN ppeMeTaMn.
YTo6bI npriroTOBnTB HeXhBiN φapSi dIy Ke6a6a IIN KIOΦTbI, npOnyCTnte MraC Ope3 Mrcopy6ky 2-3 pa3a Do nOlyuHnA φap7a Tpe6yEmoKOHcNCTeHcUH.
Cobet.
BcJIeI 3a MЯcOM MOxHObIpoBepHyTb HeCKOJIbKO He6OJIbUHX KycOuKOB XJIe6a, YTO6bI B MЯcOpy6ke He OCTaJIOCb MЯca.
Haxmte ceKtop "I" KhoNk BKn/BbIK F, yTo6bl npoJnxntb pa60ty.
Baxho!ДоЖДИТЕСь ПОЛНО OCTaHOBKN пибopa,пepeД Tem КаK HaЖаТь KHOПКу "Вк" (F) Или "O6 "O6paTHbI XOD"(G).
(MaChble WapnKc NOrypTOM)
6 nopuzn — nOtroTOBka: 1 yac OcTaBbTe Ha 1 yac B XoIOnIbHnke
IhrgpeJeHbI TeCTa IJI Ke66n:
600 r mca, 300 r 6yIpya (dpo6JIeHoi nIweHnCbl), coIb
IhrgpeJeHbI dIy coyca:
1 Kr Iyorypta, 1 nuYok KIn3bl, 4 DoJbKn YeCHoka, 3 CToJIOBbIe JIOKKn KyKypu3HOm Mykn, CoJIb, nepeuc
- Pa3pejxbTe Mxco Ha 4 qactn. YcTaHOBnte Ha MxCopy6ky peWeTky C OTBePCTnMa 4,7 MM. PpOpyCTnTe MxCo BmecTe c 6yIpyom. NocOJIte H OCTaBbTe CMECb B XoJIoNJIbHnKe Ha 1 qac.
- Дя Формірованій Шарпков: установіte писносбуліешие дія keбаба на голову мэсCopyбки. Пюпуністе смесь черз мэсCopyбу. Oтделяіte šарпкій друг от друга, смацьага небольшим коли ueCTВOM BOДы.
- Дя пиготовеля coуca: ВьIMоTe pyOK KIN3bl, ВьICUHTe erO bymaxныIM NOIOTeHcEM N OTOpBnTe JInCTbЯ. OUnCTHte n Iopy6nTe cheCHOK.Ожарыт QueCHOK n JInCTbЯ KIN3bl B CKOBOPOde Ha He6OJIbWOM orHe B TeueHne 1-2 MInHyT. OTLOXHTe B CTOpOHy.
- B36eIte Iorgypt BmecTe C KyKpy3Hoi MykO H npnnpaBbTe COJIbIO n nepcem. BneIte cmeCb IorgypTa H KyKpy3HO M yKn B CKOBOPOdy, IpOueINB Upe3 MeJkoE CnTO. DoBeIte CmeCb DO KInHeHna, 3aTeM
yMeHbWnte OROHb. TOTOBbTe Ha MeJleHHOM ORHe, CJIeJa 3a TeM, YTO6bl IyOrypT He npuropaI.
I3roToBneHo BoΦpaHm nIaXonHnHa "GROUPE SEB", France
11HaKoHeuHnKdI npiroToyBaHHKe66e
12 KInbue
J Ushek
K HacaKa dIy npiroToYBaHH neuBa (3aIexHo BID MoDeJI)
K1ПiДСТАВКа
K2Φopma
L HacaKa dJa npiroToyBaHnKOB6ac

NEPWE BUKOPUCTAHN PNCPTPO
ГОЛOBКМ'ЯСОРУБКИ(A):
YcTaHOBJIeHHra roIOBkn m'acopy6kn (cxemn 1.1 i 1.2)
Bi3bMitb Kopnyc A1 3a Tpy6ky 3aBaHTaxKeHHra, WnpuM OTBOPOM Doropn. NOtim BCTaBTe uHeK A2 (DobroIO BicCIO BnepeД) y Kopnyc A1.
Hacaditb hix 3 Hepkabiooi cTani A3 Ha KopoTKy Bicb, IIO BVCTynae i3 uHeka A2, roctpIMN kpaMn ha3OBHI. YcTaHOBITb Bn6paHy pewiTKy Ha hix A3 TaK, IIO6 BVCTyn 3aIwOy y na3 Ha Kopnyci A1.
Iokn3akpyTITbraKyA5 (He 6koKyoUH uHeK).
YcTaHOBJIeHHra rOIOBKn M'acopy6Kn Ha npncIpoi (cxema 2)
Y 6IOK DBNrhyHa H, kN C1iD BiIDKlHOnTn BId eNeKTpOmepeXi, BCTaBTe roIOBky M'acopy6kN TAK, 0o6 Tpy6ka 3aBaHTaxeHHra 6yla hAxJIeHa BnpaBO.
Po3TaWyIe DBa CTrpIXHi Ha rOIOBci M'rcopy6Kn HABnpoTn DBox Na3iB Ha 6NoCi DBNrHyHa.
Повсгю Вставе Глобуку мясорубиу блokдвигуна H, a notim поBERHITb Tpy6ky 3aBaHTaxKeHHЯ ЛВОпу до унору (BOHa MaE пиИНТN ВERTNKаЛьнe ПОLOжЕнЯ).
YcTaHOBITb 3HIMnIIOtOK B Ha Tpy6ky 3aBaHTaxeHHra TOnOBKn M'acopy6Kn.
PiKlIOuITb npncTpii Do eNeKTpomepeXi; BiH roTOBn Do BnKOpNCtaHHa.
BnKOpncTaHHa
IprnoToyte Bci noTpbiHi npOdykTn dny noOpri6HeHn. Bndanitb kiCTkn, xpaui ta XnII.
IopixTe M'aco Ha shMaTkN (pnp6n3HO 2 cm x 2 cm).Po3TaWyIe emHicTb dIa4puy nI rOIOBkoM'acopy6Kn. YbIMKHiTB npncptpi, HATNCHyBUn IonoXeHHRA «I» KhoNkN BBIMK./BIMK.F.
Ioknaitb mmatkn M'raC B I npoTobxHITb ix OdnH 3a OdnHm y Tpy6ky 3aBaHTaKeHHra DOonomoroIO wTOBxAca C.
Hikon He npoToBxuTe npOkyTu Tpy6ky 3aBaHTaKeHH naIbcaMn a60 iHsIM npniladm.
Ioo6 oedepxaTn dpi6Hn fapw dny Ke6be a6o KeΦTa, nponyciTb M'aco uepe3 roJIOBky M'acopy6Kn BiD 2 do 3 pa3iB, dOKn He 6yde DocraHyTo nOTpi6Horo pIBn noDiPi6HeHHa.
Popa.
3aBepuBn noDpi6HeHHa M'ra, MoXHa npokpyTuTn chepe3 M'acopy6ky KjIbKa 7MaTkiv XJI6a, 06 3i6paTn 3aIIuShKn fapuy.
Ioo po6ntn, kio ix3actprrna y npnctroi? (cxema 3)
3ynnHItb po60ty m'acopy6kn, HATnCHyBUn nOIOKeHHRA 0 KHOJKN BBIMK./BIMK.F.
IOTIM HATnCHiTb i IOTpMaIte KhONKy «Reverse» G npotrarom KINbKOx ceKyHd, 06 yCyHTn nepeShKOdy.
HaTnchItb noIooXeHHra «I» KhoIKN BBIMK./BIMK. F, 0o6 npOdoBXHTn oDpi6HeHHa.
Baxnbo. Nepsh hix haTnckatn KhONKn «BbimK.» F a6o «Reverse» G, 3auekaite,doKN npncptiIN NOBHCIO He 3ynHnTbcra.
HACADKAДЛЯ KEБBE(I)
36npaHHa (cxema 4)
BcTaBTe 1HeK A2 B Kopnyc A1 roJOBKn M'acopy6Kn. YcTaHOBiTb HakoHeuHK dJa npiroTyBaHHa Ke6Be F1 TaK, 0o6 BnCTyn 3aIwOy na3 Ha Kopnyci A1.
YcTaHOBIb KInbue I2 HauHaKoHeuHnKOM dJa npriToyBaHHaKe6be, a Notim NobHiCTU 3akpyTITb NOrO raikoi A5.
YcTaHOBItb 3i6paHy roJOBky M'acopy6kn Ha 6Iok DnRgamma H.
LHa HacaKa, kMy MoXHa BCTaHOBnIOBaTu Ha rOIOBky M'acopy6Kn, daE 3Mory roTyBaTu Bci BnDn KO6ac i3 npnpabAmn Ha BaW BnaChn cMaK.
36npaHHa (cxema 6)
BcTaBTe 1nHeK A2 B KOpnyc A1 roJIOBkn M'acopy6Kn.
BcTaBTe 1neK J TaK, 0o6 BnCTyn yBiIwOB y na3 Ha Kopnyci A1.
YcTaHOBItb HacaIky L i raIky A5, nicIy OTO NOBHiCTIO 3aKpyTITb II. YcTaHOBiTB 3i6paHy roIobKy M'acopy6kn Ha 6JOK DBnryHa H.
BnKOpncTaHHa
Baxnbo. Lio hacay cniD BnKOpncTOByBaTu Iiue nicToro, k M'aco noDi6HeHe, npnpaba Doanda, i Bci iHrpeiEHTn do6pe nepemiuahi.
iLai jia jia jia jia jia jia jia jia jia jia
: 1
E jll bc baiy J
H
A4 A5 B C A
.A2 gA3
-
L
A1 k 10000000000000000000000000000000000000
A4 1000g.A3 aIbA5 aIgolA2
1
(Lg11,12,J)gJgJgJgJgJgJgJgJgJgJgJgJgJgJgJgJgJgJgJgJgJgJgJgJgJgJgJgJgJgJgJgJgJgJgJgJgJgJgJg
(D 1bc)
A
J 1
.
1
(1)(20 1
1
1 10-1.
J
菱 s = 1 - 1 : ab( 1 - a) + b( 1 - b) + c( 1 - c) + d( 1 - d) = 3
:
1
j1l2 = 83 - 43a + b - 83a + b = - 83
1
y = 1
1
1 1
J 2
它恰好 m^2 - 1 = 0 m + 1 - 1 = 0 .
a1 = 2,a2 = - 4
:
-1
J 10 -2yjzjL 10-8yj
..
. 000000000000000000000000000000
aagaaagaaagaaagaaagaaagaaagaaagaaagaaagaaagaaagaaagaaagaaagaaagaaagaaagaaagaaagaaagaaagaaagaaagaaagaaagaaagaaagaaagaaagaaagaaagaaagaaagaaagaaagaaagaaagaaagaaagaaagaaagaaagaa
()
a
四: 1,2,3,4 : 1,2,3,4 :
:
-001 Jd -J 112 -a 110 -j 10. - j 100
·s + ( 1 + u) 1 - ( 1 + u) 1 = ( 1 + u) 1 - ( 1 + u) 1 = ( 1 + u) 1 - ( 1 + u) 1 = ( 1 + u) 1 - 1 = ( 1 + u) 1 - 1 = ( 1 + u) 1 - 1 = ( 1 + u) 1 - 1 = ( 1 + 3u) 1 - 1 = ( 1 + 3u) 1 - 1 = ( 1 + 3u) 1 - 1 = ( 1 + 3u) 1 - ·s + ( 1 + u) 1 - 1 = ( 1 + 3u) 1 - 1 = ( 1 + 3u) 1 - 1 = ( 1 + 2u) 1 - 1 = ( 1 + 2u) 1 - 1 = ( 1 + 2u) 1 - 1 = ( 1 + 2u) 1 - 1 = ( 1 + 2u) 1 - 1 = 2
A
Jll lL 1.
1
1
a 1
aJ 1000
- 1.2.3.4.5.6.7.8.9.10.11.12.13.14.15.16.17.18.19.20.21.22.23.24.25.26.27.28.29.30.31.32.33.34.35.36.37.38.39.40.41.42.43.44.45.46.47.48.49.50.51.52.53.54.55.56.57.58.59.60.61.62.63.64.65.66.67.68.69.70.71.72.73.74.75.76.77.78.79.80
0
BAC = = 1
.
.1 1
-
- = ( x1,y1) , = ( x2,y2)
1 1
1
1000000000000000000000000000000000000000000
Jalalllg
V 10 no oghil sla. hla
s
()
菊, s = 1 - 1 : 90^ 苦 f( x_0) = 12
:
-1iagluo jiuie -joojogalw gboaolp J 4 -aae aee
-1
a
y. no j 11111111111111111111111111111
(A4b 2V abwogallgagge)Jl all J
山山山
()
J:La aaiy A aal A1 Kglll b
1
1 1
J 1
1
1
aallll lalol .nlae yj 1j alg w aal o: ab
Jaa
1 1
1 1111 F / 1111 1
Jaaaiy bll y j 8 1 8 8 B aill l c aall
C
y
11 11
i
:
i 1
a.o.aol
(3JSSI:Loaall 1j Jdo
F 10000000000000000000000000000000000000000000
a
F 1
F"On" Icbai Jolal Jc jll 1
.G "Reverse" 1
(1)
(4)
11 1A1 A2
Ic I2 aal A1 Jkll 1c lglaoaagolgolgolgolgol
A5
H
gug gag aagaaagaaagaaagaaagaaagaaagaaagaaagaaagaaagaaagaaagaaagaaagaaagaaagaaagaaagaaagaaagaaagaaagaaagaaagaaagaaagaaagaaagaaagaaagaaagaaagaaagaaagaaagaaagaaagaaagaaagaaagaaagaaagaaagaa
a b - a]
()(K)
(5)
J 1A1 aal Jg A2
K2 k. A1 k.
A1JcA5aLalJ,J
$$ \left(J _ {i} \omega_ {i} \omega_ {i} \omega_ {i} \omega_ {i} \omega_ {i} \omega_ {i} \omega_ {i} \omega_ {i} \omega_ {i} \omega_ {i} \omega_ {i} \omega_ {i} \omega_ {i} \omega_ {i} \omega_ {i} \omega_ {i} \omega_ {i} - K \right. $$
$$ a l e s - K 1 $$
$$ \downarrow \downarrow - K 2 $$
$$ \left. \ddot {c} \right| _ {c} = 2 0 \text {w i t h} - L $$
yI Jll
J 1
y. 11 j 11 11 11 11 11 11 11 11 11 11 11 11
y
: (A) a
(1.2g1.1)
A1 JJJ
A1Jgll (ygljgll) A2pilll jbjp 2 A2 pill jn no nnnn nn nnnn nnnn nnnn nnnn nnnn nnnn nnnn nnnn nnnn nnnn nnnn nnnn nnnn nnnn nnnn nnnn nnnn nnnn nnnn nnnn nnnn nnnn nnnn nnnn nnnn nnnn nnnn nnnn nnnn nnnn nnnn nnnn nnnn nnnn
A3 aIbllle gaii I 1 kki j. 1 1 1 1 1 1 1 1 1 1 1 1 1 1 1 1 1 1 1 1 1 1 1
()A5
: (2 Jkll) jlll lge aagssrnnn n 1e g ooggaaagaaagaaagaaagaaagaaagaaagaaagaaagaaagaaagaaagaaagaaagaaagaaagaaagaaagaaagaaagaaagaaagaaagaaagaaagaaagaaagaaagaaagaaagaaagaaagaaagaaagaaagaaagaaagaaagaaagaaagaaagaaagaaagaaagaaagaaagaaagaaagaaagaaagaa
()
AR
.(LS-123456)aJlJgJnJzJbI JgJgJy:J 000000000000000000000000000000000000000000000000
sulgo 1io aogaoo no gaiall lraol
i
Jalll Jlalll 0j- A
$$ \text {p a i n d} \mathrm {A 1} \text {j o k . - A 1} $$
$$ \underset {\sim} {a} \left[ \begin{array}{l l l} \vdots & \vdots & \vdots \ \vdots & \vdots & \vdots \end{array} \right] = - A 2 $$
A3
$$ a _ {n} = \sum_ {i = 1} ^ {n} a _ {i} $$
A4a
pcll pJ (plo 5.V) aagoo oogaaa -A4b
()(loV.0gloA)
A5
B
$$ \mu \omega \cup \dot {\psi} \dot {\psi} - C $$
Ld
- E
(1-0)
"Reverse" _n = 1^1n + n - 1
J 1
a<1 0
11
四 -12
aill 1 -J
.1JLJLJLJLJLJLJLJLJLJLJLJLJLJLJLJLJLJLJLJLJLJLJLJLJLJLJLJLJLJLJLJLJLJLJLJLJLJLJLJLJL
$$ \begin{array}{l} \therefore \text {d i a l} _ {i} \geqslant 1, j, j, j, j, j, j, j, j, j, j, j, j, j, j, j, j, j, j, j, j, j, j, j, j, j, j, j, j, j, j, j, j, j, j, j, j, j, j, j, j, j, j, j, j, j, j, j, j, j, j, \dots \ \left. \dots \right.\left. \dots \right.\left. \dots \right.\left. \dots \right.\left. \dots \right.\left. \dots \right.\left. \dots \right.\left. \dots \right.\left. \dots \right.\left. \dots \right.\left. \dots \right.\left. \dots \right.\left. \dots \right.\left. \right.\left. \dots \right.\left. \dots \right.\left. \dots \right.\left. \dots \right.\left. \dots \right.\left. \dots \right.\left. \dots \right.\left. \dots \right.\left. \dots \right.\left. \dots \right.\left. \dots \right.\left. \dots \right.\left[ \right. 2 / 3 ] _ {0} ^ {1} ] _ {0} ^ {1} ] _ {0} ^ {1} ] _ {0} ^ {1} ] _ {0} ^ {1} ] _ {0} ^ {1} ] _ {0} ^ {1} ] _ {0} ^ {1} ] _ {0} ^ {1} ] _ {0} ^ {1} ] _ {0} ^ {1} ] _ {0} ^ {1} [ 4 \ . \mathrm {d i s} [ L _ {i} ] \mathrm {d} [ L _ {j} ] \mathrm {d} [ L _ {k} ] \mathrm {d} [ L _ {l} ] \mathrm {d} [ L _ {m} ] \mathrm {d} [ L _ {n} ] \mathrm {d} [ L _ {o} ] \ \left. \right.\left. \right.\left. \right.\left. \right.\left. \right.\left. \right.\left. \right.\left.\left.\left.\left.\left.\left.\left.\left.\left.\left.\left.\left.\left.\left.\left.\left.\left.\left.\left.\left.\left.\left.\left.\left.\left.\left.\left.\right.\right.\right.\right.\right.\right.\right.\right.\right.\right.\right.\right.\right.\right.\right.\right.\right.\right.\right.\right.\right.\right.\right.\right.\right.\right.\right\rangle_ {\text {的}} ^ {\prime} = 0, 0, 0, 0, 0, 0, 0, 0, 0, 0, 0, 0, 0, 0, 0, 0, 0, 0, 0, 0, 0, 0, 0, 0, 0, 0, 0, 0, 0, 0, 0, 0, 0, 0, \ \therefore \text {i} \quad \text {i} \quad \text {i} \quad \text {i} \quad \text {i} \quad \text {i} \quad \text {i} \quad \text {i} \quad \text {i} \quad \text {i} \quad \text {i} \quad \text {i} \quad \text {i} \quad \text {i} \quad \text {i} \quad \tag {45} \ \end{array} $$
#
$$ \cdot \frac {1}{2} \frac {1}{2} \frac {1}{2} \frac {1}{2} \frac {1}{2} \frac {1}{2} \frac {1}{2} \frac {1}{2} \frac {1}{2} \frac {1}{2} \frac {1}{2} \frac {1}{2} \frac {1}{2} \frac {1}{2} \frac {1}{2} \cdot $$
$$ \begin{array}{l} \left. \int_ {a} ^ {b} \frac {\mathrm {d} y}{y - 1} \right| _ {0} ^ {1} \leqslant \frac {1}{2} \cdot \frac {1}{2} \cdot \frac {1}{2} \cdot \frac {1}{2} \cdot \frac {1}{2} \cdot \frac {1}{2} \cdot \frac {1}{2} \cdot \frac {1}{2} \cdot \frac {1}{2} \cdot \frac {1}{2} \cdot \frac {1}{2} \cdot \frac {1}{2} \ \therefore \lim _ {x \to 0} \frac {\sin x}{x + 1} = \frac {\sin x}{x + 1} \ \end{array} $$
$$ \therefore \ddot {g} g \dot {s} \dot {z} \dot {r} \dot {p} \dot {q} \dot {r} $$
$$ \therefore \lim _ {j \rightarrow \infty} \left| \frac {\partial f}{\partial x} \right| = \lim _ {j \rightarrow \infty} \left| \frac {\partial f}{\partial y} \right| $$
$$ j \left[ \frac {1}{2} \frac {\partial u _ {i}}{\partial x} + \frac {\partial v _ {i}}{\partial y} + \frac {\partial w _ {i}}{\partial z} + \frac {\partial A _ {i}}{\partial t} \right] = 0 $$
$$ \cdot \dot {H} _ {\text {g o t a l}} $$
$$ \begin{array}{l} \mathrm {i} \mathrm {g} \mathrm {K} \mathrm {s} \mathrm {s} \mathrm {s} \mathrm {s} \mathrm {s} \mathrm {s} \mathrm {s} \mathrm {s} \mathrm {s} \mathrm {s} \mathrm {s} \mathrm {s} \mathrm {s} \mathrm {s} \mathrm {s} \mathrm {s} \mathrm {s} \mathrm {s} \mathrm {s} \mathrm {s} \mathrm {t} \mathrm {t} \mathrm {t} \mathrm {t} \mathrm {t} \mathrm {t} \mathrm {t} \mathrm {t} \mathrm {t} \mathrm {t} \mathrm {t} \mathrm {t} \mathrm {t} \mathrm {t} \mathrm {t} \mathrm {t} \mathrm {t} \mathrm {t} \mathrm {t} \mathrm {t} \mathrm {s} \mathrm {s} \mathrm {s} \mathrm {s} \mathrm {s} \mathrm {s} \mathrm {s} \mathrm {s} \mathrm {s} \mathrm {s} \mathrm {s} \mathrm {s} \mathrm {s} \mathrm {s} \mathrm {s} \mathrm {s} \mathrm {s} \mathrm {s} \mathrm {s} \mathrm {r l} B _ \text i s i s i s i s i s i s i s i s i s i s i s i s i s i s i s i s i s i s i s i s i s i s i s i s i s i s i s i s i s i s i s i s i s i s i s i s i s i s i s i s i s i s i s i s i s i s i s i s i s i s i s \ \therefore \text {d i s k} _ {\mathcal {Z}} \text {j} _ {\mathcal {I}} A 2 \text {d i s k} _ {\mathcal {Z}} \text {j} _ {\mathcal {I}} \log_ {\mathcal {Z}} A 3 \text {d i s k} _ {\mathcal {Z}} A 4 \text {d i s k} _ {\mathcal {Z}} \text {j} _ {\mathcal {I}} \text {j} _ {\mathcal {I}} A 5 \ \therefore \Delta l a = \Delta d j _ {1} \Delta u _ {2} \Delta v _ {3} \Delta w _ {4} \Delta x _ {5} \Delta y _ {6} \Delta z _ {7} \ \therefore \Delta_ {i} = \Delta_ {i} \Delta_ {i} \Delta_ {i} \Delta_ {i} \Delta_ {i} \Delta_ {i} \Delta_ {i} \Delta_ {i} \Delta_ {i} \Delta_ {i} \Delta_ {i} \Delta_ {i} \Delta_ {i} \Delta_ {i} \Delta_ {i} \Delta_ {i} \Delta_ {i} \Delta_ {\mathrm {一}} \ \therefore \text {a n d} \text {i n} \text {j a r} \text {g i o g i o g i o g i o g i o g i o g i o g i o g i o g i o g i o g i o g i o g i o g i o g i o g i o g i o g i o g i o g i o g i o g i o g i o g i o g i o g i o g i o g i o g i o g i o g i o g i o g i o g} \ \end{array} $$
$$ \begin{array}{l} A 5 _ {\text {i} \text {i} \text {i} \text {i} \text {i} \text {i} \text {i} \text {i} \text {i} \text {i} \text {i} \text {i} \text {i} \text {i} \text {i}} A 4 _ {\text {i} \text {i} \text {i} \text {i} \text {i} \text {i} \text {i} \text {i} \text {i} \text {i}} A 3 _ {\text {i} \text {i} \text {i} \text {i} \text {i} \text {i} \text {i} \text {i}} A 2 _ {\text {i} \text {i} \text {i} \text {i} \text {i} \text {i} \text {i} \text {i}} A 1 _ {\text {i} \text {i} \text {i} \text {i} \text {i} \text {i}} \ \therefore \frac {1}{2} \div \frac {1}{2} = \frac {1}{2} \ \end{array} $$
$$ . \dot {s} \dot {s} \dot {s} \dot {s} \dot {s} \dot {s} \dot {s} \dot {s} \dot {s} \dot {s} \dot {s} \dot {s} \dot {s} \dot {s} \dot {s} \dot {s} \dot {s} \dot {s} \dot {s} \dot {s} \dot {s}. $$
$$ : (S) 1 4 5 $$
$$ \left. \right.\left. \right.\left. \right.\left. \right.\left. \right.\left. \right.\left. \right.\left. \right.\left. \right.\left. \right.\left. \right.\left. \right.\left. \right.\left. \right.\left. \right.\left. \right.\left. \right.\left. \right.\left. \right.\left. \right.\left.\left.\left.\left.\left.\left.\left.\left.\left.\left.\left.\left.\left.\left. \text {d i s t a n t} \right] _ {\text {d i s t a n t}} \right] _ {\text {d i s t a n t}} \right] _ {\text {d i s t a n t}} \right] _ {\text {d i s t a n t}} \right] _ {\text {d i s t a n t}} \right] _ {\text {d i s t a n t}} \right] _ {\text {d i s t a n t}} ^ {\prime} \right] _ {\text {d i s t a n t}} ^ {\prime} \right] _ {\text {d i s t a n t}} ^ {\prime} \right] _ {\text {d i s t a n t}} ^ {\prime} \right] _ {\text {d i s t a n t}} ^ {\prime} \right] _ {\text {d i s t a n t}} ^ {\prime} \right] _ {1 2}, J\right) _ {\text {d i s t a n t}} $$
$$ \left(D _ {S} \right\rvert_ {d} \left. \frac {1}{2} \frac {1}{2} \frac {1}{2} \frac {1}{2} \frac {1}{2} \frac {1}{2} \frac {1}{2} \frac {1}{2} \frac {1}{2} \frac {1}{2} \frac {1}{2} \frac {1}{2} \frac {1}{2} \frac {1}{2} \frac {1}{2} \right\rvert_ {\omega} $$
p^2 + 21 = 0
2- 300- y jz 250
100-2-1
8 1j j. 4.7
J 1
. 1
2
即 1 a : a b : b c : c a : a b : b c : c
3
210°C (mark 6)
5
10-15 6
aLgS aGgS aGgS
10-15:20 20 4
:2y 1go
2-1-1 1-1
1-2
1
必须 j ≤ c^2 - 1
. 2
.3
4
. 5
s
45:30 4
: p 2 x 1 y 0
-1 2-200 2-000000000000000000000000000000000000000
Jg 2-0s sss 1.5 -
1
. 5 2
jI y) 1111111111111111111111111111
()
35: 40: 4
p^jy^lg^m
2-1350-250
-60- -5- -2- - - - - -
8 1j.4.7 1
- 4
j 1 j 1 j 1 j 1 j 1 j 1
1 15 1
10 10 10
. 15
3
i
4
10 10 10 10 10 10 10 10 10 10 10 10 10 10 10 10 10 10 10 10 10 10 10 10 10 10 10 10 5
. 1
1jI sIgI gIgIgIgIgIgIgIgIgIgIgIgIgIgIgIgIgIgIgIgIgIgIgIgIgIgIgIgIgIgIg
山
15k 7
. 1
Jaaal gssgii
8 1 4.7
S
Lg 1
I 1 J 1 J 1 J 1 J 1 J 1 J 1 J 1 J 1 J 1 J 1 J 1 J 1 J 1 J 1 J 1 J 1 J 1 J 1 J 1 J 1 J 1 J 1 J 1 J 1 J 1 J 1 J 1 J 1
15 7 5
S
(slogsljli)
10-15:25 25 4
L 15 10 L
s
J 1 A1 2 J 1 J 1 J 1 J 1 J 1 J 1 J 1 J 1 J 1 J 1 J 1 J 1 J 1 J 1 J 1 J 1 J 1 J 1 J 1 J 1 J 1 J 1 J 1 J 1 J 1 J 1 J 1 J 1 J 1 J 1 J 1 J 1 J 1 J 1
$$ \left(J _ {2 0} \ddot {g} _ {1} \dot {g} _ {2}\right) \frac {\dots \dot {g} _ {1} \dot {g} _ {2}}{g _ {1}} \frac {\dots \dot {g} _ {1}}{g _ {2}} \frac {\dots \dot {g} _ {1}}{g _ {2}} - K $$
$$ \begin{array}{l} \Delta \omega_ {i} \Delta \omega_ {j} \Delta \omega_ {k} - K 1 \ \varphi_ {l} - K 2 \ \left. \omega_ {i j} \omega_ {j i} \omega_ {j j} \omega_ {j l} - L \right. \ \end{array} $$
a
L 1
1
. 1
.
jnnnns nss
(A)
(1.2g1.1)
1J 1A
1A 2A 3A 4A 5A
()
(2g) 1sss s g jgs
H 2.
H
()
J 1
alol (LS-123456) ggj:
c 1
.
ok
$$ \therefore \dot {S} = \frac {1}{2} \sum_ {i = 1} ^ {n} \left(\sum_ {j = 1} ^ {m} S _ {i j}\right) - A $$
$$ \omega \omega \omega \omega \omega \omega \omega - A 1 $$
$$ \therefore \text {A 2} $$
$$ \Delta \text {d i s g} \quad \text {j} \quad \text {j} \quad \text {j} \quad \text {j} \quad \text {j} \quad \text {j} \quad \text {j} \quad \text {j} \quad \text {j} \quad \text {j} \quad \text {j} \quad \text {j} \quad \text {j} \quad \text {j} \quad \text {j} - A 3 $$
$$ s \dot {s} \dot {s} s L _ {A} < s _ {1} - A 4 $$
$$ \left(J _ {d} \ddot {g} _ {j} \dot {g} _ {j}\right) \left(\text {i} _ {j} 3 \text {i} _ {j} \text {i} _ {j} 2. 4\right) \text {i} _ {j} \text {i} _ {j} \text {i} _ {j} \text {i} _ {j} \text {i} _ {j} \text {i} _ {j} \text {i} _ {j} - A 4 a $$
$$ \therefore \frac {1}{2} \sum_ {i = 1} ^ {n} \frac {1}{2} \sum_ {j = 1} ^ {m} \frac {1}{2} \sum_ {k = 1} ^ {n - j} \frac {1}{2} \sum_ {l = 1} ^ {m - k} \frac {1}{2} $$
$$ \therefore \text {s i g m a} 4. 7) \text {b u s y o l o g a l} - A 4 b $$
$$ \left(J _ {1} \quad j _ {2} \quad j _ {3}\right) \left(\text {j i} _ {1} 7. 5 \text {i} _ {2} \text {j i} _ {3} 8\right) S _ {1} \text {j i} _ {2} \text {j i} _ {3} \text {j i} _ {4} A 4 c $$
$$ \therefore \dot {z} \dot {z} \dot {z} \dot {z} \dot {z} \dot {z} \dot {z} \dot {z} $$
$$ \omega_ {0} \omega_ {1} \omega_ {2} \omega_ {3} - A 5 $$
$$ \therefore \sum_ {i = 1} ^ {n} \sum_ {j = 1} ^ {m} \sum_ {l = 1} ^ {n} \sum_ {s = 1} ^ {m} \sum_ {t = 1} ^ {n} \sum_ {u = 1} ^ {m} \sum_ {v = 1} ^ {n} \sum_ {w = 1} ^ {m} - B $$
$$ \dots \ddot {s} s \dot {s} L \dot {s} - C $$
$$ \therefore \lim _ {x \rightarrow - \infty} \frac {\sin x}{x ^ {2}} = \frac {\sin x}{x ^ {2}} $$
$$ \dots \dots \dots \dots \dots \dots \dots \dots \dots \dots \dots \dots \dots \dots \dots \dots \dots \dots \dots \dots \dots \dots \dots $$
$$ (1 - 0) \dot {s} \dot {s} \dot {s} \dot {s} \dot {s} \dot {s} \dot {s} \dot {s} \dot {s} \dot {s} \dot {s} - F $$
$$ (\mathbf {s} \text {d i s t a t e} \mathbf {c} \text {i n} \mathbf {j} \text {b o l d s y m b o l {c r}}) \quad \text {R e v e r s e} \quad \text {c u c k} \text {j b o l d s y m b o l {a d} - G} $$
$$ \text {g o} \dots \text {a a} - H $$
$$ d s d t \omega - 1 $$
$$ \left. \frac {1}{2} \sum_ {i = 1} ^ {n} \sum_ {j = 1} ^ {m} J _ {i j} - 1\right) $$
$$ a b - 1 2 $$
$$ \left. \frac {1}{2} \frac {1}{2} \frac {1}{2} \frac {1}{2} \frac {1}{2} \frac {1}{2} \frac {1}{2} \frac {1}{2} \frac {1}{2} \frac {1}{2} \right\rangle_ {\mathrm {o}} - J $$
| MOULINEX INTERNATIONAL GUARANTEE : COUNTRY LIST | |||
| 1 | |||
| ALGERIA | (0)41 281853 | 1 year | www.moulinex-me.com |
| ARGENTINA | 0800-122-2732 | 2 años 2 years | GROUPE SEB ARGENTINA S.A. Billinghurst 1833 3°, C1425DTK Capital Federal Buenos Aires |
| ARMENIA | (010) 55-76-07 | 2 uniph 2 years | ΦΑΚ "Фρημιαμι Μυ[F 125171, Uniph, Lbphuŋwnjub juαngh, 16A, 2hμ.3 |
| AUSTRALIA | 02 97487944 | 1 y e a r | GROUPE SEB AUSTRALIA PO Box 7535, Silverwater NSW 2128 |
| OSTERREICH AUSTRIA | 01 890 3476 | 2 J a h r 2 years | SEB ÖSTERREICH GmbH Campus 21 - Businesspark Wien Süd, Liebermannstr. A02 702 2345 Brunn am Gebirge |
| BAHRAIN | 17291537 | 1 year | www.moulinex-me.com |
| BangLAdESH | 8921937 | 1 y e a r | www.moulinex.com |
| BELARUS | 017 2239290 | 2 roda 2 years | 3AO «Гулпma СБ-Bocstok», 125171, Mockba, Ленистков шося, Д. 16A,ст. 3 |
| BELGIQUE BELGIIE BELGIUM | 070 23 31 59 | 2 ans 2 jaar 2 years | GROUPE SEB BELGIUM SA NV 25 avenue de l'Espèrance - ZI 6220 Fleurus |
| BOSNA I HERCEGOVINA | Info-linija za potrošače 033 551 220 | 2 godine 2 years | SEB Devellopment Predstavnišvo u BiH Vrazova 8/II 71000 Sarajevo |
| BRASIL BRAZIL | 11 2915-4400 | 1 ano 1 year | SEB COMERCIAL DE PRODUTOS DOMESTICOS LTDA Rua Vençâncio Aires, 433, Pompeția, São Paulo/SP |
| Былгария Bulgaria | 0700 10 330 | 2 rodihi 2 years | Г РИ П СБ БылгарияEOOD Бун. Былгария 81 B, er. 5 1404 София |
| CANADA | 1-800-418-3325 | 1 an 1 year | GROUPE SEB CANADA 345 Passmore Avenue Toronto, ON M1V 3N8 |
| CHILE | 12300 209207 | 2 años 2 years | GROUPE SEB CHILE Comercial Ltda Av. Providencia, 2331, Piso 5, Oficina 501 Santiago |
| COLOMBIA | 01 8000 520022 | 2 años 2 years | GROUPE SEB COLOMBIA Apartado Aereo 172, Kilometro 1 Via Zipaquira Cajica Cundinamarca |
| HRVATSKACROTIA | 01 30 15 294 | 2 godine 2 years | SEB mku & p d.o.o. Vodnjanska 26, 10000 Zagreb |
| ČESKA REPUBLIKCZECH REPUBLIC | 731 010 111 | 2 roky 2 years | GROUPE SEB ČR s.r.o. Futurama Business Park (budova A) Sokolovská 651/136a 186 00 Praha 8 |
| DANMARKDENMARK | 44 663 155 | 2 År 2 years | GROUPE SEB NORDIC AS Tempovej 27 2750 Ballerup |
| EESTIESTONIA | 668 1286 | 2 aastat 2 years | GROUPE SEB POLSKA Sp. z o.o. ul. Bukowinska 22b 02-703 Warszawa |
| EGYPT | :16622 | srdža 1 year | Jugoslav Srbijski ul. Žižek 14 |
| SUOMIFINLAND | 09 622 94 20 | 2 Vuotta 2 years | Groupe SEB Finland Kutoantie 7 02630 Espoo |
| France continentale+ Guadeloupe, Martinique, Réunion, Saint-Martin | 09 74 50 10 14 | 1 an 1 year | GROUPE SEB France Service Consommateur MOULINEX 112 Ch. Moulin Carron, TSA 92002 69134 ECULLY Cedex |
| DEUTSCHLANDGERMANY | 0212 387 400 | 2 Jahren 2 years | GROUPE SEB DEUTSCHLAND GmbH / KRUPS GmbH Herrnainweg 5 63067 Offenbach |
| EAMAAAAGREECE | 2106371251 | 2 xóvia 2 years | SEB GROUPE EAMAAOZ A.E. Ośość KaβaIIeρatrou 7 T.K. 145 64 K. Knipóra |
| 香港HONG KONG | 8130 8998 | 1 year | SEB ASIA Ltd. Room 903, 9/F, South Block, Skyway House 3 Sham Mong Road, Tai Kok Tsui, Kowloon Hong-Kong |
| MAGYARORSZÁGHungARY | 06 1 801 8434 | 2 év 2 years | GROUPE SEB CENTRAL-EUROPE Kft. Távíró kőz 4 2040 Budaörns |
| INDONESIA | +62 21 5793 6881 | 1 y ear | GROUPE SEB INDONESIA (Representative office) Sudirman Plaza, Plaza Marein 8th Floor JL Jendral Sudirman Kav 76-78, Jakarta 12910, Indonesia |
| ITALIAYITALY | 1 99 207 892 | 2 anni 2 years | GROUPE SEB ITALIA S.p.A. Via Montefeltro, 4 20156 Milano |
| 日本JAPAN | 0570 077 772 | 1 year | 株式会社格ルーフフジーナン 千144-0042 東京都大田区羽田旭町 11-1 羽田ケロノダート事務模 5F |
| JORDAN | 4629700 | 1 year | www.moulinex-me.com |
| KA3AKCTAH KAZAKHSTAN | 727 378 39 39 | 2 xbln 2 years | ЖАК «Гулma СБ- Восток» 125171, Місяч, Ленисторическая шocceci,16A,3 ун |
| 한국어 KOREA | 1588-1588 | 1 year | 류)그름 친본 썟리어 서울시 희로구 썸개선로 35 썸리贝尔 2舍 110-790 |
| 단지 KUWAIT | 24834787 | 1 year | www.moulinex-me.com |
| LATVJA LATVIA | 6 6 1 6 3 4 0 3 | 2 gadi 2 years | GROUPE SEB POLSKA Sp. z o.o. ul. Bukowinska 22b 02-703 Warszawa |
| BELANON | 01 364392 | 1 year | www.moulinex-me.com |
| LIETUVA LITHUANIA | 5 2 1 4 0 0 5 7 | 2 metai 2 years | GROUPE SEB POLSKA Sp. z o.o. ul. Bukowinska 22b 02-703 Warszawa |
| LUXEMBOURG | 0032 70 23 31 59 | 2 ans 2 years | GROUPE SEB BELGIUM SA NV 25 avenue de l'Espérance - ZI 6220 Fleurus |
| MAKEDONJAMACEDONIA | (02) 20 50 319 | 2理想信念 2 years | Groupe SEB Bulgaria EOOD Office 1, floor 1, 52G Borovo St., 1680 Sofia - Bulgaria Гул СБ Блиларя ДООЛ Ун. Боров 52 Г, си. 1, офис 1, 1680 Соб�а, Блиларя |
| MALAYSIA | 603 7802 3000 | 2 ye a r | GROUPE SEB MALAYSIA SDN. BHD Unit No. 402-403, Level 4, Uptown 2, No. 2, Jalan SS21/37, Damansara Uptown, 47400, Petaling Jaya, Selangor D.E. Malaysia |
| MEXICO | (01800) 112 8325 | 1 ano 1 year | Groupe.S.E.B. México, S.A. DE C.V. Goldsmith 38 Desp. 401, Col. Polanco Delegacion Miguel Hildalgo 11 560 México D.F. |
| MOLDOVA | (22) 929249 | 2 ani 2 years | TOB «Гун СБ Укална» 02121, Харковские пое, 201-203, 3 noeepx, Кли, Укална |
| NEDERLAND The Netherlands | 0318 58 24 24 | 2 Jaar 2 years | GROUPE SEB NEDERLAND BV De Schutterij 27 3905 PK Veenendaal Nederland |
| NEW ZEALAND | 0800 700 711 | 1 year | GROUPE SEB NEW ZEALAND Unit E, Building 3, 195 Main Highway, Ellerslie, Auckland |
| NORGE NORWAY | 815 09 567 | 2 ar 2 years | GROUPE SEB NORDIC AS Tempovej 27 2750 Ballerup |
| OMAN | 80075000 | 1 year | www.moulinex-me.com |
| PERU | 441 4455 | 1 año 1 year | Groupe SEB Perú Av. Camino Real N° 111 of. 805 B San Isidro - Lima |
| POLSKA POLAND | 801 300 420 koszt jak za połaczenia lokalne | 2 lata 2 years | GROUPE SEB POLSKA Sp. z o.o. ul. Bukowńska 22b 02-703 Warszawa |
| PORTUGAL | 808 284 735 | 2 a no s 2 years | GROUPE SEB IBERICA SA Urb. da Matinha Rua Projectada à Rua 3 Bloco1 - 3° B/D 1950 - 327 Lisboa |
| QATAR | 44558796 | 1 year | www.moulinex-me.com |
| REPUBLIC OF IRELAND | 01 677 4003 | 1 year | GROUPE SEB IRELAND Unit B3 Aerodrome Business Park, College Road, Rathcoole, Co. Dublin |
| ROMÁNIA ROMANIA | 0 21 316 87 84 | 2 ani 2 years | GROUPE SEB ROMÁNIA Str. Daniel Constantin nr. 8 010632 Bucuresti |
| POCCNY RUSSIA | 495 213 32 29 | 2 roda 2 years | 3AO «Гулва СБ-Восток», 125171, Мскьа, Ленисторов шосс, д. 16A, стр. 3 |
| SAUDI ARABIA | 920023701 | 1 year | www.moulinex-me.com |
| SRBIJA SERBIA | 060 0 732 000 | 2 godine 2 years | SEB Developpement Borda Stanojevića 11b 11070 Novi Beograd |
| SINGAPORE | 6550 8900 | 1 year | GROUPE SEB SINGAPORE Pte Ltd. 59 Jalan Peminpin, #04-01/02 L&Y Building Singapore 577218 |
| SLOVENSKO SLOVAKIA | 233 595 224 | 2 roky 2 years | GROUPE SEB Slovensko, spol. s r.o. Cesta na Senec 2/A 821 04 Bratislava |
| SLOVENIJA SLOVENIA | 02 234 94 90 | 2 leti 2 years | SEB d.o.o. Gregorăčeva ulica 6 2000 MARIBOR |
| SOUTH AFRICA | 0100202222 | 1 year | GS South Africa Building 17, PO BOX 107 The Woodlands Office Park 20 Woodlands Drive, Woodmead 2080 |
| ESPÁÑA SPAIN | 902 31 22 00 | 2 años 2 years | GROUPE SEB IBÉRICA S.A. C/ Almogãvers, 119-123, Complejo Ecourban 08018 Barcelona |
| SRI LANKA | 115400400 | 1 year | www.moulinex.com |
| SVERIGE SWEDEN | 08 594 213 30 | 2 aR 2 years | TEFAL SVERIGE SUBSIDIARY OF GROUPE SEB NORDIC Truckvägen 14 A, 194 52 Upplands Vâsby |
| SUISSE SCHWEIZ SWITZERLAND | 044 837 18 40 | 2 ans 2 Jahre 2 years | GROUPE SEB SCHWEIZ GmbH Thurgauerstrasse 105 8152 Glattbrugg |
| USZMIINA THAILAND | 02 769 7477 | 2 years | GROUPE SEB THAILAND 2034/66 Italthai Tower, 14th Floor, n° 14-02, New Phetchburi Road, Bangkapi, Huaykwang, Bangkok, 10320 |
| TÜRKIYE TURKEY | 216 444 40 50 | 2 YIL 2 years | GROUPE SEB ISTANBUL AS Beybi Giz Plaza Dereboyu Cad. Meydan Sok. No: 28 K.12 Maslak |
| U.S.A. | 800-395-8325 | 1 year | GROUPE SEB USA 2121 Eden Road Millville, NJ 08332 |
| Украіна UKRAINE | 044 300 13 04 | 2 рoked 2 years | TOB «Грун СЕВ Украіна» 02121, Харковские等着, 201-203, 3 nobech, Кли, Украінa |
| Даганы леслова UAE | 8002272 | 1 year | www.moulinex-me.com |
| UNITED KINGDOM | 0345 602 1454 | 1 year | GROUPE SEB UK LTD Riverside House, Riverside Walk Windsor, Berkshire, SL4 1NA |
| VENEZUELA | 0800-7268724 | 2一个好的 2 years | GROUPE SEB VENEZUELA Av Eugenio Mendoza, Centro Letonia, Torre ING Bank, Piso 15, Ofc 155 Urb. La Castellana, Caracas |
| VIETNAM | 08 38645830 | 2理想信念 2 years | Vietnam Fan Joint Stock Company 25 Nguyen Thi Nho Str, Ward 9, Tan Binh Dist, HCM city |
| الله ن YEMEN | 01454980 | 1 year | www.moulinex-me.com |

: www.moulinex.com