
SelectTech 552i - Fitness Equipment BOWFLEX - Free user manual and instructions
Find the device manual for free SelectTech 552i BOWFLEX in PDF.
| Product Type | Adjustable Dumbbells |
| Brand | Bowflex |
| Model | SelectTech 552i |
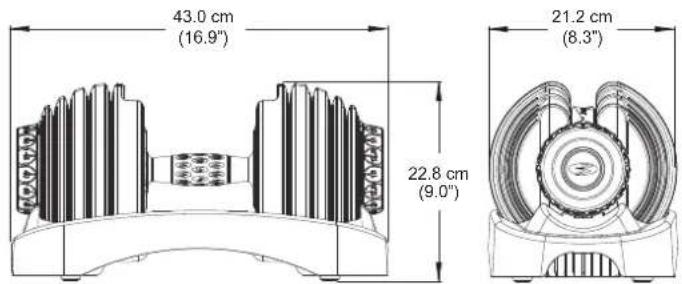
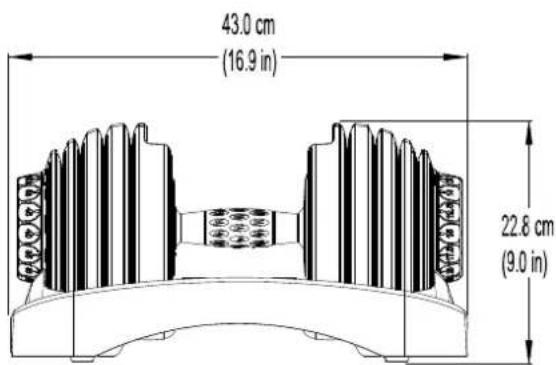
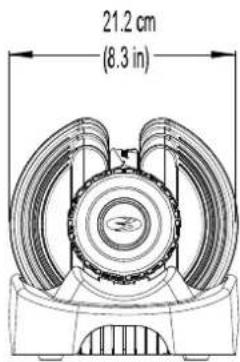
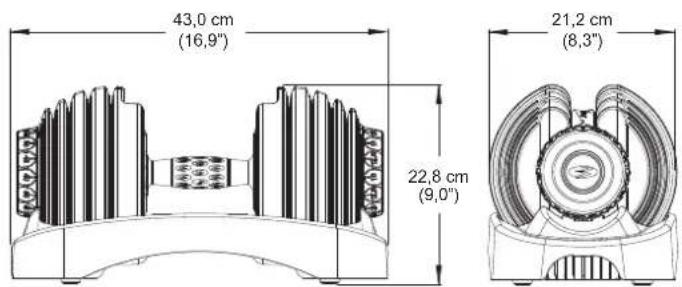
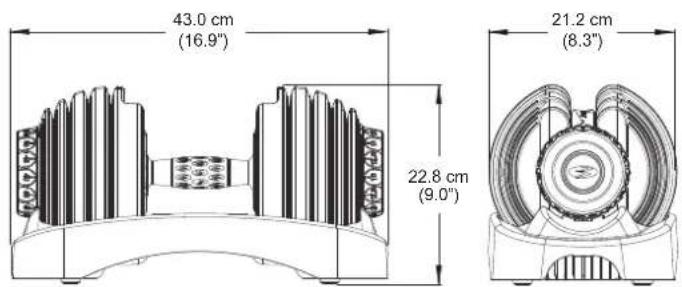
| Dimensions (L x W x H) | 43 x 21.2 x 22.8 cm |
| Total Weight | 24.8 kg |
| Weight Range | 2.27 kg to 23.9 kg (5 to 52.5 lbs) |
| Number of Increments | 15 |
| Selection Mechanism | Rotary adjustment knob with notches |
| Safety | Locking mechanism, outward-facing locking pins |
| Material | Coated weight discs, reinforced plastic handle and base |
| Intended Use | Indoor, home use |
| Maintenance | Silicone lubricant, cleaning with damp cloth, no solvents |
| Warranty | Manufacturer's warranty (contact customer service) |
Frequently Asked Questions - SelectTech 552i BOWFLEX
User questions about SelectTech 552i BOWFLEX
0 question about this device. Answer the ones you know or ask your own.
Ask a new question about this device
Download the instructions for your Fitness Equipment in PDF format for free! Find your manual SelectTech 552i - BOWFLEX and take your electronic device back in hand. On this page are published all the documents necessary for the use of your device. SelectTech 552i by BOWFLEX.
USER MANUAL SelectTech 552i BOWFLEX
Thanks for choosing BowFlex SelectTech 552i Dumbbell as your fitness equipment. We are sincerely encourage you to read through this Owner's manual carefully before the assembling of your equipment started, especially of below WARNINGS! WARNINGS WILL REDUCE THE RISK OF BURNS, FIRE, ELECTRICAL SHOCK OR INJURY TO PERSONS.
Before exercising, find your equipment's serial number located on a white barcode sticker on product, and exercise in the space provided below.
ENTER YOUR SERIAL NUMBER AND MODEL NAME IN THE BOXES BELOW:
SERIAL NUMBER:
MODEL NAME: BowFlex SelectTech 552i Dumbbell
» Refer to the SERIAL NUMBER and MODEL NAME when calling for service.
SERIAL NUMBER LOCATION
natural_image
Technical line drawing of a mechanical assembly with gears and a wheel (no text or symbols)
WARNING
- READ ALL INSTRUCTIONS BEFORE USING THIS EXERCISE EQUIPMENT.
- All warnings and instructions should be read and proper instruction obtained prior to use. Use this equipment for its intended purpose ONLY.
- If at any time the Warning stickers become loose, unreadable or dislodged, replace the labels, contact your local distributor for them.
- Keep children under the age of 13 away from this strength training equipment. Teenagers must be supervised at all times while using this equipment.
- This equipment is not intended for use by persons with reduced physical, sensory or mental capabilities, or lack of experience and knowledge, unless they have been given supervision or instruction concerning use of the equipment by a person responsible for their safety.
- Inspect the machine before use. DO NOT use machine if it appears damaged or inoperable.
- DO NOT exceed weight capacity of this equipment.
- Make sure all adjustment devices are fully inserted and properly adjusted before use to avoid injury.
- Injuries to health may result from incorrect or excessive training. Cease exercise if you feel faint or dizzy. Obtain a medical exam before beginning an exercise program.
- Keep body, clothing, hair, and fitness accessories free and clear of all moving parts.
- Make sure machine is stabilized on the floor and uneven surfaces are leveled before use.
- It is essential that your equipment is used only indoors, in a climate controlled room.
- Always fully stow all accessories between workouts. This helps keep you and everyone in your household safe, and helps preserve longevity of your equipment.
- To assure that the safety level of this product is maintained, examine components for wear and tear on a regular basis. Components that are worn excessively or inoperable should be replaced immediately or the product should be put out of use until it is repaired.
- DO NOT over exert yourself during exercise.
- The equipment is only for indoor use at home, DO NOT to use in any commercial, rental, school or institutional setting..
- Consult a physician before starting an exercise program. Stop exercising if you feel pain or tightness in your chest, become short of breath, or feel faint. Contact your doctor before using the machine again.
• Periodically inspect and test the locking mechanism for correct function. Follow the test procedures included in this manual.
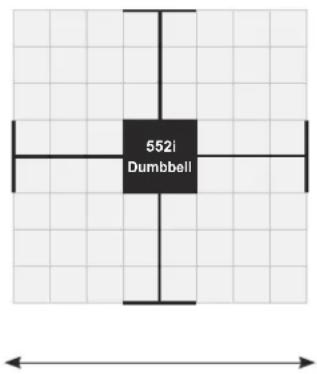
- Before you start your workout, make sure that your surroundings are free from possible interference and third parties. Your workout free space should be 60 cm(2 feet) more than the maximum reach of the exercise in all directions.

ADDITIONAL WARNING - ADJUSTABLE EQUIPMENT (FREE WEIGHT)
- DO NOT engage the locking mechanism and use the handle to try to lift the main body and base together. To lift the main body and base together, engage the locking mechanism and use the lift handles molded into the base assembly.
- DO NOT try to force the Adjustment Knob to turn when the main body has been removed from the base.
- DO NOT Drop to the floor. Damage to the product and possible personal injury can occur.
- DO NOT let the equipment's forcefully hit together during operation. Damage to the product and possible personal injury can occur.
- DO NOT lean on the equipment's handles or use them to support your body weight, such as using them as a base to perform a push up. Damage to the product and possible personal injury can occur.
- DO NOT try to disassemble your equipment's handles, or base assembly.
- The equipment are very heavy. If you are not using the optional Stand, put the equipment assembly directly on the floor for best support.
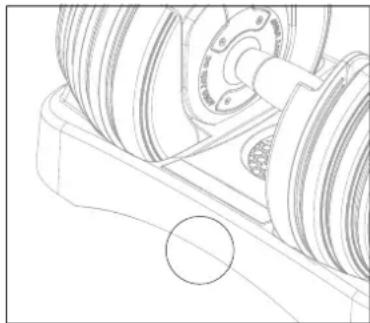
- If use with Dumbbell stand, please keep at least 1.3 m (50 inch) on each side of the stand clear. This is the recommended safe distance for access and passage around and emergency dismounts from the machine.
FREE AREA
WORKOUT SPACE
- Exercise on a level and stable base. There should be 1.3m (50") of free space each side surrounding.
- Do not exercise in any area that will block any vent or air openings. The equipment should not be located in a garage, covered patio, near water or outdoors.
CAUTION!
1.3 M ^f you experience chest pains, nausea, dizziness or shortness of breath, stop exercising immediately and consult your physician before continuing.
TECH SPECS
| Assembled Dimensions (L x W x H) | 43 x 21.2 x 22.8 cm / 16.9" x 8.3" x 9" |
Product Weight 24.8 kg / 54.6 lbs.
WARRANTY
If your equipment requires warranty service, please contact local Customer Tech Support.

From now on, you can assemble your equipment at your convenience. For detailed instructions on assembly, operation, programs, troubleshooting, and maintenance, please scan the QR code on the left side to access the complete manual.
If scanning the QR code fails, you can visit the website provided here: https://global.bowflex.com/en/manuals.html

For assembly video, please visit: https://global.bowflex.com/en/assembly-videos.html

NEED HELP?
If you have any questions, need assistance with missing parts, or require technical support or maintenance for your equipment, please contact Customer Tech Support.
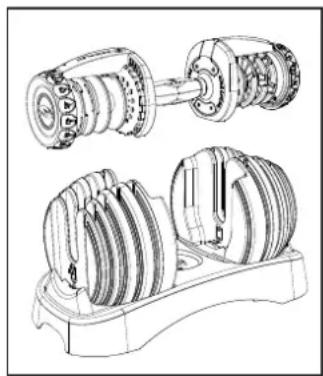
FEATURES
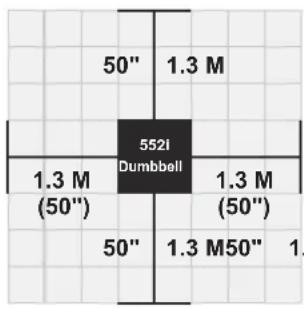
A. HANDLE GRIP
B. ADJUSTMENT KNOB
C. WEIGHT PLATES
1. 1.25 LBS (0.57 KG)
2. 2.5 LBS (1.13 KG)
3. 5 LBS (2.27 KG)
4. 7.5 LBS (3.4 KG)
5. 7.5 LBS (3.4 KG)
D. WEIGHT LOCKING TAB
E. BASE
F. LIFTING HANDLE
There are 15 weight increments:
| KG 2 | 27 3.4 | 4.5 5.7 | 6.8 8 9 | 10.2 11 | .4 13.6 | 15.9 18 | .2 20.5 | 22.7 23.9 | ||||||
| LBS 5 | 7.5 10 | 12.5 15 | 17.5 20 | 22.5 25 | 30 35 | 40 45 | 50 52.5 |

Do not drop the dumbbell. Dropping the dumbbell will damage the weight plates and/or the locking mechanism, and can cause the weight plates to disengage (drop) from the handle without warning. This can cause serious injury, and will void the warranty.
- After removing the dumbbell from its protective packaging, inspect the products and packaging material for any damages.
- Push down slightly on the handle assembly to make sure it is fully seated in the base. Rotate each adjustment knob several full rotations to make sure it turns freely in both directions. Make sure there is a click at each weight increment of the adjustment knob. This click will help you locate the proper alignment to select a given weight increment.
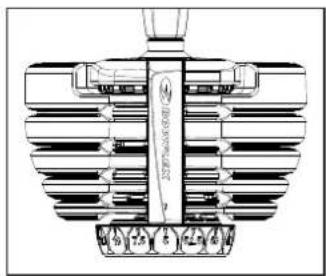
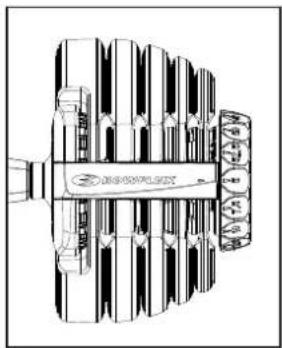
- The weight increments range from 10 lbs to 90 lbs (4.5 to 41 kg) on both adjustment knobs. To properly select a given weight (20 lbs [9 kg] for example), rotate both adjustment knobs until that number (20) is aligned with the arrow located on the outward edge of the BowFlex nameplate (Fig.1).
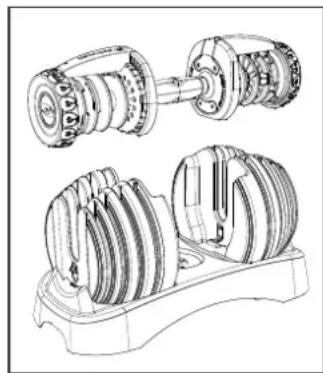
- After confirming the proper rotational function of the adjustment knob, turn each adjustment so that the number 10 is aligned with the arrow in the BowFlex nameplate.
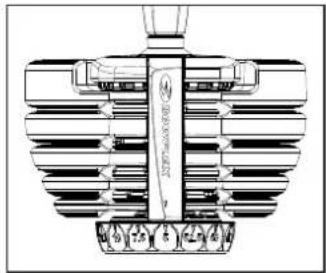
- With both adjustment knobs set to 10, pull the handle straight up from the dumbbell. This will remove only the handle from the base, and let all of the weight plates stay in the base (Fig. 2). The handle without plates gives the initial weight of 10 lbs (4.5 kg).
- You may increase the selected weight by rotating each adjustment knob clockwise.
- The dumbbell handle and weight plates are symmetrical. The handle is inserted with either end facing the user, provided that you have selected the same weight number on both ends of the dumbbell.
NOTICE: When you remove the dumbbell from the base or return it to the base, use a vertical motion, perpendicular to the base. Do not tilt the dumbbell or move it laterally (parallel to the base) until it is fully clear of the unselected weight plates.
natural_image
Diagram of a multi-tiered mechanical or electrical component with no visible text or symbolsFigure 1

natural_image
Technical line drawing of a mechanical assembly with two views (top and side), showing internal components without any text or symbols.Figure 2

Do not lean on the dumbbell handles or use them to support your body weight, such as using them as a base to perform a push up. Doing so will damage the weight plates and/or the locking mechanisms, and can cause the weight plates to disengage (drop) from the handle without warning. This can cause serious injury, and will void the warranty.

Inspect the dumbbells prior to each use. Do not use a dumbbell with worn or damaged parts. Contact BowFlex Customer Service for repair information.
Understanding and testing the locking mechanism function
The BowFlex SelectTech Dumbbell features an exclusive locking mechanism designed to ensure proper and complete selection of the weight plates as well as to ensure weight plate retention during the workout.

Fully understand the function of this mechanism and do tests of the mechanism regularly to make sure it operates correctly.
Function
The locking mechanism provides two key functions:
- The mechanism will only allow the adjustment knobs to be rotated when the dumbbell handle is completely inserted and engaging the dumbbell base.
- The mechanism is designed to lock the dumbbell handle to the base if either adjustment knob is not fully engaging the selected weight plates.
Purpose
The locking mechanism serves two important purposes:
- The mechanism will prevent deselecting (dropping) weight plates from the dumbbell when it is NOT in the dumbbell base.
- The mechanism will prevent partial selection of the weight plates in which the plates are not fully supported and the locking pin is not fully engaged.
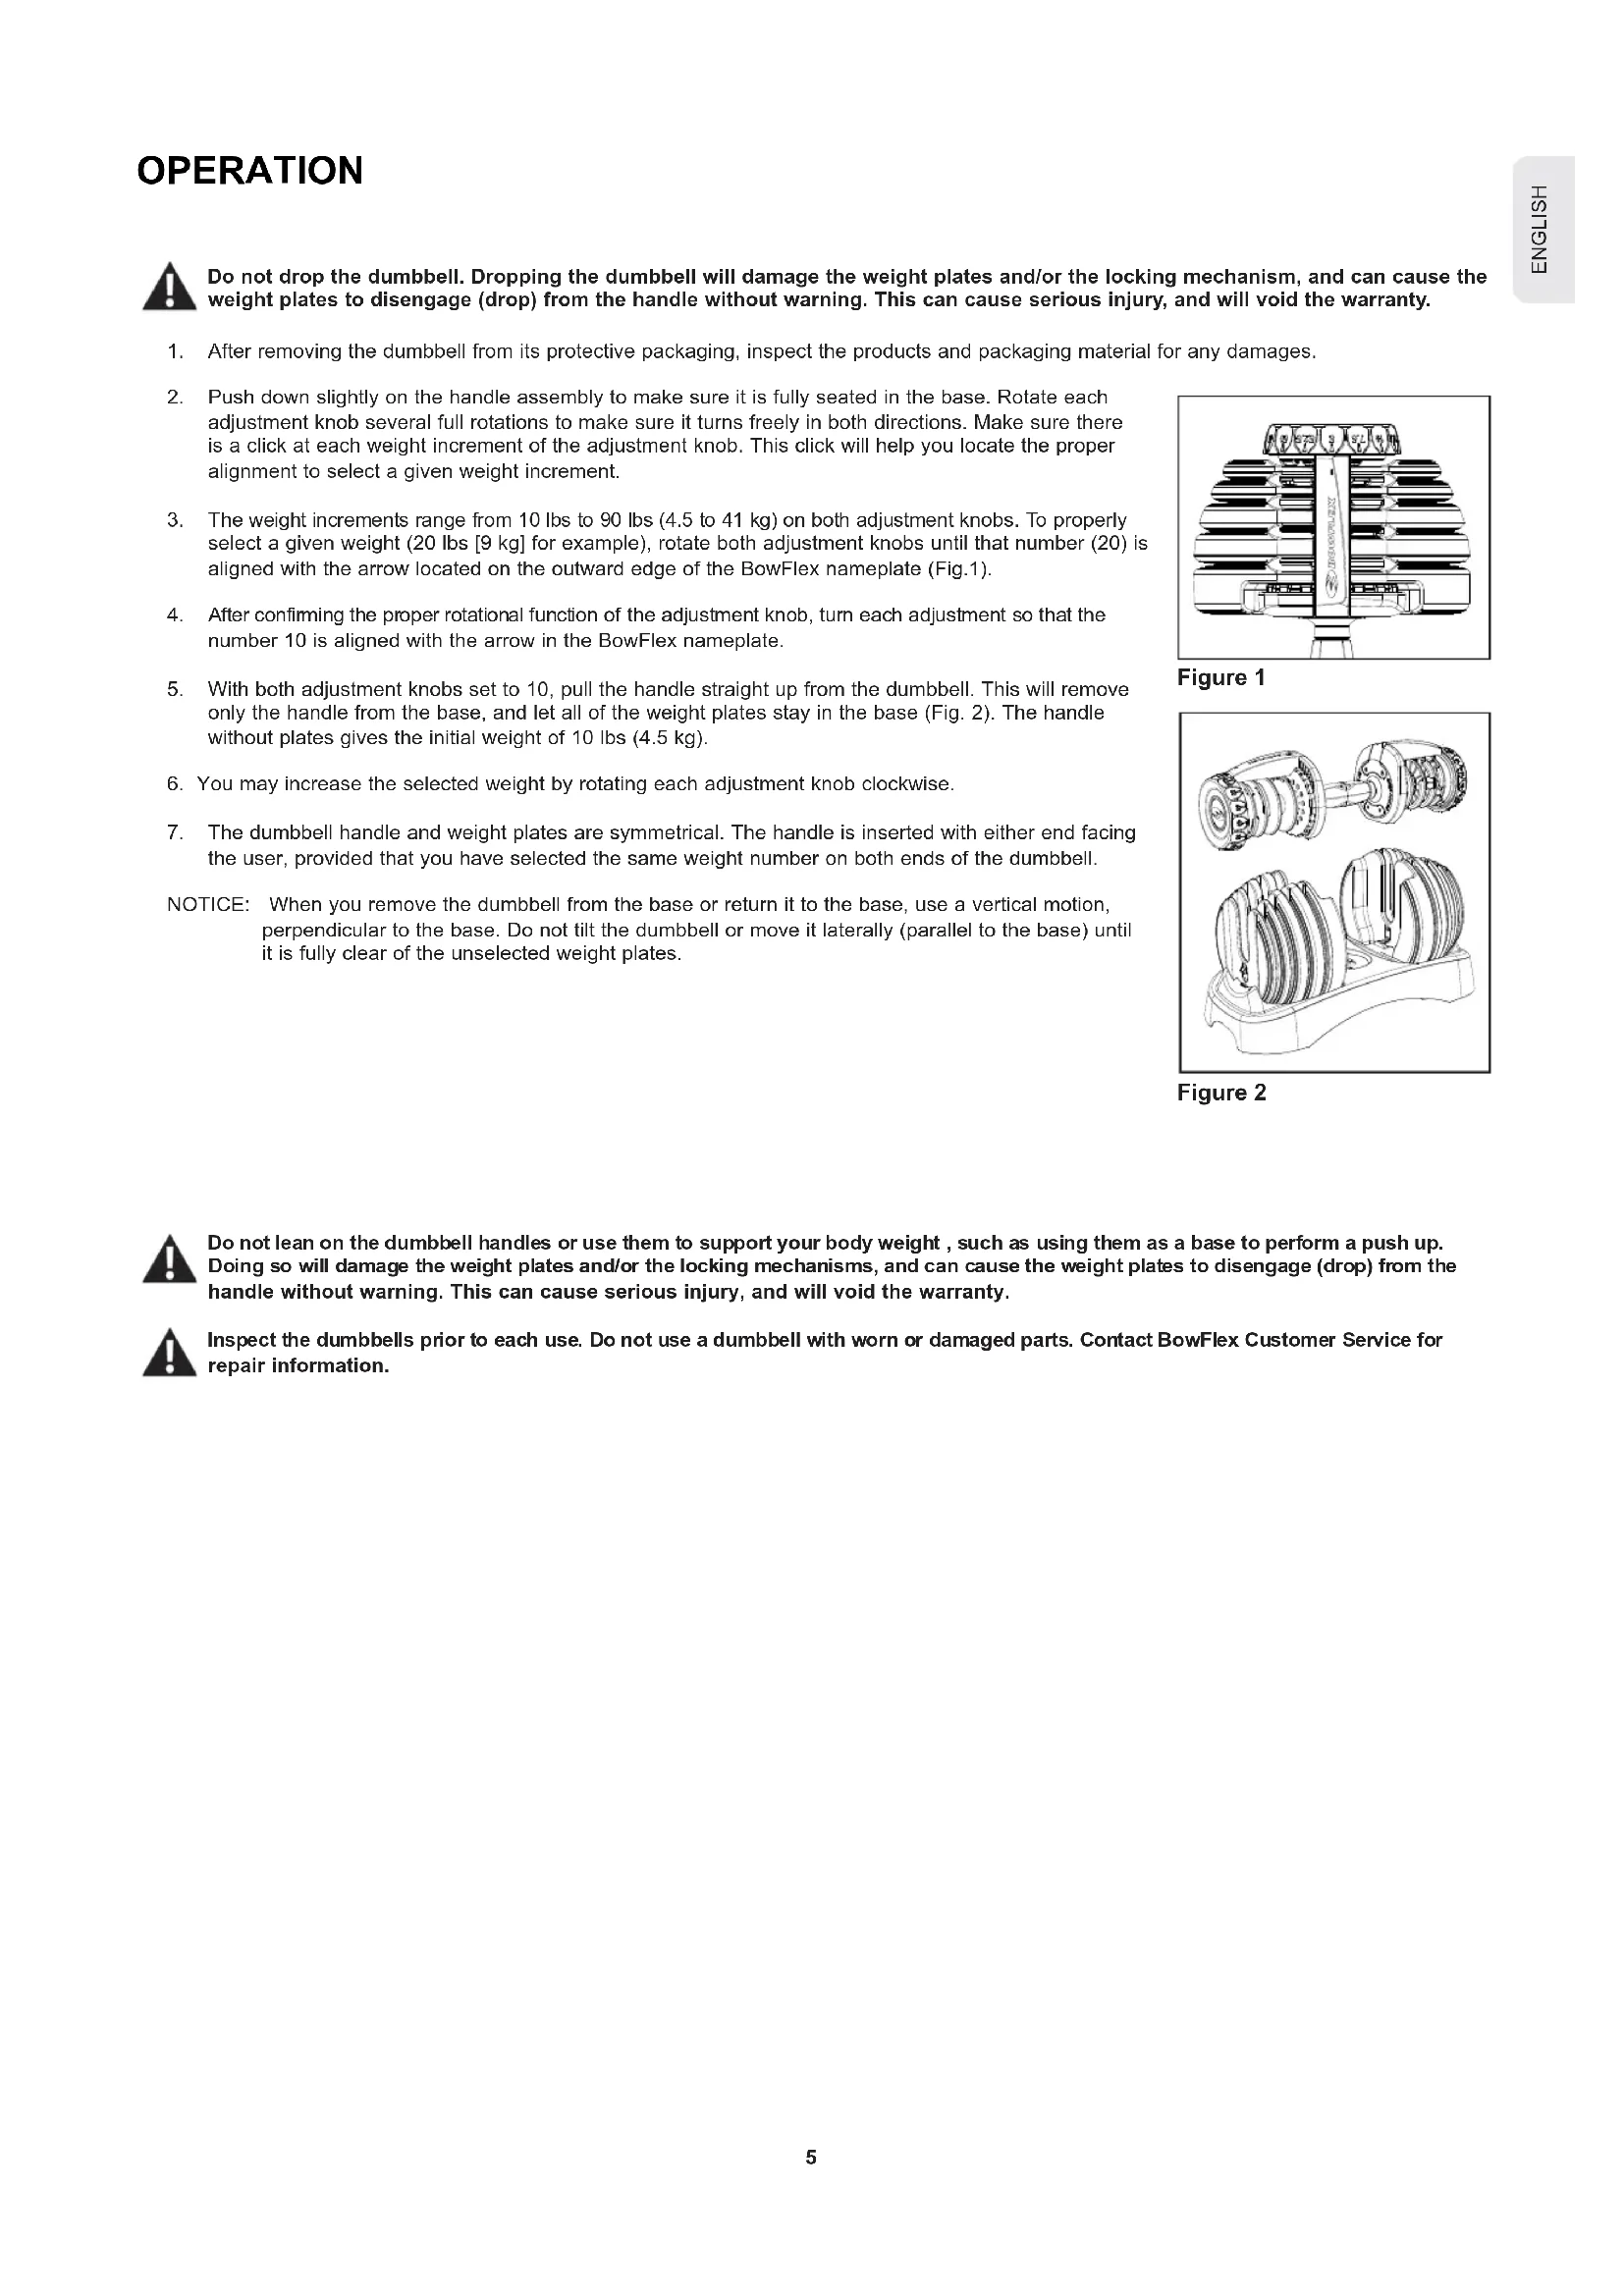
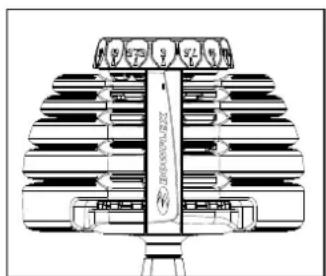
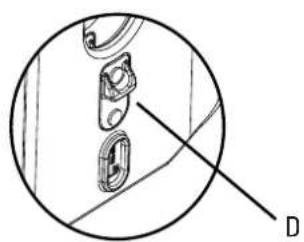
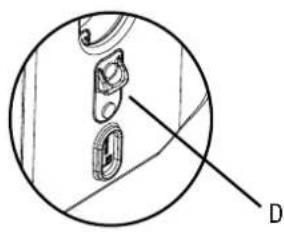
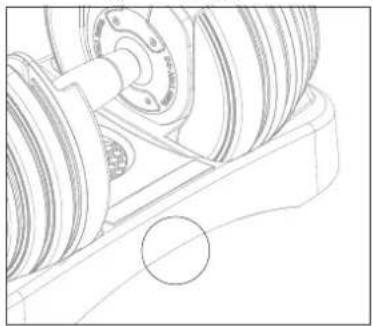
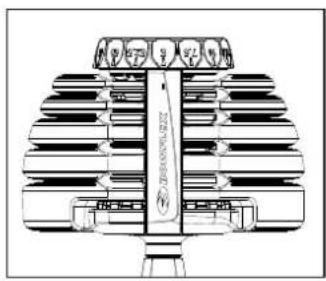
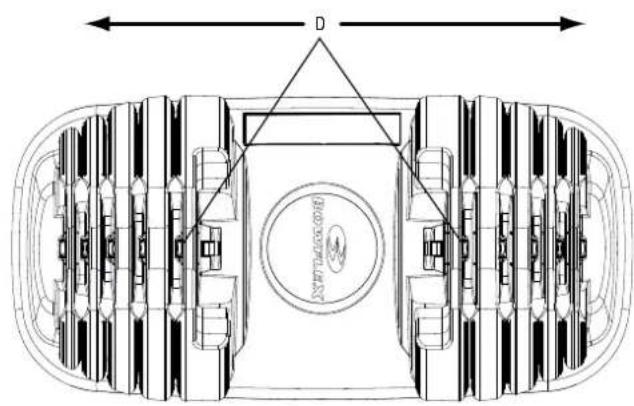
All locking tabs (D) must point outward.

natural_image
Top-down architectural diagram of a multi-level vehicle or terminal room with central circular structure and directional arrows (no text or symbols)Correct—tabs (D) point outward.

natural_image
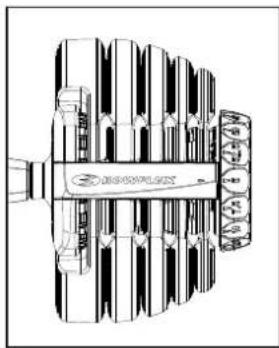
Technical line drawing of a mechanical device with multiple housing components and internal cutouts (no text or symbols)Incorrect—tab reversed.

natural_image
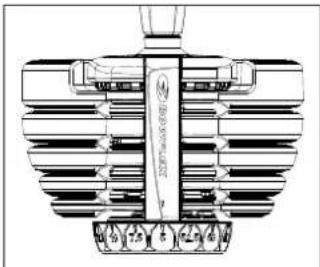
Technical line drawing of a mechanical component with multiple cylindrical parts and a separate view showing internal features (no text or symbols)Testing proper locking mechanism function
- With the dumbbell handle set in the dumbbell base, turn both adjustment knobs to the number 10. You will know you have fully and correctly selected the number when you feel the adjustment knob settle into a notch (known as a detent). You will also hear a slight, but audible, clicking noise that corresponds with the detent locations for each number.
- You should be able to withdraw the handle from the base leaving all the weight plates behind.
- With the handle removed from the base, grab one adjustment knob with your other hand and gently attempt to turn the knob, the knob should not rotate. A locking pin in the mechanism will have engaged the rotational assembly when the unit was withdrawn from the base. Perform this test with all adjustment knobs.

Do not use too much force to try to turn the locked adjustment knob. Too much force can damage the locking mechanism.
- After confirming the proper function of the locking mechanism as described above, return and fully insert the dumbbell handle back into the base assembly.
- With the handle back in the base, turn the adjustment knob on one side to a position that is between the numbers 5 and 7.5. This represents an incomplete weight selection where the adjustment knob has not fully selected a weight and the knob is in-between the selection detents (clicks).
- With the selection knob in this improper position, gently attempt to lift up on the handle to remove it from the base. You should find that the handle is locked to the base and cannot be removed with light pressure, as it can normally.
- Return the improperly selected adjustment knob to a full and proper weight selection and assure that the dumbbell handle can once again be removed.
- Repeat this test for all adjustment knobs.
- Assure the entire dumbbell handle assembly is properly tightened. Do this by setting the adjustment knobs to 10 pounds and removing the handle assembly from the base. Grab both adjustment knobs and very slightly push and pull the knobs toward and away from the handle grip. The knobs should not exhibit free play and all of the selection discs should feel tightly connected.
- You have now tested the function of the locking mechanism. We suggest you repeat this test monthly to make sure that the locking mechanism operates correctly.

Do not engage the locking mechanism and use the handle to try to lift the dumbbell and base together. To lift the dumbbell and base together, engage the locking mechanism and use the lift handles molded into the base assembly.
MAINTENENCE
BowFlex SelectTech Dumbbell maintenance

Equipment must be regularly examined for damage and repairs. The owner is responsible to make sure that regular maintenance is done. Worn or damaged components must be replaced immediately or the equipment removed from service until the repair is made. Only manufacturer supplied components can be used to maintain and repair the equipment.
The BowFlex SelectTech Dumbbell is a very low maintenance product. However, there are steps that you should take to keep the product performing and looking its very best.
- Should your SelectTech Dumbbell handle assembly, plates or base become soiled you may clean them with a cloth lightly dampened with warm water and a small amount of mild soap. Wipe dry with a separate cloth.
- The SelectTech Dumbbell is internally lubricated and will not require further internal lubrication. The contact between weight plates and selection discs is not lubricated but has naturally low friction. This generally will not require any lubrication. Should you feel it necessary to lubricate the weight plates and/or selection discs, use only a silicon lubricant, preferably "food grade".

Do not use any solvents, harsh detergents, chemicals or bleach on this product – doing so may damage the materials, resulting in degradation of the product's performance or strength.
Do not attempt to disassemble the dumbbell handle or base assembly. These items are not designed to be user serviced. Doing so will void the manufacturers warranty. Contact BowFlex directly for service.
TROUBLESHOOTING
| Problem Solution | |
| Dumbbell handle does not fully insert into base when no plates are selected (handle has no plates attached). | Make certain that both adjustment knobs are set directly to the number 5. |
| Dumbbell handle does not fully insert into base when plates are selected (handle has plates attached). | 1. Check to see if you have selected different weights on each side of the dumbbell (for example one adjustment knob is set to 5 and the other is set to 7.5). If this is the case, you must replace the dumbbell in the base with the same orientation from which it was was withdrawn. This is to allow the plates to settle back into the correct and vacant openings in the base.2. Verify that the plates not selected (those plates remaining in the dumbbell base) are in their correct spots and have not been moved to different support slots. This may be blocking the dumbbell from fitting back into the base. |
| Adjustment knob will not turn while handle is in base. | 1. Check to assure that the dumbbell handle is fully depressed into the dumbbell base. If not fully depressed, the locking mechanism will not be released and may prevent the adjustment knobs from rotating.2. Check to see if any weight plates have been put into the base assembly backwards with the “Locking Tab” facing the grip of the dumbbell handle. All weight plates must have the selection tongue facing away from the grip of the dumbbell handle.3. Check to see if there is any dirt, debris or other obstruction in the dumbbell base. You may need to remove the weight plates from the base to accomplish this check. Remember to put each weight plate back in its appropriate location with the selection tongue facing away from the dumbbell grip. |
| Plates are not secured to the handle and drop out. | 1. Confirm that all of the weight plates have the “Locking Tab” facing away from the dumbbell grip. If one or more of the weights are inserted backwards with “Locking Tab” facing inward toward the grip, the handle can get blocked, and the plates may wedge into the handle.2. Verify that the plates not selected (those plates remaining in the dumbbell base) are in their correct spots and have not been moved to different support slots. This may be blocking the dumbbell from fitting back into the base. |
SelectTech Dumbbell locking mechanism test
After replacing any part of your BowFlex SelectTech Dumbbell, be sure to perform the following procedures before using your Dumbbell for any exercises:

This is a functional test of the weight plate locking mechanism.
- With the dumbbell handle set in the dumbbell base, turn both adjustment knobs to the lowest number (Figure 1). You will know you have fully and correctly selected the number when you feel the adjustment knob settle into a notch (known as a detent). You will also hear a slight, but audible, clicking noise that corresponds with the detent locations for each number.
- You should be able to withdraw the handle from the base leaving all the weight plates behind (Figure 2).
- With the handle removed from the base, grab one adjustment knob with your other hand and firmly attempt to turn the knob; the knob should not rotate.
- Place the dumbbell back into the base, and turn the adjustment knob to the next lowest weight setting. Lift the dumbbell from the base approximately 1 inch (2.5 cm).
- With the handle still above the base, grab one adjustment knob with your other hand and firmly attempt to turn the knob; the knob should not rotate. A locking pin in the mechanism will have engaged the rotational assembly when the unit was withdrawn from the base. Perform this test with all adjustment knobs.
- Repeat this test for all weight settings on your dumbbells.

If any of the knobs rotate outside of the cradle, do not use the dumbbell, and contact TECH SUPPORT
natural_image
Technical line drawing of a mechanical component with ribbed structure and mounting holes (no text or symbols)Figure 1

natural_image
Technical line drawing of a mechanical assembly with two views of a shaft and housing (no text or symbols)Figure 2
natural_image
Technical line drawing of a mechanical assembly with rollers and a mounting bracket (no text or symbols)
WARNUNG

natural_image
Technical diagram showing a mechanical component with a labeled section D (no text or symbols present)
natural_image
Technical line drawing of a multi-tiered mechanical component with no visible text or symbolsAbbildung 1

natural_image
Technical line drawing of a mechanical assembly with two views (top and side), showing internal components without any text or symbols.Abbildung 2

natural_image
Top-down schematic of a vehicle interior layout with no visible text or symbolsnatural_image
Technical line drawing of a mechanical device with multiple housing compartments and internal components, showing exploded view (no text or symbols)natural_image
Technical line drawing of a mechanical component with multiple cylindrical parts and a separate view showing internal features (no text or symbols)natural_image
Technical line drawing of a mechanical component with no visible text or symbols
natural_image
Technical line drawing of a mechanical component with ribbed structure and mounting holes (no text or symbols)Abbildung 1

natural_image
Technical line drawing of a mechanical assembly with two views of a shaft and housing (no text or symbols)Abbildung 2
natural_image
Technical line drawing of a mechanical assembly with gears and a wheel (no text or symbols)
natural_image
Technical diagram showing a mechanical component with a labeled section D (no text or symbols present)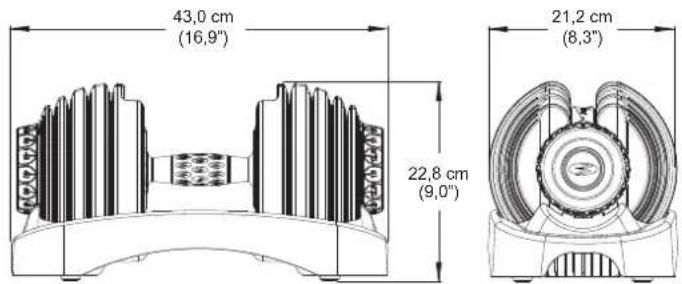
natural_image
Technical line drawing of a mechanical component with layered structure (no text or symbols)Afbeelding 1

natural_image
Technical line drawing of a mechanical assembly with gears and housing (no text or symbols)Afbeelding 2

natural_image
Top-down schematic of a vehicle interior layout with no visible text or symbolsnatural_image
Technical line drawing of a mechanical device with multiple housing compartments and internal components, showing exploded view (no text or symbols)natural_image
Technical line drawing of a mechanical component with multiple views and a close-up detail (no text or symbols)natural_image
Technical line drawing of a mechanical component with no visible text or symbolsnatural_image
Technical line drawing of a mechanical component with ribbed structure and mounting holes (no text or symbols)Afbeelding 1

natural_image
Technical line drawing of a mechanical assembly with two views of a shaft and housing (no text or symbols)Afbeelding 2
natural_image
Technical line drawing of a mechanical assembly with gears and a wheel (no text or symbols)
AVERTISSEMENT
SUPERFICIE LIBRE
ESPACE D'ENTRAÎNEMENT

natural_image
Technical diagram showing a mechanical component with a labeled section D (no text or symbols present)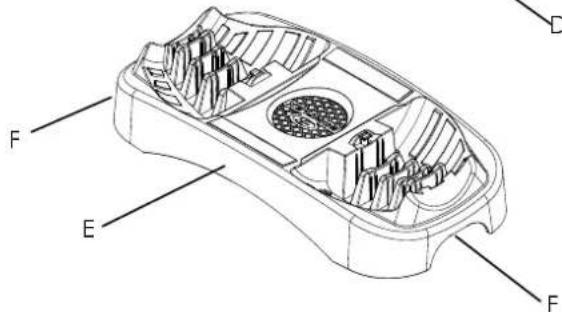
natural_image
Technical line drawing of a mechanical component with no visible text or symbolsFigure 1

natural_image
Technical line drawing of a mechanical assembly with gears and shafts (no text or symbols)Figure 2
natural_image
Technical line drawing of a mechanical assembly with labeled parts (D), showing internal components and cross-sections without any readable text or symbols.natural_image
Technical line drawing of a mechanical component with multiple circular features and a separate view showing internal components (no text or symbols)verrouillage.
natural_image
Technical line drawing of a mechanical component with ribbed structure and scale markings (no readable text or symbols)Figure 1
natural_image
Technical line drawing of a mechanical assembly with two views of a gear or transmission housing (no text or symbols present)Figure 2

natural_image
Technical line drawing of a mechanical assembly with gears and a wheel (no text or symbols)
ATTENZIONE
natural_image
Technical diagram of a mechanical component with labeled section D (no text or symbols beyond label)

natural_image
Diagram of a multi-tiered mechanical or electrical component with no visible text or symbolsFigura 1

natural_image
Technical line drawing of a mechanical assembly with two views (top and side), showing internal components without any text or symbols.Figura 2

natural_image
Top-down schematic of a vehicle showing front, rear, and side views with no text or symbolsnatural_image
Technical line drawing of a mechanical device with multiple housing compartments and internal components, shown with magnified views (no text or symbols)natural_image
Technical line drawing of a mechanical component with multiple cylindrical parts and a separate view showing internal features (no text or symbols)natural_image
Technical line drawing of a mechanical component with no visible text or symbols
natural_image
Technical line drawing of a mechanical component with ribbed structure and mounting holes (no text or symbols)Figura 1

natural_image
Technical line drawing of a mechanical assembly with gears and shafts (no text or symbols)Figura 2
natural_image
Technical line drawing of a mechanical assembly with rollers and a shaft (no text or symbols)
ADVERTENCIA
natural_image
Diagram of a mechanical component with labeled point D, showing internal structure without any text or symbols.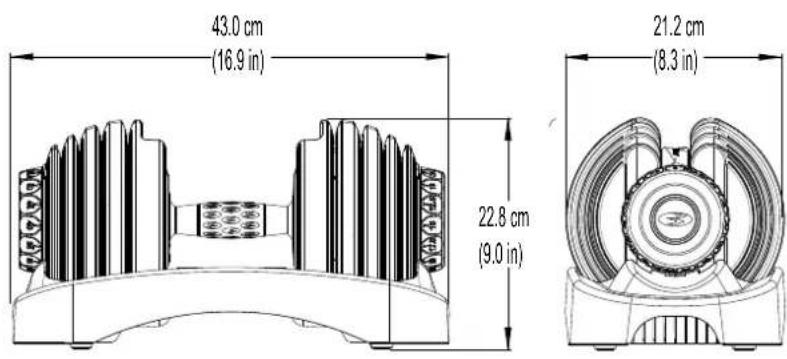
| KG | 3.4 4 | 5 5.7 6 | 8 8 9 10 | 0.2 11.4 | 13.6 15 | 5.9 18.2 | 20.5 22.7 23.9 | |||||||
| LBS | 5 7.5 10 | 12.5 15 | 17.5 20 | 22,5 | 25 30 35 | 40 45 | 50 52.5 |
Funcionamiento

natural_image
Technical line drawing of a mechanical assembly with gears and shafts (no text or symbols)Figura 2

natural_image
Technical line drawing of a mechanical assembly with labeled parts (D), showing internal components and a close-up inset view of a component detail (no text or symbols present)natural_image
Technical line drawing of a mechanical component with multiple cylindrical parts and internal cutouts (no text or symbols)natural_image
Technical line drawing of a mechanical assembly with gears and a wheel (no text or symbols)
AVISO
natural_image
Technical diagram showing a mechanical component with a labeled section D (no text or symbols present)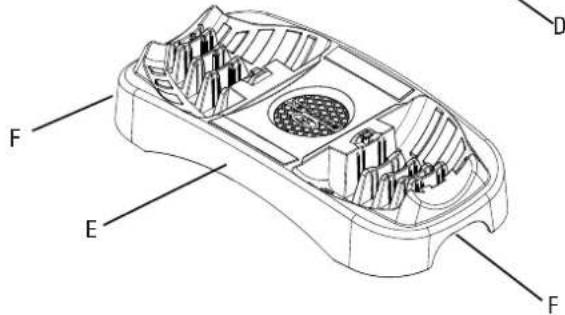
natural_image
Technical line drawing of a multi-tiered mechanical component with no visible text or symbolsFigura 1
natural_image
Technical line drawing of a mechanical assembly with two views of a shaft and housing (no text or symbols)Figura 2

natural_image
Top-down schematic of a vehicle interior layout with no visible text or symbolsnatural_image
Technical line drawing of a mechanical device with multiple housing components and internal cutouts, shown in two views (D), no text or symbols present.natural_image
Technical line drawing of a mechanical component with multiple cylindrical parts and a separate view showing internal features (no text or symbols)natural_image
Technical line drawing of a mechanical component with no visible text or symbolsnatural_image
Technical line drawing of a mechanical component with ribbed structure and mounting holes (no text or symbols)Figura 1

natural_image
Technical line drawing of a mechanical assembly with two views of a shaft and housing (no text or symbols)Figura 2
موقع الرقم التسلسلی
natural_image
Technical line drawing of a mechanical assembly with gears and a wheel (no text or symbols)• Business Management (0.1.2) على كل zijn محيط. • Because of the purpose, please check waiting before going to be done. • Please check waiting before going to be done.
تنبيه!
natural_image
Technical line drawing of a mechanical component with layered structure (no text or symbols)1 الشكل
natural_image
Technical line drawing of a mechanical assembly with two views (top and side), showing internal gears and shafts without any text or symbols.2 الشكل
natural_image
Technical line drawing of a mechanical device with multiple housing components and internal cutouts (no text or symbols)natural_image
Technical line drawing of a mechanical component with multiple cylindrical parts and a separate view showing internal features (no text or symbols)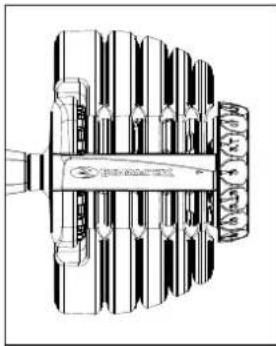
natural_image
Technical line drawing of a mechanical component with ribbed structure and mounting holes (no text or symbols)1 الشكل
natural_image
Technical line drawing of a mechanical assembly with gears and shafts (no text or symbols)2 الشكل

natural_image
Technical line drawing of a mechanical assembly with gears and a wheel (no text or symbols)


https://global.bowflex.com/en/manuals.html

https://global.bowflex.com/en/assembly-videos.html

- 1.25 LBS (0.57 KG)
- 2.5 LBS (1.13 KG)
- 5 LBS (2.27 KG)
- 7.5 LBS (3.4 KG)
- 7.5 LBS (3.4 KG)

| KG 2 | 27 3.4 | 4.5 5.7 | 6.8 8 9 | 10.2 11 | .4 13.6 | 15.9 18 | .2 20.5 | 22.7 23.9 | ||||||
| LBS 5 | 7.5 10 | 12.5 15 | 17.5 20 | 22.5 25 | 30 35 | 40 45 | 50 52.5 |
!
natural_image
Diagram of a multi-tiered mechanical or electrical component with no visible text or symbols
natural_image
Technical line drawing of a mechanical assembly showing internal gears and shafts (no text or labels)!
!

natural_image
Top-down architectural diagram of a multi-level building with central circular structure and symmetrical windows (no text or symbols)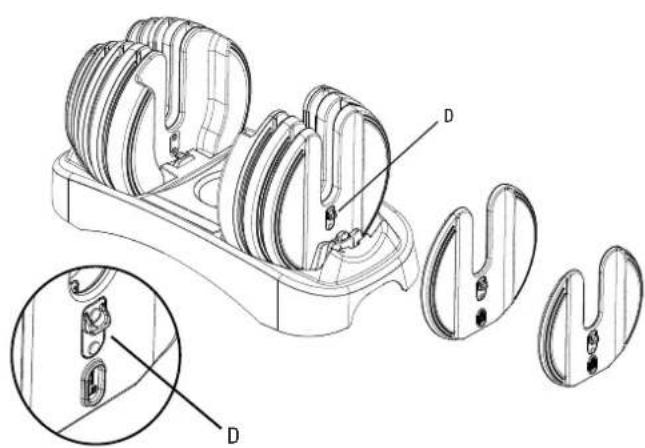
natural_image
Technical line drawing of a mechanical component with multiple views and labeled parts (no text or symbols present)
natural_image
Technical line drawing of a mechanical component with multiple cylindrical parts and internal cutouts (no text or symbols)
natural_image
Technical line drawing of a mechanical component with no visible text or symbols


!
natural_image
Technical line drawing of a mechanical component with layered structure (no text or symbols)!

natural_image
Technical line drawing of a mechanical assembly with gears and shafts (no text or symbols)
natural_image
Empty rectangular frame with no text, numbers, or symbols inside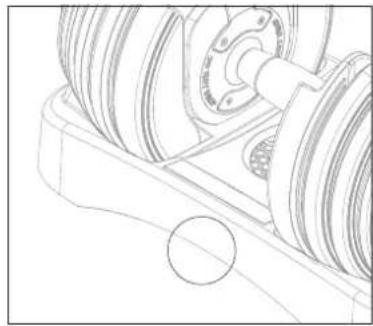
natural_image
Technical line drawing of a mechanical assembly with gears and a shaft (no text or symbols)


https://global.bowflex.com/en/manuals.html

https://global.bowflex.com/en/assembly-videos.html

- 1.25 LBS (0.57 KG)
- 2.5 LBS (1.13 KG)
- 5 LBS (2.27 KG)
- 7.5 LBS (3.4 KG)
- 7.5 LBS (3.4 KG)


| KG 2 | 27 3.4 | 4.5 5.7 | 6.8 8 9 | 10.2 11 | .4 13.6 | 15.9 18 | .2 20.5 | 22.7 23.9 | ||||||
| LBS 5 | 7.5 10 | 12.5 15 | 17.5 20 | 22.5 25 | 30 35 | 40 45 | 50 52.5 |
!
natural_image
Diagram of a multi-tiered cylindrical structure with no visible text or symbols
natural_image
Technical line drawing of a mechanical assembly showing two views of a gear or transmission system (no text or labels)!
!


natural_image
Top-down architectural diagram of a multi-level building with central circular structure and symmetrical windows (no text or symbols)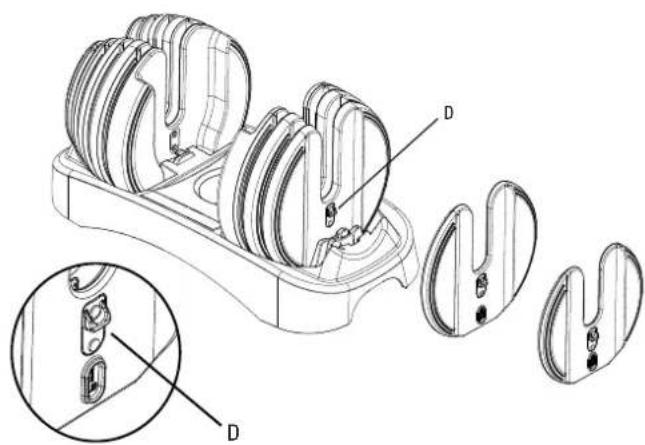
natural_image
Technical line drawing of a mechanical component with multiple views and labeled parts (no text or symbols present)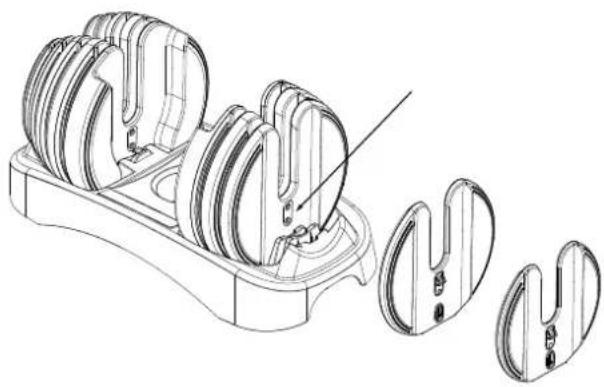
natural_image
Technical line drawing of a mechanical component with multiple views and a close-up view of internal parts (no text or symbols)
natural_image
Technical line drawing of a mechanical component with no visible text or symbols


!
natural_image
Technical line drawing of a mechanical component with ribbed structure (no text or symbols)!

natural_image
Technical line drawing of a mechanical assembly showing two views of a gear or transmission system (no text or labels)
BowFlex

- WARNING
- ADDITIONAL WARNING - ADJUSTABLE EQUIPMENT (FREE WEIGHT)
- WORKOUT SPACE
- CAUTION!
- WARRANTY
- FEATURES
- Understanding and testing the locking mechanism function
- Function
- Purpose
- Testing proper locking mechanism function
- MAINTENENCE
- BowFlex SelectTech Dumbbell maintenance
- TROUBLESHOOTING
- SelectTech Dumbbell locking mechanism test
- WARNUNG
- AVERTISSEMENT
- ESPACE D'ENTRAÎNEMENT
- verrouillage.
- ATTENZIONE
- ADVERTENCIA
- Funcionamiento
- AVISO
- BowFlex
Brand : BOWFLEX
Model : SelectTech 552i
Category : Fitness Equipment