HND 715T86S - Dishwasher HOOVER - Free user manual and instructions
Find the device manual for free HND 715T86S HOOVER in PDF.

User questions about HND 715T86S HOOVER
0 question about this device. Answer the ones you know or ask your own.
Ask a new question about this device
Download the instructions for your Dishwasher in PDF format for free! Find your manual HND 715T86S - HOOVER and take your electronic device back in hand. On this page are published all the documents necessary for the use of your device. HND 715T86S by HOOVER.
USER MANUAL HND 715T86S HOOVER
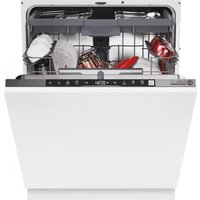
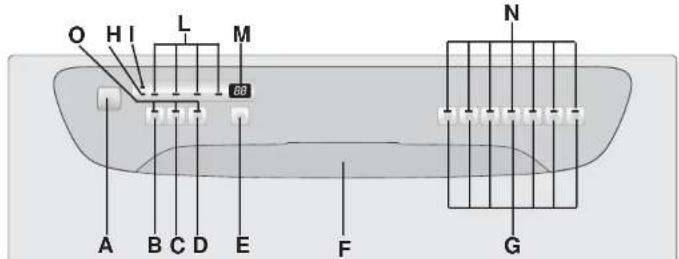
Pulsante "1/2 FLEXI"
A "ON/OFF" button
B "ECO" button
C "POWER" button
D "1/2 FLEX" button
E "DELAY START" button
F Open door
G "PROGRAMS" buttons
H "SALT EMPTY" light
I "RINSE AID EMPTY" light
L "PROGRAM STATUS" LEDs
M DIGITAL DISPLAY
N "PROGRAM SELECTION" LEDs
O "OPTION SELECTION" LEDs
DIMENSIONS:
| with working top | without working top | |
| Height | cm 85 | 82 |
| Depth | cm 60 | 57,3 |
| Width | cm 60 | 59,8 |
| Depth with door open | cm 120 | 117 |
| TECHNICAL DATA: | ||
| EN 50242 place load | 15 | |
| Capacity with pans and dishes | 9 persons | |
| Water supply pressure | Min. 0,08 - Max 0,8 MPa | |
| Fuse | (see rating plate) | |
| Power input | (see rating plate) | |
| Supply voltage | (see rating plate) | |
PROGRAM SELECTION AND SPECIAL FUNCTIONS
(Use in conjunction with programme guide)
Program settings
- Open the door and place dirty dishes inside the appliance.
Press the "ON/OFF" button ①.
After pressing the "ON/OFF" button, the LED for the factory set is "recommended" (which is ideal for full load daily use) or the LED for the "Auto Memory" program (see below) will blink. The length of the program will be shown on the display alternating hours with minutes [I.e.,[T] (1 hour)/[25] (25 minutes)].
IMPORTANT
The dishwasher has two very practical functions:
the "recommended" program for quick and sure selection;
- the "Auto'Memory", function which saves a program used at least 3 times consecutively so that if you regularly use the same washing cycle each time you do not have to continually set the program thereby saving time and effort.
To select an option, press the corresponding button (the LED will turn on).
Option buttons must be pressed BEFORE starting the program for them to be accepted.
To choose another program, press the corresponding button (the relevant LED will blink to confirm the selection).
To start the program, press the selected program button again to confirm. The program starts automatically, the relevant LED will stop blinking and remain on and the cycle length will appear on the display.
If the previously described operations were performed with the door open, the program will not start until the door is closed.
"AUTOMATIC" programs
AUTOCLEAN
The dishwasher is equipped with a dirt sensor, able to analyse water murkiness during all "AUTOMATIC" program phases (see program list); thanks to this sensor the washing cycle parameters are automatically adapted to the real quantity of dirt on dishes. Thus excellent washing results are guaranteed while optimising water and energy consumption.
Program interruption
Opening the door when a program is running is not recommended especially during the main washing and final hot rinse phases. However, if the door is opened while a program is running (for example, to add dishes) the machine stops automatically and the display will flash the remaining time before the end of the cycle. Close the door, without pressing any buttons. The cycle will start from where it left off (if it is necessary, the appliance will make a short thermal anti-shock programme before).
IMPORTANT
A running program can be interrupted without opening the door by pausing the dishwasher.
To pause, hold the running program button down for at least 2 seconds and release when the corresponding LED starts blinking.
Simply press the program button again to restart the cycle from where it left off (the LED will stop blinking and remain on).

WARNING!
If you open the door during the drying cycle, an audible audio signal advises you that the drying cycle has not yet completed.
Changing a running program
Proceed as follows to change or cancel a running program:
Hold down the current program button (with the LED on) for at least 5 seconds. All program LEDs will turn on for one second. The running program will be cancelled and the corresponding LED will start to blink. The display will go blank and the program end LED will turn on in the display
At this point a new program can be set.
IMPORTANT
If, when the program button is held down, "00" blinks on the display, it means that there is water in the appliance. Close the door (if open) and wait until the dishwasher empties the water. When empty a new program can be set.

WARNING!
Before starting a new programme, you should check that there is still detergent in the dispenser. If necessary, top up the dispenser.
If there is any break in the power supply while the dishwasher is operating, a special memory stores the selected programme and, when the power is restored, it continues where it left off (if it is necessary, the appliance will make a short thermal anti-shock programme before).
Program operations
When a program is running, the time until the end of the cycle will be displayed and the 4 "PROGRAM STATUS" LEDs:
WASH
"RINSE"
=
STOP = "END"
will light singularly and in sequence to indicate the current phase
Program end
The display will go blank and the last "PROGRAM STATUS" LED will light to indicate that the cycle has ended.
A 5 second buzzer will sound (if not muted) at 3 times at 30 second intervals to signal that the program has ended. The program end LED will light and the display will go blank. Dishes can now be removed and the dishwasher turned off by pressing the "ON/OFF" button or dishes can be loaded for a new cycle.
Option buttons
IMPORTANT
All options MUST be turned on or off, BEFORE starting the program.
"ECO" button
The "ECO" button provides over 20% time and energy savings by reducing the final water heating and drying times during the last rinse cycle.
This option is recommended for light soil washes, and for when the dishes are not required perfectly dry straight away.
If you want to get better drying, we advise to leave the dishwasher door slightly ajar at the end of the cycle, to allow for a natural circulation of air inside the dishwasher.
"POWER" button
The "POWER" option always guarantees the best results by more effectively dealing with heavier soiling. By using this option, the strength of the selected cycle will be increased, adding one rinse and increasing the temperature of the water in the washing phase where foreseen.
This option is recommended for very dirty dishes or when dirty dishes may not have been pre-treated allowing the soiling to dry up.
"1/2 FLEXI" button
To ensure that your dishwasher meets all your requirements, this button allows you to select:

oad Top Basket
By selecting this option dishes are washed in the top basket and cutlery in lower basket.

oad Lower Basket
By selecting this option dishes are washed in the lower basket only.
"DELAY START" button
Dishwasher start time can be set with this button, delaying start from 1 to 23 hours.
Proceed as follows to set a delayed start:
Press the "DELAY START" button ("00") to appear on the display).
Press the button again to increase the delay in hours (each time the button is pressed the delay is increased by 1 hour to a maximum of 23).
To start the countdown, press the selected program button (the relevant LED will stop blinking and remain on and the start time delay will be shown in the display).
At the end of the countdown, the program will automatically start and the length of the selected cycle will be shown in the display.
Proceed as follows to cancel a delayed start:
Hold the selected program button down for at least 5 seconds.
- Delayed start cancellation is confirmed when the selected program LED starts to blink. The display will go blank and the program end LED will light (any selected options will also be cancelled and the corresponding LEDs will turn off).
At this point, a new program and option buttons must be set to start a new program as indicated in the "PROGRAM SETTINGS" section.
Buzzer mute
The buzzer may be muted as follows:
With the dishwasher off, hold down the second option button (from the left) while simultaneously pushing the "ON/OFF" button.
"b'll appear on the display to indicate that the buzzer is on.
Press the same option button (second from the left) within 5 seconds ("b0" will appear on the display to indicate that the buzzer is off).
Wait for a buzzer to sound to indicate that the settings were saved.
To turn the buzzer on again, follow the same procedure ("b1" will appear on the display to indicate that the buzzer is on).

WARNING!
To ensure the correct operation of the anti-overflow safety device, it is recommended not to move or to tilt the dishwasher during operation. If it is necessary to move or to tilt the dishwasher, first make sure the washing cycle is finished and that no water is left in the tank.
The dishwasher is able to signal a series of faults in the display. AUTOMATIC FAULT SIGNALS
| FAULTS CAUSE SOL | UPTION | |
| E2 appears on the display and the buzzer sounds. | No water (inlet hose closed). | Turn off the dishwasher, open the inlet hose and reset the cycle. |
| E3 appears on the display and the buzzer sounds. | The machine cannot drain water. | Check if the drain tube is bent or if the siphon or filters are clogged.If the problem persists, contact Customer Service. |
| E4 appears on the display and the buzzer sounds. | Water leak | Check if the drain tube is bent or if the siphon or filters are clogged.If the problem persists, contact Customer Service. |
| E5 appears on the display and the buzzer sounds. | Electronic temperature control fault. | Contact Customer Service. |
| E6 appears on the display and the buzzer sounds. | Electronic control fault. | Contact Customer Service. |
| E8 or Ei appear on the display and the buzzer sounds. | The water heating element is not working correctly or the filter plate is clogged. | Clean the filter plate.If the problem persists, contact Customer Service. |
THE WATERBLOCK SYSTEM
The waterblock system has been designed to improve the safety of your appliance, particularly when the machine is left unattended. The waterblock system actually prevents flooding which might be caused by a machine malfunction or as a result of a fracture on the pipes.
How does waterblock work
The sump located in the base of the appliance collects any possible water leakage and operates a sensor which subsequently activates a valve placed under the water tap and stops any water from the supply even with the tap fully opened. If the box containing the electrical parts is damaged, remove the plug from the socket immediately.
To ensure perfect operation of the safety system, box "A" with the hose, should be connected to the tap as shown in figure "1". The inlet hose should not be cut, as it contains parts under load. If the hose is not long enough for correct connection, it must be replaced with a longer one. The hose can be obtained from your Service Agent.
This dishwasher is also equipped with an anti-overflow safety device which, if water exceeds normal levels due to malfunctions, automatically blocks water flow and/or drains excess quantities.
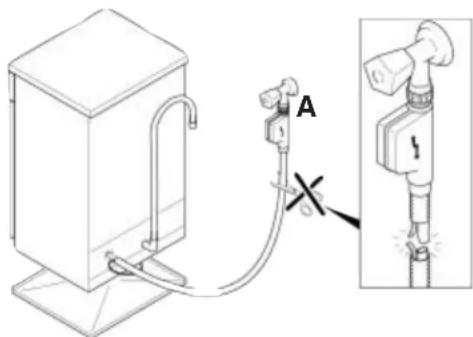
Fig. 1
PROGRAMME SELECTION
Wash with prewash
If setting the INTENSIVE wash programme, a second dose of about 20 g of detergent
(1 table-spoon) must be added directly in the machine. For A WASH 59' programme add 5 g.
| Programme | Description |
| 55-65°C | UNIVERSAL | AUTOCLEAN | ("RECOMMENDED" PROGRAMME) Once a day - for normal soiled pans and any other items that have been left all day for washing. |
| 65-75°C | INTENSIVE | Once a day - for heavily soiled pans and any other items that have been left all day for washing. | |
| 45-55°C | DELICATE | Suitable for delicate crockery and glassware. Also for less soiled items excluding pans. | |
| \(A_{wash}\ 59'}\ 70°C\) | \(A \ WASH\ 59'\) | Suitable for heavily soiled items that are to be washed straight after a meal (Max 8 place load). - WASHING CLASS A- | |
| \(E_{CO}\ 45°C\) | ECO | Energy Saving Programme suitable for normal soiled items. Using detergents with enzyme. Programme standardised to EN 50242. | |
| \(R_{29'}\ 50°C\) | RAPID 29' | Quick wash for dishes which are to be washed immediately after the meal. Wash load of 4/6 persons. | |
| COLD RINSE | Short cold pre-wash for items that are stored in the dishwasher until you are ready to wash a full load. | ||
(1) = "AUTOMATIC" PROGRAMS (AUTOCLEAN) ARE OPTIMISED THANKS TO THE DIRT SENSOR THAT ADAPTS WASHING PARAMETERS TO DISH DIRT LEVELS.
| Check list | Programme contents | Average duration in minutes | Special function buttons available | |||||||||
| Detergent for sealing (Prewash)1 | Detergent for washing | Clean filter | Check rinse aid dispenser | Hot pre wash | Cold pre wash | Main wash | First cold rinse | Second cold rinse | With cold water (15°C):**Tolerance ± 10%:-ECO2bution | *POWERT button | *1/2 FLEX3button | *DELAY START4button |
| ●● | ● | (○)● | 55°C/65°C | (○) | ○ | 80/100 | YES | YES | YES | YES | |||||
| ● | ●● | ●○ | ●65°C/75°C | ○ | (○) | ○ | 110/125 | YES | N/A | YES | YES | ||||
| ●● | ● | (○)● | 45°C/55°C | (○) | ○ | 70/85 | YES | N/A | YES | YES | |||||
| ●●●● | ○● | 70°C | ● | ○ | 59 | YES | YES | YES | YES | ||||||
| ●●●● | ● | 45°C | ● | ○ | 150 | YES | YES | YES | YES | ||||||
| ●●● | ●50°C | ○ | 29 | N/A | N/A | YES | YES | ||||||||
| ● | ○ | 5 | N/A | N/A | YES | YES |
WITH HOT WATER THE TIME REMAINING UNTIL THE END OF THE PROGRAMME IS AUTOMATICALLY DISPLAYED WHILE THE PROGRAMME IS RUNNING.
N/A = OPTION NOT AVAILABLE
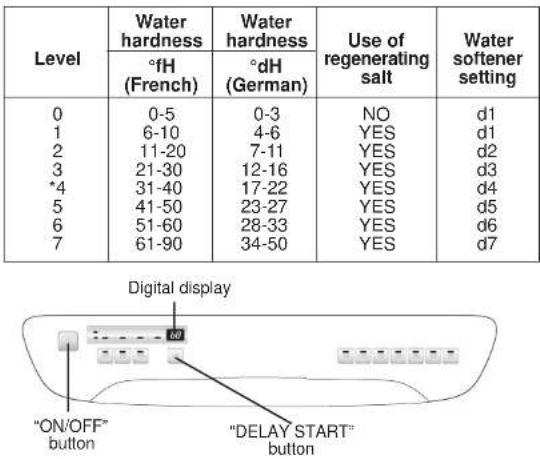
WATER SOFTENER UNIT
Depending on the source of supply, water contains varying amounts of limestone and minerals which are deposited on the dishes leaving whitish stains and marks. The higher the level of these minerals present in the water, the harder the water is. The dishwasher is fitted with a water softener unit which, through the use of special regenerating salt, supplies softened water for washing the dishes. The degree of hardness of your water can be obtained from your water supply company.
Regulating the water softener with electronic programmer
The water softener can treat water with a hardness level of up to 90^ (French grading) or 50^ (German grading) through 8 settings.
The settings are listed in the table below.
- The softener unit is set in the factory at level 4 (d4) as this satisfies the requirements of the majority of users.
Regulate the setting of your water softener unit according to the degree of hardness of your water as follows: - Keep the "DELAY START" button pressed in and at the same time press the "ON/OFF" button ① The factory setting "d4" will appear on the display.
- To change the setting, press the "DELAY START" button. Each time you press that button the setting will increase by one level. When you have reached "d7", the display will go back to "d1".
- When the required setting appears on the display, wait for an audible signal to confirm that the new setting has been stored in memory.
20
DESCRIPCION DE LOS MANDOS
A Tecla "MARCHA/PARO"
B Tecla "ECO"
CTecla "POWER"
Tecla "1/2 FLEXI"
E Tecla "INICIO DIFERIDO"
F Apertura puerta
G Teclas "PROGRAMAS"
H Senalación luminosa "FIN SAL"
I Señalación luminosa "FIN ABRILLANTADOR"
LEDs "FASES DE LAVADO"
M DISPLAY DIGITAL
N LEDs "SELECTION PROGRAMA"
LEDs "SELECTION OPCION"

21
=“LAVO”
= ^ ^
SSS = "SECO"
STOP = "FIN"
N.D. - OPGION NO DISPONIBLE
" LAVAGE"
=BINCAGE
SSS = "SECAGE"
STOP = "FIN"
Touche "DEPART DIFFERE"
| Programme | Description |
| ●● | ● | (○) | 55°C/65°C | (○) | ○ | 80/100 | OUI | OUI | OUI | OUI | |||||
| ● | ●● | ●○ | ●65°C/75°C | ○ | (○) | ○ | 110/125 | OUI | N/A | OUI | OUI | ||||
| ●● | ● | (○) | 45°C/55°C | (○) | ○ | 70/85 | OUI | N/A | OUI | OUI | |||||
| ●●●● | ○● | 70°C | ● | ○ | 59 | OUI | OUI | OUI | OUI | ||||||
| ●●●● | ● | 45°C | ● | ○ | 150 | OUI | OUI | OUI | OUI | ||||||
| ●●● | ● | ●50°C | ○ | 29 | N/A | N/A | OUI | OUI | |||||||
| ● | ○ | 5 | N/A | N/A | OUI | OUI |
AVEC DE LEAU CHAUBE LE TEMPS RESTANT AVANT LA FIN DU PROGRAMME DE LAVAGE EST AUTOMATIQUEMENT AFFICHÉ EN COURS DE CYCLE.
N/A = OPTION NON DISPONIBLE
ADOUCISSEUR D'EAU
| ●● | ● | (○)●55°C/65°C | (○) | ○ | 80/100 | JA | JA | AJA | ||||||
| ● | ●● | ●○ | ●65°C/75°C | ○ | (○) | ○ | 110/125 | JA | N.D | JA | JA | |||
| ●● | ● | (○)●45°C/55°C | (○) | ○ | 70/85 | JA | N.D | JA | JA | |||||
| ●●● | ○● | 70°C | ● | ○ | 59 | JA | A | JA | JA | |||||
| ●●● | ● | 45°C | ● | ○ | JA | A | JA | JA1 | ||||||
| ●● | ● | 50°C | ○ | 29 | N.D | N.D | JA | JA | ||||||
| ● | ○ | 5 | N.D | N.D | JA | JA |
^a BEI WARMWASSERANSCHLUB KORRIGIER TICH DIE RESTZEIT ZUM PROGRAMMENDE AUTOMATISCH IM LAUF DE DES PROGRAMMENDES.
N.D. - OPTION NICT VERFUGBAR
WATERBLOCK
| ●● | ● | (○)●55°C/65°C | (○) | ○ | 80/100 | JA | JA | AJA | ||||||
| ● | ●● | ●○ | ●65°C/75°C | ○ | (○) | ○ | 110/125 | JA | N/A | JA | JA | |||
| ●● | ● | (○)●45°C/55°C | (○) | ○ | 70/85 | JA | N/A | JA | JA | |||||
| ●●●● | ○● | 70°C | ● | ○ | 59 | JA | A | JA | JA | |||||
| ●●●● | ● | 45°C | ● | ○ | JA | A | JA | JA1 | ||||||
| ●●● | ● | 50°C | ○ | 29 | N/A | N/A | JA | JA | ||||||
| ● | ○ | 5 | N/A | N/A | JA | JA |
/l() = "AUTOMATISCHE" PROGRAMMA'S (AUTOCLEAN) ZIJN MOGELIJK DANKZU EEN VERVULINGSSensor DAT HET WASPROCES AANPAST AAN DE MATE VAN VERVULING VAN DE VAAT.
WANNEER DE MACHINE WARM WATER GEBRIKTI TUDENS EEN PROGRAMMA, KOMT AUTOMATISCH. OP DE DISPLAY TE STAINA HOEVEEL MINUTEN HET NOG DUURT TOT HET EINDE VAN HET PROGRAMMA.
N/A-KEUZEMOGELIKKHEID NIET AANWEZIG.
WATERONTHARDINGSSYSTEEM
| ●● | ● | (○)●65°C/65°C | (○) | ○ | 80/100 | SIM | SIM | SIM | SIM | |||||
| ● | ●● | ○ | ●65°C/75°C | ○ | (○) | ○ | 110/125 | SIM | N/A | SIM | SIM | |||
| ●● | ● | (○)●45°C/55°C | (○) | ○ | 70/85 | SIM | N/A | SIM | SIM | |||||
| ●●● | ○● | 70°C | ● | ○ | 59 | SIM | SIM | SIM | SIM | |||||
| ●●●● | ● | 45°C | ● | ○ | 150 | SIM | SIM | SIM | SIM | |||||
| ●●● | ● | 50°C | ○ | 29 | N/A | N/A | SIM | SIM | ||||||
| ● | ○ | 5 | N/A | N/A | SIM | SIM |
COM AQUA QUENTE, O TEMPO QUE FALTA ATO AOF HIM DO PROGRAMA E AUTOMATICAMENTE APRESENTADO ENQUANTO O PROGRAMA ESTIVER A DECORRER.
The manufacturer declines all responsibility in the event of any printing mistakes in this booklet. The manufacturer also reserves the right to make appropriate modifications to its products without changing the essential characteristics.