
TYST10H - TV PANASONIC - Free user manual and instructions
Find the device manual for free TYST10H PANASONIC in PDF.
| Product type | 16:9 plasma television |
| Brand | Panasonic |
| Model | TYST10H |
| Compatible screen size | 37, 42 or 50 inches |
| Panel type | Plasma |
| Maintenance | Wipe with a dry cloth. For stubborn dirt, use a cloth dampened with a mild neutral detergent solution, then wipe with a dry cloth. Do not use solvents, thinners or household wax. |
| Safety | Installation by at least two people. Use the provided anti-tip brackets. Leave a gap of 10 cm at the top, left and right, 6 cm at the bottom and 7 cm at the rear. Do not use if the pedestal is bent, cracked or broken. |
| Included mounting parts | Short screws (4), wide screws (3), long screws (4), foot (1), base (1), vertical supports (2), hexagon socket wrench (1), straps (2), black screws (2), screws (2), wood screws (1), attachments (4) |
| Included accessories | Cable ties |
| Mounting options | On TV stand (pedestal) or wall mounting with attachments |
| Installation precautions | Have installation done by a qualified technician. Install on a stable, level surface. Avoid very humid places. Tighten all screws properly. |
| Handling | Do not expose to direct sunlight or near a heating appliance. Do not attach adhesive tape or labels. |
| Languages of the manual | French, English, German, Danish, Spanish, Italian, Japanese, Dutch, Swedish |
Frequently Asked Questions - TYST10H PANASONIC
User questions about TYST10H PANASONIC
0 question about this device. Answer the ones you know or ask your own.
Ask a new question about this device
Download the instructions for your TV in PDF format for free! Find your manual TYST10H - PANASONIC and take your electronic device back in hand. On this page are published all the documents necessary for the use of your device. TYST10H by PANASONIC.
USER MANUAL TYST10H PANASONIC
Precautions with regard to setting up
WARNING
Installation work should only be carried out by a qualified technician.
- If the pedestal is not installed correctly, the Wide Plasma Display may fall over and personal injury may result.
CAUTION
Do not use any displays other than those given in the catalogue.
Do not climb up onto the pedestal or use it as a step. (Young children should be made particularly aware of this caution.)
- If the unit falls over or becomes damaged through misuse, injury may result.
Do not use the pedestal if it becomes warped or physically damaged.
- If you use the pedestal whilst it is physically damaged, personal injury may result. Contact your nearest Panasonic Dealer immediately.
Set up on a stable, level surface.
- If this is not done, the unit may fall over and become damaged, and personal injury may result.
Do not use in places with high humidity.
- Long-term usage in such conditions can cause warping or deformation. This can lead to loss of strength, and the unit may fall over and become damaged, and personal injury may result.
During setting-up, make sure that all screws are securely tightened.
- If sufficient care is not taken to ensure screws are properly tightened during assembly, the pedestal will not be strong enough to support the Wide Plasma Display, and it might fall over and become damaged, and personal injury may result.
Use the accessory fall-prevention brackets to secure the Wide Plasma Display.
- If the unit is knocked or children climb onto the pedestal with the Wide Plasma Display installed, the Wide Plasma Display may fall over and personal injury may result.
Two people are required to install and remove the display.
-
If two people are not present, the display may be dropped, and personal injury may result.
-
Leave a space of at least 3^15 / 16 inches (10 cm) at the top, left and right, at least 2^3 / 8 inches (6 cm) at the bottom, and at least 2^49 / 64 inches (7 cm) at the rear.
Notes on handling
1) If the unit is placed in direct sunlight or next to a stove, the light and heat may cause discoloration or deformation.
2) Cleaning
Wipe the unit with a dry cloth. If the unit is particularly dirty, clean it using a cloth soaked with water to which a small amount of neutral detergent has been added, and then wipe with a dry cloth.
Do not use products such as solvents, thinner or household wax for cleaning, as they can damage the surface coating.
(If using a chemically-treated cloth, follow the instructions supplied with the cloth.)
3) Do not attach sticky tape or labels, as they can make the surface of the pedestal dirty.
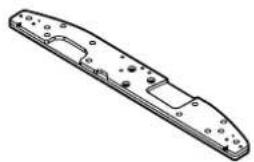
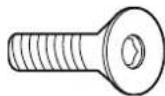
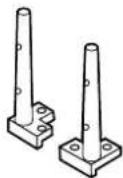
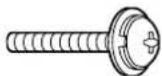
Parts for assembly
① Short screws .... 4

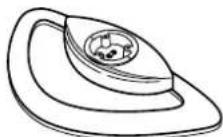
⑤ Base 1
② Large screws ... 3
⑥ Poles 2
③ Long screws ... 4
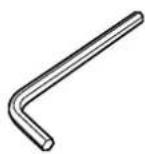
⑦ Allen key ......... 1
④ Pedestal 1
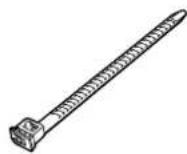
⑧ Binding strap ... 1
Assembling the stand
1. Attach the base to the pedestal.
Using the Allen key 7securely fasten the base to the pedestal with the large screws ② as shown in the diagram on the right.

2. Attach the poles.
Securely attach both left and right poles to the top face of the base as shown below using short screws 1.
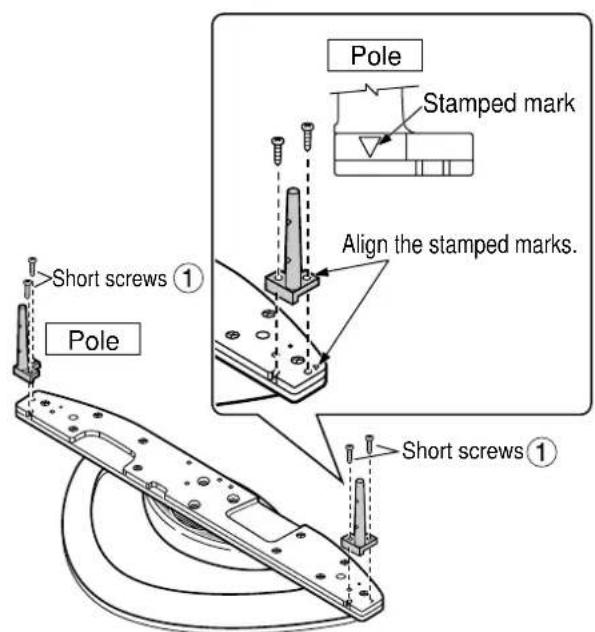
For 42-inch/50-inch
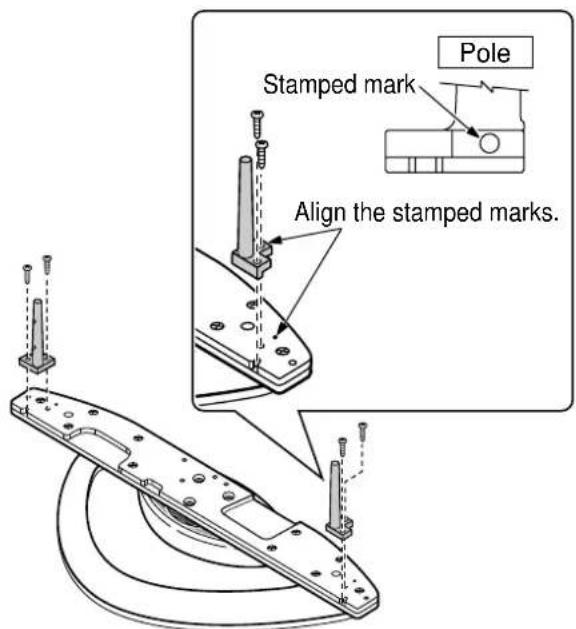
For 37-inch
Attach to the display console
- Attach the connection cables to the display.
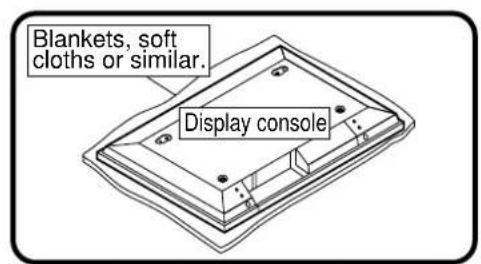
* Place clean blankets or similar on a level floor or table, and place the display on top of them facing down.

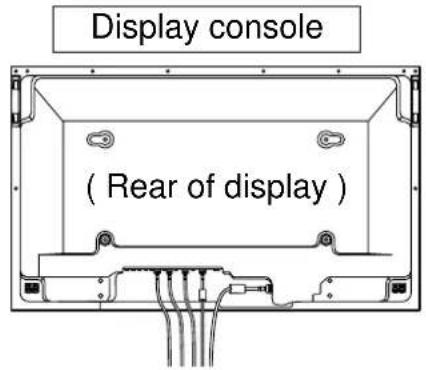
- Insert the poles into the holes in the display console.
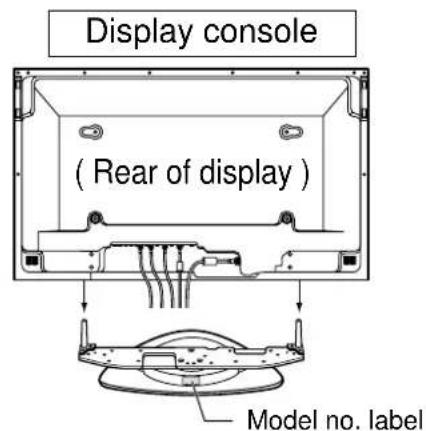
Position the side of the pedestal with the model no. label to the rear. Push the assembly into the display until it stops.
- Fasten with screws
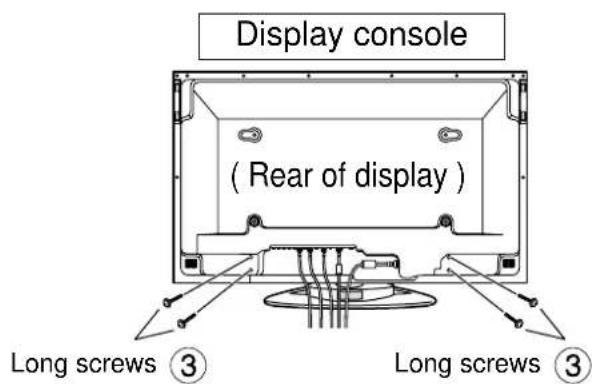
* Work on a level and stable surface.
Cable Binding Instructions
- Bind all cables to the PDP base with the supplied binding strap.
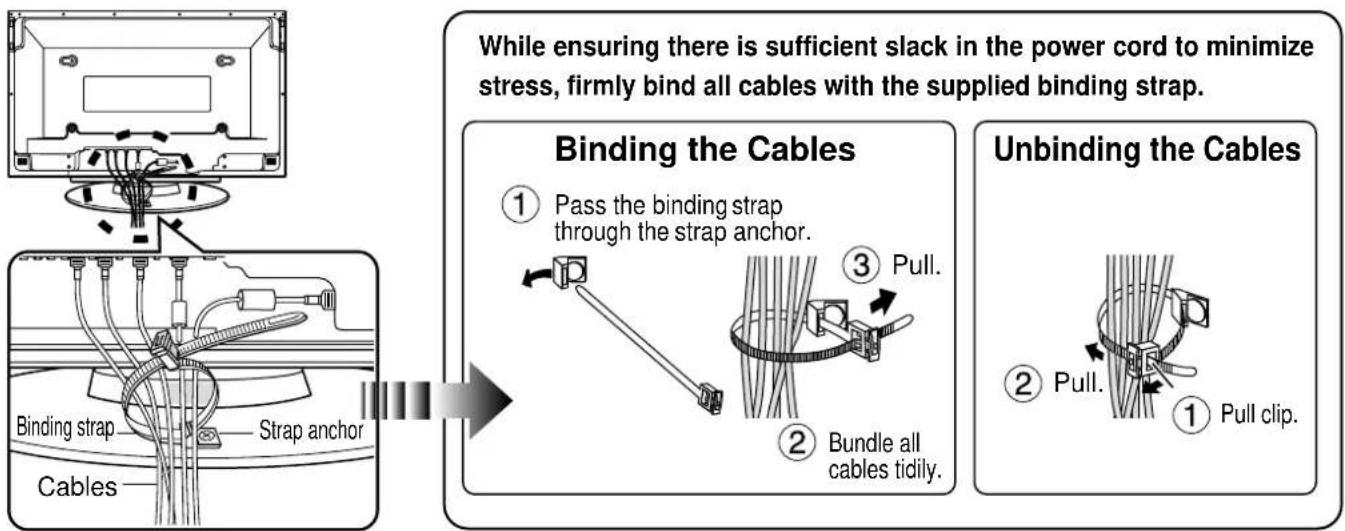
Rear View
Secure the console to prevent tipping
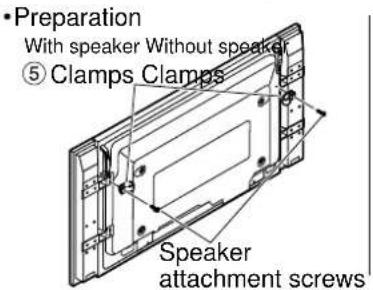
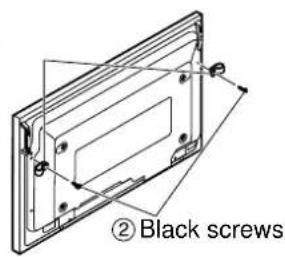
Parts for assembly

① Bands.....2

② Black screws


(3) screws.......2

Clamrod.screws
(5)

Attaching to a TV stand Attaching to a wall
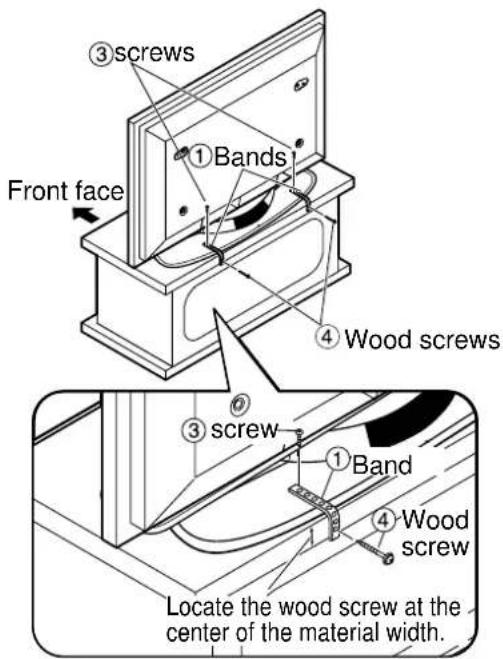
(5)
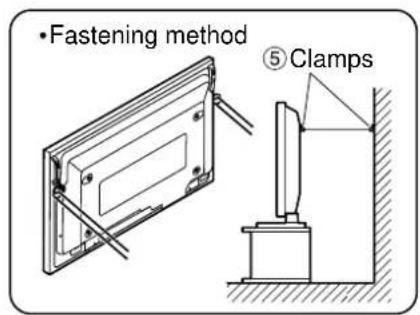
- Securely attach to a wall, pillar or similarly solid structural feature using separately-obtained products such as cords or chains of adequate strength.
Dimension diagram
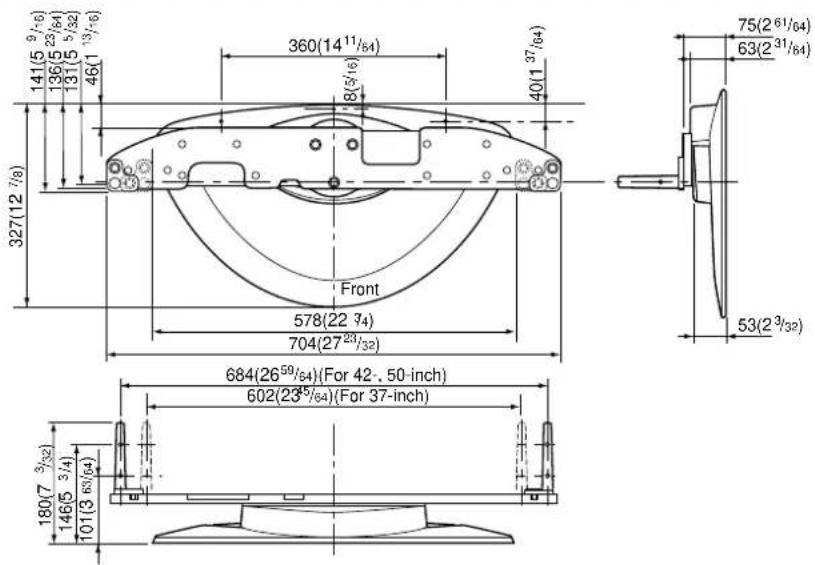
Units: mm (inches)
Matsushita Electric Industrial Co., Ltd
Web Site: http://www.panasonic.co.jp/global/
Panasonic Consumer Electronics Company Division of Matsushita Electric Corporation of America
One Panasonic Way Secaucaus, NJ 07094
Panasonic Sales Company, Division of Matsushita Electric of Puerto Rico, Inc.
AVE. 65 de Infanteria, Km 9.5
San Gabriel Industrial Park
Carolina, Puerto Rico 00985
Panasonic®
RACKS AND STANDS
Panasonic Consumer Electronics Company or Panasonic Sales Company (collectively referred to as "the warrantor"), will replace parts in case of defects in materials or workmanship, free of change, in the USA or Puerto Rico, for ten (10) days from the date of the original purchase.
In-warranty parts in the USA
can be obtained during the warranty period be contacting:
Panasonic Services Company (PASC)
20421 84th Avenue South
Kent, Washington 98032
Tel.:1-800-833-9626
Fax.:1-800-237-9080
(6 am to 5 pm Monday-Friday; 6 am to 10:30 am Saturday; PST)
Service in Puerto Rico can be obtained during the warranty period by calling the telephone number listed above.
This warranty is extended only to the original purchaser. A purchase receipt or other proof of the original purchase is required for replacement parts under the warranty.
This warranty only covers failures due to materials and workmanship and does not cover normal wear. The warranty does not cover damages which occurred in shipment or failures which result from accidents, misuse, abuse, neglect, mishandling, misapplication, faulty installation, set-up adjustments, improper maintenance, alteration, line power surge, lightning damage, modification, or commercial use, such as hotel, office, restaurant, or other business or rental use of the product, or damage that is attributable to acts of God.
LIMITS AND EXCLUSIONS
There are no express warranties except as listed above.
PANASONIC SHALL NOT BE LIABLE FOR INCIDENTAL OR CONSEQUENTIAL DAMAGE RESULTING FROM THE USE OF THIS PRODUCT, OR ARISING OUT OF ANY BREACH OF THIS WARRANTY. ALL EXPRESS AND IMPLIED WARRANTYES. INCLUDING THE WARRANTYES OF MERCHANTABILITY, ARE LIMITED TO THE APPLICABLE WARRANTY PERIOD SET FORTH ABOVE.
Some states do not allow the exclusion or limitation of incidental or consequential damages, or limitations on how long an implied warranty lasts, so the above exclusions or limitations may not apply to you.
This warranty gives you specific legal rights and you may also have other rights which vary from state to state. If a problem with this product develops during or after the warranty period, you may contact your dealer or call the number listed above.
If the problem is not handled to your satisfaction, then write to the Customer Satisfaction Center at the Panasonic Consumer Electronics Company address indicated above.
Matsushita Electric Industrial Co., Ltd
Web Site: http://www.panasonic.co.jp/global/
Matsushita Electric Industrial Co., Ltd
Web Site: http://www.panasonic.co.jp/global/
Matsushita Electric Industrial Co., Ltd
Web Site: http://www.panasonic.co.jp/global/
Matsushita Electric Industrial Co., Ltd
Web Site: http://www.panasonic.co.jp/global/
Matsushita Electric Industrial Co., Ltd
Web Site: http://www.panasonic.co.jp/global/
Matsushita Electric Industrial Co., Ltd
Web Site: http://www.panasonic.co.jp/global/
Matsushita Electric Industrial Co., Ltd
Web Site: http://www.panasonic.co.jp/global/
孕藻哉如藻藻藻藻藻藻藻藻藻藻藻藻藻藻藻藻藻藻藻藻藻藻藻藻藻藻藻藻藻藻藻藻藻藻藻藻藻藻藻藻藻藻藻藻藻藻藻藻藻藻藻藻藻藻藻藻藻藻藻藻藻藻藻藻藻藻藻藻藻藻藻藻藻藻藻藻藻

丛起于而,如云。
Dus晋LReI BnTcH 1
StEnDr的BbKJtJrR
J 2sAe IiE i

DIsSpLReI BnKhaNahHb HsHae的JinIiIit#