VivoWatch BP - Smartwatch ASUS - Free user manual and instructions
Find the device manual for free VivoWatch BP ASUS in PDF.
| Product type | Smartwatch |
| Brand | ASUS |
| Model | VivoWatch BP |
| Display | Touchscreen |
| Sensors | PPG (photoplethysmogram), electrode, accelerometer (implicit) |
| Water and dust resistance | IP67 (splashes, rain, snow, shower; not swimming) |
| Power | Rechargeable lithium-ion battery; charges via charging dock 5 V DC 0.5 A |
| Connectivity | Bluetooth (max range 3 m) |
| Main functions | Heart rate measurement, emotional stress assessment (PTT index and blood flow estimation), activity tracking (steps, calories, sleep), exercise mode with GPS, call and message notifications, walking and medication reminders |
| Strap | Medical-grade silicone |
| Operating temperature | 5 °C to 40 °C (ambient) |
| Storage temperature | -20 °C to 45 °C |
| Care and cleaning | Keep clean and dry; clean charging connectors with a dry cloth; avoid chemical liquids or salt water |
| Safety | Do not overtighten the strap; remove if irritation occurs; do not leave in a car in the sun; not a medical device, do not adjust medications |
| Companion app | ASUS HealthConnect (Android/iOS) |
| Calibration required | Yes, with a reliable blood pressure monitor (2-3 times for accuracy) |
Frequently Asked Questions - VivoWatch BP ASUS
User questions about VivoWatch BP ASUS
0 question about this device. Answer the ones you know or ask your own.
Ask a new question about this device
Download the instructions for your Smartwatch in PDF format for free! Find your manual VivoWatch BP - ASUS and take your electronic device back in hand. On this page are published all the documents necessary for the use of your device. VivoWatch BP by ASUS.
USER MANUAL VivoWatch BP ASUS
Android App E-manual iOS App
Table of Contents
English 1
Français....35
Deutsch 69
Italiano....103
Русский 137
Español 171
Português 205
Čeština 239
Eesti....273
Lietuvių....307
Latviešu 341
Appendix 375
Introduction
Thank you for purchasing the ASUS VivoWatch BP! ASUS VivoWatch BP is the world's first wearable device that packs ASUS HealthAI technology and some fitness functions with all the benefits of being accurate, smart, and compact. Please fill in the following information for future reference:
DATE PURCHASED: ____
SERIAL NUMBER: ____
Staple your receipt here
Register your product at https://account.asus.com/product_reg.aspx
About this manual
This manual provides information about the hardware and software features of your ASUS VivoWatch BP, organized through the following chapters:
Chapter 1: Getting started
This chapter details the hardware components of your ASUS VivoWatch BP and shows you how to use the different parts of your ASUS VivoWatch BP.
Chapter 2: Using your ASUS VivoWatch BP
This chapter provides an overview of using your ASUS VivoWatch BP.
Appendix
This section includes notices for your ASUS VivoWatch BP.

Read all of the information in the instruction manual and any other literature in the box before operating the device. For the full manual version of your ASUS VivoWatch BP, visit our multi-language web site at: https://www.asus.com/VivoWatch/VivoWatch-BP-HC-A04/HelpDesk_Manual/.
Conventions used in this manual
To highlight key information in this manual, some text are presented as follows:
This message contains vital information that must be followed to complete a task.
This message contains additional information and tips that can help complete tasks.
This message contains important information that must be followed to keep you safe while performing tasks and prevent damage to your ASUS VivoWatch BP's data and components.
Typography
Bold = This indicates a menu or an item that must be selected.
Italic = This indicates sections that you can refer to in this user guide.
Safety precautions
- The ASUS VivoWatch BP and the charging dock must be recycled or disposed of properly.
- Keep any small components away from children.
- Your ASUS VivoWatch BP should only be used in environments with ambient temperatures between 5°C and 40°C, and stored in environments with ambient temperatures between -20°C and 45°C.
- DO NOT leave your ASUS VivoWatch BP in a hot car. Temperatures in a parked car on sunny days can exceed the recommended ambient temperatures.
- Some people may experience irritations to certain materials used in jewelry, watches, and other wearable items that are in prolonged contact with their skin. This can be due to allergies, environmental factors, extended exposure to irritants like soap, sweat, or other causes.
- You may be more likely to experience irritation from any wearable device if you have allergies or other sensitivities.
- If you have known skin sensitivities, please take special care when wearing your ASUS VivoWatch BP.
- You may be more likely to experience irritation from your ASUS VivoWatch BP if you wear it too tightly.
-
Remove your ASUS VivoWatch BP periodically to allow your skin to breathe.
-
Keeping your ASUS VivoWatch BP and the strap clean and dry will reduce the possibility of skin irritation.
- If you experience redness, swelling, itchiness, or any other irritation or discomfort on your skin around, or beneath, your ASUS VivoWatch BP, please remove your ASUS VivoWatch BP and consult your physician before resuming wear.
- Continued use, even after symptoms subside, may result in renewed or increased irritation.

- The ASUS VivoWatch BP is not a medical device and makes no medical claims. It is not intended to diagnose health conditions. The measurement results are only for your reference.
- DO NOT adjust medication based on the measurement results from the ASUS VivoWatch BP. Take medication as prescribed by your physician. Only a physician is qualified to diagnose and treat the disease.
Battery precautions
- Do not dispose of in fire.
- Never attempt to short-circuit the battery.
- Never attempt to disassemble and reassemble the battery.
- Discontinue usage if leakage is found.
[Non-Text]
Getting started
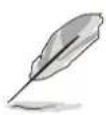
Getting to know your ASUS VivoWatch BP

- Your ASUS VivoWatch BP can be used as a standalone device for measurements and time adjustments.
- Download and install the companion app for a complete overview of your health data. For more details, refer to the Installing the companion app section in this manual.
• ASUS VivoWatch BP complies with IP67 for dust and water-resistant. Suitable for splashes, rain, snow, or showering. Not suitable for swimming, diving, snorkeling, scuba diving, or high speed watersports.
- DO NOT use your ASUS VivoWatch BP in liquids with chemicals or salt water (such as sea water, swimming pools, or hot springs) as it may damage the charging connectors. If your ASUS VivoWatch BP has been in contact with the mentioned liquids, ensure to thoroughly rinse the connectors with fresh water and dry it with a clean cloth to prevent corrosion.
1
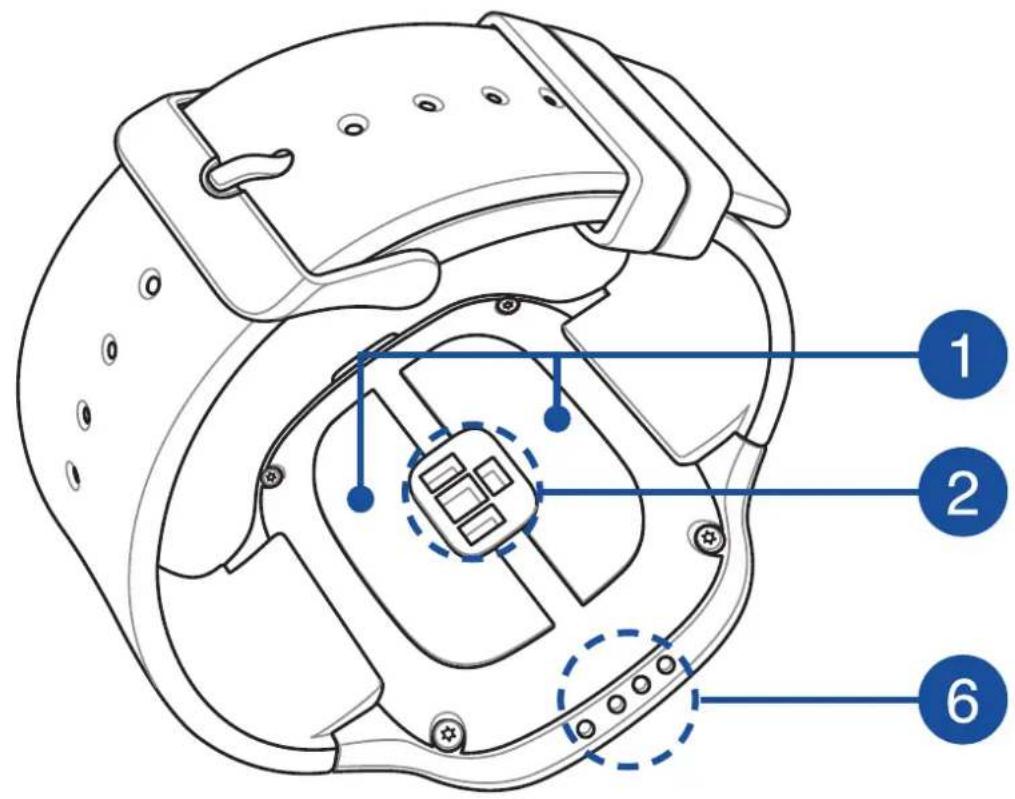
Electrode
This electrode works in conjunction with the PPG sensor to allow you to measure your heart rate and health data.
For more details, refer to the Using your ASUS VivoWatch BP section in this manual.
2
PPG (Photoplethysmogram) sensor
This sensor works in conjunction with the electrode to allow you to measure your health data. This sensor also allows you to measure your heart rates.
For more details, refer to the Using your ASUS VivoWatch BP section in this manual.
3
Touch screen display panel
Use the touch screen display panel to operate your ASUS VivoWatch BP using gestures.

For more details, refer to the Using your ASUS VivoWatch BP section in this manual.

Home button
Press this button on your ASUS VivoWatch BP to return to the home screen. You can also press this button to unlock your ASUS VivoWatch BP or enable other functions.
Press and hold this button for two (2) seconds to power on your ASUS VivoWatch BP, or press and hold this button for fifteen (15) seconds to power off your ASUS VivoWatch BP.
To prevent data lost, ensure to upload your data before powering off your ASUS VivoWatch BP.

Strap (Medical grade silicone)
The strap allows you to wear your ASUS VivoWatch BP on your wrist.

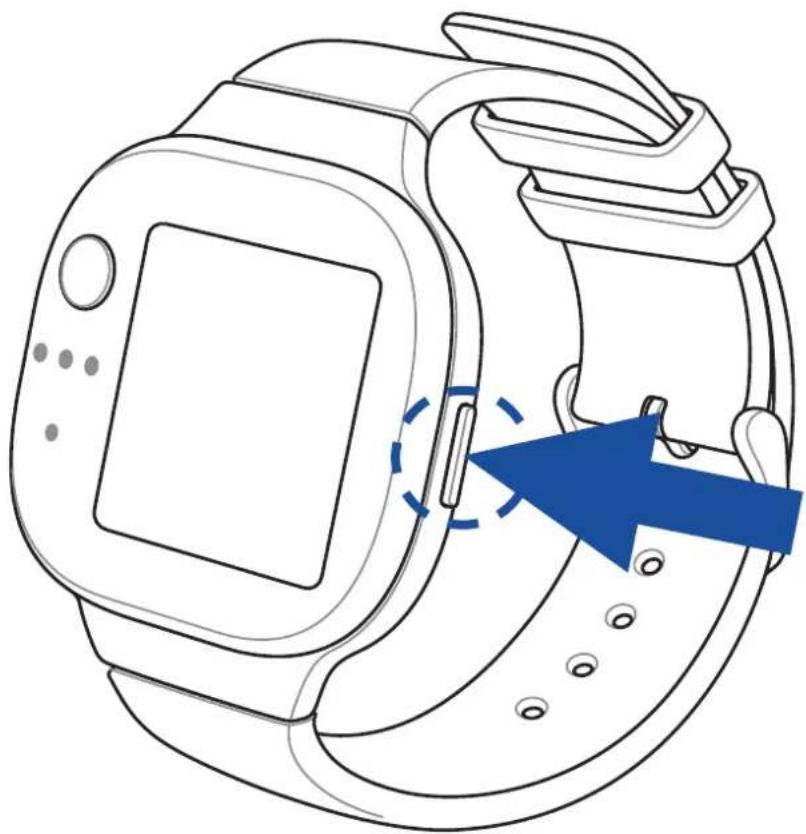
Charging connectors (Input: 5Vdc, 0.5A)
Align and connect these charging connectors to the charging connectors on your charging dock to charge the battery of your ASUS VivoWatch BP.
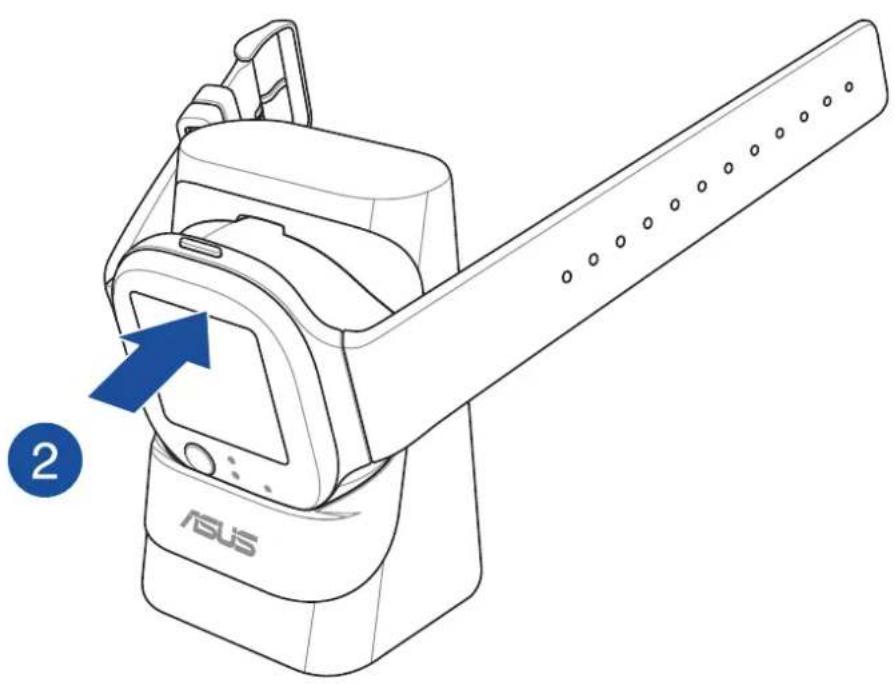
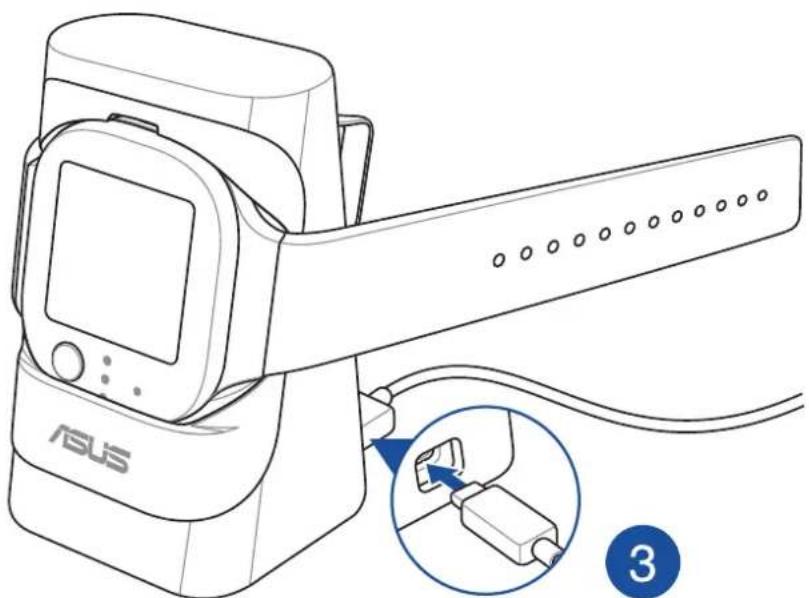
Charging your ASUS VivoWatch BP
- Align and place the charging connectors on your ASUS VivoWatch BP onto the charging connectors in the charging dock.

Ensure that the charging connectors are clean and dry before charging.
- Gently push your ASUS VivoWatch BP so that it is firmly seated inside the charging dock.
- Connect the USB cable to the charging dock, then connect the USB cable to a power source to start charging.
natural_image
Line drawing of a Huawei Smartwatch (ASUS) device with a close-up inset showing internal components (no text or symbols)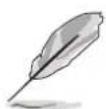
Your ASUS VivoWatch BP automatically powers on when fully charged.
- Connecting the USB cable improperly may cause serious damage to the ASUS VivoWatch BP. Any damage caused by misuse is not covered by the warranty.
- Do not short circuit the charging connectors on the dock.
• Some power banks can not detect low current devices, and will therefore not be able to charge the ASUS VivoWatch BP.
2
Using your ASUS VivoWatch BP
Installing the companion app
Pair your ASUS VivoWatch BP with the companion app to take advantage of all its features, such as activity data, pill reminders, path tracking, message and call notifications, and sleep and health recommendations.
- On your phone, log in or sign up for a Google account or Apple ID.
- Launch Play Store or App Store.

natural_image
Blue square icon with white abstract geometric design resembling a stylized letter 'A' or cross (no text or symbols)- Search for ASUS HealthConnect App, then install the companion app.
natural_image
Simple grayscale icon of a magnifying glass (no text or symbols)
natural_image
App icon featuring a blue heart with circular arrows and dots on a dark background (no text or symbols)Pairing for the first time

- Turn on the Bluetooth of your phone before pairing.
-
Ensure that the ASUS VivoWatch BP is within three meters from your phone.
-
Press and hold the home button for two (2) seconds to power on your ASUS VivoWatch BP.
- Launch the ASUS HealthConnect App.
- Follow the onscreen instructions on your phone and ASUS VivoWatch BP to complete the pairing process.
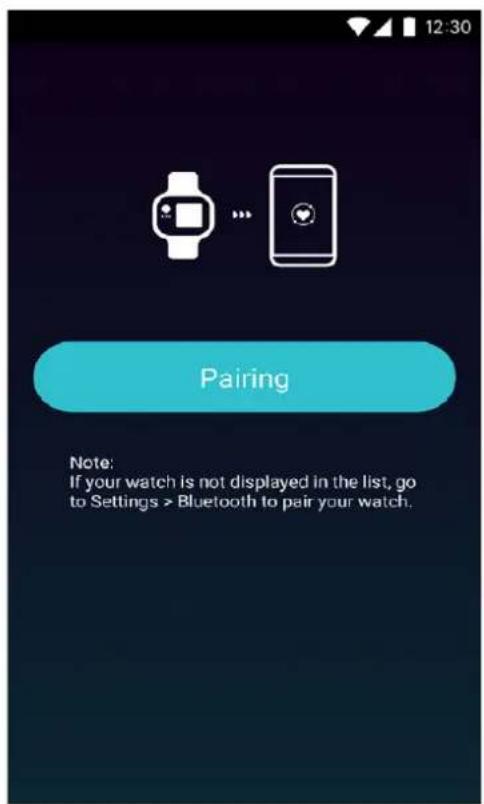
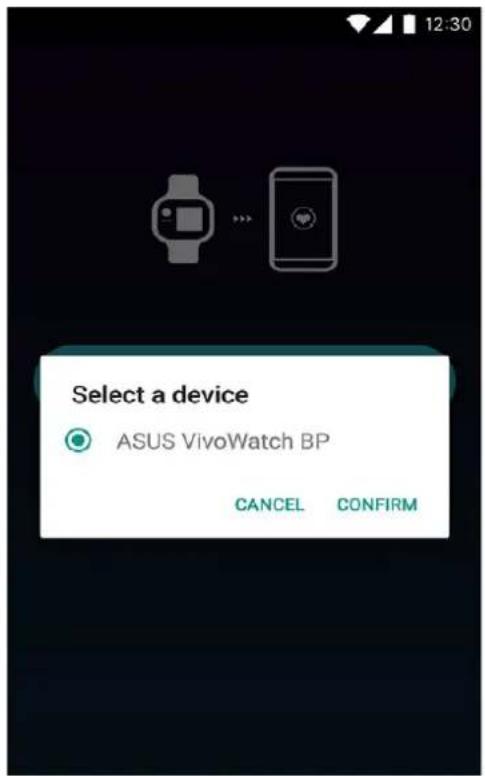
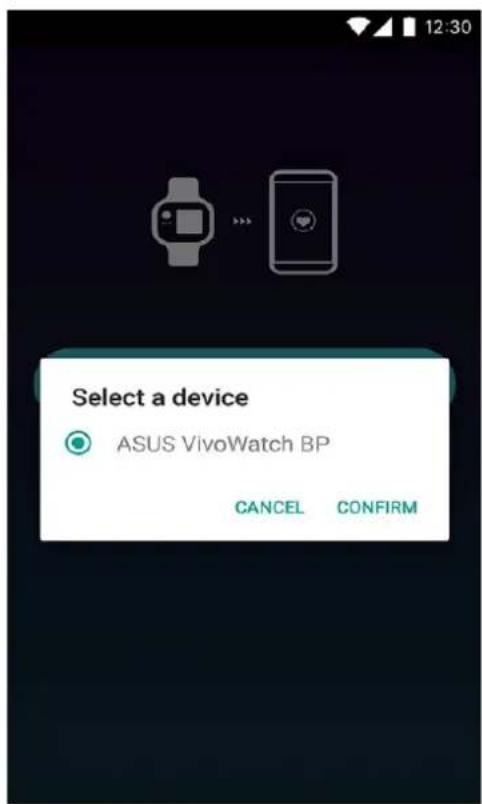
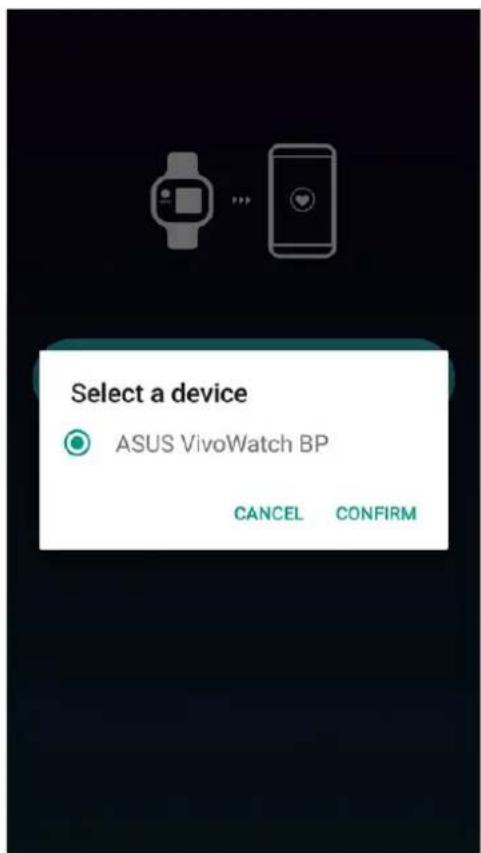
Pairing with another device or pairing again

- Turn on the Bluetooth of your phone before pairing.
-
Ensure that the ASUS VivoWatch BP is within three meters from your phone.
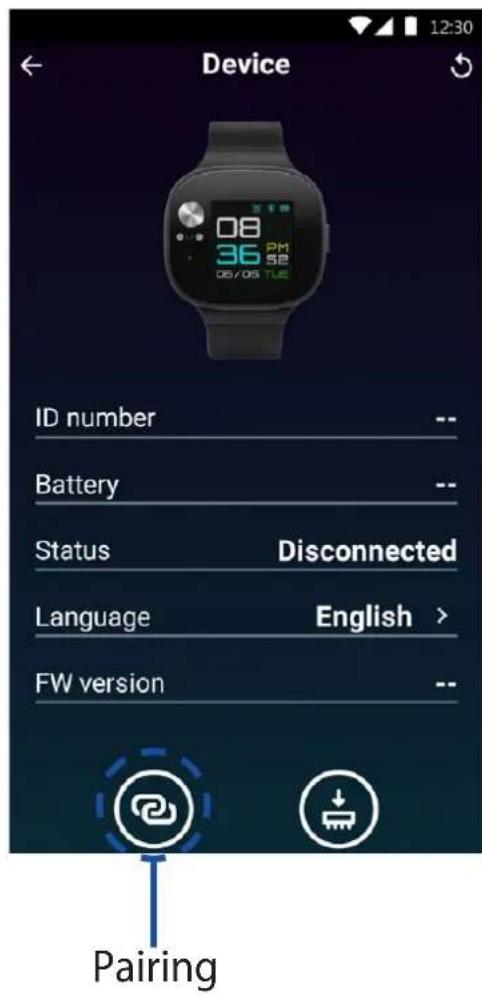
-
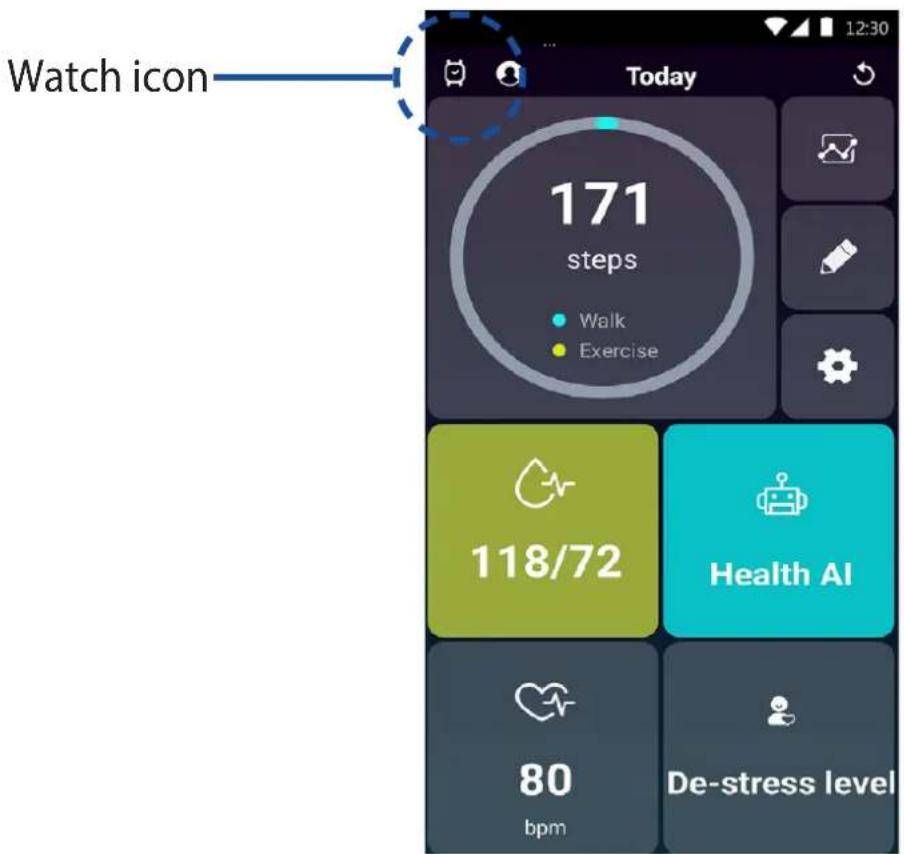
From the Today screen, tap the watch icon on the top left corner.
- From the Device screen, tap Pairing on the bottom left.
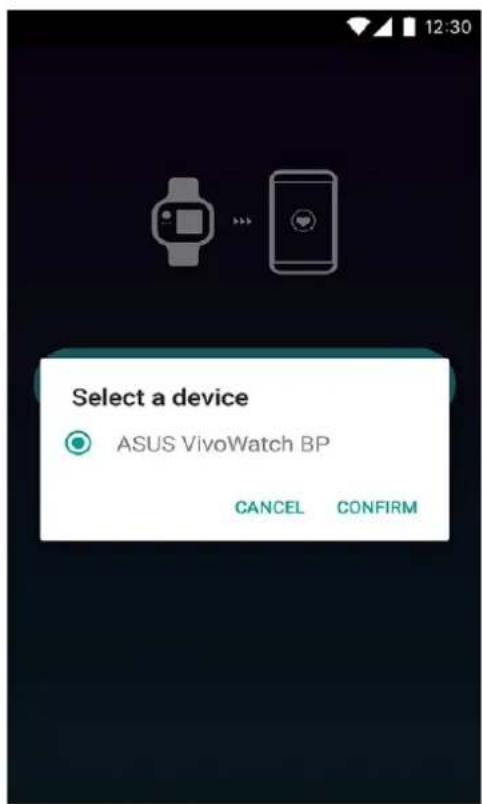
- Select your ASUS VivoWatch BP (or other wearable devices in the ASUS Vivo series, such as the ASUS VivoWatch and ASUS Vivobaby) from the available list, then tap OK to start the pairing.

Calibrating your ASUS VivoWatch BP
You must calibrate your ASUS VivoWatch BP with a reliable measuring device before using it for health data tracking. Calibrate your ASUS VivoWatch BP two to three times for the most accurate results.
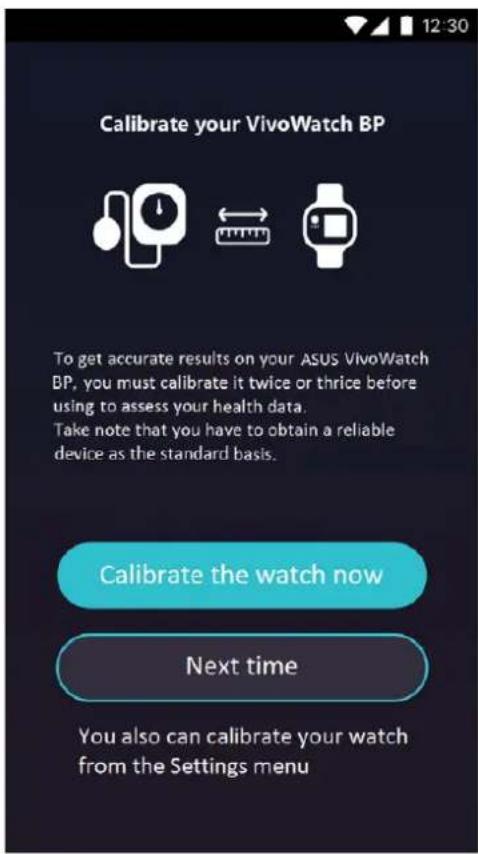
You can also access the calibrate screen by tapping on the home screen, then go to settings menu.
Navigating your ASUS VivoWatch BP
Unlocking your ASUS VivoWatch BP
Press the Home button to unlock your ASUS VivoWatch BP. You can scroll through the ASUS VivoWatch BP features after it is unlocked.
natural_image
Line drawing of a smartwatch with a blue arrow indicating the adjustment point (no text or symbols present)
After a period of inactivity, the ASUS VivoWatch BP returns to the home screen and is locked to prevent unwanted operations.
Scrolling through ASUS VivoWatch BP features
Swipe left or right to scroll through the ASUS VivoWatch BP features.
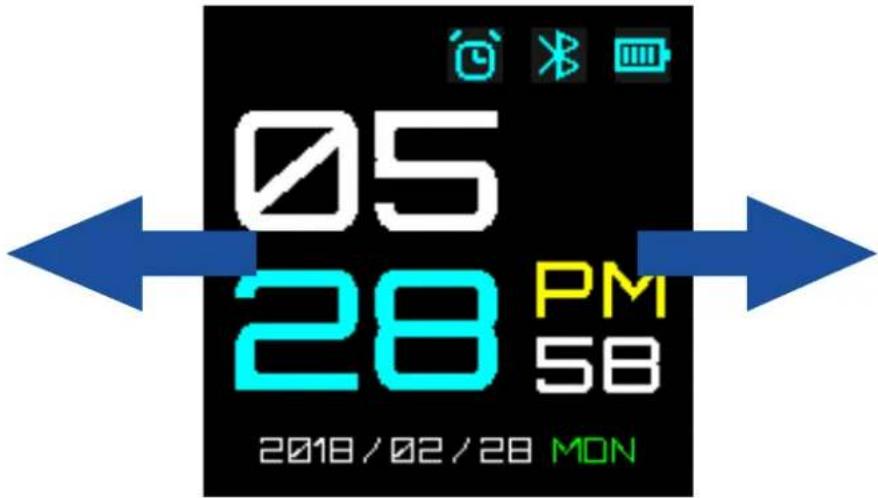
You can press the Home button to return to the HOME screen.
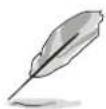
Viewing more information for the selected feature
Swipe up or down to view more information for the selected ASUS VivoWatch BP feature or change the watch face.
Not all features contain additional information.
ASUS VivoWatch BP features
Your ASUS VivoWatch BP shows information about your daily activity status, exercise time, and sleep quality to assist you towards a healthier life.
The screens shown in this manual are for reference only.
Home screen
The ASUS VivoWatch BP home screen displays the time, date, and status of your ASUS VivoWatch BP.

| Icon Description | |
 | Locked |
 | Battery level |
 | Connected |
 | Alarm |

Swipe up or down to change the watch face.
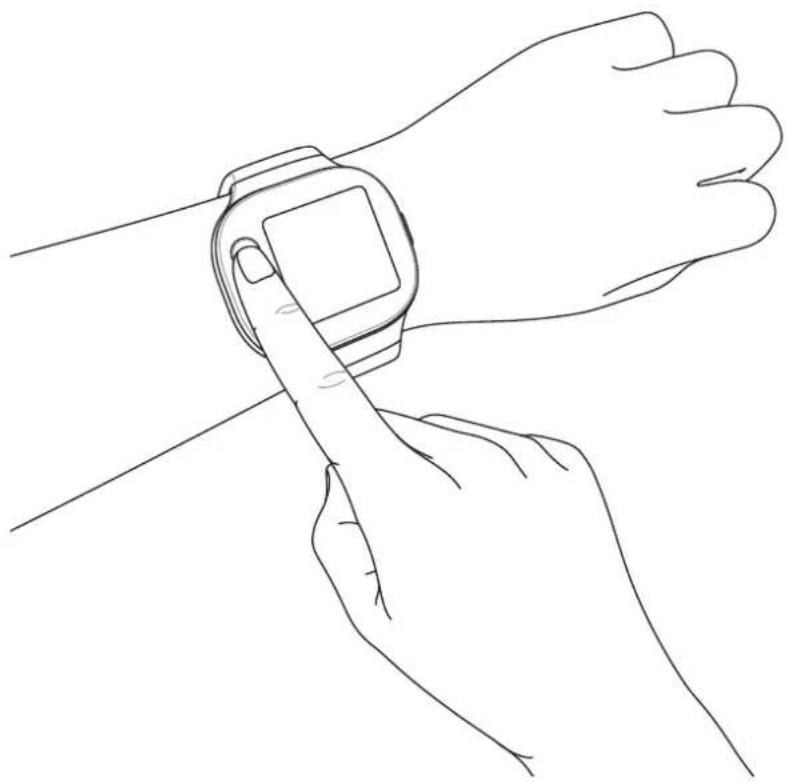
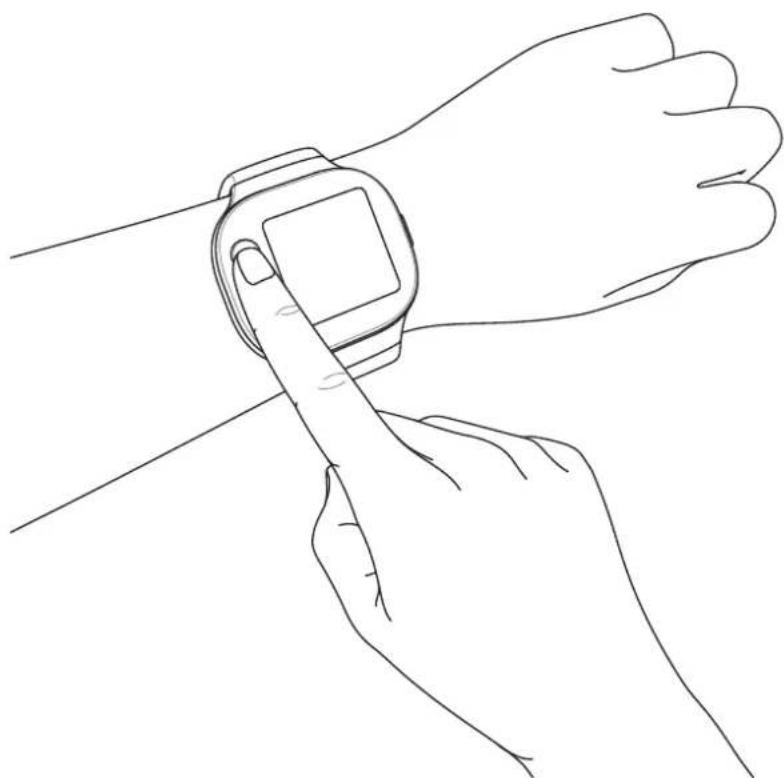
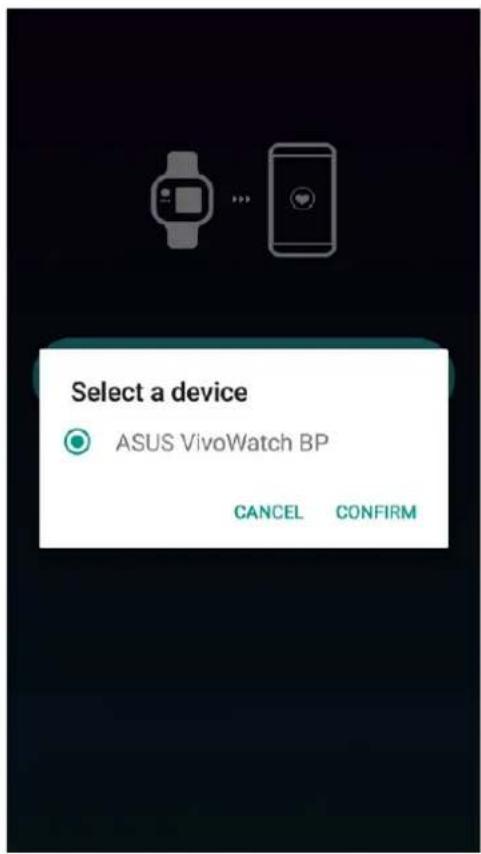
Measuring screen
This screen allows you to measure your heart rate and health data. Your ASUS VivoWatch BP can also estimate your emotional stress by using the PTT (Pulse Transit Time) Index and the estimated the blood flow rate. Swipe right from the Home screen to enter the Measuring screen.
To measure your heart rate and health data, scroll to this screen, then place your finger onto the electrode and the PPG (green light) sensor.

natural_image
Line drawing of a hand holding a smartwatch, no text or symbols presentYour ASUS VivoWatch BP uses the PPG sensor in conjunction with the electrode to allow you to pick up your health data, and the way you wear your ASUS VivoWatch BP can affect the accuracy of the measurements.
To get more accurate results:
- Wear the ASUS VivoWatch BP in a normal way with the watch face facing up, the bottom of the ASUS VivoWatch BP touching your skin, and the ASUS VivoWatch BP away from your wrist bone.
- Wear your ASUS VivoWatch BP in a way without being uncomfortable. Do not strap the ASUS VivoWatch BP too tight to your wrist.
- Place your finger gently on the electrode and cover the green light while measuring your health data.
- Remain still while measuring to get the most accurate results.

- The accuracy of the PPG sensor may vary depending on measurement conditions and surroundings. If the PPG sensor is dirty, clean the sensor and try again.
- Do not look directly into the PPG sensor, the sensor light may impair your vision.
- Please make sure children do not look directly into the sensor light.
- The ASUS VivoWatch BP is not a medical device and makes no medical claims. It is not intended to diagnose health conditions. The measurement results are only for your reference.
Heart rate screen
This screen shows your current heart rate. The PPG sensor on your ASUS VivoWatch BP automatically determines your current heart rate.

To get more accurate results:
- Wear the ASUS VivoWatch BP in a normal way with the watch face facing up, the bottom of the ASUS VivoWatch BP touching your skin, and the ASUS VivoWatch BP away from your wrist bone.
- Wear your ASUS VivoWatch BP in a way without being uncomfortable. Do not strap the ASUS VivoWatch BP too tight to your wrist.
- You can get the most accurate results from the heart rate monitor when you are warmed up.
Settings
This screen allows you to change settings directly on your ASUS VivoWatch BP. Swipe right from the Home screen three times to enter the Settings screen.
Swipe up or down on the Settings screen to view the configurable settings listed below.
SETTING
| Setting Description | |
| Alarm Turn alarms on or off. | |
| Time Adjust the time. | |
| Profile Adjust your profile. | |
| Language Change device language. | |
| Brightness Adjust the brightness of your ASUS VivoWatch BP. This effect is more noticeable in darker environments. | |
| About View more information about your device, such as firmware version, serial number, e-labels, and etc. |
Activities screen
Your ASUS VivoWatch BP will automatically record your daily activities and display them on this screen. Swipe left from the Home screen to enter the Activities screen.
You can view your daily activities such as steps you have taken, calories you have burned, your sleep time, and your comfort sleep time as they are recorded.
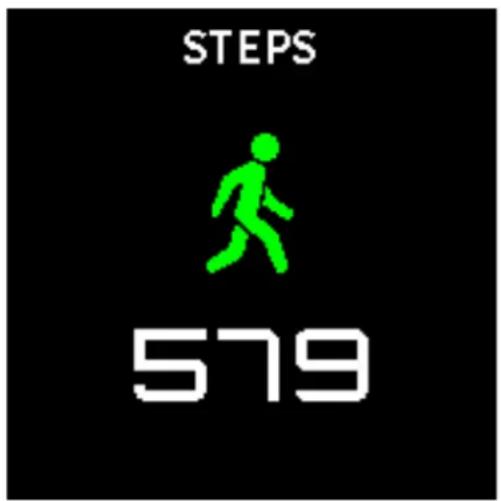
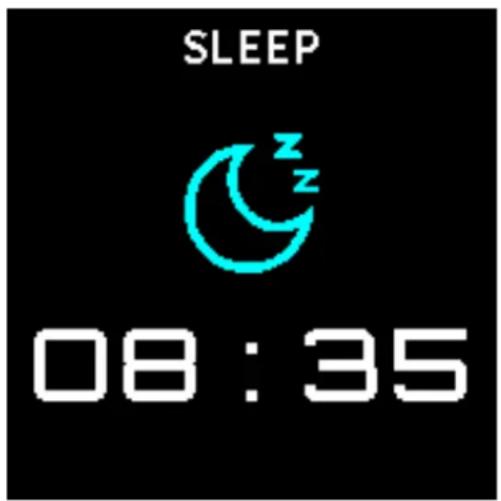
Swipe up or down to view other activities.
Exercise screen
This screen allows you to keep track of your exercise sessions. When you start exercise mode, your ASUS VivoWatch BP will record information about the current exercise session and show the information as they are recorded.
Entering exercise mode
To enter exercise mode, swipe left or right to the EXERCISE screen, then tap START to enter exercise mode.
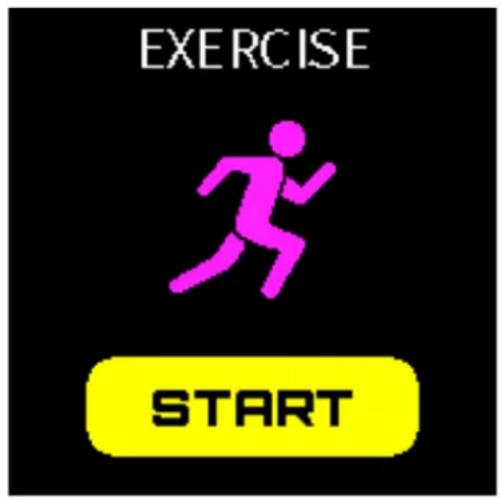
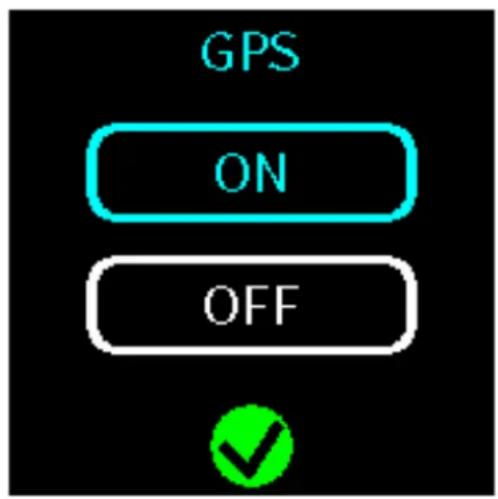
- When you turn the GPS feature ON, wait for the GPS signal to lock on in an outdoor open area before you start your exercise session.
- The Mon will turn to when the GPS signal is locked on.
From the exercise screen, swipe left or right to view information such as the real time heart rate, exercise time, calories, steps, and distance for the current exercise session.
Exiting exercise mode
To exit exercise mode, swipe up on the EXERCISE screen, then tap END to exit exercise mode.

Notifications
When you receive a call or message on your paired phone, your ASUS VivoWatch BP will vibrate and show you the phone number of the caller or a preview of the message.


Reminders
Your ASUS VivoWatch BP will also show you walk and pill reminders to aid you towards a healthier lifestyle.


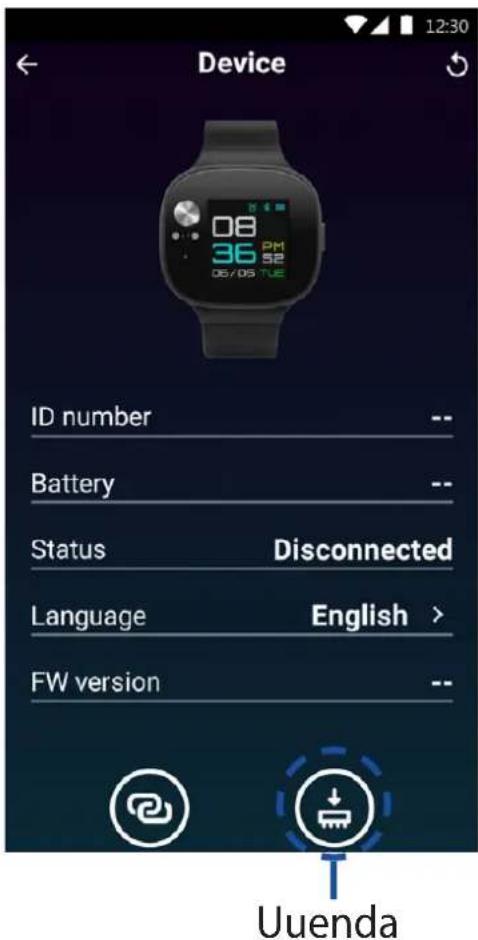
Updating your ASUS VivoWatch BP Updating through the ASUS HealthConnect App
- Launch the ASUS HealthConnect App.
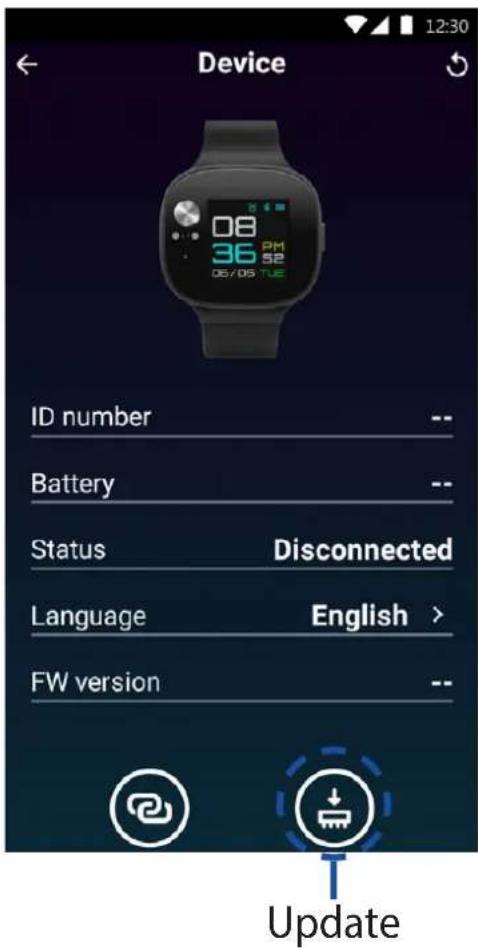
- From the Today screen, tap the watch icon on the top left corner.
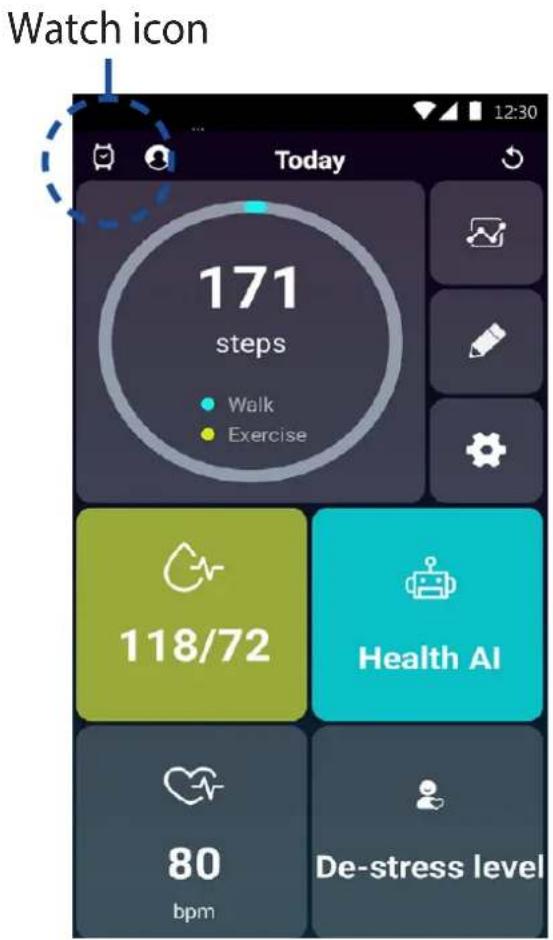
- From the Device screen, tap Update on the bottom right. A pop-up message will appear when the firmware update is complete.
Updating through the PC Tool
- Place your ASUS VivoWatch BP into the charging dock, then use a USB cable to connect the charging dock to a computer.
- Download the latest firmware from the ASUS VivoWatch BP support site.
- Open the ".exe" file and follow the instructions to update the firmware.
Introduction
natural_image
Line drawing of a Asus brand scanner with a blue arrow pointing to the screen (no text or symbols on the device itself)natural_image
Line drawing of a Huawei Smartwatch (ASUS) device with a close-up inset showing internal components (no text or symbols)
natural_image
Two app icons: a colorful play triangle and a blue square with white musical notes (no text or symbols)natural_image
Two app icons: a magnifying glass and a heart with circular arrows, both on a dark background (no text or symbols)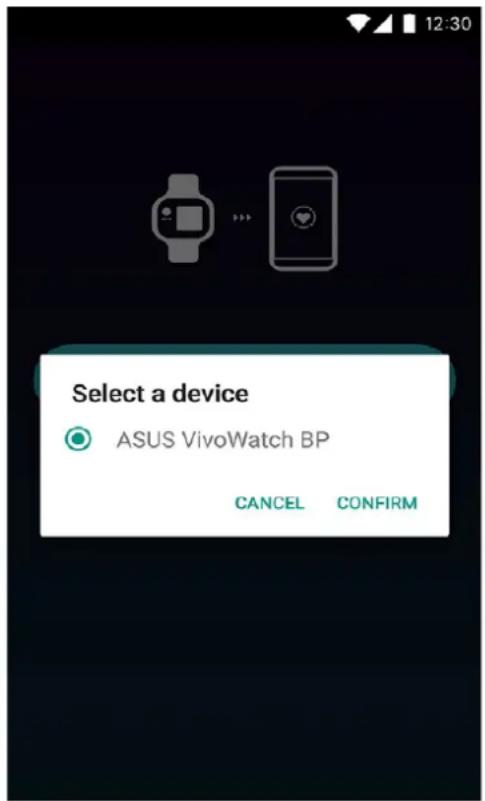

natural_image
Line drawing of a smartwatch with a blue arrow indicating the adjustment point (no text or symbols present)
Rappels
https://account.asus.com/product_reg.aspx

natural_image
Line drawing of a Huawei Smartwatch (ASW) device with a close-up inset showing cable connection (no text or symbols)
natural_image
Two app icons: a colorful play button and a blue square with white musical notes (no text or symbols)natural_image
Two app icons: a magnifying glass and a heart with circular arrows, both on a dark background (no text or symbols)Erste Kopplung
natural_image
Line drawing of a smartwatch with a blue arrow indicating a touch point (no text or symbols present)
natural_image
Line drawing of a hand holding a smartwatch, no text or symbols presentErinnerungen
natural_image
Line drawing of a Huawei i36 smartwatch with a close-up inset showing the connector (no text or symbols)
natural_image
Blue square icon with white abstract geometric design resembling a stylized letter or symbol (no text or numbers)natural_image
Simple grayscale icon of a magnifying glass (no text or symbols)
natural_image
Abstract icon with a blue heart inside concentric circles on a dark background (no text or symbols)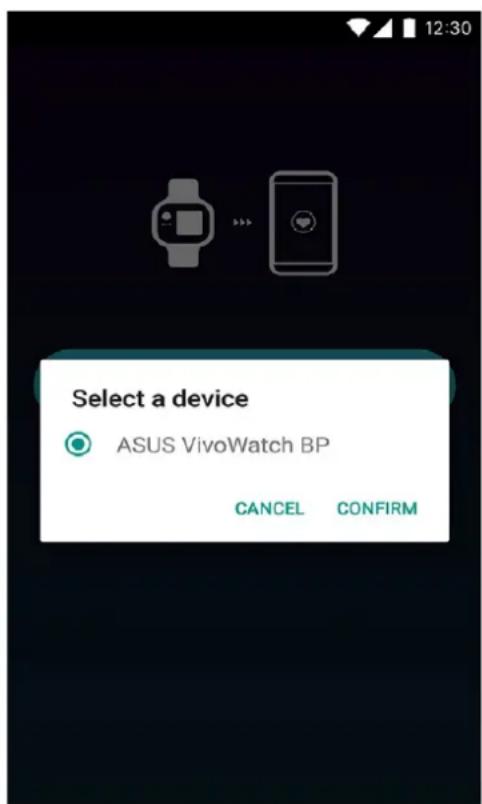
natural_image
Line drawing of a smartwatch with a blue arrow indicating the adjustment point (no text or symbols present)

natural_image
Line drawing of a hand holding a smartwatch with a finger, no text or symbols present
Promemoria
https://account.asus.com/product_reg.aspx
О руководстве
natural_image
Line drawing of a Asus brand scanner with a blue arrow pointing to the screen (no text or symbols on the device itself)natural_image
Line drawing of a Huawei iX8 device with a close-up inset showing the connector (no text or symbols present)
natural_image
Two app icons: a colorful play triangle and a blue square with white musical notes (no text or symbols)natural_image
Two app icons: a gray magnifying glass and a blue heart with circular arrows on a dark background (no text or symbols)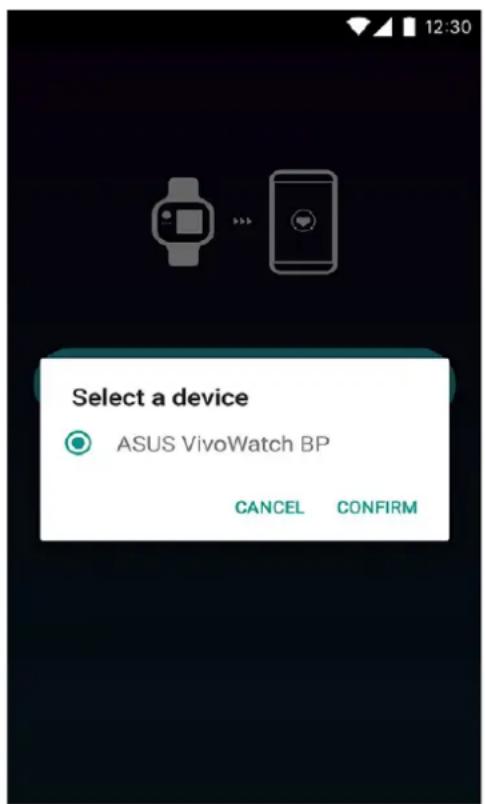
natural_image
Line drawing of a smartwatch with a blue arrow indicating the adjustment point (no text or symbols present)
natural_image
Line drawing of a hand holding a smartwatch, no text or symbols presentНапоминания
natural_image
Line drawing of a Huawei Smartwatch (ASUS) device with a close-up inset showing the connector detail (no text or symbols)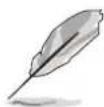
natural_image
Blue square icon with white abstract geometric design resembling a stylized letter 'A' or cross (no text or symbols)natural_image
Simple grayscale magnifying glass icon (no text or symbols)
natural_image
Abstract icon with a blue heart surrounded by circular arcs and colored dots (no text or symbols)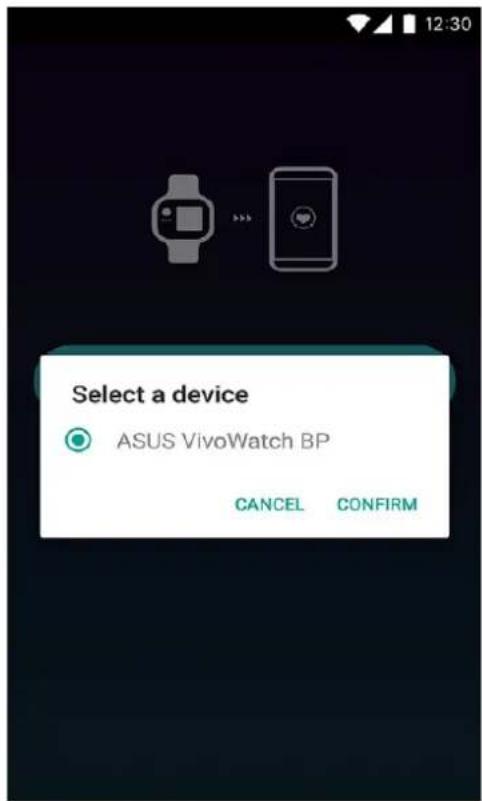
Emparejamiento

natural_image
Line drawing of a smartwatch with a blue arrow indicating the adjustment point (no text or symbols present)
natural_image
Line drawing of a hand holding a smartwatch with a finger, no text or symbols presentRecordatorios
Actualizar
natural_image
Line drawing of a Huawei device with a close-up inset showing a cable connector (no text or symbols)
natural_image
Blue square icon with white abstract geometric design resembling a stylized letter or symbol (no text or symbols present)natural_image
Simple grayscale icon of a magnifying glass (no text or symbols)
natural_image
Abstract icon with a blue heart and circular arrows on a dark background (no text or symbols)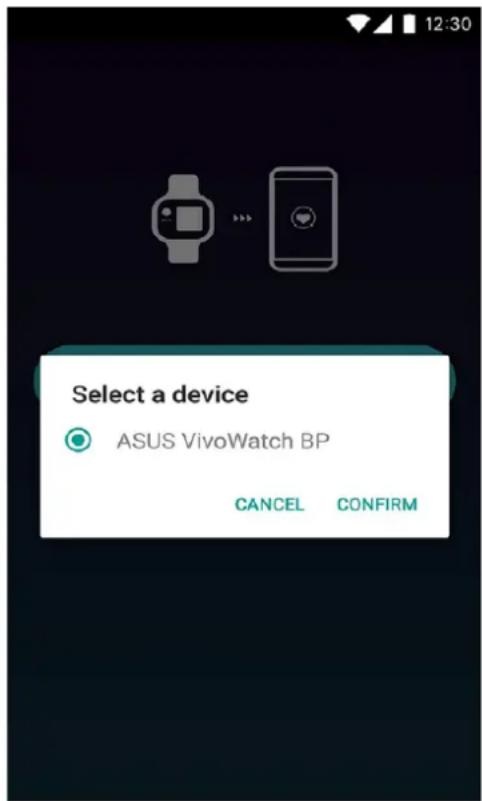
Emparelhar com outro dispositivo ou emparelhar novamente
natural_image
Line drawing of a smartwatch with a blue arrow indicating a touch point (no text or symbols present)

natural_image
Line drawing of a hand holding a smartwatch, no text or symbols presentLembretes
natural_image
Line drawing of a Asus smartwatch with a close-up inset showing the cable being inserted (no text or symbols present)
Po úplném nabití se náramek ASUS VivoWatch BP automaticky zapne.
natural_image
Two app icons: a colorful play button and a blue square with white musical notes (no text or symbols)natural_image
Two app icons: a magnifying glass and a heart inside a circular design on a dark background (no text or symbols)První spárování

natural_image
Line drawing of a smartwatch with a blue arrow indicating the adjustment point (no text or symbols present)

natural_image
Line drawing of a hand holding a smartwatch, no text or symbols presentPřipomenutí

https://account.asus.com/product_reg.aspx
Teave juhendi kohta
natural_image
Line drawing of a Huawei Smartwatch (ASUS) device with a close-up inset showing the cable connector (no text or symbols)
natural_image
Blue square icon with white abstract geometric design resembling a stylized letter 'A' or cross (no text or symbols)- Otsige nutiseadme rakendust ASUS HealthConnect App ja installige rakendus.

natural_image
Simple grayscale icon of a magnifying glass (no text or symbols)
natural_image
Abstract icon with a blue heart inside concentric circles on a dark background (no text or symbols)Esmakordne paarimine


ASUS VivoWatch BP kaliibrimine
natural_image
Line drawing of a smartwatch with a blue arrow indicating the adjustment point (no text or symbols present)
Meeldetuletused
- Kuval Device toksake all paremal olevat käsku Uuenda. Kui tarkvara uuendamine on löppenud, ilmub ekraanile vastav sönum.
https://account.asus.com/product_reg.aspx

natural_image
Line drawing of a Huawei device with a close-up inset showing the cable being inserted into a connector (no text or symbols present)
natural_image
Blue square icon with white abstract geometric design resembling a stylized letter 'A' or cross (no text or symbols)natural_image
Simple grayscale magnifying glass icon (no text or symbols)
natural_image
Abstract icon with a blue heart and circular elements on a dark purple background (no text or symbols)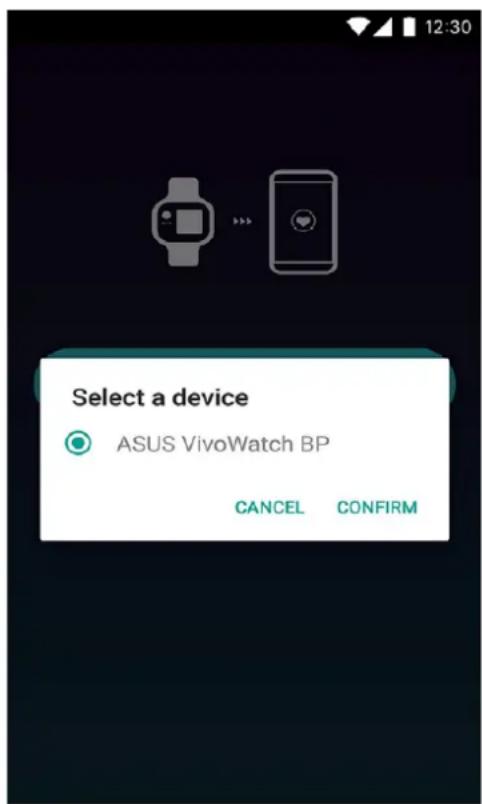
natural_image
Line drawing of a smartwatch with a blue arrow indicating the adjustment point (no text or symbols present)

natural_image
Line drawing of a hand holding a smartwatch, no text or symbols presentPriminimai
Atnaujinimas
https://account.asus.com/product_reg.aspx
Par šo rokasgrāmatu
natural_image
Line drawing of a Huawei device with a close-up inset showing cable connection (no text or symbols)
natural_image
Blue square icon with white abstract geometric design resembling a stylized letter 'A' or cross (no text or symbols)natural_image
Simple grayscale icon of a magnifying glass (no text or symbols)
natural_image
App icon featuring a blue heart with circular arrows and dots on a dark background (no text or symbols)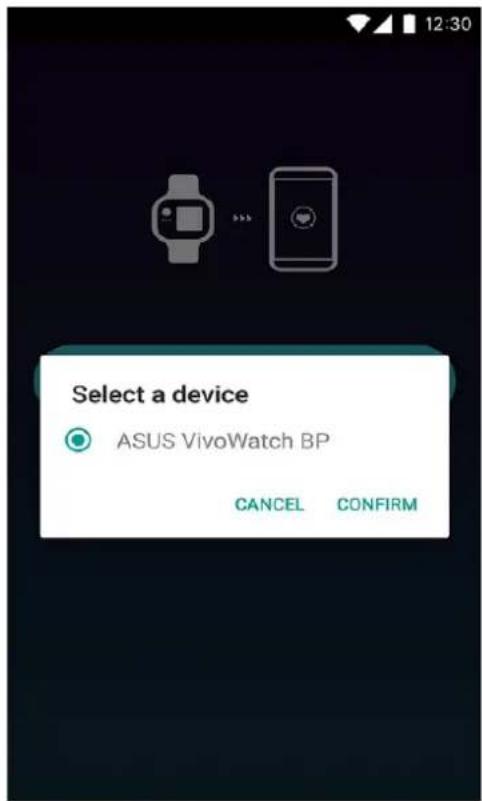

natural_image
Line drawing of a smartwatch with a blue arrow indicating the adjustment point (no text or symbols present)
Atgādinājumi
Federal Communications Commission Interference Statement
This equipment has been tested and found to comply with the limits for a Class B digital device, pursuant to part 15 of the FCC Rules. These limits are designed to provide reasonable protection against harmful interference in a residential installation. This equipment generates, uses and can radiate radio frequency energy and, if not installed and used in accordance with the instructions, may cause harmful interference to radio communications. However, there is no guarantee that interference will not occur in a particular installation. If this equipment does cause harmful interference to radio or television reception, which can be determined by turning the equipment off and on, the user is encouraged to try to correct the interference by one or more of the following measures:
• Reorient or relocate the receiving antenna.
- Increase the separation between the equipment and receiver.
- Connect the equipment into an outlet on a circuit different from that to which the receiver is connected.
- Consult the dealer or an experienced radio/ TV technician for help.
CAUTION:
Any changes or modifications not expressly approved by the grantee of this device could void the user's authority to operate the equipment.
This device complies with Part 15 of the FCC Rules. Operation is subject to the following two conditions: (1) this device may not cause harmful interference, and (2) this device must accept any interference received, including interference that may cause undesired operation.
RF exposure warning
The equipment complies with FCC RF exposure limits set forth for an uncontrolled environment.
The equipment must not be co-located or operating in conjunction with any other antenna or transmitter.
Compliance Statement of Innovation, Science and Economic Development Canada (ISED)
This device complies with Innovation, Science and Economic Development Canada licence exempt RSS standard(s). Operation is subject to the following two conditions: (1) this device may not cause interference, and (2) this device must accept any interference, including interference that may cause undesired operation of the device.
CAN ICES-3(B)/NMB-3(B)
Radio Frequency (RF) Exposure Information
The radiated output power of the Wireless Device is below the Industry Canada (IC) radio frequency exposure limits. The Wireless Device should be used in such a manner such that the potential for human contact during normal operation is minimized.
This device has also been evaluated and shown compliant with the IC RF Exposure limits under portable exposure conditions (antennas are less than 20 cm of a person's body).
Simplified EU Declaration of Conformity
ASUSTek Computer Inc. hereby declares that this device is in compliance with the essential requirements and other relevant provisions of Directive 2014/53/EU. Full text of EU declaration of conformity is available at https://www.asus.com/support/.
CE

The Simplified EU Declaration of Conformity of this device has been updated. This device now complies with Radio Equipment Directive 2014/53/EU, and no longer complies with R&TTE Directive 1999/5/EC.
RED RF Output table
| Function Frequency Maximum Output Power (EIRP) | |
| Bluetooth 2402 - 2480 MHz 4 dBm | |
NCC警語:
Global Environmental Regulation Compliance and Declaration
ASUS follows the green design concept to design and manufacture our products, and makes sure that each stage of the product life cycle of ASUS product is in line with global environmental regulations. In addition, ASUS disclose the relevant information based on regulation requirements.
Please refer to http://csr.asus.com/english/Compliance.htm for information disclosure based on regulation requirements ASUS is complied with:
EU REACH SVHC
ASUS Recycling/Takeback Services
ASUS recycling and takeback programs come from our commitment to the highest standards for protecting our environment. We believe in providing solutions for you to be able to responsibly recycle our products, batteries, other components as well as the packaging materials. Please go to http://csr.asus.com/english/Takeback.htm for detailed recycling information in different regions.
Proper disposal
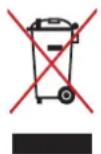
Do not throw your ASUS VivoWatch BP in municipal waste. This product has been designed to enable proper reuse of parts and recycling. The symbol of the crossed out wheeled bin indicates that the product (electrical, electronic equipment and mercury-containing button cell battery) should not be placed in municipal waste. Check local regulations for disposal of electronic products.

Do not throw the battery in municipal waste. The symbol of the crossed out wheeled bin indicates that the battery should not be placed in municipal waste.
Rechargeable Battery Recycling Service in North America

For US and Canada customers, you can call 1-800-822-8837 (toll-free) for recycling information of your ASUS products' rechargeable batteries.
Regional notice for California

WARNING
Cancer and Reproductive Harm - www.P65Warnings.ca.gov
Notices for removable batteries
- Risk of explosion if battery is replaced by an incorrect type.
- The battery and its component must be recycled or disposed of properly.
Nordic Lithium Cautions (for lithium-ion batteries)
CAUTION! Danger of explosion if battery is incorrectly replaced. Replace only with the same or equivalent type recommended by the manufacturer. Dispose of used batteries according to the manufacturer's instructions. (English)
| Manufacturer ASUSTek COMPUTER INC. | |
| Address 4F, No. 150, LI-TE RD., PEITOU, TAIPEI 112, TAIWAN | |
| Authorized Representative in Europe | ASUS COMPUTER GmbH |
| Address HARKORT STR. 21-23, 40880 RATINGEN, GERMANY | |
COPYRIGHT AND WARRANTY INFORMATION
No part of this user guide, including the products and software described in it, may be reproduced, transmitted, transcribed, stored in a retrieval system, or translated into any language in any form or by any means, except documentation kept by the purchaser for backup purposes, without the express written permission of ASUSTeK Computer INC. ("ASUS").
Product warranty or service will not be extended if: (1) the product is repaired, modified or altered, unless such repair, modification of alteration is authorized in writing by ASUS; or (2) the serial number of the is defaced or missing.
ASUS PROVIDES THIS User guide "AS IS" WITHOUT WARRANTY OF ANY KIND, EITHER EXPRESS OR IMPLIED, INCLUDING BUT NOT LIMITED TO THE IMPLIED WARRANTIES OR CONDITIONS OF MERCHANTABILITY OR FITNESS FOR A PARTICULAR PURPOSE. IN NO EVENT SHALL ASUS, ITS DIRECTORS, OFFICERS, EMPLOYEES OR AGENTS BE LIABLE FOR ANY INDIRECT, SPECIAL, INCIDENTAL, OR CONSEQUENTIAL DAMAGES (INCLUDING DAMAGES FOR LOSS OF PROFITS, LOSS OF BUSINESS, LOSS OF USE OR DATA, INTERRUPTION OF BUSINESS AND THE LIKE), EVEN IF ASUS HAS BEEN ADVISED OF THE POSSIBILITY OF SUCH DAMAGES ARISING FROM ANY DEFECT OR ERROR IN THIS User guide OR PRODUCT.
Products and corporate names appearing in this user guide may or may not be registered trademarks or copyrights of their respective companies, and are used only for identification or explanation and to the owners' benefit, without intent to infringe.
SPECIFICATIONS AND INFORMATION CONTAINED IN THIS User guide ARE FURNISHED FOR INFORMATIONAL USE ONLY, AND ARE SUBJECT TO CHANGE AT ANY TIME WITHOUT NOTICE, AND SHOULD NOT BE CONSTRUED AS A COMMITMENT BY ASUS. ASUS ASSUMES NO RESPONSIBILITY OR LIABILITY FOR ANY ERRORS OR INACCURACIES THAT MAY APPEAR IN THIS User guide, INCLUDING THE PRODUCTS AND SOFTWARE DESCRIBED IN IT.
Copyright © 2018 ASUSTeK Computer INC. All Rights Reserved.
LIMITATION OF LIABILITY
Circumstances may arise where because of a default on ASUS' part or other liability, you are entitled to recover damages from ASUS. In each such instance, regardless of the basis on which you are entitled to claim damages from ASUS, ASUS is liable for no more than damages for bodily injury (including death) and damage to real property and tangible personal property; or any other actual and direct damages resulted from omission or failure of performing legal duties under this Warranty Statement, up to the listed contract price of each product.
ASUS will only be responsible for or indemnify you for loss, damages or claims based in contract, tort or infringement under this Warranty Statement.
This limit also applies to ASUS' suppliers and its reseller. It is the maximum for which ASUS, its suppliers, and your reseller are collectively responsible.
UNDER NO CIRCUMSTANCES IS ASUS LIABLE FOR ANY OF THE FOLLOWING: (1) THIRD-PARTY CLAIMS AGAINST YOU FOR DAMAGES; (2) LOSS OF, OR DAMAGE TO, YOUR RECORDS OR DATA; OR (3) SPECIAL, INCIDENTAL, OR INDIRECT DAMAGES OR FOR ANY ECONOMIC CONSEQUENTIAL DAMAGES (INCLUDING LOST PROFITS OR SAVINGS), EVEN IF ASUS, ITS SUPPLIERS OR YOUR RESELLER IS INFORMED OF THEIR POSSIBILITY.
SERVICE AND SUPPORT
Visit our multi-language web site at https://www.asus.com/support/