Action Super Plus 1200 - Hair dryer VALERA - Free user manual and instructions
Find the device manual for free Action Super Plus 1200 VALERA in PDF.
| Product Type | Wall-mounted Hair Dryer |
| Brand | Valera |
| Model | Action Super Plus 1200 |
| Nominal power | 1200 W |
| Supply voltage | 220-240 V ~ |
| Frequency | 50/60 Hz |
| Max input current | 10 A |
| Mounting type | Wall bracket (Types 036, 038A, 038B) |
| Controls | Push button ON/OFF (hold) + power switch |
| Power levels | 2 levels (minimum, maximum) + cool air (Cool) |
| Thermal protection | Safety thermostat (automatic shut-off in case of overheating) |
| Double insulation | Yes (no earth connection required) |
| Noise level | < 70 dB(A) |
| Cable type (installation) | H05VV-F2x1.5 mm² |
| Maintenance and cleaning | Damp cloth; air intake grille: brush or vacuum cleaner |
| Recommended use | Private hotel rooms/bathrooms, guesthouses, residences, boat cabins |
| Domestic warranty | 24 months (EU/Switzerland) |
| Professional warranty | 12 months |
| Compliance | European Directives 2014/30/EU, 2014/35/EU, 2011/65/EC, 2009/125/EC |
Frequently Asked Questions - Action Super Plus 1200 VALERA
User questions about Action Super Plus 1200 VALERA
0 question about this device. Answer the ones you know or ask your own.
Ask a new question about this device
Download the instructions for your Hair dryer in PDF format for free! Find your manual Action Super Plus 1200 - VALERA and take your electronic device back in hand. On this page are published all the documents necessary for the use of your device. Action Super Plus 1200 by VALERA.
USER MANUAL Action Super Plus 1200 VALERA
The following table is in Chinese:
2010.10.15
Tangliangdaqaike
Pilash people company
parlo a un prospect in the
[Unreadable]
INSTRUCTIONS FOR USE AND INSTALLATION
BEDENUNGSANLEITUNG
UND MORTAGEARNESUNG
INSTRUCTIONS D'UTILISATION
ET DE MONTRGE
ISTROZON PER L OSO FEBRU NONTEGOIS
E FERIL MONTAGIO INSTRUCIONES DE URO X MONTA LE
INSTRUCCIONES DE 090 OBRUYA HENIZINGO
EN INSTILLATIEGAANVA
Valera is a registered trademark of Ligo Electric S.A. - Switzerland
CE
(EN) Hairdress - Wall holder 6
DE Haartrockner. Wandhalter 9
ASSEMBLY AND OPERATING INSTRUCTIONS
Original instructions
Read these instructions thoroughly. Available also on www.valera.com
CAUTION
- For additional protection, the installation of a residual current device (RCD) having a rated residual operating current not exceeding 30mA is advisable in the electrical circuit supplying the bathroom. Ask your installer for advice. - Make sure the electrical system is fitted with a device which guarantees omnipolar disconnection from the electricity mains under category fill overvoltage conditions.
- Make sure the unit is perfectly dry before using it. - WARNING: Do not use this appliance near bathtubs, showers, basins or other vessels containing water.
• This hairdryer must be fixed so that a person taking a bath or shower
cannot reach the handle, considering the cord at maximum extension. • This appliance can be used by children from 8 years of age and over, and by persons with limited physical, sensory or mental abilities or who lack the relevant experience and knowledge, if they are suitably supervised or have been educated to use the appliance safely and made aware of the associated risks.
- Do not allow children to play with the appliance.
• Children must not perform cleaning and maintenance procedures unless supervised.
- Do not use your unit if it is not working properly. Do not try to repair this electrical unit yourself, rather contact an authorized technician. If the supply cord is damaged, it must be replaced by the manufacturer, its service agent or a similarly qualified person in order to avoid a hazard.
- Plug the hairdryer into an alternating current outlet only, and make sure that the voltage of your electricity supply is the same as that indicated on the rating plate of the appliance.
- Do not immerse in water or other liquids. - Never put the appliance in a place where it could fall into water or in other liquids.
- Do not try to salvage an electrical appliance which has fallen into water. - Tum the unit off when you put it down.
- Unplug the appliance when not in use, but never do it by pulling the cord.
Valera+ HOSPITALITY
| Date: 15 |
| Cate-pation | Influenza | Davida zonima | Razima |
| Influenza | Influenza | Davida rupina | davida rupina |
| Influenza | Influenza | Davida rupina | Davida rupina |
| Davida rupina | Influenza | Davida rupina | Davida rupina |
| Davida rupina | Davida rupina | Davida rupina | Davida rupina |
| Davida rupina | Davida rupina | Davida rupina | Davida rupina |
HAPPY AND THE COURSES OF PAPER
The following described text is:
Home is a third complex of accounts
Нателей 2015/07/24
5.2012年6月30日
5.2013年1月1日
vocian nii je bex iran fao
Конческих в гратк
[Unreadable]
In the case of the
In addition, the top view
Ugo Elecile SA - 6950 Ugownello / Mendelelo - Switzerland
- Remember to check regularly that the air inlet and outlet grills are clean.
- Allow your appliance to cool before storing away and do not wrap the supply cord around the hairdryer in storage.
- The A-weighted sound pressure level of the hairdryers for commercial use is below 70 dB(A).
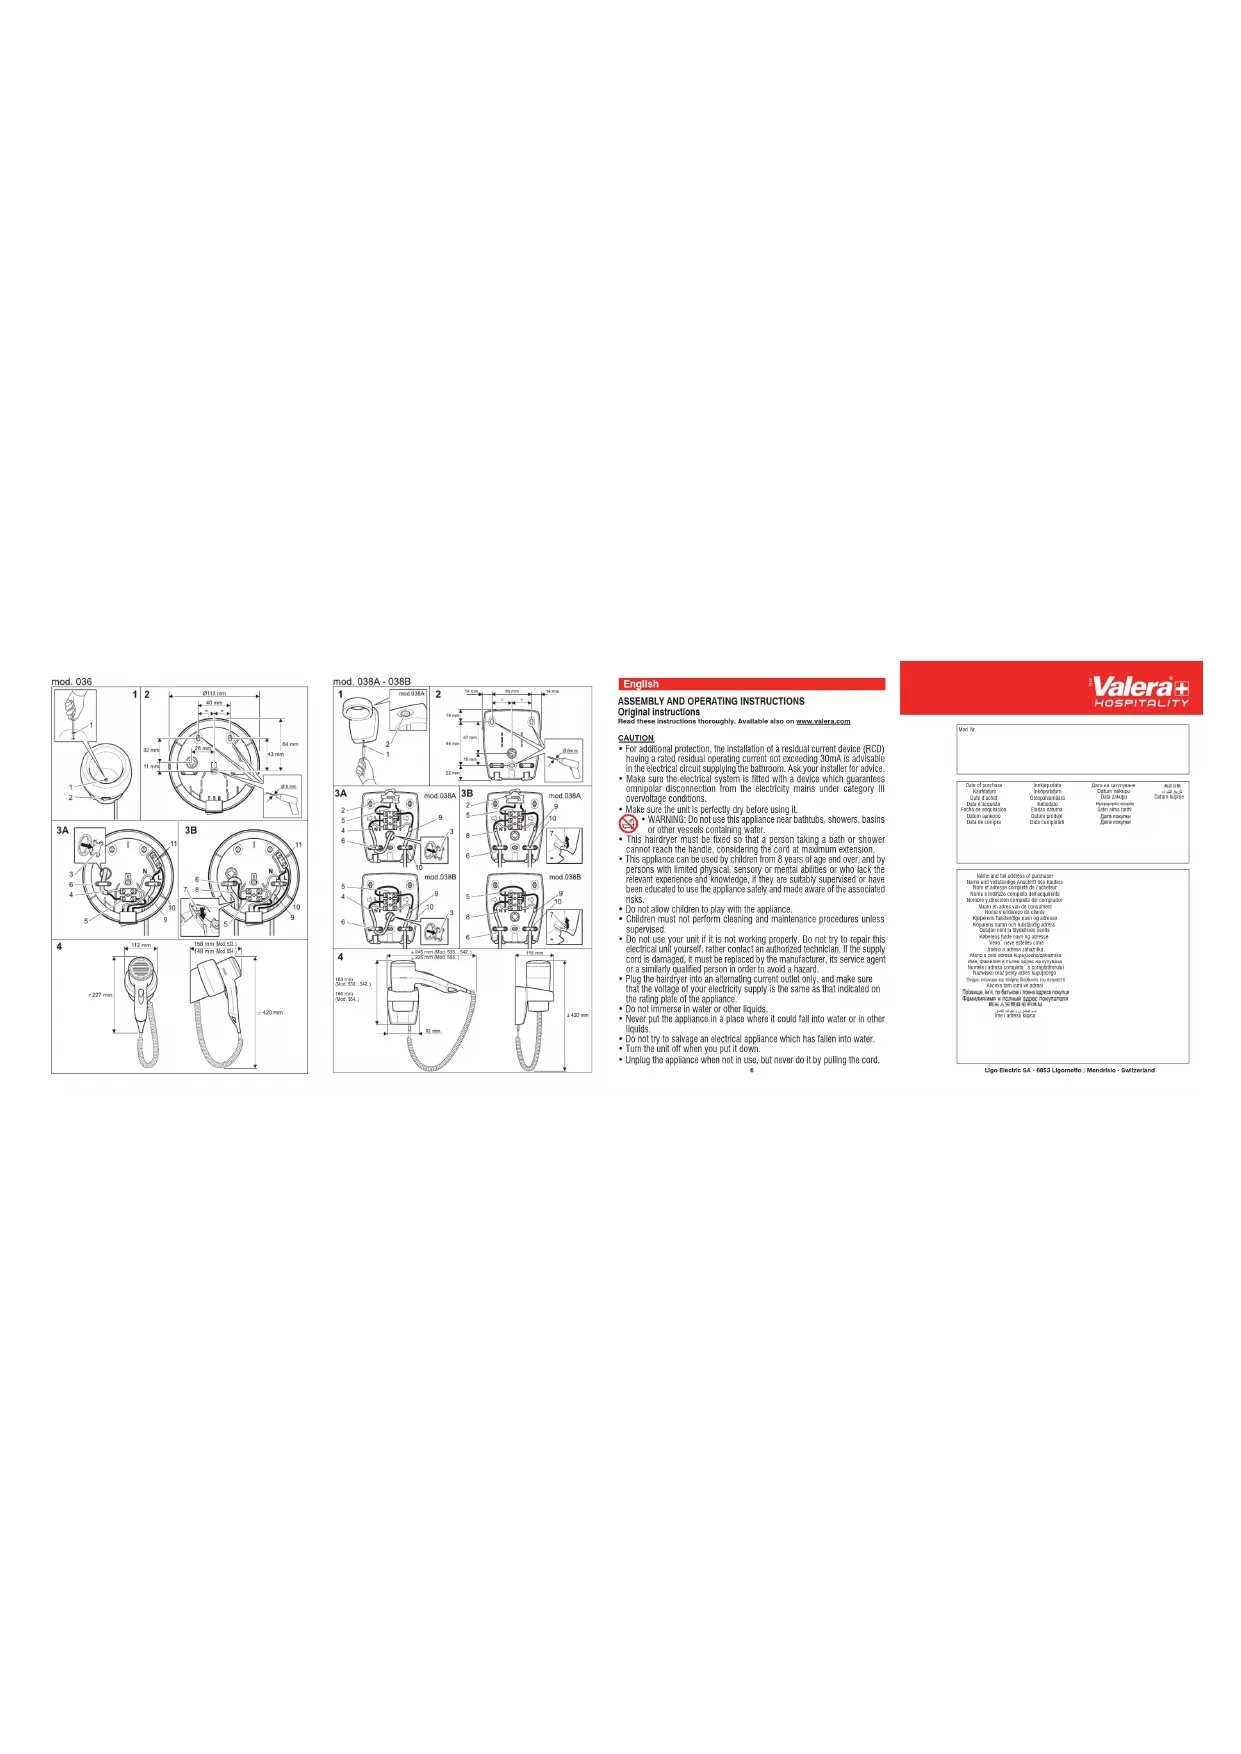
INSTALLATION INSTRUCTIONS
Wall holder for hairdryer
Type 036 - 038A - 038B
Type 036
Front housing model.
Type 038A
Vertical housing model.
Type 038B
As the 038A but with no switch.
Installation of wall holder
This wall holder must only be installed by a qualified electrician in conformity to applicable safety standards.
The wall holder may be installed in one of two ways:
A = for fixed connection lead
B = for mobile connection lead
Attention: before installing the wall holder always switch off the general switch of your mains electricity.
For each pole a switch with a minimum break distance between contacts of 3 mm must be fitted up-line of the appliance.
Each time the appliance is opened, the switch must be used to disconnect the appliance.
The connection wiring must be type H05VV-F 2x1,5 mm².
Method A
IMPORTANT: Refer to the figures for the model you have purchased.
- Unscrew the screw (1) (fig. 1) and remove the cover from the wall unit.
- Break the plastic membrane (3) at the back of the wall unit (fig. 3A).
- Route the main power cable from the wall (4) through the hole left by the plastic membrane (3) (fig. 3A).
-
Fix the back of the wall unit to the wall using the fixing screws and wall plugs provided (fig. 2).
-
Remove the terminal strip (5). The input power cable (4) and the output power cable (9) of hairdryer with max input current of 10A, if not already connected, must be connected to the terminal strip(5).
In mod. 036 the Neutral output cable(9) must be connected to terminal strip(5) and the Line output cable (9) to terminal strip (11).
- Reposition the terminal strip. Tighten the cable clamp (6 and 10) with its own screws. (fig. 3A). IMPORTANT: This
appliance is double insulated and has no ground (earth) connection.
- Fit the cover back on the wall unit with (1) (fig. 1).
- Switch the power on at the mains switch. The hair dryer is now ready to use.
Method B
IMPORTANT: Refer to the figures for the model you have purchased.
- Unscrew the screw (1) (fig. 1) and remove the cover from the wall unit.
- Break the plastic membrane (7) (fig. 3B).
- Fix the back of the wall unit to the wall using the fixing screws and wall plugs provided (fig. 2).
- Route the input power cable (8) and the output power (9) into the holes (fig. 3B).
- Remove the terminal strip (5). The input power cable (8) and the output power cable (9) of hairdryer with max input current of 10A, if not already connected, must be connected to the terminal strip(5).
In mod. 036 the Neutral output cable(9) must be connected to terminal strip (5) and the Line output cable (9) to terminal strip (11).
Reposition the terminal strip. Tighten the cable clamp (6 and 10) with its own screws. (fig. 3B). IMPORTANT: This appliance is double insulated and has no ground (earth) connection.
- Fit the cover back on the wall unit with (1) (fig. 1).
- Switch the power on at the mains switch. The hair dryer is now ready to use.
INSTRUCTIONS FOR USE
Hairdryer with wall holder
Control Switches
Control switch on wall holder
(only for models equipped with a switch) rif. 2 fig. 1:
$$ 0 - 1 = 0 \text {ff} / 0 \mathrm{n} $$
Hairdryer
Type 533.03 - 533.05 - 533.03/I - 533.05/I 542.05 - 542.06 - 542.14 - 561.22
Pushbutton:
$$ O N = O n / O f f $$
(pressure must be maintained to operate the hairdryer)
Slide Switch
Cool=(low power)
1=(medium power)
2=(maximum power)
Hairdryer
Type 554.02 - 554.05 - 554.08 - 554.11 554.13
Pushbutton:
ON=On/Off (pressure must be maintained to operate the hairdryer)
Slide Switch
1=(low power)
2=(maximum power)
Hairdryer
Type 533.04 - 533.06 - 533.14 - 533.15
554.01 - 554.04 - 554.07 - 554.10
Pushbutton=0n/Off
(pressure must be maintained to operate the hairdryer)
Hairdryer
Type 554.03 - 554.06 - 554.09 - 554.12
Slide Switch
0=(OFF)
1=(low power)
2=(maximum power)
Hairdryer Mod. 561.02 - 561.17 - 561.20 561.22
Pushbutton ON= On/off (pressure must maintained to operate the hairdryer)
Left switch 0 = Off
1 = Low air speed
2 = High air speed
Right switch Cool = Low air temperature
1 = Medium air temperature
2 = High air temperature
PRODUCT CARE
When not in use, the mains switch on the wall holder should be in the "Off" position. The hairdryer requires no special care or attention.
You can clean your appliance with a cloth dampened with water. The cleaning of hairdryers with detergents, solvents, alcohol and other chemical products is strictly prohibited.
When necessary, the air inlet grill should be cleaned with a soft brush or by vacuum cleaner.
Important
This hairdryer conforms to the safety regulations regarding electrical appliances. This hairdryer has a safety cut-out which will operate in case of overheating. The dryer will re-set itself after being left to cool for a few minutes, but please check air inlet and outlet grills are clear before continuing to use the dryer. This appliance conforms to European Directives 2014/30/EU, 2014/35/EU, 2011/65/EC, 2015/863/EU, 2009/125/EC and Regulation (EC) No. 1275/2008.
GUARANTEE
VALERA guarantees the appliance you have bought at following conditions:
- The guarantee conditions for this appliance are as defined by our dealer in the country of sale. In Switzerland and the countries of the European Union, the warranty period is 24 months if the final purchaser is a private person (domestic use) and 12 months if the final purchaser is a company or business or professional (professional use). The guarantee period starts from the date of purchase as stated on the present guarantee card regularly filled out and stamped by the dealer or on the sale's invoice.
- The guarantee is applicable only against submission of the present guarantee card or the sale's invoice.
- The guarantee covers the elimination of all defects arisen during the guarantee period resulting from proven faults in material or workmanship. The elimination of the defects will be made either by repairing the appliance or exchanging it. The guarantee does not cover any damage arising from incorrect connection to the power supply, improper use, breakage, normal wear and non-compliance with the Instructions for Use.
- All other claims of any nature, including those for eventual damages outside of the appliance, are excluded, unless our liability is legally mandatory.
- The guarantee service is carried out free of charge; it does not affect the expiry date of the guarantee.
- The guarantee becomes void if repairs are under-taken by unauthorized persons.
For UK only: this guarantee in no way affects your rights under statutory law.
In case of defect, please return the appliance well packed and together with the guarantee card regularly dated and stamped to one of our Valera Service Centres or to the dealer who will send it to the official importer for the guarantee service.

The symbol 📄 on the product or on its packaging indicates that this product may not be treated as household waste. Instead it shall be handed over to the applicable collection point for the recycling of electrical and electronic equipment. By ensuring this product is disposed of correctly, you will help prevent potential negative consequences for the environment and human health, which could otherwise be caused by inappropriate waste handling of this product. For more detailed information about recycling of this product, please contact your local city office, your household waste disposal service or the shop where you purchased the product.
VALERA is a registered trade mark of Ligo Electric S.A. - Switzerland
Schiebetaste links 0 = Aus
1 = niedrige Luftmenge
2 = höhere Luftmenge
Installation du support mural
POKYNY NA INŠTALÁCIU
0-1=Off/On (Vyp./Zap.)
Sušič vlasov
Typ 533.03 - 533.05 - 533.03/I - 533.05/I 542.05 - 542.06 - 542.14 - 561.22
Tlačidlo:
ON=On/Off (aby sušič vlasov fungoval, musíte ho držat stlačené)
Posuvný spínač
UPUTE ZA UPORABU - Originalne upute
Pažljivo pročitajte ove upute za uporabu.. Raspoložive i na www.valera.com
SIGURNOSNA UPOZORENJA
The hairdryers listed in these instructions for use are NOT suitable for installation or use in public areas, gyms, wellness/fitness centres, clubs, spas, etc. with high or low frequency of users.
They are only suitable for installation and use in private rooms/bathrooms in hotels, guesthouses, homes and ship's cabins.
DE
Other countries www.valera.com/service