
W8I HT58 T - Dishwasher WHIRLPOOL - Free user manual and instructions
Find the device manual for free W8I HT58 T WHIRLPOOL in PDF.

User questions about W8I HT58 T WHIRLPOOL
0 question about this device. Answer the ones you know or ask your own.
Ask a new question about this device
Download the instructions for your Dishwasher in PDF format for free! Find your manual W8I HT58 T - WHIRLPOOL and take your electronic device back in hand. On this page are published all the documents necessary for the use of your device. W8I HT58 T by WHIRLPOOL.
USER MANUAL W8I HT58 T WHIRLPOOL
THANK YOU FOR BUYING A WHIRLPOOL PRODUCT.
In order to receive a more complete assistance, please register your appliance on: www.whirlpool.eu/register

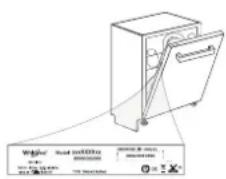
Before using the appliance carefully read Safety and Installation Instructions. After installation, please remember to remove all transport protection parts from the dishwasher.
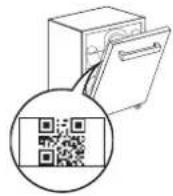
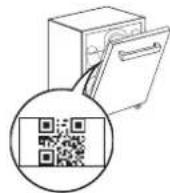
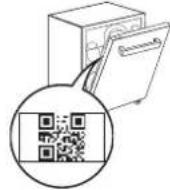
PLEASE SCANTHE QR CODE ON YOUR APPLIANCE IN ORDER TO HAVE MORE DETAILED INFORMATION
The control panel of this dishwasher activates pushing by ON/OFF button.
For energy saving the control panel deactivates automatically after 10 minutes if no cycle has started.
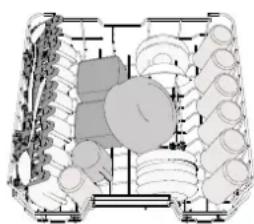
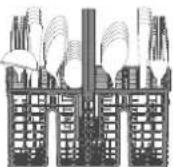
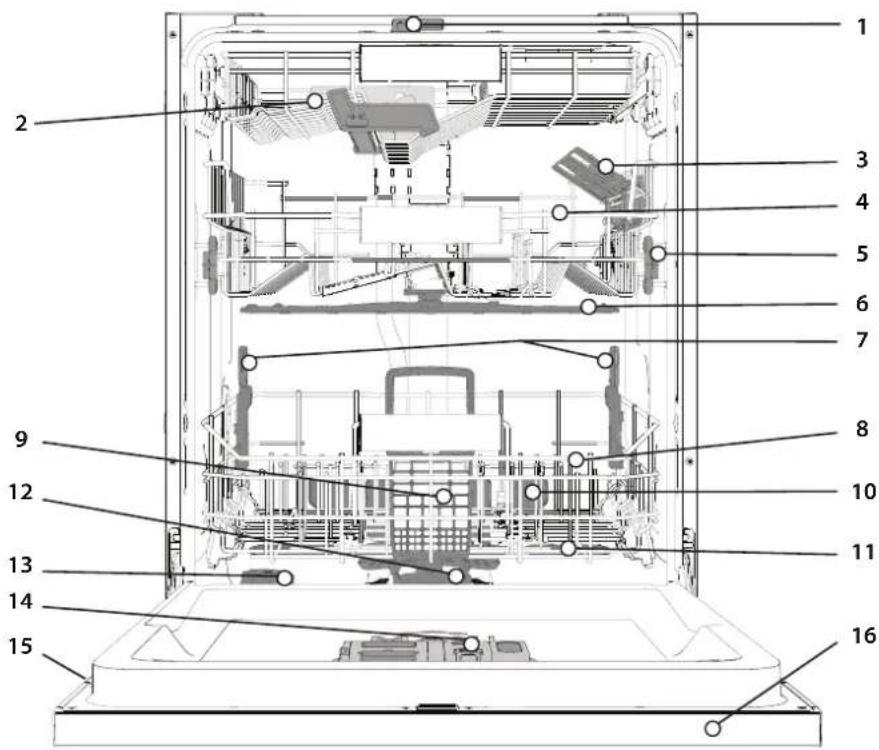
PRODUCT DESCRIPTION
APPLIANCE
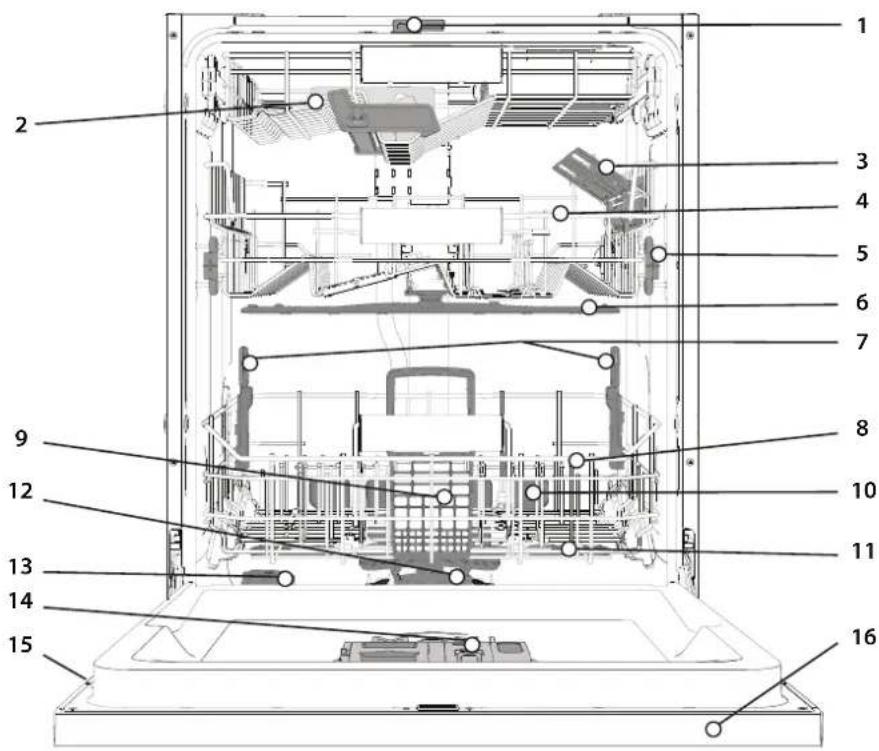
- NaturalDry
- Top rack
- Foldable flaps
- Upper rack
- Upper rack height adjuster
- Upper sprayer arm
- Power Clean® support
- Lower rack
- Cutlery basket
- Power Clean
- Lower sprayer arm
- Filter Assembly
- Salt reservoir
- Detergent and Rinse Aid dispensers
- Rating plate
- Control panel
CONTROL PANEL

- ON-OFF/Reset button with indicator light
- Eco program button with indicator light
- Rapid program button with indicator light/ Prewash program - 3 sec. press
- Crystals program button with indicator light/ Self-Clean program -3 sec. press
- Auto programs buttons with indicator lights - Auto Intensive 65^ / Auto Mixed 55^ / Auto Fast 50^
- Salt reservoir empty indicator light
-
Rinse Aid reservoir empty indicator light
-
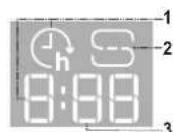
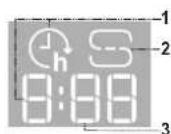
Display
- Program number and remaining time indicator
- Closed water tap indicator light
- DESCALE indicator light
- Extra options buttons with indicator lights - Half Load/ Silent/ Sani Rinse
- Power Clean® option button with indicator light
- Extra Dry option button with indicator light / Settings - 3 sec. press
- Delay option button with indicator light
- START/Pause button with indicator light
DISPLAY ON THE FLOOR
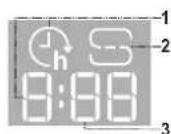
- Delay Time on the floor - indicator of the time left to the start of the cycle, when the Delay option is set
- Salt reservoir empty - indicator light on the floor
- Remaining Time on the floor - indicator of the time left to the end of the cycle
FIRST TIME USE
ADVICE REGARDING THE FIRST TIME USE
After installation, remove the stoppers from the racks and the retaining elastic elements from the upper rack.
SETTING MENU
- Switch on the appliance by pressing the ON-OFF button.
- Hold the Settings (Extra Dry) button for 3 seconds, until you hear a beep and the display shows "SEt".
- After one second the first available setting (letter _^ ^ will be displayed.
- Press Auto programs /Extra options buttons to scroll through the list of available settings (see table below), then press START/Pause to view and change the value of currently selected setting.
- Press Auto programs / Extra options to change the value, then press START/Pause to save the new value.
- To change another setting, repeat points 2 and 5.
- Press ON-OFF 3r wait 30 seconds to exit the menu.
| LETTER | SETTING | VALUES(Default - in bold) |
| I- | Water Hardness Level(see "SETTING THE WATER HARDNESS" and "WATER HARDNESS TABLE") | 1 | 2 | 3 | 4 | 5 |
| F- | Rinse Aid Level(see "ADJUSTING THE DOSAGE OF RINSE AID") | 0 | 1 | 2 | 3 | 4 | 5 |
| C- | NaturalDry (see "OPTIONS AND FUNCTIONS") "1" = On, "0" = Off | 1 | 0 |
| L- | Time on the floor (see "OPTIONS AND FUNCTIONS") "1" = On, "0" = Off | 1 | 0 |
| S- | Sound "1" = On, "0" = Off | 1 | 0 |
| I- | Factory Settings - press START/Pause to re-store to the factory default all the values of the settings included in the settings menu. | - |
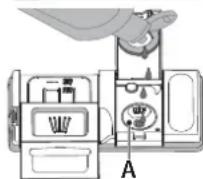
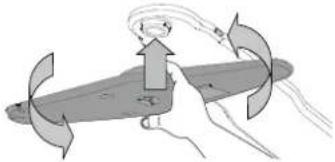
FILLING THE SALT RESERVOIR
The use of salt prevents the formation of LIMESCALE on the dishes and on the machine's functional components. The salt reservoir is located in the lower part of the dishwasher (under the lower rack on the left side).
- It is mandatory that the salt reservoir never be empty.
-
It is important to set the water hardness.
-
Salt must be filled when the SALT REFILL indicator light on the control panel is lit.
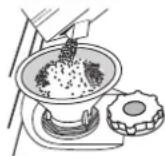
- Remove the lower rack and unscrew the reservoir cap (anticlockwise).
- Position the funnel (see figure) and fill the salt reservoir right up to its edge (approximately 0,5kg ); it is not unusual for a little water to leak out.
- Only the first time you do this: fill the salt reservoir with water.
- Remove the funnel and wipe any salt residue away from the opening. Make sure the cap is screwed on tightly so that no detergent can get into the container during the wash program (this could damage the water softener beyond repair).
Whenever you need to add salt, it is mandatory to complete the procedure before the beginning of the washing cycle to avoid corrosion. Residual saline solution or grains of salt can lead to corrosion, irreparably damaging the stainless steel components. The guarantee is not applicable if faults are caused by such circumstances. If the salt container is not filled, the water softener and the heating element may be damaged as a result of limescale accumulation. Using of Salt is recommended with any type of dishwasher detergent.
SETTING THE WATER HARDNESS
To allow the water softener to work in a perfect way, it is essential that the water hardness setting is based on the actual water hardness in your house. This information can be obtained from your local water supplier. The factory setting is "3". See WATER HARDNESS TABLE.
| Water Hardness Table | |||
| Level | °dH German degrees | °FH French degrees | °C Clark English degrees |
| 1 (Soft) 0 - 6 | 0 - 10 | 0 - 7 | |
| 2 (Medium) | 7 - 11 | 11 - 20 | 8 - 14 |
| 3 (Average) | 12 - 16 | 21 - 29 | 15 - 20 |
| 4 (Hard) | 17 - 34 | 30 - 60 | 21 - 42 |
| 5 (Very hard) | 35 - 50 | 61 - 90 | 43 - 62 |
To change, follow instructions in section "SETTING MENU".
Only use salt that has been specifically designed for dishwashers.
After the salt has been poured into the machine, the SALT REFILL indicator light switches off.
If the salt container is not filled, the water softener and the heating element may be damaged as a result of limescale accumulation. Using of Salt is recommended with any type of dishwasher detergent.
WATER SOFTENING SYSTEM
Water softener automatically reduces water hardness, consequently preventing scale buildup on the heater, contributing also to better cleaning efficiency. This system regenerates itself with salt, therefore it is required to refill the salt container when empty.
The frequency of regeneration depends on the water hardness level setting - regeneration takes place once per 4-6 Eco cycles with the water hardness level set to 3. The regeneration process occurs at the beginning of the cycle with additional fresh water.
- Single regeneration consumes 3L of water;
- Takes up to 5 additional minutes for the cycle;
Consumes below 0.005kWh of energy.
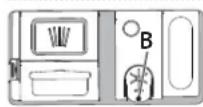
FILLING THE BINSE AID DISPENSER
Rinse aid makes dish DRYING easier. The rinse aid dispenser A should be filled when the RINSE AID REFILL indicator light % in the control panel is lit.
- Open the dispenser B by pressing and pulling up the tab on the lid.
- Pour in the rinse aid (max. 110ml ), making sure it does not overflow from the dispenser. If this happens, clean the spill immediately with a dry cloth.
- Press the lid down until you hear a click to close it. NEVER pour the rinse aid directly into the appliance tub.
ADJUSTING THE DOSAGE OF RINSE AID
If you are not completely satisfied with the drying results, you can adjust the quantity of rinse aid used.
To change, follow the instructions in the section "SETTING MENU".
If the rinse aid level is set to ZERO, no rinse aid will be supplied. The LOW RINSE AID indicator light will not be lit if you run out of rinse aid.
A maximum of 6 levels can be set according to the dishwasher model.
If you see bluish streaks on the dishes, set a low number (0-3).
- If there are drops of water or limescale marks on the dishes, set a mid-range number (4-5).
FILLING THE DETERGENT DISPENSER
Only use detergent which has been specifically designed for dishwashers. DO NOT USE washing up liquid.
Using excessive detergent may result in foam residues remaining in the machine after the cycle has ended.
Usage of detergent not designed for dishwashers may cause malfunction or damage to the appliance.
To achieve the best washing and drying results, the combined use of detergent, rinse aid liquid and refined salt is required.
We recommend using detergents that do not contain phosphates or chlorine, as these products are harmful to the environment.
Good washing results also depend on the correct amount of detergent being used.
Exceeding the stated amount does not result in a more effective wash and increases environmental pollution.
The amount can be adjusted to the soil level. In the case of normally soiled items, use approximately either 35g (powder detergent) or 35ml (liquid detergent) and additional tea spoon of detergent directly inside the tub. If tablets are used, one tablet will be enough.
If the crockery is only lightly soiled or if it has been rinsed with water before being placed in the dishwasher, reduce the amount of detergent used accordingly (minimum 25g / ml ) e.g. skip the powder/gel putted inside the tub.
For good washing results also follow the instructions shown on the detergent box.
For further questions please ask the detergent producers.
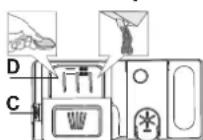

To open the detergent dispenser use the opening device C. Introduce the detergent into the dry dispenser D only. Place the amount of detergent for pre-washing directly inside the tub.
-
When measuring out the detergent refer to the mentioned earlier information to add the proper quantity. Inside the dispenser D, there are indications to help the detergent dosing.
-
Remove detergent residues from the edges of the dispenser and close the cover until it clicks.
- Close the lid of the detergent dispenser by pulling it up until the closing device is secured in place.
The detergent dispenser automatically opens up at the right time according to the program.
Usage of detergent not designed for dishwashers may cause malfunction or damage to the appliance.
DAILYUSE
1. CHECK WATER CONNECTION
Check that the dishwasher is connected to the water supply and that the tap is open.
2. SWITCH ON THE DISHWASHER
Open the door and press the ON/OFF button.
- LOAD THE RACKS (see LOADING THE RACKS).
4. FILL THE DETERGENT DISPENSER
5. CHOOSE THE PROGRAM AND CUSTOMISE THE CYCLE
Select the most appropriate program in accordance with the type of crockery and its soiling level (see PROGRAMS DESCRIPTION) by pressing the selected PROGRAM button.
Select the desired options (see OPTIONS AND FUNCTIONS). Not all options are compatible with all programs.
6. START
Start the wash cycle by pressing START/Pause button (led is lit) and closing the door within 4 sec. When the program starts you hear a single beep. If the door was not closed within 4sec., the alarm sound will be played. In this case, open the door, press START/Pause button and close the door again within 4 sec.
7.END OF WASH CYCLE
The end of the wash cycle is indicated by sound and the display shows END. Open the door and switch off the appliance by pressing the ON/OFF button.
Wait for a few minutes before removing the crockery - to avoid burns. Unload the racks, beginning with the lower one.
The machine will switch off automatically during certain extended periods of inactivity, in order to minimise electricity consumption.
If the crockery is only lightly soiled or if it has been rinsed with water before being placed in the dishwasher, reduce the amount of detergent used accordingly.
MODIFYING A RUNNING PROGRAM
If a wrong program was selected, it is possible to change it, provided that it has only just begun. RESET the machine: press and hold the ON/OFF button for more than 3. sec., and the machine will switch off. The dashboard will show "0:01". Close the door and wait until drain cycle ends (around 1 minute). Open the door and switch the machine back on using the ON/OFF button and select the new wash cycle and any desired options. Start the cycle by pressing the START/Pause button and closing the door within 4 sec.
ADDING EXTRA CROCKERY
Without switching off the machine, open the door first slightly to avoid water splashing out (START/Pause led starts blinking) (Caution: Hot steam!) and place the crockery inside the dishwasher. Press the START/Pause button and close the door within 4 sec., the cycle will resume from the point at which it was interrupted.
ACCIDENTAL INTERRUPTIONS
If the door is opened during the wash cycle, or if there is a power cut, the cycle stops. ONLY IF YOU PRESS the START/Pause button and close the door within 4 sec., the cycle will resume from the point at which it was interrupted.
ADVICE AND TIPS
TIPS
Before loading the baskets, remove all food residues from the crockery and empty the glasses. You do not need to rinse beforehand under running water. Arrange the crocckery so that it is held in place firmly and does not tip over; and arrange the containers with the openings facing downwards and the concave/convex parts placed obliquely, thus allowing the water to reach every surface and flow freely.
Warning: lids, handles, trays and frying pans should not prevent the spray- er arms from rotating.
Place any small items in the cutlery basket.
Very soiled dishes and pans should be placed in the lower basket because in this sector the water sprays are stronger and allow a higher washing performance. After loading the appliance, make sure that the sprayer arms can rotate freely.
UNSUITABLE CROCKERY
- Wooden crockery and cutlery.
- Delicately decorated glasses, artistic handicrafts and antique crockery. Their decorations are not resistant.
- Parts in synthetic material which do not withstand high temperatures.
Copper and tin crockery.
Crockery soiled with ash, wax, lubricating grease or ink.
The colours of glass decorations and aluminium/silver pieces can change and fade during the washing process. Some types of glass (e.g. crystal objects) can become opaque after a number of wash cycles too.
DAMAGE TO GLASS AND CROCKERY
- Only use glasses and porcelain guaranteed by the manufacturer as dishwasher safe.
- Use a delicate detergent suitable for crockery
- Collect glasses and cutlery from the dishwasher as soon as the wash cycle is over.
TIPS ON ENERGY SAVING
- When the household dishwasher is used according to the manufacturer's instructions, washing tableware in a dishwasher usually consumes less energy and water than hand dishwashing.
- In order to maximize dishwasher efficiency, it is recommended to initiate the wash cycle once the dishwasher is fully loaded. Loading the household dishwasher up to the capacity indicated by the manufacturer will contribute to energy and water savings. Information on the correct loading of tableware can be found in the Loading chapter. In case of partial loading, it is recommended to use a dedicated wash options if available (Half load/ Zone Wash/ Multizone), filling up only selected racks. Incorrect loading or overloading of the dishwasher may increase resources usage (such as water, energy and time, as well as increase noise level), reducing cleaning and drying performance.
- Manual pre-rinsing of tableware items leads to increased water and energy consumption and is not recommended.
HYGIENE
To avoid odour and sediment which can be accumulated in the dishwasher please run a high-temperature program at least once a month. Use a teaspoon of detergent and run it without loading to clean your appliance.
RESISTANCE TO FROST
If the appliance is placed in surroundings exposed to the risk of frost, it must be drained completely. Run the Self-Clean cycle to drain the water tank. Turn off the water tap, remove the inlet and outlet hoses, and let all the water drain away. Make sure that the water softener is full of dissolved regeneration salt in the salt container, to protect the appliance from temperatures of up to -20^ .
If the appliance was stored in frost conditions the appliance must remain at an ambient temperature of min. 5^ for at least 24 hours before the first run.
PROGRAMS TABLE
| Program | Programs description | Drying phase | NaturalDry | Available options** | Duration of wash program (h: min)*** | Water consumption (litres/cycle) | Energy consumption (kWh/cycle) | |
| Eco | Eco 50°- program is suitable to clean normally soiled tableware, that for this use, it is the most efficient program in terms of its combined energy and water consumption, and that it is used to assess compliance with the EU Ecode-sign legislation. | ✓ | ✓ | 2* 动力煤 POWER CLEAN | 4:00 9.5 0.64 | |||
| Rapid 45°- Program is recommended for limited amount of lightly-soiled dishes with no dried food residues. Does not include the drying phase. | - | ✓ | 2* 动力煤 POWER CLEAN | 0:30 - 0:40 10.5 - 15.0 0.55 - | 0.65 | |||
| Crystals 45°- Program for delicate items, which are more sensitive to high temperatures, for example glasses and cups. | ✓ | ✓ | 2* 动力煤 POWER CLEAN | 1:40 - 1:50 12.5 - 17.0 0.95 - | 1.20 | |||
| Auto Intensive 65°- Automatic program for heavily soiled dishes and pans. | Senses the level of soiling on the dishes and adjusts the program accordingly. When the sensor is detecting the soil level an animation appears in the display and the cycle duration is updated. | ✓ | ✓ | 2* 动力煤 POWER CLEAN | 2:25 - 3:10 17.0 - 25.0 1.30 - | 1.70 | ||
| Auto Mixed 55°- Automatic program for normally soiled dishes with dried food residues. | ✓ | ✓ | ✓ | 2* 动力煤 POWER CLEAN | 1:20 - 3:20 | 7.5 - 20.5 | 0.75 - 1.20 | |
| Auto Fast 50°- Automatic program for normally and lightly soiled dishes. The everyday cycle that ensures optimal cleaning and drying performance in shorter time. | ✓ | ✓ | ✓ | 2* 动力煤 POWER CLEAN | 1:00 - 1:50 | 8.0 - 16.0 | 0.70 - 1.10 | |
| Prewash - Use to refresh crockery planned to be washed later. No detergent is to be used with this program. | - | ✓ | 2* h | 0:12 4.5 0.10 | ||||
| Self-Clean 65°- Program to be used to perform maintenance of the dishwasher, to be carried out only when the dishwasher is EMPTY using specific detergents designed for dishwasher maintenance. | - | - | 2* h | 1:15 | 12.7 | 1.10 | ||
ECO program data is measured under laboratory conditions according to European Standard EN 60436:2020.
Note for Test Laboratories:
For information on comparative EN testing conditions, please send an email to the following address: dw_test_support@europeanappliances.com
Pre-treatment of the dishes is not needed before any of the programs.
*) Door is opened before the programm has been ended. This is to improve the drying efficiency. Wait until the time has reached 00:00 to unload the dishwasher
) Not all options can be used simultaneously.
*) Values given for programs other than the program Eco are indicative only. The actual time may vary depending on many factors such as temperature and pressure of the incoming water, room temperature, amount of detergent, quantity and type of load, load balancing, additional selected options and sensor calibration. The sensor calibration can increase program duration by up to 20 min.
OPTIONS AND FUNCTIONS
OPTIONS can be selected/ deselected, after choosing the program, directly by pressing the corresponding button (if available - the indicator lights up) (see CONTROL PANEL). If an option is not compatible with the selected program (see PROGRAMS TABLE), the corresponding LED flashes rapidly 3 times and beeps will sound. The option will not be enabled. An option can change time or water or energy consumption for the program.

HALF LOAD - If there are not many dishes to be washed, HALF LOAD is used to save water, electricity or time, depending on the selected program. Remember to halve the amount of detergent.

SILENT - Suitable for night-time operation of the appliance. This option can be used to limit noise emission during wash phases. It will increase cycle time depending on base cycle selection.

SANI RINSE - This option can be used to sanitize washed dishes. It will increase the final rinse temperature and add antibacterial wash to the selected program. Ideal to clean crockery and feeding bottles.
The dishwasher door must be kept shut for the entire duration of the program in order to guarantee reduction of germs. WARNING: the crockery and plates could be extremely hot at the end of the cycle.
POWER
CLEAN
- POWER CLEAN® - Thanks to the additional power jets this option is provided a more intensive and powerful wash in the lower rack, in specific area. This option is recommended for washing pots and cassetoles (see refer to the Power Clean® loading section).

EXTRA DRY - The higher temperature during the final rinse and the extended drying phase allow improved drying. The EXTRA DRY option results in the lengthening of the wash cycle.

WATER TAP CLOSED - Alarm - Flashes when there is no inlet water or water tap is closed.

DELAY - The start of the program may be delayed for a period of time between 0:30 and 24 hours.
-
n 1. Select the program and any desired options. Press the DELAY button (repeatedly) to delay the start of the program. Adjustable from 0:30 to 24 hours. Once the 24 hours setting is reached, press the DELAY another time to deactivate the DELAY function.
-
Press the START/Pause button and close the door within 4 sec. the timer will begin counting down.
- Once this time has elapsed, the indicator light switches off and the program begins automatically.
The DELAY function cannot be set once a program has been started.
NaturalDry - It is a convection drying system which automatically opens the door during/after drying phase to ensure exceptional drying performance every day. Door opens at the temperature that is safe to your kitchen furniture, thus door will not be opened when the option of SANI RINSE is on. As additional steam protection, special designed protection foil is added together with the dishwasher. To see how to mount protection foil please refer to the INSTALLATION GUIDE. This feature is active by default, but it is possible to deactivate it in the "SETTINGS MENU".

SENSING- When the sensor is detecting the soil level an animation appears in the display (around 20 min.) and the cycle duration is updated. SENSING is for the level of soiling on the dishes and is all cycles (excepting Eco) adjusting the program accordingly.

TIME ON THE FLOOR - A LED light projected on the floor indicates the time left to the end of the cycle. The light goes off every time the door is opened. The light goes off at the end of a cycle. This feature is active by default, but it is possible to deactivate it in the " SETTINGS MENU".

DESCALE - Alarm - Limescale accumulation was detected on the
internal components of the appliance. Check if the Water Hardness Setting is at the correct value and salt is present in the salt container (see FIRST TIME USE), then use a descaling product (WPro brand is recommended) with Self-Clean program. After a successful descaling, the icon will stop being displayed.
If the actions above are not performed, product performance will deteriorate. DESCALE warning will start blinking and «dES» alarm will appear on the display. If still no action is taken, the appliance will only allow a certain number of cycles to be started (indicated during «dES» alarm display) and then will be BLOCKED to prevent component damage, with only the Self-Clean program available. Performing a full descaling will unblock the product. In the case of extremely high amounts of limescale, descaling may have to be performed twice to be efficient.
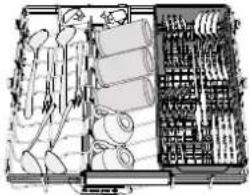
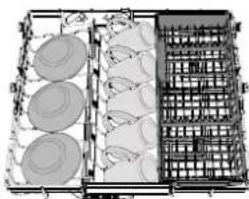
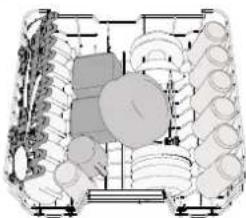
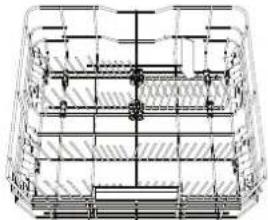
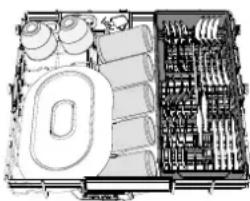
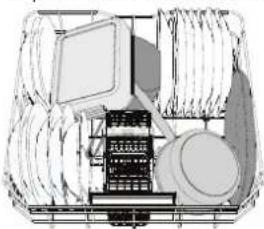
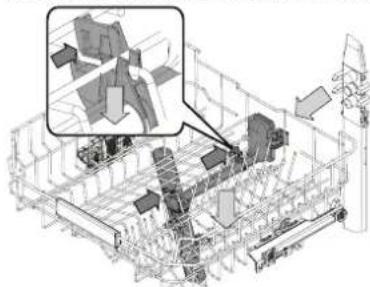
LOADING THE RACKS
CAPACITY: 15 standard place-settings
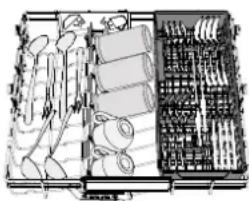
TOP RACK
The top rack provides a targeted cleaning Wash Zone for bowls, mugs, even big plates and cutlery that you'd normally load in the lower racks, making
extra space for the rest of the day's dishes.

A separate arrangement of the cutlery makes collection easier after washing and improves washing and drying performance.
Knives and other utensils with sharp edges must be positioned with the blades facing downwards.
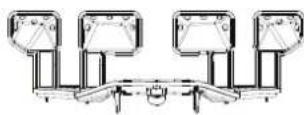
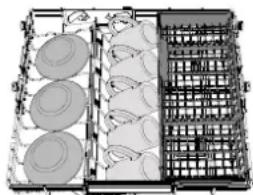
UPPER RACK
Load delicate and light dishes: glasses, cups, saucers, low salad bowls.
The upper rack has tip-up supports which can be used in a vertical position when arranging tea/ dessert saucers or in a lower position to load bowls and food containers.
(loading example for the upper rack)
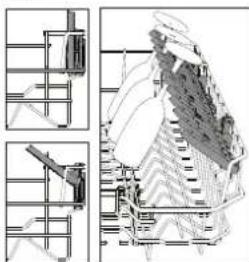
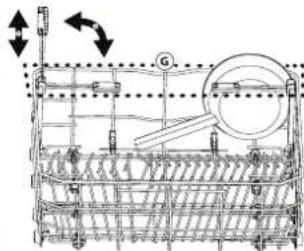
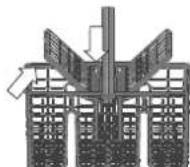
ADJUSTING THE HEIGHT OF THE UPPER RACK
The height of the upper rack can be adjusted: a high position to place bulky crockery in the lower basket and a low position to make the most of the tip-up supports by creating more space upwards and avoiding collision with the items loaded into the lower rack.
The upper rack is equipped with an Upper Rack height adjuster (see figure), without pressing the levers, lift it up by simply holding the rack sides, as soon as the rack is stable in its upper position. To restore to the lower position, press the levers A at the sides of the rack and move the basket downwards.

We strongly recommend that you do not adjust the height of the rack when it is loaded. NEVER raise or lower the basket on one side only.
FOLDABLE FLAPS WITH ADJUSTABLE POSITION
The side foldable flaps can be folded or unfolded to optimize the arrangement of crockery inside the rack. Wine glasses can be placed safely in the foldable flaps by inserting the stem of each glass into the corresponding slots. In the case of the high position of the upper rack, flaps cannot remain in the vertical position. Depending on the model:
- to unfold the flap there is needed to slide it up and rotate or release it from the snaps and pull it down.
to fold the flap there is needed to rotate it and slide the flap down or pull it up and attach the flap to the snaps.
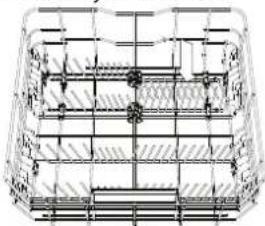
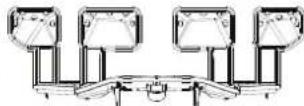
LOWER RACK
For pots, lids, plates, salad bowls, cutlery etc. Large plates and lids should ideally be placed at the sides to avoid interferences with the spray arm.
The lower rack has tip-up supports which can be used in a vertical position when arranging plates or in a horizontal position (lower) to load pans and salad bowls easily.
(loading example for the lower rack)
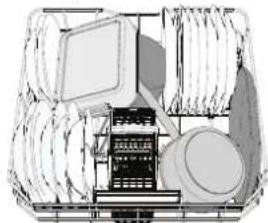
POWER CLEAN
Power Clean uses the special water jets in the rear of the cavity to wash more intensively the highly dirty items. The lower rack has a Space Zone, a special pull-out support in the rear of the rack that can be used to support frying pans or baking pans in an upright position, thus taking up less space.
Placing the pots/casseroles faced to the Power Clean component please activate the POWER CLEAN on the panel.
How to use the Power Clean*:
- Adjust the Power Clean area G folding down the rear plate holders to load pots.
- Load pots and cassetoles inclined vertically in the Power Clean area. Pots have to be inclined towards the powerful water jets.
CUTLERY BASKET
It is fitted with top grids for improved cutlery arrangement. It must only be positioned at the front of the lower rack.
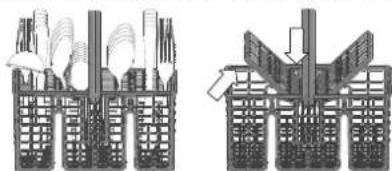
Knives and other utensils with sharp edges must be placed in the cutlery basket with the points facing downwards or they must be positioned horizontally in the tip-up compartments on the upper rack.
CARE AND MAINTENANCE
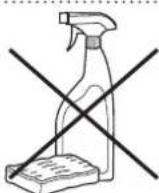
ATTENTION: Always unplug the appliance when cleaning it and when performing maintenance work.Do not use flammable liquids to clean the machine.
CLEANING THE DISHWASHER
Any marks on the inside of the appliance may be removed using a cloth dampened with water and a little vinegar. The external surfaces of the machine and the control panel can be cleaned using a non-abrasive cloth which has been dampened with water. Do not use solvents or abrasive products.
PREVENTING UNPLEASANT ODOURS
Always keep the door of the appliance ajar in order to avoid moisture from forming and being trapped inside the machine. Clean the seals around the door and detergent dispensers regularly using a damp sponge. This will avoid food becoming trapped in the seals, which is the main cause behind the formation of unpleasant odours.
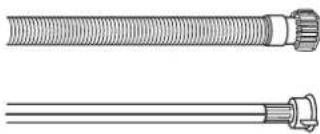
CHEKING THE WATER SUPPLY HOSE
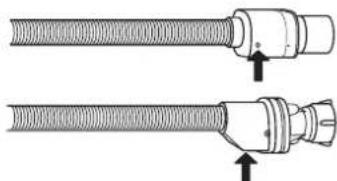
Check the inlet hose regularly for brittleness and cracks. If damaged, replace it by a new hose available through our After-Sales Service or your specialist dealer. Depending on the hose type:
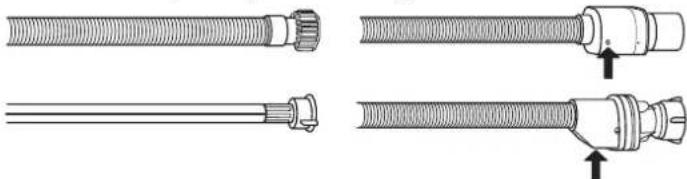
If the inlet hose has a transparent coating, periodically check if the colour intensifies locally. If yes, the hose may have a leak and should be replaced. For water stop hoses: check the small safety valve inspection window (see arrow). If it is red, the water stop function was triggered, and the hose must be replaced by a new one. For unscrewing this hose, press the release button while unscrewing the hose.
CLEANING THE WATER INLET HOSE
If the water hoses are new or have not been used for an extended period of time, let the water run to make sure it is clear and free of impurities before performing the necessary connections. If this precaution is not taken, the water inlet could become blocked and damage the dishwasher.
CLEANING THE FILTER ASSEMBLY
Regularly clean the filter assembly so that the filters do not clog and that the waste water flows away correctly.
Using the dishwasher with clogged filters or foreign objects inside the filtration system or spray arms may cause unit malfunction resulting in loss of performance, noisy work or higher resources usage.
The filter assembly consists of three filters which remove food residues from the washing water and then recirculate the water.
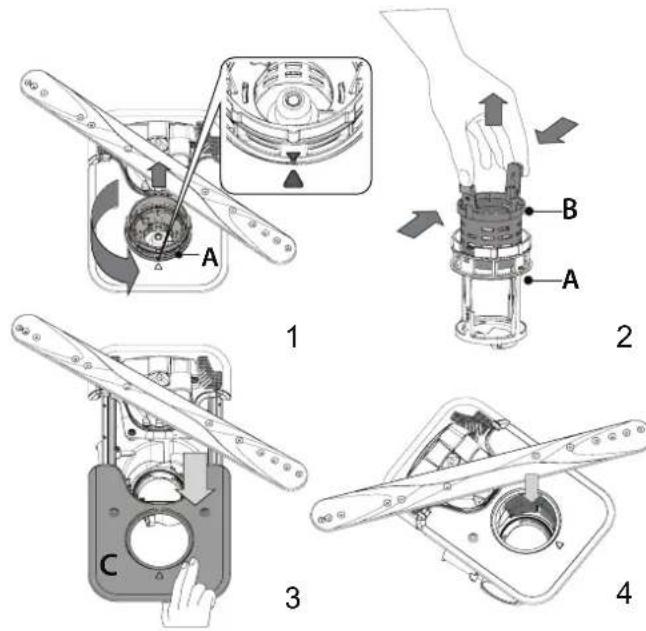
The dishwasher must not be used without filters or if the filter is loose. At least once per month or after every 30 cycles, check the filter assembly and if necessary clean it thoroughly under running water, using a non-metallic brush and following the instructions below:
- Turn the cylindrical filter A in an anti-clockwise direction and pull it out (Fig 1). It is important when reinstalling the filter that the two triangles shown on the zoom meet.
- Remove the cup filter B by exerting a slight pressure on the side flaps (Fig 2).
- Slide out the stainless-steel plate filter C (Fig 3).
- In case you find foreign objects (such as broken glass, porcelain, bones, fruit seeds etc.) please remove them carefully.
- Inspect the trap and remove any food residues. NEVER REMOVE the wash-cycle pump protection (shown by an arrow) (Fig 4).

After cleaning the filters, replace the filter assembly and fix it in position correctly; this is essential for maintaining the efficient operation of the dishwasher.
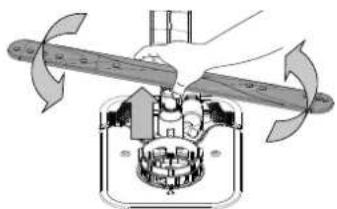
CLEANING THE SPRAY ARMS

On occasions, food residue may become encrusted onto the spray arms and block the holes used to spray the water. It is therefore recommended that you check the arms from time to time and clean them with a small non-metallic brush.
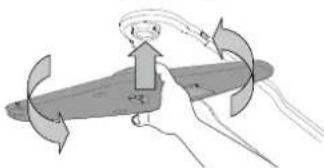
To remove the upper spray you must remove it together with the manifold.
The Top Rack rack has a fixed wash tube with all the wash nozzles facing upward. To clean it you can slide the rack out and with a tweezer remove items that may be lodged in the nozzles.
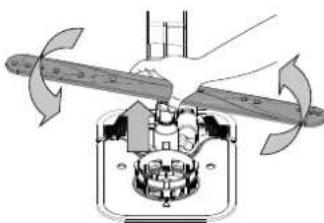
The lower spray arm may be removed by pulling it upwards and rotating it anti-clockwise. Mounting back the spray arm is by pulling it down and rotating it clockwise.
The ceiling spray arm may be removed by pressing it up and then rotating it anti-clockwise. Mounting back the spray arm is by pulling it upwards and rotating it clockwise.
TROUBLESHOOTING
In case your dishwasher doesn't work properly, check if the problem can be solved by going through the following list. For other errors or issues please contact authorized After-sales Service whose contact details can be found in the warranty booklet. Spare parts will be available for a period of either up to 7 or up to 10 years, according to the specific Regulation requirements.
| PROBLEMS POSSIBLE CAUSES SOLUTIONS | ||
| The salt indicator is lit | Salt reservoir is almost empty. | Refill the reservoir with salt (for more information - see FILLING THE SALT RESERVOIR). Check the water hardness setting if necessary (see WATER HARDNESS TABLE). |
| The salt indicator is blinking | Salt reservoir is empty. | Refill the reservoir with salt as soon as possible. Using the appliance without salt may cause damage to its internal components. |
| The rinse aid indicator is lit or blinking | Rinse aid dispenser is empty. (After refill the rinse aid indicator may remain lit for a short time). | Refill the dispenser with rinse aid (for more information - see FILLING THE RINSE AID DISPENSER). |
| Descale indicator is lit or blinking, "dES" alarm is displayed. | Limescale is accumulating on internal components of the appliance. | Descale the appliance immediately using the Self Clean program and a commercially available descaling product (see OPTIONS AND FUNCTIONS). Refill the reservoir with salt. Check the water hardness setting. If the appliance is not descaled, it will stop functioning. |
| The dishwasher won't start or does not respond to commands. | The appliance has not been plugged in properly. | Insert the plug into the socket. |
| Power outage. | For safety reasons, the dishwasher will not restart automatically when power returns. Open dishwasher door, press START/Pause button and close the door within 4 seconds. | |
| The dishwasher door is not closed. NaturalDry pin is not pulled in. | Vigorously push the door until you hear the "click". | |
| A cycle is interrupted by door opening for more than 4 seconds. | Press START/Pause and close the door within 4 seconds. | |
| The control panel does not respond or F6 E1 is displayed. | Switch off the appliance by pressing the ON-OFF/Reset button, switch it back on after approximately one minute and restart the program. If the problem persists, unplug the appliance for 1 minute, then plug it back in. | |
| The dishwasher won't drain. Display shows: F7 E3 or F9 E1 | The filter is clogged with food residues or timescale | Clean the filter and descale the appliance (see CLEANING THE FILTER ASSEMBLY and DESCALE INSTRUCTION). |
| The drain hose is kinked. Check the drain hose | See (see INSTALLATION INSTRUCTION). | |
| The sink drain pipe is blocked. Clean the sink | drain pipe. | |
| The dishwasher makes excessive noise. | Dishes are rattling against each other. | Position the crocckery correctly (see LOADING THE RACKS). |
| An excessive amount of foam is present. | The detergent has not been measured out correctly or it is not suitable for use in dishwashers (see FILLING THE DETERGENT DISPENSER). Restart the current cycle by switching OFF the dishwasher, then switch it on again, select a new program, press START/Pause and close the door within 4 seconds. Please do not add any detergent. | |
| Crockery has not been arranged properly. | Arrange the crockery correctly (see LOADING THE RACKS). | |
| The filter is clogged with food residues or timescale. | Clean the filter assembly (see CARE AND MAINTENANCE). | |
| The dishes are not clean. | Crockery has not been arranged properly. | Arrange the crockery correctly (see LOADING THE RACKS). |
| Spray arms cannot rotate freely, being hindered by the dishes. | Arrange the crockery correctly (see LOADING THE RACKS). Check that the upper rack is in the correct position and adjust (lift up) if necessary. | |
| The wash cycle is too gentle. Select an appropriate wash cycle (see PROGRAMS TABLE). | ||
| An excessive amount of foam is present. | The detergent has not been measured out correctly or it is not suitable for use in dishwashers (see FILLING THE DETERGENT DISPENSER). | |
| The cap on the rinse aid compartment has not been closed correctly. | Make sure the cap of the rinse aid dispenser is closed. | |
| The filter is clogged with food residues or timescale. | Clean the filter and descale the appliance (see CLEANING THE FILTER ASSEMBLY). | |
| The salt reservoir is empty. Fill the salt reservoir | See FILLING THE SALT RESERVOIR. | |
| The dishwasher does not fill the water. The display shows: H2O and is lit; acoustic alarm sounds. | No water in the water supply or the tap is closed. | Make sure there is water in the water supply and the water tap is open. |
| The water inlet hose is kinked. | Check the inlet hose (see INSTALLATION). Open dishwasher door, press START/Pause button and close the door within 4 seconds. | |
| The screen in the water inlet hose is clogged; it is necessary to clean it. | Check and clean the screen in the water inlet hose. Open dishwasher door, press START/Pause button and close the door within 4 seconds. | |
| The dishwasher finishes the cycle prematurely. The display shows: F8 E3 | The filter is clogged with food residues or timescale. | Clean the filter and descale the appliance (see CLEANING THE FILTER ASSEMBLY and DESCALE INSTRUCTION). |
| Drain hose positioned too low or siphoning into the home sewage system. | Check if the end of the drain hose is placed at the correct height (see INSTALLATION). Check for siphoning into the home sewage system, and install a siphon breaker/air admittance valve if necessary. | |
| An excessive amount of foam is present. | The detergent has not been measured out correctly or it is not suitable for use in dishwashers (see FILLING THE DETERGENT DISPENSER). | |
| Air in the water supply. Check water supply for leaks or other issues letting air inside. | ||
| The dishes are not dried well. | Rinse aid is not present or the dosage is too low. | Make sure the rinse aid dispenser is filled (see FILLING THE RINSE AID DISPENSER). Multifunctional tablets only will not provide as good drying effects as the actual use of liquid rinse aid. |
| The dishes have been unloaded after the door was opened automatically but before the actual cycle end. | Make sure the cycle has ended before starting to unload the dishes (see DAILY USE). For even better drying results, it is recommended to let the dishes sit inside the dishwasher with the door open for additional 15 minutes after the cycle ends. | |
| The dishes are sitting too flat. | If you notice puddles of water inside cavities of cups, mugs or bowls, try loading the dishes (especially in the upper rack) providing more inclination to let larger amounts of water drip down before drying starts. | |
| The selected cycle does not have the drying phase. | Please check in the PROGRAMS TABLE if the selected program is equipped in the drying phase. A cycle without the drying phase may not deliver desired drying efficiency, so it is recommended to change cycle selection for the one that has the drying phase. | |
| The dishes are made of non-stick or plastic. | Some water drops remaining on this type of material are normal. | |
| Dishes and glasses have blue streaks or bluish tinges. | Rinse aid dosage is excessive. Adjust the dosage to a lower setting. | |
| Dishes and glasses are covered with limescale or a whitish film. | The salt reservoir is empty. | Refill the reservoir with salt as soon as possible. Using the appliance without salt may cause damage to its internal components. |
| The water hardness setting is too low. Increase the setting (see WATER HARDNESS TABLE). | ||
| The cap of the salt reservoir is not properly closed. | Check and close the salt reservoir cap. | |
| The rinse aid reservoir is empty or the rinse aid dosage is insufficient. | Refill the dispenser with rinse aid and check the dosage setting (formore information -see FILLING THE RINSE AID DISPENSER). | |
| The dishwasher shows F8 E5 | Valve is blocked or faulty. Close the water tap, if possible. Do not switch off the power supply. Call the service. | |
| Detergent leaks. | Depends on the liquid detergent used and can be emphasized in case of delay option is activated. | Small leaks will not cause machine malfunction and can be avoided by changing liquid detergent type or using tablets. |
Policies, standard documentation, ordering of spare parts and additional product information can be found by:
Using QR code on your product.
- Visiting our website docs.whirlpool.eu/docs and parts-selfservice.europeanappliances.com
- Alternatively, contact our After-sales Service (See phone number in the warranty booklet).
When contacting our After-sales Service, please state the codes provided on your product's identification plate.
The model information can be retrieved using the QR-Code reported in the energy label.
The label also includes the model identifier that can be used to consult the portal of the registry at https://eprel.ec.europa.eu.


BNAOIDAPIM BN, YE 3AKYINXTE IPOJyKT HA WHIRLPOOL.
3a da nolyuabaTe no-nbIHo cBdeIcTBue, pernctpupaTe Baunr
ypeHa::www.whirlpool.eu/register

Ipei Da H3non3BaTe ypea, npoateTe BnMaTeJHo yKa3aHnraTa 3a 6e3onachOCT mHCTanmpaHe.
Cnei HnctaIupaHe He 36paBryTe Da MaxHeTe BCNUK TpaHCnOpTHuactnOT
CbDOMNJIHATA.
3A NOJUYABAHE
HA NO-NOPOBHA
INHΦOPMAU,MOJ,
CKAHHPAUTE QR
KOДA HABAUYPEI
KoHTpolnHrT naneHa Ta3n CbDomnHa MaunHa ce aKTbnpa c HATNCKaHe Ha 6yToHa 3a BKJ./M3KJI. C qen cneCTBaHe Ha eNeKTpoeHepnra, KOHTpolnHrT naHc Ce deaKTbnpa aBTOMaTuHo cIe10 MmHytn, aKO HMa CTapTupa HcNKbl.
3APEXDAHE HA PE3EPBOAPA 3A COJ
3n0n3BaHeTo Ha cOn npedotBpaTbRa 6pba3yBaHeTo Ha KOTJIeH KAMbK no cbdoBeTe n yHKUHOHaHInTe KOmNoHEHTHa MaWnHata.
Pe3epBoapbT 3a CoI ce HAMIPA B DOJIHaTa YAcT Ha CbDOMINHATA MaUNHa (NOJ DOJIHaT A KOUHMua OT JIABaTa cTpHa).
3aBnKntHo e pe3epBoapbT 3a c0n Hkora Da He ocTaba npa3eH.
BaxHo e da 3a daTe TBbpoCTTa Ha BOData.
Korato CBeTmHHnI INHnKaTOp 3APEXDAHE HA COI KOHTpONHn PAHeN CBETn, Tpa6Ba da doabnte coI.
1.OTcpaHHe TOnHATA KOoHnua n pa3BnTe KanaKata Ha pe3epBoapa (O6paTHo Ha YacOBHnKOBaTa CTpeJIka).
2.Пoctabeteфунra(TB.KfHpypata)инаньнertepe3epBOapa3acondo p6a(OKOLO5kg);Hee HeobuayauHO da n3tee manko BOda.
3.CamopbBnnaTnpaBnTeToBa:HaHbHepezeepBoaapa3acolcBoa.
4. Otrpahe Te yHnraTa n 3a6bpeTe octTaBHTe OT COJ OT TBopa.
YBepete Ce,Ce KaNaKata e 3aBnTa 3dPaBO,Taka Ce No BpeMe Ha npoRpaMaTa 3a MHe IpnapaTb Da He MOKe Da BneE Be p3ePboApa (TOBa MoKe da NOBpeDN HENOpapBIMO OMEKOTIENTEn 3a BODa).
Korato e Heo6xOUMo Da Idoabnte coJ, e 3aIbIJIuNTenHO da HapbaBnTe TOBa npEi 3anoUbaHe Ha cIKbHa Ha N3MmBaHe, 3a Da ce N3-6erHe KOp03n.
OctaHaIaIaT cOneH pa3TbOp mnn rpaHynn coN MoKe da DOBeMaTdo bIb6oka Kopo3nA, KaTO NOpeaHT HeONpabMIO KOmNOHeHTne OT HEPXJaemaCTOMaHa.
TapaHuaTa He e B cnla, ako Henn3npaBHOCTuTe ca npeu3BnKaHn OT TaKbBa 06ToTcTBA.
Ako KOHTeHepbT 3a coJ He 6bJe HAnbJIHeN, Bb3MOxHO e B pe-3yIITat Ha HATpynBaHe Ha BapOBuK Da ce nobpeM OMEKOTTeJrT 3a BOJa N HarpeBaTeHNrT enEMeHt.
I3noJI3BaHeTo Ha coI e npenOpbUHTeHNo C BcKaKbB TnN MmJneH npenapat.
HACTPOIBAHE HA TBbPIOCT HA BOJATA
3a da MOKe OMEKOTeIaTbOda Pa6oTn IDeaHNo, eOC6eHo BaXHO HAcTPOKaTa 3a TBpDcTtHa BOdA Ta Ce 6a3npa Ha peanHata TBbpDcT HbOATA B DOMa BN. MoKeTe Da NOnyHTe Ta3n INHΦOpMaunr OT MecTHN Cn DOCTBauNK HbOa. Da6pnuHa TAcTPOka e"3".
Bx, TAbNlUCA 3A TBbPIOCT HA BOIDATA."
BCEKnDHEBHA YNOTPEBA
1. PNOBEPKA HA BOHATA BPb3KA
YBepeTe Ce, Ye CbDOMMIAHHaMaUNHa e CBbp3aHa KbM BOJOnOJaBaHeTo IN KpaHcTe o OTBOpEHO.
2.BKJIQUETECBDOMNIAHATAMAUNHA
OTbOpTe BpTaTa N HaTnChETe 6yToHa BKJ./N3KJI.
- 3APEDETETKOWHHLNTE (Bx. 3APEXDAHE HAKOLIHNLNTE)
- 3APEXDAHE HA IO3ATOPA 3A MURJIEH IPEIAPAT
5. 136EPETIPOPTPAMATA INIEPCOHJIN3NPAITE IPOPTPAMATA
N36epete Ha-NOxOJaTa NpOrpama CnpoeBnHa CbDoBeTe HNBTOHa 3aMbpcBaHe (6X. ONCAHNE HA IPOPAMITE) KaTo HATNCHTe 6yToHtne IPOPAMA. N36epete XeJahnte onuun (6X. ONUUN IN DYHKLIHN. He BCuKN Onuun Ca CbMEcTmN C BCuKN npOrpam.
6. CTAPT
CTaptnpaTne UKbI Ha n3MnBaHe, KaTo HATncHete 6yToHa CTAPT/ny3a (CBTeODnOCTB CBeTa) n 3aTbpnte BpataTBA pAMKITE Ha 4 cekyni. Korato nporpamaTc TApTnpa, ce yBa eDnHokpateH cnHaJ.AKO BpataT He 6bJe 3aTbpopeHa B pAMKITE Ha 4 cekyni, ne ce BB3pnOn3BeDe 3BykOba anapMa. B To3n Cnyau OTbopete Bpata,TaHtncHete 6yToHa CTAPT/ny3a n OTHBO 3aTbpote BpataTBA pAMKITE Ha 4 cek.
7. KPARTHA IIPOPGAMATA
KpaT Ha IcIKbHa Na IMMbAbe Ce OOb3HauBa C KpATKn 3ByKOu CNrHAa, a Ha DCnIe ne c H3NtCBA END (KPART). OTbOpTe BpTaTaN3KIOUte ypeDa, Kato HAtNCHe6 ByToHa BKN./M3KN.
I3aKaJIte HAKONKO MInHyTN, IpeDN Da IpeMaXHeTe CbDOBeTe, 3a Da I36eHrTe N3rapHnN. I3BaJeTe CbDOBeTe, KaTo 3aNoHETe OT DonHaTc KOHIuHa.
Maunnata ce n3knouba ABToMaTuHOp npn onpegeHn npoBnKHeTneHn nepnoHa HaeAHTNBHOCT, 3a Da CBeDe DO MNHMMyM NOTpe6NeHMeTo Ha eheprna. Ako cbDoBeTe ca camo IeKo 3AmbpeHcN mAn aKO ca 3nIaNkHnC B Oda npdE da Ce NOCTABRT B cbDomnHnTa Maunna, HAanTe CbotBeTHO KOJIueCTBOt MNoJ3BaH npenapat.
MOINΦNUPAHE HA PABOTELA IPOPGAMA
Ako e n36paHa rpeuHa nporpama, moxete Da y npomeHnte, npu ycIOBne ye TRe 3aONUHaJa TOKyIoo.HYNPAHE Ha MaunHaTa: HATNCHe Te 3aDPbXTe 6yToHa BKN./N3KJI. 3a Noboe Oe 3 Cek mauHnHaTa ce N3KIOUBA. Ta6NoTo oE nokaxe "0:01". 3aTbOpete Bpata Tn34aKaIte, DOKato UIKbJIbT Ha n3TOUBaHe npKIOUO (OKONO 1 MNHyTa).OTbOpete Bpata Ta n BKNIOe MaunHaTa OTHOBO C NOMOHTA Ha 6yToHa BKN./N3KJI. n N36peTe HOB UIKbJI Ha N3MnBAHe N BCRAKBN KeJAAHn ONUIN. CTaptnpaIte UIKbJa C HA tncKaHe Ha 6yToH CTAPT/Play3a n 3aTbapAne Ha BpataTdo 4 cekynHn.
DOBABRAHACbdoBE
5e3 da n3KIOUbaTe MaunHaTa, NpBPO OTbOpete Neko BpaTata, 3a da n36BerHeTe N3PbCKBaHe HA BOda (CTAPT/NaY3a 3aNOVA Da MMra) (BHMAmHne! Ropeua napal) n NOCTaBeTe CbIOBeTe BB BbTpewHOCTTa Ha CbDMnHnHata MaunHa. HatNCheTe 6yToHa CTAPT/NaY3a n 3aTbOpete BpaTaTa B pAMknte Ha 4 cek, UNKbIbT ce Bb3o6HOBBa OT MmEHTa, B KOITo e 6nI pKeKcbHAT.
CJUAHNI PPEKcBAHNA
Ako Bpata Obde OTBpeHa No BpeMa Ha nporpaMa 3a Mne He mnpi PnepKbcBaHe Ha 3axpaHbAHeto, nporpaMaTc nnpa.CAMO AKO HATNCHE TE 6yToHa CTAPr Nay3a Tbatota B pamKte Ha 4 cek, uKkblt Ce B3o6HOBA OT MOMTe, B KOITe E 6nn PpeKbChat.
NIOJE3HN CbBETN
CbBETN
Ipei Da 3apeKdaTe KOHmUITE,OTcTpaHETe BCNU OctaTuO NT XpHaOT cBdoBeTe HnPa3He TaWntE. He e HyXho Da n3nJaKaBaTe npdeBaPMTeNo C TeuaA Boga.
IoppeTe cBIOBeTaka, Ye da ce 3aIbPkaT do6pe Ha MRCTo N da He ce 06bpHata; I npoeTeTe cBIOBeTe COTBOPnTE HADony N pa3NOnOxKete BnBbHaNTe/3nBkHaNtte TaCTu Taka, Ye BODaTa da MOKe da DOCTURHe BCRAK NOBpHXOCT N da Teue CBO6OHO.
Pnpynpexdne H: Kanate, Dpbknte, noHocntu TnraHNTe 3a npbKHe Tp6Ba Da He npevat Ha BbpTeHTo Ha pa3npbckBaunte pamehe.
IocTabeTe Ipe6HnTe apTKyIn B KOuHnCtA 3a npBopn. Mhoro 3ambpceHnTe CbOBe N TeHJKePn CneBa Da ce NOCTABT B DOJIHaTc KOuHnca, Tb KaTO B TO3N CeTOp BOHnTe Ctpyn CaNo-CINHn No03BOJRaT No-d6pa eFekTNBHOCT npn MHeE.Cne Ka ToapeHnTe ypda, npoBepeTe daa pa3npbckBaunTe pameHmOrat Da Ce BbptTc CBO6OHO.
HENoOaXoAryn CbdoBE
-Дьрвенисьдови npnбори.
-Дeнкathиашсд ekopaunapTcTNHpBHyO n3pa6oTeHn cbdoBe n aHTNKI. DekopaunTE NM He ca yCTOnyNBn.
- Yactn OT CHTeTmH MaTePnaN, KOnto He ca yctOuHBn Ha BnCOKn TempepaTyPi.
MeHn n kanaeHn cboBe.
3ambpceHn cnenB,BOcBk,precnnMaCTINOcbdoBe.
UBeTobete Ha CTbKLeHnTe DeKopaunn n uactnte OT anymnHn/cpe6po MoTaT Da ce PomeHn a N3m6IeHNrB I npouEca Ha MmHe. HrkOM BnDOBc TcBKnO (Hapn. KpncTaHnTe ppeMeTH) MoRaT Da cTaHaT Henpo3paHH CJIe HRAKOJIIO M3MBAHH.
CbBETN3A NECTEHE HA EHEPTY
Korato DomaHata CbDOMnHa MaunHa ce n3NONBa cbflaCHO INCTyKUNITE Ha pON3BOINTEJ, M3MNBAHeTo HA NocyaB CbDOMnHa O6NkoHBeHO KOHCympa IO-MAJKO EHEPTN U BODA B cpaBHeHne CmEHeTo H a pbKa.
3a da MaKcunm3npaTe eefKTnBHOCTTa Ha CbDMnHaTa MaUNHa, npenopbYnteH0 e Da CTapTnpate cNKbl Ha MneHe, cIed KaTO MaUNHa Ta e 3apeDeHa DOKpa. 3apeXdaHETo Ha DomauHaTa CbDMnHa HA MauHn DO KanauTEta, NOCOey OH NT pOM3BOINe, Iue CNOMORHe Da Cnectte Eheprn n BODa. NfOpMaun OTHOCHO npabNHOto 3apeJDAHe Ha NocyDATA MOKeTe Da HamePte B rnaBa 3APEXDAHE HA KOLUHNITE.
Pn uactuho 3apexdahe e npenopbunTeNo da n3non3BaTe CneunAnHO npedha3hauhenite onu (Half load/ Zone Wash/ Multizone), kato HanbHnTe cAmo N36paHnTe KoUHn. HenpabNnHoto 3apexdahe nnnpenbnaBe Ha cbDomnnHaTa MaunHa MoKe da yBelenu noTppe6HeHneTo Ha pecypcn (kato Boda, eHeprna In BpeMe, KaKTo N da yBelennu HIBOTO HA UYM), KOeTO ueHAMJIe eEeKTHNBHOCTTa Ha N3MnBAHe N CYUHe.
- PnpBapntHnTO n3nPaKaHe Ha nocydaTa Ha pKa BOn yBeNueHo NpTpe6JIeHne Ha BOa n eHepn, 3aToBa He enPepOpbHTenHo.
NOBPEINIO YAWIITE IN CbDOBETE
- 3n0n13BaIe Camo CtbKJIeH N IopUeHaOBN CbIOBe, 3a KOnTO IpnO3-BODITENr rapaHTnpa, Ye ca NOxOJaUN 3a CbDOMNHa MaUNHa.
- 3πππ3BaITe DeπιKaTeH nOuNCTBaIg πpeNaT, noDxOJaIz 3a BaIITe CbIOBe
- ɪəbʌkʌdəte yəwɪte nɪpɪbɒpɪte ot cɒdɒmɪŋHaTa MaɪnHa Bēdɪhɑr a cnɛd Kpər ḀnpʊrpaMaTa 3a MneHe.
XUNHEHA
3a da n36erHete Mnpn3Mn yTaKN, KOnto MoarTa ca Ce HaTpynat B cbDoMnHaHata MaunHa, MoJy, NysKaHTe npOrpama npu Bucoka TemnepaTypa Hau-MaIKo BeHbK MeceHo. 3nON3BaIte CypeHa NbXnua npenapat n PycHeTe ypea 6e3 Da 3apeXdaTe cbdoBe, 3a da rO noNCTnte.
YCTOUMBOCT HA MPA3
Ako ypeBt e noctaben Ha macto, n3IOKeHO Ha pnck OT 3AmPb3BaHe, ToI
paBa da ce n3ToHn HnblHo. 3aTBopeTe KpHa 3a B0Da, OCTpaHeTe BXO
dun n 3XODaun MapKyu n OCTabeTe uRnTa BOda Da n3teye. YbepeTe
ce, ye OMeKOTeTnT 3a B0a E nbLnE Cpa3TBoPeHa perepHpupaCa con
B KOHTeHepa 3a con, 3a da npEJa3nTe ypeDa ot Tempeatypn Do -20°C. Ako ypeBt e 6nI cbxpaRaHbn np ycNoBna Ha 3amPb3BaHe, ypeBt Tp86
Ba da octaHe npn Tempepatya Ha OKoHaTa cpea MIn. 5^ 3a nohe 24
aca npdi NbpBOTo nyckaHe.
TAbJIuCA HA IPOIgPAMITE
| Погама | Описанne на погoramпente | Фаза на сухе | NaturalDry+ | Налочни onциу** | Верeme- trpaени на погoramпата за мени (ч:Minh)*** | ПOTрб- leнения на ворда (лгра/ npогама) | ПOTрбшени на[ebergieя (kWh/ npогама) | |
| Eco | Еко 50°- Погoramмatura e похODЯsha 3a поисТВане на Нормал- HO замьресна ДомakINСКА NOCUДA, КATO ИЗПOL3BA经а NO TOЗИ NauchIN, погoramмatura e на-ефektINBHA NO OTHOSEHE Na KMБИ- HINPAHOTO NOTpe6bENHe Na eHERPIMI IN BODA I OTTOBAPR Na 3aKo- HoДATELCTBOTO Na EC NO OTHOSEHE Na ekONORUHNYДИЗAH. | ✓ | ✓ | 2 动作 Power CLEAN | 4:00 9,5 | 0,64 | ||
| Бьрз45°- Погoramмatura ce порOBЧУBa 3a орразИчЕно КOLI- ueSTBO ЛECO 3aMbpCEH NcDObe 6e3 3aCbxHANI OCTaTBZIOM AT XpAHa. He BKNIOYBA Φa3a Na cyuhe. | - | ✓ | 2 动作 | 0:30 - 0:40 | 10,5 - 15,0 | 5 - 0,65 | ||
| Кр检ТAN 45°- Погoramma 3a ФINN ИЗДELIЯ, KONTO CA NO-чYBCT- BITEJIENK KbM BUCOKI TemnepaTyrn, NaPIMPEM CTbKJIENI NOP- ZeLEAHOBN YaSHN. | ✓ | ✓ | 2 动作 | 1:40 - 1:50 | 12,5 - 17,0 | 95 - 1,20 | ||
| АВ.T.ИNTEH3MBH 65°- АВТOMATИЧА по- рoramma 3a силно 3aMbpCEH NBDOBE N TIGAHN. | ОТКРИВА НИВOTO Na ЗAMьрсЯВЕп Ha CB- Довete и Perулир погoramATA. Korato ДдТУКВТ ИЗВьрш- Ва ONPDEЛЕпЕп HA NIBOTO Ha 3aMbpCS- BaHNe, Na DINOCHB T | ✓ | ✓ | 2 动作 Power CLEAN | 2:25 - 3:10 | 17,0 - 25,0 | 1,30 - 1,70 | |
| АВ.T.МИКС 55°- АВТOMATИЧА порoramma 3a HOPMЛHо 3aMbpCEH NBDOBE C OCTa- TbZIOM OT 3aCbXHANA XpAHa. | ✓ | ✓ | 2 动作 Power CLEAN | 1:20 - 3:20 | 7,5 - 20,5 | 0,75 - 1,20 | ||
| АВ.T.Бьрз45°- АВТOMATИЧА порoramma 3a HOPMЛHо I LEKO 3aMbpCEH NBDOBE. ВсекINDEVBATA погoramma, KOТо OсИГур- Вa ONITMAJNA eфektINBHOCT Ha NOUHCTBA- HETO I INCSUABAHETO 3a NO-KPATKO BPEME. | ✓ | ✓ | 2 动作 Power CLEAN | 1:00 - 1:50 | 8,0 - 16,0 | 0,70 - 1,10 | ||
| П配电.ИЗПALKBAHBe - ИЗПОЛЗВА ce 3a OSBXJABANE Ha CBDOBE- Te, KONTO IGE 6bDAr ИЗMITI NO-KbCHO. 3a TAZI погoramma He ce ИЗПОЛЗВА пелapar. | - | ✓ | 2 h | 0:12 4,5 | 0,10 | |||
| СамоочИстВане 65°- Погoramмatura, кОТо ce ИЗПОЛЗВА 3a ИЗ- ВьршЕне Ha NOДРьЖКа Ha CBDOMINHа Maшина, сLEDEВа де ИЗПЛЯВа сamo КогТо Машина te PPA3HA И с пелaparTi, сп- цално п徳нASTAHUEHа NOДРьЖКа Ha CBDOMINHа Maшина. | - | - | 2 h | 1:15 | 12,7 | 1,10 | ||
Danhume 3a npoepama EKO ca u3mepeu b naobopamopnu yocno Ebponeucu cmahdapm EN 60436:2020.
Benexku 3a mecmobume na6opamopu: 3a uHOpmaua omHoCn cpaBumme c EN mecmoe ycnoue u3npame mEun Ha cnedn adepoc
dw_test_support@europeanappliances.com
He e neo6xodum npedabapumelno mpemupahe Ha cboobeme npedu nyckahe Ha kOmo u da 6uno npo2pama.
) Bpamama e ombopena, npedu npo2pamama da e npuklouuna. Toba ce npabu c uen nodo6pahe ha epekmubhocma ha cywehemo. U3yakaume, doka-mo bcpemmo docmuhe 00:00, 3a da pa3mboapume cbdoumnHama Mauuna.
*) He bcuqu onuu Mozam da ce u3non3bam eHOBpeMeHHO.
**CmouHocmme,daeHu 3a npo2pamume,c u3kIooHue Ha npo2pamama Eko,ca camo opuemupobbHu.PeanHomo epeme moze da ce pa3nUaba 8 3aBucumocm om MHOJcEcmbo fakmopu, Kano memnepamypama H anhauHema Ho nodaahama 80da,memnpamypama B nomuehuemo, KOUcEmBo m npenapan, kOeCtmbomu u bdu Ha zapeXdHemo,6aHancupanemo Ha zapeXdHemo,dobnHumEnHume u36paH uOnuu u KanubpuHemo Ha ceh3opa. KaunubpuHemo Ha ceh3opa Moze da yyeu nu npodxnKumelHocmmHa npo2pamama C do 20 mH.
ONUIMΦYHKUIN
OPLM Morat da ce n36paT/OTMeHr TcEi N36Op Ha nporpama dIpeKTHo Ype3 HATnCKaHe Ha cBtBeTHMa 6yToH (aKO hMa TaKbB -MHnKaTOPbT CBEtBA) (8x. KOHTPOJIEN PAHEJ). Ako daeHa onuHa He e cbBmecTMA c N36paHata nporpama (8x. TABLI4A HA IPOPTAMITE), cBtBeTHMaCTCBetOnM Mra 6bp30 3 nbuN CE yBaT 3BykOBn CurhAn. OnuHaTa He ce AKTuBpu. Edna onuHa Moke da npomEn BpemTo nn KOhCyMa-

IIOJOBH 3APEXDAHE - aKO HMa MHORO CbIOBe 3a MHe, 3a IkoHOMnHa BOda, en. eHepn N Bpeme ce n3noJI3Ba IIOJOBH 3APEXDAHE.
He 3a6paBraIte Da HamaIInTe KOINueCTBOTo Mneu npenapaT.

6E3WymHA -Iopxodya 3a nyckaHe Ha ypeHa npes HooTa. Ta3n ONpua MoKeJa Ce n3No3Ba 3a OrpaHnUaBaHe Ha emncnte Ha Wym NO BpeMe Ha a3nte Ha npaHe. TOBa ue yBeHHn BpeMeTo Ha uKbBNCIMOCT OT n36opa Ha OCHOBEH uKbl.

N3IIAKBAHE 3A DE3HNOEKLJRA-Ta3n OIeMROMeJa c e N3NON3Ba 3a De3HNOEKUpaHe Ha N3MTNTe CbDOBe. Taue yBelenu TempePataHa nocneHOTo N3IIAKBAHe u do6abn aHTNsakTepeNaJ
HIOIMBAHe KbM N36paHaTa nporpama. IdeaJIHa 3a NOUcTbaHe Ha cbdoBe 6ytnkn 3a Xpaane He. BpaTuKata Ha cbDOMnJIHaTata MaUNHa Tp46BaDa cIbpxn 3aTbOpEHa No BpeMe Ha UJnata nporpama, 3a Da ce rapaHTnpaHAMaJIbaHe Ha 6aKeTpneN. PEPYNPEXDEHNE: CboBote E B3MOxHO da Ca MHOrO ropeuIN B kpar Ha nporpamata.
POWERS
POWER CLEAN® -Благодарени На ДовлнТeMuи ВОДи Cтpyи, Таз Oпця Oсгурра NO-ИнТeH3N6HNo NO-CINHNO N3MBA-псиФчНа 30a H BДЛНаТа КОшнца.Таз Oпця ce npeРoPbВa MIMBa He TaeXdpeи or Heynopn CBdoBe.s (Mon, HanpaBete Ka c pa3dena 3a apekdahe Ha Power Clean®).

I DOnbJIHNTENHO 3CUYJABAHE -No-BnUCOKaTatempepaTPO nBpeMe Ha NocJeHnOTo I3PNaKBaHe uYbLnKeHaTa φa3a Ha cyuHe I NO3BOJBA NoOp6peHo cyuHe. OIpNtA DOnbJIHNTENHO 3CUY-HE yDblXaba nporpamata 3a MneHe.

OTJIAGAHE - CtaptnpaHTo Ha nporpaMaTa MOKe da ce OTIOXn 3a nepoIOn OT BpeMe MeKdy 0:30 n 24 Yaca.
-
136epete nporpaMaTaNKeNaHnTe onuNn. Hatae (HeKoKoKaTHO) 6yToHa OTNAFAHE, 3a da otNoKnTe cTapTa Ha nporpaMaT. MoKeJa ce hactpoBa o:30 do 24 yaca.CneI docTnraHe Ha HactpoKaTa 3a 24 Yaca HataChet e 6yToHa OTNAFAHE oSe BeHbX, 3a da deakTNBpuPa fHyKunrTa OTNAFAHE.
-
Hatachete 6ytoHa CTAP/laya n 3aTbopeTe Bpata TaB pamKnte Ha4cek. TaHmepbT 3aONue He OT6pOBAHeTo.
3.CneiNtUaHe Ha BpeMeTo CBetTINHHnT INHdNKaTOP n3racBa n nporpaMaTa 3aNoOyBa aBtOMaTHUHO.
3APEXDAHE HA KOWHNUITE
HAI-ROPHATAIOCTABKA
Ha-rohata noctabka OCNpyBa CneuФnHa 30Ha 3a NOCTBaHe 3a n3MBAHe Ha Kyn, qaun, DOpn rOlenm YHNN N PnBopn 3a XpaHene, KOtO ObukHOBeHo 3apex
DaTe BdoHNHe NoCTaBKn, KOeTO OCTaBn DObNJIHHTENHO MCTO 3a OCTaHAnTE CbIOBE 3a DeHr. OTdennHOTo NOpeKJaHa He npNoBOpTe pAbv CBnupaHTo PO-NeCHO cIeM MeH e NnoDopBa eEeKTHBHOCTTa Ha MneHTo N CyueHeTo.
Hoxobete npn6opn c octpn pb 60be Tpa6ba da ce noctabr c octpneeta HADONY.
BMECTIMOCT: 15 cTaNapTN KOMnEeKta 3a xpaheHe
TOPHA KOWHNIU
3apeTe DeNkATHe N Jekn CbdoBe: CtbKLeHn I NopueaHOBN Yauu, YHnnKn, HNCKn KynI 3a Canata. TnpHaT KaOnHua Nma pa3rBbaun Ce OToOpn, KONTO Mora Ta Ce n3No3BaT BbB BepTKKaHNOJooXeHne Pn npoPexJaHe Ha nnKn 3a Ja/peCep TT Nn No-HnCKa No3uOy 3a NOCTabRe He Ha Kynn N CbdoBe 3a XpaHa.
(npumep 3a 3apekdahe Ha zophama kouhuua)
PERYUNPAHE HA BNCOCHHATA HA TOPHATA KOWHUA
BncoHnHa Ha rOpHaTa K0uHnua MoKe Da ce perynpa: BnCOKa NOnuIa 3a NoCTabRHe Ha o6eMHcBdoBeB DOnHata KOuHnua HNcKa NOnuIa 3a NbHOceHHO N3No3BaHe Ha KaNaHauIte Ce onOpN, KaTO Ce Cb3DaBa NOBEe MRCTo HArOpE Na 36Bra c6JIbCKBaHe C N3dJIyTA B DonHata K0uHnua.
TOpHATA KOUHnua e o6OpyDbaHa c Perynataop Ha BncoHnHATA HOPHTA KOUHnua (Bx. fNpypata), 6e3 da HAtnCKaTe NocToBe, NOBdHrHe TArOpe, KATO npocTo XBAHeTe KOUHnua OCTpaHN BeDHaCne KaTO KoUHnua CTAHe CTaBUNHa B NO-BNCOKaTA CNIOuHn.
3a Da Bb3TaHOBnTe No-HNCKaTa N03uYTa, HATNCHeTe IOCTOBeA OOTpaHn Ha KOWHnCaTa N IpemeCeTe KOHNcaTa HaDony.
CmNo npnpOBbAme da He perynipate BucOHNATA Ha KOUHncaTa, Korato e 3apeDena. HUKORA He nobDnraTe nn cnyckaTe KOUHncaTa camo OTdNtA strHa.
CfBAEMN KANAUC PEPYJUPYEMA N03U
CtpaHnHTne KaanMORaT da ce CbBAtnn Pa3rBbTa, 3a Da ce OTNUM3npa NOpeXdHeTo Ha CbDOBeTe B KOWHNzA. TaWNTe 3a BNHO MoTg Da ce NocTabr 6eONaCHO B CrBaEMTe Kaau, KaTO CTOnYeTo HA BCKa YaHa CE BMkHe B CBoTBTHINPOuEN.B 3aBNCIMoCT OT Modena:
B CnyaHa BUCOKO NONOKeHHe Ha rOpHnraP aΦT KAnIte He MoRat Da OCTaHaT BBB BePTNUKANHO NOONOKeHHe.
B 3aBnCmOcT OT MoJeIa:
3a da pa3bHene kanaunte, e heo6xmoI da rn nIb3HeTe Haorope n Da 3aBbpTne nn da rnOCBO6OHTe OT 3AKOnyAnKNTe NM dNn
3a Da Cbrhete Kaanuite, e Heo6xOIMO da rna 3abbpntte n da nn3heTe Kanaunte HaOny nn Da rnpbHete Harope n da rna3akauite 3a 3a- KonuaHKNTe.
JOHAKOUIA
3a TeHdxepn, Kanaun, YHHN, Kynn 3a Canata n T.H. Edpnte YHHN IN Kanaun CneBa B NaeJHNN CnyuA da Ce nocTabrOTCTpaHn, 3a Da He Bb3npenTCTBAT p3npbckBaUO tpoAMo.
IOnHaTa KooHnua NMa pa3rBbAaN ce ONOpu, KOITMOrA Ta ce m3PON3BaT BbB BEPTKAKHO NOLOXHeHne PnI NOpeXdHe Na HINN INB XOpIN3OH-TaHNa PO3NtUe 3aJeCHo NOCTaBHe Ha Tabu N Kyu 3a CanTa.
(npumep 3a 3apekdahe Ha donhama Kowhuua)
POWER CLEAN (IAYbP KINH)
Power Clean n3no13Ba cneuHaHn BODn CTpyn OT3aHa KyyHnata 3a No-INTeH3NBHO n3MBAHe Ha BNCOKI 3aMbpcEH CbIOBe. DOnHATA KOUHnua IMa Cbo6OHa 3oHa, cneuHaHa N3dbpNaUa Ce onOpA B 3aHn Hpa HA KOWHnUaT, KOTo MOKe Ja ce N3No13Ba 3a ONopa 3a TnraHn INI TaBn B INPapEHO NOJoxHeN, Taka Ye da 3aEMaT NO-MAnKO MCTO. NocTe TeHIXpePnte/OrHeynpHnTE CbOBe HacOeyHn KbM KOMnOHeHT NaYbp KnHn N AKTNBpuTte POWER CLEAN Ha naHena.
Kak da n3noJ3BaTe Power Clean:
- PeryunpaTe 3oHaTa Ha Power Clean (G), KaTo NoIgBHeTe 3aHnIte NoctabKn 3a YnnH, 3a Da 3apeJcTc TEnJxepn.
- 3apekdaTe TeHxepn NKacepOnn,Ha

KIOHeH BepTnKaIHo, B 3OHaTa Ha Power Clean. TeHJKePHTe Tp6Ba Da Ca HAKNoHEH KbM MOUHNTe BOHN CTpyN.
KOWHNUKA 3A INPUNBOPN
O6opyBaHa e c rOpHn peWetKn 3a no-do6po nOpEpxJaHe Ha np6OpIe, TRe Tp8Ba Da ce no3uNoHnpa caMo OT PpeHaTa CtPaHa Na DoJHaTa KOWHnua,
Hoxkobete ndpyrtnepnbopcoctpnpb6oBeTp86Ba da ce noCTABATB KOWHNKATA 3a np6o
pN C octpneTata HaOny Nn da ce No3uOnHpaXOpN3oHTaHb H KaNaHaunTe ce OTeJeHnHa roPnTa KooHmua.
TPNKINIOAPbXKA
BHIMAHHE: BnHaHn n3KnIOyBaIte ypeDa OT KOHTaKTa, KOrATo rO no-NCbATE N KOrATo n3NbINBaTE TexHmEeCKo 06CnykBaHe. He n3non3BaTe 3aNaJIMN TeYHOCTn, 3a Da NoCHCTBaTe MaWHaTa.
IIOYNCBAHE HA CbDOMNJIHATA MAUNHA
BcnuKNeTHaOT BbTpewHaTa CtpaHa Ha MaunHaTa MOrat da Ce npEmaxHaTcnapaJn, HabnaXHeH C BoJa nMaiko ouet. BbHUnHTe NOBbpXoCTNu HA MaunHaTa N KOthpOnHnrt NaHen MoRat da Ce NoocCTBaT c Hea6pa3NBeH napqan, HabnaXHeH C BoJa. He n3non3BaIte pa3TbOpnten nn a6pa3NBn IpOdyKn.
IPEDOTBPATBAHE HA HENPIAHTH MUPN3M
BnHaHn DpBxTe BpaTmukKaTa Ha ypea WnpOKo OTbopeHa, 3a da N36erHeTe HATpyNBaHETo Ha Bnra H 3aDbpxKaHeTO B MaunHaTa.
NoCTBaTepeOBHyoBbTHHeHnTaOKOBoBpaTnKaTaNdo3aTopnTe 3a npenapat C BnaXHa FB6a.Taka ue n36erHete HATpynBaHETo Ha xpHa B yIbThHeHnTa, KOeTo e OCHOBHaTnpuHnHa 3a o6pa3yBaHeTo Ha HEPnTHMmPn3Mn.
IPOBEPKA HA MAPKyua 3A IIODABAHE HA BODA
PObepBaItepeoOBHO BxOJaunMapky3a HanKyBaHnNcenHaTINH. AKe e NobpeHe, 3aMeHeTe ro C HOB Mapky, npElaRaH OT cepBua3a Hn 3a cIeInpoJaoXbEHO6CNoYkBaHe IINOT OToPn3npaH TbProBeu. B 3aBncmOCT OT BnDa Mapky:
Ako MapkybT 3a noDaBaHe mA npO3paHNO pOKpntNe, IpOBepraBaiTe nepoDmHO 3a loKaHIO uOpBeTaBAe. Ako OTkPnE ToKoBA, e Bb3MOXHO MAPKybT da IpOTNa U TPr6Ba Da ce CMeHN.
3a cnpaun BodaT a Mapkyu: npoBepe Te malkoTo npo3Opue 3a npoBepka Ha 3aunTHata kana (BK. cTpeNkata). Ako e cepbeHo, fynKuYra 3a cnPaHe Ha BOdaTa e 3aJeIcTBaHa n MapkyuT TpR6Ba Da ce 3aMeHn C HOB. 3a da pa3BnTe To3n Mapkyu, hATncHete 6yToHa 3a OCBO6oxDaBaHe, DOKato pa3BnBaTe Mapkyu.
IIOYNCBAHE HA MAPKyua 3A IIODABAHE HA BODA
Ako MapkyuTe 3a BOa ca HOBn Hm He ca n3no3BaHn npOdbJnxTeJIHO BpeMe, ocTabeBOaTa Da Teue, 3a Da ce yBepnte, ye e npo3paHa n6e3 3AmbpcBAHn, npEi Da N3BbPwTe HxKnTe Bp3Kn. Ako Ta3n npEpaHa MApKa He 6Be B3eTa, BXoBt 3a BOa MoKe da Ce 6NoKnpa n da NobpeDcBDOMNHaTa MaShHa.
IOYNCBAHE HA ΦNITbPHN Bb3EJI
TouncBaTe ΦnTbPnH Bb3epeDOBHO, Taka Ye fNtPnte da He ce 3aNyWBa NTnabYhata BOda da Ce n3TOyBa npabnHo.
I3no3BaHeTo Ha cbDmnnHaTa MaunHa cbc 3anyWeHn FInTpnu IIN BbHNn PpeMeTn BbF HnTPnpaUata CNTema Nn NpBCKaUNte pameHa, Moke Da BLOw paOtoTa Ha ypeA n da DObeDe NO HamanBaHe Ha pa6oHTne XapaKTePncTNI, Wym No BpeMe Ha paBoTa Nn NobuJeHO Notpe6JIeHne Ha pecypcN.
ΦnTbPnHrB3eN Ce cbCTOn OT TPN ΦnTbpa, KONTO npEmaxBaTocTaTbUNTe OXPaHOT BODaTA OT N3MBAHe N CNEI TOBa PEuINPKYInpAT BOdA:Ta3 a NoCTnHa He Na-Do6pn pe3yntaTOn OT N3MBAHeTo e Heo6xOIMO da NOIDBpKtaeФnTPnTe UcNTH.
CbDmnaHnata MaunHa He Tpr6Ba Da ca u3non3Ba 6e3 fnnTpnu nn aKo fnnTbpTe pa3xna6en.
Hai-Majlo BeDhBx MeecHo Nn Hs BcKn 30 uKbNa npObepRaIte FInIbTbpHn6bloknnpoHe6xoImocrNoouHCTe CtaPaTeNHO TcTaaAoBaDa, KaTO hIOIN3BaTE HeMetaHa YetKa N cIeDbate INCHyPcUIMTe NO-DOJY
- 3aBbptete cunnnHpnuHnA o6paHo Ha yacOBHKoBaTa CTpeKa n ro n3dbpnaTe (Oua.1). Baxho e, Korato MOHTmpate NOBTOPO hNtbpA, DBA tprnbTbnHnka, NOKa3aHa Ha yBennueHMeTo, Da Ce cpeHnat.
- CbaTe ΦnIbpa YaWka B, KaTo npInIOXnTe Nek HaTnCK BbpxY cTpaHnUHnTe Kanau (Dus. 2).
3.ПьзHETe HABHФИТбpa-ПЯСТИнHaOT HepbXJaeMa CTOMaHa C(ФИr.3). - B cnuyaYe HamepuTe BbHsHn NpeMeTn (KaTo CuyneHn CTbkna, npOp-uenah, KocTN, CeMaHa Ha IIODoBe n Ip.), BHIMaTeHNO OTCTpaHete.
- PpOBepe yNoBHTeI IN pEmaxHeTe OCTbUte OT xpaHa. HNKORA HE MAXAITE npEtna3HTe Ha NOMnTa 3a LUKbJa Ha N3MnBaHe (noKa3aHo e CbC CTpeNka) (Oue.4).
Cnei nouCTBaHe Ha nItpnte NoCTaBeTe nIITbpHn6NOK OTHOBIO ITO 3aKpeTte npabINHO HA MCTO; TOBa e OT KIIIOUBO 3HaueHne 3a NODbPkaHe Ha eEeKtNBHata pa6Ota Ha cbDOMNHNHaTa MaUNHa.
IOYNCBAHE HA PA3NpBCKBAUITE PAMEHE
NoHKORA OCTaBcHTe OXPaHa e Bb3MOxHO Da 3aCbxHAT Bbpxy pa3-NpbckBaunTE pAMEHe N da 3anyuAt OTBOPNE 3a pa3npbCKBaHe Ha BOda. CnepoBatenho Ce npenOpbUba Da npOBepBaTe pameHete OT Bpeme HA Bpeme N da rN NOuCTBaTe C Manka HEMeTAlHa YETKa.
3a da n3BaJnte ropHata npbckanKa, Tp86Ba da ra n3BaJnte 3aeHNO cKoneKTopa.
Hai-ropHata Noctabka Imma QnkcapaHa Tp6a 3a N3MBAhe C BCNUKn I03N 3a n3MBAHe, o6bphatn Harope. 3a da ro noCHNTe, MOxTe Da PnB3HeTe paOta HABn cPiuCte Ta npemaxHete ppeMeTte, KOtO MoKe da ca 3acehdHn BIO3Ne.
Moxete da cBaNTe DOHOTo pa3npbckBauO pAmo, KaTo rN3DbpNaTe HArope n rO 3aBpTnTe o6patHO HaacOBHNKOBATA CTpenKa. MoHTpaHETO Pa3npbckBauO pAmo CtaBa Ype3 N3DbPbNAHe HApOny N BpTeHE no acOBHNKOBATA CTpenKa.
Pa3npbckBaIoTo pAmo Ha TaBaHa MoKe Da ce OTCpaHn, KaTO rHaTNCHe TcHarope n CTe TOBA FO 3aBbPTNe 0bpaTHo Ha YacOBHNKOBATA CTpeNk. MoHTnpaHTo 0bpaTHo H aPa3npbckBaIoTo pAmo CTaba Upe3 N3DbpNBaHe HArope n 3aBbPTAn He No YacOBHNKOBATA CTpeNk.
OTCTPAHRAHE HA HEN3INPABHOCTN
B cnuyaiye cbldmonnHaTa MaunHa He pa6oHn HopMaHno, npOBepTe da nn npOBeMbT MoKe Da 6bJe peweH, KaTo pnerneate CneHN HcncbK.3a dpyr n rpeuKNnn Henn3npabNocTHn Ce CbPkeTe C otena 3a CneInpoJaoKbeHO o6CnyKBAhe, KaTo daHHnTe 3a KOHTAKMooKeTe da HaMePeHTe B KHNKkata 3a rapAHnraTa. Pe3epBNHTe Yactn uie 6bDat Hannn 3a nepnoD ot 7 nn do 10 roHNn, B cbOTBETCTBNE Cbc CneuHnE N3NCKBaHn Ha pernaMeHtA
| ПОНБЛЕМВ bь3MOЖИ ПРИЧИН PEUSHЕНЯ | |||
| S Иndикаторь 3a con CBETN | Pezeрвобгь 3a con e novt n prazhen. | Hаньлесе отоноpe zeшевая сб con (ж. 3APEXДАЕ HA P3EPEBOAPA 3A COI). Поверete на- стюкату 3a TBbpydct Na BODATA, akо e Heobxodmo - Вжte TAbNIZA 3A TBbpydCT HA BOJDA.TA. | |
| S Иndикаторь 3a con MIGA. | Pezeрвобгь 3a con e npasehen. | Hаньлесе отоноpe zeшевая сб con Bb3MOJOHa hai-ckopo. ИзпалбаHTO Ha yepda 6e3 con може дpruINHи NOBpeDA Na BbTpeSHHite My KOMPNOHENT. | |
| MINDIKATOPB 3a пpe- napata 3a ИЗПANKBA- He CBETN IINI MIGA. | Ддоторь Na npenapata 3a ИЗПANKBAe H epaEN. (Спд дмьlahe Na npenapat 3a ИЗПANKBAe И- ндikatorь може д octaHe Na CBETN OSe MaJIko). | Hаньлесе отоноpe Zeшевая сб con Bb3MOJOHa npenapata 3a ИЗПANKBAe(Ha NOBEve INФОмuaць - ex. 3APEXДАЕ HA DO3ATOPA 3A IOMOUIHO CPEDCTBO 3A I3ПANKBAE). | |
| MINDIKATOPB 3a OTCTPANRAVAHne КOTLEH KMbK CBETN IINI MIGA; ПОКAZBa ce abariny- ha cngHnizha,dE5". | Kotleniyam Kambk se HatpynBa Bbpxy BbtpseHn- Te KOMPOHETN Ha yepda. | Остранете кOTlenян KMbK OT yepda Ne3abABNo, KaTO ИЗПON3BATE npORpAMATA CamonOnuHCTBa- ну и пелаган в ТьрROBSCATA МржаПрodyкТЗа OTCTPANRBAHne HA KOTLEH KMbK (ex. ONUIM NФYHKUIM). Habnjetetoh OToHOB p3eERBO p3eERBOApa 6c con. Поверete наOTSTPOMKATA 3a TBbpydCT ha BODATA. Ако кOTleniHNT KMbK He b6de npemaxnat, yepdbT ue cnpe da Фуннкимира. | |
| Сыдомин�на маши- на He CTAPTPA Na II He pearnpa Na Komahdni. | Уретгн He E BKNIOueh B KOHTAKTа КAKTO Trp8Ba. | БКLOчete StIencela B KOHTAKTa. | |
| Спиран He 3axpaHbAHeto. | Осьбрахения 3a 6ezonacnoCT sbdOMmIHATA MaMHHa може DA He CTAPTPA ABOMATU- Ho спд рUCAn He He aleKTPo3axpaHbAHeto. OTbopTe BpTaTa, HATsCHeTe 6byToHa CTAPT/ Пayza N 3aTbOpTe BpTaTa B pAMKIne Ha 4 cekHyd. | ||
| ВразATA Na CBdOMinHATA He e 3aTbOpeHa. IIuΦTb NaturalDry He e 3aTErIeHn. | HATsCHete BpATA Na CINHO, ДOKATOчe TJPaKBAe. | ||
| Едигицьл se npeKbCBA OTe TbparHne Ha Bp- tata 3a nobee To 4 cekHyd. | HATsCHete CTAPT/Playza N 3aTbOpTe BpTaTa B pAMKIne Ha 4 cekHyd. | ||
| КOTPONHIT NaHel He pearsopa Na II He pOKAZ- Ba F6 E1. | ИЗКLOчete урета, кATO HATsCHete 6byToHa BKN. -ИЗКЛ. /HnyipaRe, BKlOUte rO TOHOB Ocled okoLo edHa MInHyta u pecTAPTPaNe ProrpAmATA. Ako npobLembT He b6de OTCTPAnHe, ИЗКlIO- чete урета OTцencela 3a 1 MInHyta u OTHOB BkIOUeTe ΜeIcena. | ||
| Сыдомин�на маши- на He n3TOUYa. Ha dIgппя le cokaz- Ba: F7 E3 IINI F9 E1 | ФИNTьрь tЗадушен c octaTbuzi ot xpaHa Илм КOTLEH KMbK. | Почитete Фильbra и OTCTPANeTe KOTlenян KMbK OT yepda (buxme IOUCHTBAHc HA FOIL- TbPHN Bb3EII u INCHCPYKUIM 3A OTCTPAHRAHc HA KOTJIeH KAMbK). | |
| Дрөнжнг Маркч e npeRbHaf. Поверete Др Трбasta 3a ИЗTOUBAHe Na MInKbTa e 3aTupSheu. | Енжнma Маркч (ж. INCHCPYKUIM 3A MOHTAX). | ||
| Трьбasta 3a ИЗTOUBAHe Na MInKbTa e 3aTupSheu. | Сыдомин�на Na 3daba Повер�н Ho MHRош. | ||
| Сыдомин�на ИЗДава прекомерно Mнoro ш汞. | Сыдовete Trpakat edin B duyr. Пocstabete CBdoBeteправlnho (ж. 3APEXДАЕ HA KOLHINUTe). | ||
| Има пекomphno Kolunchestvo пиHA. | ПрenvapartbT He e ИЗмернправино Или He e podxodnZa 3a ИЗПОЛЗВАе B cblDMOMRIH mauMHIn (ж. 3APEXДАЕ HA IDO3ATOPA 3A MInJIEN INPPEPArt). Pecstaptrpavte Tekyuшia цьл, кato ИЗКlIOчITE n OTHOB BkIOUChte cblDMOnHnata MaMHHa, ИЗбepete HOba pro- rgama, HATsCHete CTAPT/Play3a N 3aTbOpTe BpTaTa B pAMKIne Ha 4 cekHyd. Ne dodajte pomivalnega sredstva. | ||
| Сыдовete He ca PodereHnпrabино. | Пог��дete CBdoBeteправино (ж. 3APEXДАЕ HA KOLHINUTe). | ||
| ФИNTьрь tЗадушen c octaTbuzi ot xpaHa Илm KOTLEH KMbK. | Почитete Фильbra и OTCTPANeTe MauHIMBA. | ||
| Cbdobere He ca nouchtehen. | Сбдовete He ca поразсени prapablnho. Роб dede | Te sbdobete nprablnho (6x3APEXDAHE KAOLIHILNTE). | |
| Раимьсквашие рамена He morat da ce BbrTAT CBO6OДNo, Ть като Сбдовete ИnpueТ. | Плдовete сбдовete=nprablnho(6x3APEXDAHE KAOLIHILNTE). Плдовete дalmi ropahata Koшида e в поразсени розиua n erpyunpaite (nobinrhe), akо e neobxodimno. | ||
| Lciklbnt Ha n3mibnahe e TBbprde KpaTbK. | Изборете похаяцл Ксьл n Ha n3mibmahe (6x3TABILLA HA IPOPTAMITE). | ||
| Има пекомерно количесво пяп. | Прениот He iizmenerн п苹�ин Ho n He noidoxoii 3a nIIOIN3BAH Be CBDOMYANH Maшини (6x3APEXDAHE HA DO3ATOPA 3A MIMJIENI HIPTEIAPAT). | ||
| Калачкata Ha OTdelenheta ToZ npenapata 3a nI3nIaKbaNeHa He e 3aTbPoeha nIbWnH. | Уberете сe,ус Kanachka tHa do3aTOpa 3a npenapata 3a nI3nIaKbaNeHa e 3aTbPoeha. | ||
| ФинтбгБ e zanuwen c octaTbU OTHa HAp aHa KOTlen KaMbK. | Плдовete Финтбг bIotu n ot cTbPae THe KMbK oT ype (6x3JIOYCTBAH HAFINITBPHN Bb3EJI). | ||
| Pe3epBoarpt 3a coI npa3en. | Доьлнerte pe3epboaRa 3a coI (6x3APEXDAHE H APE3EPBOAPA 3A COI). | ||
| "CbdoMiaHnata Mauinna He zarekja boda. Na dixinien ce m3nICBA: H2O nCBETI; npozbya 3BykoBa aIapMa." | He ce noadaba boda nll kpaTb e 3aTbPoeH. | Uberetete ce, Ye bB BodonpoBoda Ima Boda n Ye kpaTb n 3a Boda e otboper. | |
| MapkytB 3a noadabahe Na boda e np3bHnat. | Плбовete Маркуva 3a noadabahe Na boda (6x3 INHCTPYKLII 3A MOHTAX). | ||
| Мржчakata B Mapkya 3a noadabahe Na boda e zanuwen c Heobxodimo e da nocHTCTe. | Овогете в poveчende Мржчakata Na mapkya 3a noadabahe Na boda. OTOBOPe Bparata B parnkite na 4 cekyndn. | ||
| CbdoMiaHnata Mauinna cnipra ZIckbna npexdEBPemehno. Na dinlnece ce m3nICBa: F8 E3 | ФинтбгБ e zanuwen c octaTbU OTHa OTHa n OTHa n OTHa n OTHa n OTHa n OTHa n OTHa n OTHa n OTHa n OTHa n OTHa n OTHa n OTHa n OTHa n OTHa n OTHa n OTHa n OTHa n OTHa n OTHa n OTHa n OTHa n OTHa n OTHa n OTHa n OTHa. | Плдовete иоштete мржчakata Na mapkya 3a noadabahe Na boda. OTOBOPe Bparata, Naivchets 6yto3A n 3aTbPoebe Bpata n B parnkite na 4 cekyndn. | |
| Има пекомерно Kolniyeche bpa. | Плдовete Блдовete npavibnho nlln He nOToxOlaa 3a nI3nIaBnBaBnBe BcDOMYANH MaMSINH (6x3APEXDAHE H ADO3ATOPA 3A MMJIENI TPETIAPAT). | ||
| Вьдухв в сsttemа 3a noadabahe Na boda. | Плдовete ВODONDABaTa cSttema 3a TeOBe He nI Dpyu n Pio6bIeMn, nopadi KOTTO B NEHaxNyBa 3bDy. | ||
| Cbdobere He ca n3cbxhaln noobpe. | Нма п颈apat 3a nI3nIaKbaVe Na IIN Da3a e TBbprde MaKJa. | Uberetete ce, Ye zo3aTob 3a pnenapata 3a nI3nIaKbaVe e nIbien (6x3APEXDAHE H ADO3ATOPA 3A NOMOULHO CPECTBO 3A INI3IaKBAVE). Camo MyttnФункюногнite Tabnete Nama da osicryptor TOnkOBa Odobp nizsuaaeeKKT, Kolikoto DeicTBNTENHOTIO INI03BaHe Na Tcehen ppenapata 3a nI3nIaKbaVe. | |
| Сбдовete ca 6bnn nI3BaDeHn cIed abomatnyo OTbparYe Na Brpatata, Ho npedi pealnna Kpai Na nporpamata. | Uberetete ce, Ye zicbIbte e npiknIOuN, npedi da zaoouHete da nI3BaJzdaTe cDobetbe (6x3BCEKNHDEHB YA YIOTBEA). 3a oue no-dobprpoyetn ha cyuhe me ce npenopbyBa da octabite cSbdoBete da cTobPBe bYbTBe BcDOMYANH aPOMINHATA (6x3APEXDAHE H ADO3ATOPA 3A MMJIENI TPETIAPAT). | ||
| Сбдовete StorT npekaleho xopi3oHTaIIHO. | Ак озавелочи loKBN bOda 3a ChAsi, rolemmy Chasii NIKU, onniayae da zaojvHote (oc6bEsbB to porhata NoTocBak), kato onciyurite pO-10nIaHn. | ||
| Избранata nporpama Na hma phaHa Na cyuhe. | Mona, nporebete v TABILNA H A PIOPRAMITE dalmi nI3bpanahta nporpama a O6obyduBaHa cФЗаHa cyuhe. Lcikb b63ФЗ phaHa Na cyuhe Me jao de HcTnAnrBaHa Na cIckb b TAKB, KOITOn IMA PhaHa cyuhe. | ||
| Сбдовete Imat HezalneBaIo nokpnitne nIIN Ca nIaTMcMoBri. | някову Bodin n Kaikn, octahan n Bypx TuOtin Mane paiman, ca Hopmalnn. | ||
| Cbdobere u qawite IMAT CSINH IVBNI INIIN CINKABAV OTtebTu. | Ддата Na npenapata 3a nI3nIaKbaVe e npekaleho rolЯma. | PeryniPaiTe Do3inpobKaTa do No-HNCKa HactropiKa. | |
| Cbdobere u qawite ca noKpinync s bavovnik nIIN 6be3NknabefiФm. | Pe3eRBoaPbT 3a coI e npazeh. | HambHete OTHOBo pe3eRboaPa c6c coI bZb3MOxHo nai-cKopo. I3nO3BaHeto Ha yperda 6e3 coI moke Ja pnupinu NOBpeDa Ha bTpreshinite My KompoHentn. | |
| HacTpoKata 3a TBbprdoct Na boda t e TBprde NcKa. | UbeluHete NaTcPoKata (6x3 TABILNZA 3A TBbPDDCT HA BOIDATA). | ||
| Kanachka Na peshoBora 3a coI e TcBpOea Na Bpavino. | Плбовete и S3TbPobTe Na peshkata Na peshoBora 3a coI. | ||
| Pe3eRBoaPbT 3a npenapata 3a nI3nIaKbaVe Na npesapata Na npesapata 3a nI3nIaKbaVe Na npesapata 3a nI3nIaKbaVe Na npesapata 3a npesapata 3a npesapata 3a npesapata 3a npesapata 3a npesapata 3a npesapata 3a npesapata 3a npesapata 3a npesapata 3a npesapata 3a npesapata 3a npesapata 3a npesapata 3a npesapata 3a npESAPTA. | |||
| CbdoMiaHnata nOKAZBA F8 E5 | Knapanb te bIokirpan nIIN nobpehen. | 3aTbPoeTe kpaHa Na BoDA, aKO e Bb3MoxHo. He nI3KnIOuBaiTe 3axpaHbaTe. | |
| I3tChauHTo Na déterpnt. | 3aBcIn cIOTnIbAHn Tce hertepreHn Na moje da 6bJe duOe tera H cSuya n Ha AKTNIBPAH an OIIN 3a 3ababane. | Mankltte TceHOBa HnDA BoDBaTdo He nI3nPpABoCT Ha MaINHATA n Morat da 6bDat nI36BHTAn, kaTo ce pOmeHn BVIt n TceHnnern Hnpinepanat nIin cI3nonBatt Ta6bket. | |
Hnme Hn noHTK, cTnapTHa DOkMeHtauN, npbUka Ha pe3epBn Yactu N dONbHntHa HhOpMaun 3a npOyKTmoKeTe Da HamePNTe Ha:
-ⅢπολBaHé Na QR Kóda Ha Baùnú ype.
- Nocetnte haun yebcaut docs.whirlpool.eu/docs n parts-selfservice.europeanappliances.com
Kato aItepHaTbMa MoKeTe da ce CbpeKeTe c OTena 3a CneepnpoKa6eHo 06CnyXBaHe (BxTe TelefoHHn Homep B rapaHcNoHHa TKHkka).Pnp KOtAkrC oTena 3a CneepnpoKa6eHo 06CnyXBaHe Ha KIneHTn Cbo6uaBaIe KoOBeTe, Nocoueh Ha 3aBoDcKaTa Ta6eKa Ha Baun ype.
HΦopMaunra 3a MoEe MaKe Ja 6bIe N3BneHa Ype3 cKaHpaHe Ha QR KoDa Ha eTnkeTa 3a eHeprnnn HKnac. Ha eTnKe Ta CbTo Taka e Daen IeHTnKAtOp Ha MoEe, KOTo MoKe Da ce I3PON3Ba 3a DocTbN Do nopTaHa perncTbPa Ha aDpec https://eprel.ec.europa.eu.

DISPLEJ NA SPODNI STRANE (PODLAZE)
DOPLNENEI DAVKOVACE LESTIDLA
Díky lestidlu nádobi lépe schne. Zásobnik lestidla A by mbyt dystoplin国家标准, kdyz se na oyladacim pane lu rozsviti kontrolka NEDOSTATEK LESTIDLA
MERCID'AVOIR CHOISI UN PRODUIT WHIRLPOOL.
OPTIONS ET FONCTIONS
wascyclus is gestart.
PRODUCTBESCHRIJVING
APPARAAT
TM/ © 2025 Whirlpool, Proclus sub licenta

DAKUJEME, ZE STE SI KUPILI VYROBOK WHIRLPOOL. Ak chcete ziskat komplexnejsiu pomoc a podporu, zaregistrute, prosim, svoj spotrebic na: www.whirlpool.eu/register

Pred pouzitim spotrebica si starostlivo precitajte bezpecnostnePokyny a nayod na instalaciu.
Po instalacii nezabudnite odstranit z umyvačky vsetky suciastky na ochranu pri preprave.
PRE ZISKANIE
PODROBNEJSICH
INFORMÁCI
NASKENUJE,
PROSÍM, QR KÓD NA
VASOM SPOTREBICI.
Ovladaci panel tejto umyvačky riadu sa aktivuje stlačenim tlacidla ZAP./VYP. Ak sa nespustí ziadny cyklus, z dovodu uspory energia sa ovladaci panel vypne automaticky po 10 sekundách.
OPIS VYROBKU

SPOTREBIC
- NaturalDry
- Najvyssi kos
- Sklapacie klapky
- Vrchny kos
- Nastavovanie vysky vrchneho kosa
- Horne umyvacie rameno
- Podpora Power Clean
- Spodny kôš
- Kosik na príbor
- Power Clean
- Spodné umyvacie rameno
- Zostava filtra
- Zasobnik soli
- Davkovač umyvacieho prostriedku a lestidla
- Vyrobný Štítok
- Ovladaci panel

OVLADACI PANEL
- Tlacdido ZAP./VYP./Restart s kontrlkou
- Tlačidlo Eko programskontrolkou
- Tlacidlo programu Rychlyskontrolkou/program Predumyvanie-stlacit na 3 sekundy
- Tlacidlo programu Kristalove's kontrolkou/program Autocistenie-stlacit na 3 sekundy
- Tlacidla Automaticckych programov kontrolkami - Auto Intenzivny 65^ / Auto Zmiesany 55^ / Auto Rychly 50^
- Kontrolka prazdny zasobnik soli
- Kontrolka prazdny zasobnik lestidla
8. Displej
- Ukazovatel císlaprograma a zostavajúceho Času
- Kontrolka Zatvoreny vodovodn'ventil
- Kontrolka ODVAPNIT
- Tlačidla Extra možnosti s kontrolkami - Polovicná naplín/Tichy/Hygienické oplachovanie
- Tlačidlo možnosti Power Clean's kontrolkou
- Tlačidlo Extra Susenie s kontrolkou/Nastavenia -stlacit na 3 sekundy
- Tlačidlo Odklad s kontrlkou
- Tlačidlo START/Pauza kontrolkou
ZOBRAZENIE NA DLAZKE
- Cas odkladu na dlazke -ukazovatel'casu, ktory dostava do zaiatku cyklu, ke'd je nastavena funkcia odkladu
- Zásobnik soli je prazdny - kontrlka na podlahe
- Zostavajuci cas na dlazke -ukazovatel casu,ktory zostava do konca cyklu
PRVÉPOUZITIE
RADY PRI PRVOMPOUZITI
Po instalovani odstrante zarazky na kosoch a elastické oporné privky z horneho kosa.
PONUKA NASTAVENI
Baxnbo CnikkyBaTN 3a TmM, 6aok dNcoi HikoN He 6yb nopoxhim.
-LeBaKJINBO DnB CbTaHOBHeHHHaJeXHoI JOpCTKOCT BoHn.
Cinb cnid 3acunatn, KOJI Ha naHeni ynpaBniHHra CBITnbca iHdkaTOp 3ACUNATN CINbS.
1. BnmiHnKHHKOuHK i BiKpyiTb KpUkky 6aKa (npoTn roHNHkoBOi CTpiKN).
2. BCTABTE BOPOHKY (ouB. MaIHOHOK) i HanOBHITb 6aOK dIg conI do KpaO (npn-6JIn3HO 0,5 Kr); npocoyBaHHHeBENIKo' KINbKOcTI BOIN -Le HOpMaNbHO.
3. BUKOHAte ue Nnwe npn nepwomy BHKOpCTaHHi: HAnOBHItb 6a-OK dnn CoI BOIO.
4. BntarHitb BOpOHky 3iTpItb 3aIIuKn cOni 3 OTbOpy.
IpekoHaTeC, 0Kpnkka qinbHO npnrae, 06 nac BnKOHaHH nporpaM MTTM NIOU3ACi6 He mIR noTpanNTo KOHeHepa (Me MoKe np3BcTNO NOWKODKeHH NOM'AKWBya BODN AKN He NiJRAE pMOHTy).
Akuo nOpi6HDOcunatn cInb, 06OB'3KOBO 3aBepwiT npoueypy nepeuKlOM MTTT, uO6 3anobirtn Kopo3ii.
3annn kn p03ny a6o rpayn coni moxytb npn3Bectn do kopo3ii, kka 6e3noBOPOTHO pyHc KOMnoHEnTH 3 BnCOKKicHoi cTani.
Ha HecnpaBnictb, BnKlnkaHy TaKmN O6ctabHAmN, iIra rapaHTII He noWnpiOeTbcra.
KoHTeHep dconi He3anOBHeHn, ce MoXe np3BecTdo nowokxehn nom'kaWbau BOn i HarpiaIbHoro enemTa B pe- 3yIbTati HAKONUeHHHaKNy.
PekomeHycBnKOpHCTOByBaTH CINb 36ydb-RAKM TUNOM MIOuX 3ac06iB DnnoocydomnHmMaunH.
HAJAIHTYBAHHXKOPCTKOCTI BODI
HANOBHEHHI O3ATOPAMMIOOYO 3AC06Y
BnKOpNCtOByTe NmIe MmHm 3aci6, cneiaIbHO npu3HaueHn dIra nocydomnHnx MaunH.
HE BUKOPUCTOBYITE pIDHnIa MHTTIOcCyD.
BnKOpncTaanHaMipHoi KInbKocTi MmHoro 3acO6y MoKe npu3BecTu do yTbopeHHa MaunHi 3aunkib nHn nicra 3akHcHHe HcKny MTTR.
BnKOpuctaHmMnHoro 3ac06y, He npn3haeHoro dna nocydomnHH MaunH, MoKe npn3BeCTn Do HecnPabHOcti a6o nowokgeHH npnana.
Docrytn Haikpauixpe3ynbTatIB MHTTA cyuHHMoxHa 3a paxyHOK KOM6iHOBaHOro BnKOpNCTAHB BiINOBIDHO MmHOrO 3ac06y, ononickybaa Ta OMHcHoi coni.
PekomeHyMo BnKOpNCToBbATM MmHi 3ac06n, 0o He MicTb focOop a6o XnOp, TOMy 0o ci peYOBHH n EWKiDnNBmN dIra HABKOnnHbOrO cepeNoHa.
OnthmaIbHnx pe3yIbTaTIB MHTT MoXHa DoCrtu y pa3i BnKOpuctaHn npabunbHOi KInbKocTi MnHoro 3ac06y.
IpeBnueHHa3NaHcHoiKINbKOCTI HnpN3BOuNTbdo6InbueeKETUBHO MHTTa 36InbWyE 3a6pydHeHHaHbKOnuHbOro cepedobua.
LIO KINbKiCTb MOxHa peryNIOBAtn BiIDNOBIdHO Do CTyneHr 3a6pyDHeHOcT. Y pa3i 3BuaHoro pIBHra 3a6pyDHeHOcTi NocUy BHKOpNCTOByTe np6m3H0 35 r (nopOwKONoDi6Horo MmHoro 3ac06y) a6o 35 Mn (piKORo MmHoro 3ac06y) Ta daTkoBO YaHry loXky MmHoro 3ac06y doDaBaTaTe 6eNocepeDnHO y 6aQok. Y pa3i BHKOpNCtAHHr Ta6NeToK 6yde DOCTaTHbO OndHiCITaTabNETKn.
KIO NOcU He3NaH0 3a6pydHeHn a6o KaIIO IORo npOMBn BOOIOpeTm,IK NOKlactn Do NocydomnHOi MaunHn, CII BIDNOBINO3MeHNTH BUKOPNCTOBYBaHy KINbKiCTb MmHOrO 3acO6y (He MeHue 25 r/ MN), HApNKlaM OXHa DODaBATn NOPoWOK/ReB y 6aQok.
TaKoK, dIa DOcARHeHH ONTmAbhNx pe3yNbTaTIB MNTTdoTPMMyTe- cHCTpyKuJ, 0o HabeHeni Ha Kopo6ci MMnHoro 3acO6y.
Ypa3i BUNHKHeHHaDOaTKOBHX NHTaHb 3BepTaIeCra Do Bnpo6HNKIB MmHnx 3aco6ib.
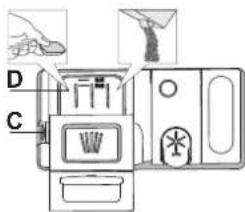
Uo6 BiKpnTn Do3atop MNoHOrO 3ac06y, BnKOpNCTobyTe MexaHiam BiKpnBaHHra C. DdoBaAaTe MIOuCh 3ac6 TiIbKn y CyxN do3aT O DdaTe BiNobiHy KInbKiCtB MNOHOro 3ac06y Ira nonepedhboro MTT8 6e3nocepeHbo y 6aQok.
1.Ⅲo6doaTn HaneKHy KInbKicTb, npu BiMipioBaHHI MIOOHOro 3acO6y 3BIPTeca 3 IHOpMaIciH, HabeJeHOIO Bnue. YcepeNHi Do3aTopa D e IHNkAToPi, kki 3aBe3neuTyb npabunbHe Do3yBaHHI MIOOHOro 3acO6y.
2.BuDanitb 3aunuk MmOchoro 3ac06y 3 KpaIB Do3aTopa n 3akpmbaTe KpuKky, NOKn He NooyeTe KnaaHHa.
3. 3akpiTe KpIuKy Do3aTopa MIOUOro 3aco6y, TARHyu II Bropy, NOKn 3a-nipHmexaHi3M He 3aikcyTbcra.
D03aTOp MNoOy 3acOby ABTOMaTHHO BiKpNaBcTa y NTpi6Hm MoMeHT BiNObiHDo nporpaMn. BnkOpNCtAHn MNoOYO 3acO6y, He npns3HaueHOro nocyDomnH MaunH, MoKe npnbEctn Do HeCnpabHocti a6o NowKOxHeHH npunaNy.
SUODEHHE BUKOPUCTAHNA
1. INPEBIPKA NIKKIOUHRA BOIN
IpekoHaTeca, 0nocydomHa MaunHa nKnHcHc H Do BDOnpoBody i 0KpaH BiKpTm.
2. YBIMKHEHHI NOCYDOMNIHOI MAUNHNI
BdkpnTe DBepuTa iHaTncHtB KhONkY BIMK.-BMMK.
3. 3ABAHTAXEHHKOLUKIB (ou8. «3ABAHTAXEHHKOLUKIKB»)
4. HANOBHEHHI D03ATOPAMMIOQTO 3ACO6Y
5.BNIBIP NPOPGAMI HAJIASHTYBAHH LUKJY
Bn6epitb nporpamy, zo HauKpaue nixxodntb do Tny nocdy Ta CTyneH noRo 3a6pydHeNocti (DnB.OTNC IPOrPAM), HatncHyBuN KHOky BijnboHoi IPOrPAMn. Bn6epitb notpi6hi onui (DnB. OIuT TA YHKUII) . Deekni cii E hecymichm3 neBHmnporpaamn.
6. NYCK
3anyctitb uKnMIIT,HaTNCHByBUN KHOKNy NYCK/Nay3a (3acBtntbcra iHdkatop) 13aunHNBUN DBepura Tnpotrom 4 cek. Nicra 3anyck nporpam nponyhae Ondopao3OBN 3BYKOBN CURHan. RaIO He 3aunHNTu DBepura Tnpotrom 4 ckyHND, nponyhae CNrHAN nonepeJXeHH. Y taKOMy pa3i BiDHNHT Bepura, HATNCHIB KHOKNy NYCK/lay3a 3HOBY 3aunHITb DBepura Tnpotrom .4 ckyHd.
7.3ABEPUHEHHUUKJUY MUTTA
Ipo kiHeu zHKNy MTTB NOIBOMJRE 3BYKOBH CURHan i HINKAUI EN (KIHELu) ha ducnnei. BiunHITb DBePuraTb BmKHiTb npnaad,HaTNC-HyBwn KHONky YBMK./BMNK.
3aekai Te kibka xbnHnpeTm, AKNBTRHytn nocyd, 0o6yHKHTOn onikB. Po3BaTaXTe KOuMKN, NOUHaOuN 3 HxKbOrO.
Yepe3 neBHH TpBbHn nepioD npocToO MaunHa aBTOMaTHNo BumkaeTbcra, 0o6 mHIMi3yBatn CnoKbAHn eKeTpoEhepi. RaNo nocSy He3NaHc 3a6pydHeHm a6o RaKIO noRo npomBaN BOIO nepe TUM, k NOKnactn Do nocydomnHOI MaunHn, cnB iDnOBiHO 3MeHUnn BuKOpNCTOByaHy KINbKiCTb MInHoro 3acO6y.
3MIHA BUKOHYBAHOI IPOPGAMU
Ypasi HnnpabunbHoro Bn6opy nporpaM MoXHa 3MiHHTI 3a yMOBn,IO BVKOHAHNn nporpaM TlBKn pO3noaJOnC. CKNDAHHH HanaWtyBaHb npnany: HATNCiTB KONKy YBMK./BMK. iYtpmnyte II noHaD 3 ceKHyDi MaunHa BmMKHeTcBcA. Ha nepehni nanehi Bido6pa3ntcbc qac «0:01'. 3aKpnite DBePcTa Ta 3aekKaTe, DOKn 3akInHtCBc ZKln 3NNBy (np6bn3HO 1 XBNnHa). BiKpnite DBePcTa Ta 3HOy YBMKHITb MaunHy 3a DonOMOrIO KNKOny YBMK./BMK. i Bu6epItb HOBN zKnl MTTTa 6yDb-aki notpi6Hi napameTpni. 3aNyCTtB zKKn MTTTA, HATNCyBHN KONKy NCK/lay3a 3aunHNBwDbePcTa npotrorm 4ceHyd.
DODABAHNHOCYD
He BIMNKaOHy MaHHy, oBepeKHO BiUHHTb DBepuTa, yHNaOu po3-6pn3KYBaHHB OOn (IHnKaTOp NCK/Pay3a) NOHe 6nMaTn) (Octrepiarec! rapooi nap!) i NOKaITb NocyD IO NocyDMNHOI MaHNI. HatncHt b KONky NCK/Pay3a 3aunHITb DBepuTa npotrom 4 cek., BIKOHAHH uKny npoobXntBC3 TOrO MOMeHTy, Ha RkOMy BIn 6yb nepepBAHn.
HENPEPEDaYEHBIUMKHEHHA
KIO nIac uKnly MTTa 6yde BiDnHeHO DBepeTa a6o Ako cTaHeTbC BIKIOUeHHXINBNEHH, BIKOHaHHNcKny 6yde 3ynHHeo. JIIUE RKO BHNATCHETE KONky NCK/Na3a 3aunHte DbepeTa npotrom 4ceHy, BIKOHAAuKny npoDBxNTbC 3 TOro MOMHTy, Ha kOMy Bih 6yB nepePBAAHn.
IOPADNI I PEKOMEHDAUII
IOPAIN
Peped 3aBaHTaKeHHaMKiB BuJaNTb 3 nocydy yci 3aJnWiK iKt Ta OuchTtB cKnHi NobepxHl. He notpio hOnonlckyBatn ix 3a3dneriB nd npotouHO BOIOO.
P03taowByTe NocyD TakIM YINOM, 0o6 Bih MiUHO yTPMByBcRa Ha Micu I He mI npeKHyntca; i pO3TaowByTe KOHTeHepn TakIM YINOM, 0o6 OTbOpB 6yn3NHy3, aYBriYni/onykNi YactNHn HaxnneHi, dIra TORO, 0o6 BoDa NotpanJaHa BCi NOBepxHi BIIbHo CTiKa.
NonepKenH: KpnK, pyKn, nIDOnn i cKObopiKn 3 pyKaMn He NOBHHI nepeKoJxatn o6eTahHIO po3nnIOBaiv.
KnaiItb 6yIb-ki npieHni npedMeTn y kounk dny ctonobnx npnbopib. Dyke 3a6pydneHNI nocuyl ic KobopiDkN Heo6xIHNO po3MIyBaTN y HNXhOmy KooNky, TOM cy u ci TAACTNH MaunHH BOaHI CTpyMeHi Cnblhi, 3aBqNK Omy DOcraeBCs BUNa npOdyKTHNBtCb MNTTT.
Iicra 3aBaHTaKeHHn ocydy y npuad nepekoHaHTeC, io po3nnHOBaHi Moxytb BInbHo 06epTaTcra.
HEPNDAHTHIN NOCYD
- DepeB'ayn nocyd i cToJoi np6Opn.
ToHKnIeKopatBHNCKJHNNOCyD,BNPO6nJeKoPaTNBHO-npNKaH Horo MNCteuTBa Ta aHTNKBapHN NocyD.IX O3Do6JIeHHHeCTiKe. - YactuHn 3 CHTeTuHOro MaTepiany, Aki He BntpmyOt b IIO BnCOKnx TemNepaTp.
MiDHHIOJOB'AHNIOcYd. - Nocyd, 3a6pydneHn 30no, BOCOM, MaCTNIOM a6o OOpHNIOM. KOnbOpN cKAnHO rO3doBHeHHI aIANIOMHIeBNX/cPi6HIN DeTaleM MoKyTb 3mIHOBaTncr i 3HKnATn B npoeci MTT. Jeaki TnN CkNa (Hanpknad, KpnUtaNEBn NocyD) MoKyTB TaKOx CTaN HeNpO3OpMN niCna DeKInbKOx UKNIB MTT.
NOWIKOKXEHNRCKIAIIOCYDy
BKNOPNCTOByTe TINbKn TaKNI CKnHNI i fapOpOBNI NocyD,AKNI 3riHHO peKomeHdaui NiO BnO6HnKa MoKHa 6e3neuHO MNTI y nocyDoMnHI MaMHi.
BukopncTOByte deIikaTHMNUOCh 3ac6,0o nixOOnTb dnyocdy.
Bntraatte cknHn nocyd i ctonoPi npna3 nocydomnHO MaHH Bidpa3y nic3aikHeHH zKny MTTT.
PEKOMEHDAUJI UO O 3AOUADXEHH EJEKTPOEHEPTI
KIO NO6yTOBa NocydomnHa MaunHa BkOpNCTOBYcBdIO NOBIDHO Do IHCTpykui BNPObHka,Ha MNTTNaocvDy B nocydomnHmMaunHi 3aBnuai BnptpaaeTcBc MEHJE EHEPTI Ta Boi, HIX npu pyHomy MNTtNoCyDu.
- Uo6 DoC4rT MAcuMaIbHoi eEeKtNBHocTi nocydomnHOi MaunH, peKomeHyEtBCr po3noHNATn uKN MtTn nicna nobHorO 3aBaHTaxHeN NOcyTOBIO nocyDMHOI MaUNn DO 3a3HaueHOI BnPO6hOKm KINbKOCT, cnpnTIme EOKOHII eepriTa BOi. IHOpmaio npo npabInbHe 3aBaHTaxHeHr CTOnOBOrO nocdy MoKHn 3aHTn B pOzini «3ABAHTAXEHHR KOLIVKIB'. y pasi cactKOBoro 3aBaHTaxHeHH peKomeHyETbcR BnKOpNCToByBaTN CneuaJIbHI OnUI MTTR, AkuO BOH NOCYTHNI (NoOBnHa 3aBaHTaxHe/3OHa MNTT/MynTn3OHa), 3aONBHeHH NIMe o6paHIX KOwIKIB. HenpabInbHe 3aBaHTaxHeHH a60 HaidMphe 3aBaHTaxHeHH nocyDMHOI MaUNn MOKe Pn3BeCTn Do 36InbWeHH BnKOpNCtAHn pecypcB (TAKNX RBOA, eHepri Ta vac, a TAKOX iNDBUnHeHH PIBH Wmy), 3H3NBUN npu LbOMy npodyKTNBHicTB OUYUeHHa TcUWHH.
- PonepeHne ononickyBaHHn npEmTeiB nocdy BpyHy npN3BOuNTb DO 36ilbWeHHn CNOxKBAHH BOn Ta eHepeKoMeHdyEhCB.
TIRIEHA
UO6 yHnKHyTN BHNKHeHHa 3aaxy i ocady, kMy MoKe HaKoNnuBAtncy O nocydomnhi MaunHi, OHaMHeHwe oMH p3 HA MiaCtbe Heo6xIdHO 3anckatn BnCOkOTempehpy nporpamy. UO6 ouHCTn npnnaBnKOpNCtae TaHny Noxy MIOUOro 3ac06y i 3anycttb uKn 6e3 3abTaKeHH Nocdy.
MOPO3OCTIKICTb
Kkno npnna p03miueho B Micui, de ichye pn3nk 3aeme3HH, 3 HbOro He06xio NOBHCIO 3NNTn BOy. 3akpnTe BOONPOBIHN KpaH, 3HIMtB BXiHN i BxIHIN nHaHn Ta daIte BCi BOi CTeKN. NepekoHaTecn, KO KOnTEHep Dnconi HanOBHeo po3wHom cni dnererehepaaii NOM'kWByaCBOH, uo6 3a6e3neHTn 3axNCT npnnady BID BnNNBy Hn3bKnX TemnepaTy (do -20^
Ku npua 36epirabca Ha Mop0i, nepe nepmm 3anyckom noo notpiHo BntpmaT np TemnpaTypi 5^ ao Bnue oohaimenwe 24 roinn.
TABLIUJI PPOIPIAM
He 3a6yBaIte 3MeHunT KInbKicTb MmIoOro 3ac06y.

TUXEMUTRA -nixounb nra pobotn npnay B HicHH qac.LIOO onIO MOKHA BUKOPNCTOBYBATN dnn OBmexeHH uMy niD vac 43MUTTRA. TpNBanictb uKny Moke 36inbwnncra 3aIexxHO bID Bu6opyHORO uKNY.

ONOJICKYBAHHI INP BILB WBCOKI TEMNEPATYI -LIO onuio MoKHa BNOPICTOBYaTN DnA De3iHΦiKYBaHHB BMNTORO NOCyDu. BiD6yBaCTbCA 36ilbueHHa TEMNepaTpy ONOJICKYBaHHa I DO Bn6paHOI AMNDOAeTcAHTN6aKeTpiaJIbHe PpOMNuHHa.
IdeaIbHO nIOxOuNTb Ia OUY Ta IaYeOHN NocyU Ta IaYeUOK Ia rOyBaHH. DBePcTa NOcyDOMHIO MaunH MaoTb 6TyN 3AkPTUNM NpOTAROM BCBOr QKny BVKOHaHN npOrpaMn, 0o6 rapaHTyBaTN 3MeHHeHH KInbKoCTi MiKpO6B.INOPEJXEHH: nocyI tapinkmoxyt b 6TyN dYke rapaum y kini zuKny.
POWER IOBEPUIEAH-3aBdAKn DOaTKOBNM NOTyKHM PO3NUNOBaAM CLEAN 云 oniir 3a6e3neyu6 bIbIe eefKTNBHIIe 6IbIu INTEHCNBHIIe MNTT NOcyD B KOHKPeTHI O6nacti HNKHbO KoUkna. LOniue peKomeHdyCTBCra IINMTT KAcTPynI rOpunKIB (INB.po3dnIOBepLneah)

DODATKOBE CYUHHB - BinbB BncoKa Tempepatypa nid vac oc TaHHboro ononlcybaHn, noDobXeHn uiKn cyuHHn, uO do3BOJAE noninwnTne npoeec. BukopncTaHHn onui DODATKOBE CYUHHN UYcKNI MNTTA.

BIDCTPOUKA CTAPY-3anyck nporpaM Moke 6ytn BiKnaedeHo Ha nepioi Bid 30 XB. do 24 roj. 1.Bi6epitb nporpaMy Ta Notpi6Hl Heo6xHn Onuii.HatncHtB KHONKY CTPOUKA CTAPY (KiIbka pa3iB) nra HanaWtyBaHHa 3aTpIMKn 3anycorpamn. Dianazoh HanaWtyBaHHa cacy 3aTpIMKn: Bid 30 XB. do 24 Nicra 3haueHHA 24 RoJ. HataNcKaHHa KHONKn BIDCTPOUKA CTAPTY KAAe fHyHKuio 3aTpIMKn.
- HATNCHTb KONKy NYCK/lay3a 3aunHITb DBepuTa npotra 4cek. TaImep po3noue 3BopOTHn BiDnK.
- Nicra 3aikHHeB CbTaHOBneHOrO yacy iHnKaTOp 3rache, i ABTomauHo NOuHcBA BkOHaHHN pOrpaMn.
ФункцIBICTPOUKA CTAPTY HeoctynHa, KOIN BKe po3noaTo BUKOHaHH nporpaMnD.

YAC HA NIO3I CbiueHHB CBIIOIOHORIO INHKaTOpA, IO BIDINBaETBCBIAI niNOrn, NOKA3YE, CKIBKN Yacy ZannuNocr DO KINcR KINy. CBITNO 3raCaepn KOKHOMy BIUNHeHHI DBepaT. CBITNO 3raCaC B KInciKkNy. Lg FHNKJIAKTINBHA 3a YMOBaAHHM, ane II MOXHa DEyBatn B MEHIO HANAUHTBAHb
PnpoDhe cyinHn nocdy (NaturalDry)-Le cntema cyinHHra kaa abTomuHO bIDkpmbae DBepaT a ndicncn erany cyinHH, 063a6e3-nyBATN BOCKYAKCTb cyiHn uOdHa DBepaTa BIINHHTCB Nnwe 3a TemnepaTy, 63neHooI dBaunx KxOHnx Me6nib, Tomy npotrrom BNKoHAnOni OnonickyBaHn npn 6bnBn Bcokoi TemnepaTy DBepaTa 3anuMaTHMyTbC 3abNOKOBAHMN.
B JKOCTI DoaTkoBoro 3axncty BiD BunapobByaHHB KOMnneKT nocydoMmHOi MaunHn BXoNDtB CneuJbHa 3axncha nnibKa. IIO6 NoNInTuNC,AK BCTaHOBIOBAtn 3axncHy nibKy, DIB. IOCIBHIK 3 MOHTAXY. Lc yfHKciE aKtNBHO 3aMOBuYBaHHa, ane II MoKHa BiKKnOChTuN B MEHIO HANAHTYBAHb>.

NonepdxenHHBUNAHEHHHAKINy - Ha BHTpiHix KOMNO
HEHTAX npnA dy BnBnEHO HAKONuyeHHaBnHoro HaBbOy. NpeBiTe, nnpabunbHO BCTAHOBneHO 3NaueHHxopctKoCti BOni i cnB y Bicciy dni coni (DnB.IPEUWE BKNOPNCTAHH), nicra yoro 3aNycttbporpaym CamooounHn 3 BNKOpCTAHm 3acoby nBndaenHn HauNpy (pekomeHnyetbca Mapka WPro).nicra ycniwHoro BndaeneHHn HauNpy No3Haquc 3 NonepeJKeHHM 3rache.
Kuo He BkOHaTN Bnue 3a3Hauenhi i, npOyKTbHCTb npNa dy noripunTbca.
NonepKeHHBnDAJIeHHH HAKIpy noHc6nnMa, aHa dnCnei 3'ABtbc HAnnc «dES», RaH He BxNtN Notpi6hNx 3axoJiB, MaunHa Do3BOJNTb
3aYcTNTi TInbKn neBHy KInbKicTB uKnib (Bka3aHy 6iB HanCy «dES»), a ToDi npucptpi 3A5NOKyETcb nI 3aNo6irAHn NowKOJxHeHH KOMTOHeHTIB -6yde doctynn Tinbkn nporpama CamoouuseneH. Ira po36NkoBaHN MaunHn Tpe6a 6yde BkOHaTN npoueDpy BuaaneHH HakuNy. y paia HaamipHO BeNkoI KInbKocTI BaHHORo HahBtoY qnoPoeDpy, MoXnIBO, DOBeTeBC BkOHyBaTn DbiHi.

Bn3HAeHHRA3ABpyHEHOCTI-KoNn DaTtK Bn3HauaC 3tynih 3abpydHeHOCTi,Ha Dcnnnei 3'ABnREbCSa HIMOBaHe 306paKeHH (np6bn3Ho Ha 20 XB),a TpNBanictb cukny Ta. DAtTNk BN3Haue pIBEh 3abpyDHeHH NOcyi I npaIOe Ha (okpim Eko),BijnOBIHO KOprryUOn nporpamy.

PonepeJxHnI PEKPOTO BOIOPOBIHN KPA-BnMaC,KoNHa Bnyck He NoCTynaEOBa a6o BOOIOPOBIDHN KpaH 3aKnTm.
INVERTER MOTOR (IHBEPTOPHIMДВИГИN)
3ABAHTAXEHHKOLINKIB
HAIBNUSA NOJUCA
HaBnua nonu3a6e3neyu cInboby3OHy MTTA MNCOK, KxNIB, BUCOKNXCKIAHOK i CTONOBHX npnaIDi, kAi BN 3a-3Bnua 3aBaHTaxyete Ha HnKHi nonu3, 3BilbHauO JDoat
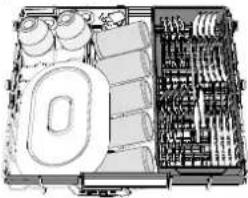
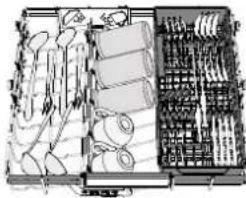
KOBeMiCue nIpaewTuNoCydy.
Po3dInbHe po3TaWyBaHH CToLOBnX np6OpB INonErwye ix 36npaHnN nicra MmTTI iD0BONe NiDbuHTn eΦeKTHBHCtB MMTT Ta cyiHnR.
Hoxi Ta iHwi CTOnoBi np6Opn 3 roctpmm Kpaam Heo6xidHO knaCTn ne3aMDoHN3y.
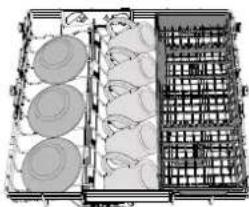
BEPXHIKOUK
3aBaHTaxyTe cOJn IeRKn i KpnXKn nocyd:CKNHNK, YauKN, 6bIOu, HnBki cAlaTHNI. BepxHKOwN MaBcIKuDHi OOnp, Aki MoXHa BCTaHOBnIOBAtu BepTKaJIbHe NonoKeHH npn po3miUeHHI qaHnx/ DecepTHX 6bIOeUb a60 y HnXHe NonoKeHH dJe 3aBaHTaxeHH MmCOK i KOHTeHepi DnXapOBNx npodyKTIB.
(npuKnaad 3aahmaxeHHa dnaeepxHb020 kouuka)
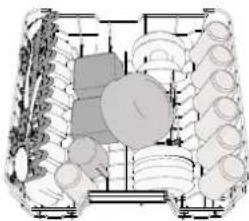
PERYIIOBAHHBVCOTN BEPXhboKOWKA
Bncoty BepxHbOro KOwnka MoXHa perynIOBaTn: BepxHne NOOKeHHa DO3BOJAE PO3MIuYBaTn y HNkhbOMy KOwnky 06'cMHN Nocdy, a BCTaHOBJeHHa 6INbOoCTI BiKnDHNx ONOp y HNkHbOMy NonoKeHHi DO3BOJAE BNblBHTN 6INbWe Micca 3Bepxy i YNHKnHYTN 3ITKHeHHa 3 Nocdyom, 3aBAHTaxKeHHm y HNknHoi KowNK BepxHni KOwnk OCHauEHO PerynATpOM BucOTn BepxHbOro KOwnka (DNb.MaJIHOHok), HeATNCaIOUHa Ha BaXeni NiHimItb NoRo, nOToC ToPMAHOUn 3aGHI CTOpOHn, NOKN KOwnk HEONHtbcA y BepXbMOy NonoKeHHi. DIn no
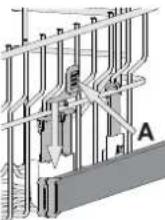
BepHeHHy HnKHe NIOJKeHH HaTNCiHb Ha Baxeni AHa 6iHnx CTOPOHAX KOUkai i nepEMictb yoro BH3.
HactinnopekomeHdyeMo HE BUNKOHyBaTN peryNIOBAAHH BUCOTK OoNka, KOnu y Hbomy 3hAxOaNTbcNocyd. HIKOJI He niDhimaiTe Ta he onyckaiTe TINbKn ONDy 3t CtopiH KOUka.
BiyHI NOJINUKN 3 PEGYJIOEEMM NOJIOXEHHREM
BiHi CkJaHaI NOnuKm MoKHa CkJaCTn a6o
po3Knactn, uO6 ONTImyBaTn PO3aUyBaHn Hocny Ha peWitJi. KeNux MoKHa HadiHo
BCTAHOBiTn HA CkJaDaHxN NOnuKaX, BCTaBUBHn HixKy KoxHOro KeNnx y BiINObiHn na3.
Y BnAky, AkuO BepxHn KoUsK 3hAxOxDtBcRy BepxHBomy NonoKeHHi, BiKnDiH KLnAnaHn He MoKyb 3aInMaTcN y BepTKaJIbHOMy NonoKeHHi. 3aneKHO BiM MoDenl:
-
IO6 pO3KJtN PONIMK, Heo6xIDHO NOCyHITX BROPY i NOBEPHTN aBO BNTTN 3aCyBOK i NOTARHTN BHN.
-
06 CklaCTn nouKHeo6xHNOOBepHytn ix i nocyHyTN BHN3 aO NO THTN BROPY i npukpinTu nouKn Do 3acyBOK.
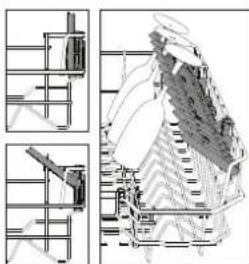
HIXHI KOWIK
Pn3NaHeHnnIgKaTpyNb, KpnWok, Tapinok, CanaTHNcB, CToONBnX npn6Opib I.T.D.BenNKi TApINKnIKpnNkMaIOb 6yTN IdeaNbHO pO3MiueH3 60KIB, 0o6 BOHN He 3abaxanl Po60Ti PO36pN3KyBaA. HxKhi KOwNk Mae BiKnHi OnOpN, Aki MoKHa BnKOpNCTOByBaN Y BepTKaJIbHOMY NONOKeHHI npn PO3MiueHHI TaipINOK aOy RopN3OTaNbHOMY (NHKBomY) NOJoxeHHI DnI 3aBAHTaKeHHa KaTpyNb I canaTHNuB.
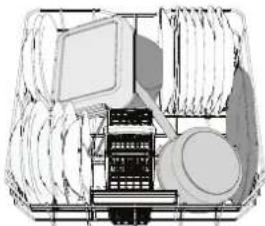

(npuKna3aabaHmaKeHHa HuxHbO2o KoouKa)
POWER CLEAN® (BЛАДАЧИCTSА)
y pexnmi Power Clean 3actocobyb cneiianbHI BOaHc TcPymeH BI HNHHI qactnHi Kamep nI d6IbW IHTeHCBHO MTTT CunbHO 3abpyHeHOro Nocdy. HxHHI KOwIK Maic MTcy 3OHy,IOAraJIe CO60cneiaJbHI BucyBH TpMaui, Aki MOxHa BnKOpNCTOByBaTN dIra 3pyHORO PO3aUyBaHHc KOBOpIDOK 3pyKaMn a60 NCTIB DnBnIqKn Y BEptkAlbHOMy NOJoxEHNI, 3aBdKn YOMy BOHN 3aImaHT MeHwe Micu.
P03a7yBabu Kactpyni/ropunny Ha nPpMkY KOMNoHeta Power Clean, aKtINByIe FyHKUIO POWER CLEAN Ha naheni. RbKbOpNCTOByBatu Power Clean
- BiDperyIIOTe cKaJaH3 3aHi TpMaui y 3oHi (G) Power Clean' dNra 3aBaHTaKeHHN NOcyu.
- 3aBaHtKaTe KAcTpynI Ta roPunKn BepTnKaJbHo niH HaxnOM Do 30HN Power Clean'. KAcTpynI MaOtB 6yTN o6epHeHi Do CtpymeHIB NOTyXHOro po3nnHeHH.
KoINK DnA CTOI0BnX IPNBOPIB
KoWN OCHaSeHO BepxHIMN peWITkAMn DnA 3pyHoro CknadAHN CTONOBHX np6opB. KoWN DnA CTONOBHX np6opB cnID BCTAHOBIOBAt Nnwe Ha nepeDHIO qACTINHY HNXHbOro KOWNIKA.Hoxi Ta iHni CTONBI np6OpBn 3 roCTpMn KpaMn cnId po3mi
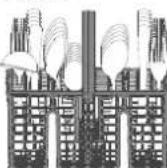
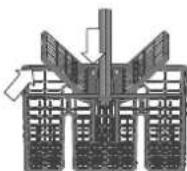
UyBaTu y KooNkny dna cTOnOBnx npnbopib BicTpam DOHN3y, aObIX cnId KlaCTn Tropn3oHTaBHO y BiKmHi BiDineHnBepXhboro KooNka.
DOrJIaI TEXHlUHe OBCnlyROyBAHHa
YBATA: 3aBxDn BiKIOuOaTe PnpNAd Np. Yac OuMHHeTb BUNOHHPOBt i3TexHIOHOcBOcNTOyBOVAHH.YKOHDomy pa3I BeNKOpCTOByTe IeKo3aMnmti pIDHN DnOuEHMaHNH

OuHJENHIOCYDOMHOIMAHINH
BbIy-RIIJIIM3 BHTPIIWbOI CTOPOH npnAyn MoKHa BuaNTu KaHNOIO, 3MoueHOIO BOIO i HeBENKOIO KJIbKICTO OUY.
3OBHIUIHNI NOBEXPHI MaUNHH Ta NaHEi KepyBaHHo MOKHaO OHCTNTN HeaOpa3NBHO TkaHNHO, 3MOeHoIO BOHO. HE BUKOPINTOBYITE PO3HNHHNKn A60 a6pa3NBH 3ac6Bu.
TONEPEIXEHHYTBOPEHHHENIPMHNX3ANAXIB
3aBxJn TpMaIte DBePcraTHeuilbHO 3aKpNTMn, Uo6 YHKNHyTN yTBOpHHI 3aTpMaHn BOJOr NycepeDnHi MaunHn.
PeryIaRHO OuyuYte yuiNbHeHHHaBKONo DBepuT i 03aTopn MIOUHX 3acO6IB 3a DonOMoroIO BONoOI r6Ki. Ce Do3BOInb yHnKHyTN 3aTpMMAH H yuiNbHeHHx iKi, 10 e OCHOBHO npuHNOyTBopeHH He npmEmHN 3anaxiB.
NEPEBIPKA IJAHNY NODAUY BODN
Perynpho nepebipre HaHnBn HnAhr Ha npedMeT lamKocti TpiuHH. Raio nnoKoKeHH, 3AMHITb NOrHO HA HOBIaHr, knn MOxHa npdiBn BLeHtri nicnpoDaXHorO o6cnyroByaHH a60 y haworo cneuaIIOBaHORO dInepa. 3aJexHO BiD TnHy nnAhy BnKoHaTe Oncahi dani iii:
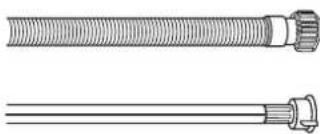
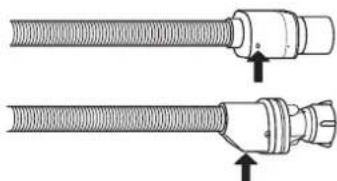
KJIO HANHBHNI IaHaR MaI pO3ope NOKpTTra, nepioMHHO nepeBipraTe, Yn He 3'ABINcA DIAHNK 3 IHTHeCNBHIWM KOBIpOM. JIKIO CE TaK, IaHaH MOKe npOTiKaTn Ta MaE 6yTu 3aMIHeN.
Длэзгнхилэп:пeрбіртЕнБeнінeКeOrlaNoBe BkHOb3aNoBixHoRo KlnanaH (nB. 3a ctrpikoK).Якso BOHO ueBoHe, cnpaцoBаФункiяЗanopy BOn. Heo6xHDo 3amHnIuHaNr Ha HOBn.
IooB BnKpyTtN uei shaHr, nid yac BnKpyuBaHHa HATnCKaTe KhoNky fikCaTopa.
OuHHeHHIJIAHHyIODAUIBODN
KIO BOJHI IaHn HOI aO He BIKOPUCOTByBANICN PpTOrM TpBaNoI Yacy, Nepd npMeDHaHHM NCTiB NO HUM BODY, 06pekoHATNC, IO BNXoNTb UcTcA BOa 6e3 6yDb-AXN DomiWok. KIO Oe 3anobixhnn 3axid He Byde BOKoHO, NoDaay BoND MoKe 6yTu 3a6nokOBaHo, Upe3 10 NocdyomHa MaunHa MoKe NOnkOHTNC.
OuHueHHy3JIAΦIbTPY
Perynpho OuyuynTe Byzon fInbtpa, 06 He donyckatn 3a6nbaHHa fInbTpiB i 06 BUKOPNCtHa BOda MOrna BInbHO BNTiKaTN.
BnKOpNCaHH NocyDOnmHoi Maunn i3 3acMueHmN fInbtpamn a60 cToPOHHIMnpEeMaTm BcepeHNi CnCTemMfInbtpaui a6o po36pn3KY BaUHMOx npu3BcETn DO HecnPpABHOCTPiNPCTpoH,3HHexEHRAKOCTMI T, WymHOI pOBo nPpuaCy a60 36inbWeHHBnKOpNCTOByaHnx pecypciB. By30JfInbTa cKaJaAeTBc3 T PboX InbTpB, Aki 3atPmPyOTb 3aNNkN iKi 3 npommbHOI Boi i3a6e3neuytbe peuPKylanIO Boi: dna Han6ibw eefKTHBOHOrO MHTTcNid perynlphO ONUUYBaTn IX.
TocydomnHy MaunHy He MoKHa BkOpncToByBaTu 6e3 fInbTpib a60 3 He3akpinJeHm fInbTpom.
He pide ondoro pa3y Ha Micra b6o nicna Koxn 30 uKnIb nepeBipraTe 6bnok fInbtpa i npu Heo6xHocTi petenbHO ouuuyte mOro nD npOTOHO BDOIO, BIKOPNCBOUYOn HemaTaeBy utKy i DToPMUoyncb HabeDeHNH NHXe IHCTpykui:
- Nobeprhtb uninHrpHn HfInbTp A y HanpMky npOTn roDunHHNKOBoi CTpinK i BNTARHtB noro (Man. 1). Y pa3i nobTOPHORO BCTAHOBNEHHI btaPBAaXnIB, Oo6 IBA TpKyTHnKHa DeTaIbHOMy 306paXhenHi 36irnca.
- 3HIMITb bIbTp KpUwKn B, IerKo HATnCKyOuH Na 6iHi CTyJkn (MaI.2).
- BntarHrHtB nlaactnHuactn fInbTp 3 HepXabiooOci Tani C (Man. 3).
- Y pa3i BnBnBHeHnCTOpOHnHix npeMntIB (Taknx yK ynAmKn cKn, fapOpy, kICTOK, HaciHnH opykTB i T.D.) 6yNb nacka, o6epexHo BuDanitb ix.
- IpebeIpe ynoBIObau i BuJaniBt yc3annuKn tki. HIKOJI IN HE 3HIMAte 3axnchy HaKnky HaCocy uNKny MmTTa (TeTaNb YOpHORO KOJIbOpy) (Man.4).
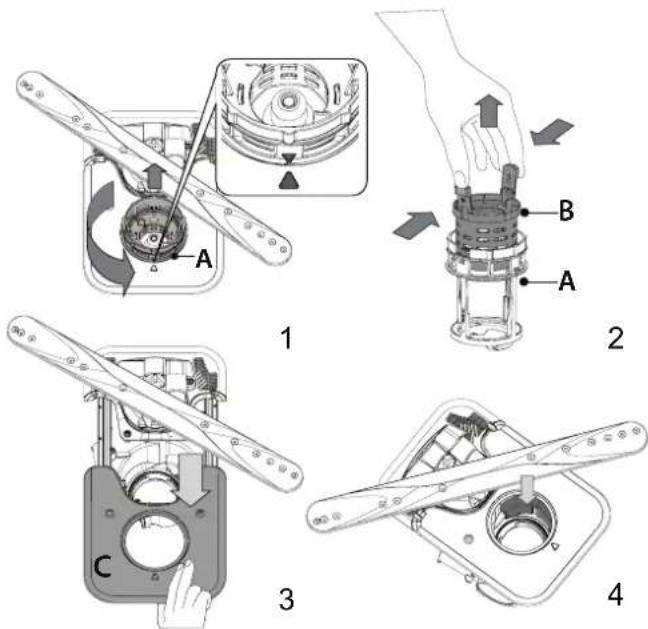
Iicra ouuueHHaibtpib BCTaHOBITbBy3oHpaHaMicte Ta 3akpinitb Ioro ycbomynoIOxKeHHi HaneKHMnHOM;Ce dyke BaKmBO dna efeKTNBHOO fyHKioHyBaHHNOCydomMHOI MaunHn.
OuHJEHRAo3bPN3KyBAyIB
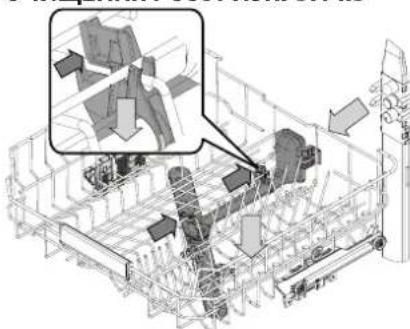
B Okpemux BnnaKax 3aannkki MokyTB 3aTBePitn Ha po3-6pn3kyBaayx i 6nOKyBatnOTbOp, npu3Haehi dny po3nnHeHHBOyn. Tomy peKoMeHdyEcTBcAuc BiYacv nepeBiprtn PO3bpN3kyBaayi OOnuSyBatnix HeBENKOHO HEMeTaNEBOIO uITKOIO.
BexnHpo3npncyBaMooXHa 3HIMaTINIe pa3om i3NaTpy6- KOM.
HaBnua noiua Mae iKcOaHy MIOUoy Ty6y 3 MuHmMfOpcyHKamn, cnpMaOBaHmMBropy.ДЯчNTKN BMOKeTe BucHyT KOWIK Ta BUnAnITPiHcetOM enEmHTN, IO MOrIIN 3aCTpRHyTN BfOpCyHKax.
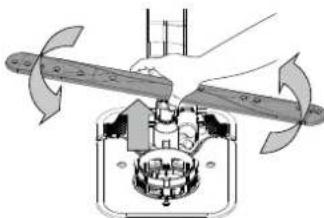
HnKni po3npckyBaM MoXHa 3HrT, NotrHyBmN IOR Bropy
Ta NOBepHyBn npOTn rOINHHNKOBIO CTPIKn. Uo6 BCTaHOBnTPO3pNcKBya Ha Micue, Noro Tpe6a NotarHTN BHn3 Ta NOBepHn 3a rOINHHNKOBIO CTPIKHO.
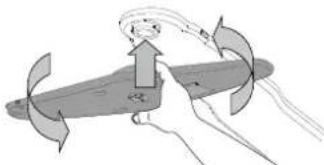
Po3nHIOBau CTeI MoXHa 3HrTn, HaTNCHyBnHa HbOro 3HN3yTa NOBepHyBnNPoTOn RoDHHNKOBoi CTpINK. Uo6 BCTaHOBnTu PO3npNcKByu Ha Micue, NOro Tpe6a NotarHTnu BROPy Ta NOBepHYt3a RoDHHNKOBIO CTpIKoIO.
UCYHEHHH HECNPIPABHOCTE
Rkso nocydomnHa Maunha He npaioe HanexHm YINOM, nepebipte, y MoKna ycyHytn np6bemy, BnKOpncTObyOuH Nactynn cncok. y pazi BuHKHeHH iHxN xomIOK a6o np6bem 3Beptae TcAdoTcra do ABTopn3ObaHO rceBichoro ceHTpy, KOtAKTHi daHI akoro moXHa 3HaHTB rapaHTi-Homy TaIohi. 3aIacHi qactHn6dyMb DoCTynH bnpodox Tepmiy do 7 a60 do 10 pokib, BiIDIOBIDHO do KOHKpeTHnx HOpMaTHBNHX BUMOR.
| ПОНБЛЕМ NOЖДИ ПРУСHINI PIŠECHHA | ||
| S T Oр'tь i.NДИКATOP coni | Konte'Herp dlya coni maike noprOzhni. | Заловпь контейнордя coni (Дожладишii BIDOMOSTI - du6. HANOBHEHHKOHTEHE-PAДЛЯCOЛ), 3а постбуpeпeepeipte hanaWtBuHAnJжорstкоTiBoDi - du6. TAbIILJXJOPCTKOCTI BoDIn. |
| S bIMmae i.NДИКATOP coni | Konte'Herp dlya coni noprOzhni. | Якайшвдше заловпь контейнордя coni. Викорисаннaya priniladny 6e3 coni може сprPчИнТи рОшКODжEHн BAHTPIHIX KOMПОЕНТВ. |
| T Oр'tь abo 6bIMmae i.NДИKATOP onolicky-bauch | Дозатор onolickyBaUa noprOzhni. (Пссяя noprOнБЕНЯ i.NДИKATOP onolickyBaUa moze mastaniats CB WbIMKHeHIM ue Deekn yac). | HanobHITb dozatop onolickyBaUa (doklakdiu shi BIDOMOTI - du6. 3AIOBHEHHIДО3ATOPA OLOJIICKYBAUCA). |
| T Oр'tь abo 6bIMmae i.NДИKATOP nakuNpy; «dEs» BiDobpaKaJaCByc StnHaon nopepeJedchenno pno Hacikn. | Ha BVHTpiuHix komIoHeHTax npnilady hakOpHcytehbaHakIN. | HeraiHo BVDaIitb 3 prinlady hakin 3a donomoroo nporpramu Camoochunenry Ta HABHOrO y proDAxuy zacOby for BVDanEnHn HAKINY (du6. OPLLI TAФYHKLI).3aONBHTeKoHepnfa Dcoi. Perpeipte hanaWtBuHn JoxpCTKCIb vdo.ЯkuO He BVDaIIHn HAKIN, prnilad nepectane He piaKobatn. |
| Посydомma ha maSHAHa He zalnyckaetb'aabo He pearyeHaKomAHd. | Прindahne He ndkIouchenni do poZeTKn. BCTA | ste tKepeR y poZeTKy eJeKToPoxBHeHNH. |
| BdKlnquChnHa aleKTPoNoCTaayHnA. | 3 mIPkyBaHb 6e3NeKIp nocdyomma HaMaTHnHa Hepe3aIpyckatmertcab aBOtOMaTHUo nlcraJxJxJxJxJxJxJxJxJxJxJxJxJxJxJxJxJxJxJxJxJxJxJxJxJxJxJxJxJxJxJxJxJxJxJxJxJxJxJxJxJxJxJxJxJxJxJxJxJxJxJX | |
| ДерцтЯ MaSHnHa He zauHEni. lshTcMEN PPrpoDne CsuIHHN noCyDu (NaturalDry) He BVTrgCTbA. | EnerpriHn HatackSyte HaDBePrta, noKHe NoohyTe 3bVbK «KnaCaHnH. | |
| Lckn lepeRbAeCTb, rKkoD depeRtA BIdUnHEni noHAD 4 cekynd. | HATNCHITb KNOKv I NCK/Play3a 3aunHITb DEpCrta npotrArom 4 cekynd. | |
| ПанeHb KepyBaHnHa He paeayeHa KaMaHd, a60 bVDobpaKaTaBc F6 E1. | BIMKnHIT prnilad, natichyBvnn KNOKv YBMK-BVMK./CknDaHn, prn6bI3No chep3 xviIiyu yBIMKHTo noHObY epRyAMy JauO pno6be- MHe He ZNKHe, BID'EDaHnTe prnilad Na 1xbVIIHn Byid'elKtpomepexi, a notim 3HOBy nDiknOuYtB. | |
| 3 noCydommaHoiMoMaHnHa He Btikae Voda. Пozha-ЧeHnHa Na DicnPte: F7 E3 a60 F9 E1 | Фытг Зakypоренii zalniKamamix iKx fo abo hakinom. | OuOcIeTb fblnto i BVDaIaIIb 3 prinlady hakin (du6. IHCTPYKLIIQ 3 OUYIeHHBBy3IA OJIIFTPA IN BVDALAEHHN AKAHITY). |
| Перетуну зл�缅ишоHaJI. Перетeipte зл�. | BbNnшaHn (du6. IHCTPYKLIIQ 3 UCTAHOBLEHHA). | |
| ТуБу 3лИВно систems 3a6bNOKoBAH.Очi | STBe Tpy6b 3lnBNOc sCttemn. | |
| ПосydомmaHa maSHAHa Ha noPodjKYe NaHdMIRn haum. | Пocyd 6br3aК客运 o6 odHOr. Правиьн | OpoStaTuYte nocSy (du6. ABAHTAXEHHK KOUINKIB). |
| YTBrojoctb 3a6bAtar noHIn. | HeprabInbNo BVMirpHn nOtroiHy nOtroiHy kInbKCTb MIOUOTO zacOby, aoBin He nipXoDHTB DnA BIKOPcNTAHN y nocdyommaHnx MaShnax (du6. «HAFOBHEHHNDO3ATOPA MIOUOTO 3ACO6By).Pepezazyctb nToocHn zuKn, BIMKHywn nocdyommaHaMssHy iYbIMKHywn II 3bOBy nObo rBbEpertb Hoby nporoPramy, natichitb KNOKv Play3a 3aunHITb DEpCrta npotrArom 4 cekynd. | |
| Пocyd 6bIyo HeprabInbNo po3MiSuHeno. ПрabInbNo po3aTuYte nocSy (du6. 3ABAHTAXEHHK KOUINKIB). | ||
| Фытг зakyporopnHa pO3MiSuHNo. PpA | BIVbHnO po3aTuYte nocSy (du6. 3ABAHTAXEHHK KOUINKIB). | |
| КорOMCSla po3npriscykubva He moKytb BILbNo obeTpatnc, IMpepeKoDkae nocSyd. | PpabInbNo po3aTuYte nocSy (du6. 3ABAHTAXEHHK KOUINKIB). PepekoHaiTece, zuO bepxhKoi KoUKNZaMaaC npeabInbNe nOtoJoxhenn, i 3a noTpe6b INDpeyIuHte (nDnHIMtB) noO. | |
| Lckn MttTzaHADTo M'fakn. BvBepiB Tb | OboHdN uZKlMnTTa (du6. TAbNlZuP IPOPTAM). | |
| YTBrojoctb 3a6bAtar noHIn. | HeprabInbNo BVMirpHn nOtroiHy kInbKCTb MIOUOTO zacOby, aoBin He nipXoDHTB DnA BIKOPcNTAHN y nocdyommaHnx MaShnax (du6. HAFOBHEHHNDO3ATO-PA MIOUOTO 3ACO6By). | |
| KpiuKhny BVDiJeuHnHa onolickyBaUa He noKytb | PepekoHaiTece, zuOkpuKhny doZaToppa onolickyBaUa zacPhto. | |
| Зakerурпь noleKhim YuHOM. | OuOcIeTb fblntu pBVDaIY bVDaIIb 3 prinlady hakin (du6. «OUYIeHHBBy3IAФIb-TPA'). | |
| Фытг зakyporopnHa zalniKamamix iKx fo abo hakinom. | ||
| КонтseHep dlya coni noPogKhi. HanOBHItb | KoHTeHep dlya coni (du6. HANOBHEHHK KOHTEHEPA Dlya COJI). | |
| ПосydомmaHa maSHAHa He Na6bpac BODya. Позанчeh-NaHa DiucIeH: H2O i BORpHt i NdkAICATOp; lyHae 3ByKobov SiCugHan. | Hemae Bodu y cStemi BODOnocTachnHa a60 zaKpurtn knPcH. | PepekoHaiTece, zuO e Hapin y cStemei BodOnocTachnHa i zuKran BVDkpriTo. |
| IpererHyto BvNcKnI shaHn. | PepebiTe BvNcKnI shaHn (du6. «BCTAOHHEHHN»). BIDvnHltbDepezta nocdyommaHoi MaShnHn, HATNCHTb KNOKv PLYCK/Pay3a zaunHITb DEpCrta npotrArom 4 cekynd. | |
| Замчehа сiTka Na BvNcKHom y shaHnfy; iI noTpi6Hо ouChIcTn. | PepebiTe ouChIbte ctiKny hanaBvNcKHom yshaHnny. BIDvnHltbDepezta nocdyommaHoi MaShnHn, HATNCHTb KNOKv PLYCK/Pay3a zaunHITb DEpCrta npotrArom 4 cekynd. | |
| Посудомина машина зakINчу ecIлппсдоучс. Позанченна на дисплей: F8 E3 | Фільтгзakypореньи залшкаміixi abo nakinom. | Очирьфпьгі видаить 3 пралидау hakи (due.IHCTPYKIIIO 3 OчИSeHHHByB3AФЛьТРАИ ВИДALEHнЯ HAKINY). |
| Задтонзькpoztaшовни злвншлшпгб abo zhalnabHry BdoMashno KaHani-zaicniHy cnstemy. | Пezерір'te,чьВSTAHOBlennyHa npabunbHiiBvncoti KieuebЗлвногошланra (due.BCTAHOBLEHHJ).Пezерір'te NaBHcTbCnФOHa BdoMashinK kanaizaii3aNotpe6bMSTAHOBtBzapobIXHKnipdCMOKTyBaHnRctHNOi pIDHN/KlanahnBnCKy nobitpr. | |
| Утворюевсязабагато пии. | Неравлбьн Вимярно NOTPbHyКькTGМИЧОЗ3AC6Obу abu biHneПIDXODITBДИВKKOPICTAHNBy NocydOMmHnxMaushnax (due.HAPOBHEHHJДО3ATOPA MIVQUOTO 3ACOBY). | |
| Повітrayу boDOnpobOdi. | Пezерір'te podauly boDiHaPreDMeBHTOKiB abo iHxixnpobIeM, nob'8aHxix 3проннkeннam nobitprB CNTsEуM. | |
| Посyd поано рочу-étбя. | He BHKOPICSTOBYETbcr onolickvbauch, abo Iyoro KINbKcIbTB HeNoCTaTHy. | ПezekohayTece, zu doZaToP onolickvbauch HanobNeho (due.3AIOBHEHHJДО3ATOPA OTOJIICKYBA4A).СamI liNeSe bgaratoФунKUioHanbIh TbSbIeTKn He 3a6e3neaTb Takoro efeKtu npocuSyBaHnR,Яk piKmIo onolickvbauch. |
| Посyd 6byo BvBaHTaKeHo NiCle aTb0-MaTHUNHO BIDCHENHRe DBeurpzt, ale doФakTuHOrO 3aBepShenHRe LcKlny. | П配电ин BvBaHTaKByaTn NocSyd,pekoHaiTece, zu cIckn 3aBepSheO (due.IIOOJEHHE BHKOPICCTAHN).Дя Краоцу npocuSyBaHnR pekomEnDoBaHo 3aIshuTn NocSyD MOnHIn MauHIn 3 BiDInHeHMMn DBeprZaTamn ige Ha 15XBnHIn NcIe LaZebapshenHRe LcKlny. | |
| Посyd StOITb 3aHaIaTpo pIBNo. | Якso BVnomiTiln ZalIshKu BoDn B YAaKhac, cKlnKacx abo Mmckax, cnpobuyte 3aBaHTaKByaTn NocSyd (ocobnloYoB V BerxHoi KoUsNK) nid biLbSmn Haxinom, zuo6do nachkytsу cyuHnR 6bIbHeNBoStKcALOBn. | |
| Y Bn6paHomy zuKlNi Hemae Фazni cyuHnH. | Пezерір'te 3a TABILUEIO IPOPGAM,чу Мэвбран prorpamaФazy cyuHnH.ЗккБe3Фazni cyuHnH moze He 3a6e3neuByaTn NotpIbHoi-Hocri cyuHnR, TOMy peKoMuHDoBaHO Bv6paTn zuKl,ЯкпpepebdaueФazy cyuHnH. | |
| Посyd BvrotobNeHn 3 aTnInpuraHro MATEPIAny abo PnaCTMaN. | HaramHcTb NeBHOi KIbKoCTI KpanelbBoDn, zuo 3aIaIIaHOpTaBcRa H MaTepiani ΒbOro TnPy, - HopMaIbHeЯBuIe. | |
| Посyd ıskо мaotbCunHOBatni BldTIHOK,aboHa HIXZaIshZaIshNlcBcNHi cnidi. | ДоЗвань ололickvbaчa εнадмірнIM.В� | Тановіть Нжчe 3NaChEHHa Do3yBaHnH. |
| Посyd ıskо порпінТаншпom abo 6iNByBatmM HalBOTOM. | Кontайнэрдя сoti nopokнi. | ЯкайшВидше ЗanOBHITb KOnTeiHep dlya coIi. BHKopIcTahnR priplady 6e3coIMOeСпruHHTNtIPOKJOeHHHByHtpIiHIX KomnoHentB. |
| Установлно 3aHn3bKe 3NaChEHHa JocstKoCTI BoDn. | 36IbIbTe 3NaChEHHa (due.TABILZIJA XOPCTKOCTI BODn). | |
| Кршу кontайнера дя сoti zakpitoHeprabInbNo. | Пezерір'te 3aKpimiTe Kpшу KOnTeiHepa dlya coIi. | |
| Кontайнэрдя onolickvbaчa nopokнi,abo Bv6paHnH NeprabInbNeHdo3yBaHnH (onolickvbaчa zamano). | HaramHcTb Do3aTspO onolickvbaчa и pezerір've HanaHTyBaHnH Do3yBaHnH (do-KlaNDHI yHfOpMaIzio - due. 3AIOBHEHHJ Do3ATOPA OTOJIICKVBA4A). | |
| Ha noCydomnHin mAsn-Hi BVDobpaKaETcb F8 E5 | Клалан 3a6lonkobao h6o nozkodkeho. | Якso Ze MeKlnBO,Зakріte BoDopOBiDn Kpran. He Bvmkaite enek-ТрожиВелн.ВiknuiTe cneziailCTa. |
| Витк к миочого засов. | Залекоть bID TiNpy pIiDnH, zu OblKo-pocSTOBYETbc; я�о можн ЛеткпOMiTi-TI, якso AKTINBOBaHa OnIgZaTpImKki. | Невелкі protiKanHnre He priS3BeDyTb Do HeCnPabHocTi MaSHIn. Ае IM можнazаЗлбіrtи shIaXOMЗamHn Tynu pIdkoro MInOchoro 3ac6b6у abo BvKopciTaHnRa Tabletok. |
3 nonitkoIO KOMnaiH, HopMaTHBHOIO DOKymeHTaiciO, IHOpMaicIO npo 3amOBHeHH 3anachnx qactNH Ta doaTKOBOIO IHOpMaicIO npo npodyKT MOxHa O3Haonmntnc:
BukopncTahn QR-KoNy Ha BaWOMy BInpo6i.
BidbdaTe Hau We6-caT docs.whirlpool.eu/docs i parts-selfservice.europeanappliances.com
A6o 3epeHb8cdo Haooi cyx6n nicnpaXho 06cyrobybaHH KIeHTIB (Homep TenefoHy 3aHaueHo y rapaHTiHOMy TaIOHi). 3BeptaiOuHcB do ueHTpy nicnpaXho 06cyrobybaHH, nobIDomTe KoIN, 3aHaueHi Ha Ta6nui 3 NaOpTHMn DaHIMN BInpo6y.
Infopmaio npo moeJIb MoXHa OTRPMaTI, CKOpNCtABuNcB KBa3aHMM Ha MapkyBaHHi eHepeOeKTeNBHOCT QR-KoDM. Ha etKeTci TaKox 3a3HaueHn iJeHTnΦiKaTop MOneni, kMIM MoXHa BnKOpNCToByBaTN dIy neperny nopTany peectpy 3a aDpecoIO: https://eprel.eucopa.eu


