
PCBS 3110 - Vacuum Cleaner ProfiCare - Free user manual and instructions
Find the device manual for free PCBS 3110 ProfiCare in PDF.
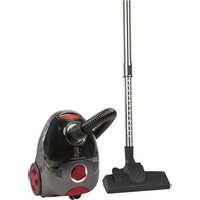
| Product type | Bagless vacuum cleaner with cyclone dust collector |
| Brand | ProfiCare |
| Model | PCBS 3110 (ref. PC-BS 3110) |
| Power supply | 220-240 V~, 50/60 Hz |
| Power consumption | 700 W |
| Protection class | II |
| Net weight | Approx. 4.1 kg |
| Dust container capacity | 4 liters |
| Filtration type | Cyclonic with fine dust filter and washable debris filter |
| Exhaust filter | Exhaust filter (washable) located at the rear |
| Cable length | Approx. 6 m (estimate, not specified) |
| Operating radius | Limited by cable length |
| Included accessories | Telescopic suction tube, floor nozzle with carpet/hard floor selector, parquet brush, crevice tool/brush 2-in-1 |
| Main functions | Dry vacuuming for hard floors and carpets, adjustable power, air regulator on handle |
| Maintenance | Empty container after each use or when MAX level is reached; wash filters with clean water, dry completely in air before reinstalling |
| Safety | Do not vacuum liquids, hot ashes, or sharp objects; do not use without filter; keep out of reach of children under 8 years |
| Intended use | Private household use only |
| Storage | Wind up cable, hang floor nozzle in parking position at rear of appliance |
| Repairability | Do not repair yourself; contact authorized technician; use only original spare parts |
| Warranty | Keep warranty card and receipt |
Frequently Asked Questions - PCBS 3110 ProfiCare
User questions about PCBS 3110 ProfiCare
0 question about this device. Answer the ones you know or ask your own.
Ask a new question about this device
Download the instructions for your Vacuum Cleaner in PDF format for free! Find your manual PCBS 3110 - ProfiCare and take your electronic device back in hand. On this page are published all the documents necessary for the use of your device. PCBS 3110 by ProfiCare.
USER MANUAL PCBS 3110 ProfiCare
OPMERKING: Opyouwbare "2 in 1" zuigmond
Thank you for choosing our product. We hope you will enjoy using the appliance.
Symbols in this Instruction Manual
Important information for your safety is specially marked. It is essential to comply with these instructions in order to avoid accidents and prevent damage to the appliance:

WARNING:
This warns you of dangers to your health and indicates possible injury risks.

CAUTION:
This refers to possible hazards to the appliance or other objects.

NOTE:
This highlights tips and information.
Content
Overview of the Components 3
General Notes 31
Special Safety Precautions for this Appliance 31
Unpacking the Appliance 32
Overview of the Components / Scope of Delivery 32
Start-up. 32
Using the Appliance 33
Maintenance. 33
Cleaning 34
Storage 34
Troubleshooting 35
Technical Data. 35
Disposal. 35
General Notes
Read the operating instructions carefully before putting the appliance into operation and keep the instructions including the warranty, the receipt and, if possible, the box with the internal packing. If you pass the appliance on to a third party, always include all the relevant documents.
- The appliance is designed exclusively for private use and for the envisaged purpose. This appliance is not fit for commercial use.
- Do not use it outdoors. Keep it away from sources of heat, direct sunlight, humidity (never dip it into any liquid) and sharp edges. Do not use the appliance with wet hands. If the appliance is humid or wet, unplug it immediately.
- Always switch off the appliance and pull the mains plug out of the socket (pull the mains plug, not the cable) when you are not using the appliance, attaching accessories, for cleaning or in the event of a fault.
- Do not operate the appliance without supervision. If you leave the room you should always turn the appliance off. Remove the plug from the socket.
- The appliance and the mains lead have to be checked regularly for signs of damage. If damage is found the appliance must not be used.
- Use only original spare parts.
- In order to ensure your children's safety, please keep all packaging (plastic bags, boxes, polystyrene etc.) out of their reach.

WARNING:
Do not allow small children to play with the plastic foil.
There is a danger of suffocation!
Special Safety Precautions for this Appliance
- Do not repair the appliance by yourself. Always contact an authorized technician. If the supply cord is damaged, it must be replaced by the manufacturer, its service agent or similarly qualified persons in order to avoid a hazard.
- This appliance can be used by children aged from 8 years and above and persons with reduced physical, sensory or mental capabilities or lack of experience and knowledge if they have been given supervision or instruction concerning use of the appliance in a safe way and understand the hazards involved.
Children shall not play with the appliance.
- Cleaning and user maintenance shall not be made by children without supervision.
- Do not suck up liquids!
- Do not suck up hot ashes or pointed or sharp objects!
- Do not use the appliance in damp rooms!
- Never use without the filter. Check that the filter is inserted correctly!
- Keep hair, clothing and body parts away from the vacuum nozzle during use!
- Keep the vacuum cleaner away from sources of heat like radiators, ovens, etc.!
Unpacking the Appliance
- Remove the appliance from its packaging.
- Remove both protection parts from the bottom of the appliance.
- Check the delivery scope for completeness.
- Check the appliance for any transport damage, in order to prevent hazards.

NOTE:
In case of any transport damage, contact your dealer immediately. Do not use a damaged appliance!
Overview of the Components / Scope of Delivery
1 Air slide
2 Handle
3 Suction hose
4 Hose connection
5 On / off switch
6 Carrying handle
7 Dust collector release button
8 Cable-winding button
9 Suction power control
0 Ventilation grill lock (outlet filter)
11 Positioning aid
12 Dust container
13 Dust collector base plate
14 Connection head of the vacuum hose
15 Carpet / hard floor selector
16 Floor nozzle (with hook (not shown))
17 Telescopic suction tube
18 Parquet brush
19 Combined crevice and brush nozzle
Start-up
- Insert the connection head of the suction hose into the hose connection of the appliance. Tighten the connection header anticlockwise.
- To release the hose again, turn the connecting header clockwise.
- Insert the vacuum tube into the handle if required.
- Then assemble the floor nozzle and / or the accessories. To detach the nozzle attachments from the suction pipe, pull them off by turning them slightly.
Nozzle Attachments
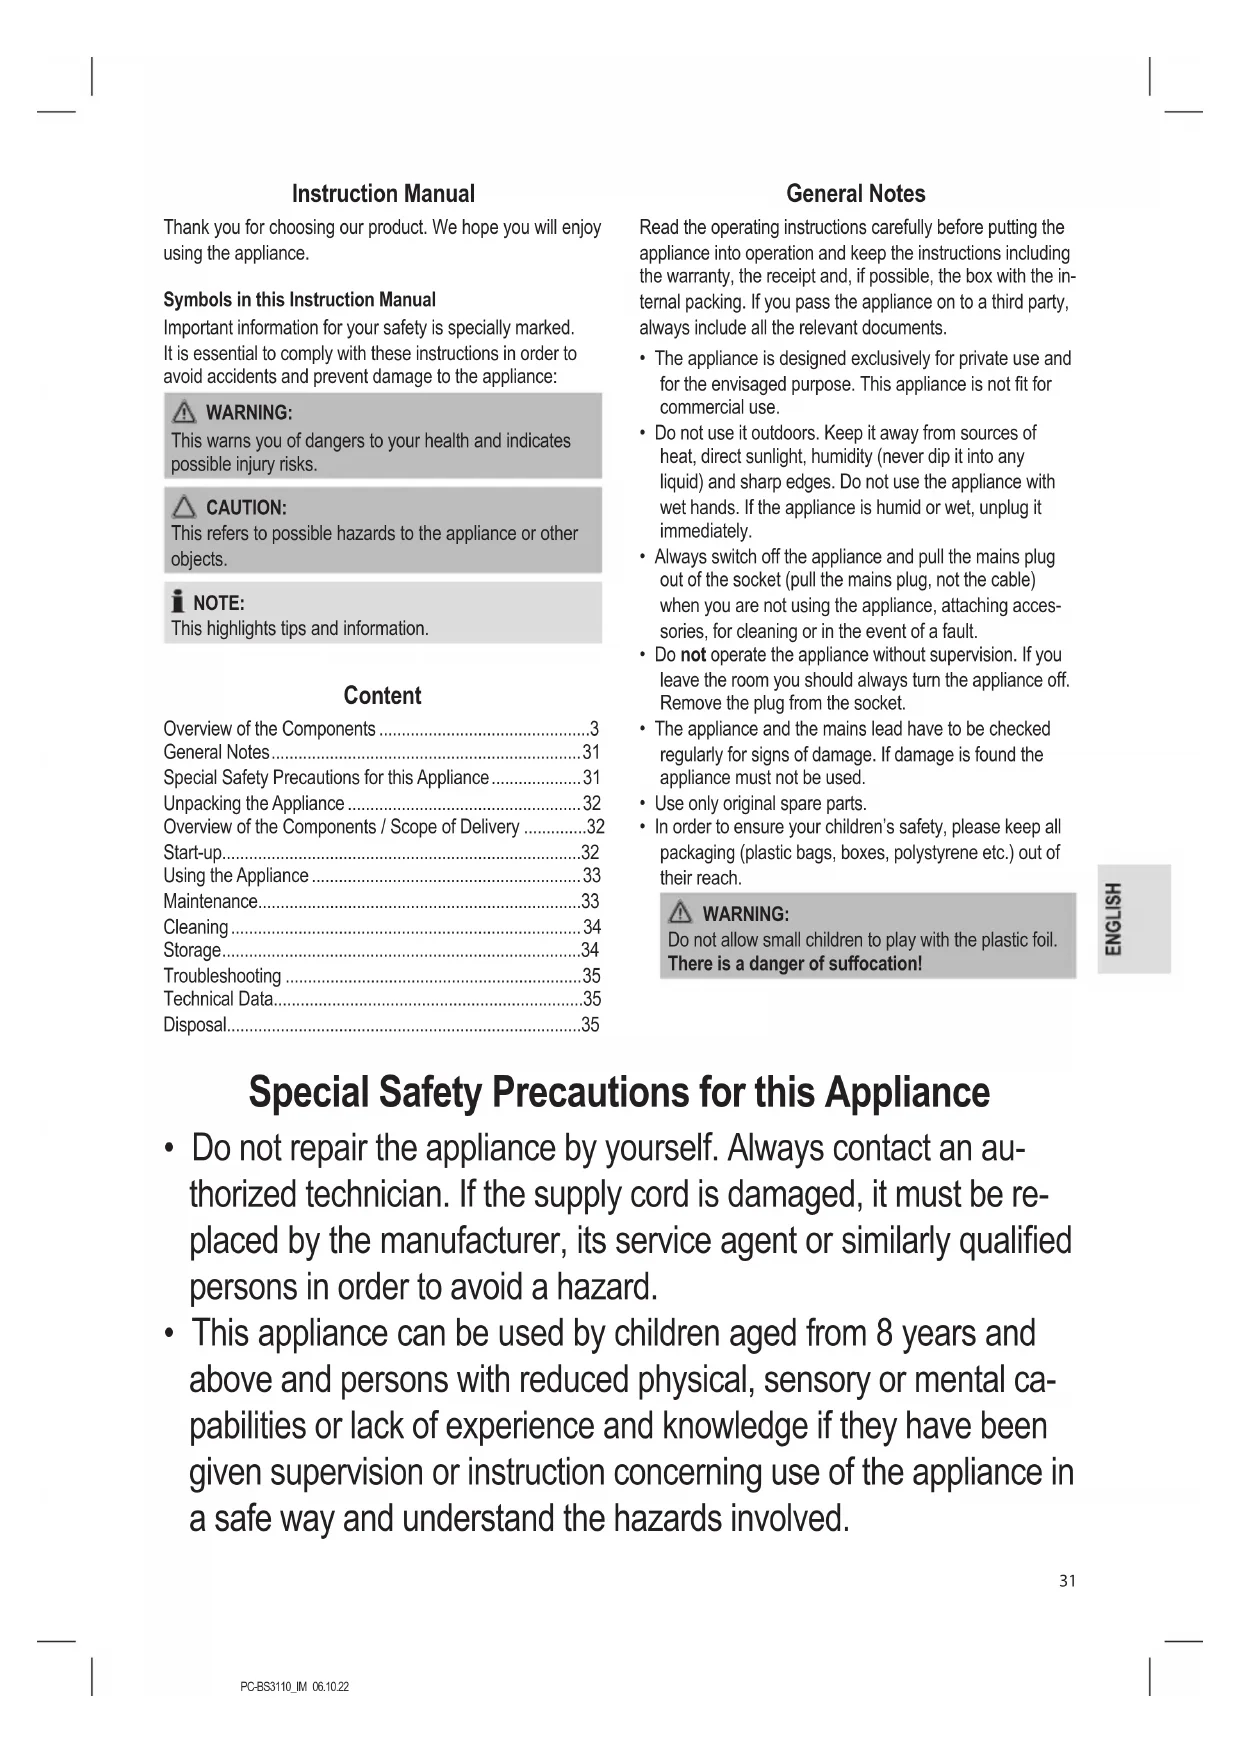
Floor Nozzle (16)
The floor nozzle features castors for easier movement. You can clean smooth surfaces and carpets with the floor nozzle.
- Adjust the brushes outwards or inwards using the lever (15).
Best use of the appliance depends on the texture of the floor covering. We recommend the following use:
- Use without brushes:
For vacuuming floor coverings with a deep pile
Use with brushes: For vacuuming smooth floors and carpets with a shallow pile
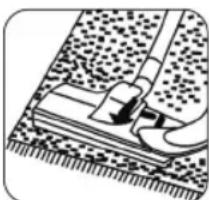
Parquet Brush (18)
For gentle cleaning of sensitive hard floors like parquet, laminate, tiles, etc.
Crevice and Brush Nozzle (19)

NOTE: Folding "2 in 1" nozzle
When this is folded together it can be used as a groove nozzle. If you would like to use the brush nozzle, pull the brush section in the direction of the arrow until it locks in place.
- Crevice nozzle:
For vacuuming dirt from corners, joints and small gaps.
- Brush nozzle:
For removing dirt gently from slits in upholstery and mattresses. Also suitable for removing dust from sensitive surfaces such as furniture or curtains.
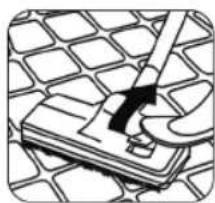
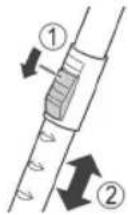
Telescopic Suction Pipe (17)
The length of the telescopic suction pipe can be adjusted individually:
- Loosen the locking mechanism by sliding and holding the button in the direction of the arrow marking.
- Extract one tube from the other to the desired length.
- Release the button in order to lock the connection.
Mains Cable
Pull the mains cable from the cable compartment. The cable compartment is located at the back of the appliance below.

CAUTION:
- Pull out the cable up to the maximum length indicated with the yellow mark.
- Never pull the cable out up to the red mark as the cable winding can be damaged.

NOTE:
If the red mark is visible, pull in the cable with the help of the cable winding button back to the yellow mark.
Electrical Connection
- Before connecting the plug to the wall socket, check whether the mains voltage is correct. Refer to the information on the rating plate of the appliance.
- Connect the appliance to a certified wall socket only.
Using the Appliance
- Insert the mains plug into a correctly installed power socket.
- Turn the appliance on by the on / off switch by pressing down the button.
- Set the "carpet / hard floor" switch, depending on the floor covering.
- Adjust the suction power with the suction power control.
- Vacuum at a steady speed. There is no need to exert pressure.

NOTE:
Pay attention to the range that can be covered with the cable length!
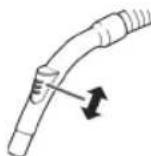
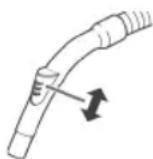
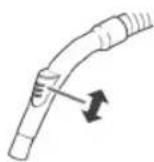
Air Slide
Open the air slide on the hose handle in order to regulate the airflow or to clear any particles sticking to the nozzle.
Switching Off and Winding Up the Mains Cable
- Turn the vacuum cleaner off by the on / off switch and remove the plug from the socket.
- Keep the plug in your hand.
- Press the cable winding button and guide the cable. Hold the cable to avoid wrapping.
Maintenance
Emptying the Dust Collector
Empty the dust collector once the collected dirt reaches the MAX marking.
- Disconnect the mains plug from the wall socket.
- Disconnect the hose from the hose connection.
- Press the button (7) to release the dust collector. Remove the dust collector.
- Empty the dust collector over a dustbin. To do this, pull the latch on the dust collector to open the base plate.
- Then close the base plate again.
- Attach the dust collector to the appliance. First position it at the bottom of the appliance and then secure it with the hook on top.
- Check that the position of the dust collector is secure by briefly lifting the appliance at its carrying handle.
Filters
Your appliance features 4 filters. The common dust bag system has been replaced by a transparent dust collector. The higher flow speed of the collector allows for heavy dirt and smallest floating particles to be separated from the "sucked-in air".
It is thus not necessary to buy dust bags.
The filters must be cleaned regularly.
Filter Insert

CAUTION:
- Never wash the filter in the washing machine.
- Do not use a hairdryer for drying.
- Only use the appliance after the filters have been installed correctly.
Proceed as follows to remove, clean and reinstall the filter insert:
- Empty the dust collector as described previously.
- Remove the dust collector lid. Turn it anticlockwise in the direction of .

The markings "I" and are imprinted on the right side of the dust container.
- Remove the fine dust filter. Remove the foam insert from the fine dust filter.
- Remove the coarse dirt filter from the dust collector. To do this, reach into the recesses of the filter and remove it by pulling it upwards.
- Use a brush to clean the filters. In case of heavy staining, clean the filters under running water.
- Let the filters air-dry completely before refitting them!
- Wipe the dust collector with a damp cloth and then wipe it dry.

If moisture gets into the rubber seal of the base plate, carefully remove the seal and dry it as well as the base plate. Replace the seal.
- Put the coarse dirt filter back into the collector. Make sure that the guides are seated in the openings.

NOTE:
The recesses are made in such a way that the guides fit in one position only. This prevents incorrect assembly.
- Insert the foam insert into the fine dust filter. The smooth side must be visible.
Place the fine dust filter onto the coarse dirt filter.
- Put the lid back on the dust collector. The guides must fit into the openings. Press it gently and turn it clockwise until it clicks into position.

NOTE:
The recesses are made in such a way that the guides fit in one position only. This prevents incorrect assembly.
Check the correct fit of the cover. The flattened side of the handle must fit over the hose connector.
- Fit the dust collector in the appliance.
Outlet Filter
The appliance is also equipped with an outlet filter.
It is located on the back of the unit next to the parking aid.
- Push down the lever (10) and remove the ventilation grille.
- Remove the filter insert and clean it. You can brush out the filter.
- Reinsert the filter. The guide eyes have to point upwards.
- Put the ventilation grille back on the appliance. Observe the guide lugs. The ventilation grid must engage audibly.
Cleaning

WARNING:
- Pull the mains plug out of the socket before cleaning or maintaining the appliance.
- Under no circumstances should you immerse the appliance in water for cleaning purposes. Otherwise this might result in an electric shock or fire.

CAUTION:
- Do not use a wire brush or any abrasive items.
- Do not use any acidic or abrasive detergents.
Clean the housing with a soft, dry cloth without additives.
Storage
- Let the appliance cool down completely.
- Wind the cable completely.
- Please insert the hook of the floor nozzle into the parking assistant on the rear of the appliance.
Troubleshooting
| Problem Possible Cause | Remedy | |
| The appliance does not work. | The appliance is not connected to mains power. | Check the connection to the mains. |
| Check the position of the switch. | ||
| Weak suction power. | The suction power is set too low. | Check the position of the control. |
| The dust collector is full. Empty the dust collector. | ||
| Weak suction power. | The filters are dirty. | Clean the filters as described under "Maintenance". |
| CAUTION: Restart operation only with dry filters. | ||
| There is a foreign body in the suction tube or the nozzle. | Check the accessories for foreign bodies. | |
Technical Data
Model: PC-BS 3110
Power supply: 220-240 V~, 50/60 Hz
Power consumption: 700 W
Protection class: II
Net weight: approx. 4.1 kg
The right to make technical and design modifications in the course of continuous product development remains reserved.
This appliance has been tested according to all applicable, current CE directives and built according to the latest safety regulations.
Disposal
Meaning of the "Dustbin" Symbol
Protect our environment: do not dispose of electrical equipment in the domestic waste.
Please return any electrical equipment that you will no longer use to the collection points provided for their disposal.
This helps avoid the potential effects of incorrect disposal on the environment and human health.
This will contribute to the recycling and other forms of re-utilisation of electrical and electronic equipment.
Information concerning where the equipment can be disposed of can be obtained from your local authority. Your dealer and contractual partner is also obliged to take back the old appliance free of charge.
Instrukcja obslugi
IcnoJIb3OBAHnE np6opa
- BCTaBbTe BnIky 3JIeKTPoNtAHHa B npaBnIbHO yCTaHOJENHyyO 3JIeKTPuHeCKyHO po3Elyk.
2.BKIOHTe ycTPOINCTBO nepeKIOHATeIeM BKN/ BbIKN, HAKAB ERO KHOIky.
3.YctaHOBtnepeKJIOuATEb《KOBep/NOI》B3aBNCMOCTNOTMECTQAHCNTK. - PerynpIte MoUHocTb BCaCbIBaHnC nOMOuBIO peryJIrTopa MOUHOCTN BCaCbIBaHnR.
- Побдпгчскгс почогнй скорoctь. He Tpe6y-ETc npunaratb 3haHTeJbHOrO yCnIy.

ПРИМЕЧАНО:
O6paTne BHHMaHHe Ha pacCToHHe, KOtOpoe oBeCneuBaETc nnHou shypa!
BeryHOK Bo3dyxa
OtkoIte 6eYHok Bo3dyxa Ha pyUke
7nAnra, YTO6bl peRyInpOBAb T NOtOK Bo3-
Dyxa Hn ydaNtB npEmdTebl, npnInnne
K HacaKe.
BbIKIOeHHe nCBOpaUNBaHne 1hypa 3JIeKtpoNTaHn
- BbIKIOHHTe nbIEcOC npeKIOHATeEM BKN / BbIKn I3BNEKHTe BNkY I3 3NeKTPnueckO p03eTKN.
2.ДеркinteВилkyВpykax. - Haxmte KhoNkY cbopauBaHnA uHypa n HappaBnTe WHyp B nbilecoc. Depxnte uHyp pykamn He donyckaiTe o6pa3oBaHne neTeb.
06cnyxuBaHne
OnycToWeHne nbIeSc6OpHnka
BbIbpaCbIbAaTe MycOp n3 nbIeNec6OpHnKa, KaK ToIbKO ypoBeHb DoIeT do OTMeTKn MAX.
- BbIKIIOHHTe BNIKy n3 ceTeBO pO3ETK.
- OToCeoEHHInTe UAnHr OToYcTpoIcTBA.
3.ДЯOTCOeINHeHnIbIeC6OpHnKaHaKmTeKHONKy(7). BItaIteNbIeC6OpHnK. - BbIbIcOpTe MycOp n3 nbJIeSc6OpHnKa B MycOpHoe Be- dpo. Ipy 3TOrO BbITaHHTe 3aJeNkY Ha nbJIeSc6OpHnKe, yTO6bI OTKpbItb OCHOBaHne.
- 3aTeM 3aKpOte OCHOBaHne.
- 3aKpeHnTe nIbnec6opHN B yctpoNCTBe.Chauana yCTaHOBnTe erO BHyTp b N 3aTEM 3aKpeHnTe C NOMOuBoB BepxHero KpUQka.
- Поверьтей Наджноctь pacnoLOXKeHne nbilec6Op-нka, спгка пиюняв устоCTBO 3a pykny.
ΦnIbTp
B yctpoCTBe npedymOTpeHo 4 pNbtpa.ObHna cn-CTema C MeWKOM DnA c6opapbIIN bbla 3ameHeHa Ha npo3paHbI Nblnc6OpHbK.Boeep BicokKa CKOpocTb c6opaPbIN N03BOJnEePa3dJIaT TKeEnyIObl N MaJeWneYactNUBI B 3acacbIAeMOM BO3dyxa.
TakIM o6pa3OM, OTCyTCTByeT Heo6xOdNMOcTB NOKyNaTb MEUKN.
gogglghgglghglghglghglghglghglghglghglghglghglghglghglghglghglghglghglghglghglghglghglghglghglghglghglghglghglghglghglghglghglghglghglghglghglghglghglghglghglghglghglghglghglghglghglghglghglghglghglghglghglghglg
j40
a1000000000000000000000000000000000000000
- 1,2 1,3
| الله | الله | الله | |
| الله بعبيا بعبيا بعبيا بعبيا بعبيا بعبيا بعبيا بعبيا بعبيا بعبيا بعبيا بعبيا بعبيا بعبيا بعبيا بعبيا بعبيا بعبيا بعبيا بعبيا بعبيا بعبيا بعبيا بعبيا بعبيا بعبيaga بعبيaga بعبيaga بعبيaga بعبيaga بعبيaga بعبيaga بعبيaga بعبيaga بعبيaga بعبيaga بعبيaga بعبيaga بعبيaga بعبيaga بعبيaga بعبيaga بعبيaga بعبيaga بعبيaga bga بعga بعga bga bga bga bga bga bga bga bga bga bga bga bga bga bga bga bga bga bga bga bga bga bga bga bga bga bga bga bga bga bga bga bga bga bga bga bga bga bga bga bga bga bga bga bga bga bga bga bga bga bga ba gga bga bga bga bga bga bga bga bga bga bga bga bga bga bga bga bga bga bga bga bga bga bga bga bga bga bga bga bga bga bga bga bga bga bga bga bga bga bga bga bga bga bga bga bga bga bga bga bga bga bs gga bs bs bs bs bs bs bs bs bs bs bs bs bs bs bs bs bs bs bs bs bs bs bs bs bs bs bs bs bs bs bs bs bs bs bs bs bs bs bs bs bs bs bs bs bs bs bs bs bs bs bs bs bs bs bs bs bs bs bs bs bs bs bs bs bs bs bs bs bs bs bs bs bs bs bs bs bs bs bs bs bs bs bs bs bs bs bs bs bs bs bs bs bs bs bs bs bs bs bs bs BSBSBSBSBSBSBSBSBSBSBSBSBSBSBSBSBSBSBSBSBSBSBSBSBSBSBSBSBSBSBSBSBSBSBSBSBSBSBSBSBSBSBSBSBSBSBSBSBSBSBSBSBSBSBSBSBSBSBSBSBSBSBSBSBSBSBSBSBSBSBSBSBSBSBSBSBSBSBSBSBSBSBSBSBSBSBSBSBSBSBSBSBSBSBSBSBSBSBSBSBSBBSBSBSBSBSBSBSBSBSBSBSBSBSBSBSBSBSBSBSBSBSBSBSBSBSBSBSBSBSBSBSBSBSBSBSBSBSBSBSBSBSBSBSBSBSBSBSBSBSBSBSBSBSBSBSBSBSBSBSBSBSBSBSBSBSBSBSBSBSBSBSBSBSBSBSBSBSBSBSBSBSBSBSBSBSBSBSBSBSBSBSBSBSBSBSBSBSBSBSbs bs bs bs bs bs bs bs bs bs bs bs bs bs bs bs bs bs bs bs bs bs bs bs bs bs bs bs bs bs bs bs bs bs bs bs bs bs bs bs bs bs bs bs bs bs bs bs bs bs bs bs bs bs bs bs bs bs bs bs bs bs bs bs bs bs bs bs bs bs bs bs bs bs bs bs bs bs bs bs bs bs bs bs bs bs bs bs bs bs bs bs bs bs bs bs bs bs bs bsbs bs bs bs bs bs bs bs bs bs bs bs bs bs bs bs bs bs bs bs bs bs bs bs bs bs bs bs bs bs bs bs bs bs bs bs bs bs bs bs bs bs bs bs bs bs bs bs bs bs bs bs bs bs bs bs bs bs bs bs bs bs bs bs bs bs bs bs bs bs bs bs bs bs bs bs bs bs bs bs bs bs bs bs bs bs bs bs bs bs bs bs bs bs bs bs bs bs bs BS BS BS BS BS BS BS BS BS BS BS BS BS BS BS BS BS BS BS BS BS BS BS BS BS BS BS BS BS BS BS BS BS BS BS BS BS BS BS BS BS BS BS BS BS BS BS BS BS BS BS BS BS BS BS BS BS BS BS BS BS BS BS BS BS BS BS BS BS BS BS BS BS BS BS BS BS BS BS BS BS BS BS BS BS BS BS BS BS BS BS BS BS BS BS BS BS BS BS BS BGSBSBSBSBSBSBSBSBSBSBSBSBSBSBSBSBSBSBSBSBSBSBSBSBSBSBSBSBSBSBSBSBSBSBSBSBSBSBSBSBSBSBSBSBSBSBSBSBSBSBSBSBSBSBSBSBSBSBSBSBSBSBSBSBSBSBSBSBSBSBSBSBSBSBSBSBSBSBSBSBSBSBSBSBSBSBSBSBSBSBSBSBSBSBSBSBSBSBSBS BS BS BS BS BS BS BS BS BS BS BS BS BS BS BS BS BS BS BS BS BS BS BS BS BS BS BS BS BS BS BS BS BS BS BS BS BS BS BS BS BS BS BS BS BS BS BS BS BS BS BS BS BS BS BS BS BS BS BS BS BS BS BS BS BS BS BS BS BS BS BS BS BS BS BS BS BS BS BS BS BS BS BS BS BS BS BS BS BS BS BS BS BS BS BS BS BS BS BS bs bs bs bs bs bs bs bs bs bs bs bs bs bs bs bs bs bs bs bs bs bs bs bs bs bs bs bs bs bs bs bs bs bs bs bs bs bs bs bs bs bs bs bs bs bs bs bs bs bs bs bs bs bs bs bs bs bs bs bs bs bs bs bs bs bs bs bs bs bs bs bs bs bs bs bs bs bs bs bs bs bs bs bs bs bs bs bs bs bs bs bs bs bs bs bs bs bs bs ns ns ns ns ns ns ns ns ns ns ns ns ns ns ns ns ns ns ns ns ns ns ns ns ns ns ns ns ns ns ns ns ns ns ns ns ns ns ns ns ns ns ns ns ns ns ns ns ns ns ns ns ns ns ns ns ns ns ns ns ns ns ns ns ns ns ns ns ns ns ns ns ns ns ns ns ns ns ns ns ns ns ns ns ns ns ns ns ns ns ns ns ns ns ns ns ns ns ns ns NS NS NS NS NS NS NS NS NS NS NS NS NS NS NS NS NS NS NS NS NS NS NS NS NS NS NS NS NS NS NS NS NS NS NS NS NS NS NS NS NS NS NS NS NS NS NS NS NS NS NS NS NS NS NS NS NS NS NS NS NS NS NS NS NS NS NS NS NS NS NS NS NS NS NS NS NS NS NS NS NS NS NS NS NS NS NS NS NS NS NS NS NS NS NS NS NS NS NS NS NBNSNBNSNBNSNBNSNBNSNBNSNBNSNBNSNBNSNBNSNBNSNBNSNBNSNBNSNBNSNBNSNBNSNBNSNBNSNBNSNBNSNBNSNBNSNBNSNBNSNBNSNBNSNBNSNBNSNBNSNBNSNBNSNBNSNBNSNBNSNBNSNBNSNBNSNBNSNBNSNBNSNBNSNBNSNBNSNBNSNBNSNBNSNBNSNBNSNBNSNBNSNbNBNSNBNSNBNSNBNSNBNSNBNSNBNSNBNSNBNSNBNSNBNSNBNSNBNSNBNSNBNSNBNSNBNSNBNSNBNSNBNSNBNSNBNSNBNSNBNSNBNSNBNSNBNSNBNSNBNSNBNSNBNSNBNSNBNSNBNSNBNSNBNSNBNSNBNSNBNSNBNSNBNSNBNSNBNSNBNSNBNSNBNSNBNSNBNSNBNSNBNBNSNBNSNBNSNBNSNBNSNBNSNBNSNBNSNBNSNBNSNBNSNBNSNBNSNBNSNBNSNBNSNBNSNBNSNBNSNBNSNBNSNBNSNBNSNBNSNBNSNBNSNBNSNBNSNBNSNBNSNBNSNBNSNBNSNBNSNBNSNBNSNBNSNBNSNBNSNBNSNBNSNBNSNBNSNBNSNBNSNBNSNBNSNBNSNBNSNBNRBNSNBNSNBNSNBNSNBNSNBNSNBNSNBNSNBNSNBNSNBNSNBNSNBNSNBNSNBNSNBNSNBNSNBNSNBNSNBNSNBNSNBNSNBNSNBNSNBNSNBNSNBNSNBNSNBNSNBNSNBNSNBNSNBNSNBNSNBNSNBNSNBNSNBNSNBNSNBNSNBNSNBNSNBNSNBNSNBNSNBNSNBNSNBNSNBNSNBNSNAIBNBAIBNBAIBNBAIBNBAIBNBAIBNBAIBNBAIBNBAIBNBAIBNBAIBNBAIBNBAIBNBAIBNBAIBNBAIBNBAIBNBAIBNBAIBNBAIBNBAIBNBAIBNBAIBNBAIBNBAIBNBAIBNBAIBNBAIBNBAIBNBAIBNBAIBNBAIBNBAIBNBAIBNBAIEBIAIIBIAIIBIAIIBIAIIBIAIIBIAIIBIAIIBIAIIBIAIIBIAIIBIAIIBIAIIBIAIIBIAIIBIAIIBIAIIBIAIIBIAIIBIAIIBIAIIBIAIIBIAIIBIAIIBIAIIBIAIIBIAIIBIAIIBIAIIBIAIIBIAIIBIAIIBIAIIBIAIIBIAIIBAIBIAIIBIAIIBIAIIBIAIIBIAIIBIAIIBIAIIBIAIIBIAIIBIAIIBIAIIBIAIIBIAIIBIAIIBIAIIBIAIIBIAIIBIAIIBIAIIBIAIIBIAIIBIAIIBIAIIBIAIIBIAIIBIAIIBIAIIBIAIIBIAIIBIAIIBIAIIBIAIIBIAIIEBIAIIBIAIIBIAIIBIAIIBIAIIBIAIIBIAIIBIAIIBIAIIBIAIIBIAIIBIAIIBIAIIBIAIIBIAIIBIAIIBIAIIBIAIIBIAIIBIAIIBIAIIBIAIIBIAIIBIAIIBIAIIBIAIIBIAIIBIAIIBIAIIBIAIIBIAIIBIAIIBIAIIIBIAIIBIAIIBIAIIBIAIIBIAIIBIAIIBIAIIBIAIIBIAIIBIAIIBIAIIBIAIIBIAIIBIAIIBIAIIBIAIIBIAIIBIAIIBIAIIBIAIIBIAIIBIAIIBIAIIBIAIIBIAIIBIAIIBIAIIBIAIIBIAIIBIAIIBIAIIBIAIIBIAI IBIAIIBIAIIBIAIIBIAIIBIAIIBIAIIBIAIIBIAIIBIAIIBIAIIBIAIIBIAIIBIAIIBIAIIBIAIIBIAIIBIAIIBIAIIBIAIIBIAIIBIAIIBIAIIBIAIIBIAIIBIAIIBIAIIBIAIIBIAIIBIAIIBIAIIBIAIIBIAIIBIAIIBIBIAIIBIAIIBIAIIBIAIIBIAIIBIAIIBIAIIBIAIIBIAIIBIAIIBIAIIBIAIIBIAIIBIAIIBIAIIBIAIIBIAIIBIAIIBIAIIBIAIIBIAIIBIAIIBIAIIBIAIIBIAIIBIAIIBIAIIBIAIIBIAIIBIAIIBIAIIBIAIIBIAIBBIAIIBIAIIBIAIIBIAIIBIAIIBIAIIBIAIIBIAIIBIAIIBIAIIBIAIIBIAIIBIAIIBIAIIBIAIIBIAIIBIAIIBIAIIBIAIIBIAIIBIAIIBIAIIBIAIIBIAIIBIAIIBIAIIBIAIIBIAIIBIAIIBIAIIBIAIIBIAIIBIAIIBRAIBIAIIBIAIIBIAIIBIAIIBIAIIBIAIIBIAIIBIAIIBIAIIBIAIIBIAIIBIAIIBIAIIBIAIIBIAIIBIAIIBIAIIBIAIIBIAIIBIAIIBIAIIBIAIIBIAIIBIAIIBIAIIBIAIIBIAIIBIAIIBIAIIBIAIIBIAIIBIAIIBIAI |
aJU
PC-BS 3110
60/50\~240-220
700
II.
4.1 jg 1
jaiuui jygbull gla aaaagai gaii 1p! i gall bai
L
gj g jaiy aaii g aagj gjj jai jia jia jia jia jia jia jia jia jia jia jia jia jia jia jia jia jia jia jia jia jia jia jia jia jia jia jia jia jia jia jia jia jia jia jia jia jia jia jia jia jia
.1J51 aai 10
jglj jno jalolll
aagaa aaiyogg (10) aaiyj Lw .1
2.
- a1b1^2 go do go
4
Lg aagll
a
:
1561 no y
aJgJ 1J 1J 1J
j( 4,0)
51 200 161 3 j4j1 jao
.
a#
.
:
. abdS 31 go 59 ell . olgo pss
ab = 5 且 a1 = 5 b1 = 5
100 100 100
#
jul 1000
MAX a0x12 00a12 12a12 12g0 g0g0 12g0 12g0 12g0 12g0
.1
ailo 10 gbo 11 23
. 1
yblwduu plal.Lxgbl alw 3 yell gao 4
d 可以 d 与 d = d + 1 互换,即 d2 = d1 + 1
S_ OBC = 12 · OB · BC = 12 × CD × 5
jglal no jlaaol o jgl 5gai .jglal 3 jglal gao s
jog jol jol g no no jol jolg ogo j no 57
jaoJooJooJoooo
2
pbi juiiwi pi cai 4 aiy dyl yolld jglzdi
当 = , = ,且 , | | = | | = 1 .
joo joo joo joo joo joo joo joo joo joo joo joo joo joo joo joo joo joo joo joo joo joo joo joo joo joo joo joo joo joo joo joo joo joo joo joo joo joo joo joo joo joo
《aolgj 3 aaiabol jou
aJyIyIyIyIyIyIyIyIyIyIyIyIyIyIyIyIyIy
aagaaay jalll aai
a
:
#
ailllll 1
jglal adao jg aaiia poa y
gao ge jie caiyui Jusu bia jiaqiu
a:5j o3e1g aiaag g jbjg jaiy jaii y bghjgl
1.
acllwljololololololololololololololololololololololololololololololololololololololololololololololololololololololololol
#
ab = 16
a 1000
aill jll jai jao oagjll jzj Uj3
26 - 36 = 10
gila Jj. dacall gU yllabla ynil gilo U ayb, jgfoa
a aal Jaaag. aaleg jao slad daag jauill
(17) 5kwiolal
:Jus JgSswll paoy Ugb b
a
-
20 j11 de la
-
| g( x) = 1x - 1x + ·s + 1x|
.0gaiibl
- .alogj jzjzj
g
j0g jU5u daaabd jgaab1 jus
jzul JwJdJgJg
:
#
alal alal
jbiol yool dooll jol bdo 151 151
S ACD = S COD + S_ DCE
= x + y
i
J 1
在 Rt ABD AD = BD
1
aosxoo
e 056511 cloglab11 g21 sss
jolpail oalil ciailll
- 150
jgljll plucuul
1.aaoo8jgaa
2.
a0j31 200000000000000000000000000000000000000
jolaiy og 3ooll ohtiwo jolaoiyogb 4
-
-
-
- 5.
-
-
:aloo
JUJI UJB 1jS jS JIJI JJIJIJIJIJIJI
alglbdujio
a0g0gbl 1g0ll aai jbiol ooi
Gg 111y g1 ggl ggl ggl ggb
aagaiy aaiitoo
aagg jwogjL
j 1
y
aIzol gai zj Sll clal.4g9g jSll jj jle b2013
3


- OPMERKING: Opyouwbare "2 in 1" zuigmond
- Symbols in this Instruction Manual
- WARNING:
- CAUTION:
- NOTE:
- Content
- General Notes
- Special Safety Precautions for this Appliance
- Unpacking the Appliance
- Overview of the Components / Scope of Delivery
- Start-up
- Nozzle Attachments
- Parquet Brush (18)
- Crevice and Brush Nozzle (19)
- NOTE: Folding "2 in 1" nozzle
- Telescopic Suction Pipe (17)
- Mains Cable
- Electrical Connection
- Using the Appliance
- Air Slide
- Switching Off and Winding Up the Mains Cable
- Maintenance
- Emptying the Dust Collector
- Filters
- Filter Insert
- Outlet Filter
- Cleaning
- Storage
- Troubleshooting
- Technical Data
- Disposal
- Meaning of the "Dustbin" Symbol
- Instrukcja obslugi
- IcnoJIb3OBAHnE np6opa
- ПРИМЕЧАНО:
- BeryHOK Bo3dyxa
- BbIKIOeHHe nCBOpaUNBaHne 1hypa 3JIeKtpoNTaHn
- 06cnyxuBaHne
- OnycToWeHne nbIeSc6OpHnka
- ΦnIbTp
- aJU
- jglj jno jalolll
- a
- #
- jul 1000
- 2
- :
- ab = 16
- - 36 = 10
- 5kwiolal
- g
- :
- ab = xa + yb
- i
- 1
- jgljll plucuul
- :aloo
- alglbdujio
- aagg jwogjL
- 3
Brand : ProfiCare
Model : PCBS 3110
Category : Vacuum Cleaner