
V603S - Cooker TAURUS - Free user manual and instructions
Find the device manual for free V603S TAURUS in PDF.
| Brand | Taurus |
| Model | V603S |
| Product Type | Built-in induction hob |
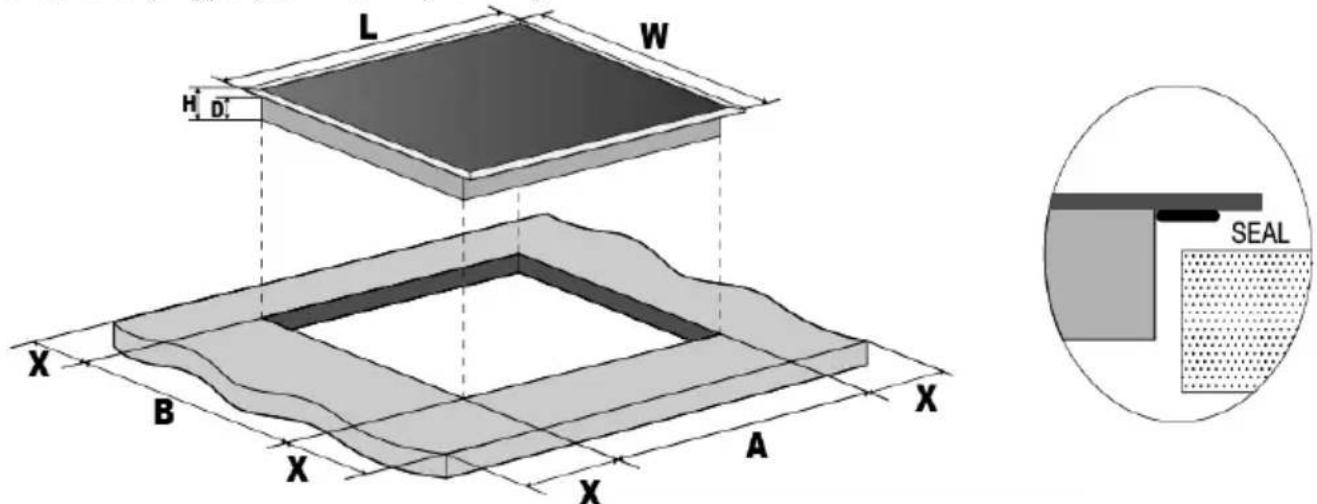
| Dimensions (W x D x H) | 590 x 520 x 52 mm |
| Cutout dimensions (A x B) | 555+5 -0 x 495+5 -0 mm |
| Minimum overhead clearance | 760 mm min. |
| Minimum worktop thickness | 30 mm |
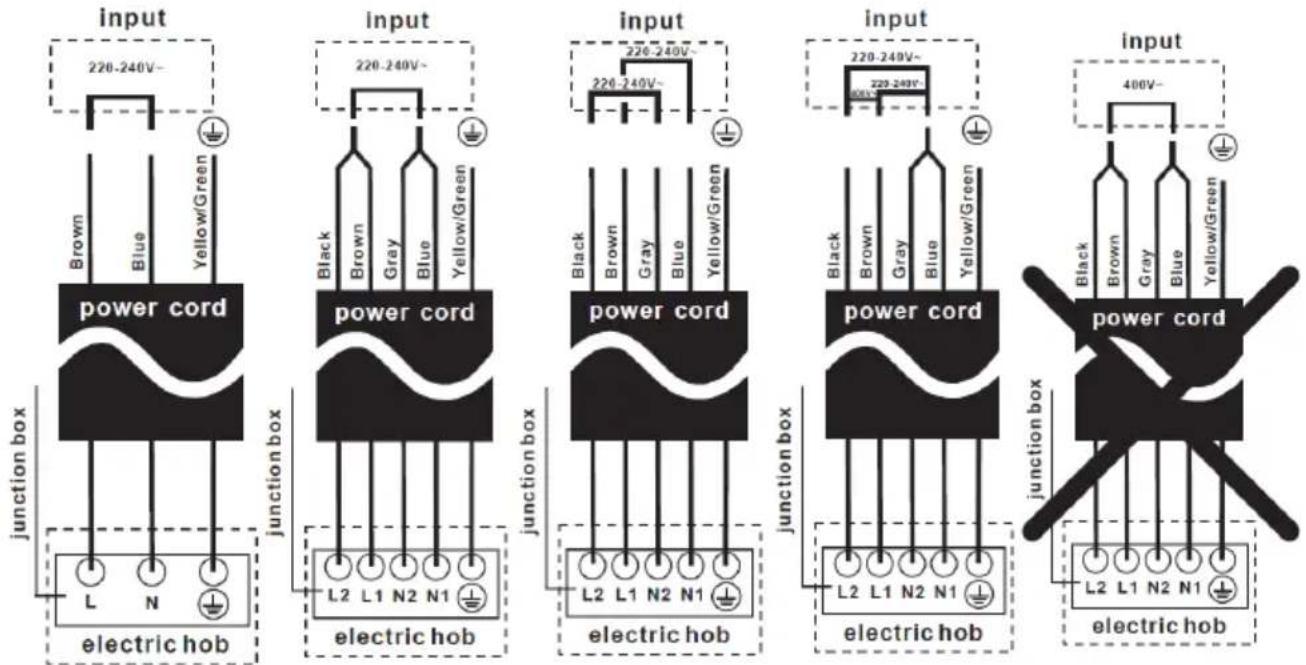
| Power supply | 220-240 V, 50/60 Hz |
| Number of cooking zones | 4 |
| Zone power | 2 x 1800 W, 2 x 1200 W |
| Control type | Touch controls with slider |
| Functions | Timer, Stop & Go, Child lock, Pan detection, Auto shut-off, Overheat protection, Anti-spill protection, Residual heat indicator |
| Surface material | Ceramic glass |
| Included accessories | Foam seal, fixing clips, screws |
| Warranty | Legal warranty (according to current legislation) |
| After-sales service | Via taurus-home.com |
Frequently Asked Questions - V603S TAURUS
User questions about V603S TAURUS
0 question about this device. Answer the ones you know or ask your own.
Ask a new question about this device
Download the instructions for your Cooker in PDF format for free! Find your manual V603S - TAURUS and take your electronic device back in hand. On this page are published all the documents necessary for the use of your device. V603S by TAURUS.
USER MANUAL V603S TAURUS
English Electric hob
1. INSTALLATION
Installation Instructions
The appliance must be installed and connected in accordance with current regulations. After unpacking the appliance, ensure there is no visible damage. If it has been damaged during transit, DO NOT USE, contact where you buy immediately.
Selection of installation equipment
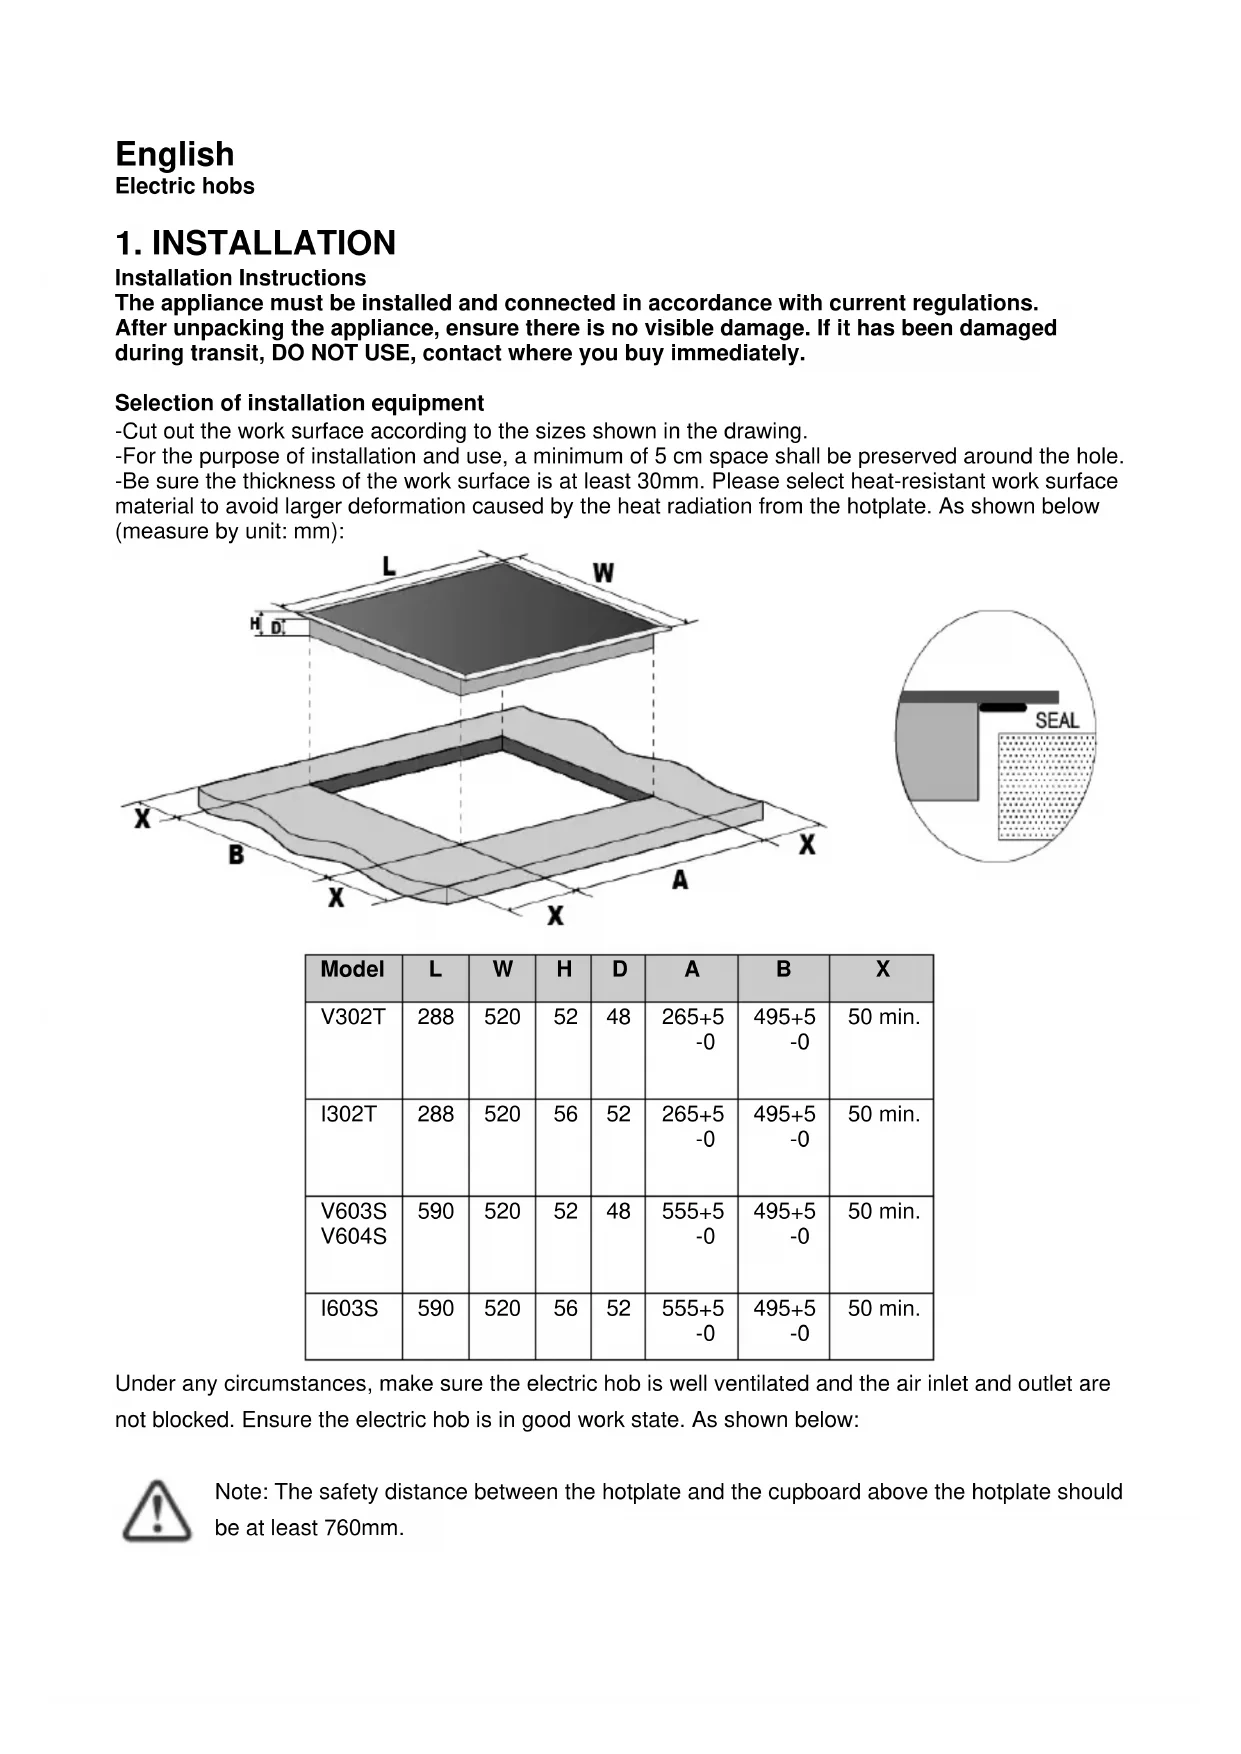
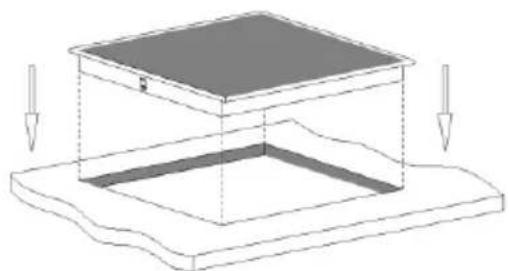
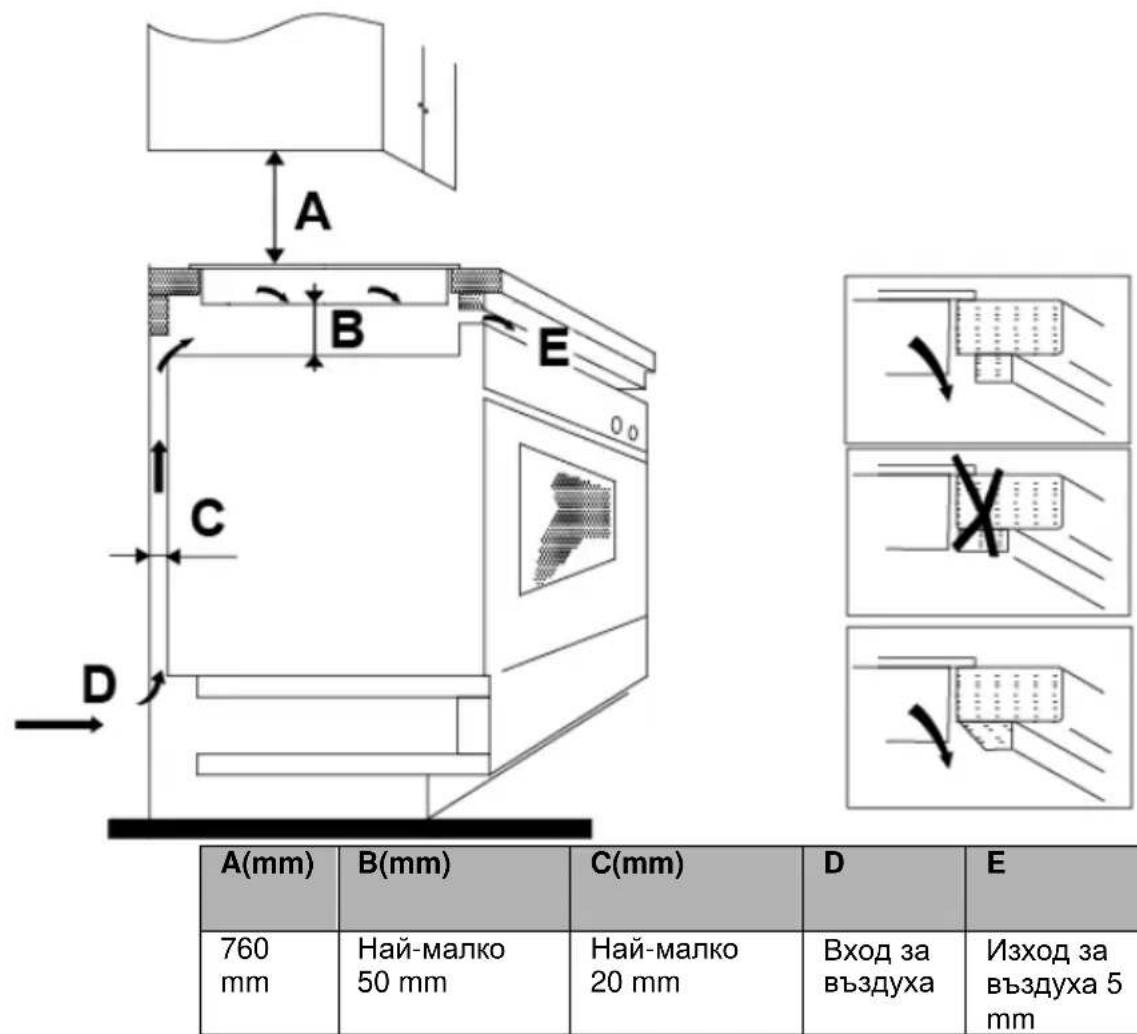
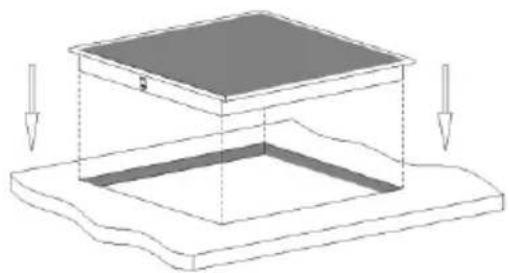
- Cut out the work surface according to the sizes shown in the drawing.
-For the purpose of installation and use, a minimum of 5cm space shall be preserved around the hole.
-Be sure the thickness of the work surface is at least 30mm . Please select heat-resistant work surface material to avoid larger deformation caused by the heat radiation from the hotplate. As shown below (measure by unit: mm):
| Model | L | W | H | D | A | B | X |
| V302T | 288 | 520 | 52 | 48 | 265+5 -0 | 495+5 -0 | 50 min. |
| I302T | 288 | 520 | 56 | 52 | 265+5 -0 | 495+5 -0 | 50 min. |
| V603S V604S | 590 | 520 | 52 | 48 | 555+5 -0 | 495+5 -0 | 50 min. |
| I603S | 590 | 520 | 56 | 52 | 555+5 -0 | 495+5 -0 | 50 min. |
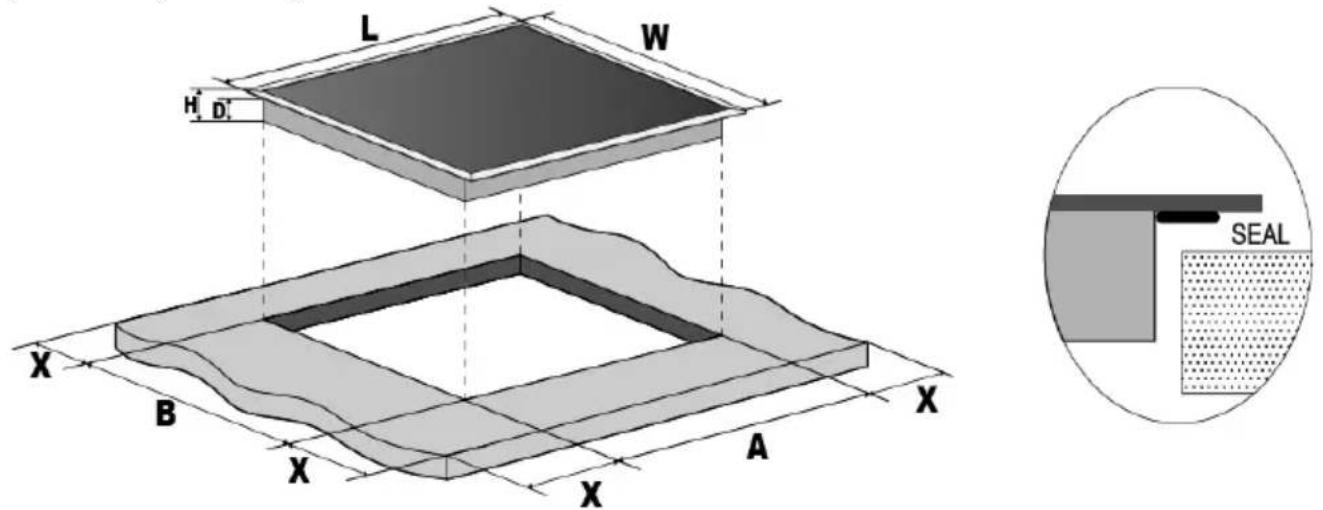
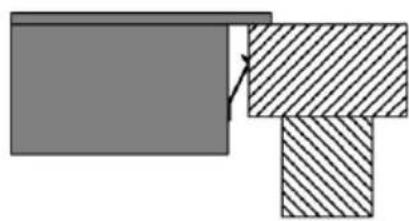
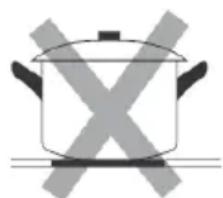
Under any circumstances, make sure the electric hob is well ventilated and the air inlet and outlet are not blocked. Ensure the electric hob is in good work state. As shown below:

Note: The safety distance between the hotplate and the cupboard above the hotplate should be at least 760mm.
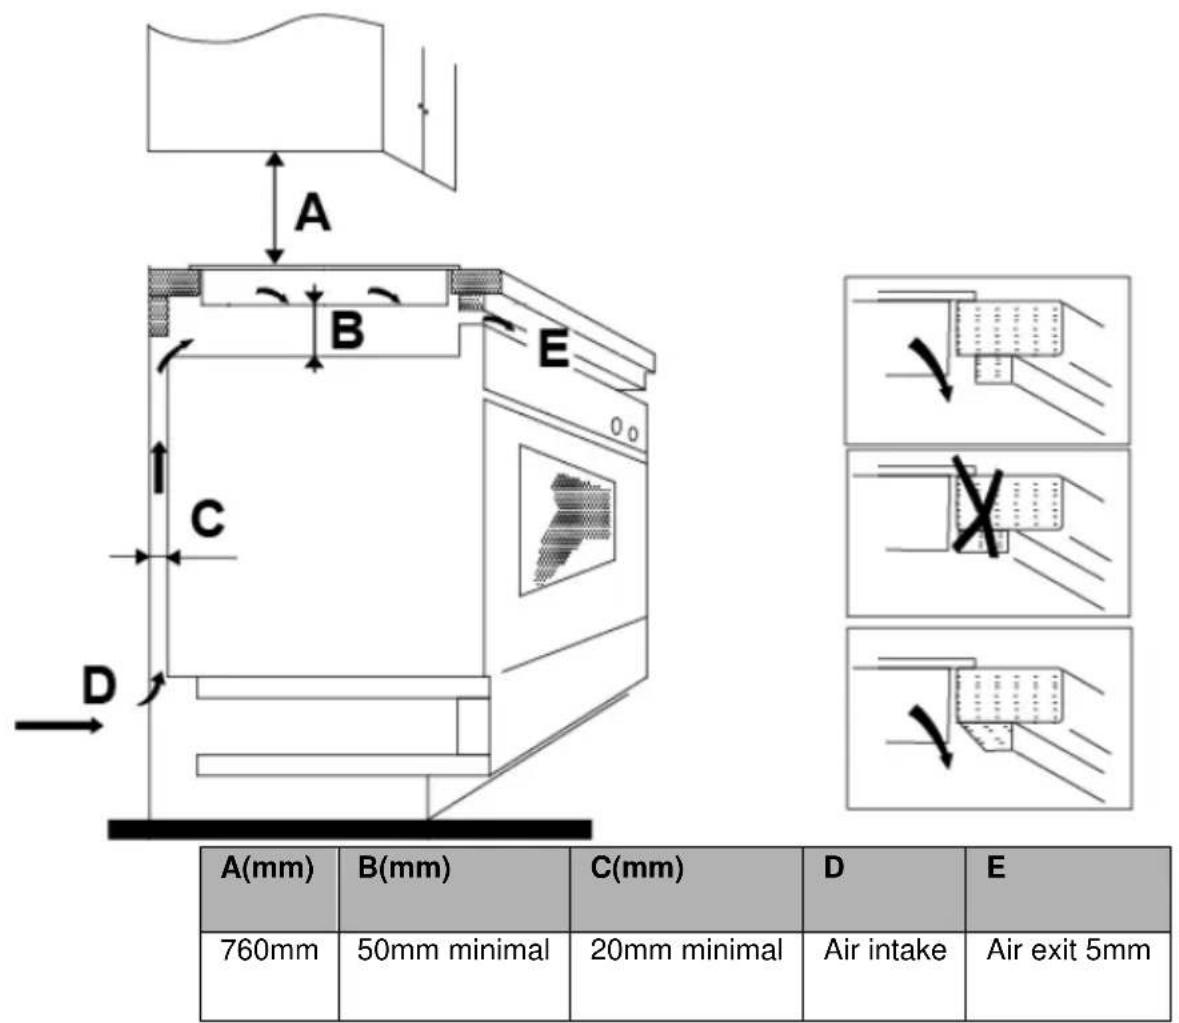
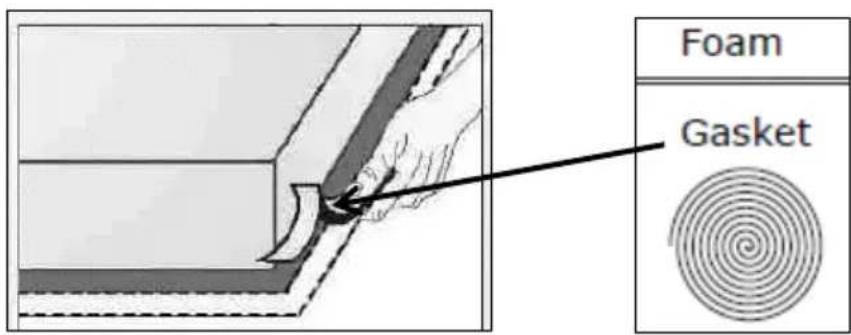
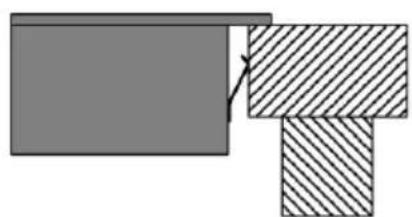
Installing the foam gasket
Before inserting the hob into the opening in the kitchen worktop, the supplied foam gasket (in a plastic bag) must be attached to the lower side of the ceramic glass.
Do not install the hob without the foam gasket!
The gasket should be attached to the hob in the following method:
- Remove the protective film from the gasket.
- Then attach the gasket to the lower side of the glass, next to the edge.
- The gasket must be attached along the entire length of the glass edge and should not overlap at the corners.
- When installing the gasket, make sure that the glass does not come into contact with any sharp objects.

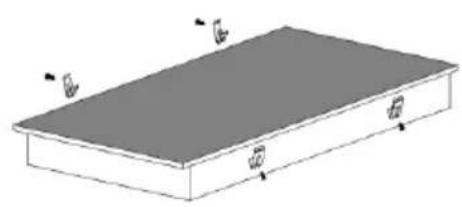
Before locating the fixing brackets
The unit should be placed on a stable, smooth surface (use the packaging). Do not apply force onto the controls protruding from the hob.
Easy Fit kits
There is one easy fit kits package for each hob, include fixing clips and screws (for V302T, V603S, V604S total 2pcs clip and 2pcs screw, for I302T, I603S total 4pcs clip and 4pcs screw). Find the easy fit kit package first.
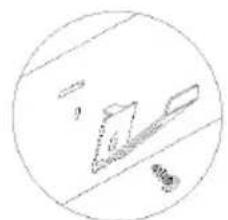
Fix clips to hob: Insert the fixing clips into fixing holes reserved on 2 sides of housing, fix clip to housing with screw, then insert hob into cabinet/work surface.


Fix hob to cabinet: Insert the hob into the cabinet/work surface as below diagrams, the mounted clips on the sides can secure your hob sturdily.
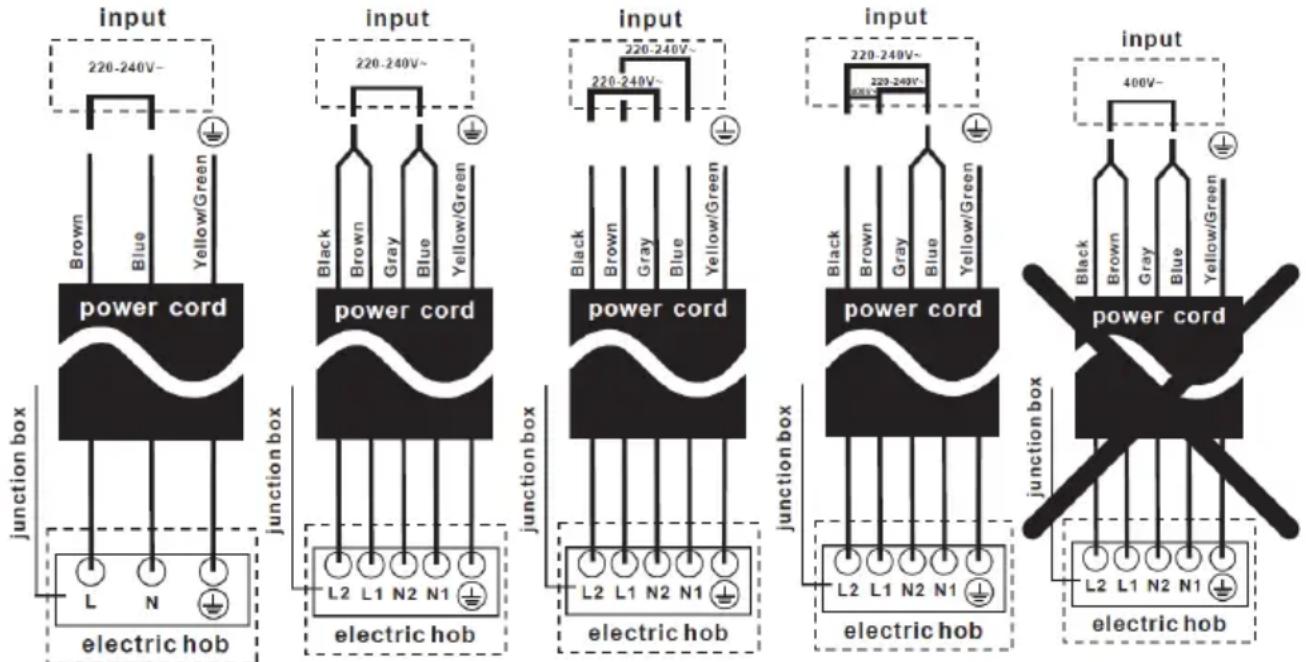
Connecting the hob to the mains power supply
The power supply should be connected in compliance with the relevant standard, or a single-pole circuit breaker. The appliance has a large power rating and must be connected to electricity by a Qualified Electrician.
Notes:
- If the cable is damaged or needs replacing, this should be done by an after-sales technician using the proper tools, so as to avoid any accidents.
- If the appliance is being connected directly to the mains supply, an omni polar circuit breaker must be installed with a minimum gap of 3mm between the contacts.
- The installer must ensure that the correct electrical connection has been made and that it complies with safety regulations.
- The cable must not be bent or compressed.
- The cable must be checked regularly and only replaced by qualified technician.
Cautions
-
The hob must be installed by qualified personnel or technicians. Please never conduct the operation by yourself.
-
The electric hob shall not be mounted to cooling equipment, dishwashers and rotary dryers.
- The electric hob shall be installed such that better heat radiation can be ensured to enhance its reliability.
- The wall and induced heating zone above the work surface shall withstand heat.
- To avoid any damage, the sandwich layer and adhesive must be heat resistant.
- A steam cleaner is not to be used.
- This electric hob can be connected only to a supply with system impedance no more than 0.427 ohm. In case necessary, please consult your supply authority for system impedance information.
Note: For some of the models, there might apply with a power cord with plug. If so, you can directly plug in socket. Please keep power cord plug out after use, for those model power cord with plug.
The method of connections shown below.
2. Operation Instructions
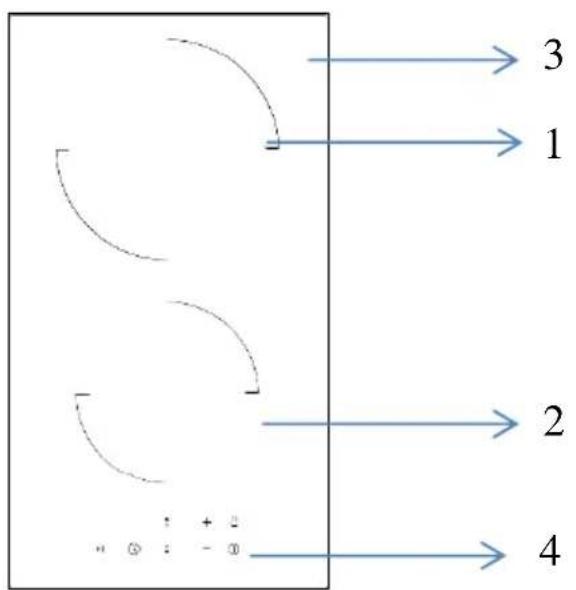
Product Overview
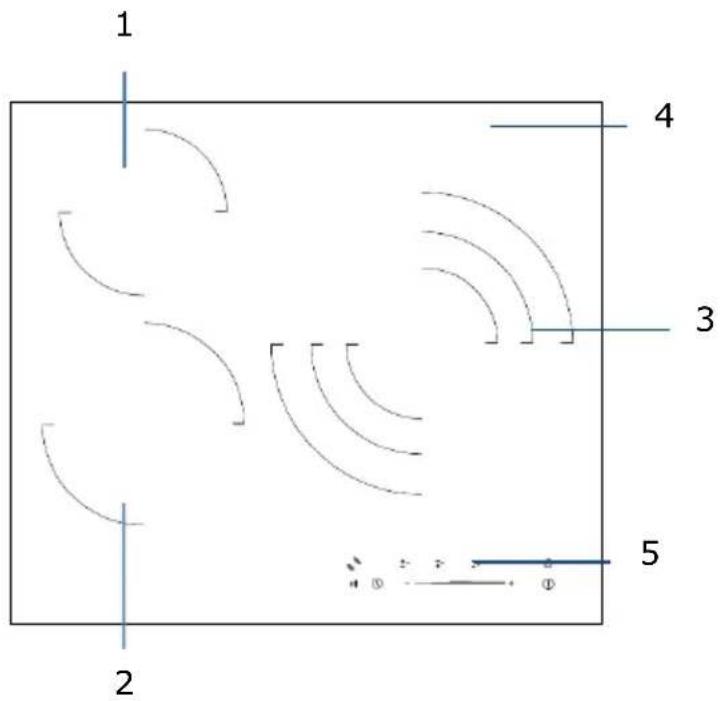
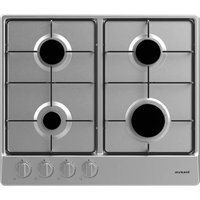
Model: V302T
- 1800W Cooking Zone
- 1200W Cooking Zone
- Glass plate
- Control panel
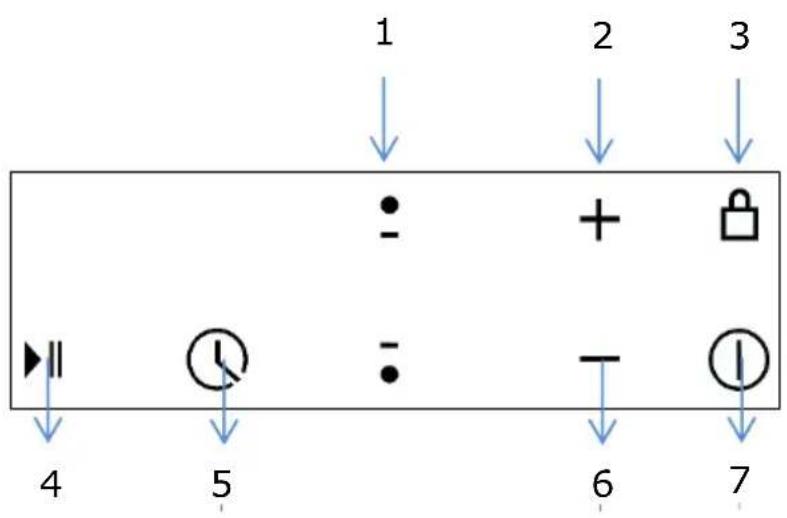
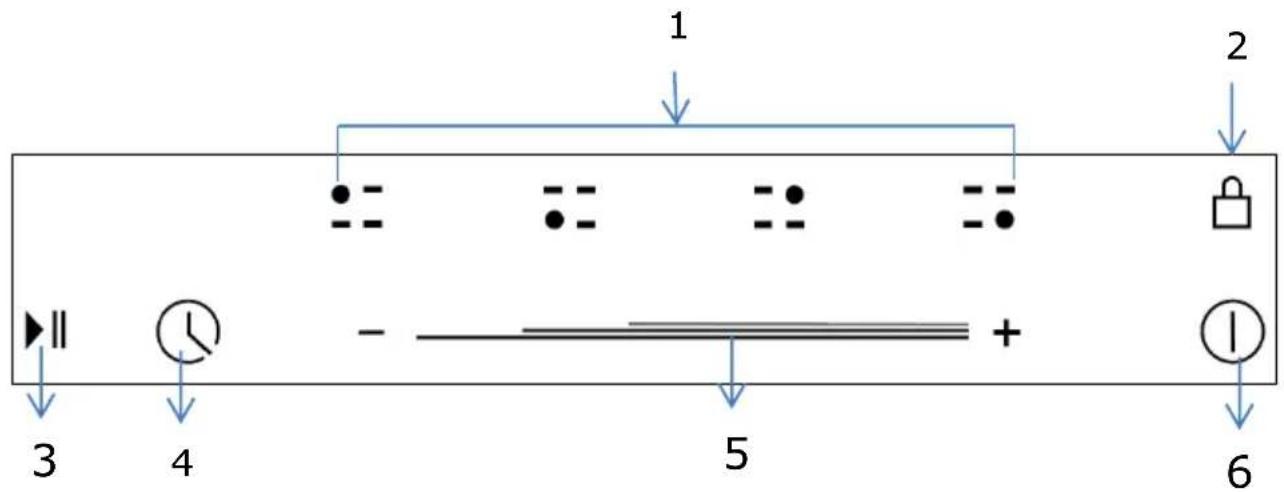
Control Panel
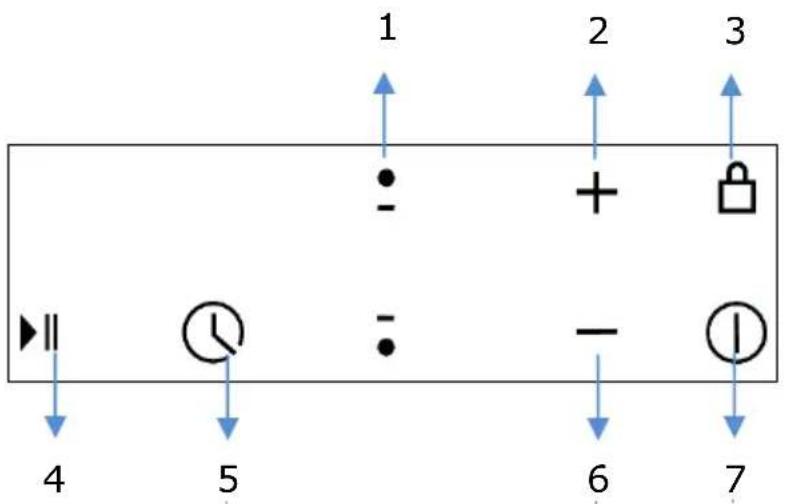
- Cooking Zone selection button
- Heating level/Timer "+" button
- Child Lock control button
- Stop & Go control button
- Timer control button
- Heating level/Timer “-” button
- ON/OFF button
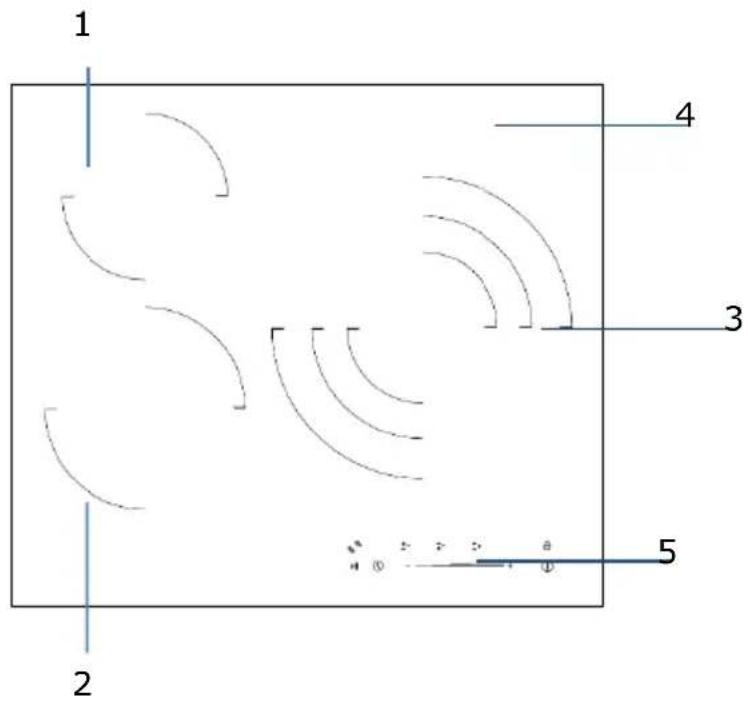
- 1200W Cooking Zone
- 1800W Cooking Zone
- 2700W/1700W/850 Triple Cooking Zone
- Glass plate
- Control panel
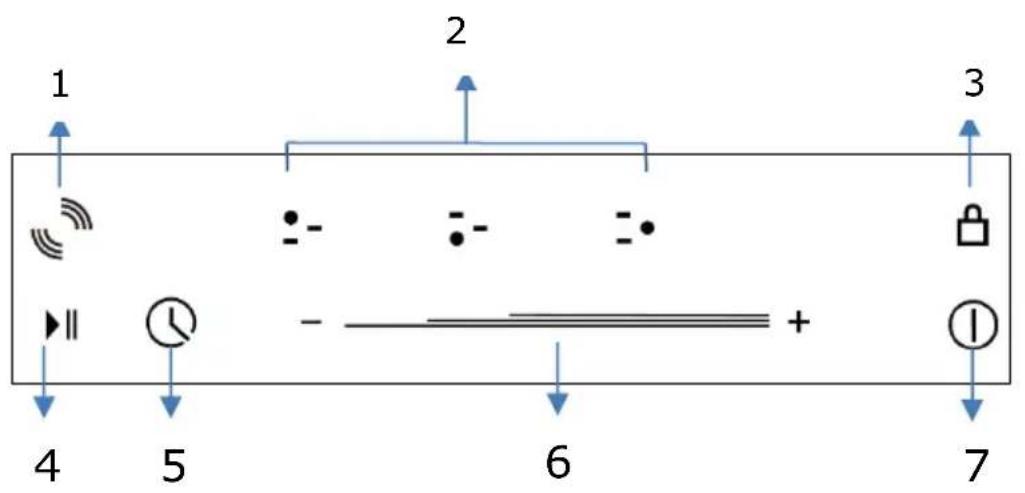
Control Panel
- Extended zone control button
- Cooking Zone selection button
- Child Lock control button
- Stop & Go control button
- Timer control button
- Heating level/Timer slider control
- ON/OFF button
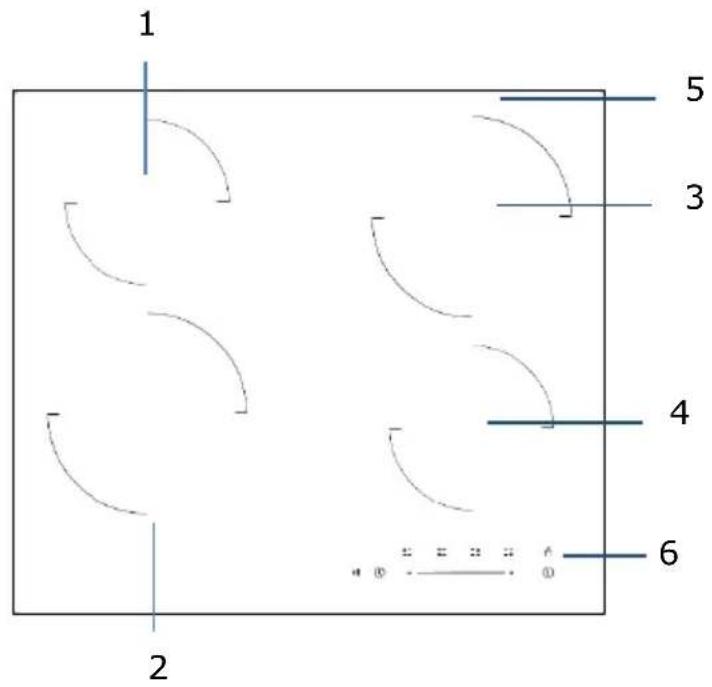
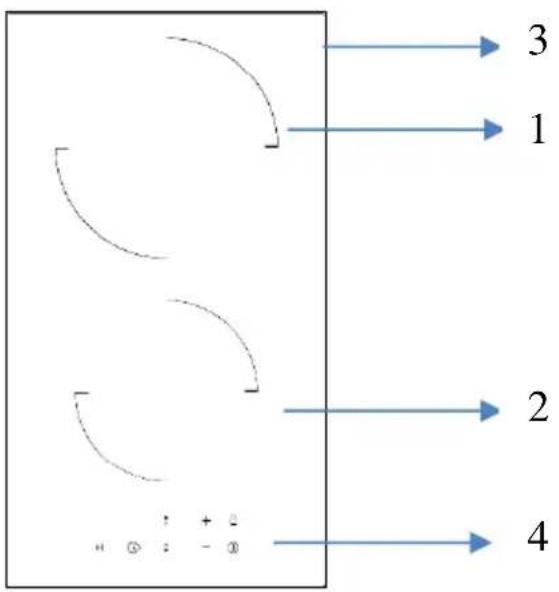
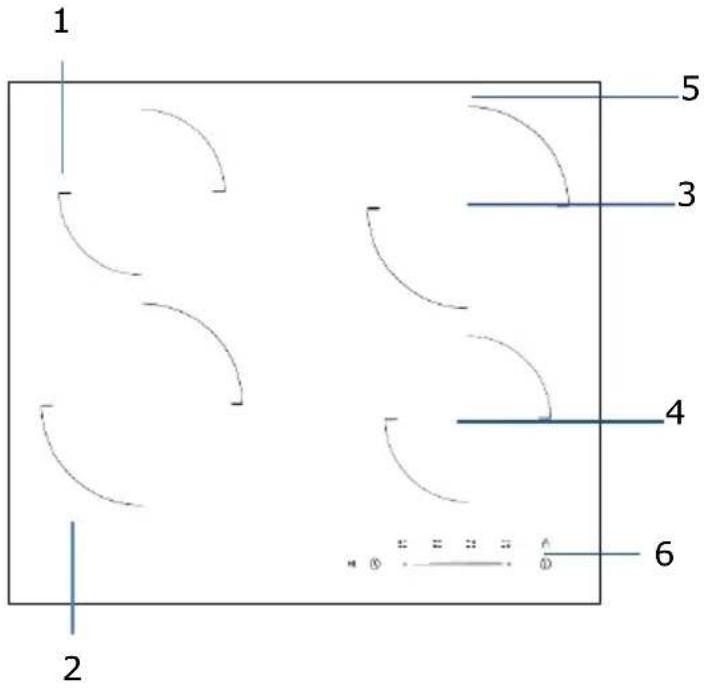
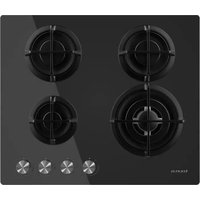
- 1200W Cooking Zone
- 1800W Cooking Zone
- 1800W Cooking Zone
- 1200W Cooking Zone
- Glass plate
- Control panel
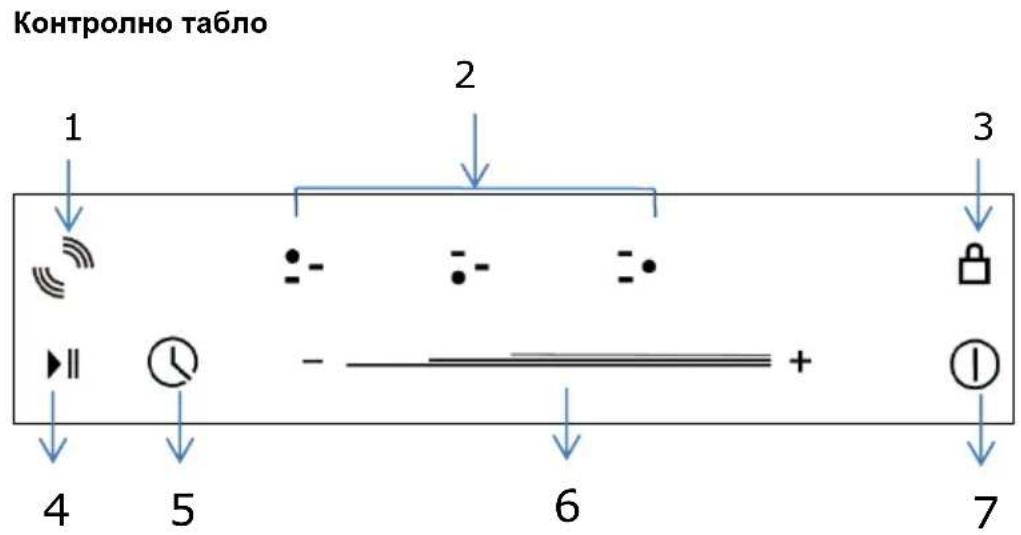
Control Panel

- Cooking Zone selection button
- Child Lock control button
- Stop & Go control button
- Timer control button
- Heating level/Timer slider control
- ON/OFF button
Model: I302T
- 2000W Boost 2600W Cooking Zone
- 1500W Boost 2000W Cooking Zone
- Glass plate
- Control panel
Control Panel

- Cooking Zone selection button
- Heating level/Timer "+" button
- Child Lock control button
- Booster function control button
- Stop & Go control button
- Timer control button
- Heating level/Timer “-” button
- ON/OFF button
1.1500W Boost 2000W Cooking Zone
2. 2000W Boost 2600W Cooking Zone
3. 2300W Boost 3000W Cooking Zone
4. Glass plate
5. Control panel
Control Panel
- Cooking Zone selection button
- Booster function control button
- Stop & Go control button
- Timer control button
- Heating level/Timer slider control
- Child Lock control button
- ON/OFF button
Notes: Product diagrams in the manual for reference only, there might be slightly difference due to continually product improvements.
Before using your New Hob
- Read this guide, taking special note of the safety manual.
- Remove any protective film that may still be on your new electric hob.
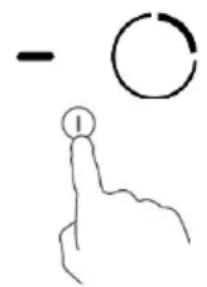
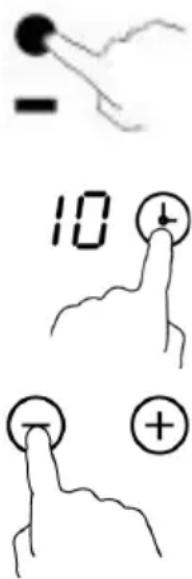
Using the Touch Controls
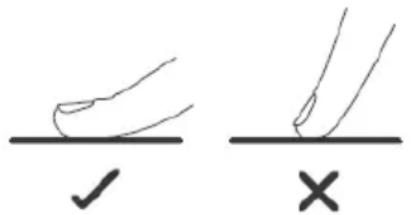
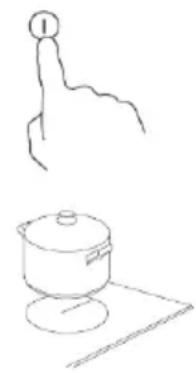
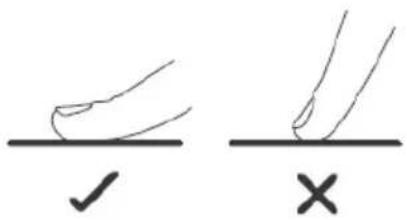
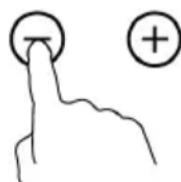
- The controls respond to touch, so you don't need to apply any pressure.
- Use the ball of your finger, not its tip.
- You will hear a beep each time a touch is registered.
- Make sure the controls are always clean, dry, and that there is no object (e.g. a utensil or a cloth) covering them. Even a thin film of water may make the controls difficult to operate.
Choose the right Cookware

- Only use cookware with a base suitable for induction cooking. Look for the induction symbol on the packaging or on the bottom
of the pan.
-
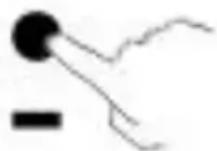
You can check whether your cookware is suitable by carrying out a magnet test. Move a magnet towards the base of the pan. If it is attracted, the pan is suitable for induction hob.
If you do not have a magnet: -
Put some water in the pan you want to check.
- If does not flash in the display and water is heating, the pan is suitable.
- Cookware made from the following materials is not suitable for an induction hob: pure stainless steel, aluminium or copper without a magnetic base, glass, wood, porcelain, ceramic, and earthenware.
- Induction hob are made from smooth, ceramic glass, the heat comes from a magnetic induction coil which heats the cookware but not the cooking surface. The heat from the cookware is transferred to the food.
- It's important that you use only metal pans specifically designed and/or approved for use on induction hobs. Never allow melamine or plastic containers to come in contact with the heat zones.
- A pan which diameter less than 140 mm may not be detected by the induction hob.
Do not use cookware with jagged edges or a curved base.


Make sure that the base of your pan is smooth, sits flat against the glass, and is the same size as the cooking zone. If you use smaller pot efficiency could be less than expected. Always centre your pan on the cooking zone.
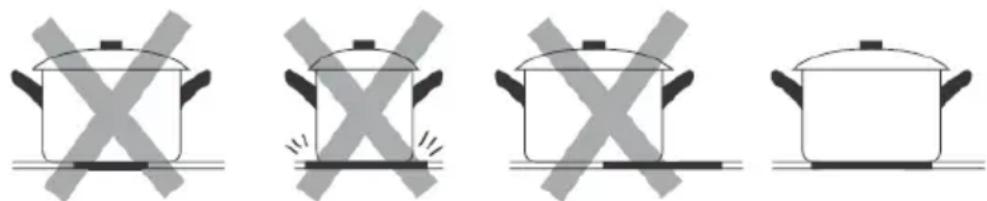
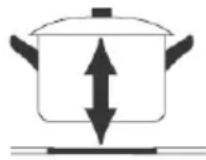
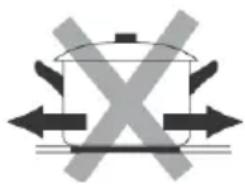
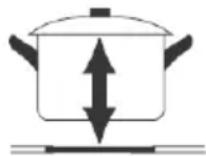
Always lift pans off the hob - do not slide, or they may scratch the glass.

Notes: You can use any kind of pot or pan for Ceramic Hob.
Suggested Pan dimensions for induction hob
The cooking zones are, up to a limit, automatically adapted to the diameter of the pan. However, the bottom of this pan is suggested to have a minimum of diameter according to the corresponding cooking zone. To obtain the best efficiency of your hob, please place the pan in the centre of the cooking zone.
Base diameter of the pots:
| Cooking zone | Minimum (mm) | Maximum (mm) |
| 160mm | 140 | 160 |
| 180mm | 140 | 180 |
| 210mm | 160 | 210 |
| 280mm | 230 | 280 |
Using your Hob
To start cooking
- After the hob be connected to electricity and power on.
Press and hold the ON/OFF control button for about 3 seconds till you hear a "beep" to turn the hob on. Now the hob enters into Standby mode, all heat setting indicators and Timer setting indicators show "-
-
Place a suitable pan on the cooking zone you wish to use.
-
Make sure the bottom of the pan and the surface of the cooking zone are clean and dry.
-
Set heating level of cooking zone
1) For V302T, V603S, V604S, I302T, I603S, before adjust heating level, need to touching the heating zone selection control button to select and active the cooking zone you wish to use.
The heat setting indicator of the selected zone flashing when be active, then you could adjust its heat level by below:
-Touch control models: V302T, I302T
- Set heat setting by touching the

or

button.
- If press and hold either of the two buttons, the value will adjust down or up rapidly, from 0 to 9 in circle.
-Slider Touch control models: V603S, V604S, I603S
- adjust heat setting by sliding the slider control.


Notes:
- After connect to electricity, when power on, the buzzer of hob beeps once, all indicators light up for 1 second then go out.
- When the hob in Standby mode, if there is no practice within 1 minute, the electric hob will auto turn off, with buzzer beeps once.
- To turn on hob, press the ON/OFF control button and hold on for about 3 seconds; To turn it off, just need to press ON/OFF button again.
- The power level can be adjusted from 0 to 9, default setting is level 5.
- The heat setting indicator of the selected zone flashing when adjusting. After adjusting, the number flashing for 5 seconds then stop flashing, then the setting is be confirmed.
To turn off hob
- You can turn the cooking zone off by adjust heat setting to level 0, which indicator shows “-”.
- You can also turn the whole hob off by touching the ON/OFF control button.

Note: If there is power cut off during cooking, all setting will be cancelled.
Note: The cooling fan of induction hob will remain on for about 1 minute after the hob be turned off.
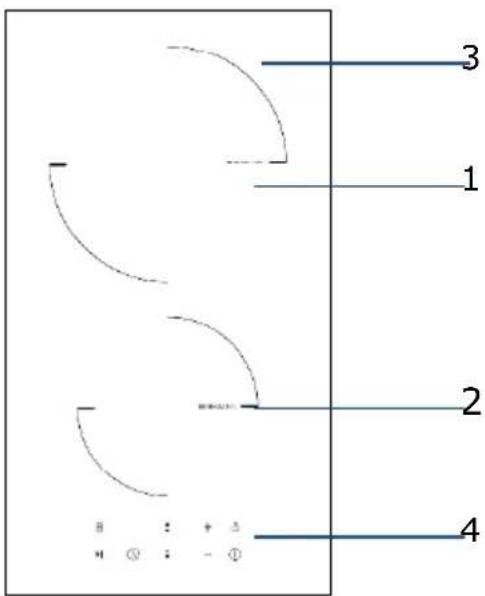
Using Large Heating Area-Ceramic Hob
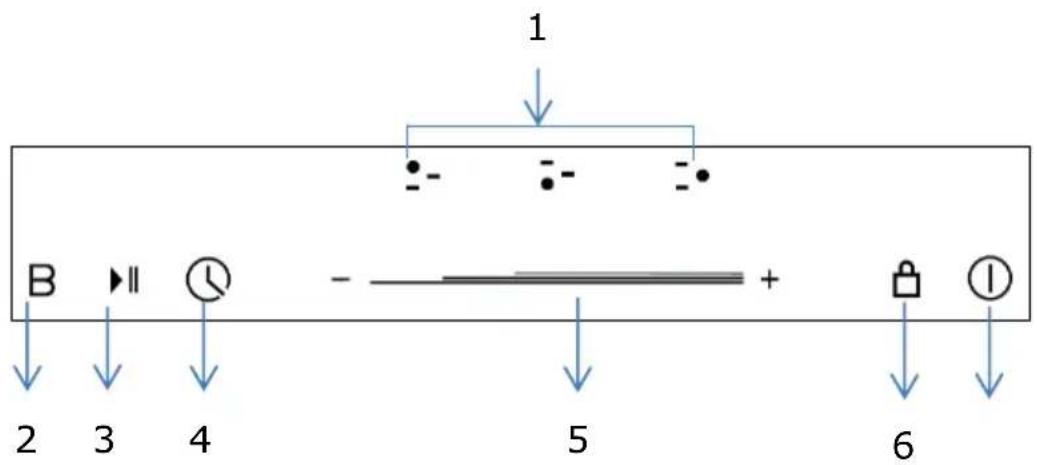
Some of ceramic hob models might have one or several extended cooking zones (Oval/Dual/Triple zone), these extended zones can provide larger cooking area and additional heat to fit for different size of cooking pan.
To use Extended zone when hob is working, follows below:
- Select and active the cooking zone which you would like to use extended zones, for those cooking zone with this feature. 1) For V603S;
Touch the heating zone selection control button to select and active it for adjustment.
- The central zone will be switched on, when first adjust of heat level for extended cooking zone.
- When the heating zone be selected and active (power level indicator flashing), touch extended zone control button to active extended heating element to get a large heating area.

Notes:
- By continuous touch the control button, the extended zones work at below consequence:
-Triple zone: "Central-Dual-Triple-Central-Dual-Triple-Central zone...
- When Triple Zone active, the LED indicator of it will show power setting and "B" alternately.
Using Booster Function-Induction Hob
Some of induction hob models might have one or several cooking zones which has Booster function. You can use the "Booster" function to boost power of relevant cooking zone for a maximum power rating for 5 minutes. This function could reduce the cooking time, which convenience for cooking when in hurry!
To use booster function when hob is working, follows below:
- Active the cooking zone you want to use booster function.
1) For I302T, I603S:
Touch the heating zone selection control button to select the cooking zone you want to use boost function.
- Touch the Booster function control button B the heating zone indicator will show "b" and flashing for 5 seconds then stop flashing, then Booster function be activated.

Note:
- When using booster function, if the other cooking zone in vertical direction also working meanwhile power setting higher than level 2, programmer will auto turn power setting of the other zone to level 2.
- After booster finish, the cooking zone will return to original setting.
Cancel the Booster function
- Follow above practice of active Booster function one more time when Booster is working, could cancel the Booster function.
-You can also cancel Booster function by adjust power level setting.
Child Lock Safety Control
- You can lock the controls to prevent unintended use (for example children accidentally turning the cooking zones on) by active Child Lock function.
- When the controls are locked, except the ON/OFF control button and Child Lock control button, all other touch control buttons are disabled.
To lock the controls
Touch the Child Lock control button once. The timer indicator will show "Lo", and Child Lock function be active.
To unlock the controls
- Make sure the electric hob is turned on.
- Touch and hold the Child Lock control button for 3 seconds, the buzzer beeps once and "Lo" disappears in timer indicator, the Child Lock be inactive.
- You can now start using your electric hob.

Under the child lock mode, all controls button be disable except the ON/OFF button and child lock button.
You can always turn the hob off with the ON/OFF control in an emergency, but you shall unlock the hob first in the next operation
Note: Under Child Lock function, if turn the hob off without inactive the Child Lock function. When turn on the hob later, the Child Lock function will still valid.
Stop & Go function
- Make cooking easy! When cooking, your doorbell rings, phone rings, or kid shouts from another door. Need to step out of kitchen? These means dinner could burn, or take longer time to ready if you switch everything off.
- The Stop & Go function can turn off all zones. When you back, with one more touching of the button, hob restarts where they were, to carry on cooking.
1. Active Stop & Go function
To active Stop & Go function, you can press the Stop & Go function button once. Then all programmer setting be hold on and hob stop heating, all heat setting indicators show "P".
2. Inactive Stop & Go function
To cancel Stop & Go function, you can press the Stop & Go function again, after come back. Then all programmer setting will return to what they were, Stop & Go indicator "P" disappear from all indicators.

When Stop & Go function active, all control buttons are disable except the ON/OFF and Stop & Go button.
Note: The hob will auto turn off, if Stop & Go function last more than 10 minutes.
Using the Timer
When the hob is turned on, you can use the timer in two different ways:
- You can use it as a minute minder. In this case, the timer will not turn any cooking zone off when the set time is up.
- You can set it to turn either or more than one cooking zones off.
- You can set the minute minder/timer for up to 99 minutes.
Timer overview

Using the Timer as a Minute Minder If you have not selected any cooking zones
-
Touch the timer control button, the number in timer indicator flashing.
-
Then adjust Minute Minder setting follows below: 1) Touch control models: V302T, I302T
-
Set heat setting by touching the or button.
-
If press and hold either of the two buttons, the value will adjust down or up rapidly in circle.
Note: When the timer indicator flashing, touch timer control button another time, can quick confirm the timer setting.
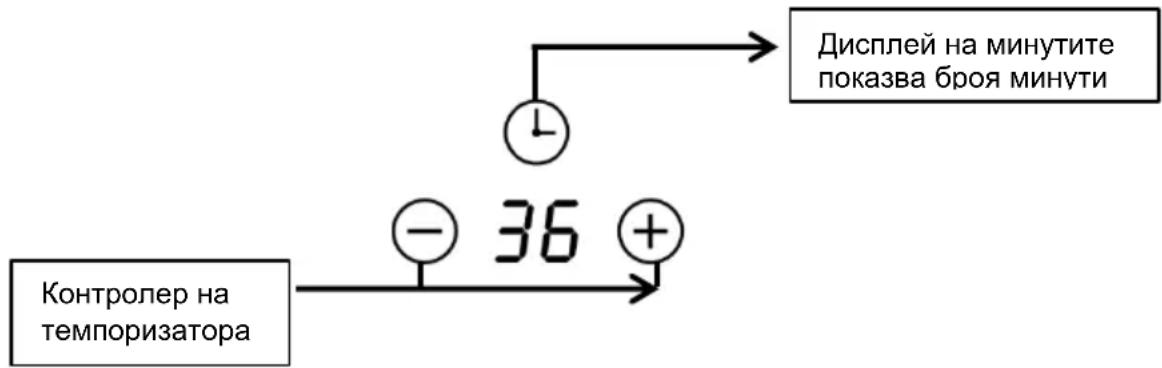
2) Slider Touch control models: V603S, V604S, I603S:
-
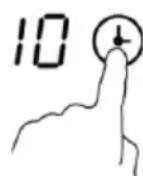
Touch the timer control button once, the number of single digit in timer indicator flashing, then adjust single digit of minute minder setting by sliding the slider control.
-
Press the timer control button again, the number of tens digit in timer indicator flashing, then adjust tens digit of minute minder setting by sliding the slider control.

#
Note: By continuous touch the timer control button, the slider works at below consequence: "Single Digit-Tens Digit -Confirm Setting-Single Digit-...
- When the minute minder is set, it will begin to count down immediately, the display will show the remaining time.
- Buzzer will beep for 30 seconds and timer indicator shows "--" when the setting time finished. Any efficient touching of control buttons during it, would end up the buzzer beeps.
Setting the timer to turn cooking zone off
- Touch the heating zone selection control button to select the cooking zone you wish to set timer for.
- Touch the timer control button, the number in timer indicator flashing.
-
Then adjust Timer setting 1) Touch control models: V302T, I302T
-
Set heat setting by touching the or button.
-
If press and hold either of the two buttons, the value will adjust down or up rapidly in circle.
Note: When the timer indicator flashing, touch timer control button another time, can quick confirm the timer setting.


2) Slider Touch control models: V603S, V604S, I603S:
- Touch the timer control button once, the number of single digit in timer indicator flashing, then adjust single digit of minute minder setting by sliding the slider control.
- Press the timer control button again, the number of tens digit in timer indicator flashing, then adjust tens digit of minute minder setting by sliding the slider control.

Note: By continuous touch the timer control button, the slider works at below consequence: "Single Digit-Tens Digit-Confirm Setting -Single Digit...
- When the timer is set, it will begin to count down immediately, the display will show the remaining time.
NOTE: The red dot next to power level indicator will illuminate for those zones be set with timer. You can check timer setting of different cooking zone which set with timer, by active this cooking zone.
NOTE: If more than one heating zone has timer setting, the timer indicator will show the lowest time. The red dot next to power level indicator will flash.
- When cooking timer expires, the corresponding cooking zone will be switch off automatically.
Note: The default setting of minute reminder and timer is 30 minutes.
Note: After adjusting, the setting in timer indicator will flashing for 5 seconds and then stop flashing, then the setting be confirmed.
Note: The minute reminder and timer can be used at the same time, timer indicator shows the lowest time setting. If the lowest setting is minute reminder, the red dot next to timer indicator will flash. If the lowest setting is timer setting, the red dot of corresponding cooking zone power level indicator will flash.
Note: If indicator shows timer setting of cooking zone. To check minute reminder setting, press the timer control button, the indicator will show minute reminder setting.
Detection of Pan and Small Articles
For induction hob, if display flashes" "alternately with heat setting.
- you have not placed a pan on the correct cooking zone or,
- the pan you're using is not suitable for induction cooking or,
- the pan is too small or not properly cantered on the cooking zone.


Notes:
- No heating takes place unless there is a suitable pan on the cooking zone.
- The display will auto turn off after 2 minutes if no suitable pan is placed on it.
- When an unsuitable size or non-magnetic pan (e.g. aluminium), or some other small item (e.g. knife, fork, key) has been left on the hob, the corresponding cooking zone will automatically turn off in 1 minute.
Residual Heat Warning
Beware of hot surfaces
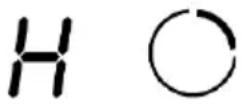
When the hob has been operating for some time, there will be some residual heat. The letter "H" appears in power setting indicator to warn you to keep away from it.
It can also be used as an energy saving function:
if you want to heat further pans, use the hotplate that is still hot.
Auto Shutdown
Another safety feature of the hob is auto shutdown. This occurs whenever you forget to switch off a cooking zone. The default shutdown times as below table:
| Power level | 1 | 2 | 3 | 4 | 5 | 6 | 7 | 8 | 9 |
| Default working timer (hour) | 8 | 8 | 8 | 4 | 4 | 4 | 2 | 2 | 2 |
Over-heat Protection
A temperature sensor equipped can monitor the temperature inside the hob. When an excessive temperature is monitored, the hob will auto stop operation.
Over-flow Protection
For your safety, the programmer will auto shut off the power if liquid boiling or wet cloth over touch control panel. All control buttons became invalid except ON/OFF and Child Lock button, unless you wipe the touch control area dry.
Cooking Guidelines
Take care when frying as the oil and fat heat up quickly, particularly if you are using Booster function. At extremely high temperature oil and fat will ignite spontaneously and this presents a risk of fire.
Cooking Tips
- When food comes to the boil, reduce the power setting.
- Using a lid will reduce cooking times and save energy by retaining the heat.
- Minimize the amount of liquid or fat to reduce cooking times.
- Start cooking on a high setting and reduce the setting when the food has heated through.
Simmering, cooking rice
- Simmering occurs below boiling point, at around 85^ , when bubbles are just rising occasionally to the surface of the cooking liquid. It is the key to delicious soups and tender stews because flavours
develop without overcooking the food. You should also cook egg-based and flour thickened sauces below boiling point.
- Some tasks, including cooking rice by the absorption method, may require a setting higher than the lowest setting to ensure the food is cooked properly in the time recommended.
Searing steak
To cook juicy flavoursome steaks:
- Stand the meat at room temperature for about 20 minutes before cooking.
- Heat up a heavy-based frying pan.
- Brush both sides of the steak with oil. Drizzle a small amount of oil into the hot pan and then lower the meat onto the hot pan.
- Turn the steak only once during cooking. The exact cooking time will depend on the thickness of the steak and how cooked you want it. Times may vary from about 2 - 8 minutes per side. Press the steak to gauge how cooked it is - the firmer it feels the more 'well done' it will be.
- Leave the steak to rest on a warm plate for a few minutes to allow it to relax and become tender before serving.
For stir-frying
- Choose a ceramic compatible flat-based wok or a large frying pan.
- Have all the ingredients and equipment ready. Stir-frying should be quick. If cooking large quantities, cook the food in several smaller batches.
- Preheat the pan briefly and add two tablespoons of oil.
- Cook any meat first, put it aside and keep warm.
- Stir-fry the vegetables. When they are hot but still crisp, turn the cooking zone to a lower setting, return the meat to the pan and add your sauce.
- Stir the ingredients gently to make sure they are heated through.
- Serve immediately.
Heat Settings
The settings below are guidelines only. The exact setting will depend on factors including your cookware and the amount you are cooking. Experiment with the hob to find the settings that best suit you.
| Heat setting | Suitability |
| 1 - 2 | ·delicate warming for small amounts of food ·melting chocolate, butter, and foods that burn quickly ·gentle simmering ·slow warming |
| 3 - 4 | ·reheating ·rapid simmering ·cooking rice |
| 5 - 6 | ·pancakes |
| 7 - 8 | • sautéing • cooking pasta |
| 9 | • stir-frying • searing • bringing soup to the boil • boiling water |
3. Cleaning and Maintenance
Cleaning and Maintenance
Important: Before any maintenance or cleaning work is carried out, DISCONNECT the appliance from ELECTRICITY supply and ensure the appliances is completely cool.
Cleaning the Hob Surface
Clean spillages from the hob surface as soon as possible after use. Always ensure the surface is cool enough before cleaning.
Use a soft cloth or kitchen paper to clean the surface. If the spillage has dried on the surface, you may need to use a specialist vitro-ceramic glass cleaner, which is available for most of supermarkets.
Do not use other abrasive cleaners and/or wire wool etc., as it may scratch the ceramic glass surface of your hob.
Hints and Tips
| What? | How? | Important! |
| Everyday soiling on glass (fingerprints, marks, stains left by food or non-sugary spill overs on the glass) | 1. Switch off the power supply. 2. Apply a vitro-ceramic glass cleaner while the glass is still warm (but not hot)! 3. Rinse and wipe dry with a clean cloth or paper towel. 4. Switch on the power supply to the hob. | ·When turn off the power supply of hob, there will be no ‘hot surface’ indication but the cooking zone may still be hot! Take extreme care. ·Heavy-duty scourers, some nylon scourers and harsh/abrasive cleaning agents may scratch the glass. Always read the label to check if your cleaner or scourer is suitable. ·Never leave cleaning residue on the hob glass surface: the glass may become stained. |
| Boil over, melts, and hot sugary spills on the glass | Remove these immediately with a fish slice, palette knife or razor blade scraper suitable for ceramic glass of hob, but beware of hot cooking zone surfaces: 1. Switch off the power supply. 2. Hold the blade or utensil at a \( {30}^{ \circ } \) angle and scrape the soiling or spill to a cool area of the hob. 3. Clean the soiling or spill up with a dish cloth or paper towel. 4. Follow steps 2 to 4 for 'Everyday soiling on glass' above. | - Remove stains left by melts and sugary food or spill overs as soon as possible. If left to cool on the glass, they may be difficult to remove or even permanently damage the glass surface. - Cut hazard: when the safety cover is retracted, the blade in a scraper is razor- sharp. Use with extreme care and always store safely and out of reach of children. |
| Spill overs on the touch controls | 1. Switch off the power supply. 2. Soak up the spill 3. Wipe the touch control area with a clean damp sponge or cloth. 4. Wipe the area completely dry with a paper towel. 5. Switch on the power supply to the hob. | - The hob may beep and turn itself off, and the touch controls may not function while there is liquid on them. Make sure you wipe the touch control area dry before turning the hob back on. |
Maintenance of the Hob
If you find something goes wrong for your hob, before contact the service or where you purchased it, please check whether below:
- There is no power to the appliance:
- Check whether there is a power cut of your department;
- Check whether the appliance be connected to electricity properly;
- Has the timer setting elapsed;
- Whether it reaches the longest cooking time setting and auto shut off;
-
Whether there is liquid boiling over touch control panel and overflow protection devices auto shut off;
-
The touch control panel buttons can't be active:
-
Whether it's under "Child Lock", which there is "Lo" shows in timer displayer;
-
Whether liquid/wet cloth over touch control panel active overflow protection;
-
After cooking there is "H" shows on display:
-
This is normal. The hob is with Residual Heat Warning safety features. It will remain on until the surface is cool enough for touch.
- After turn off, the fan of induction hob remains working for a while:
-This is normal, this is to help appliances completely cool down. - Some pans make crackling or clicking noises during use of induction hob:
-This is normal, it's the sound of induction coils during working, and for different construction of your cookware, the clicking might be slightly different. - The glass is being scratched:
-Check whether you use unsuitable cookware, like rough-edged cookware.
-Check whether unsuitable, abrasive scjourer or cleaning products being used.
Failure Inspection for induction hob
If an abnormality comes up, the induction hob will enter the protective state automatically and display corresponding protective codes:
| Problem | Possible causes | What to do |
| E1/E2 | Abnormal supply voltage | Please check whether power supply is normal, Power on after the power supply is normal. |
| E3 | High temperature of the pan sensor | Check whether no liquid in pan, fill with liquid then restart. |
| E5 | High temperature of the IGBT temperature sensor | Please restart after the induction hob cools down. |
For all other error codes, switch off and call your service provider.
Consells i suggeriments
H36op Ha ypei MoHTax
-Подржete pa60ThaTа NOBbpxHocCT cbIacHo pa3MepuTe, yka3aHn Ha n3O6paXeHneTo.
- 3a MOHTaK N yNoTpe6a CneIbA da ocTabnTe pa3cToHHe ot Hau-MaJko 5 cm Okono OTbopa.
- YBepTe ce, Ye De6eJIiHaTa Ha pa6oTHaTa NOBbpxHocT e Hau-MaIko 30 mm. 3a pa6oTHa NOBbpxHOCT n36peTe TaKaBa OT yCTOuYIB Ha TOnnHa MaTePnA1 C cen N36rBaHe DeΦopMaua, npEduN3BvKHa O TOnnHnHTo N3NbUbaHe OT ropeaTa Ploya. HabIoDaBaTe CJIeHNaT a Fmrgpa (eDHHuca Mprka: mm)
| Мodem | L | W | H | D | A | B | X |
| V302T | 288 | 520 | 52 | 48 | 265+5 -0 | 495+5 -0 | 50 min |
| I302T | 288 | 520 | 56 | 52 | 265+5 -0 | 495+5 -0 | 50 min |
| V603S V604S | 590 | 520 | 52 | 48 | 555+5 -0 | 495+5 -0 | 50 min |
| I603S | 590 | 520 | 56 | 52 | 555+5 -0 | 495+5 -0 | 50 min |
YBepTe ce, ye eNeKtpnueckata nnoa e do6pe BENTnnpaHa, a cBIO uYe BXoDbT u3XoDbT Ha Bb3dyx He ca 3anyuSeH. YBepTe ce, ye eNeKtpnueckata nnoa ce HAMnpa B do6po CbCTOraHne. Na6IoudaaiTe fngypata no-dony.

Белека: Бezонаноюпастая мени рлоча за ratовец ишkaфад п��а седва на сьдев на-малко 760 mm.
NoctabrHe Ha ynIbTHeHneTo OT nHa
Ipei Da Bkapate IIOUaTa B OTBopa Ha pa6OTHa TIOUc Ha KxHra, DOCTaBeHOTo yNtBTHHeOe OT IyHa CneBa Da Ce CBbPke B DOJHaT a Yact Ha BNTpOKepaMkata.
He mONTpaTe nloa 6e3 yIJIbTHeHneTo ot nHa!
YnIbTHHeHHeTo CneDbA da ce CbeEHH C nIoouTa CbflaCHO CneHaTApnoeDypa:
- OtctpaHHe 3aunTHoTO nOKpHTne ot ynnbTHHeHHeTo.
CneTOBa CbpxKeTe ynnbTHHeHnTo KbM dOnHaTa YacHT Ha cTbKJIoTO, HenocpeCTBeHo Do p6a. - YnIbTHHeHneTo cIeDba Da e nOCTaBeHo no CyaNaTa DbJxHa Ha CTbKJIeHnPa b6, 6e3 da ce NOIgBa Ha bIInTe.
- Ppi noctabraHe Ha ynnbTHHeHneTo ce yBepTe, Ye cTbKnOTo He BIn3a B DoNnP c OcTpni PpeMeTn.
Ipei Da yctAHOBITE MCTOTO Ha IbpxkaHTe 3a 3akpenBaHe.
YpeBcIeDbA Da ce noCTaBn Bbpxy rJaKa i cTa6uHa nobbpxHocT (n3noJ3BaIte am6anaja). He ynpaxHraBaiTe ycInne Bbpxy KOHTpOlePnte, nOdaBauNi ce ot nIoouata.
Ha6op 3a ynechBahe Ha noctabReHo
Има habори 3a постая на всяк плоча. Te вklюват скоь 3a за крpenвае и винтоBE (3a V302T, V603S, V604S; obio 2 скоьи 2 винта, 3a I302T, I603S obio 4 скоь 4 винта). Ha nbрв място OTКрипTe habора 3a лесно постаян.
3akpenete cko6nte kblm nloyata:BkapaTe 3akpenBaunte ckoBn OTbOpnte 3a 3akpenBahe, npedBndeHn 3a ceINa OT dBete CtpaHn Ha kyTna, 3akpenete cko6ata KbM KyTnra T CBnHT, Cnei KOETO BkapaTe nloyata B wkapha/pa60thata NOBbpxHOCT.

3akpenete nloyata KbM shka: BkapaIte nloyata B shka/pa6oTHaT NOBbpxHocT, cnopeKAKTO NOCOUBAT CJIeHNTE DnIarpam. MoHTnpaHInTe cko6n OT cTpaHInTe MORat Da Hanachat nIOyata.
Bknoyeme ypeda e enekmuueckama Mpeka.
YpeBcT CneBa Da 6bDe BKNIOueH KbM 3axpaHbaHeTO CbIaCHO CbOTBEHnA CTaHdApT, INN KbMeHNOpONCeH npeKbcBauch. YpeBcT npITexKaBa BnCOKa HOMHaJIHa MOUHOCT N eJekTpueckataBpb3ka CneBa Da 6bDe OcbIeCTBeHa OT KBaIINΦuIpaH eJekTpOTExHnK..
3a6eJexKn:
-
C ueI n36yBaHe Ha npOn3WeCTBnA, aKO Ka6eIbTe nOBpeH nnAko cneDba Da 6bDe IoDMHeH, TOBa CneDBA Da 6bDe N3BbPseHo OT TexHnuecko JInCe 3a CneInpOdaXBeHo 06cnyKBaHe.
-
B cnya, ye ypeBbT 6bIe BKJIIOueH HAnpaBO KbM eJIeKTpNcKaTa MpeXa MeJy KOHTaKTITc CneBa Da ce NoCTaBN BCenONJIpeH npeKbcBaU c OTbOp Ha-NMaIko ot 3 mm.
3.Инсталupaшия Тхнк седва да ce уberи, Ye eJektpnueckaTa Bpb3ka e npabunHо n3BbPseHa, KaKTo u Ye ca n3IbJIHeHn n3NcKBaHryTa 3a 6e3OanachocT.
-
Ka6eJbT cneBa da He 6bDe npereBHaT JIn npntuHaT.
-
Mon npoBepaTe peoBHO cbCTOHeTo Ha Ka6ena.AKO ce HanaTnOIMHa, TAp6Ba Da ce 3BbPmEINHCTBeHO OT KBAJIINΦuNpuHo TEXHuecko IuIe.
BHIMAHNE
- Инстадирано на плоча сддва за сдае edинстbeHo OT KBaJIHФИцраMuН Лиca ил тхнии. В НИКаКьВ сdчай Heя поставиTe cam.
- EneKtpnueckata nloa He 6nBa da ce noctabra Bbpxy XnaHnHypeN, CbdomnAHHMaunHn N BbpTaux Ce cyuHnHn.
- EneKtpnueckata nloca cneBb da ce MOHTnpa TaKa, Ye da ce noCTnHe No-do6po TOnNo13JIbUBaHe. ITo To3n HauHn Ce NOBnAba HeiHaTaeΦeKtNBHOCT.
- CTeHaTaNHdUcapaHaTa TOnnHHa 3OHa Bbpxy pa6oTHaTa 3OHa cJeDbA da ca TOnnOyctOnuBn.
- C ceJ n36yBaHe Ha uTeH, NOKpTHeTo TnI ,CaHDbNv" I JeHHeuTa NOBbpxHocT cJeDba Da e TOIIOyCTOuHbA.
- B HnkaKbB cIyuaH He n3NoI3BaIe npoctpuyn 3a nouchTbaHe.
7.Енектуveckaразлоча можеда се ВкючсамоВи3TOUHКсИМпeДСнССТeMaTа, Heнадхьрляш 0,427 оma.Bслчай на Heo6xOДMOCST,obpHete ce KbM KOMпeTeHTHITe oprани,здд поверпгу ИмпeДанca Ha CSCTeMaTа.
Белека: Няков OT морелte могат да вклочьт ka6ел 3a Мржага с уcentel.В с lyчай на Heo6хODIMOCТ морелу.da ro вклочte habpanbo.При морелteс мржов ka6elen c uencel CBшягт спедва дa ce ИЗКLOЧи спed уnotpe6a.
No-dony ca noka3aHn pa3JIuHHTe HaunHn Ha Cbbp3BaHe.
2. Hapьчнк с уka3aHHa
O6so onncaHne Ha n3denneto
MoeJ:V302T
1.30Ha 3a rotBeHe 1800W
2.30ha 3a rotBeHe 1200W
3. CtbkneH noDnoc
4. KoHTpOJIHo Ta6JIo
KoHTpOJHo Ta6JIo
- BytoH 3a n3bnpaHe Ha 3oHaT a rotBeHe.
- BytoH " ^+ 3a cnla Ha TOnnHaTa/Temnpn3aTOp
3.Блоровьенобетанстеленбунза Deca - ByToH „Stop & Go“
- KoHTpOJen 6yToH Ha TeMnOpn3aTopa
- BytoH "-" 3a cnna Ha TOnnHaTa/Temnopn3atOp
7.преквсвачВКЛ/N3KЛ
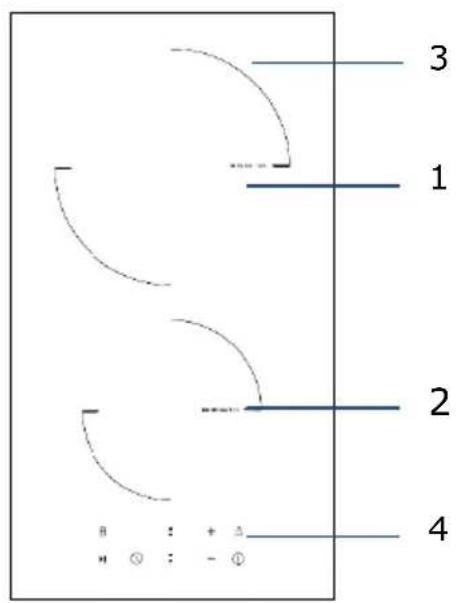
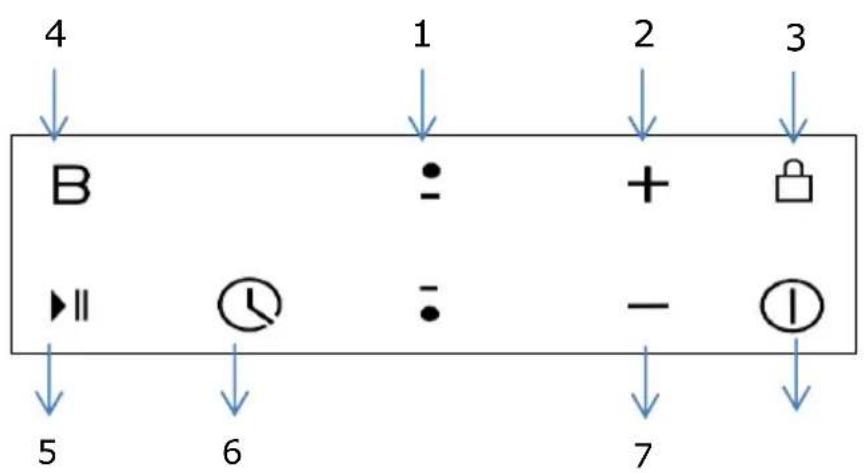
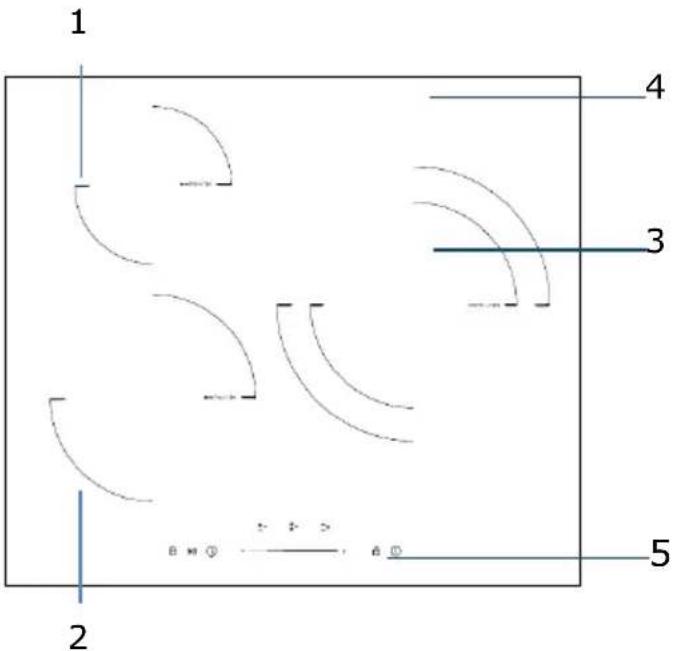
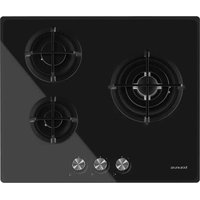
MoeJ:V603S
1.3oHa 3a roTBeHe 1200W
2.30ha 3a roTBeHe 1800W
3. 30ha 3a TpoHOrToTBeHe 2700W/1 700W/850W
4. CtbkneH noDnOc
5. KoHTpOJIHo Ta6JIo
- KoHTpOneP Ha HaIaScaTata Ce 30Ha
- Bytoh 3a n3bnpaHe Ha 3oHaTa 3a rotBeHe.
3.БлokировьенбутонзадтскабezонаCHOCT - ByToH ,Stop & Go"
5.Бутонза Контюн на Temnopиэtopа - Пьзрац ce контолор на силata на TOПИнота/TeMNotaTOp
- ByToH ,ON/OFF"
1.30ha 3a rotBeHe 1200W
2.30ha 3a rotBeHe 1800W
3. 3oHa 3a rotBeHe 1800W
4.30ha 3a roTbeHe 1200W
5. CtbkneH noHoc
6. KoHTpOJIHo Ta6JIo
KoHTpOJHo Ta6JIo
- BytoH 3a n36upaHe Ha 30HaT a roTBeHe.
2.Блokировьенбутон3aДeТСКа6e3ОнacHOCT - ByToH „Stop & Go“
- KoHTpoJIeH 6yToH Ha TemnOpn3aTopa
- Пьзрац ce контолор на сида на ToПинота/TeMnOриЗатOP
- ByToH ,ON/OFF"
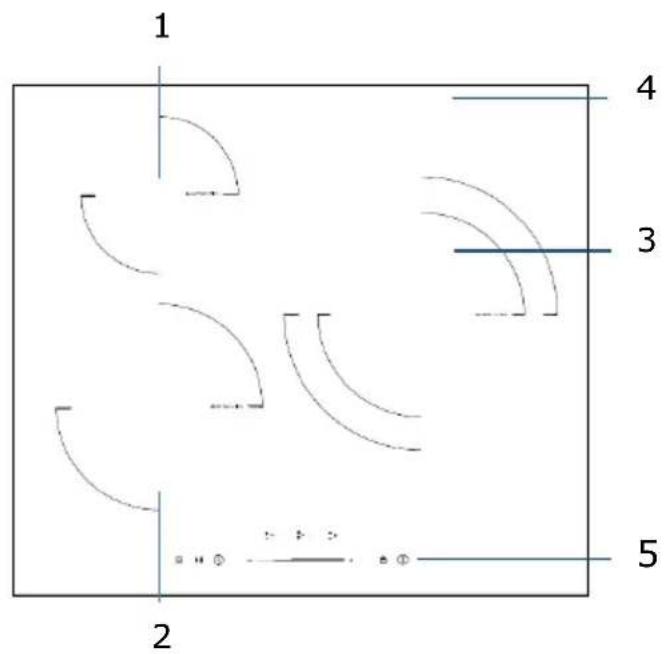
- Booster 2000W 30Ha 3a rotBeHe 2600W
- Booster 1500W 30Ha 3a roTBeHe 2 000W
- CtbkneH noHoc
- KoHTpOJIHo Ta6JIo
KoHTpOJHo Ta6JIo
- BytoH 3a n3bnpaHe Ha 3oHaTa 3a rotBeHe.
2.Бутон“+”3a сида на толпината/TeMnpn3atop
3.БлokировьенбуToH3aДeТСКа6e3ОпаСнOCT - KoHTpOJIeH 6yToH 3a ФунКцЯ „ycnJIbaHe".
- ByToH „Stop & Go"
- KoHTpOHeN 6yToH Ha TemnOpu3aTopa
7.Бутон“+”3a сида NaHaToJIHHaTa/TeMnOpn3aTOp - ByToH ,ON/OFF"
1.ПоДсильванe 1500W 30на 3a rotВенe 2000W
2.Подсильванe 2000W зона 3a roтvere 2600W
3.Подсильке 2300WЗназа roтBEHe 3000W
4. CtbkneH noDnOc
5. KoHTpOJIHo Ta6JIo
KoHTpOJHo Ta6JIo
- ByToH 3a n36upaHe Ha 3oHaTa 3a rotBeHe.
- BytoH 3aФyHKcIaN „NoCnIbAHe"(",Booster")
- ByToH „Stop & Go“
4.БутонзаКоHTponHaTeMnOpn3aTopa - Пльзraц ce контралета сида на.ToПИнота/TeMNotaTOp
6.БлоровьенобezonaacnteileнбуToH3a Deua
7.преквсвачзвкн/N3KЛ
3a6eJekn: Dnarpamnte Ha npOdyKTnte B hapbYHnka HmAT cMo OCBeDomTeJIHa cToHocT. Bb3MOxHH ca Jekn pa3IyHnnpaDn HEnpeKbCHaTOTO NOOp6pBaHe Ha n3DeJIyTa.
PpeiynoTpe6aHaHObata nloya.
-Прочete HabToIto pBkoBoIDCTBO, KaTO o6bPHeTe Oco6eHO BHMaHne Ha HapbYnka no 6e3onachOCT.
- OTeTaPaHeTcKaKaBb NOKpNbAaOΦoJnO No BaWaTa HOba eNeKtpuYecka nNoya.
Pa6ota c dOnnnpHnte KOHTpOlepi
- KoHTpOnepeTe ce ynpaBnBaT ue3 Donnp. No Ta3n npuHa He e Heo6xOdmo Da ynpaxHbATE HaTnCK Bbpxy CbInte.
- INON3BaIe Bb3rIaBnHcKaTa, a He BbPxA Ha npbcTa.
- PnB BcKaO DoKocBaHe ige CyyeTe Neko n3CBnPbaHe.
- YBepTe ce, Ye KOHTpOJIePnTe ca BnHaI NcCTn I cyXn, KaKTo N ye HЯMa NOKpIBaUg rN npEIMeTn (HaIrpImep DoMaKInHcKn CbD nII IN Kbpna). DOpN TbHbK cNoI BOda MoKe Da 3aTpPydHi pa6oTaTc KOHTpOJIePnTe
IopbpaTe npxOaun DomaknHcN cboBe 3a rotBeHe

-
I3noI3BaIte cIbOBe C IOxOJaIO 3a INHdYKcIraT aDbHo. IOTbpcTe CIMBOJa 3a INHdYKcIra N ONAKOBAkATA IIN Ha DbHOTo Ha cbda.
-
Mojete da npoBepuTe, daJn cBdoBeTe Bn ca noDxoJaun NocpeIcTBOM MaHHT.
IpokapaiTe MaHHT KbM OCHOBaTa Ha cbda.AKO cbuT Ce npBnua,cbdt e NOxOJa3a INyKUHOHaTa nnoua.
Bcnya,hepepa3nonaratecmarrHt:
- HajeIte MaJIko BOda B Cbda, KOJTo NCKaTe Da npOBepnte.
2.Ako -DnCnpeT He npMnRbA n BODaTa ce 3arpaBa,TOBa O3HaUaBa,Ye cbDbTe eoXoJau.
CbOBE, n3rotBeHn OT CneHNTe MaTePnaJI Hc CA noDxOJaU 3a yNoTpe6a: uNCTa HepbKdaema CTOMHa, anyMHHn nn MeD 6e3 MarHHTHa OCHOBA, CTbKnlo, DbpBO, nopceJHa, KepaMnKa n rInHa.
- INdukunOHnTe nIOuN ca n3rotBeHn OT rnaKb BHTPOKePAMnKa. TOnnHaTa n3n3a OT MaHnTHa HNDyKUNoHnBa 6oBnHa, 3arpaUca Cbda, Ho He n NobbpxHOCTT a Ha rotBeHe. TOnnHaTa Ha cbda ce npedaba Ha xpaHata.
Baxho e da n3no3BaTe eHnCTBeHO TnraHn nn KaHeta OT MeTaN, n3rotbeHn nn cepTnphiunpaHn camo 3a ynotpe6a Bbpxu HnykUOnHHn nNoyn. Hnkora He no3BOJBAITE dOnnp Ha TOJIINHHTE 3OHN C MeJaAMHoBN Unn PAACTMACOB NKHTeHepn.
Bb3MOxH0 e INdyKcUHOHaTa nIOy da He ycnee da pa3no3Hae TnraH c dnaMeTbp no1 140 mm. MoJI He nI3NoJ3BaIte cbIOBe c HepaBHomepH p6Obe nn I3BnTO bHO.

YBepete ce, ye IbHOTo Ha cBda e paBHO, ye Ira daobpe BbpxycTkNoto, nYe Ima cbuia pa3mep kaTO 30HaT a 3a rotBeHe. B cnUayai, ye nI3noJ3BaTe cBdoBe C NO-MaIbK dIaMaTeTp b eFHKacHOCTTa MOKe Da ce OKaKe no-HnCKa OT OuaKaBaHaT. BuHaRn NoCTabrIe CbDa B CpeDaTa Ha 3OHaT a 3a rotBeHe.
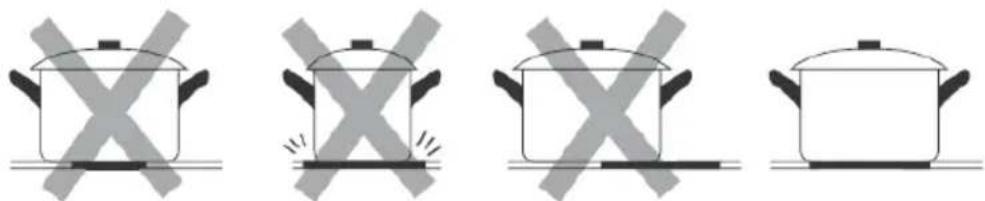
Bnhar noBnraIte cIIOBeTe, a He rI npnnIb3BaIeTe, TbN KaTO MoKe Da HaIpaKaTe CtbkNoTo.
3a6eJekn: MoKeTe Da n3non3BaTe BcKaKbB BnD TeHJkepa NIn TnraH Ha BnTpOKepaMnHaTa nnOca.
IpenopbTuHn pa3Mepn 3a cbDoBeTe 3a INdukuOHHaTa IIOya.
30HnTe 3a rotBeHe ce npncno6BaT aBtOMaTHUHO KbM dHaMeTbpa Ha cbda -do ONpeJeHa rpaHua. Pn BCnUKN pNOXeHn IpeOpbUba Ce DbHOTo Ha cbda Da e C MInHMaJIeH dHaMeTbp, OTROBapuHa cBoTBeTHaTa 3OHa 3a rotBeHe. C ueJ n3BJIuHahe MaKcImaJIHa eФNKacHocT OT pIOuata, NOCTABYIte cbDa B CpeDaTa Ha 3OHaTa 3a rotBeHe.
Dnametpn Ha OCHOBaTa Ha CbIOBete:
| Зona за зомеende | Muhumален (mm) | Мakсимален (mm) |
| 160 mm | 140 | 160 |
| 180 mm | 140 | 180 |
| 210 mm | 160 | 210 |
| 280 mm | 230 | 280 |
Haunn Haynotpe6a
Haayano Ha rotBeHeto
- CneiB KKnIOuBaHe Ha nIOouTa KbM eJeKTpIueckaTa MpeKa,
HaTnCHeTe I npbXTe HaTnChat 6yToHa 3a BkN/In3KnB npOdbJxKeHne Ha 3 CEkyHn, DOKaTO ce Uye IN3CBnPbAHe 3a BkNIOUcBaHe Ha nIOuYata.
Плоча пеминава кьм реким „ИЗчakва(", "Standby",), кato BCичкInHДИКATOPи 3a HabТроьВаHe Ha MOцHOCТа И Temnopи3aTopa nOKa3ВaT".
-
NocTabete noDxOJaCbBvBpXy 3oHaTa 3a rotBeHe.
-
YBepete ce, Ye IbHOTo Ha Cbda N NOBbpxHOCTTa Ha 3OHata 3a IOTBeHe ca YNCTN IN CyXN.
-
Harnacete cnlaTa Ha 3aRpaBaHe Ha 3oHaTa 3a rotBeHe.
1) 3a V302T, V603S, V604S, I302T, I603S, npedn da hargacnte tonnnnHaTa cnla, cneDb a noctabte npbct Bbpxy 6yToHa 3a n36op Ha 3oHa 3a rotBeHe c ceI da n36epTe n 3aJeicTBate JeenaHata ot Bac 3oHa 3a rotBeHe.
HnIkaTopbT 3a Cnla Ha TOnnHaTa Ha N36paHaTa 30Ha Ie 3anOHe Da npIMrBa, Korato e 3aJeCTBaH. CneTo ToBa MoKe da HargInTe TOnnnHAta Cnla cNopeK KaTO CneDBA:
- 3a mojenn c npablenne uee3 donnp: V302T I302T
Harlacete tonlinHHata MouHocKaTO DOKOCHe 6yToH
AkoHaTnCHeI 3aIbPknTe HaTnCHaTeINHOTBaTa6yToHa CToHOCCTTa 6bp3o ue Ce Hactpon BvB Bb3xoJaU peD O do 9.

-MoJIeN C nIb3rau Ce KOHTpOJIep: V603S, V604S, I603S
- Harnacete TOnnnHHaT a MoUHocT, npnnb3BaNk nIb3raunCe KOHTpOlep.

3a6eJexKn:
- CnéД ВКЮЧВане на урEDA ce чуВа сEDно ИЗСВИРВанe. BCИЧКИ ИНДИКАТОПС CBETВATВпрдьлжЕнe Ha eДна сЕкунда, сЛeД KOЕТ ИЗГACВaT.
- Korato Плоча Тс Намара В ржим „ИЗчakван", по ДО 1 МИнУт А He се пpeдпреме НяКвВ DeиCTBVE eIeKtpnueckaТа ПLOЧа ИЗКПЮчВа aBTOMaTNUH, KaTO ИЗДава ИЗСВИрван.
- 3a BKIIIOUBAHe Ha IIIOuAte HAITNCHE Te 6yToHa BkI./n3Kl. I rO 3aApbXTe HATNCHaT B npOdbJxKeHne Ha TpN CeKyHdN; 3a HeHOTO n3KIIIOUBAHe HATNCHE Te OTHOBo 6yToHa 3a BkI./n3Kl.
- TOnnnHnata MoUHocT MoKe da ce Harnacr ot 0 do 9. CToHocTt a no noDpa3bupahe e 5.
- По врeme Ha NaHacToPkata Ha TOnnHaTa HndKaTOpbT 3a NaHacToPkca Ze npMmRBa. CneiN3BbPswBaHe Ha NaHacToPkata YncNoTo ige npMmRHe B npOdbJxKeHne Ha 5 cekyHdi, cIeD Koeto npMmRBaHeTO cnnpa. По To3n NaUnH NaHacToPkata ce notBbpxDaBA.
Kak da n3KJIIOUHM nIoouTa
- Moxe Ta n3KIOUHTe 30HaTa 3a roTBeHe, KaTo HAcTpOInTe MOuHocTTa Ha 0, HATnCKaIKn HeKOJIKKpATHo INHdNkAToPa “-”, DOKaTo yKaKe ,0".
- Cbio TaKa e Bb3MOxHO da ce n3KnHouN cIaTa nloya, KaTo ce HATNCHE 6yTOH BKn/IN3Kn
Белека: Ако по Врeme На rotbeHeTo cnpe eNeKtpnuecknT TOK, BCNUKN HacTpOuKn ce aHynipaT.
N3NoJ3BaHe Ha Temnop3aTopa
Korato nnoyata e BkIIOueHa MOKe Da n3nOJI3BaTe Temnop3aTopa No Dbpa3JIuHn HaunHa:
- Moxe da ro n3no13BaTe kaTo 6poaH a MNHyTu. B To3n cnyaai Temnopn3aTopbT hAma da n3KnIOUH NIKOy OT 3OHITE 3a RotBeHe npu DOCTnraHe Ha ONpeJeHOTo BpeMe.
- MojkeTe Da Ito HaJIacnte Taka, Ye Da Ce I3KJIOUe EJHa IIN NOBeYe 3OHN 3a RotBeHe.
- MoxkeTe Da Harglacnte 6poya Ha MmHyTn Hau-MHoro Do 99 MmHyTn.
I3rJed Ha Temnopn3aTopa
N3nON3BaHe Ha Temnopn3aTopa KaTo 6poa Ha MNHyTN.
Ako He cTe n36paJn HNKo 30Ha 3a roTBeHe
1.Dokochete 6yToHa 3a ynpabneHne Ha Temnopn3aTopa
Homepzt 3aOnueHa npMnRbHa nHdkatopa Ha Temnop3atopa.
- CneT OBa HarnaceTe 6poaHa MmHyTu Cnopek KaKTo CKeDbA:
1) 3a mojenn c npablenne uee3 donnp: V302T, I302T
HaIacTe TOJIINHHaTa MOUHOCT KaTO DOKOCHeTe 6yToHn HII
- Ako haTnchTe n DbpxKnte Taka HraKOJ OT 6byTOHNTe, CToHOCTTa 6bp30 ue ce HaJIacn B HNCXODaI peI.

Белека: Когато Индikatopbт Ha TeMnpn3aTopa npIMrBa, ДOKОСеТ KoHTpoJHn8 6yToH Ha TeMnpn3aTopa OTHOB. ПО To3n HauIN Ie MoXeTe d a NOTBbpDnte NaCTpoiKaTHa TeMnpn3aTopa.
2) 3a MoDEJIc DoKocBaem nIb3rau ce KOHTpOJIep: V603S, V604S, I603S
- ДOKОСHEТЕ ВEDньж KOHTрОння БУTOH Ha Temnopn3aTopa Na ИнДиКATopa Ha Temnopn3aTopa Уе 3anOчHe DA npIMnRBa cToHocCTTa Ha eDInHn. CJIeT TOBa HArIacTe cToHocCTTa Ha 6pOrya Ha MInHyTu, KaTo npemeCTBaTe ПльЗraшЯ ce KOHTpoJep.
- HaTINCHETe OTHOBO 6yToHa Ha KOHTPOJIepa Ha TEMNOPIN3aTOPa.YIcNoto, OTROBAPRso Ha DeCEtNUITE 1e 3aONUHe Da npIMnIRBa Ha INdIKaTOPa Ha TEMNOPIN3aTOPa. CNeD TOBa HArIacTe YIcNTO Ha DeCEtNUITE BbPxy 6pOraHa MInHyTu KaTO pINDbVIXBAte PIIb3raUmaCe KOHTPOJIep.

Белека: Ако прдьлжиTe ДдOKOCBaTe KOHTPONHЯ 6уTOH Ha TeMнори3aTopa, пьзraциТе кOTРОпЕ рse DeIcTBA KaKTo CJIeДВa:
"Yncno Ha eDHHuN- Yncno Ha deCeTnU
-NotBbpeTeHcNToHa eHNHnnte -
- Cnei haarlaacHeTo Ha 6pOaHa MNHyTtTe 3anOue o6paTHoTo 6poEHe. Ha dinPnIe ige ce nokae octabaIoTO BpeMe.
- Cnéд ИЗтуане на ор dedелено Вразм ec ce chуe CBИРЕВ npodbIxKeHne Ha 30 cekyHdi, a Ha INdINKaTopa Ha TemnOpN3aTopa ec ce I3Пиш "--". Ako DoKoCHeTe KOHTpOJHnTe 6byToHn NO Bpeme Ha O6paTHOTO bpoEne CBИPehTo ec ce npeKpaTn.
Kak da Harglacm Temnop3aTopa 3a n3KnIOyBaHe Ha 3oHaTa 3a RotBeHe
1.Дokochete 6byToHa 3a n3bnpaHe Ha 3oHata 3a 3arpaHe 3a Da n36peTe 3oHata 3a rotBeHe, npKoTTO JeJaTe Da n3NoJ3BaTe Temnopn3aTopa.
2.ДOKОСHETe KOHTPOHnHa ByToH Ha TeMnOpn3aTopa ①e 3anOuHe da npIMnRbA eDHO YnCNo Ha INdNkAtopHa TaemnOpn3aTopa.
3. Toraba Harnacete TemnopuraTopa
1) 3a mojenn c npablenne uee3 donnp: V302T, I302T
HarrnaceteToPnnHHataMoUHocTkaToDOKOCHTe6byTOHN
- Ako hatuche Te 3aBpKHTe HATUCHAT HAKO OT 6yTOHITe CTOHOCTTa 6bp30 ue ce HaIacn BbB Bb3XODA u INN HN3XODA u pei.
Белека: KoraTO ИндКаTopbT Ha Temnopn3aTopa 3anpIMrBa HaTnCHeTe OTHOBO KOHTPOHnIg ByToH Ha Temnopn3aTopa, 3a Da NOTBbPdnte HAcTpOiKaTa Ha Temnopn3aTopa.

2)-3a moDeJIcdoKocBaem nIb3rau ce KOHTpOneP: V603S, V604S, I603S:
-ДOKОСHETe BeHbK KOHTPOJHn8 6yToH Ha Temnop3aTopa. Ye 3anoyHe Da npIMrBa cToHocTTa Ha eINHnTe Ha INdIkaTopa Ha Temnop3aTopa. CneT TOBa HarnaceTe uΦpaTa Ha eINHnTe Ha 6pOraHa MmHyTu, KaTO npemeCTBaTe PIIb3raUryce KOHTPOJIep.
- HaTnCHeTe OTHOBo 6yToHa Ha KOHTpOJIepa Ha TeMnOpN3aTopa.YIcNoTO, OTROBapraIoo Ha DeceTIuTe Ⅲe 3aOnUHe Da npIMrBa Ha INdIkAToPa Ha TeMnOpN3aTopa.CleI TOBa HarglaCete YIcNoTo Ha DeceTIuTe Bbpxy 6pOraHa MInHyTu KaTo PnIDBVKBaTe PJIb3raUmCe KOHTpOJIep.

Белека: Ако прдьлжиTe Дд дOKOCBaTe KOHTpoJHЯ 6уToH Ha Temnopn3aTopa, пьзraця Се кHTpoJep
Ie DeInCTBa KaKTo CneiBa:"UncNo Ha einnHnC- YncNo Ha DecetnC
-NotBbpeTe YncIto Ha eINHnIte -...
- Cnéi HarlaçHeTo Ha Temnopn3aTopa 3anoyHe o6paTHoTo 6poeH.
Ha dincpner ige ce nokaxe octabaosTo BpeMe.
BENEXKA: YepBeHaTa TOUka DO INHdNKaTOPa Ha MOuHOCTTa
Ie CBeTHe 3a 3OHHTe, pN KOnTO e 6NJ aKTHBnpaH Temnopn3aTopa.
Moxete da npOBepuTe hAcTroKnTe Ha Temnop3aTopa Ha BCaKa OT 3OHHe 3a rotBeHe KaTo AKTUBnPate CnOMEHaTaTa 3OHa 3a rotBeHe.
BENEXKA:
Ako nMa noBuee ot eHa 3oHa 3a roTBeHe Ha pExnM ,Temnop3aTop", HndNKaTOpBT Ha Temnop3aTOPa Ie VKaKe Hau-HNCKaTa CToHOCt.
YepeHata Toka B 6n3OCT DO CBETINHHN INDOKATOP 3a MOUHOCTTa.
Ie 3anoyHe da npMnRBA.
- Cnéi n3Tnue He Ha 3aJaDeHTo BpeMe 3a rotBeHe BbnpoChaTa 30Ha 3a rotBeHe Ie n3rache ABTomaTHUHO.
BeJexka: Hacrpoikata no nopa3bnpaHe Ha 6pOyHa MmHyTu Ha TemnOpu3aTopa e 30 MmHyTu.
He 6nI nOCTaBEN CbD B npabunHaTa 30Ha 3a rotBeHe; nn,
- n3no3BaHnT ot Bac cBd He roDeH 3a INdyKUHOHH neKn; nnn,
- cIbTe IpeKaIeHO MaIomepeH IIN He e Do6pe ZeHTpnpaHB 3OHaTa 3a RotBeHe.
3a6eJekn:
- 3a rpaBaHe Hma Da 3aNoUHe, DOKaTo He NoCTaBnTe NODXoJaIc bD B 3OHaTa 3a rotBeHe.
- B cnyuai, ye He ce noctabn HOB cbd nucnpeT ue n3rache CneD n3TuHaTeo Ha 2 MNHyTN.
- Ako Bbpy nnoyata e 6nI OCTaBeH cBd C HeNoDxOJa pa3Mep IIN HemaRHTeH TaKbB (HaNPmepOT aYMNHN) IIN aKO e 6nI NOCTaBeH dpyr MaNbK ppeMET (HaNP. HOX, BNIuca, KIOU) BbnpoChaTa3OHa 3a rotBeHe ige Ce n3KnOuyn ABTomTuHc SJIe N3TNUHeTo Ha 1 MNHyTa.
PpeynpekdeHne 3a ocTaTbUHa TOnnHa BnMaBaIte c ropeuNTe NOBbpXHOCTN!
CJIeI n3nOJ3BaHe Ha IIOUaTa I3BecTHO BpeMe NO HeI OCTaBA OCTaTbUHa TOIIInHa.
Kato npedynpejxdeHne 3a TOBa Ha INdikatopa 3a HacTpoiKa Ha MOUHOCTTa.
Ie ce noBn 6yKBata ,H".

Cbto taka moke da ce n3noJ3Ba kaTo yHKnna 3a neCTeHe Ha eHeprna:
Ako jenaete da 3arpeete npu ncbdoe n3no3BaTe oue tonnaTa 3oHa.
ABTOMaTHUHO N3KIOUBOHe
Дрuya onця 3a 6e30anachocT ha nIIOyata e aBTOMATNUHOTO n3KJIHOVAHe. To ue ce akTNBnpa, KOraTo 3a6paBNTe da n3KJIIOHTe HAKOYOT 3OHNTe 3a rotBeHe. BpeMeHaTa 3a aBTOMATNUHO n3KJIIOUVAHe no NOdpa3bnpaHec a cIeHNITE:
HactpoKa Ha TOnJIHHHaTa MoUHOCT
Hactpoiknte, nocouhen no-dony mMat camo ocbeDomnteJHa cToHocT. TOnHaTa Hactpoikka 3aBncn ot pa3nunHn o6ctOarTeJIcTBa KaTO HaPnPmep N3NoJ3BaHnCbD N KOJIueCTBOTo XpaHa, KoEtO npedctOn da ce npiroTbn. Hanpabete ONNT C pIoOyata, 3a da npOBepnte KOn Hactpoikn ca Hau-noDxOJaUk NkM pa3nUnHnTe BnDoBe XpaHn.
This product enjoys the recognition and protection of the legal guarantee in accordance with current legislation. To enforce your rights or interests you must go to any of our official technical assistance services.
You can find the closest one by accessing the following web link: http://taurus-home.com/
You can also request related information by contacting us.
You can download this instruction manual and its updates at http://taurus-home.com/
François
GARANTIE ET ASSISTANCE TECHNIQUE
COUNTRY ADDRESS PHONE
| Algeria Zone d'Activite, N° 62, Constantine 21377077756 | ||
| Argentina Av. del Libertador 1298,(B1638BEY), Vicente López (Pcia. Buenos Aires) | 541153685223 | |
| Belgium Mariëndonkstraat 5, 5154 EG, Elshout 31620401500 | ||
| Benin 359 Av. Steinmetz, 1930, Cotonou 0299-21313798 | ||
| Bulgaria | 265,Okolovrasten Pat, Mladost 4, 1766, Sofia | 35929211120 / 35929211193 |
| Burkina Faso Avenue Bassawarga, 01 BP915, Ouagadougou 226 25301038 | ||
| Congo (Republic of) 98 Blvd General Charles de Gaulle, Pointe Noire 242066776656 | ||
| Cyprus | 20, Bethlehem Str. / P.O.Box 20430, 2033, Strovolos | 35722711300 |
| Czech Republic | Milady Horakove 357/4, 568 02, Svitavy | 420 461 540 130 |
| Democratic Republic of the Congo | AV. Pont Canale N° 3440, Kinshasa | 00243-991223232 |
| Equatorial Guinea | SN Av Patricio Lumumba y C/ Jesus B, Bata | 00240 333 082958 / 00240 333 082453 |
| Equatorial Guinea | Calle de las Naciones Unidas, PO box 762, Malabo | 240333082958 / 240333082453 |
| Espana Avda Barcelona, S/N, 25790 Oliana (Lleida) atencioncliente@taurus.es | 902 118 050 | |
| Ethiopia Lideta Sub City Kebele 10 H.NO 124, Addis Ababa | +251 11 5518300 | |
| France | Za les bas musats 18, 89100, Malay-le-Grand | 03 86 83 90 90 |
| Gabon | BP 574, Port-Gentil Centre-ville | 24101552689 / 24101560698 |
| Ghana | Ederick Place, Accra-Ghana | 302682448 / 302682404 |
| Gibraltar 11 Horse Barrack Lane, 54000, Gibraltar 00350 200 75397 / 00350 200 41023 | ||
| Greece Sapfous 7-9, 10553, Athens +30 21 0373 7000 | ||
| Guinea BP 206, GN, Conakry (224) 622204545 | ||
| Hong Kong Unit H,13/F., World Tech Centre, Hong kong (852) 2448 0116 / 9197 3519 | ||
| Hungary Késmárk utca 11-13, 1158, Budapest +36 1 370 4519 | ||
| India C-175, Sector-63, Noida, Gautam Budh Nagar - 201301, Delhi | (+91) 120 4016200 | |
| Ivory Coast 01 Rue Des Carrossiers-Zone 3, B.P 3747, Abidjan 01 (RCI) | 22521251820 / 225 21 353494 | |
| Jordan 28 Basman St Down town, Amman +962 6 46 222 68 | ||
| Kuwait | P.O. BOX 3379 hawally, 32034, Hawally | +965 2200 1010 |
| Lebanon Damascus Highway; Sciale Building, Jamhour 9615922963 | ||
| Luxembourg | Mariëndonkstraat 5, 5154 EG, Elshout 31620401500 | |
| Mali | BP E2900, Dravela Bolibana | 223227216 / 223227259 |
| Marruecos | Avenue 2 Mars, Résidence Nassrallah, Appt n° 2 1er, Casablanca | (+212) 522 86 30 95 |
| Mauritania | 134 Avenue Gamal Abdener Ilot D, Nouakhchott | 2225254469 / 2225251258 |
| Mexico Rosas Moreno N° 4-203 Colonia de San Rafael C.P. 06470 – Delegación Cuauhtémoc, Ciudad de México | (+52) 55 55468162 | |
| Montenegro | Rastovac bb, 81400, Niksic | +382 40 217 055 |
| Netherlands | Mariëndonkstraat 5, 5154 EG, Elshout 31620401500 | |
| Nigeria 8, Isaac; John Str,G.R.A Ikeja Lagos 23408023360099 | ||
| Paraguay | Denis Roa 155 c/ Guido Spano, Asunción | 21665100 |
| Peru | Calle los Negocios 428, Surquillo, Lima | (511) 421 6047 |
| Portugal Avenida Rainha D. Amélia, n°12-B, 1600-677, Lisboa | +351 210966324 | |
| Romania | Dudesti Pantelimon 23, 410554, Bucharest | 031.805.49.58 |
| Serbia | Rastovac bb, 81400, Niksic | +382 40 217 055 |
| Slovakia Milady Horakove 357/4, 568 02, Svitavy 420 461 540 130 | ||
| Southafrica | Unit 25 & 26, San Croy Office Park, Die Agora Road, Croydon, Kempton Park, 1619, Johan- nesburg | (+27) 011 392 5652 |
| Tunisia | 2, Rue de Turquie, Tunis | 21671333066 |
| Ukraine | Block 6, Ap Housing Estate Topol-2, B, 49000, Dnepropetrovsk | 380563704161 / 380563704161 |
| United Arab Emirates | P.O.BOX 8543, Dubai | 14506246200 |
| Uruguay | Luis Alberto de Herrera 3468, 11600, Montevideo | 598 2209 28 00 |
| Vietnam Lot 7 Ind. Zone for, Ha Noi 84437658111 / 84437658110 | ||

- English Electric hob
- INSTALLATION
- Installation Instructions
- Selection of installation equipment
- Installing the foam gasket
- Do not install the hob without the foam gasket!
- The gasket should be attached to the hob in the following method:
- Before locating the fixing brackets
- Easy Fit kits
- Connecting the hob to the mains power supply
- Notes:
- Cautions
- The method of connections shown below.
- Operation Instructions
- Control Panel
- Model: I302T
- Before using your New Hob
- Using the Touch Controls
- Choose the right Cookware
- Suggested Pan dimensions for induction hob
- Using your Hob
- To turn off hob
- Using Large Heating Area-Ceramic Hob
- To use Extended zone when hob is working, follows below:
- Using Booster Function-Induction Hob
- To use booster function when hob is working, follows below:
- 1) For I302T, I603S:
- Note:
- Cancel the Booster function
- Child Lock Safety Control
- To lock the controls
- To unlock the controls
- Stop & Go function
- Active Stop & Go function
- Inactive Stop & Go function
- Using the Timer
- Timer overview
- Using the Timer as a Minute Minder If you have not selected any cooking zones
- 2) Slider Touch control models: V603S, V604S, I603S:
- #
- Setting the timer to turn cooking zone off
- Detection of Pan and Small Articles
- Residual Heat Warning
- Beware of hot surfaces
- It can also be used as an energy saving function:
- Auto Shutdown
- Over-heat Protection
- Over-flow Protection
- Cooking Guidelines
- Cooking Tips
- Simmering, cooking rice
- Searing steak
- For stir-frying
- Heat Settings
- Cleaning and Maintenance
- Cleaning and Maintenance
- Cleaning the Hob Surface
- Maintenance of the Hob
- Failure Inspection for induction hob
- H36op Ha ypei MoHTax
- NoctabrHe Ha ynIbTHeHneTo OT nHa
- He mONTpaTe nloa 6e3 yIJIbTHeHneTo ot nHa!
- Ha6op 3a ynechBahe Ha noctabReHo
- 3a6eJexKn:
- BHIMAHNE
- Hapьчнк с уka3aHHa
- KoHTpOJHo Ta6JIo
- PpeiynoTpe6aHaHObata nloya.
- Pa6ota c dOnnnpHnte KOHTpOlepi
- IopbpaTe npxOaun DomaknHcN cboBe 3a rotBeHe
- IpenopbTuHn pa3Mepn 3a cbDoBeTe 3a INdukuOHHaTa IIOya.
- Haunn Haynotpe6a
- Kak da n3KJIIOUHM nIoouTa
- N3NoJ3BaHe Ha Temnop3aTopa
- I3rJed Ha Temnopn3aTopa
- N3nON3BaHe Ha Temnopn3aTopa KaTo 6poa Ha MNHyTN.
- Ako He cTe n36paJn HNKo 30Ha 3a roTBeHe
- Kak da Harglacm Temnop3aTopa 3a n3KnIOyBaHe Ha 3oHaTa 3a RotBeHe
- BENEXKA:
- 3a6eJekn:
- PpeynpekdeHne 3a ocTaTbUHa TOnnHa BnMaBaIte c ropeuNTe NOBbpXHOCTN!
- ABTOMaTHUHO N3KIOUBOHe
- HactpoKa Ha TOnJIHHHaTa MoUHOCT
- François
- GARANTIE ET ASSISTANCE TECHNIQUE
Brand : TAURUS
Model : V603S
Category : Cooker