LIFE P66107 - Radio MEDION - Free user manual and instructions
Find the device manual for free LIFE P66107 MEDION in PDF.
| Product type | Radio alarm clock with wireless charging station |
| Brand | Medion |
| Model | LIFE P66107 |
| Dimensions (L x H x D) | Approx. 19.6 x 8.3 x 11.7 cm |
| Weight | Approx. 449 g |
| Power supply | AC adapter 9 V ⎓ 3 A (included) |
| Backup battery | Lithium battery 3.7 V 110 mAh (built-in) |
| Display | LED display with 3 brightness levels |
| FM radio | Range 87.5 - 108 MHz, 60 presets |
| Bluetooth | Version 5.0, A2DP and AVRCP profiles |
| Wireless charging | Qi surface, max power 10 W |
| USB port | USB 5 V 2 A for charging and MP3 playback (FAT32, max 32 GB) |
| AUX input | 3.5 mm jack |
| microSD reader | microSD slot, max 32 GB (MP3) |
| Alarms | 2 independent alarms with snooze |
| Sleep timer | Durations of 15, 30, 45, 60 or 120 min |
| Cleaning | Soft, dry cloth; do not use solvents |
| Operating temperature | 10 °C to +35 °C; humidity < 80% |
| Supplied accessories | AC adapter, FM antenna, user manual |
| Repairability | Repair by qualified personnel only; no consumer spare parts |
Frequently Asked Questions - LIFE P66107 MEDION
User questions about LIFE P66107 MEDION
0 question about this device. Answer the ones you know or ask your own.
Ask a new question about this device
Download the instructions for your Radio in PDF format for free! Find your manual LIFE P66107 - MEDION and take your electronic device back in hand. On this page are published all the documents necessary for the use of your device. LIFE P66107 by MEDION.
USER MANUAL LIFE P66107 MEDION
- Information about this user manual 49
1.1.Explanation of symbols. 49
- Proper use FR 5
3.Declaration of conformity 51
- Safety information ES 5
4.1. Operating safety 5
4.2.Installation location 53
4.3. Repairs 54
4.4. Environmental conditions 5
4.5. Power supply 5
4.6. Mains adapter.. 57
4.7. Batteries 57
4.8.Qi charging pad 60
- Package contents 6
- Device overview 6
6.1. Front view 6
6.2.View from below/back 63
- Setting up the device 64
7.1. Mains connection 64
7.2. Connecting the antenna 64
- Dimmer 64
-
Charging smartphones 6
-
Setting the time/date 66
- Turning on the device 67
11.1. Switching mode 67
11.2. Connecting an external playback device 68
11.3. Inserting USB memory sticks 69
11.4. Inserting SD memory cards 69
11.5. Radio operation 71
11.6. Setting alarm 1 71
11.7. Setting alarm 2 72
11.8. Quickly activating/deactivating the alarm .... 73
11.9. Snooze function 73
- Troubleshooting 73
- Cleaning 74
- Disposal 75
- Technical specifications 76
15.1. Symbols on the type plate and power pack.... 78
- Service information 81
- Legal Notice 83
- Privacy statement 84
1. Information about this user manual

Thank you for choosing our product. We hope you enjoy using this device.
Please read the safety instructions and the user
manual carefully before using the device for the first time.
Note the warnings on the device and in the user manual.
Always keep the user manual close to hand. If you sell the device or give it away, please ensure that you also pass on this user manual. It is an essential component of the product.
1.1. Explanation of symbols
If a block of text is marked with one of the warning symbols listed below, the hazard described in that text must be avoided to prevent the potential consequences described there from occurring.

DANGER!
Warning: risk of fatal injury!

WARNING!
Warning: risk of possible fatal injury and/or serious irreversible injuries!

CAUTION!
Warning: risk of minor and/or moderate injuries!

More detailed information about using the device!

WARNING!
Warning: risk of electric shock!
Bullet point/information on steps during operation
Instruction to be carried out
2. Proper use
The device is designed to receive and display time data and for sounding an alarm as a wake-up call.
The device is only intended for private use and not for industrial/commercial use.
Please note that we shall not be liable in cases of improper use:
- Do not modify the device without our consent and do not use any auxiliary equipment that we have not approved or supplied.
- Only use replacement parts or accessories that we have supplied or approved.
- Comply with all the information in this user manual, especially the safety information. Any other use is considered improper and can cause personal injury or property damage.
- Do not use the device in extreme environmental conditions.
3. Declaration of conformity
MEDION AG hereby declares that this device complies with the fundamental requirements and the other relevant provisions of:
- Radio Equipment Directive 2014/53/EU
- Ecodesign Directive 2009/125/EC
RoHS Directive 2011/65/EU.
Complete declarations of conformity are available at www.medion.com/conformity.
4. Safety information
4.1. Operating safety
- This device may be used by children over the age of 8 and by persons with limited physical, sensory or mental abilities or by those without experience and knowledge, if they are supervised or have been instructed in the safe use of the device and have understood the dangers that result from it.
- Children must not be allowed to play with the device. Cleaning and user maintenance may not be carried out by children unless they are supervised.
- The LED lamp is an integral component of the device. The light source in this lamp may only be replaced by the manufacturer, a service technician commissioned by the manufacturer or a similarly qualified person.

DANGER!
Risk of choking and suffocation!
Packaging film can be swallowed or used improperly, creating a risk of choking and suffocation.
- Keep packaging material such as plastic film or plastic bags away from children.
4.2.Installationlocation
- Keep your device and all connected components away from moisture and avoid dust, heat and direct sunlight. Non-compliance with these instructions can lead to faults or damage to the device.
- Do not place naked flames, such as lit candles, on or near the device, as this poses a fire hazard.
- Do not use the device outdoors as it could be damaged by weather such as rain, snow, etc.
-
Avoid exposing the device and the power pack to water droplets or spray and do not place any liquid-filled containers (vases or similar) on or next to the device or the power pack. Liquids penetrating the device may impair the electrical safety of the product.
-
The slots and openings on the device are for ventilation purposes. Do not cover these openings (risk of overheating, fire hazard)!
- Position the cables so that no-one can tread on them or trip over them.
- Make sure that there is enough clearance between the device and any surrounding furniture or walls. Ensure a minimum clearance of 10cm around the device for sufficient ventilation.
- Place and operate all the components on a stable, level and vibration-free surface in order to prevent the device from falling.
4.3. Repairs
-
Contact customer services if:
-
the mains adapter cable is burnt or damaged
- liquid has penetrated the device
- the device is not operating correctly
-
the device has fallen or the housing is damaged.
-
Repairs to your device should only be carried out by qualified specialists.
-
If a repair must be carried out, please contact only our authorised service partners.
4.4. Environmental conditions
- Only use the device in accordance with the environmental conditions specified in the technical data.

DANGER!
Risk of electric shock!
Major changes in temperature or fluctuations in humidity can cause moisture to build up within the device due to condensation – this can cause an electrical short circuit.
After transporting the device, wait until it has reached ambient temperature before switching it on.
4.5. Power supply

DANGER!
Risk of electric shock!
Even when the device is switched off, some components are live.
In order to disconnect the power to your device or to completely isolate the device from voltage sources, remove the mains adapter from the power socket.
- Operate the device only from an earthed power socket that is close by and easy to access.

DANGER!
Risk of electric shock!
The device contains live parts. They pose a risk of electric shock or fire if an unintentional short circuit occurs.
-
Never open the housing and never insert any objects through the slots and openings into the device!
-
Do not place any objects on the cables as they may be damaged.
- Keep the device at a distance of at least one metre from sources of high-frequency or magnetic interference (televisions, speakers, mobile telephones etc.) to avoid malfunctions and data loss.
4.6. Mains adapter
- Use only the mains adapter supplied.
- If the housing of the mains adapter or the connection cable is damaged, the mains adapter must be disposed of and replaced with a new mains adapter of the same type.
- The mains adapter may only be used in dry rooms.
4.7. Batteries
This device is operated with a button cell battery to save the time in the event of power failure. Please note the following:
- Keep new and used batteries out of the reach of children. Do not swallow batteries as they can cause chemical burns.

WARNING! Risk of chemical burns!
If a button cell battery is swallowed, it can lead to serious internal burns within 2 hours that can lead to death.
-
Seek medical help immediately if you think that batteries may have been swallowed or secreted in any part of the body.
-
Stop using the device if the battery compartment does not close properly, and keep it out of reach of children.
- Before inserting the battery, check that the contacts in the device and on the battery are clean and, if necessary, clean them.
- Pay attention to the polarity (+/-) when inserting the battery.
- There is a risk of explosion if the battery is replaced incorrectly! Only replace the battery with batteries of the same or an equivalent type.
-
Never try to recharge non-rechargeable batteries. Risk of explosion!
-
Never expose the batteries to excessive heat (such as direct sunlight, fire or similar).
- Store batteries in a cool, dry place. Strong direct heat can damage batteries. Do not expose the device to sources of intense heat.
- Never short-circuit batteries.
- Never throw batteries into a fire and never dismantle batteries.
- Remove flat batteries from the device immediately. There is an increased risk of leakage.
- Do not allow battery acid to come into contact with the skin, eyes or mucous membranes. In the event of contact, rinse the affected areas immediately with plenty of clean water and consult a doctor immediately.
- If the device is not going to be used for longer periods, remove the battery.
4.8. Qi charging pad

NOTICE!
Risk of damage!
Cards with magnetic strips as well as credit cards, telephone cards, passbooks or boarding passes can be damaged by the magnetic field of the charging pad.
Do not place any extraneous materials such as metal parts, magnets, cards with magnetic strips or similar near to the charging pad.

NOTICE!
Risk of overheating!
There is a risk of the mobile device overheating if extraneous materials are placed between the device and the charging pad.
Do not place any extraneous materials such as metal parts, magnets, cards with magnetic strips or similar between the mobile device and the charging pad.
- Use only suitable devices for charging that support the Qi standard (10 W max.).
5. Package contents
Please check your purchase to ensure that all items are included. If anything is missing, please contact us within 14 days of purchase. The following items are supplied with your device:
Alarm clock
FM antenna
- Mains adapter
- User manual and warranty card

DANGER!
Risk of choking and suffocation!
Packaging film can be swallowed or used improperly, creating a risk of choking and suffocation.
- Keep packaging material such as plastic film or plastic bags away from children.
6. Device overview
6.1. Front view
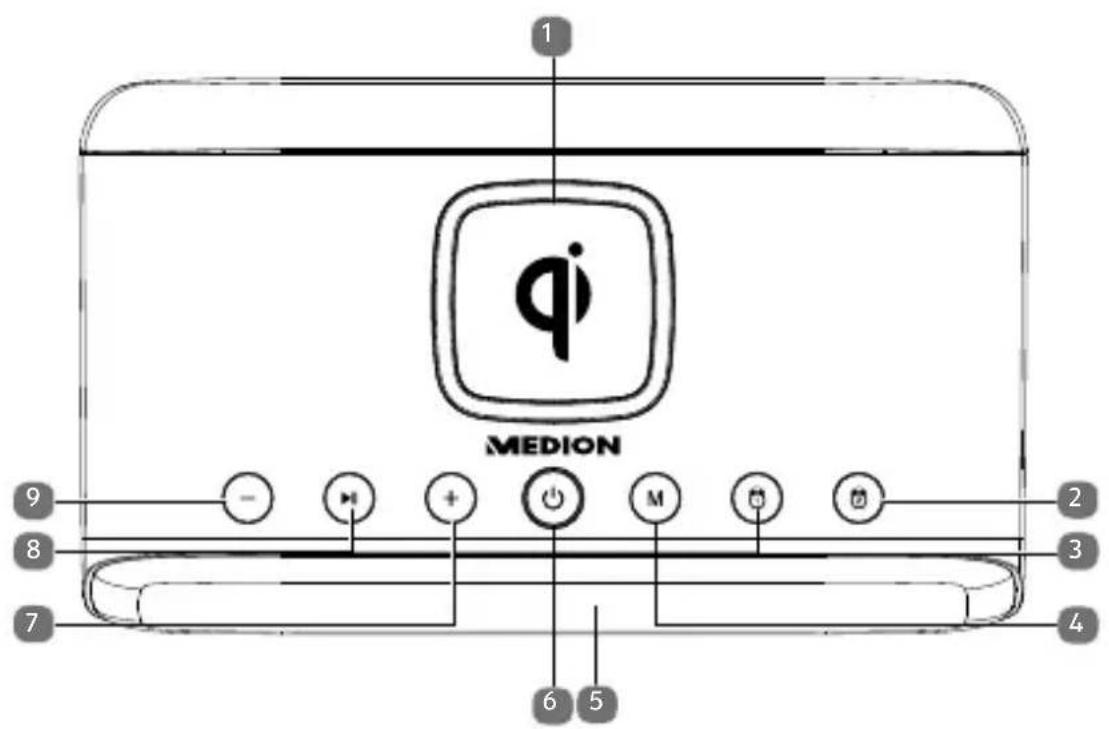
| 1 Chargin | g pad for wireless charging of a smart- phone |
| 2 | Switch alarm2 on/off; amend setting value |
| 3 | Switch alarm1 on/off; amend setting value |
| 4 M Switch mode; set the time; end Bluetooth con- nection | |
| 5 Display | |
| 6 Dim the display; switch device on/off | |
| 7 Next track; increase volume | |
| 8 Start/pause; accept/end call, reject call; mute in FM/AUX mode, FM station search | |
| 9 Previous track; decrease volume | |
6.2. View from below/back
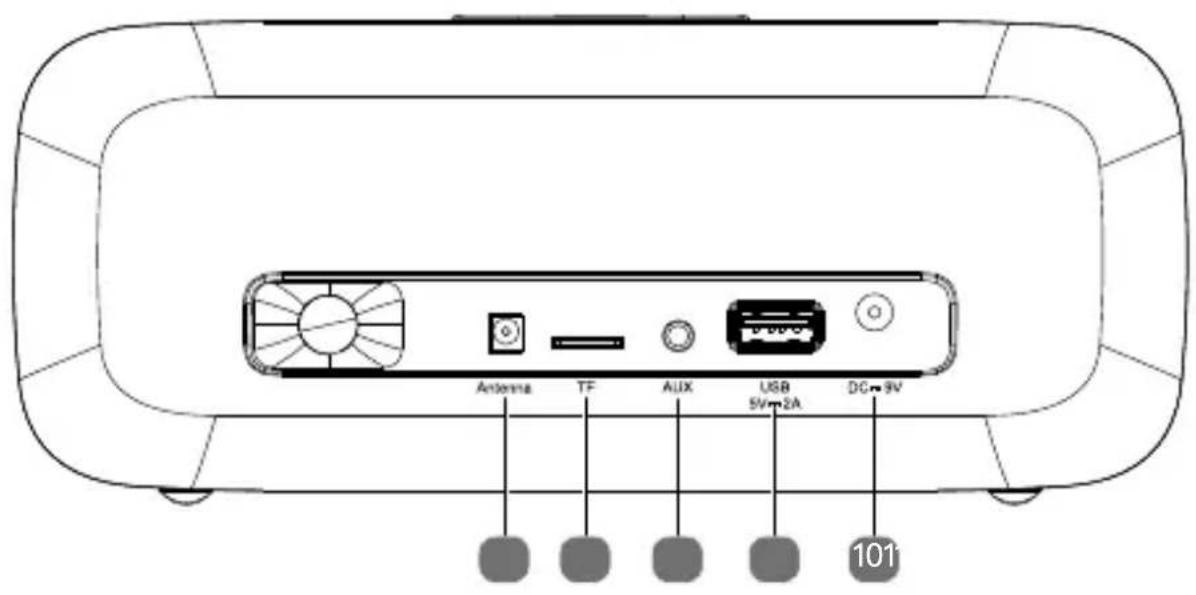
| 10 DC | IN 9V | 3.0A – Connection for mains adapter |
| 11 | USB 5V 2A- USB port | |
| 12 | AUX IN – Connection for external device | |
| 13 | MICRO SD – Memory card slot | |
| 14 FM | antenna | connection |
DE
EN
FR
ES
IT
NL
7. Setting up the device
- Place the device on a sturdy, level surface. Some aggressive varnishes can corrode the rubber feet on the device. If necessary, place the device on a suitable underlay.
7.1. Mains connection
Connect the mains adapter.
To do this, place the connection cable plug in the socket DC9V/3A and the supplied mains adapter into a properly installed earthed power socket which is accessible at all times.
7.2. Connecting the antenna
Connect the antenna connector.
To do so, insert the connector of the antenna into the antenna connection
8. Dimmer
The dimmer has three brightness levels and one level that switches off the display lighting.
When the radio is switched off, press the button once or several times to run through the dimming phases.
9. Charging smartphones
The device features two options for charging a smartphone:
1) You will find a USB port on the rear of the device. This can be used to charge USB devices with the aid of a USB cable.
Plug a compatible USB cable into the USB 5V 2A port.
2) There is a charging pad for smartphones on the top of the device, which enables wireless/inductive charging.
- Place the smartphone on the charging pad. Charging begins immediately. Take care to ensure that the device is positioned correctly, to ensure that reliable charging is guaranteed.

Wireless charging: The maximum charging output is 9 V. The charging function can, where applicable, be impaired by protective cases for the smartphone.
Charging with USB: The charging function is only activated when the device is turned on.
10. Setting the time/date
All operating buttons for this setting are located on the top of the device.
Press and hold briefly to access time setting mode.
24H flashes on the display.
Use + or - to select the desired display (12H/24H) hours.
Press M to confirm. The hours flash.
Use + or - to select the desired hour.
Press M to confirm. The minutes flash.
Use + or - to select the desired minutes.
Press M to confirm. The day flashes.
Use + or - to select the desired day.
Press M to confirm.
In the morning, the sun icon : is also shown on the display. In the afternoon and evening the moon icon * is displayed.
11. Turning on the device
Press and hold the button.
The device switches on with the last used operating mode.
Press and hold the button to switch the device to standby mode.
11.1. Switching mode
11.1.1. Bluetooth mode
Press the button repeatedly until the BT icon flashes on the display.
The clock radio is now in search mode. During the search, BT flashes on the display.

The clock radio attempts to automatically connect itself to the last audio output device connected via Bluetooth. If this is not possible, the clock radio sends its device identification via Bluetooth and BT flashes on the display.
- Switch on the Bluetooth function on your audio output device and enable search mode. On your audio output device select your clock radio MD 44196 from the list of available devices and pair the devices.

You will find more information about the Bluetooth function of your audio output device in its user manual.
If you are prompted to enter a password, enter 0000.
After successful Bluetooth pairing, a beep sounds and the clock radio's screen now permanently shows BT.

You can control how tracks are played and the volume on your audio output device and on the clock radio. The functions available when using an audio output device on the clock radio depend on your external device and the software used.
11.2. Connecting an external playback device
You can use the AUX IN connection to connect an external playback device (for example a CD player or MP3 player).
Plug the end of a 3.5mm jack cable (not supplied with the device) into the AUXIN socket on the back of the device.
- Connect the other end of the cable to your external device.
AUX will appear on the display.
Press the button to mute the audio.
Press the button again to unmute the audio.
The audio signal from your external device will now be played back.

The track playback is controlled via the external device. The volume can be controlled both on your external device and the clock radio.
11.3. Inserting USB memory sticks
Insert the USB memory device into the USB port on the back of the clock radio.
USB will appear on the display.
Press the button to activate playback.
Press the button again to pause playback.
Press and hold the ^+ button to skip to the next track.
Press and hold the - button to skip to the previous track.

Please note the following when connecting a USB stick:
- Due to the numerous different file systems and file formats, compatibility with the connected memory media cannot be guaranteed.
- Depending on the size of the data medium, it may take some time for the system to be detected.
- The FAT32 file system is supported; the supported file format is MP3.
- USB sticks up to 32 GB are supported.
- External hard disks are not supported.
11.4. Inserting SD memory cards
Insert the SD memory card into the slot on the back of the clock radio. The card's contacts show towards the front of the device.
SD will appear on the display.
Press the button to activate playback.
Press thll button again to pause playback.
Press and hold the ^+ button to skip to the next track.
Press and hold the - button to skip to the previous track.

Please note the following when connecting an SD memory card:
- Due to the numerous different memory cards on the market, compatibility with the connected memory media cannot be guaranteed.
- Depending on the size of the data medium, it may take some time for the system to be detected.
- The MP3 file format is supported.
- SD memory cards up to 32 GB are supported.
11.4.1. Sleep timer
If you listen to music via a USB memory stick or an SD card, you can program a sleep timer.
Press and hold the M button to switch to the sleep timer. The icon flashes slowly on the display.
Press the + button to repeat individual tracks or repeat all tracks
Press and hold the button to confirm your selection.
Then press and hold the button to set the duration of the sleep timer.
will appear on the display.
Use + or - to select the desired sleep time of 15 min., 30 min., 45 min., 60 or 120 min.
Then press and hold the button to confirm the selected time.
11.5. Radio operation
Switch on the clock radio.
Press the M button once until the last frequency you listened to is shown on the display.
Press and hold the + button to skip to the next stored station.
Press and hold the - button to skip to the previous stored station.
Press the button to mute the audio.
Press the button again to unmute the audio.
11.5.1. Automatic station search
The clock radio allows you to store up to 60 stations.
Press and hold the button for the automatic station search to store the first 60 stations that can be received.
11.6. Setting alarm 1
All operating buttons for this setting are located on the top of the device. You can set two alarm times.
Press the button twice in quick succession.
Use + or - to select the desired hours.
Press the button to confirm. The minutes flash.
Use + or - to select the desired minutes.
Press the button to confirm. The alarm tone flashes.
Use + or - to select the desired alarm tone.
Press the button to confirm. The day flashes.
Use + or - to select the desired day.
The following options are available:
1-5 = workdays (Monday-Friday)
1-7 = weekdays (Monday-Sunday)
6-7 = weekends (Saturday-Sunday)
Press the button to confirm. The volume flashes.
Use + or - to select the desired volume.
Quiet L1 - loud L4
Alarm off = OFF
Press the button to confirm.
The alarm has been set.
11.7. Setting alarm 2
All operating buttons for this setting are located on the top of the device. You can set two alarm times.
Press the button twice in quick succession.
Use + or - to select the desired hours.
Press the button to confirm. The minutes flash.
Use + or - to select the desired minutes.
Press the button to confirm. The alarm tone flashes.
Use + or - to select the desired alarm tone.
Press the button to confirm. The day flashes.
Use + or - to select the desired day.
The following options are available:
1-5 = workdays (Monday-Friday)
1-7 = weekdays (Monday-Sunday)
6-7 = weekends (Saturday-Sunday)
Press the ② button to confirm. The volume flashes.
Use + or - to select the desired volume.
Quiet L1 – loud L4
Alarm off = OFF
Press the button to confirm.
The alarm has been set.
11.8. Quickly activating/deactivating the alarm
In time mode, press the button for the desired alarm or twice to activate or deactivate alarm 1 or 2.
11.9. Snooze function
- When the alarm sounds, activate the snooze function by pressing any button on the top of the device.
12. Troubleshooting
If a fault occurs, first see whether you can resolve the problem yourself. You might find this overview useful.

CAUTION!
Risk of chemical burns!
Opening the device can cause injuries.
- Never attempt to repair the device yourself. If a repair is necessary, please contact our Service Center or a suitable authorised repair workshop.
Fault Possible cause/action
No function
If the device has been disrupted by a thunderstorm, a static charge or another external factor, follow this procedure to resolve the problem: Disconnect the mains adapter and then plug it in again.
Fault Possible cause/action
The alarm does not sound at the time set
Check the alarm time set
Check whether the alarm has been activated. The symbol must be shown on the display.
13. Cleaning
Always pull the mains adapter out from the socket before cleaning the device.
Only use a dry, soft cloth to clean the device. Do not use chemical solutions or cleaning products because these may damage the device's surface and/or inscriptions.
14. Disposal

Packaging
Your device has been packaged to protect it from damage in transit. Packaging materials are raw materials and can therefore be reused or recycled.

Device
At the end of its service life, do not dispose of the device in the normal household rubbish.
Take old devices to a collection point for electrical scrap or a recycling centre. Remove the battery before disposing of the device and dispose of it separately.

Batteries
Do not dispose of used batteries with normal household rubbish. Take the batteries to a collection point for used batteries.
Contact your local waste disposal company or your local authority for more information on this subject.
15. Technical specifications
| Mains adapter | |
| Manufacturer | Dongguan Becky Electronics Tech Co., Ltd. Importer: MEDION AG Am Zehnhof 77 45307 Essen Germany HR number: HRB 13274 |
| Model name BQ30A-0903000-G | |
| Input voltage/current输入 AC frequency | AC 100–240 V ~ 50/60 Hz 0.8 A max. |
| Output voltage/current | 9.0 V DC —— 3 A Θ-θ- |
| Output power 27.0 W | |
| Average efficiency during operation | 87.18% |
| Efficiency with low load (10%) | 85.27% |
| Power consumption with zero load | 0.050 W |
| Relevant load conditions: | |
| Percentage of output current according to type plate | |
| Load condition 1 100% ± 2% | |
| Load condition 2 75% ± 2% | |
| Load condition 3 50% ± 2% | |
| Load condition 4 25% ± 2% | |
| Load condition 5 10% ± 1 % | |
| Load condition 6 0% (zero load) | |
| Intertek GS | |
| Device | |
| Power supply DC 9 V 3 A | ── |
| Bluetooth Version; profiles 5.0; A2DP, AVRCP | |
| Bluetooth operating fre-quency | 2402 – 2480 MHz |
| Bluetooth max. transmission power | 4 dBm |
| QI frequency range 110.21 – 204.98 kHz | |
| QI max. field strength 35.6 dbμA/m @ 10cm | |
| USB port DC 5 V 2 A max. | ── |
| Storage card slot microSD (max. 32 GB) | |
| AUX IN port 3.5 mm jack | |
| Backup battery (permanent-ly installed) | Manufacturer: Shenzhen FXN Electronic Technology Co., Ltd. Model: 302323 Output voltage: DC 3.7 V——110 mAh, 0.407 Wh |
| Environmental conditions: Temperatures; humidity (non-condensing) | In operation: 10 °C ~ +35 °C; < 80% Not in operation: 0 °C ~ +40 °C; < 90 % |
DE
EN
FR
ES
IT
NL
CE
15.1. Symbols on the type plate and power pack

Protection class II
Electrical devices in protection class II are devices that have double and/or reinforced insulation throughout, and do not have the option of connecting a protective earth. The housing of an electrical device in protection class II, with surrounding insulating material, might either form all of the additional or reinforced insulation, or part of it.

Indoor use
Devices with this symbol are intended solely for indoor use.

Fig. A

Fig. B
Polarity markings
In the case of devices with coaxial power connectors, these symbols indicate the polarity of the connector. There are two types of polarity: either positive inside and negative outside (Fig. A), or negative inside and positive outside (Fig. B).

CE labelling
Products that feature this symbol meet the requirements of the EU directives (see chapter entitled "Declaration of conformity").

Tested safety
Products that feature this symbol meet the requirements of the German Product Safety Act.

Symbol for direct current (DC)

Symbol for alternating current (AC)
Transformer - short circuit-proof
A transformer in which the temperature does not exceed specified limits if the transformer is overloaded or short-circuited, and which continues to meet all the requirements specified in the relevant standard once the overload or short circuit has been rectified.

Energy efficiency level VI
Energy efficiency levels are used to describe the efficiency levels of internal and external power supply units. Energy efficiency is sub-divided into a number of categories, where Level VI is the most efficient.
16. Service information
Please contact our Customer Service team if your device ever stops working the way you want or expect it to. There are several ways for you to contact us:
- In our Service Community, you can meet other users, as well as our staff, and you can exchange your experiences and pass on your knowledge there. You will find our Service Community at community.medion.com.
- Alternatively, use our contact form at www.medion.com/ contact.
- You can also contact our Service team via our hotline or by post.
| Opening times | Hotline number UK |
| Mon – Fri: 08.00 – 20.00 Sat – Sun: 10.00 – 16.00 | ➀ 0333 3213106 |
| Hotline number Ireland | |
| ➂ 1 800 992508 | |
| Service address | |
| MEDION Electronics Ltd. 120 Faraday Park, Faraday Road, Dorcan Swindon SN3 5JF, Wiltshire United Kingdom | |

You can download this and many other sets of operating instructions from our service portal at www.medion.com/gb/service/start/. You will also find drivers and other software for a wide range of devices there. You can also scan the QR code on the side of the screen, to download the operating instructions onto your mobile device from the service portal.
DE
EN
FR
ES
IT
NL
17. Legal Notice
Copyright © 2020
Date: 12.05.2020
All rights reserved.
These operating instructions are protected by copyright.
Mechanical, electronic and any other forms of reproduction are prohibited without the written permission of the manufacturer.
Copyright is owned by the company:
MEDION AG
Am Zehnhof 77
45307 Essen
Germany
Please note that you cannot use the address above for returns. Please always contact our Customer Service team first.
18. Privacy statement
Dear customer,
We wish to inform you that we, MEDION AG, Am Zehnhof 77, 45307 Essen, Germany process your personal data as a data controller.
For matters regarding data protection, we are supported by our company data protection officer who can be contacted at MEDION AG, Datenschutz, Am Zehnhof 77, D - 45307 Essen; datenschutz@medion.com. We process your data for the purpose of warranty processing and associated processes (e.g. repairs) and therefore rely on processing your data for the sales contract concluded with us.
Your data will be provided to repairers contracted to us for the purpose of warranty processing and associated processes. We generally store your personal data for a period of three years in order to fulfil your legal warranty rights.
You have the right to be informed of the personal data concerned as well as the right to rectification, deletion, restriction of processing, the right to object to processing, as well as the right to data portability.
In case of access and cancellation rights, restrictions apply according to S 34 and S 35 of BDSG (Federal Data Protection Act) (Art. 23 GDPR). In addition, there is a right of appeal to a competent data protection supervisory authority (Article 77 GDPR in conjunction with S 19 BDSG). The state official for data protection and freedom of information for MEDION AG is Nordrhein Westfalen, P box 200444, 40212 Düsseldorf, Germany. www.ldi.nrw.de.
The processing of your data is necessary for warranty processing: it is not possible to process the warranty without the provision of the required data.
Sommaire
DE
Risque de surchauffe!
Chere cliente, cher client,