BDL170 - Laser pointer BLACK & DECKER - Free user manual and instructions
Find the device manual for free BDL170 BLACK & DECKER in PDF.
| Product Type | Laser Pointer |
| Brand | Black & Decker |
| Model | BDL170 |
| Wavelength | 650 ± 5 nm (red) |
| Laser Class | Class 2 |
| Maximum Operating Range | Up to 609 cm (20 ft) |
| Leveling Accuracy | ± 3 mm at 3 m |
| Self-Leveling Range | ±5° |
| Self-Leveling Time | < 5 seconds |
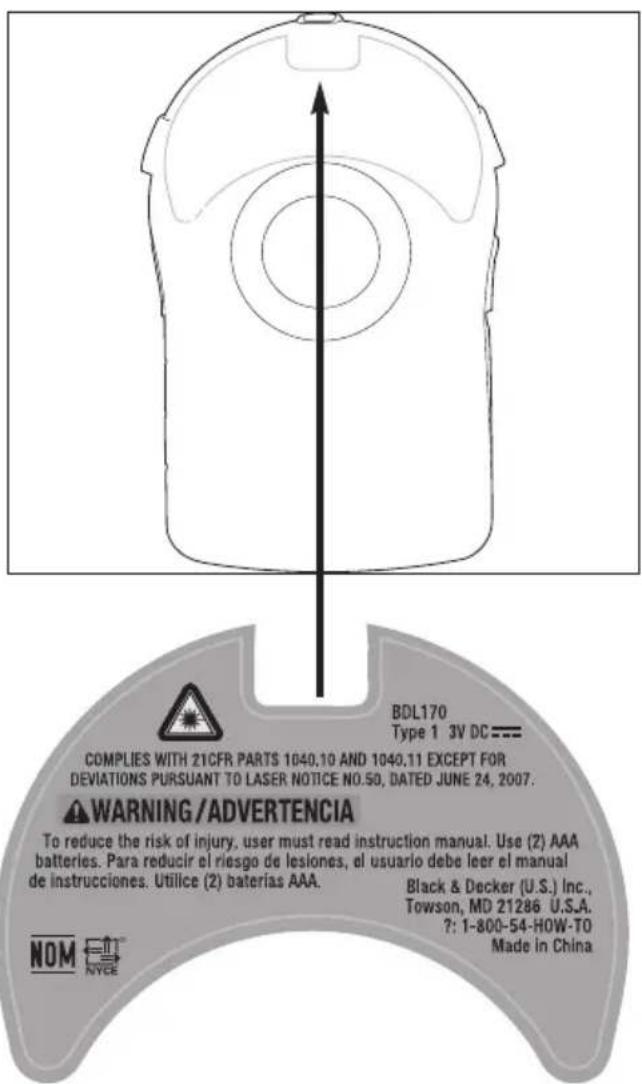
| Power Supply | 2 AAA 1.5 V batteries (included) |
| Voltage | 3.0 V |
| Operating Temperature | 5 °C to 40 °C |
| Main Functions | Self-leveling, integrated angle finder, vertical and horizontal projection, magnetic wall mount, removable adhesive strip |
| Safety | Class 2 laser, avoid direct eye contact, do not use with optical instruments |
| Care and Cleaning | Clean with mild soap and a damp cloth; do not immerse |
| Warranty | 2 years for domestic use |
Frequently Asked Questions - BDL170 BLACK & DECKER
User questions about BDL170 BLACK & DECKER
0 question about this device. Answer the ones you know or ask your own.
Ask a new question about this device
Download the instructions for your Laser pointer in PDF format for free! Find your manual BDL170 - BLACK & DECKER and take your electronic device back in hand. On this page are published all the documents necessary for the use of your device. BDL170 by BLACK & DECKER.
USER MANUAL BDL170 BLACK & DECKER
With Built In Protractor
INSTRUCTION MANUAL
Catalog No. BDL170
THANK YOU FOR CHOOSING BLACK & DECKER!
GO TO WWW.BLACKAND DECKER.COM/NEWOWNER
TO REGISTER YOUR NEW PRODUCT.
BEFORE RETURNING THIS PRODUCT
FOR ANY REASON PLEASE CALL
1-800-544-6986
BEFORE YOU CALL, HAVE THE CATALOG No. AND DATE CODEAVAILABLE. IN MOST
BLACK & DECKER REPRESENTATIVE CAN RESOLVE THE PROBLEM OVER THE PHONE. IF
A SUGGESTION OR COMMENT, GIVE US ACALL. YOUR FEEDBACK IS VITALTO BLACK
SAVE THIS MANUAL FOR FUTURE REFERENCE.
WARNING: Read and understand all
instructions. Failure to follow all instructions listed below may result in electric shock, fire and/or serious personal injury.
SAVE THESE INSTRUCTIONS Safety Instructions
DANGER: Laser Radiation, avoid direct eye exposure, serious eye injury can result.
-
Do not use optical tools such as a telescope or transit to view the laser beam.
-
Position the laser so unintentional eye contact will be avoided.
-
Do not operate the laser around children or allow children to operate the laser.
-
Do not disassemble. Modifying the product in any way can increase the risk of laser radiation.
WARNING: Use of controls or adjustments or performance of procedures other than those specified in this manual may result in hazardous laser radiation exposure.
-
Do not operate in explosive atmospheres, such as in the presence of flammable liquids, gases, or dust.
-
Use only with the specifically designated batteries. Use of any other batteries may create a risk of fire.
-
Store idle product out of reach of children and other untrained persons. Lasers are dangerous in the hands of untrained users.
-
Use only accessories that are recommended by the manufacturer for your model. Accessories that may be suitable for one laser, may create a risk of injury when used on another laser.
-
Repairs and servicing MUST be performed by a qualified repair facility. Repairs performed by unqualified personnel could result in serious injury.
-
Do not remove or deface warning labels. Removing labels increases the risk of exposure to radiation.
-
For indoor use only.
-
This product is intended for use in a temperature range of 41^(5^) - 104^(40^) .
CAUTION: Use caution when drilling, nailing or cutting into walls, floors and ceilings which may contain electrical wiring or pipes. Always turn off the power when working near electrical wires.
CAUTION: Use of controls or adjustments or performance of procedures other than those specified in this manual
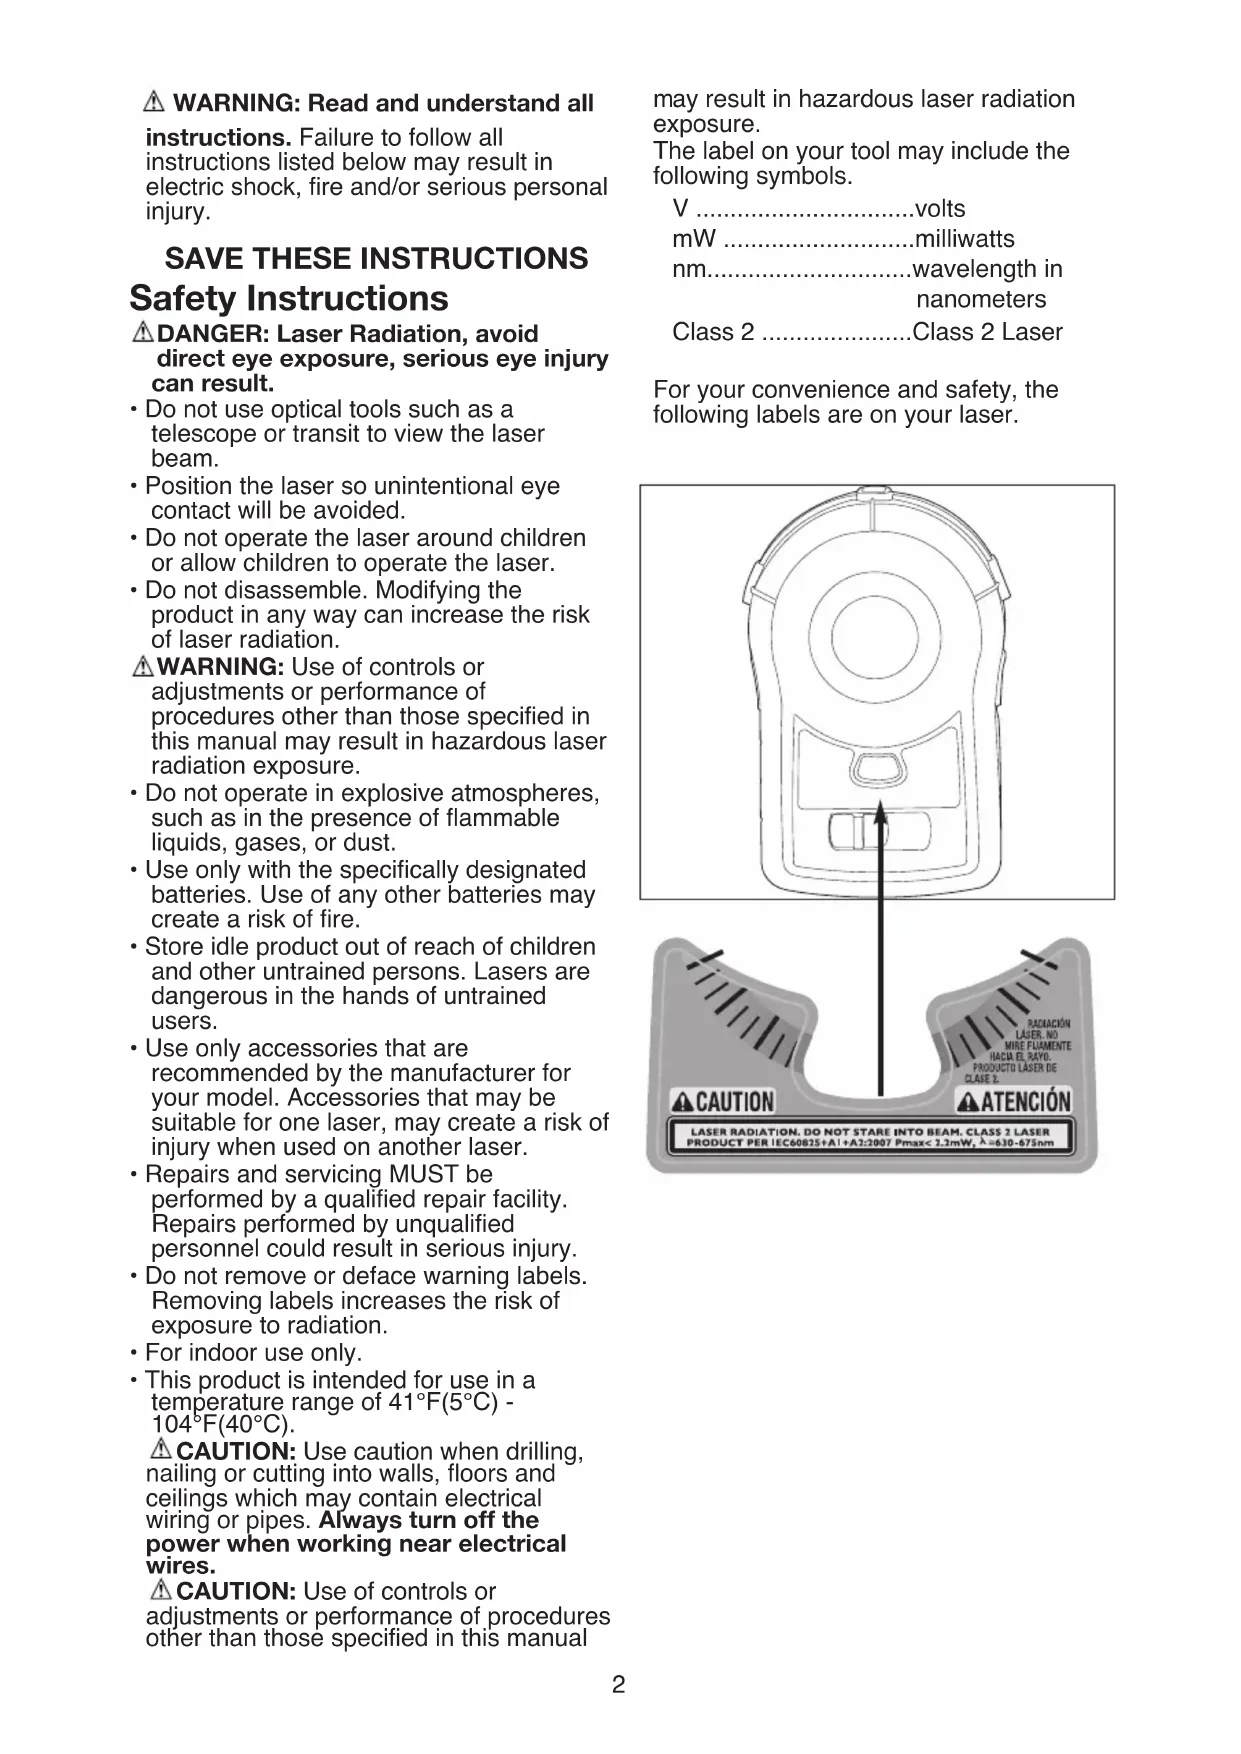
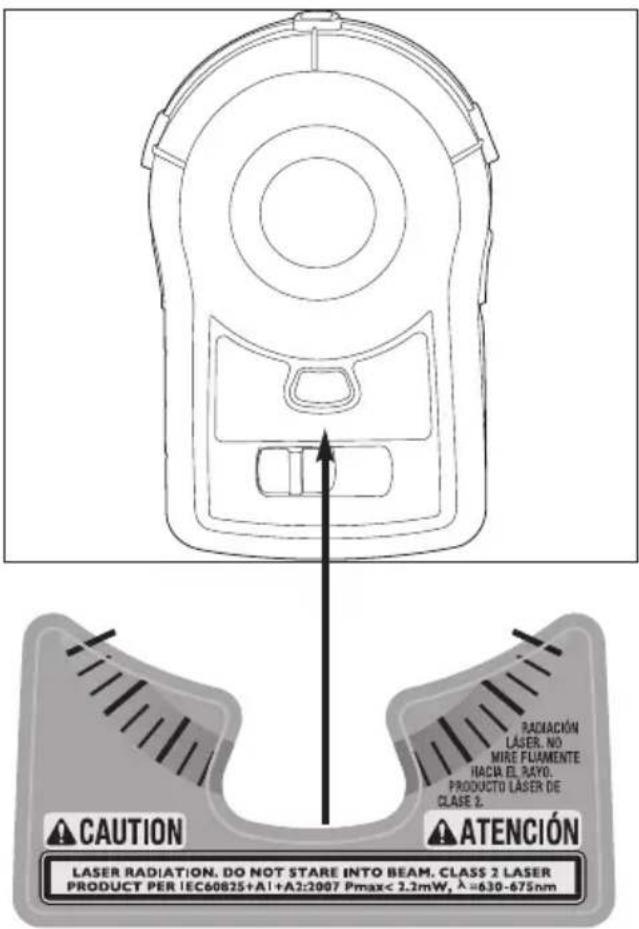
may result in hazardous laser radiation exposure. The label on your tool may include the following symbols.
V .volts
mW milliwatts
nm... wavelength in nanometers
Class 2 .........Class 2 Laser
For your convenience and safety, the following labels are on your laser.
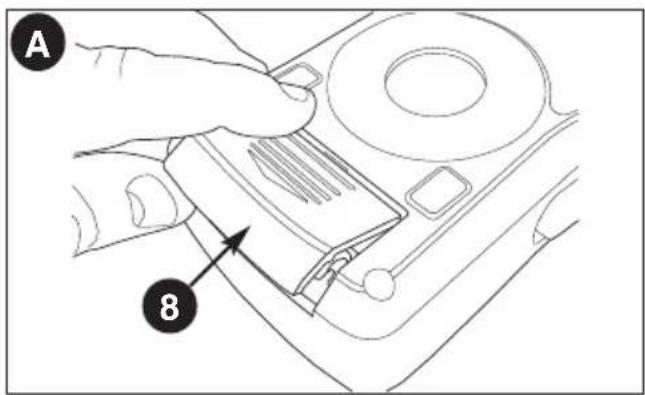
Installing the Batteries - figure A
- Ensure laser on/off actuator (1) is in the full off position by sliding the actuator to the left "OFF" position.
- Open the battery compartment cover (8) located on the back of the unit. Insert 2 fresh 1.5 volt AAA batteries making sure to match (+) and (-) terminals correctly. Close battery compartment cover and click into place.
WARNING: Batteries can explode, or leak, and can cause injury or fire. To reduce this risk:
- Carefully follow all instructions and warnings on the battery label and package.
- Always insert batteries correctly with regard to polarity (+ and -), marked on the battery and the equipment.
- Do not short battery terminals.
- Do not charge batteries.
- Do not mix old and new batteries. Replace all of them at the same time with new batteries of the same brand and type.
- Remove dead batteries immediately and dispose of per local codes.
- Do not dispose of batteries in fire.
- Keep batteries out of reach of children.
- Remove batteries if the device will not be used for several months.
"Transporting batteries can possibly cause fires if the battery terminals inadvertently come in contact with conductive materials such as keys, coins, hand tools and the like. The US Department of Transportation Hazardous Material Regulations (HMR) actually prohibit transporting batteries in commerce or on airplanes (i.e. packed in suitcases and carryon luggage) UNLESS they are properly protected from short circuits. So when transporting individual batteries, make sure that the battery terminals are protected and well insulated from materials that could contact them and cause a short circuit."
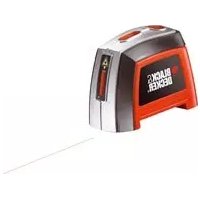
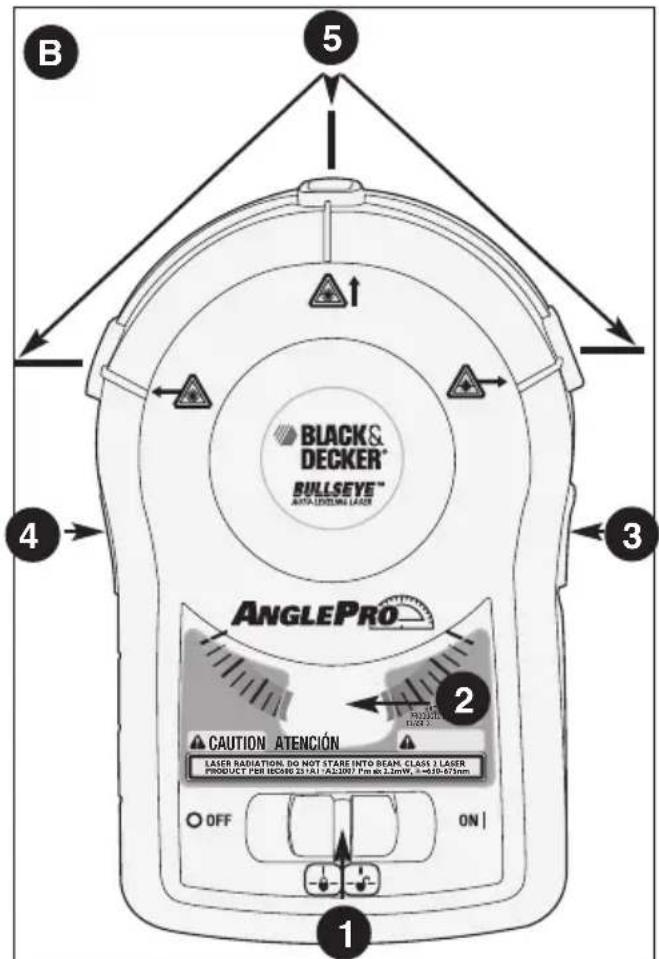
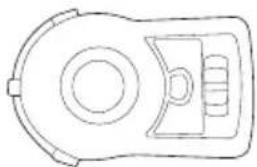
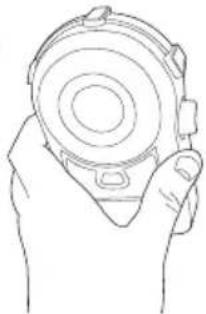
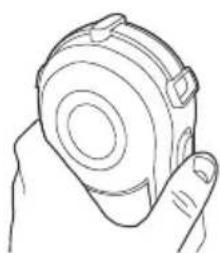
Features - figure B
1.) On / Off Actuator
2.) Protractor
3.) Laser Direction Button - (Left Projection)
4.) Laser Direction Button - (Right Projection)
5.) Self-Leveling Laser Lines
6.) Wall Mounting Attachment - (drywall pin and keyhole)
7.) Self Adhesive Strip
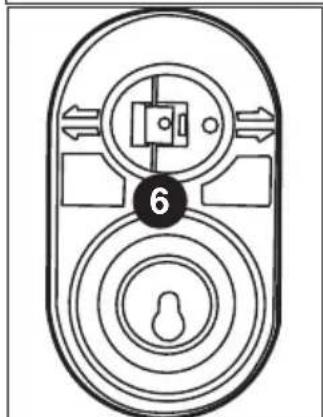
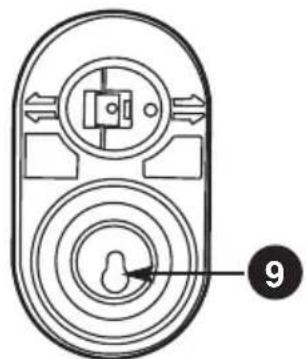
Hanging on a wall using a screw -figure C
The laser unit can be hung on a wall with a screw, using the keyhole opening (9) in the wall mounting attachment.
- Place the keyhole opening over the head of the screw and make sure that the attachment is seated into the narrow opening of the keyhole.
- Tighten the screw.
- Align the circular pocket on the back of the laser with the magnetic circle on the front of the wall attachment.
Make sure that the unit is seated firmly, and is secure on the wall.

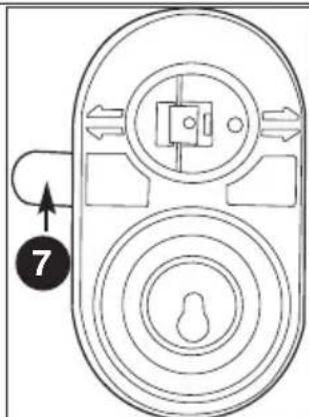
Hanging on drywall surfaces only - figure D
The laser unit can be hung on drywall, using the drywall pin (10) in the wall mounting attachment.
- To press pin into drywall, first expose pin by rotating pin base from opposite side (fig D).
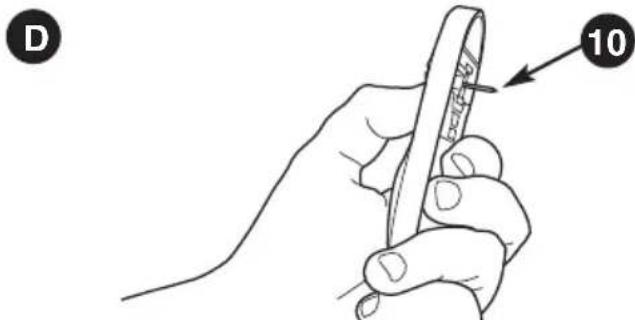
- While maintaining pressure on pin base, insert pin straight and seat firmly against drywall surface.
- The drywall pin should always be pushed in by hand and never driven by a hammer.
- To remove drywall pin from the wall, pull out straight.
- Align the circular pocket on the back of the laser with the magnetic circle on the front of the wall attachment.
Make sure that the unit is seated firmly, and is secure on the wall.
CAUTION: Pin is sharp and should be handled with care. Always be sure drywall pin is closed when not in use.
NOTE: The pin is only for use on drywall NOT other surfaces including plaster.
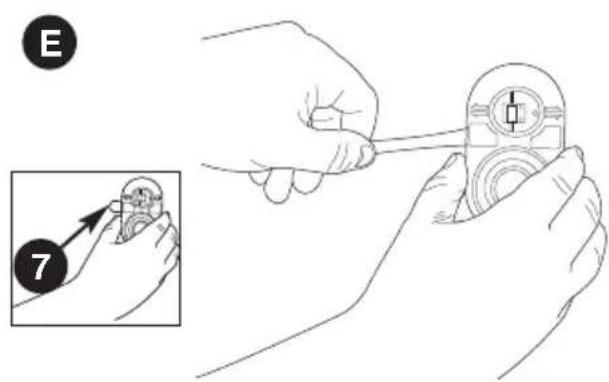
Hanging on a wall using removable adhesive strip - figure
NOTE: Black & Decker suggests the use of 3M® Command® Strips.
The laser unit can be hung on a wall using a removable adhesive strip (7) that is attached to the back of the wall mounting attachment.
NOTE:
1.) The wall should be clean and dry to use the adhesive strip.
2.) Adhesive strip can be used on drywall, plaster and wood.
3.) Adhesive strip cannot be used on some types of wallpaper.
- Remove liner paper from one side of adhesive strip (7) and apply strip to back of wall mounting attachment (6).
- Remove liner paper from other side of adhesive strip and press attachment firmly onto wall.
- Align the circular pocket on the back of the laser with the magnetic circle on the front of the wall attachment.
Make sure that the unit is seated firmly, and is secure on the wall.
- To remove from wall, first remove the laser unit from the wall mounting attachment. Then, holding the wall attachment with one hand, slowly stretch the adhesive strip straight along the wall away from the wall mounting attachment until it releases from the wall (figure E). Do not pull strip at an angle.
Operating Instructions
DANGER: Laser Radiation, avoid direct eye exposure.
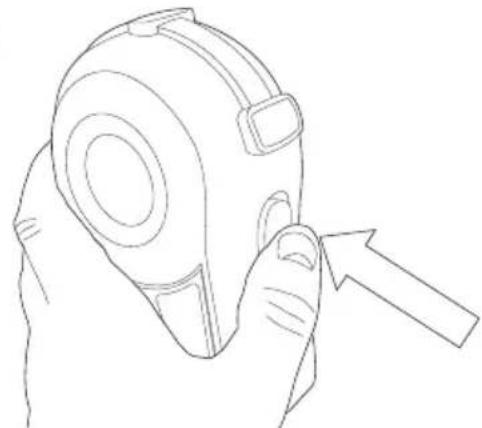
On/Off Actuator - figure F
- Slide the ON/OFF actuator (1) to the middle position shown in figure F to turn the laser on in a locked position.
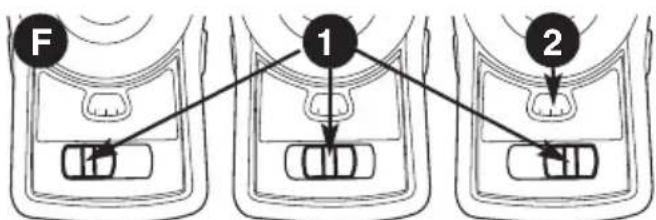
- Slide the actuator all the way to the right to activate the self leveling mode.
- Slide the actuator all the way to the left to turn the laser off.
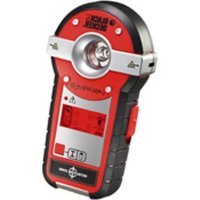
Protractor Mode
The internal protractor (2) (figure f) of the BDL170 can be used to:
- Transfer an angle
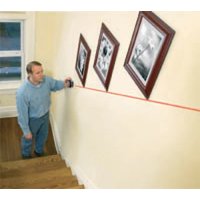
- Apply an angle (Example : transfer stair angle to align pictures on stairs wall)
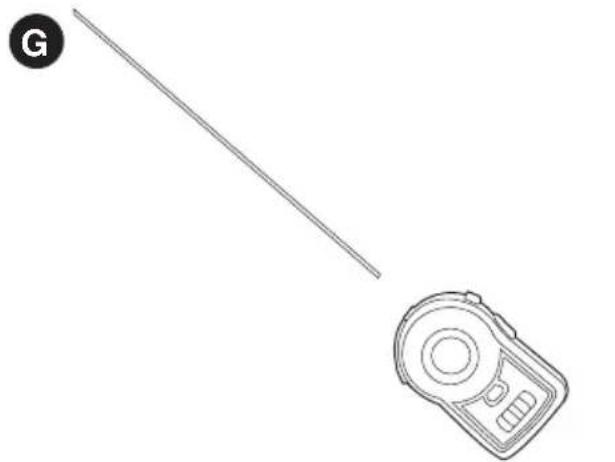

Using the Protractor - figure G, H
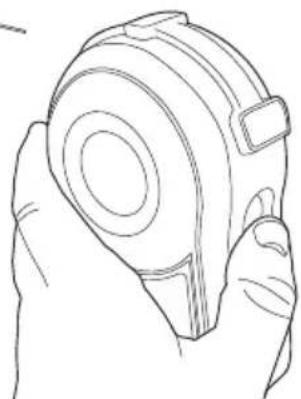
- Hang the laser on the wall surface using one of the 3 different hanging modes or hand hold it on the wall.
- Slide the on/off actuator (1) to the middle position.
- The laser will come on and project a laser line.
- It will be locked in one position.
- The protractor (2) back light will come on.
- The protractor window will show an angle relative to vertical.
The unit can be spun around 360 degrees, and the angle reading can be taken from the window.
The angle can then be transferred to another work area. - Although the laser direction can be changed from vertical to left or right in "Protractor Mode", for best results, it should be set to the vertical position.
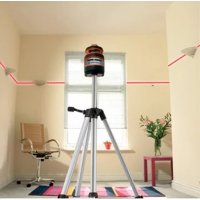
Auto Leveling Mode - figure I,J,K,L,M
To activate the Self Leveling Mode, slide the ON/OFF actuator (1) all the way to the right.
- The protractor window backlight will go out.
The laser will project a "plumb" line vertically. (fig. 1)

0
Directing the Laser Line - figure J,K,L
The laser can be projected level to the left, plumb (straight up) and level to the right.
- The buttons on the sides (3 & 4) are used to change the direction of the laser line.
- To change the direction, push the button in the direction you want the laser to go.
J
K
-
In figure K the button is fully depressed, and a level laser line is directed out the left side of the unit.
-
Press button the other way, and the laser line directs out the right side of the unit.
M
- With the button pushed back to center, the laser line is projected vertically.
Storage
Always store the laser indoors with the ON/OFF actuator (1) in the "OFF" position.
Maintenance
Use only mild soap and damp cloth to clean the tool. Never let any liquid get inside the tool; never immerse any part of the tool into a liquid.
IMPORTANT: To assure product SAFETY and RELIABILITY, repairs, maintenance and adjustment (other than those listed in this manual) should be performed by authorized service centers or other qualified service personnel, always using identical replacement parts.
Accessories
Recommended accessories for use with your tool are available from your local dealer or authorized service center. If you need assistance regarding accessories, please call:
1-800-54-HOW-TO (544-6986).
WARNING: The use of any accessory not recommended for use with this tool could be hazardous.
Service Information
All Black & Decker Service Centers are staffed with trained personnel to provide customers with efficient and reliable power tool service. Whether you need technical advice, repair, or genuine factory replacement parts, contact the Black &
Decker location nearest you. To find your local service location, refer to the yellow page directory under "Tools-Electric" or call: 1-800-544-6986 or visit www.blackanddecker.com
Full Two-Year Home Use Warranty
Black & Decker (U.S.) Inc. warrants this product for two years against any defects in material or workmanship. The defective product will be replaced or repaired at no charge in either of two ways.
The first, which will result in exchanges only, is to return the product to the retailer from whom it was purchased (provided that the store is a participating retailer). Returns should be made within the time period of the retailer's policy for exchanges (usually 30 to 90 days after the sale). Proof of purchase may be required. Please check with the retailer for their specific return policy regarding returns that are beyond the time set for exchanges.
The second option is to take or send the product (prepaid) to a Black & Decker owned or authorized Service Center for repair or replacement at our option. Proof of purchase may be required. Black & Decker owned and authorized Service Centers are listed under "Tools-Electric" in the yellow pages of the phone directory and on our website www.blackanddecker.com.
This warranty does not apply to accessories. This warranty gives you specific legal rights and you may have other rights which vary from state to state. Should you have any questions, contact the manager of your nearest Black & Decker Service Center. This product is not intended for commercial use.
FREE WARNING LABEL
REPLACEMENT: If your warning labels become illegible or are missing, call 1-800-544-6986 for a free replacement.
TROBBESGOUTNG
| Problem | Possible Cause | Solution |
| · Laser does not project on wall. | ·Weak batteries. ·The self leveling range of the unit is +/-5 degrees, if the unit is not held within 5 degrees of vertical, the laser lines will not project on wall. | ·Replace with fresh batteries. ·Be sure that the unit is as straight up and down as possible. |
| ·Laser projects on wall but lines are not level. | ·Wall on which the unit is mounted or held must be within +/- 5 degrees of vertical for the self leveling mechanism to function correctly. If this is exceeded, the lines will still project but may not be level. ·The laser on/off switch must be pushed to the full on position. | ·Use the unit against vertical walls only, lines will not be level on sloped walls or other non-vertical surfaces. ·Be sure laser on/off switch is in the full on position. |
TECHNICAL SPECIFICATIONS
Laser Diode Wavelength: 650± 5 nm (red color)
Laser Class: Class 2
Working Range: Up to 20 feet (609 cm) (depends on light conditions)
Leveling Accuracy: ±1/8 inch (3 mm) @ 10 feet (3 m)
Auto Leveling Range: ±5°
Auto Leveling Lines Settling Time: <5 sec
Batteries:
Voltage:
Operating Temperature:
Imported by
Black & Decker (U.S.) Inc., 701 E. Joppa Rd.
Towson, MD 21286 U.S.A.

BlackandDecker.com
1-800-544-6986
See 'Tools-Electric'
Yellow Pages
for Service & Sales

Black & Decker Canada Inc.
100 Central Ave.
Col. Industrial Bravo
GUADALAJARA, JAL
Av. La Paz #1779
(33) 3825 6978
Col. Americana Sector Juarez
MEXICO, D.F.
Eje Central Lázaro Cardenas No. 18
(55) 5588 9377
Local D, Col. Obrera
MERIDA, YUC
Calle 63 #459-A
(999) 928 5038
Col. Centro