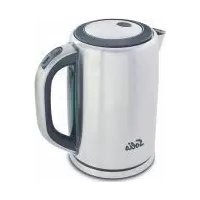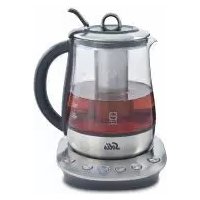
Classic 5514 - Kettle Solis - Free user manual and instructions
Find the device manual for free Classic 5514 Solis in PDF.



User questions about Classic 5514 Solis
0 question about this device. Answer the ones you know or ask your own.
Ask a new question about this device
Download the instructions for your Kettle in PDF format for free! Find your manual Classic 5514 - Solis and take your electronic device back in hand. On this page are published all the documents necessary for the use of your device. Classic 5514 by Solis.
USER MANUAL Classic 5514 Solis
Solis of Switzerland AG
Solis-Haus · Europastrasse 11 · CH-8152 Glattbrugg-Zurich · Schweiz Telefon +41 44 874 64 54 · Telefax +41 44 874 64 99 info@solis.ch · www.solis.ch · www.solis.com
CONSIGNES DE SECURITE IMPORTANTES
Solis of Switzerland SA
Solis-Haus • Europastrasse 11 • CH-8152 Glattbrugg-Zurich • Suisse Telephone +41 44 874 64 54 • Télefax +41 44 874 64 99 info@solis.ch • www.solis.ch • www.solis.com
NORMEDI SICUREZZAIMPORTANT
Solis of Switzerland SA
Solis-Haus • Europastrasse 11 • CH-8152 Glattbrugg-Zurigo • Svizzera Telefono +41 44 874 64 54 • Fax +41 44 874 64 99 info@solis.ch • www.solis.ch • www.solis.com
IMPORTANT SAFETY PRECAUTIONS
Please read through this user manual thoroughly before using your Solis Tea Kettle Classic so that you become familiar with your appliance and can use it safely. We thoroughly recommend that you keep these instructions and, if you pass the appliance on, that you also hand these instructions to the new owner.
For your own safety, please observe the following safety measures when using electrical appliances:
- To avoid electric shock, neither the appliance base nor the power cord and plug resp. the electrical contacts in the bottom of the jug and on the appliance base must come into contact with water or any other liquids. Water can enter the housing and damage the appliance! Should the appliance base resp. the power cord or plug resp. the electrical contacts in the bottom of the jug and on the appliance base come into contact with liquids, use dry rubber gloves to immediately pull the power plug from the power socket. Do not use the appliance before having it checked for functionality and safety by Solis or a Solis approved service centre.
- The glass jug itself must not be submerged in water or other liquids and has to be completely dry on the outside and bottom when being placed on the appliance base.
- Do not operate or unplug the appliance with wet or moist hands or feet.
- Before using the appliance, check that the voltage stated on the type plate matches your mains voltage.
- Place the appliance while in function on a heat and moisture resistant, level, stable, clean and dry surface, like a table or work top. A minimum distance of 20~cm to walls, curtains or heat resp. steam sensitive objects has to be kept at all times. We recommend not using the appliance under heat and moisture sensitive furniture resp. hanging cupboards. The
room should be well ventilated to allow the steam to escape quickly.
- Never use the Tea Kettle near the edge of a table. Make sure it is kept out of the reach of children and pets to prevent it from being pulled down and damaged with the escaping boiling water causing scaldings.
- Do not leave the power cable hanging over table edges so that it can be pulled. Make sure that it does not come into contact with hot surfaces, such as hotplates or a radiator, or that it comes into contact with the appliance. Fully unwind the cord before use.
- Protect the appliance from frost. In winter, do not leave the appliance in a car. Never place the appliance or the glass jug alone in the fridge or the freezer, e.g. to make ice tea.
- Keep the appliance away from hot gas, hot ovens and other heat-emitting appliances or heat sources. Do not use the appliance near flammable or explosive liquids or gases. Never use the appliance on a hot or wet surface. Never place the appliance near moisture, heat and naked flames. Keep the appliance away from moving parts or appliances.
- Never carry the appliance by the power cable and do not place it on the power cable.
- We recommend that you do not use an extension cable with this appliance. Do not connect the power plug to a plug board to which other appliances are connected. Do not place the appliance directly underneath a power socket.
-
Unplug the appliance when it is not in use or unattended and before cleaning. We recommend the use of a residual current device (RCD safety switch) to ensure additional protection during the use of electrical appliances. It is advisable to use a safety switch with a rated residual operating current of 30mA maximum. For professional advice consult an electrician.
-
Do not make any adjustments to the appliance, cable, plug or accessories.
- Caution: The surfaces of the appliance, the glass jug (incl. the surface of the heating element in the jug bottom), the lid ring with the lid insert, the tea strainer as well as the water / the tea in the jug will become very hot during boiling and stay very hot even some time after switching off. Be careful not to burn yourself!
- In order to avoid electric shock, never submerge or bring the glass jug bottom, the appliance base, the power cord or the power plug into contact with water. Never rinse the outside of the glass jug with running water. Never handle the wet tea strainer or the wet lids above the appliance base!
- Never take hold of an appliance that has fallen into water. Always take the plug out of the power socket before removing the appliance from the water. Do not use the appliance again until you have had it's ability to function safely checked by Solis or a Solis approved service centre.
- Never place the Tea Kettle in a place where it could fall into water (e.g. next to a sink).
- Place the appliance so that it is never exposed to direct sunlight.
- Do not leave the Tea Kettle unattended when in use. Incorrect use may cause injury!
- Never put sharp or pointed objects and tools into the appliance openings. The appliance may become damaged - danger of electric shock!
- Do not shake or relocate the appliance while it is in operation.
-
Check if the glass jug is correctly positioned on the base before starting to use the appliance.
-
Only use the Solis Tea Kettle for heating water and making tea. It is not suitable for boiling other liquids (milk, hot chocolate, coffee, etc.).
- Only fill the jug with water through the lid opening, not through the spout. For filling water, always lift the appliance off the appliance base.
- Only switch the appliance on when there is enough water in the kettle (note 0,5 litres MIN marking!), otherwise the appliance might be damaged.
- Should there be too little water in the jug or should the water have evaporated, thereby triggering the overheat protection, pull the plug and let the appliance cool down for approx. 30 minutes, before refilling cold water into the jug. Caution: Never fill the appliance with cold water to cool it down, always wait for the jug to cool down by itself.
- Use the appliance only as described in this manual. Never switch the appliance on with an empty jug. Improper use can cause personal injury. Only fill the jug with cold water and make sure never to exceed the MAX marking resp. fall under the MIN marking.
- A maximum of 1,2 litres of water can be filled into the glass jug. If more water is poured in, the boiling water could splash resp. splutter out of the jug and cause scaldings resp. damage to the appliance. Should hot water splash out of the jug during boiling, switch the appliance off immediately with the START/STOP button (press and hold button for 2 seconds) and pull the plug. The appliance base and the outside of the jug with the electrical contacts have to be completely dry before, during and after the boiling process.
- Only use with the provided accessories, or accessories recommended by Solis, incorrect accessories can lead to damage of the appliance.
-
This appliance is only for domestic use and is not suitable for commercial use. Do not use in moving vehicles or boats.
-
Do not use the appliance outdoors. Do not store the appliance outdoors or in rooms with high humidity.
- Check your Tea Kettle before every use.
- In order to avoid electric shock, do not use the appliance if the cable or plug are damaged or the appliance is otherwise faulty, dropped or damaged. Never attempt repairs yourself, but take your appliance to Solis or a Solis approved service centre in order to get it inspected or mechanically and electrically repaired.
- People with limited physical, sensorial or mental capabilities as well as unknowing or inexperienced people (incl. children) must not use the Tea Kettle except when supervised or thoroughly instructed on how to use the appliance by a person responsible for their safety. Additionally, they must be aware of the dangers arising from the appliance and know how to operate it safely. Cleaning and maintenance of the appliance must not be done by unsupervised children. The appliance must not be operated or cleaned by children under the age of 8.
- Always keep the appliance and power cord out of the reach of children.
- Children must not clean the appliance except when supervised by a grown-up person responsible for their safety.
- Children must not be allowed to play with the Tea Kettle. Keep the packaging material incl. plastic bags out of reach of children. Suffocation hazard!
- Keep the appliance away from children during use - the water in the jug is hot! As the glass jug itself will become warm, you may only touch it by the handle to lift it.
-
Do not disconnect resp. lift the glass jug from the appliance base during boiling or steeping or when the tea strainer is inserted. If you lift the jug nonetheless, the appliance switches back to the operating mode and has to be reset resp. restarted.
-
Never pull the power plug while water is being heated. Always switch the appliance to the operating mode with the START/ STOP button before (press and hold button for 2 seconds).
- Avoid contact with the hot steam that escapes from appliance openings during and even after boiling. Always pour hot water / tea out of the spout carefully and slowly to prevent it from splashing and scalding somebody. Always keep the lid shut during boiling.
- Always keep the lid closed during the boiling process. Once the set water temperature has been reached and the tea strainer has to be placed in the jug, the grey lid insert of course has to be opened. As hot steam will escape when the lid is opened, you should use a kitchen glove or towel to remove the grey lid and not hold your face resp. other body parts directly above the jug opening. The same applies if you remove the hot tea strainer from the jug after steeping. Never remove the lid ring during use or while the appliance is cooling down!
- Hot water resp. tea must only be poured out through the spout. The lid has to remain closed for this.
- Be especially careful when lifting or carrying the jug filled with hot water / tea.
- The appliance resp. the jug has to be cooled down before you fill it with fresh, cold water. Only fill the jug with cold water, however, not ice water. Always let the appliance cool down between two boiling or heating phases.
- Never start the appliance using a remote or timer.
- Only use the included jug and lid with this appliance. Do not use the appliance on another appliance base and never place the jug on a hot stove top. Improper accessories can cause electric shock, fire or personal damage and damage the appliance itself!
-
The jug is made from glass and might break when being handled or used carelessly. Never use the appliance with a damaged glass jug.
-
Never place the tea leaves directly in the glass jug, always put them into the tea strainer.
- The lid has to be closed during heating and while the tea is steeping. Do not place anything on the lid. Never cover the appliance during use, the space above the appliance has to remain unobstructed at all times.
- Before moving or cleaning the appliance, always switch it off with the START/STOP button (press and hold button for 2 seconds). Then, pull the power plug from the socket and wait for the appliance to cool down completely. Please pull the plug if the appliance is not in use.
- Pull the plug after every use. Only then is the appliance definitely switched off.
- Keep the appliance clean. Always switch the appliance off, pull the power plug and let the appliance cool down completely before cleaning and storing it. Please refer to the "Cleaning and maintenance" section on page 114 of this manual.
- Only use mild detergent and a soft towel for cleaning. Aggressive detergents and solvents or abrasive materials could damage the surface.
- Before first use, remove all packaging materials and stickers resp. labels, clean the inside of the jug and rinse the lid. Please refer to the section "Before first use" on page 105 of this manual.
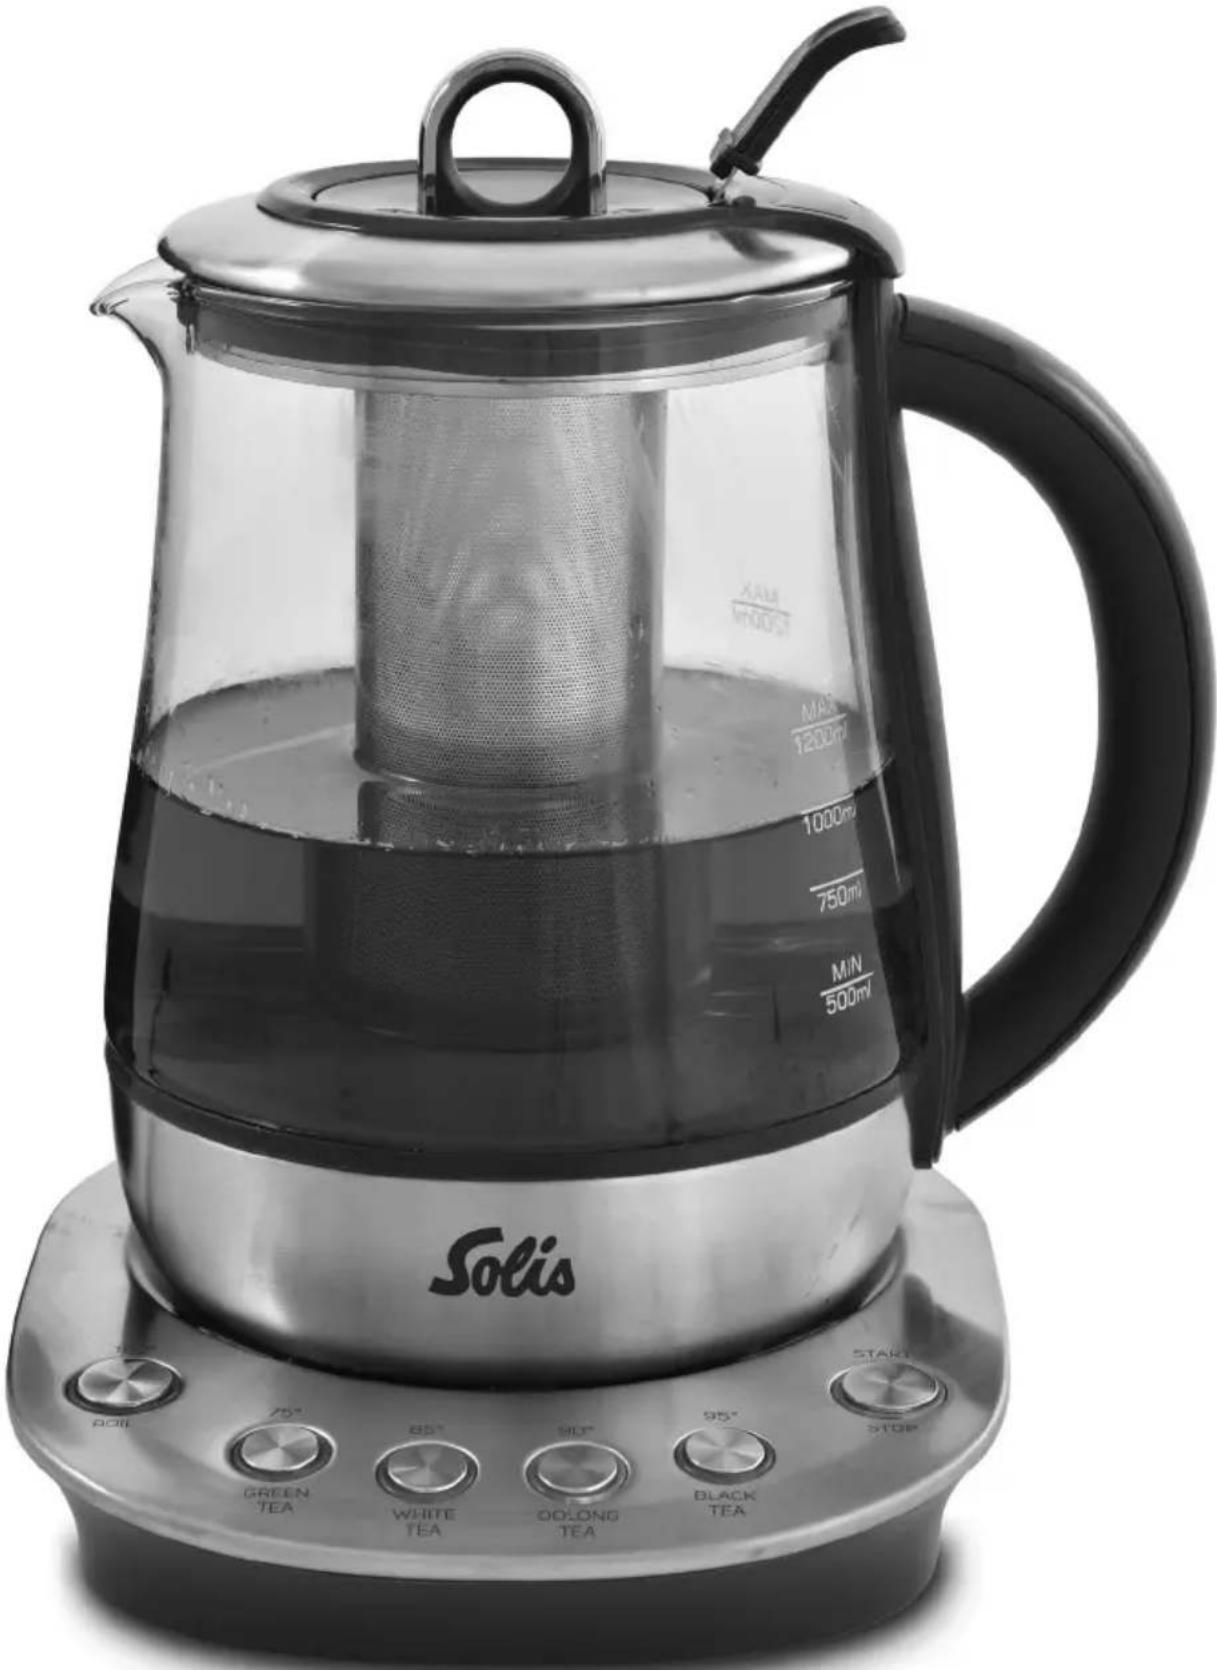
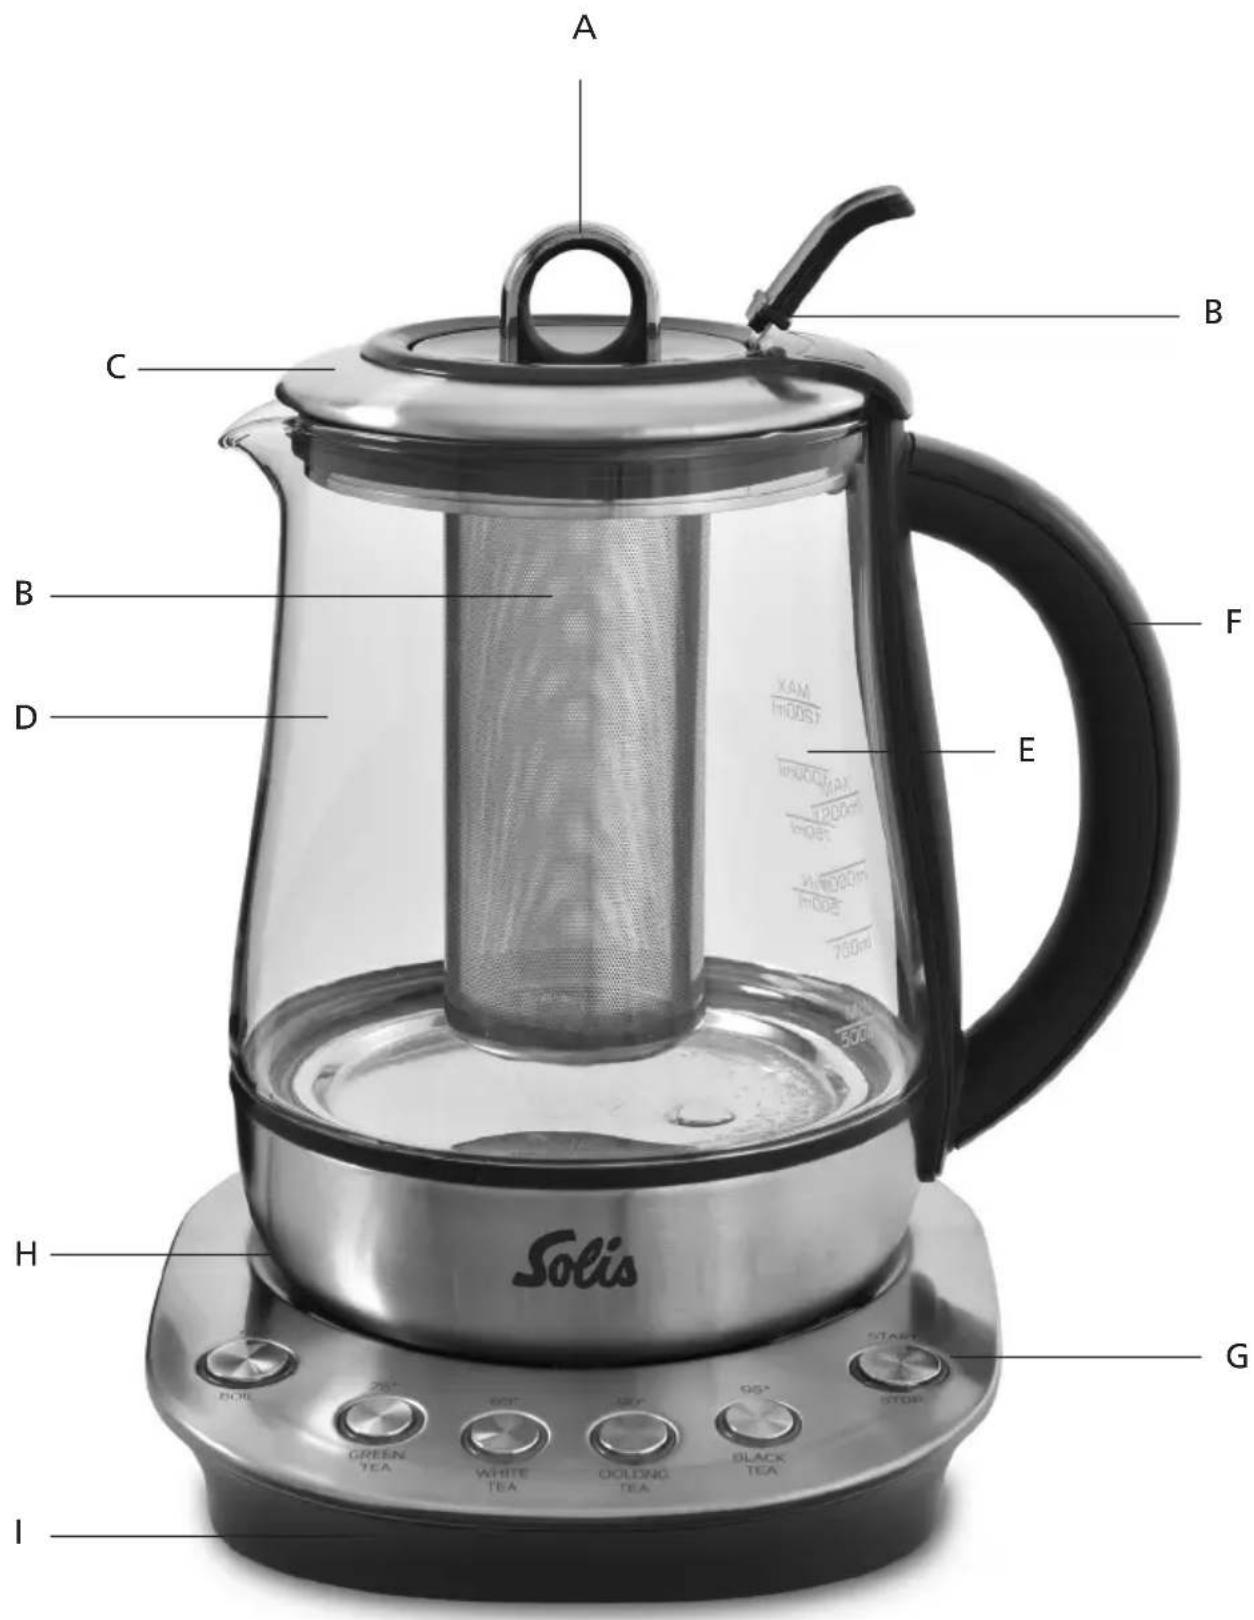
APPLIANCE DESCRIPTION
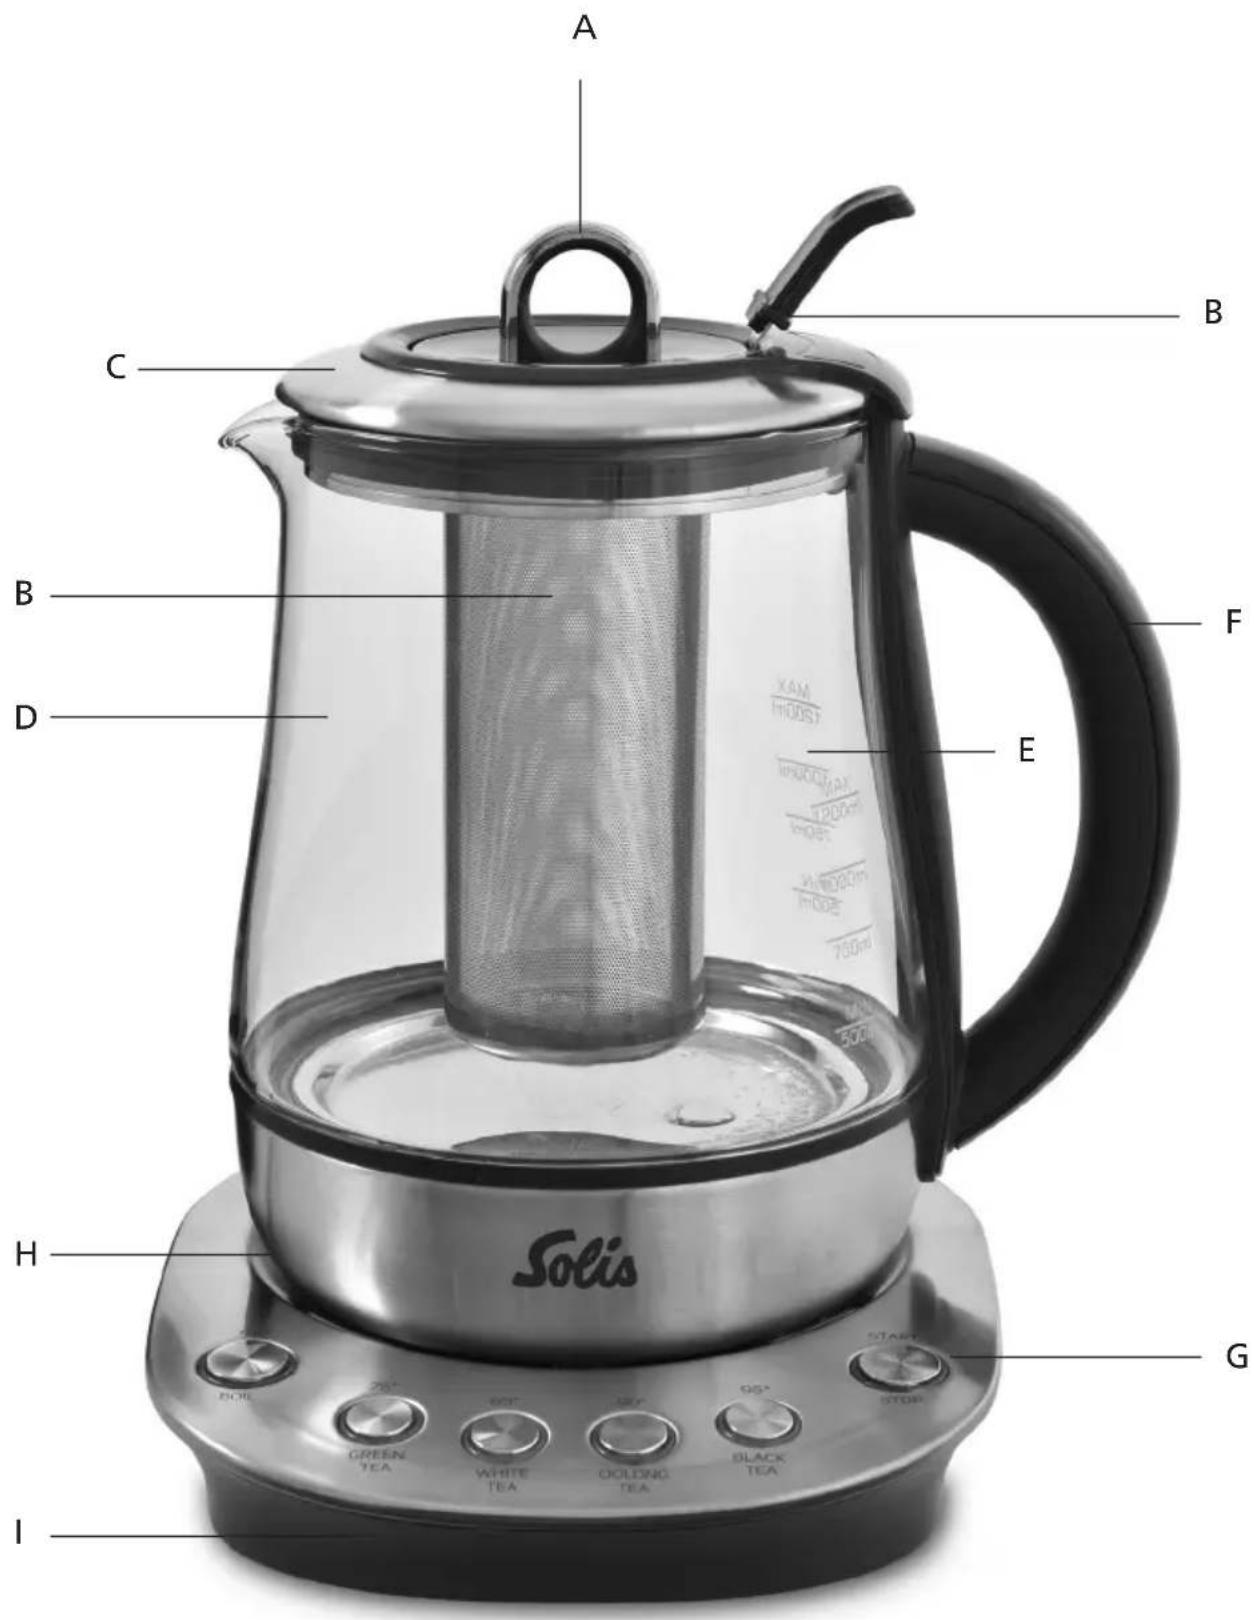
A Small grey lid insert
B Stainless steel tea strainer with handle, can be mounted into the lid and closed with the small lid insert
C Main lid (lid ring) with rubber seal, into which the small lid insert can be mounted and locked. Thanks to the plastic latch on the lid ring, it can be easily pulled off the glass jug.
D Glass jug made from heat resistant glass; with spout and a capacity of 1,2 litres; in the bottom: the temperature sensor
E Water level indicator with MIN and MAX marking
F Heat insulated rubber glass jug handle
G Control panel with illuminated function buttons
H Heating element, concealed and powerful with 1200 - 1400 watts with automatic shutdown function and overheating protection
I Appliance base with cord wrap in the bottom

THE CONTROL PANEL AND THE FUNCTION BUTTONS
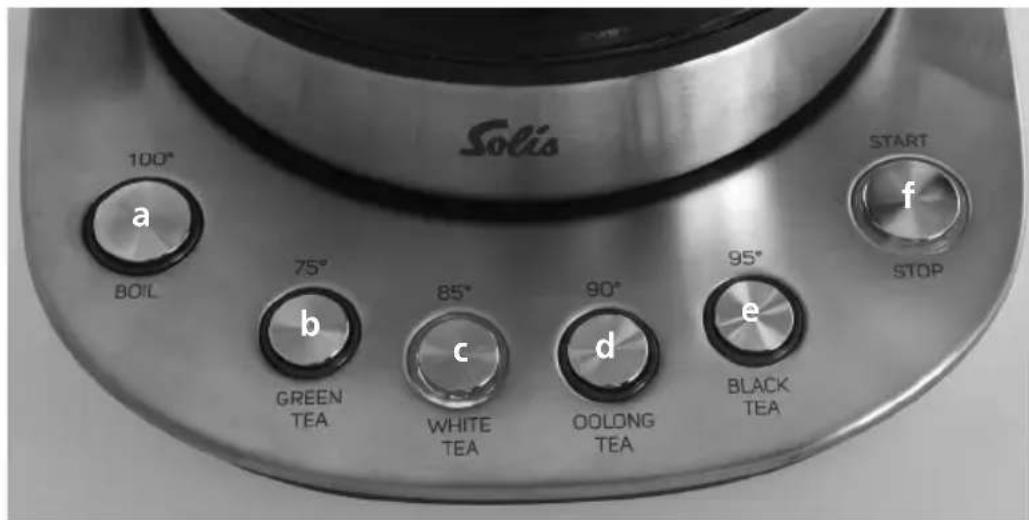
a Button with function light "100%BOIL"
b Button with function light "75°/GREEN TEA"
c Button with function light "85°/WHITE TEA"
d Button with function light "90°/OO LONG TEA"
e Button with function light "95°/BLACK TEA"
f Button with function light "START/STOP"
Note: This tea kettle is not calibrated for commercial or scientific use. The temperatures can vary by +/- 5^ Celsius. These temperatures, however, are in the spectrum for ideally brewing all tea varieties.
OPENING AND CLOSING THE LID INSERT
- You can lift off the entire lid for filling water or just remove the small, grey lid insert. For inserting resp. withdrawing the tea strainer, just the lid insert has to be taken off resp. reinstalled.
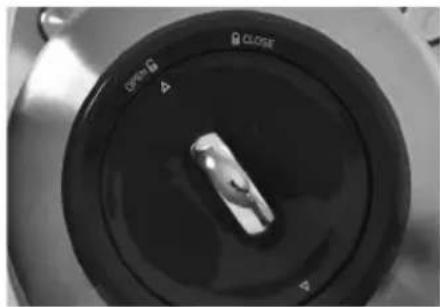
■ REMOVING LID INSERT
- Turn the lid insert so that the white arrow on the lid insert lines up with the lock-symbol by "OPEN" on the lid ring: You can remove the lid insert.
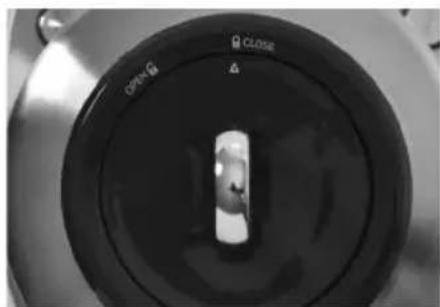
LOCKINGLIDINSERT
- Turn the lid insert so that the white arrow on the lid insert lines up with the lock-symbol by "CLOSE" on the lid ring: The lid insert is locked.
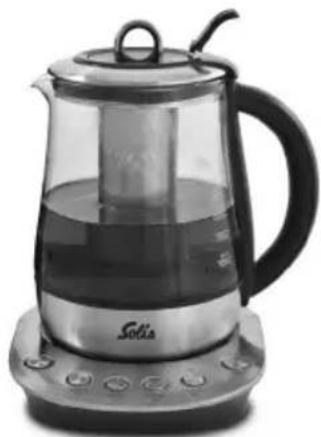
■ LOCKING THE LID INSERT WITH MOUNTED TEA STRAINER
- When the tea strainer is mounted into the jug, you can lock the lid insert as described above.
- To do that, the handle of the tea strainer has to be placed in the notch on the lid ring.
PROGRAM SELECTION, BREWING TEMPERATURES, STEEPING TIME
- The built in electronic makes it possible for you to choose from 5 different programs: 4 programs for different kinds of tea with pre-programmed brewing temperatures and steeping time as well as a 100^ water cooker function.
| Program Tea | variety / function | Brewing temperature | Steeping time |
| BOIL | Boiling function | 100°C | |
| GREEN TEA | Green tea | 75°C | 3 minutes |
| WHITE TEA | White tea | 85°C | 4 minutes |
| OO LONG TEA | Asian tea | 90°C | 5 minutes |
| BLACK TEA | Black tea, Herbal tea, Fruit tea | 95°C | 6 minutes |
WARM-KEEPING FUNCTION
- The appliance is equipped with a 30-minute warm-keeping function. The warm-keeping temperature depends on the original brewing temperature and varies between 65^ and 90^ . It automatically activates after the steeping time of a tea program has elapsed or after the water cooker function (button 100^ /BOIL) has finished (please refer to the chapter on page 112).
BEFORE FIRST USE: CLEANING GLASS JUG, TEA STRainer AND LID
Before the first use, the jug has to be cleaned and the accessories have to be rinsed. Please proceed as follows:
- Remove both lids and the tea strainer. To do that, turn the lid insert so that the white arrow lines up with the lock-symbol by "OPEN". Then, you can pull the small lid insert off. Withdraw the tea strainer and remove the lid ring by pulling up its plastic latch above the lid.
- Wipe the inside and outside of the glass jug as well as the appliance base clean with a soft, slightly wet towel and dry everything afterwards.
- Clean the lid insert, the lid ring as well as the tea strainer in warm dish water with a soft towel, rinse everything with clear water and dry all parts carefully. Place neither the appliance base nor the jug resp. its parts in the dishwasher.
- Fill the jug with cold water up to the MAX marking on the water level indicator.
Caution: The MAX marking in the jug must never be exceeded, otherwise boiling water might splash out! The maximum capacity is 1200ml . Likewise, the MIN marking (500ml) must never be undercut, otherwise the overheating protection is triggered and the appliance automatically switches off.
- First, place the lid ring back on the jug and press the lid firmly onto the jug so that the rubber seal resp. the lid closes all the way all around.
- Then, place the lid insert in the lid ring, the arrow on the lid insert has to line up with the lock-symbol by "OPEN". Then, fasten the lid insert by turning it clock wisely until the arrow on the insert lines up with the lock-symbol by "CLOSE" on the lid ring.
- If necessary, dry the outside of the glass jug as well as the jug bottom. Place the jug on the dry appliance base.
- Connect the power plug to a suitable power outlet, the power cord has to be completely unwound.
- All button surrounds light up briefly in blue, after that, only the buttons surrounds of the START/STOP button and the GREEN TEA button light up constantly in blue.
- Press the 100^ /BOIL button, the button surround lights up in blue. Then, press the START/STOP button. The button surround of this button lights up in red and the water is heated to 100^ C.
- Wait for the water to come to the boil. The end of the cooking process is indicated by a fivefold acoustic signal and the flashing of the blue button surround
by 100^ /BOIL. After that, the appliance automatically switches to the warm-keeping phase.
- Press the START/STOP button for 2 seconds to switch the appliance off. The button surrounds of the START/STOP button and the 100^ /BOIL button light up constantly in blue.
- Carefully pour the water out of the spout, with the lid closed.
- Let the appliance cool down and refill it with cold tap water. To do that, just removing the lid insert is enough.
- Repeat the boiling process another time, pour that water away as well.
- Now your appliance is ready for use.
STARTING UP
Please note:
- The surfaces marked with the symbol become very hot during the boiling process and stay hot for some time after. This concerns the glass jug, the lid with the grey lid insert, the tea strainer and of course the water / the tea in the jug. Be especially careful when opening the lid insert to mount the tea strainer, use cooking gloves or a kitchen towel.
- Do not overfill the glass jug! Please note the MAX marking, otherwise the boiling water might splash out.
- Keep in mind that the appliance base, the power cord and the power plug as well as the outsides and the bottom of the glass jug must never become wet.
STEP 1: FILLING THE GLASS JUG WITH COLD TAP WATER
- Remove both lids or just the lid insert from the jug and fill the jug with cold tap water (not ice water), at least up to the MIN marking. Do not exceed the MAX marking.
- The tea strainer is not yet placed in the jug.
- Close the jug with the lid. The lid ring has to line up with the edge of the jug all around, the arrow on the lid insert must first be in the "OPEN" position, then in the "CLOSE" position.
- If necessary, dry the outside of the glass jug as well as the jug bottom. Place the jug on the dry appliance base.
STEP 2: CONNECTING THE APPLIANCE TO THE POWER
- Connect the power plug to a suitable power outlet, the power cord must be completely unwound.
- The appliance switches to operating mode, a signal sounds and all button surrounds light up briefly in blue. After that, only the button surrounds of the START/STOP button and the GREEN TEA button light up constantly in blue.
Standby mode / Power saving mode:
If you do not press any button within a timeframe of 5 minutes, the appliance switches to power saving mode, all button surrounds go out. In this case, you simply have to lift the glass jug, disconnect it from the base and then place it back on the base or press a random button to return the appliance to operating mode.
MAKING TEA
CHOOSEING THE TEA PROGRAM AND HEATING WATER
- Choose the desired tea program by pressing the corresponding button. The according blue button surround will light up constantly.
- Then, press the START/STOP button. Its button surround lights up in red and the heating up phase starts.
- You can make use of your time during the heating up phase by filling the dry tea strainer with tea leaves. The amount of tea depends on your personal taste of how strong you like the tea. In any case, match the amount of tea to the amount of water. Please refer to our "Tips for brewing tea" on page 110 of this manual.
- Once the set water temperature has been reached, a fivefold acoustic signal sounds and the blue button surround of the selected button flashes.
INSERTING THE FILLED TEA STRAINER
- Unfasten the lid insert by turning it counter clock wisely to the left (arrow by "OPEN") and lift the small lid off. Caution: Hot steam escapes and the lid insert is hot, therefore definitely use cooking gloves or a kitchen towel and keep the face away from the lid opening! Do not touch the lid ring when inserting the tea strainer.
- Submerge the tea strainer in the jug resp. the water. The handle of the tea strainer has to be placed in the notch in the lid ring.
- Now you can firmly close the lid with the lid insert. Turn the small lid clock wisely to the right to make the arrow up with "CLOSE" on the lid ring.
Caution: Do not lift the glass jug off the appliance base to insert the tea strainer! The appliance would switch off (START/STOP button surround lights up in blue) and require restarting.
- Note: If you do not immediately lower the tea strainer into the glass jug and activate steeping time after the signal has sounded, the water temperature is held for 10 minutes and the signal is sounded again after 2 minutes.
ACTIVATING STEEPING TIME
- Press the button of the selected tea program another time right after inserting the tea strainer to activate steeping time. A long signal sounds. During steeping time, the button surround of the chosen program constantly lights up in blue. The water temperature is held during steeping time resp. heated in short phases.
Caution: If you do not press the tea program button to start the steeping process for 10 minutes after the water has been heated, the button surround of the
START/STOP button changes to blue and the appliance is no longer in the tea program but in operating mode.
Note: Please keep in mind that the lid is hot and that hot steam escapes once the lid is removed. Use a kitchen towel or cooking gloves!
- Once the steeping phase has been completed, a sixfold acoustic signal sounds (1 x long, 5 x short) and the appliance automatically switches to warm-keeping mode for 30 minutes. The blue button surround of the chosen tea program slowly flashes. After another 30 seconds, a sixfold signal is sounded to remind you that the tea strainer should now be removed from the jug.
Removing the tea strainer from the jug:
- Once the steeping time has elapsed, the tea strainer should be removed from the jug so that the tea does not get too strong. To do that, the jug should stay in place on the appliance base.
- Open the lid insert (turn the lid to the left, towards "OPEN") and carefully remove the tea strainer from the tea, using the handle. Take care not to dribble any water over the jug resp. onto the appliance base.
- Then, close the lid insert again (turn the lid to the right, towards "CLOSE").
Caution: Please keep in mind that the lid is hot and that hot steam escapes once you lift the lid off. Use a kitchen towel or cooking gloves!
Warning: The tea strainer is hot as well! The hot drops from the tea strainer might also scald you!
Tips:
- Use a small plate to carry the tea strainer from the jug to the kitchen sink or the waste bin. Take care not to let any drops from the tea strainer or lid insert fall onto the appliance base or the outside of the jug.
- If you wish to let the tea steep for a while after the steeping time has elapsed, you can simply leave the tea strainer in the jug for the beginning of the warm-keeping function.
- You can, however, shorten steeping time. To do that, press the button of the chosen tea program for at least 2 seconds during steeping time. A sixfold signal (1 x long, 5 x short) is sounded and your appliance automatically switches to warm-keeping mode. The blue button surround flashes slowly.
Caution: If you disconnect the glass jug from the appliance base during the water heating phase, to insert the tea strainer or during the steeping phase, operation is automatically stopped (START/STOP button surround lights up in blue)! In that case, you have to restart the appliance.
After that, place the small lid insert back on the glass jug and close it.
The tea is now ready to be served.
- Note: If you wish to stop the tea program, press the START/STOP button lit up in red for at least 2 seconds until a signal sounds. The button surround changes to blue.
TIPS FOR BREWING TEA
- The dosage and amount of tea leaves depends on your personal taste. Basically, 2 to 3g of tea leaves are good for 200ml of water, meaning approx. 1 well filled tea spoon per cup.
- The water quality has a deciding influence on the taste of the tea. We recommend using filtered water.
- Very small tea leaves soak up the water faster than big leaves, the tannin therefore spreads out in the water more quickly. With longer steeping times, the tea will become stronger (resp. possibly bitter) more quickly when using small leaves.
- If the amount of water is at or just above 500ml , you should make sure that the tea leaves in the tea strainer are completely covered in water. If necessary, use a spoon to push the tea leaves down in the tea strainer.
- You can put home-dried or fresh tea leaves into the tea strainer or a tea bag. As a rule, all tea varieties should be placed in the jug in the tea strainer, do not put any tea leaves / tea bags directly into the glass jug.
HEATING THE WATER TO A PRESET TEMPERATURE RESP. BRING IT TO THE BOIL
With your Solis Tea Kettle Classic, you can simply heat water to one of the 4 temperatures resp. bring water to the boil.
- Place the water-filled jug without the tea strainer on the appliance base. The outside of the jug and the appliance base have to be dry, the lid has to be closed.
- Plug the power plug into the power outlet. For a short moment, all button surrounds light up in blue, after that, only the button surrounds of the START/STOP button and the GREEN TEA button will light up.
- Press a tea program resp. a button if you wish to heat water to the corresponding temperature (75^ / 85^ / 90^ / 95^ / 100^) . The blue button surround lights up around the button.
- After that, press the START/STOP button, its button surround lights up in red and the heating up process starts.
- Once the desired temperature has been reached, a fivefold signal sounds and the button surround of the selected program button flashes.
- If you have chosen the 100^ /BOIL button, the appliance automatically switches to the warm-keeping function for 30 minutes after completing the boiling phase. The blue button surround of the 100^ /BOIL button flashes slowly.
- If you have chosen another temperature (75^ / 85^ / 90^ / 95^) , and wish to activate the warm-keeping function, you have to press the previously chosen program button for at least 2 seconds while the blue button surround is flashing. A sixfold signal sounds and the warm-keeping function is activated for 30 minutes. The flashing intervals of the button surround change to slower flashes.
- If you wish to stop the program during the heating up phase, you can do this at any time by pressing the START/STOP button for at least 2 seconds until a signal sounds and the button surround of the START/STOP button changes to blue.
WARM-KEEPING FUNCTION
The warm-keeping function prevents the tea resp. the hot water in the glass jug from cooling down in the next 30 minutes. Depending on the set temperature, the warm-keeping function varies between 65^ and 90^ .
In the following cases, the warm-keeping function is activated automatically:
- After the steeping time of a certain tea program has elapsed. The warm-keeping function can be identified by the slow flashing of the blue light of the button surround. 30 seconds after the steeping time has elapsed, another signal sounds to remind you to remove the tea strainer from the jug. This prevents the tea from getting too strong. At the end of the warm-keeping phase, after 30 minutes, a sixfold signal sounds, the appliance switches off and the button surround of the START/STOP button changes to blue and the tea program button lights up constantly in blue as well.
- At the end of the classic water cooker function, if you have selected the 100^ / BOIL program. Here, too, the blue light of the button surround only flashes slowly if the warm-keeping function is activated. At the end of the warm-keeping phase, after 30 minutes, a sixfold signal sounds, the appliance switches off and the button surround of the START/STOP button changes to blue. The 100^ / BOIL button, too, lights up constantly in blue.
- Important: If you disconnect the glass jug from the appliance base during the warm-keeping phase (START/STOP button surround lights up in blue) and place the jug back on the base before the 30 minutes of the warm-keeping phase have elapsed, you have to reactivate the warm-keeping function by briefly pressing the START/STOP button. The button surround of the START/STOP button changes back to red, the warm-keeping phase is continued until the 30 minutes have elapsed.
- To fully cancel the warm-keeping function, press the START/STOP button for at least 2 seconds, the button surround changes to blue. The chosen program, too, lights up constantly in blue.
SWITCHING THE APPLIANCE OFF
- Every program and every function can be interrupted at all times. To do so, you can press the START/STOP button for 2 seconds to switch the appliance to operating mode.
- To switch the appliance off, press the START/STOP button for 2 seconds to switch the appliance to operating mode (when the program hasn't fi nished yet) and then pull the power plug to disconnect the appliance from the power.
- The power plug should be pulled after every use, so that the appliance is completely disconnected from the power and switched off.
OVERHEAT PROTECTION
Should the appliance overheat, e.g. if there is no or too little water in the jug or if it has already evaporated, the appliance automatically switches off. In this case, pull the plug and let the appliance cool down for approx. 30 minutes before using it again. The buttons can only be used again once the appliance has cooled down suffi cientsly. Never try to cool the appliance down by fi llir it with cold water! Always let the appliance cool down between two heating phases
GOOD TO KNOW
- Never exceed the MAX marking when fi lling the jug as this might cause the water to splash out of the jug during boiling and cause scalding resp. electric shock!
- Filled to the MAX marking, the jug holds 1,2 litres of water.
- Never fi II the jug with too little water. The MIN marking (500 ml) has to be reached every time, otherwise the overheat protection is triggered and the appliance switches off.
- Always check if the lid is correctly closed before connecting the power plug to the socket.
- Dry the outside of the jug including the jug bottom as well as the appliance base before plugging in the plug.
-
During a program, you can deactivate it at any time by pressing the START/STOP button for 2 seconds.
-
Should there be too little water in the jug or should the water have evaporated, thereby triggering the overheat protection, pull the plug and let the appliance cool down for 30 minutes before refilling cold water into the jug.
- If you use the function 100^ /BOIL to boil water or a heating function, never open the lid, as hot water might splash out of the jug. If you want to open the lid, e.g. to refill cold water, the hot water remaining in the jug should be poured out through the spout first, with the lid closed.
- Because steam needs to escape during the boiling process, the spout is always open. Therefore, water might escape when the filled jug is tilted or toppled to one side. As a consequence, the filled jug always has to be in an upright position.
Caution: Always be careful not to burn or scald yourself on the hot steam that escapes from the spout.
- If you do not need the hot water anymore, pull the power plug, pour the remaining water out of the jug and let the appliance cool down.
Notes:
- Do not tilt the filled jug too strongly and never turn it upside down, even when the lid is shut. Water can escape even if the lid is shut!
- Before switching the appliance on, always make sure that the lid is shut.
- The cover of the heating element in the jug bottom is made from high quality stainless steel. Should any brown deposits form, this is not rust but limestone which can be removed as described in the section "Dscaling" on page 116.
CLEANING AND MAINTENANCE
- Before cleaning, pull the power plug and let the Tea Kettle and the accessories cool down completely.
- Never submerge the jug or the appliance base in water or any other liquids and do not spray water or any other liquids onto the appliance parts. Risk of electric shock!
- Clean the outside and inside of the jug as well as the appliance base after every use with a slightly wet towel and dry everything.
- Clean the tea strainer and the lid ring with the lid insert in hot dish water, rinse everything with clear water and dry everything carefully
Tip: If you want to remove the discolourations on the tea strainer, put a few drops of mild washing up liquid on a soft sponge and clean the tea strainer with it. Never put the washing up liquid directly on the tea strainer, always put it on the sponge. After that, thoroughly rinse the tea strainer with clear water and dry it.
Notes:
- Do not use any aggressive cleaning agents or solvents and no scratching materials to clean the appliance, this might damage the surfaces.
- The accessories can not be cleaned in the dishwasher. Do not use a steam cleaner for cleaning.
Discolourations on the glass jug caused by the tannin in the tea can be removed as follows:
Fill the glass jug up the MAX marking with 1200 ml of cold water and choose one of the following three options:
a) Put a halved lemon and the previously squeezed juice into the water and bring it to the boil. Let the solution sit overnight. After that, pour the water away, refill the jug with 1200ml and boil again. If necessary, repeat the process.
b) Put 2 tablespoons of soda bicarbonate into the water and bring it to the boil. Let the solution sit overnight. After that, pour the water away, refill the jug with 1200ml and boil again. If necessary, repeat the process.
c) Put 6 tablespoons of white vinegar into the water and bring it to the boil. Let the solution sit overnight. After that, pour the water away, refill the jug with 1200ml and boil again. If necessary, repeat the process.
After that, carefully dry the glass jug with a soft towel.
DESCALING THE GLASS JUG
- After prolonged use or through the exposure to hard water, limestone deposits might form in the jug. A white layer of limestone forms on the inside of the jug. This can reduce operating performance and impair the taste of the water / tea.
Caution: If the limestone layer is very thick, it might cause the appliance to overheat and damage it beyond repair!
- Solis recommends regularly (depending on water hardness, however at least once a month) descending your jug with a mixture of SOLIPOL® fierce and water. This also applies if you use filtered water. Please use only SOLIPOL® fierce (art.-no. 703.01) for descending the appliance. Damages caused by the use of unsuitable descending agent are not covered by warranty.
- Remove the tea strainer.
- Pour 400ml of cold water into the glass jug and switch the appliance on. Bring the water to the boil with the water cooker function 100^/BOIL .
Take the water jug off the base, carefully open the lid (Caution, hot steam!) and pour 800 ml SOLIPOL® forge into the water jug so that the descaling solution reaches the MAX marking. Please ensure that the glass jug is placed on a non-sensitive resp. shielded worktop.
- Let the descending solution sit for approx. 30 minutes. Do not boil!
- Slowly pour the descending solution out through the spout to descale that area as well. Remove possibly remaining limestone deposits on the spout with a towel soaked in a solution of SOLIPOL® fierce and water.
- After you have poured the descending solution away, you have to fill the jug three times with fresh, cold tap water up to the MAX marking, bring it to the boil with the function 100^ /BOIL and pour the water away each time to remove all residues of the descending solution. Let the appliance cool down between two boiling processes!
STORAGE
- When not needed, the Tea Kettle should be disconnected from the power, be allowed to cool down completely and then dried.
- Wind the power cord around the cord wrap in the bottom of the appliance base.
- Place the dry lids and the dry tea strainer on resp. in the dry jug.
- Store the cool, clean and dry appliance in an upright position, best in the original packaging. Do not place any objects on the appliance.

TROUBLESHOOTING
| Problem Possible cause | and solution |
| Appliance does not function | - Is the power plug connected to the power outlet?- Check if the power socket is connected to the power with another electrical device.- Check if power cord or power plug are damaged. If yes, do not use the appliance but bring it to a Solis service centre. |
| The appliance can not be switched on | - Check if the glass jug is correctly positioned on the appliance base. |
| Some functions can not be activated | - Once a function button has been pressed and the heating up phase has begun, the other buttons can not be operated anymore. Exception: The START/STOP button. An exception to this rule is the warm-keeping function (see page 112 of this manual).- If you wish to change a program, you either have to elapse the currently activated program or press the START/STOP button for 2 seconds to prematurely quit the program. |
| The appliance makes loud noises during the heating phase | - The appliance is calcified. Descale the appliance as described. |
| Brewing tea takes longer than usual | - The appliance is calcified. Descale the appliance as described. |
| The tea is too strong or too weak | - Tea taste is highly individual.- If the tea is too weak, increase the amount of tea leaves.- If the tea is too strong, use less tea leaves resp. remove the tea strainer from the jug right after the steeping time has elapsed. |
| The amount of tea is smaller than the amount of water filled | - Please note that different tea varieties absorb different amounts of water, the amount of tea in the end is there-fore smaller than the amount of water filled. Addition-ally, a small amount of water evaporates during prepara- tion. |
| Glass jug and/or tea strainer have taken on the taste of the tea that has been brewed | - Glass jug and tea strainer can take on the taste of espe-cially intensive varieties of tea like e.g. peppermint or other herbal or fruit teas and even be discoloured. This is normal and not an appliance defect. Clean the glass jug and the tea strainer as described in the section “Clean- ing”. |

TECHNICAL SPECIFICATIONS
Model-No. KE 1303, type 5514
Product description Water and tea cooker
Voltage/frequency 230-240V\~ /50/60Hz
Output 1200 - 1400 watts
Power consumption < 0.5 watts in standby mode
Capacity 1,2 litres
Dimensions (W x H x D) approx. 17,5 x 27,0 x 21,5 cm
Weight approx. 1,46 kg
Technical changes reserved.

SUPPLIES
For your Solis Tea Kettle Classic, the following supplies are available:
Art.-no. 703.01 SOLIPOL® forte descaling agent (Folding bottle with 1'000ml )
SOLIPOL® forte is available from good specialist retailers or from Solis of Switzerland Ltd. Telephone: 0848 804 884, Telefax: 0848 804 890 email: info.ch@solis.com or www.solis.ch (shipping only in Switzerland)

DISPOSAL
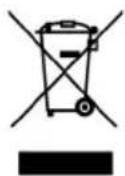
EU 2002/96/EC
Directions for proper disposal of the product according to EU directive 2002/96/EU
At the end of its working life this equipment must not be disposed of as an household waste. It must be taken to special local community waste collection centres or to a dealer providing this service. Disposing of electrical and electronic equipment separately avoids possible negative effects on the environment and human health deriving from an inappropriate disposal and enables its components to be recovered and recycled to obtain significant savings in energy and resources. In order to underline the duty to dispose of this equipment separately, the product is marked with a crossed-out dustbin.
Solis of Switzerland Ltd reserves the right to carry out technical and visual changes and modifications to improve the product at any time.

solis HelPline:
091 802 90 10
(Only for customers in Switzerland)
This item stands out due to its long-life cycle and reliability. Despite this though, if a malfunction ever occurs, simply give us a call. Often a breakdown can be easily and quickly remedied with the right tip or technique without having to straight away send off the device for repair. We will give you all the advice and practical support you require.
Keep the original packaging in a safe place so that you may use it in the event that transportation or shipping of the product becomes necessary.
Solis of Switzerland Ltd
Solis-House · Europastrasse 11 · CH-8152 Glattbrugg-Zurich · Switzerland Phone +41 44 874 64 54 · Fax +41 44 874 64 99 info@solis.ch · www.solis.ch · www.solis.com
BELANGRIJKE
APPARAATBESCHRIJVING
APPPARAAT UITSCHAKELEN
Solis of Switzerland AG
Solis-Haus · Europaastrasse 11 · CH-8152 Glattbrugg-Zurich · Zwitterland
TelefooN +41 448746454Fax +41 448746499
info@solis.ch · www.solis.ch · www.solis.com
| GARANTIE DE 2 ANS (valable uniquement accompagnée de la preuve d'achat) | 2 ANNI DI GARANZIA (valida solo con lo scontrino) | 2 JAAR GARANTIE (Alleen geldig met bewijs van aankoop) |
| Nous accordons une garantie pour ce produit, si le défaut est imputable à un défaut de piece ou main d'œuvre, sous réserve d'une utilisation et d'un entretien corrects. La garantie prend effet à la date inscrite sur la preuve d'achat, devant être jointe au produit. En cas d'utilisation profession- nelle, la durée de la garantie est limitée à 12 mois. Les conditions de garantie détaillées sont dispon- bles sur le site www.solis.com. | Sul presente prodotto assicuriamo una garanzia qualora sua dimostrabile che il guasto sa stato causato da un difetto di costruzione o dei materiali e qualora il prodotto sa stato impiegato corretta- mente e con la dovuta cura. La garanzia decorre dal- la data di acquisto, per la quale fa fede lo scontrino di vendita che deve essere alleviata all'articolo. In caso di utilizzo commerciale, il periodo di garanzia ammonta a 12 mesi. Le condizioni di garanzia det- tagliate sono visionabili su www.solis.com. | Wij geven voor dit product garantie, indien het defect aantoonbaar het gevolg is van een ma- teriaal- en/of constructiefout en bij juist handelen en onderhoud ontstaan is. De garantie begint op de verkoopdatum die vermeldt staat op het aanko- opbewijs die bij het product meegegeven is. Voor commercieel gebruik geldt een garantietermijn van 12 maanden. Uitgebeinde garantievoorwaarden kunt u vinden op www.solis.com. |
| SERVICE CLIENTÉLE Pour toute réparation, les clients et clients résid- nant en Suisse renoient directement l'appareil à: Solis Produzione SA, Centro Solis, Via Penate 4, CH-6850 Mendrisio, Suisse. Il est recommendé de teléphone avant tout retour d'appareil, car les dysfonctionnements peuvent souvent être résolus par nos experts à l'aide de quelques conseils et astuces. Hors de Suisse, les contacts spécifiques à chaque pays sont indiqués sur le site www.solis.com. Bien entendu, nous vous informons volontiers par telephone. Vous pouvez nous contacter par télé- phone aux numérios suivants: | SERVIZIO CLIENTI I clientsi residenti in Svizzera devono inviare gli articoli da riparare direttamente a: Solis Produ- zione SA, Centro Solis, Via Penate 4, CH-6850 Mendrisio, Svizzera. In agli caso, prima di spedire l'apparechchio, è preferibile contattare Telefonica- mente il servizio clienti: spesso i problemi di fun- zionamento si possono risolverve correctamente con il consiglio o l'accorgimento giusto dei nostri specia- listi. I clienti al di fuori della Svizzera devono vis- tare il situ www.solis.com per verificare i contatti specifici del proprio Paese. Ovviamente siamo disponibili a fornire informazionianche telefoni- camente; siamo raggiungibili ai seguenti numeroi: | KLANTENSERVICE Het is altijd handig om te bellen voordat u het apparaat opstuurt, odomat storingen vaak snel en eenvoudig+kunnen worden opgelost met een juiste tip of trucje van once specialisten. Bezoek onze website www.solis.com voor landspecifieke contactgegevens. Uiteraard geven wij u deze in- formatie ook graag Telefonisch. U kunt ons op de volgende telefoonnummers bereiken: Voor Nederland: +31 85 4010 722 Voor Belgie: +32 2 808 35 82 Voor overige landen: +41 44 874 64 84 |
| Pour la Suisse: +41 91 802 90 10 Pour la Belgique: +32 2 808 35 82 Pour les autres pays: +41 44 874 64 84 | Per la Svizzera: +41 91 802 90 10 Per gli altri Paesi: +41 44 874 64 84 |
2 JAHRE GARANTIE 2 YEAR GUARANTEE (Nur mit Kassenbeleg gültig) (Only valid with a till receipt)
We provide a guarantee for this product, if the defect has demonstrably arisen as a result of faults in the material or construction, and has arisen despite proper handling and care. The guarantee starts from the date of sale, as noted on the sales receipt, which must be enclosed with the item. For commercial use, the guarantee lasts for 12 months. The detailed guarantee conditions are available at www.solis.com.