
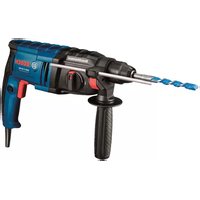
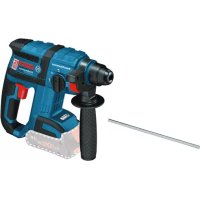
GBH 220 Professional - Hammer BOSCH - Free user manual and instructions
Find the device manual for free GBH 220 Professional BOSCH in PDF.
| Brand | Bosch |
| Model | GBH 220 Professional |
| Product type | Rotary hammer |
| Rated power input | 720 W |
| Impact rate | 0 - 4800 bpm |
| Impact energy (EPTA 05:2016) | 2.0 J |
| No-load speed | 0 - 2000 rpm |
| Tool holder | SDS-plus |
| Max. drilling diameter - Concrete | 22 mm |
| Max. drilling diameter - Steel | 13 mm |
| Max. drilling diameter - Wood | 30 mm |
| Weight (EPTA 01:2014) | 2.3 kg |
| Protection class | II (double insulation) |
| Sound pressure level | 94 dB(A) |
| Sound power level | 105 dB(A) |
| Vibrations - Drilling in concrete | 14.2 m/s² |
| Vibrations - Chiselling | 13.7 m/s² |
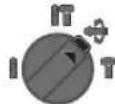
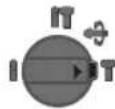
| Functions | Hammer drilling, drilling without hammer, chiselling, Vario-Lock adjustment (13 positions), right/left rotation |
| Maintenance and cleaning | Clean ventilation slots, replace dust protection cap if damaged, clean tool holder after each use |
| Safety | Safety clutch, insulated auxiliary handle, lock switch, depth gauge |
| Spare parts and reparability | Spare parts available from Bosch after-sales service (10-digit reference number on the label) |
Frequently Asked Questions - GBH 220 Professional BOSCH
User questions about GBH 220 Professional BOSCH
0 question about this device. Answer the ones you know or ask your own.
Ask a new question about this device
Download the instructions for your Hammer in PDF format for free! Find your manual GBH 220 Professional - BOSCH and take your electronic device back in hand. On this page are published all the documents necessary for the use of your device. GBH 220 Professional by BOSCH.
USER MANUAL GBH 220 Professional BOSCH
GBH 220 Professional
Robert Bosch Power Tools GmbH
70538 Sutpart
GERMANY
www.bosch-pt.com
160992A77P{2021.12}PS/71

1609 92A 77P
en Original Instructions
fr Notice originale
pt Manual original
zh正本使用说明书
zh原始使用说明见
thnnaaannnnnnaa
2
Id Petunik-Petunikuntuk
Pengguenan Original
Bangc hongdan sur dung
ar
fa 1ol(5nimj2jia

2
English Page 6
Francais.. Page 11
Portugues. Pagina 18
中文 页25
繁體中文. 30
Inu. 35
General Power Tool SafetyWarnings
WARNING
Read all safety warnings, instructions, illustrations and specifica
tions provided with this power tool. Failure to follow all instructions listed below may result in electric shock, fire and/ or serious injury.
Save all warnings and instructions for future reference.
The term "power tool" in the warnings refers to your mains-operated (corded) power tool or battery-operated (cordless) power tool.
Work area safety
- Keep work area clean and well lit. Cluttered or dark areas invite accidents.
Do not operate power tools in explosive atmospheres, such as in the presence of flammable liquids, gases or dust. Power tools create sparks which may ignite the dust or fumes. - Keep children and bystanders away while operating a power tool. Distractions can cause you to lose control.
Electrical safety
Power tool plugs must match the outlet. Never modify the plug in any way. Do not use any adapter plugs with earthed (grounded) power tools. Unmodified plugs and matching outlets will reduce risk of electric shock.
- Avoid body contact with earthed or grounded surfaces, such as pipes, radiators, ranges and refrigerators. There is an increased risk of electric shock if your body is earthed or grounded.
Do not expose power tools to rain or wet conditions. Water entering a power tool will increase the risk of electric shock.
Do not abuse the cord. Never use the cord for carrying, pulling or unplugging the power tool. Keep cord away from heat, oil, sharp edges or moving parts. Damaged or entangled cords increase the risk of electric shock.
When operating a power tool outdoors, use an extension cord suitable for outdoor use. Use of a cord suitable for outdoor use reduces the risk of electric shock.
If operating a power tool in a damp location is unavoidable, use a residual current device (RCD) protected supply. Use of an RCD reduces the risk of electric shock.
Personal safety
Stay alert, watch what you are doing and use common sense when operating a power tool. Do not use a power tool while you are tired or under the influence of drugs, alcohol or medication. A moment of inatten
tion while operating power tools may result in serious personal injury.
Use personal protective equipment. Always wear eye protection. Protective equipment such as a dust mask, non-skid safety shoes, hard hat or hearing protection used for appropriate conditions will reduce personal injuries.
Prevent unintentional starting. Ensure the switch is in the off-position before connecting to power source and/or battery pack, picking up or carrying the tool. Carrying power tools with your finger on the switch or energising power tools that have the switch on invites accidents.
- Remove any adjusting key or wrench before turning the power tool on. A wrench or a key left attached to a rotating part of the power tool may result in personal injury.
Do not overreach. Keep proper footing and balance at all times. This enables better control of the power tool in unexpected situations.
Dress properly. Do not wear loose clothing or jewellery. Keep your hair and clothing away from moving parts. Loose clothes, jewellery or long hair can be caught in moving parts.
If devices are provided for the connection of dust extraction and collection facilities, ensure these are connected and properly used. Use of dust collection can reduce dust-related hazards.
Do not let familiarity gained from frequent use of tools allow you to become complacent and ignore tool safety principles. A careless action can cause severe injury within a fraction of a second.
Power tool use and care
Do not force the power tool. Use the correct power tool for your application. The correct power tool will do the job better and safer at the rate for which it was designed.
Do not use the power tool if the switch does not turn it on and off. Any power tool that cannot be controlled with the switch is dangerous and must be repaired.
- Disconnect the plug from the power source and/or remove the battery pack, if detachable, from the power tool before making any adjustments, changing accessories, or storing power tools. Such preventive safety measures reduce the risk of starting the power tool accidentally.
- Store idle power tools out of the reach of children and do not allow persons unfamiliar with the power tool or these instructions to operate the power tool. Power tools are dangerous in the hands of untrained users.
- Maintain power tools and accessories. Check for misalignment or binding of moving parts, breakage of parts and any other condition that may affect the power tool's operation. If damaged, have the power tool repaired before use. Many accidents are caused by poorly maintained power tools.
- Keep cutting tools sharp and clean. Properly maintained cutting tools with sharp cutting edges are less likely to bind and are easier to control.
Use the power tool, accessories and tool bits etc. in accordance with these instructions, taking into account the working conditions and the work to be performed. Use of the power tool for operations different from those intended could result in a hazardous situation. - Keep handles and grasping surfaces dry, clean and free from oil and grease. Slippery handles and grasping surfaces do not allow for safe handling and control of the tool in unexpected situations.
Service
Have your power tool serviced by a qualified repair person using only identical replacement parts. This will ensure that the safety of the power tool is maintained.
Hammer SafetyWarnings
Safety instructions for all operations
Wear ear protectors. Exposure to noise can cause hearing loss.
Use auxiliary handle(s), if supplied with the tool. Loss of control can cause personal injury.
Hold the power tool by insulated gripping surfaces, when performing an operation where the cutting accessory or fasteners may contact hidden wiring or its own cord. Cutting accessory or fasteners contacting a "live" wire may make exposed metal parts of the power tool "live" and could give the operator an electric shock.
Safety instructions when using long drill bits with rotary hammers
Always start drilling at low speed and with the bit tip in contact with the workpiece. At higher speeds, the bit is likely to bend if allowed to rotate freely without contacting the workpiece, resulting in personal injury.
Apply pressure only in direct line with the bit and do not apply excessive pressure. Bits can bend, causing breakage or loss of control, resulting in personal injury.
Additional Safety Information
Switch the power tool off immediately if the application tool becomes blocked. Be prepared for high torque reactions which cause kickback. The application tool becomes blocked when it becomes jammed in the workpiece or when the power tool becomes overloaded.
Use suitable detectors to determine if utility lines are hidden in the work area or call the local utility company for assistance. Contact with electric lines can lead to fire and electric shock. Damaging a gas line can lead to explosion. Penetrating a water line causes property damage or may cause an electric shock.
Always wait until the power tool has come to a complete stop before placing it down. The application tool can jam and cause you to lose control of the power tool.
- Secure the workpiece. A workpiece clamped with clamping devices or in a vice is held more secure than by hand.
Products sold in GB only:
Your product is fitted with an BS 1363/A approved electric plug with internal fuse (ASTA approved to BS 1362). If the plug is not suitable for your socket outlets, it should be cut off and an appropriate plug fitted in its place by an authorised customer service agent. The replacement plug should have the same fuse rating as the original plug. The severed plug must be disposed of to avoid a possible shock hazard and should never be inserted into a mains socket elsewhere.
Do not touch any application tools or adjacent housing components shortly after operation. These can become very hot during operation and cause burns.
The application tool may jam during drilling. Make sure you have a stable footing and hold the power tool firmly with both hands. Otherwise you could lose control of the power tool.
Take care when carrying out demolition work using the chisel. Falling fragments of the demolition material could injure you or any bystanders.
Product Description and Specifications

Read all the safety and general instructions. Failure to observe the safety and general instructions may result in electric shock, fire and/or serious injury.
Please observe the illustrations at the beginning of this operating manual.
Intended Use
The power tool is intended for hammer drilling in concrete, brick and stone, as well as for light chiselling work. It is also suitable for drilling without impact in wood, metal, ceramic and plastic. Power tools with electronic control and right/left rotation are also suitable for screwdriving.
Product Features
The numbering of the product features refers to the diagram of the power tool on the graphics page.
(1) Keyless chucka)
(2) SDS-plus drill chuck
(3) SDS-plus tool holder
(4) Dust protection cap
(5) Locking sleeve
(6) Lock-on button for on/off switch
(7) On/off switch
(8) Rotational direction switch
(9) Release button for impact/mode selector switch
(10) Impact/mode selector switch
8 | English
(11) Button for depth stop adjustment
Auxiliary handle (insulated gripping surface)
(13) Depth stop
(14) Handle (insulated gripping surface)
(15) Securing screw for keyed chuck
(16) Keyed chuck
(17) SDS plus shank for drill chuck
(18) Front sleeve of the keyless chuck
(19) Rear sleeve of the keyless chuck
(20) Saugfix suction opening
(21) Saugfix clamping screw
(22) Saugfix depth stop
(23) Saugfix telescopic tubea)
(24) Saugfix wing bolt
(25) Saugfix guide tubea
(26) Universal holder with SDS-plus shank
a) Accessories shown or described are not included with the product as standard. You can find the complete selection of accessories in our accessories range.
Technical Data
| Rotary hammer GBH 220 | ||
| Article number | 3611 BA6 0.. | |
| Rated power input W 720 | ||
| Impact rate min | 1 | 0-4800 |
| Impact energy per stroke ac-cording to EPTA-Proced-ure 05:2016 | J 2.0 | |
| No-load speed min | 1 | 0-2000 |
| Tool holder SDS-plus | ||
| Spindle collar diameter mm 48.5 | ||
| Max. drilling diameter | ||
| - Concrete A) | mm 22 | |
| - Steel mm 13 | ||
| - Wood mm 30 | ||
| Weight according to EPTA-Procedure 01:2014 | kg 2.3 | |
| Protection class | ☐/II | |
A) optimum performance with drilling diameter 6-12 mm The specifications apply to a rated voltage [U] of 230V . These specifications may vary at different voltages and in country-specific models.
Noise/Vibration Information
Noise emission values determined according to EN 62841-2-6.
Typically, the A-weighted noise level of the power tool is: Sound pressure level 94 dB(A); sound power level 105 dB(A). Uncertainty K = 3 dB.
Wear hearing protection!
Vibration total values a_h (triax vector sum) and uncertainty K determined according to EN 62841-2-6:
Hammer drilling into concrete: a_h = 14.2 m/s^2, K = 1.5 m/s^2 , Chiselling: a_h = 13.7 m/s^2, K = 1.5 m/s^2
The vibration level and noise emission value given in these instructions have been measured in accordance with a standardised measuring procedure and may be used to compare power tools. They may also be used for a preliminary estimation of vibration and noise emissions.
The stated vibration level and noise emission value represent the main applications of the power tool. However, if the power tool is used for other applications, with different application tools or is poorly maintained, the vibration level and noise emission value may differ. This may significantly increase the vibration and noise emissions over the total working period.
To estimate vibration and noise emissions accurately, the times when the tool is switched off or when it is running but not actually being used should also be taken into account. This may significantly reduce vibration and noise emissions over the total working period.
Implement additional safety measures to protect the operator from the effects of vibration, such as servicing the power tool and application tools, keeping their hands warm, and organising workflows correctly.
Assembly
Pull the plug out of the socket before carrying out any work on the power tool.
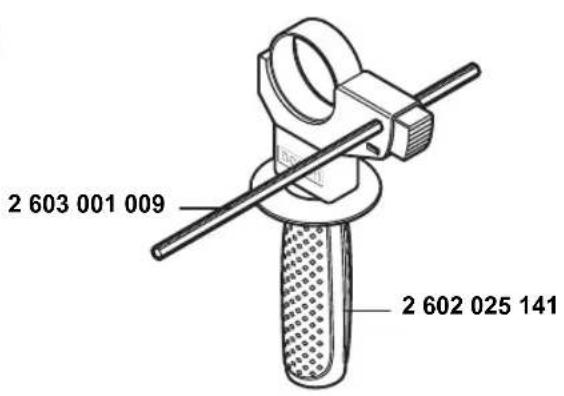
Auxiliary handle
Do not operate your power tool without the auxiliary handle (12).
Make sure that the auxiliary handle is always tightened. Otherwise you could lose control of the power tool when working.
Swivelling the auxiliary handle (see figure A)
You can swivel the auxiliary handle (12) to any angle for a safe work posture that minimises fatigue.
Turn the lower gripping end of the auxiliary handle (12) anticlockwise and swivel the auxiliary handle (12) into the required position. Then turn the lower gripping end of the auxiliary handle (12) clockwise to retighten it. Make sure that the retaining strap of the auxiliary handle slots into the corresponding groove of the housing.
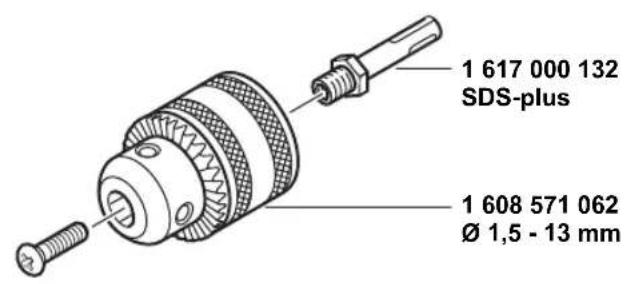
Selecting drill chucks and tools
Hammer drilling and chiselling require SDS-plus application tools that are inserted into the SDS-plus drill chuck.
For drilling without impact in wood, metal, ceramic and plastic as well as for screwdriving, tools without SDS-plus are used (e.g. cylindrical shank drill bits). For these tools, a keyless chuck or a keyed chuck are required.
Changing the drill chuck
Fitting the keyless chuck/ keyed chuck (see figure B)
Screw the SDS-plus shank (17) into a keyless chuck (1)/keyed chuck (16). Secure the keyless chuck (1)/keyed chuck (16) using the securing screw (15). Note that the securing screw has a left-hand thread.
Inserting the keyless chuck/ keyed chuck (see figure B)
Clean and lightly grease the insertion end of the SDS plus shank (17).
- Insert the keyless chuck (1)/keyed chuck (16) with the shank into the tool holder with a turning motion until it locks automatically.
- Check that it is locked by pulling the keyless chuck (1)/keyed chuck (16).
Removing the keyless chuck/ keyed chuck
- Push the locking sleeve (5) back and remove the keyless chuck (1)/keyed chuck (16).
Changing the Tool
The dust protection cap (4) largely prevents the penetration of drilling dust into the tool holder during operation. When inserting the tool, make sure that the dust protection cap (4) does not become damaged.
Replace a damaged dust protection cap immediately. It is recommended that you have use an after-sales service for this.
Changing the tool (SDS plus)
Inserting SDS-plus application tools (see figure C)
The SDS-plus drill chuck enables you to change the application tool easily and conveniently without needing to use additional tools.
- Clean and lightly grease the insertion end of the application tool.
- Insert the application tool into the tool holder while turning it until it locks automatically.
- Check the latching by pulling the tool.
As a requirement of the system, the SDS-plus application tool can move freely. This causes a certain radial run-out at no-load, which has no effect on the accuracy of the drill hole, as the drill bit centres itself upon drilling.
Removing SDS-plus application tools (see figure D)
- Push the locking sleeve (5) back and remove the application tool.
Changing the keyless quick-change chuck Inserting the application tool (see figure E
Note: Application tools that do not have SDS plus must not be used for hammer drilling or chiselling. Tools without SDS plus and their drill chucks are damaged by hammer drilling or chiselling.
- Insert the keyless chuck (1).
Hold the rear sleeve (19) of the keyless chuck (1) firmly and turn the front sleeve (18) anti-clockwise until the tool can be inserted. Insert the tool.
Hold the rear sleeve of the keyless chuck (1) and firmly tighten the front sleeve by hand in a clockwise direction until it stops clicking. This will automatically lock the drill chuck.
- Check that it is seated securely by pulling the tool.
Note: If the tool holder was unscrewed all the way, a scraping sound may be heard while retightening the tool holder and it may not fully tighten.
In this case, turn the front sleeve in the opposite direction to the arrow by one full turn. This will allow the tool holder to be fully tightened.
- Turn the impact/mode selector switch (10) to the "drilling" position.
Removing the application tool (see figure F)
Hold the rear sleeve (19) of the keyless chuck firmly in place. Open the tool holder by turning the front sleeve in the direction of the arrow until the tool can be removed.
Dust/Chip Extraction
The dust from materials such as lead paint, some types of wood, minerals and metal can be harmful to human health. Touching or breathing in this dust can trigger allergic reactions and/or cause respiratory illnesses in the user or in people in the near vicinity.
Certain dusts, such as oak or beech dust, are classified as carcinogenic, especially in conjunction with wood treatment additives (chromate, wood preservative). Materials containing asbestos may only be machined by specialists.
- Use a dust extraction system that is suitable for the material wherever possible.
- Provide good ventilation at the workplace.
- It is advisable to wear a P2 filter class breathing mask.
The regulations on the material being machined that apply in the country of use must be observed.
- Avoid dust accumulation at the workplace. Dust can easily ignite.
Dust extraction with the dust extraction attachment (accessory)
Fitting the dust extraction attachment (see figure G)
For dust extraction, the dust extraction attachment (accessory) is required. When drilling, the dust extraction attachment retracts so that the attachment head is always close to the surface at the drill hole.
- Press the button for depth stop adjustment (11) and remove the depth stop (13). Press the button (11) again and insert the dust extraction attachment into the auxiliary handle (12) from the front.
- Connect an extraction hose (diameter 19 mm, accessory) to the suction opening (20) of the dust extraction attachment.
The dust extractor must be suitable for the material being worked.
When extracting dust that is dry, especially detrimental to health or carcinogenic, use a special dust extractor.
10 | English
Setting the drilling depth on the dust extraction attachment (see figure H)
You can also set the required drilling depth X when the dust extraction attachment is fitted.
- Push the SDS-plus application tool into the SDS-plus tool holder (3) as far as it will go. Otherwise, the movability of the SDS-plus drilling tool can lead to incorrect adjustment of the drilling depth.
- Loosen the wing bolt (24) on the dust extraction attachment.
- Without switching it on, press the power tool firmly against the surface you wish to drill. The SDS-plus application tool must be touching the surface.
- Position the guide tube (25) of the dust extraction attachment in its holder such that the head of the dust extraction attachment rests on the surface to be drilled. Do not slide the guide tube (25) further than necessary over the telescopic tube (23), so that as much as possible of the scale remains visible on the telescopic tube (23).
- Retighten the wing bolt (24). Loosen the clamping screw (21) on the depth stop of the dust extraction attachment.
- Slide the depth stop (22) onto the telescopic tube (23) so that the distance X shown in the illustration matches your required drilling depth.
- Tighten the clamping screw (21) in this position.
Operation
▶ Products that are only sold in AUS and NZ: Use a residual current device (RCD) with a nominal residual current of 30 mA or less.
Start-up
Pay attention to the mains voltage. The voltage of the power source must match the voltage specified on the rating plate of the power tool. Power tools marked with 230V can also be operated with 220V .
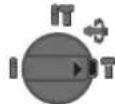
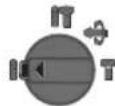
Setting the Operating Mode
The operating mode of the power tool is selected using the impact/mode selector switch (10).
- To change the operating mode, press the release button (9) and turn the impact/mode selector switch (10) until it clicks into the required position.
Note: Only change the operating mode when the power tool is switched off. Otherwise, the power tool may become damaged.
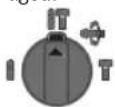
Position for hammer drilling into concrete or stone
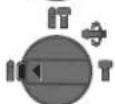
Position for drilling without impact in wood, metal, ceramic and plastic and for screwdriving

Vario-Lock position for adjusting the chisel position
The impact/mode selector switch (10) will not engage in this position.
Position for chiselling
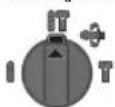
Setting the rotational direction (see figure I)
The rotational direction switch (8) is used to change the rotational direction of the power tool. However, this is not possible while the on/off switch (7) is being pressed.
Only operate the rotational direction switch (8) when the power tool is not in use.
Always set the rotational direction to clockwise rotation for hammer drilling, drilling and chiselling.
- Clockwise: To drill and to drive in screws, press the rotational direction switch (8) all the way to the left.
- Anticlockwise: To loosen and unscrew screws and nuts, press the rotational direction switch (8) all the way to the right.
Switching On/Off
- To switch on the power tool, press the on/off switch (7).
- To lock the on/off switch (7), press and hold it while also pushing the lock-on button (6).
- To switch off the power tool, release the on/off switch (7). If the on/off switch (7) is locked, press the switch first and then release it.
Adjusting the Speed/Impact Rate
You can adjust the speed/impact rate of the power tool when it is on by pressing in the on/off switch (7) to varying extents.
Applying light pressure to the on/off switch (7) results in a low rotational speed/impact rate. Applying increasing pressure to the switch increases the speed/impact rate.
Changing the chiselling position (Vario-Lock)
You can lock the chisel in 13 different positions, so you can select the optimum working position for each task.
- Insert the chisel into the tool holder.
- Turn the impact/mode selector switch (10) to the "VarioLock" position.
- Turn the application tool to the required chisel position.
- Turn the impact/mode selector switch (10) to the "chiselling" position. With this, the tool holder is locked.
- Set the rotational direction for chiselling to clockwise.
Chiselling with lock function
To chisel for extended periods without pressing the on/off switch (7), lock the on/off switch in "chiselling" operating mode.
- To lock the power tool, press the on/off switch (7) down fully whilst simultaneously pressing the lock-on switch (6).
- To switch the lock off, press the lock-on button (6) again.
Note: If you switch to a different operating mode while the on/off switch is locked, the power tool will switch off.
Practical Advice
Only apply the power tool to the screw/nut when the tool is switched off. Rotating tool inserts can slip off.
Setting the drilling depth (see figure J)
You can use the depth stop (13) to set the required drilling depth X.
- Press the button for depth stop adjustment (11) and insert the depth stop into the auxiliary handle (12). The fluting on the depth stop (13) must face downwards.
- Insert the SDS-plus application tool into the SDS-plus tool holder (3) to the stop. Otherwise, the movability of the SDS-plus drilling tool can lead to incorrect adjustment of the drilling depth.
- Pull the depth stop far enough out that the distance between the drill bit tip and the edge of the depth stop corresponds to the required drilling depth X.
Overload clutch
If the application tool jams or snags, the power transmission to the drill spindle will be interrupted. Always hold the power tool firmly with both hands to withstand the forces this may create and adopt a position with stable footing.
- Switch the power tool off immediately and remove the application tool if the power tool becomes blocked. Switching on when the drilling tool is blocked may cause high torque reactions.
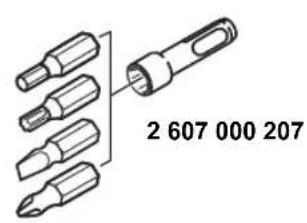
Inserting screwdriver bits (see figure K)
Only apply the power tool to the screw/nut when the tool is switched off. Rotating tool inserts can slip off.
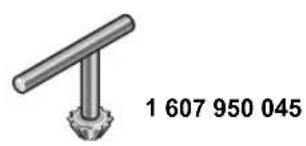
A universal holder (26) with SDS-plus shank (accessory) is required to work with screwdriver bits.
- Clean and lightly grease the insertion end of the shank.
- Insert the universal holder into the tool holder while turning it until it locks automatically.
- Check that it is locked by pulling the universal holder.
- Insert a screwdriver bit in the universal holder. Only use screwdriver bits that fit the screw head.
- To remove the universal holder, slide the locking sleeve (5) backwards and remove the universal holder (26) from the tool holder.
Maintenance and Service
Maintenance and Cleaning
Pull the plug out of the socket before carrying out any work on the power tool.
To ensure safe and efficient operation, always keep the power tool and the ventilation slots clean.
In order to avoid safety hazards, if the power supply cord needs to be replaced, this must be done by Bosch or by an
after-sales service centre that is authorised to repair Bosch power tools.
Replace a damaged dust protection cap immediately. It is recommended that you have use an after-sales service for this.
- Clean the tool holder (3) after each use.
After-Sales Service and Application Service
Our after-sales service responds to your questions concerning maintenance and repair of your product as well as spare parts. You can find explosion drawings and information on spare parts at: www.bosch-pt.com
The Bosch product use advice team will be happy to help you with any questions about our products and their accessories.
In all correspondence and spare parts orders, please always include the 10-digit article number given on the nameplate of the product.
Malaysia
Robert Bosch Sdn. Bhd.(220975-V) PT/SMY
No.8A,Jalan 13/6
46200 Petaling Jaya
Selangor
Tel.: (03) 79663194
Toll-Free: 1800 880188
Fax: (03) 79583838
E-Mail: kiathoe.chong@my.bosch.com
www.bosch-pt.com.my
You can find further service addresses at:
www.bosch-pt.com/serviceaddresses
Disposal
The power tool, accessories and packaging should be recycled in an environmentally friendly manner.
Do not dispose of power tools along with household waste.
Français
Robert Bosch Morocco SARL
53, Rue Lieutenant Mahmoud Mohamed
20300 Casablanca
Tel.: +212 5 29 31 43 27
E-Mail: sav.outillage@ma.bosch.com
www.bosch-pt.com/serviceaddresses
www.bosch-pt.com/serviceaddresses
Eliminação
www.bosch-pt.com/serviceaddresses
处理废弃物
www.bosch-pt.com/serviceaddresses
廢棄物處理
nnaannnnnnuuauuaaunauauan
aalwla wu uulwauwauwauwauwauwauwauwauwauwauwauwauwauwauwauwauwauwauwauwauwauwauwauwauwauwauwauwauwauwauwauwauwauwauwauwauwauwauwauwauwauwauwauwauwauwauwauwauwauwauw
2011111111111111111 1
W
JauuuaaiaiulwWauuuaanuauauuauauauauauauauauauauauauauauauauauauauauauauauauauauauauauuuuuuuuuuuuuuuuuuuuuuuuuuuuuuuuuuuuuuuuuuuuuuuuuuuuuuuuuuuuuuuuuuuuuuuuuuuuuuuuuuuuuuuuuuuuuuuuuuuuuuuuuuuuuuuuuuuuuuuuuuuuuuuuuuuuuuuuuuuuuuuuuuuuuuuuuuuuuuuuuuuuuuuuuuuuuuuuuuuuuuuuuUU
nannnnnnaaannnnnnnnnnnnnnnnnnnnnnnnnnnnnnnnnnnnnnnnnnnnnnnnnnnnnnnnnnnnnnnnnnnnnnnnnnnnnnnnnnnnnnnnnnnnnnnnnnnnnnnnnnnnnnnnnnnnnnnnnnnnnnnnnnnnnn
aunnnnnaeauwngnnaeaayuaanwnndu nnnuuueoovolwnvwwnnnnnnnnnnnnnnnn
aunnnnnae aannnnne nnnnne ane annnnnne
aalwauoalwunwnanuunwauwlnwauwauwauwauwauwauwauwauwauwauwauwauwauwauwauwauwauwauwauwauwauwauwauwauwauwauwauwauwauwauwauwauwauwauwauwauwauwauwauwauwauwauwauwauwauwauwauwauwauwauw
wnluuunnuuunnuuunnuuunnuuunnuuunnuuunnuuunnuuunnuuunnuuunnuuunnuuunnuuunnuuunnuuunnuuunnuuunnuuunnuuunnuuunnuuunnuuunnuuunnuuunnuuunnuuunnuuunnuuunnuuunnuuunnuuunnuuunnuuunnu
777777777777
nnaananaananaananaananaananaananaananaananaananaananaananaananaananaananaananaananaananaananaananaananaananaananaananaananaananaananaananaananaananaananaananaananaananaananaananaananaananaananaananaananaananaananaananaananaananaananaananaananaananaananaanaraannnnnnaa
Jnnaaannnnnnae aennnnnnae annnnnne nnnnnnne nnne
Jauunrnnnnaaannrnnnnae nnne annnnnnae nnnnnae
uunnuuunnuunnuunnuunnuunnuunnuunnuunnuunnuunnuunnuunnuunnuunnuunnuunnuunnuunnuunnuunnuunnuunnuunnuunnuunnuunnuunnuunnuunnuunnuunnuunnuunnuunnuunnuunnu
aunnnaunnnn nn nnnnnnnnnnnnnnnnnnnnnnnnnnnnnnnnnnnnnnnnnnnnnnnnnnnnnnnnnnnnnnnnnnnnnnnnnnnnnnnnnnnnnnnnnnnnnnnnnnnnnnnnnnnnnnnnnnnnnnnnnnnnnnnnnnnnnnnnnnnnnnn
Hnnnnae nnne nnnnne nnnnne nnnnne nnnnne nnnnne nnnnne nnnnne nnnnne nnnnne nnnnne nnnnne nnnnne nnnnne nnnnne nnnnne nnnnne nnnnne nnnnne nnnnne nnnnne nnnnne nnnnne nnnnne nnnnne nnnnne nnnnee
WnnaovalwWvWvWvWvWvWvWvWvWvWvWvWvWvWvWvWvWvWvWvWvWvWvWvWvWvWvWvWvWvWvWvWvWvWvWvWvWvWvWvWvWvWvWvWvWvWvWvWvWvWvW
y
nnaaannnnaanrnnnnae
aannnnae aen nnnnne neanennnne ane annnnnne ane ane ane ane ane ane ane ane ane ane ane ane ane ane ane ane ane ane ane ane ane ane ane ane ane ane ane ane ane ane ane ane ane ane ane ane ane
1 1
nntnnn nnnnnnnnnnnnnnnnnnnnnnnnnnnnnnnnnnnnnnnnnnnnnnnnnnnnnnnnnnnnnnnnnnnnnnnnnnnnnnnnnnnnnnnnnnnnnnnnnnnnnnnnnnnnnnnnn
I 1
guaanuuaaunnuuauuauauauauauauauauauauuuuuuuuuuuuuuuuuuuuuuuuuuuuuuuuuuuuuuuuuuuuuuuuuuuuuuuuuuuuuuuuuuuuuuuuuuuuuuuuuuuuuuuuuuuuuuuuuuuuuuuuuuuuuuuuuuuuuuuuuuuuuuuuuuuuuuuuuuuuuuuuuuuuuuuuuuuuuuuuuuuuuuuuuuuuuuuuuuuuuuuuuuuuuuuuuuuuuUU
#
-103:110000000000000000000000000000000000000
- yuuuunnnnnnnuuunnaaannnnnnnnnnnnnnnnnnnnnnnnnnnnnnnnnnnnnnnnnnnnnnnnnnnnnnnnnnnnnnnnnnnnnnnnnnnnnnnnnnnnnnnnnnnnnnnnnnnnnnnnnnnnnnnnnnnnnnnnnnnnnnnnnnnnnnnnnn
uunnnnnaaannnnnnaanennn nnnnnnnnnnnnnn
Jauunrnnnnaaannnnnnnnnnnnnnnnnnnnnnnnnnnnnnnnnnnnnnnnnnnnnnnnnnnnnnnnnnnnnnnnnnnnnnnnnnnnnnnnnnnnnnnnnnnnnnnnnnnnnnnnnnnnnnnnnnnnnn
Saugfix (aunwJnou)
mnuuauv Saugfix (nunwunau G)
nunnnnnaan nn nnn Saugfix (nnnnnnnn)
Saugfix nnnnnnnnae nnnnnnae Saugfix
- nuiuunnnn (11) uanennnnnnnn (13) 11 Saugix nuu (12) nnnu
- nannnna (19 19. ynnnnnnn) Taunnuon (20) Saugfix
Iuunnuuulw! uuu uunnuuuauvuwwvauuuu uuuu uuuuuuuuuuuuuuuuuuuuuuuuuuuuuuuuuuuuuuuuuuuuuuuuuuuuuuuuuuuuuuuuuuuuuuuuuuuuuuuuuuuuuuuuuuuuuuuuuuuuuuuuuuuuuuuuuuuuuuuuuuuuuuuuuuuuuuuuuuuuuuuuuuuuuuuuuuuuuuuuuuuuuuuuuuuuuuuuuuuuuuuuuuuuuuuuuuuUU
nannnnnnnn
nunnnnnnnnnnnnnnnnnnnnnnnnnnnnnnnnnnnnnnnnnnnnnnnnnnnnnnnnnnnnnnnnnnnnnnnnnnnnnnnnnnnnnnnnnnnnnnnnnnnnnnnnnnnnnnnnnnnnnnnnnnnnn
- 10000000000000000000000000000000000000000000000000000000000000000000000000
wnwng: wauuunnnnunwuuuun uunwun
unnuuynnnn nnannn nounnnn
chunwadnnu nnuu: Iayulinaunnilulu Ian: uanin uanaan an nnnuan
chunu Vario-Lock annuwchunu
mnyannn/nynnu (10) uuiiunu
chunwuyinwen
www.bosch-pt.com/serviceaddresses
#
wovwnn wnnn nnnn nn nnnn nnnn nnnn nnnn nnnn nnnn nnnn nnnn nnnn nnnn nnnn nnnn nnnn nnnn nnnn nnnn nnnn nnnn nnnn nnnn nnnn nnnn nnnn nnnn nnnn nnnn nnnn nnnn nnnn nnnn nnnn nnnn nnnn nnnn
ywnnnnnae nn nwnnnnnuu
Bahasa Indonesia
Keselamatan personnel
Kopling began berlebih
Palma Tower 10th Floor
Jalan RA Kartini II-S Kaveling 6
Pondok Pinang, Kebayoran Lama
www.bosch-pt.com/serviceaddresses
Caramembuang
Cac canh bao phy them
Tat dung cu dien ngay neu phu tung bi chan. Hay chuan bi cho nhung mo-men phan ung cao, ma gay ra su doi nguc. Phu tung bi chan, neu dung cu dien bi qua tai hoac bi ket trong poi gia cong can gia cong.
Dung thiet bi do tim thich hop de xac dinh nou co cac cóng trinh cóng cóng lap dat
50 | Tiéng Viét
ngam trong khu vuc lam viec hay lien he voi Cty cng trinh cong cóng dia phuong de nho htro. Dung cham duong dan dien co the gay ra hoa hoan va dien giat. Lam hu'hai duong dan khiga co the gay no. Lam thung duong dan nuoc gay hu' hong tai san hay co kha nang gay ra dien giat.
Luon luon doi cho may hoan toan ngung hantruoc khi dát xuong. Dung cu lap vao may co the bi kep chat dan den viec dung cu dien cam tay bi mat dieu khien.
Kep chat vatgia cong. Vatgia cong duoc kep bang mot thiet bi kep hay bang eto thi vu ng chac hon giu bang tay.
Khong cham vao bat ky dung cu hoac bo phan vo gan ke nao ngay sau khi van hanh. Chung co the rat nong trong qua trinh vanh vagy bong.
Dung cu gai co the chan khi khoan. Giu dung cu dien that chac bang ca hai tay va giu tu the dung cho thich hop va can bang. Ban co the mat kiem soat thong qua dung cu dien.
Can than voi cong viec pha do bang may duc. Cac manh vo cua vat lieu pha do roi xuong co the gay thuong tich cho nguoi xung quanh hoac chinh ban.
Khop Ly Hop Chong Qua Tai
Neu dung cu lap trong may bi ket hay kep, luc truyen dong den truc khoan bi ngan lai. Luon gi chat dung cu dien bang hai tay va dung vung vi khi dung cu hoat dong se phat sinh luc.
Hayt dung cu dien va thao dung cu gai neu dung cu dien bi vuong. Khi mo may ma dung cu ung dung bi ket cung, luc xoan van cao co the xay ra.
Lap dau chia vän vit (xem Hinh K)
Chi dát dung cu dién da tát len dai oc/vit. Dung cu dang quay co the bi tuot ra.
De su dung dau chia van vit ban can co phan lap dau gai po thong (26) voi chuoi tiep hop SDS-plus (Phu kien).
-Lam sach can chuoi cua chuoi tiep hop va boi mot Iop mong dau boi tron len.
-Lap phan lap dau gai po thong bang dong tac xoay vao trong phan lap dung cu cho den khi duoc tu dong khoa lai.
- Kiem tra hiieu qua khoa bang cach keo tu phan lap dai gai po thong ra.
-Lap dau gai van vit vao trong phan lap dau gai pho thong. Chi su dung dau gai van vit vu voi dau vit.
54 | Tiéng Viét
- De thao phan lap dau gai po thong hay day vong Khoa (5) ra phia sau va thao phan lap dau gai po thong (26) ra khoi phan lap dung cu.
Khong duoc thai bó dung cu dien vao chung voi rac sinh hoat!
www.bosch-pt.com/serviceaddresses
Su'thai bo
Jd Jn Jn Jn Jn Jn Jn Jn Jn Jn Jn Jn Jn Jn Jn Jn Jn Jn Jn Jn Jn Jn Jn Jn Jn Jn Jn Jn Jn Jn
auiJSEJ1
aJgL 1c gbl
jgJg JouJg J
.ajjgSJJ oJy aai jll cagolglg
gglgglolglglllgl
2g jy g/g g g w J, djuS do
.0
UaIg auiu Iuaalai
Jauw
100 1
gogol ayuysd jydu
(aUJgSJ aS uU U Ls abwgl) aUjgSJ aS uU
山(g)oSjoo gjlluJgSll
.(auijSJlauWJ
JswjUkOylo
USSu dLg clls
Jus Jusj Uuig
gglgglg jg jaaal
4joo 1bji a
a9 jg gJ 1slo21 Joo
aJIJIgJlJIgJilgwI
JLWJbIg
.ooJg ooc
4J0
aui jgll oai josiuu loic
j0j00000000000000000000000000000000000
jIJI
jUqS1 Uo21
40 auiuJl oJ
Joo Jy Jy Jai
UgA Go ayIgAII UyIgAII
()aJgJJIuJgSJJ
aJUJUWgall.(
aui jui Uo uai jia aaiuai
aogolawu
.1gJgJgJgJgJg
ugS lo sic aJyJSL Ulo sall Jb
.
4gJUboJUjc aJU.
.ugbUj! aJUg<U Uo sall
aJySjOeSsI JdS JI JI JI
JLJI pssuX .JLJI JuswI gwi
aw gIgawgaiuJgSjosall Jg
J 1
gJ 1gJg jJg J
g aJU U L JUJJ .aJaiA|j
auiyssuulooosuilljaoasuaill
Jjoll aJyJgSll oJol sWl sic
aJlll sall lIyI pI sI Ie jai
Sai JIJaoiul J. JJI Joo
aagb aai piai si jolla lae oJgs gJoo go
aabaa aawaa wj jn s k jy 1.
aayjj n gkaii aaii aai i 9.
g jn jn jn jn jn jn jn jn jn jn jn jn jn jn jn jn jn jn jn jn jn jn jn jn jn jn jn jn jn jn jn jn jn jn jn jn jn jn jn jn jn jn jn jn jn jn jn jn jn jn j
8g auiu go salg bla 21bdoa 2 4
jue g uu uuuu d0.3il j Lswu bua
eggl yu loo ojuuul uudg uu wu
aJololul
aJg jgll g aJgS Jd 1s s. Jauu Jauu Jauu Jauu Jauu Jauu Jauu Jauu Jauu Jauu Jauu Jauu Jauu Jauu Jauu Jauu Jauu Jauu Jauu Jauu Jauu Jauu Jauu Jauu Jauu Jauu Jauu Jauu Jauu Jauu Jauu Jauu Jauu Jauu
Lg jgll aai ojgl pssl 4
aJw jwgl oJUJI I SsIbgs
Sd ayjgll bglal ao. aJyll sI
.ajyll lloxl g JIg JIg JIg
ogu Lg JIg JIg JIg
ayla I Jyol ksw JIg JIg JIg
.ajyll g
(a Saugfix 1aLJb0aJg21
Saugfix 200000000000000000000000000000000000000000000000000000000000
23()
(a) Saugfix bJUJJ J24(
Saugfix bduu gill 25
SDS plus 2000
gagglglllgljgljlaa a
LuluJgAolSglgIgIgIgIgIgIgII
aaiiLiull
UJbI Isc/ UaJI Isc Jpa
0sJyI LJIJI 1/1111 1 1 1
(7)lablg juswll elao lc bawll lablg juswll elao lc cawll bs wls yg scc gagug .uassio uab/ulssc 7 (7) abalosjuu
()
13 1g jj jj j j j j j j j j j j j j j j j j j j j j j j j j j j j j j j j j j j j j j j j j j j j j j j
(10)JgJlgljIgJlgln oJ - (JAIJI JAnJI)“Vario-Lock,gog .gjJlJgJlgljIJxJ-
aaii 1
(1)12.
-)bawJgbs baw aaij)20(.wJbWJ
wotuuyuuyuuyuuyuuyuSD
:doaJglicoJol www.bosch-pt.com/serviceaddresses
aui jSll o sll
Jg gglg auiuS Jd SsuW y i j 1i 1i 1i 1i 1i 1i 1i 1i 1i 1i 1i 1i 1i 1i 1i 1i 1i 1i 1i 1i 1i 1i 1i 1i 1i 1i 1i 1i 1i 1i 1i 1i 1i 1i
-1gJU|gJ
. 1
-
.
Culll aabg psswL Cull
aag aegg aegg aegg aegg aegg aegg aegg aegg aegg aegg aegg aegg aegg aegg aegg aegg aegg aegg aegg aegg aegg aegg aegg aegg aegg aegg aegg aegg aegg aegg aegg aegg aegg aegg
Jssll 1s
JgolJI/ugJI Uc aJUgSJI oaiJI g 1Jusu .alabo uSlo sic bag .jju sO jlgJI
J(jgJJIjil) jll gac
(13)gssJ 0000
1132 111111111111111111111111111
136gJ 1000 jgjoll u
Jd aagll GSD-splus Jd 0c 0j -
oac aagaw gdd .(3SDS-plus oai
. qalqla bpa uJS DS-splus Jd
wJn jyafalwI jgSj yasssd sdo jd -
qaoaiaaqaasssd aobg qai dW
X.ogjol
山
yIaJI JgJgJgJgJgJgJgJgJgJgJgJgJgJgJgJgJgJgJgJgJgJgJgJgJgJgJgJgJgJgJgJgJgJgJgJgJgJgJgJgJgJgJgJgJgJgJg
Jusll osc Jg g auiu jss Oaal jabl 4
jogjc uuu .auu jss oall jauil sic
.aaasua udd ooc uow sic aull
(KjgJJIbJI)UJIgUJI bJI pJI 5
golal/oglljc auiuSJ oai g
JwI Ssc J. oSic bag .gj jg Jl w Jolal gllgllp aJ pds W .(g) SDS-plus glw 26
d aasw g aasl gls jg bj -
gl djl sll ool g plll laljj 1
.duai sli no dlsl! ay nI
plall oolll cssn no cll pks!
psswl .plll lalgl buaag
. gll w jnl llgllb jpaab
J61
000s1giojS gJbbsu 5u wlio
J 1 J 1 J 1 J 1 J 1 J 1 J 1 J 1 J 1 J 1 J 1 J 1 J 1 J 1 J 1 J 1 J 1 J 1 J 1 J 1 J 1 J 1 J 1 J 1 J 1 J 1 J 1 J 1 J 1 J 1 J 1 J 1 J 1 J 1 J
gljlaag y jl jy dlo 1
wds jglao labe g o slaiu sgo
gls jk jd siigj go j. .sjj
.
gJgWpOslawIgJlA
PdSgWjabo.1sCwUJSS
GJLgJgJlgOslu
JUkOgUJgJU.
JUgJgJgJU
jI jU g JjJj
10LssSgJ slj
.15s 15s g a jj1j1 s
.
jglj sglgu dsguue cule wluo jy .s o laiw jiu uuiabl g jqolkiw
1jjI Joggbo
. 15iS oIaiol kws jI gJgJjI Sui, sUog g gJI IJI Ugi JI d S igw Jy Ig g
sbs jll aalwgs n jnssjus g .siI JJI (S)g 1Jl dWgl jol jil jai S
49 Laleo yeg
oJal g d jg JgS wJus Jd aLolai g yjgl Jd as sdi olw JyJl alg Jlaim Jd
Lol dJUc
.1sJlJjI CwD Jd
.
.
Sjto slw dS wblg
iiaom .si j g oJ S Ugs Osw
g ausw JjI cBd s ss C
. siu oui
. jL e g w j
. jl jolsc g w
Josuwolab 1sluwul
jSg ju sl uJ g o w qul ygs dU Jg gos JLdabq Jus CwI .CwI U
4.1Jd jjao g j
JL laimjogj jI Jgws JbO J
dgi jj LS ggi gSLS bIw g Su
.dui
siiguo o w di jy Jswao jy jilac
. gwa sljba Iw jg y
4oJc g oIgIwS 54
dius .sis g jgjI sIg 12JU JUJIS g iio o jol slm
Jooi,SuO oJgoad
Juaaiao du bao jy JjI Jaae iJy Jau 1uJyUabg jlg Eegj Slae Jai dSsw sW gacu ly Jau o laaw .Jau law o
jugjw
L uS yIy
Lgil gJgJgJgJgJgJgJgJgJgJgJgJgJgJgJgJgJgJgJgJgJgJgJgJgJgJgJgJgJgJgJgJgJgJgJgJgJgJgJgJgJgJgJgJgJgJgJgJgJgJgJ
jIjoljam a dS jgssasw s j 4 .s o laiw cww o w diJlws
(a) aSiSoo ooi jdu 21
(a) o si So jw elj gwsoc uusuSba (22)
(a)SiSoJmuUgSuluUgJ (23)
(a)SiSoJmuLswgja (24)
a . siSoo laoiJdgl (25)
duoosjusowLgogocosjla (26)
gaw gac uusuSba (13)
((gLc)SgJ(SJ))dss (14)
(a)Jgoso oIbjiawjow (15)
(aJgaoo pUai daw (16)
^(a) SDS plus _山 du (17)
(a)SjIogil pUaJ dW uJgL Jg (18)
(a)Jlogil pIaJ aU lac uog (19)
SiSoJUuUdU (20)
(SDS-plus)JjI Jgogy jy
gJwI JjI jI gSDS-plus pIaI dW Iawgi
.5Gc UJl jI JUdaiwI uJg Scl
JUJSLJUOJIuOJIuOJIuOJIuOJIuOJIuOJIuOJIuOJIuOJIuOJIuOJIuOJIuOJIuOJIuOJIuOJIuOJIuOJIuOJIuOJIuOJIuOJIuOJIuOJIuOJIuOJIuOJIuOJIuOJIuOJIuOJIuOJIuOJIu
jI jI JJ JI JI JI JI JI JI JI JI JI JI JI JI JI JI JI JI JI JI JI JI JI JI JI JI JI JI JI JI JI JI JI JI
. 11111111111111111111111111111
)jgw Cua jy jy a.(sla 1pai piaol gjg (sjlca 1g w c y gju u
jS jg w pB iJ u d aIJJ Jdai dai g w g 1Jg jIg w js Jo Su logil jgbu d sEg)SDS-plus JjI Jwls oogi (D
jIJJguiuacJ(5)Jgui- .JUyJJlJl
jogil pai w j! oog
0laaiI jgo jjI jJ (E goo
SdS-1s 100000000000000000000000000000000000000000000000000000000
LgS SjI gW pKim qil pbl aW g SDS-plus .sij y wu wJ jip g .sij Jj (1) sJlogil pbl aW
SooIj(1)Sulogil pUzdiu(19)GcCg- )18(ogzmuJgJyJd
JjIjI jIgUdS JIOJ U CcUw SLOu aOc .sSJSL 1JJJJ.
Soo (1) Suogil pabi du w g - 4s sso cws u j yg g yjls la sdo as oigim ciwl sl aoe dgiqui .siyu .gwi
.8gw 0 jaa kglj gbl pIaJnlaol I J n jn jn jn jn jn
JSSOswjLgill jjIaJi:diS JyJaiu 50 SjJjI jI JIeR pKwI .gwi dWg Wg
g j Jj g j g j j 1 1 1 1 1 1 1 1 1 1 1 1 1 1 1 1 1 1 1 1 1 1 1 1 1 1 1 1 1 1 1 1 1 1 1 1 1 1 1 1 1 1 1
oJawl sJgO JjI jwJ (F ggi dsiEg)
SsOJglogilpbiaw(19)Gcog-
gglwUjlaJIyJlJyJLj.
JLaJlJlUgUuSsJU
aaijg0sJ 1
jw sls lsl j sio 5g j g j sllguo lglg g jso 1go i g j
gaaegs)Sdss
Sos dws)12(ogolds 1.
-ssdawuUc
12(uaa.ww.
SASdawuJ)12(uaJgJ
sss sso cclw 15gjoo
JLsS dws Jgdoawd sWdydi
jbi j 1s l y oLw s d y s ggo J
jJjJwO
IjIgolaiawla
jju jglg jig gGgSjLgJgWg
ISDS-splus dωj
gSoljw,jLg,ugdufougdyuJgWgl
()gao)juiy
g SDS - plus (L) digi
pIaJ uS uJjU JU.
.1jui 1d jsi pblai d w g sjiogil
pIbiawgogai
Jgaoo pIa j dW/cSjlogil poai dW qai Jgai dui Sgaj)B(
psj 17SDS-plus o jss -
w. jaiu (16) ugoo pojai w/1) slogil
l (16) Ugao pojai w/1) slogil pojai
dua dgi. iJ (15) iaI ay
.ogjj gj JiaI a
pUbi dW/Logil pUbi dU jSjI B(jgai ay Sis Egsj) Jgao
SDS plus oai daw oj jw s j jg jgl - .uis uas gos jg osjui (17
1(16)gaoo pabi w/(1)logil pabi dW - jjjj jda jgsy jgy b0j y caw sas d .gwh jksgsjgbds jloj li ss
aw/(1) Sjlogil pIaJ aw U JusS L I J Jaa -.sJUaS (16) Jgaoo pJIa
Jgoso pabiaw/clogil pabiaw wuolpabiaw g uacu (5) ais Jgog - 1j16Jgoso pabiaw/(1) slogil
JjU
jucg jgai (4)jucg jgjblao wgyo sac jgb a jls u jl o jy ddo s cui jjul jol gloim .dG
4)jucg jcblaogd sJ 1j le g ju JcBglss
duogj. gge Ig jyu wI Jgwo 10Jwgi I Jlsi Sgwo .pail (ugj j uu loa)
.0s olaow (jS daob) oslo
-gej1lawjs
.5uJ1sJgAsgSg
-djUgiayuwoii
julp2.sis o laiw
59j y 9990 y Joo L jy
.
Jg230VjUgIaS1JgJg
220VjUg jIgJ 1
JLjJg
JSLac Egi puiuogai
jI jS Lg ggi (10) /u/ u
.1sKyIJIJg
(a)
j/dufo ggdsg ju 9
jgbduuulgolgsaeggo)10
.
jugolgjIjIuqglslacgj:di
jui juiuuiuiuiuiuiuiuiuiuiui
Jgag
yj jg 5g
S
jduouggSls gw Cggo
jusg Sswu, soljw jLg
SLS
Cgo jVario-Lock 9
olg
(10)
.
uog


(1g)
(8)(20
/1jwgsdsolgim.
jooj|u|cwooog(7)gol
.
gpoLkioj8) Coo
JlOg oKwJjSg
()
aaii jjw jgbu uam gj p
g!sSd gddjJg d
LdUJdsggsgssg 00 g jglg q
.1g j 15 g 1go j 1aawl
4.1
.igw Jaiu wJulw d u jlg g
oSiSo JU LJc g Js JuSo
(Lss)
jguaiuyuiEgaj) jSo uljquiG(
JgS(uSo UaLo a Jg gS(uSo sU
jLgW gac uIg J (13) goc aJd
. 1XolgJ
1j u(7) 1og ggbg 1s U S
6aasjyoggajg
Jl
g gabg aLs uJy JjUuS golc
ggbuS u gj jg jg j.1
jogg jw ljj (7)
S OBC = S COD + S_ BOC
a/1u
jwg jyj1d/ u/du sJgdo
LsI J (7) wgo/wnogj dSsi dagg
suluui sssuo jiu
(7)gol/(g)sL(5g)ps
cljuljuljoljol.ajj
GwU Laloo g 2gaa oju laaw
.
la, LsU LbB wJaw g Ugw agjw slp
j0j10j|j|gj
J 1
www.bosch-pt.com/serviceaddresses
olkwsjJla0jI
gduyui yuyu g uolao,
gajooj juiuuj bao kjj
.
sla uu j uls l y slj!uji
| de | EU-Konformitäserkläragung | Wir erklären in alleiniger Verantwortung, dass die genannten Produkte allen einschlagigen Bestimmungen der nachfolgenden aufgeführten Richtlinien und Verordnungen entsprechen und mit folgenden Normen übereinstimmen. Technische Unterlagen bei: * | |
| Bohrhammer Sachnummer | |||
| en | EU Declaration of Conformity | We declare under our sole responsibility that the stated products comply with all applicable provisions of the directives and regulations listed below and are in conformity with the following standards. Technical file at: * | |
| Rotary Hammer Article number | |||
| fr | Déclaration de conformité UE | Nous déclarons sous notre propre responsabilité que les produits décrits sont en conformité avec les directives, règlements normatifs et normes écuminées ci-dessous. Dossier technique auprès de: * | |
| Marteau perforateur N° d'article | |||
| es | Déclaración de conformidad UE | Declaramos bajo notre propre responsabilité, que los produits nombrados cumplen con todas las dispositions correspondientes de las Directivas y los Reglandos Mentionados a continuación y está en conformidad con las siguientes normas. Documentos tínicos de: * | |
| Martillo de articulo perforador | |||
| pt | Déclaração de Conformidade UE | Declaramos sob esta exclusiva responsabilité que os produits Mentionados cumpre às disposções e os regulamentos indicados são em conformidade com as següentes normas. Documentação técnica pertencente à: * | |
| Martelo do producto perforador | |||
| it | Dichiarazione di conformità UE | Dichiariamo quello alla piena responsabilità che i prodotti indicate sono conformi a tutte le dispositions pertinenti delle Direttive e dei Regolamenti elencati di seguito, nonché alle seguenti Normative. Documentazione Tecnica presso: * | |
| Martello Codice prodotto perforatore | |||
| nl | EU-conformiteitsverklaring | Wij verklaren op eigén verantwoordelijkheid dat de genoemde producten voldoen aan alle desbetreffende bepalingen van de hierna genoemde richtlijnen en verorderingen en overeenstemmen met de volgende normen. Technisch dossier bij: * | |
| Boorhammer Productnumber | |||
| da | EU-overensstammelseserkläraging | Vi erklær someneansvarlige, at det beskreve Produkt er i overensstammelse med alle gändende bestemmelse i fällende direktiver og forordninger og opfylder fällende standarder. Tekniske bilag ved: * | |
| Borehammer Typenummer | |||
| sv | EU-konformitetsförklaring | Vi föklarar under eget ansvar att de námnda produktura uppfyller kraven i alla gällande bestämelse i de nedan angivna direktiven och Förordningarnas och att de stämmer överens med fällande normer. Teknisk Dokumentation: * | |
| Borrhammare Produktnumber | |||
| no | EU-samsvarserkläraging | Vi erklær undereneansvar at de nevnte Produktene er i overensstammelse med alle relevante bestemmelse i direktivene og forordningene nedenfor og med fällende standarder. Teknisk Dokumentasjon hos: * | |
| Borhammer Produktnumber | |||
| fi | EU-vaatimustemmukaisuusvakuutus | Vakuutamme tätten, etta mainitut tuotteet vastaavat kaikkia seuraavien direktiivien ja asetusten asiaankuulvia vaatimuksaia ja ovat seuraavien standardien vaatimusten mukaisia. Tekniset asiakirjat saatavana: * | |
| Poravasara Tuotenumero | |||
| el | Δηλωη πιστόπτας EE | Δηλωνομε με απολείαικη μας ευθύνη, ὄτι τα σαναφρόμενα προῖντα avιποτοχουν Εόλες κι σχετικές διατάξεις τυν πο κατων αναφρόμενων σθηγων καλ κανονιμών και ταιύνται με τα ακόλουθα προίπι. Teχνικά ἀγραρα στή: * | |
| Περιαρομίδο Αριθμός ευρετηρίου | |||
| tr | AB Uygunluk Beyani | Tek sourlu olarak, tanimlanan urünün asağidakiyonetmelik ve direktiflerin geçerli buttun hülkümlerine ve asağidaki standartlara uygun olduguñu beyan ederiz. Teknik belgelerin bulunduguу yer: * | |
| Kırıci-delici Ürün kodu | |||
| II | |||
| pl | Deklaracja zgodnosci UE | Osciadczamy z pełna odpowiedzialnoscia, ze niniejsze produkty odpowiadaj wzystkim wymaganiom poniżej wyszczególniych dyrektyw i Rozporjadźne, oraz ze są zgodne z następućymi normami. Dokumentacja techniczna:* | |
| Miot udarowo-oblotowy Numer katalogowy | Prohlasujeme na vyhradní zodpovednost, ze uvedeny výrobek splůne věsechna príslůné ustanovné niže uvedenych směrnic anariadić je aje vsouladu snášedujícimi normami: Teknicke podklady u:* | ||
| cs | EU prohlášeni oshodě | Prohlasujeme na vyhradní zodpovednost, ze uvedeny výrobek splůne věschtý príslůné ustanovné nižsie uvedenych směrnic anariadić je aje vsulade snášedujícimi normami: Teknicke podklady má spolocnost:* | |
| Vrtací kladivo ObjednaciCIDSO | Vyhlasujeme na vyhradní zodpovednost, ze uvedeny výrobek splůne věschtý príslůné ustanovné nižsie uvedenych směrnic anariadić je aje vsulade snášedujícimi normami: Teknicke podklady má spolocnost:* | ||
| sk | Eú vyhlásenie ozhode | Egyedūli felelo séggel kijelentjuk, hagy a megnevezett terméknek megfelelnek az alábbiakban felsorolársa keruló irányelvek és rendeleket valamennyi idevágó elöirásainak és megfelelnek a kõvetkežo szabványoknak. Mûszaki dokumentumok megörzési pontja:* | |
| Vrétace kladivo VecnéCIDSO | Egyedūli felelo séggel kijelentjuk, hagy a megnevezett terméknek megfelelnek az alábbiakban felsorolársa keruló irányelvek és rendeleket valamennyi idevágó elöirásainak és megfelelnek a kõvetkežo szabványoknak. Mûszazi dokumentumok megörzési pontja:* | ||
| hu | EU konformitási nyilatkozat | Mlb 3a8b1aem pod nau shу undnohočnyu OTBETCTBENHOCTb,чTo Na3BaBHeIe prnoodykTb COOTBETCTBIVT BCEM DeiCTBNUOIM PrénoHCAHIM HIXKEYA3AHbIX DINOPEKTHB IN PACNOPEJHKEN, a TAKKE HIXKEYA3AHbIX HOPM. TexNHUCKA JOKUMENTAùN XPAHNTCAY: * | |
| Fúrókalapács Cikkszám | Mlb 3a8b1aem pod nau shу undnohočnyu OTBETCTBENHOCTb,чTo Na3BaBHeIe prnoodykTb COOTBETCTBIVT BCEM DeiCTBNUOIM PrénoHCAHIM HIXKEYA3AHbIX DINOPEKTHB IN PACNOPEJHKEN, a TAKKE NIXKEYA3AHbIX HOPM. TexNHUCKA JOKUMENTAùN 36EPIGAETBCAY: * | ||
| ru | 3a8b1aem o cootbetrCTBIVN EC | Mlb 3a8b1aem pod nau shу undnohočnyu OTBETCTBENHOCTb,чTo Na3BaBHeIe prnoodykTb COOTBETCTBIVT BCEM DeiCTBNUOIM PrénoHCAHIM HIXKEYA3AHbIX DINOPEKTHB IN PACNOPEJHKEN, a TAKKE NHIXKEYA3AHbIX HOPM. TexNHUCKA JOKUMENTAùN 36EPIGAETBCAY: * | |
| Perφopatop Tobarhny NO | Mlb 3a8b1aem pod nau shу undnohočnyu OTBETCTBENHOCTb,чTo Na3BaBHeIe prnoodykTb COOTBETCTBIVT BCEM DeiCTBNUOIM PrénoHCAHIM HIXKEYA3AHbIX DINOPEKTHB IN PACNOPEJHKEN, a TAKKE CHINKUOHN HOPM. TexNHUCKA JOKUMENTAùN 36EPIGAETBCAY: * | ||
| uk | 3a8b1aem noi nau shу undnohočnye BC | Mlb 3a8b1aem pod nau shу undnohočnyu OTBETCTBENHOCTb,чTo Na3BaBHeIe prnoodykTb COOTBETCTBIVT BCEM DeiCTBNUOIN PrénoHCAHIM HIXKEYA3AHbIX DINOPEKTHB IN PACNOPEJHKEN, a TAKKE NHIXKEYA3AHbIX HOPM. TexNHUCKA JOKUMENTAùN 36EPIGAETBCAY: * | |
| Perφopatop Tobarhny NoHomep | Mlb 3a8b1aem pod nau shу undnohočnyu OTBETCTBENHOCTb,чTo Na3BaBHeIe prnoodykTb COOTBETCTBIVT BCEM DeiCTBNUOIN PrénoHCAHIM HIXKEYA3AHbIX DINOPEKTHB IN PACNOPEJHKEN, a TAKKE CHINKUOHN HOPM. TexNHUCKA JOKUMENTAùN 36EPIGAETBCAY: * | ||
| kk | EO cāikeyctik mafyndamaçby | θ3 jayanepoivinkien bi3 atalranf énhimdep terMehenje JX3bIqraHAN DINOPEKTHAqpAmpA | |
| Perφopatop ΘHIM HEMPI | DINOPEKTHAqpAmpA men JXAPBKTAPDbH TNICTI KAFIDAPBbHa n Caikeyctirin JX3aHene HOpMaP. TexNHUCKA JOKUMETAùN 36EPIGAETBCAY: * | ||
| ro | Declaratie de conformitate UE | Declaratem pe proprie raspundere cà produsele mentionate corspund tuturor dispoziṭiñor relevante ale directivelor.si reglementárilor enumerate in celece urmeazà si sunt in conformitate cu urmátoarele standarde. Documentatie tehnica la:* | |
| Ciocan rotopercutor Numar de identificare | Declarãm pe proprie raspundere cà produsele mentionate corspund tuturor dispoziṭiñor relevante ale directivelor.si reglementárilor enumerate in celece urmeazà si sunt in conformitate cu urmátoarele standarde. Documentatie tehnica la:* | ||
| bg | EC dεκlapaúca 3a sbotbetrCTBVe | C nblaNa OTRTOBOPHOCT Hne DEKnaprapame, ye nocooucheHte prnoodykTn OTBOVAPAT Ha BCSUKN BAVINDAH NINCKBAHNA Ha DINOPEKTHBTE n PaoipopebideNo-Donu y C botbetrCTBa Ha CLENDHTe CTAnDAPTN. TexNHUCKA JOKUMETAùN pyn:* | |
| Perφopatop Katanojen Hoomep | Co ŒLONOSa OTRTOBOPHOCT HnzabvAmE, deKa OπHuaHIne PrnoHBoDinCe Bo CoglAChOCT Co CITE PEPEVAHTN OndpeBdo n CLENDHTe perylnaTbN n PioPnHcN n CE Bo CoglAChOCT Co CLENDHTe HOPM. TexNHUCKA JOKUMETAùN KaJ:* | ||
| mk | EU-N3jaba 3a coobpa3HoCT | Co ŒLONOSa OTRTOBOPHOCT HnzabvAmE, deKa OπHuaHIne PrnoHBoDinCe Bo CoglAChOCT Co CITE PEPEVAHTN OndpeBdo n CLENDHTe perylnaTbN n PioPnHcN n CE Bo CoglAChOCT Co CLENDHTe HOPMn. TexNHUCKA JOKUMETAùN KaJ:* | |
| Čekann 3aБpoj na den/ajpTrKn | Dyunpehbe | ||
| Dyunpehbe | Eu-izjava o usaglašenosti | ||
| Busilica Čekić Broj predmeta | Svid doticih odgovornost izjavljemo, da navedeni proizvodi odgovaraju svim doticih odredbama naknadno navedenih smernica u uredaba i da su skladu sa sledećim standardima. Tehnicka dokumentacija kod: * | ||
| sl | Izjava o skladnosti EU | Izjavljamo pod ozključno odgovornostjo, da je omenjen izdelek v skladu z vsemi relevantnimi dolovi direktiv in uredb ter ustreza naslednjim standardom. Tehnicna dokumentacija pri:* | |
| Vrtalno kladivo Številka artikla | Pod punom odgovornošću izjavljemo da navedeni proizvodi odgovaraju svim relevantnimi odredbama direktiva i propisiima navedenima u nastavku i da su skladni sa sljedćim normama. Tehnicka dokumentacija se moze dobiti kod: * | ||
| hr | EU izjava o skladnosti | Pod punom odgovornošću izjavljemo da navedeni proizvodi odgovaraju svim relevantnimi odredbama direktiva i propisiima navedenima u nastavku i da su skladni sa sljedćim normama. Tehnicka dokumentacija se moze dobiti kod: * | |
| et | EL-vastavusdeklaratsion | Kinnitame ainuvastutajatena, et nimetatud tooted vastavad järgnevalt loetletud direktivide ja määruste kõikidele asjaomastele nõuetele ja on kooskõlas järgmiste normidega. Tehnilsed dokumendid saadaval:* | |
| Puurvasar | Tootenumber | ||
| lv | Deklaracija par atbilstibu ES standartiem | Mës ar pilnu atbildibu pazinojam, ka šeit aplukotie izstradājumi atbilst visiem tãåk minētajas direktivas un rikojumos ietvertajam saistošajam nostädnēm, kã ári sekojosiem standartiem. Tehniskã dokumentácija no:* | |
| Perforators | Izstrādājuma numurs | ||
| lt | ES atitikties deklaracija | Atsakingai pareiskiame, kad išvardyti gaminiai atitinka visus privalomus žemiau nurodytu direktvyir reglamentu reikalavimus ir šiuos standartus. Technine dokumentacijsa saugoma:* | |
| Perforatorius | Gaminio numeris | ||
| GBH 220 3 611 BA6 020 | 2006/42/EC EN 62841-1:2015 2014/30/EU EN IEC 62841-2-6:2020+A11:2020 2011/65/EU EN 55014-1:2017+A11:2020 EN 55014-2:2015 EN IEC 61000-3-2:2019+A1:2021 EN 61000-3-3:2013+A1:2019 EN IEC 63000:2018 | ||
| BOSCH * Robert Bosch Power Tools GmbH (PT/ECS) 70538 Stuttgart GERMANY | |||
| Henk Becker Helmut Heinzelmann Chairman of Head of Product Certification Executive Management i.v. h. | |||
| Robert Bosch Power Tools GmbH, 70538 Stuttgart, GERMANY Stuttgart, 16.12.2021 | |||

- GBH 220 Professional
- WARNING
- Work area safety
- Electrical safety
- Personal safety
- Power tool use and care
- Service
- Hammer SafetyWarnings
- Safety instructions for all operations
- Safety instructions when using long drill bits with rotary hammers
- Additional Safety Information
- Products sold in GB only:
- Product Description and Specifications
- Intended Use
- Product Features
- | English
- Technical Data
- Noise/Vibration Information
- Assembly
- Auxiliary handle
- Swivelling the auxiliary handle (see figure A)
- Selecting drill chucks and tools
- Changing the drill chuck
- Fitting the keyless chuck/ keyed chuck (see figure B)
- Inserting the keyless chuck/ keyed chuck (see figure B)
- Removing the keyless chuck/ keyed chuck
- Changing the Tool
- Changing the tool (SDS plus)
- Removing SDS-plus application tools (see figure D)
- Changing the keyless quick-change chuck Inserting the application tool (see figure E
- Removing the application tool (see figure F)
- Dust/Chip Extraction
- Dust extraction with the dust extraction attachment (accessory)
- Fitting the dust extraction attachment (see figure G)
- | English
- Setting the drilling depth on the dust extraction attachment (see figure H)
- Operation
- Start-up
- Setting the Operating Mode
- Setting the rotational direction (see figure I)
- Only operate the rotational direction switch (8) when the power tool is not in use.
- Switching On/Off
- Adjusting the Speed/Impact Rate
- Changing the chiselling position (Vario-Lock)
- Chiselling with lock function
- Practical Advice
- Setting the drilling depth (see figure J)
- Overload clutch
- Inserting screwdriver bits (see figure K)
- Maintenance and Service
- Maintenance and Cleaning
- After-Sales Service and Application Service
- Malaysia
- Disposal
- Français
- Eliminação
- 处理废弃物
- 廢棄物處理
- W
- 777777777777
- nnaaannnnaanrnnnnae
- #
- -103:110000000000000000000000000000000000000
- Saugfix (aunwJnou)
- mnuuauv Saugfix (nunwunau G)
- nannnnnnnn
- Bahasa Indonesia
- Keselamatan personnel
- Kopling began berlebih
- Caramembuang
- | Tiéng Viét
- Khop Ly Hop Chong Qua Tai
- Lap dau chia vän vit (xem Hinh K)
- | Tiéng Viét
- Su'thai bo
- aaiiLiull
- aui jSll o sll
- Culll aabg psswL Cull
- Jssll 1s
- J(jgJJIjil) jll gac
- 山
- (KjgJJIbJI)UJIgUJI bJI pJI 5
- jugjw
- L uS yIy
- oSiSo JU LJc g Js JuSo
Brand : BOSCH
Model : GBH 220 Professional
Category : Hammer