SPMSP001 - Fitness Equipment SportPlus - Free user manual and instructions
Find the device manual for free SPMSP001 SportPlus in PDF.
| Product type | Stepper (mini stepper) for cardiovascular training and muscle toning |
| Brand and model | SportPlus SPMSP001 |
| Dimensions (L × W × H) | 40 × 38 × 18 cm |
| Total weight | 7 kg |
| Maximum user weight | 100 kg |
| Braking system | Independent of speed |
| Walking movement | Dependent (linked pedal movement) |
| Adjustable step height | Yes, via adjustment knob (7) |
| Computer | Model LT9569 with LCD display |
| Computer power supply | 1 LR44 / AG13 button cell battery |
| Computer functions | Time, step count, steps per minute, calories, auto scan |
| Usage | Private domestic (non-medical and non-commercial) |
| Assembly required | Yes, simple assembly described in the manual |
| Warranty | 2 years from date of purchase |
| Maintenance and cleaning | Clean after use with a slightly damp soft cloth; regularly check for wear of parts |
| Safety | Not for use by children without supervision; keep a safety distance of at least 1 m around the device; use on flat, non-slip surface |
| Spare parts and repairability | Spare parts available via customer service; repairs by qualified personnel only |
Frequently Asked Questions - SPMSP001 SportPlus
User questions about SPMSP001 SportPlus
0 question about this device. Answer the ones you know or ask your own.
Ask a new question about this device
Download the instructions for your Fitness Equipment in PDF format for free! Find your manual SPMSP001 - SportPlus and take your electronic device back in hand. On this page are published all the documents necessary for the use of your device. SPMSP001 by SportPlus.
USER MANUAL SPMSP001 SportPlus
Congratulations for choosing a SportPlus product. We have every expectation that you will be fully satisfied with your new purchase.
To guarantee optimal function of this product, please adhere to the following instructions:
Before using this product for the first time, please read the manual carefully!
- The product has been designed with safety features. Nevertheless, please read the safety instructions carefully and use the equipment only as described in the manual to avoid hazards and personal injury.
Please retain this manual for future reference.
- Should you pass on this product, ensure to include the corresponding instruction manual.
TABLE OF CONTENTS
- TECHNICAL DATA 16
2.SAFETYINSTRUCTIONS 17 - EXPLODED DIAGRAM 19
- COMPONENTS LIST 20
- ASSEMBLY INSTRUCTIONS 21
- USING THE PRODUCT 23
7.COMPUTER 24 - TRAINING TIPS 25
- CLEANING & MAINTENANCE 27
- NOTES ON DISPOSAL 27
11.COMPLAINTS & WARRANTY 28
1. TECHNICAL DATA
Product specifications
Dimensions (L x W x H): 40 x 38 x 18 cm
Total weight: 7kg
- Braking system: speed independent
- Step motion: dependent
Class: H.C.
Max. weight of user: 100kg
Computer specifications
Model: LT9569
Number of batteries: 1
Type of batteries: LR44 AG13 button cell
- Computer functions: Time, number of steps, steps per minute, calorie consumption, automatic display toggling
Calorie consumption is calculated based on an estimated value, independent of the set resistance.
2. SAFETY INSTRUCTIONS
INTENDED PURPOSE
- This product is intended for household use and is not suitable for medicinal, therapeutic or commercial purposes.
The maximum permissible weight of a person using this product is 100kg - When used regularly, the product strengthens your cardiovascular system and the muscles in your calves, thighs and buttocks.
HAZARD FOR CHILDREN
- Parents and supervisors should be aware of their responsibility, since, due to children's natural playfulness and love of experimentation, situations and conduct will likely arise for which the training unit is not intended.
- Children cannot recognize the hazards that this product may pose. For this reason, keep this product out of the reach of children. The product is not a toy. Store the product at a location out of the reach of children and pets.
- If you allow a child to use the product, do not leave it unattended during use. Make all necessary adjustments to the product yourself and supervise the child during exercise.
- Keep packaging materials out of the reach of children. They pose a suffocation hazard!
CAUTION - RISK OF INJURY
- Do not use the product if it is damaged or defective. In this case, contact a professional workshop or our service center.
- Always verify that the product is in impeccable condition before use. Defective components must be replaced immediately as failure to do so may impair the functioning and safety of the unit.
Make sure that no more than one person use the product at a time. - Always use the product on a horizontal, level, nonslip and solid surface. Never use the product near water and make sure there is a safety clearance of at least 1 meter on all sides of the product. Prevent your arms and legs from coming near the product's moving components. Do not put any objects into any openings on the product.
CAUTION - PRODUCT DAMAGE
- Do not alter the product in any way and use only original replacement parts. Have all repairs carried out in a professional workshop or from similarly qualified persons - improper repairs can lead to serious risks for the user. Use the product for the intended purposes as described in this user manual only.
- Shield the product from spraying water, moisture, high temperatures and direct sunlight.
ADVICE WITH REGARD TO BATTERIES
- Batteries could be fatal if swallowed. For this reason, store batteries out of the reach of children. If a battery has been swallowed, seek medical attention immediately.
- Remove the batteries if they are empty or if you are no longer using the product. In this way, you will avoid damages that can be caused by leaking.
- The batteries may not be charged or activated with other means, dismantled, thrown into fire or short-circuited. There is a DANGER OF EXPLOSION!
- Heed correct polarity (+ and -) when inserting the batteries. Always replace all batteries with new ones. Do not use old and new batteries or batteries of different types together!
- Preferably use alkaline batteries, since they last longer than regular zinc-carbon batteries.
- A battery replacement is necessary as soon as the display starts to fade or fades completely.
INFORMATION ON ASSEMBLY
Assembly of the product must be carried out carefully by an adult person. Ask for the assistance of another person with technical insight in case of doubt.
Before beginning assembly of the product, read all assembly steps carefully and review the diagram.
- Remove all packaging materials and place all individual components on a free surface. This will give you a good overview and simplify assembly. Shield the assembly surface from filth and scratching by laying down suitable padding.
- Check the components against the components list to make sure all are present. Do not dispose of all packaging materials until assembly is completed.
- Please note that there is always a risk of injury when using tools or completing manual tasks. Therefore, please exercise caution when assembling this product.
- Make sure your work environment is hazard-free. For example, do not leave any tools lying around. Place the packaging materials somewhere where they will not pose any hazards during assembly. Packaging foil or plastic bags pose a suffocation hazard for children!
- After assembling the product according to the instructions, make sure that all screws, bolts and nuts are installed correctly and tightened.
- If necessary, lay out protective padding (not included) beneath the product to protect your floor as there is no guarantee that, for instance, the rubber feet will not leave marks behind.
3. EXPLODED DIAGRAM
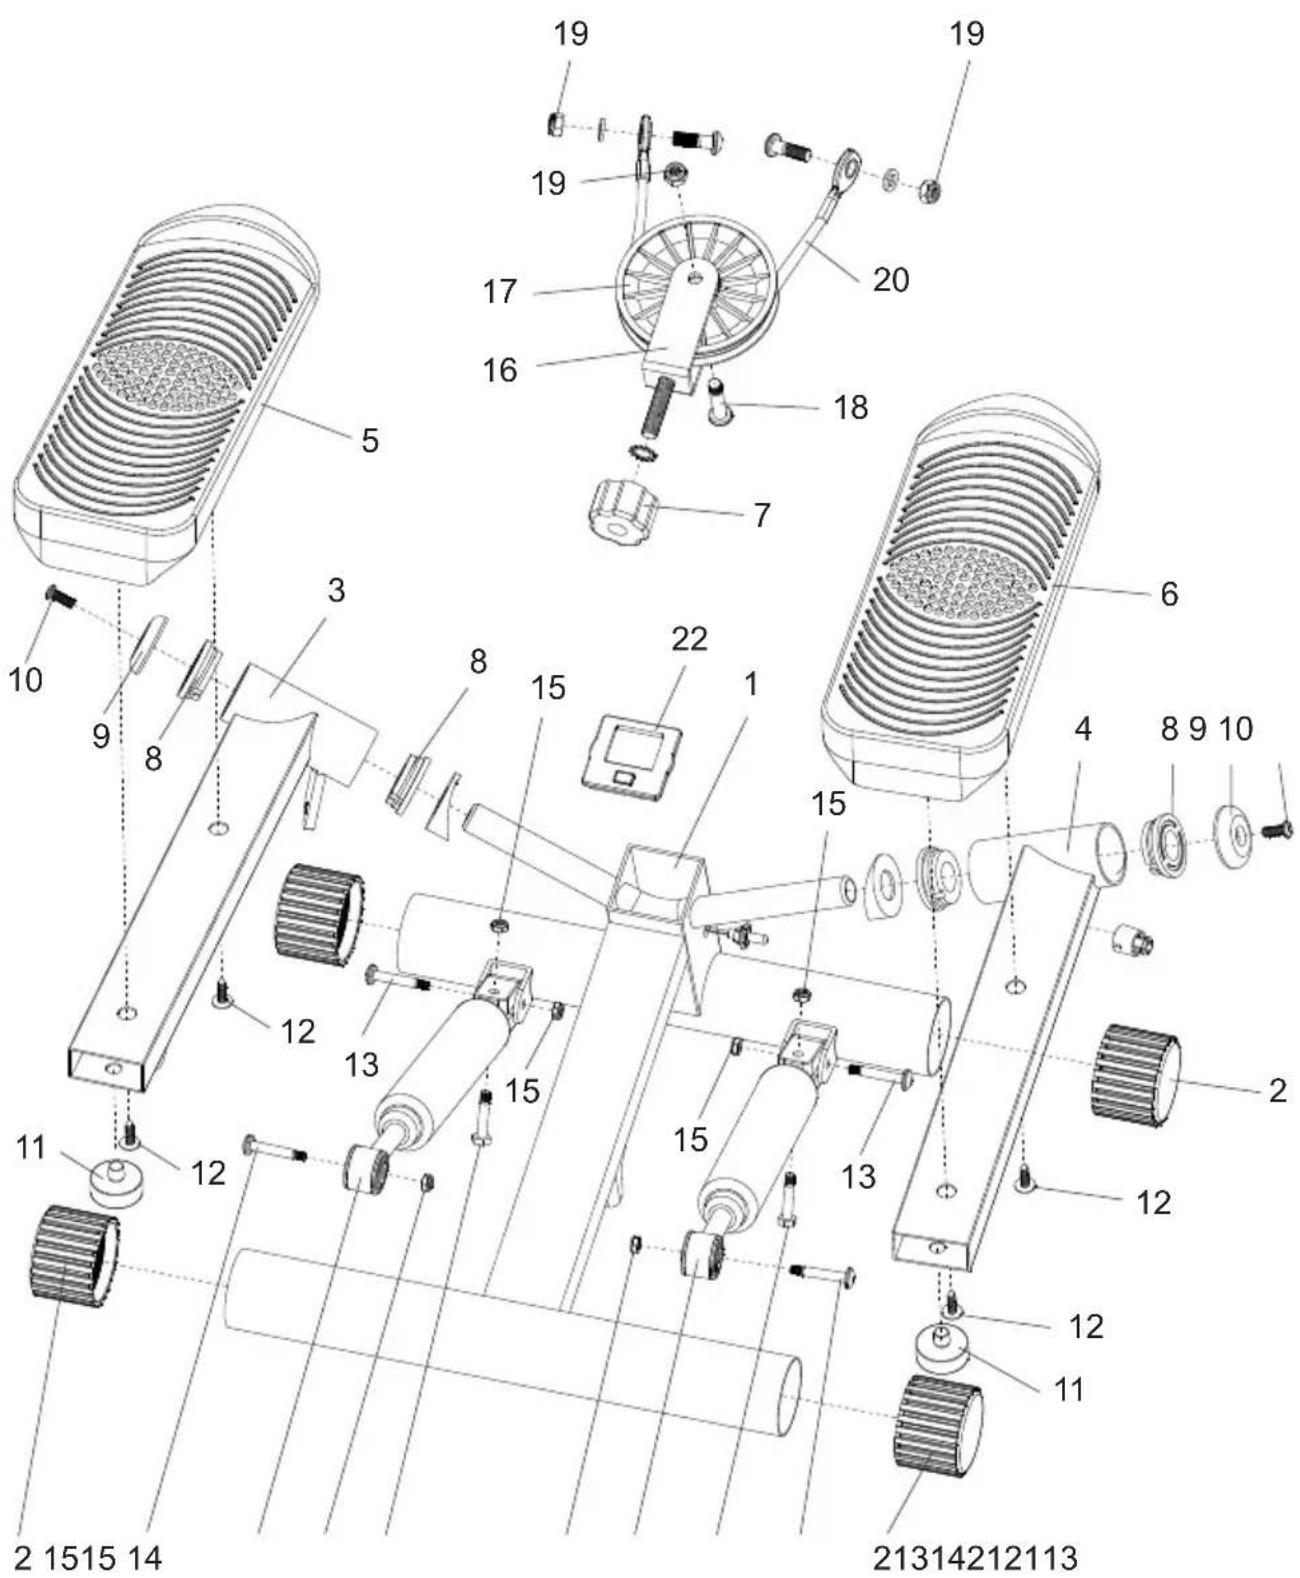
4. COMPONENTS LIST
| No. | Description | Quantity |
| 1 | Main | frame 1 |
| 2 | End cap | (Ø50) 4 |
| 3 | Pedal | mount (L) 1 |
| 4 | Pedal | mount (R) 1 |
| 5 | Pedal | (L) 1 |
| 6 | Pedal | (R) 1 |
| 7 | Set knob | 1 |
| 8 | Plastic bushing (Ø40) 4 | |
| 9 | Bolt cap | 2 |
| 10 | BOlt | (M6*15 mm) 2 |
| 11 | Stopper | 2 |
| 12 | Bolt | (M5*20 mm) 4 |
| 13 | Bolt | (M6*36 mm) 4 |
| 14 | Bolt | (M6*31 mm) 2 |
| 15 | Nut | (M6) 6 |
| 16 | Pullebracket | 1 |
| 17 | Pulley (100 mm) 1 | |
| 18 | Pulley bolt (M8*37) | 1 |
| 19 | Nut | (M8) 1 |
| 20 | Cable (355 mm) | 1 |
| 21 | Hydraulic cylinder | 2 |
| 22 | Computer | 1 |
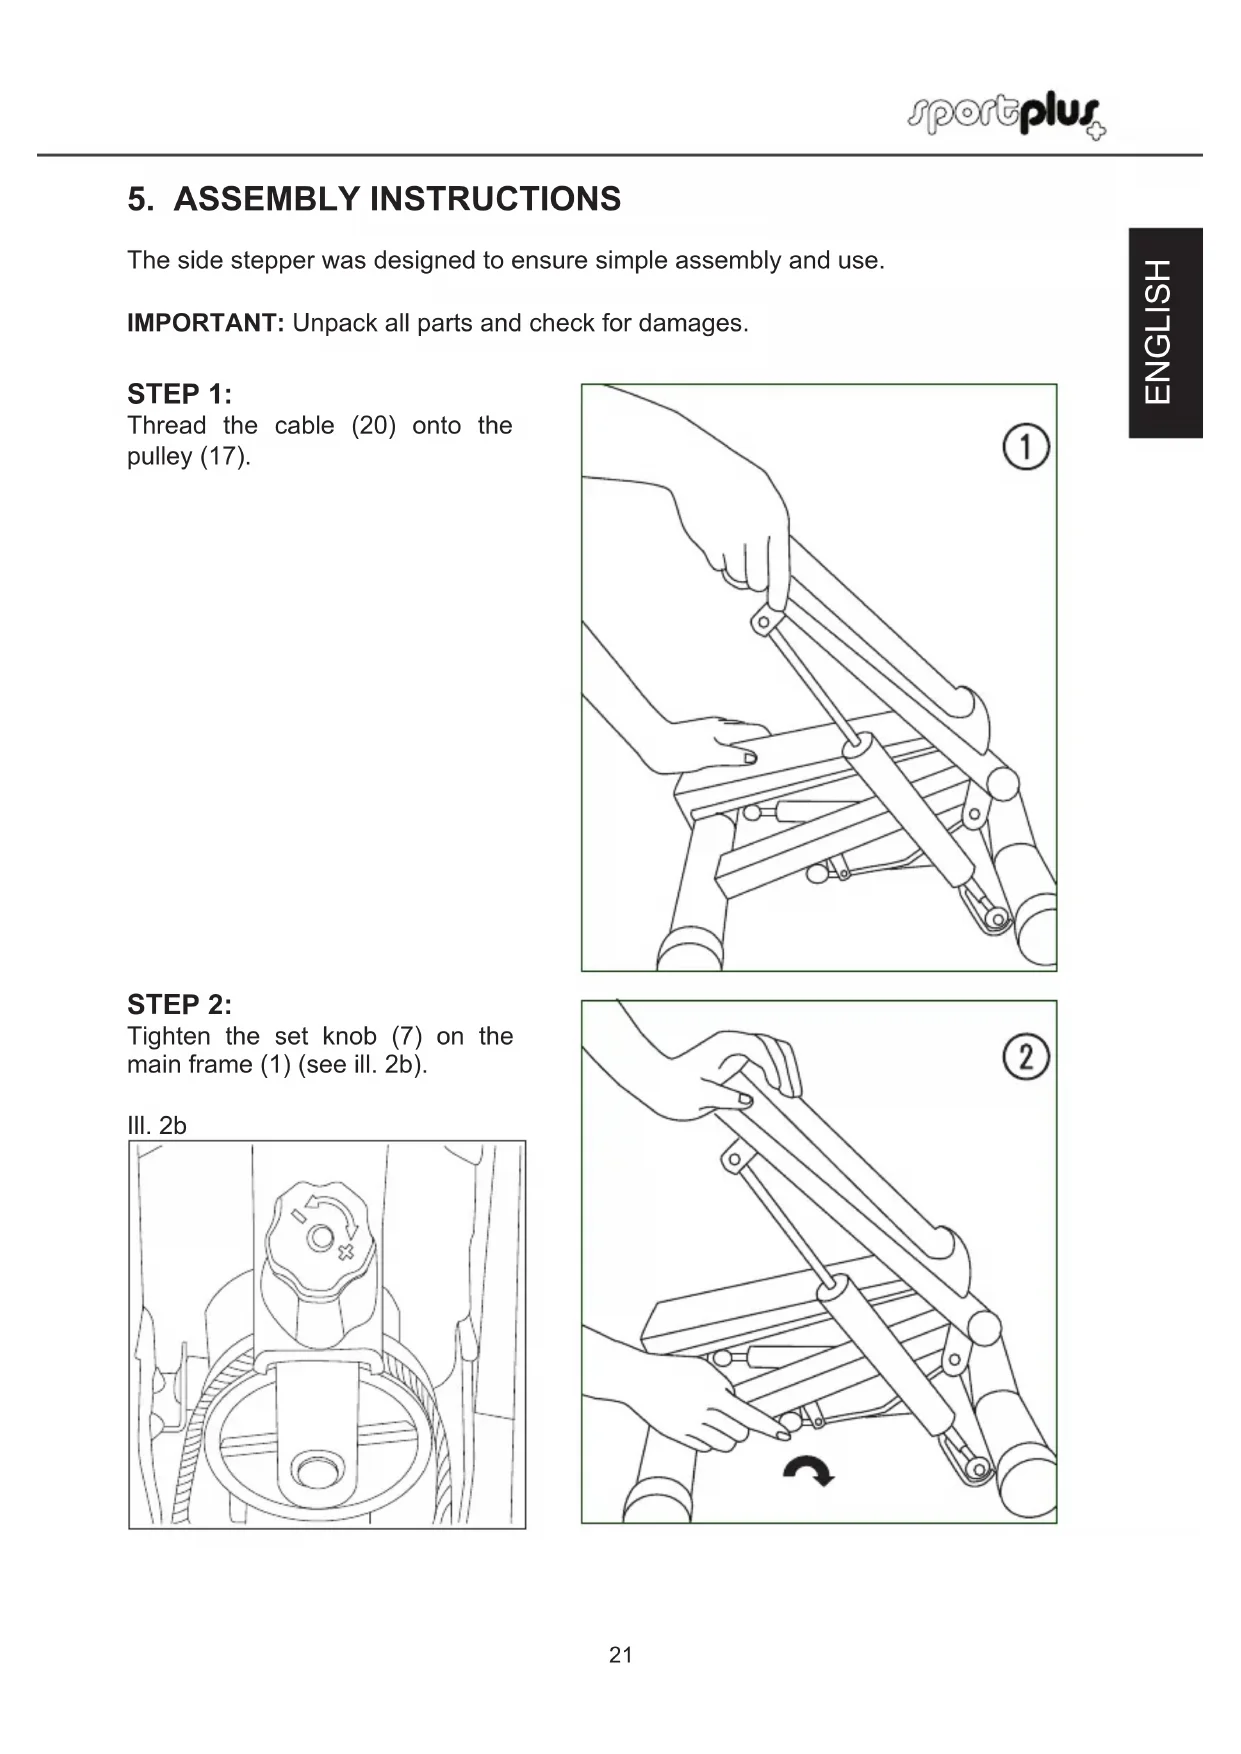
5. ASSEMBLY INSTRUCTIONS
The side stepper was designed to ensure simple assembly and use.
IMPORTANT: Unpack all parts and check for damages.
STEP1:
Thread the cable (20) onto the pulley (17).

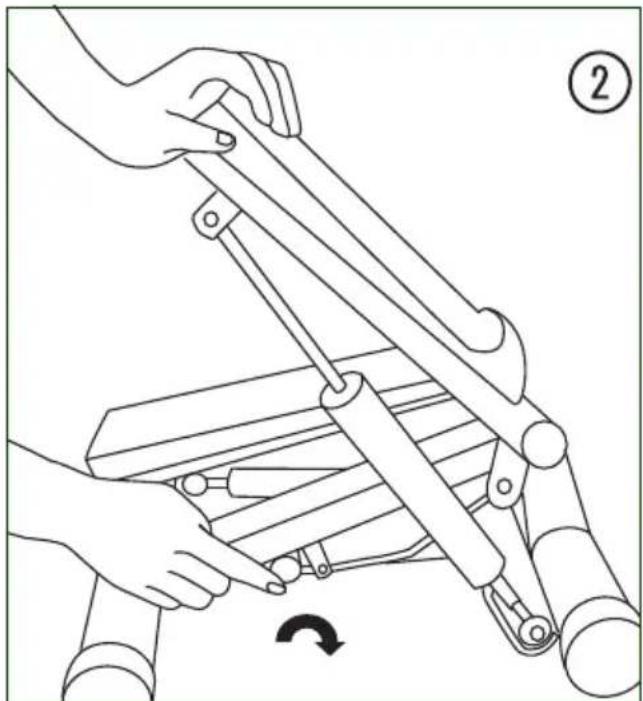
STEP 2:
Tighten the set knob (7) on the main frame (1) (see ill. 2b).
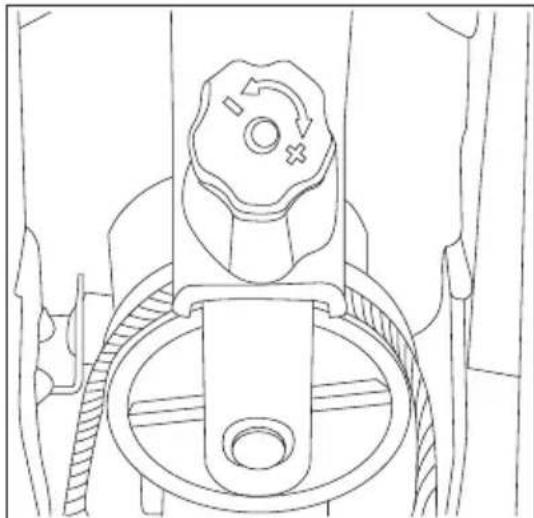
III. 2b
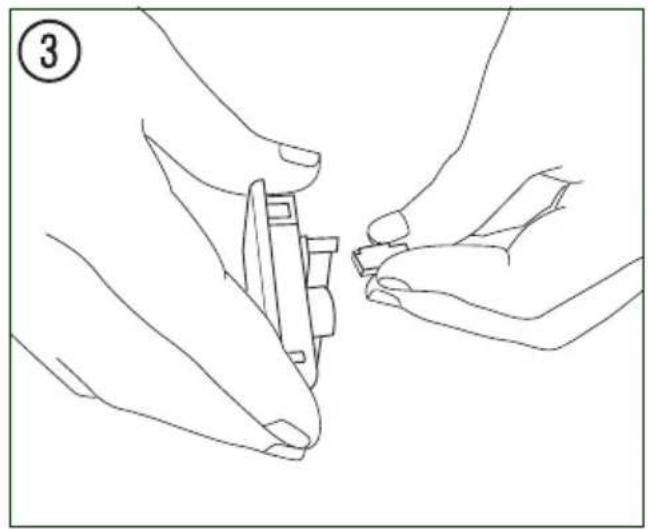
STEP 3:
Connect the sensor to the bottom of the computer (22).
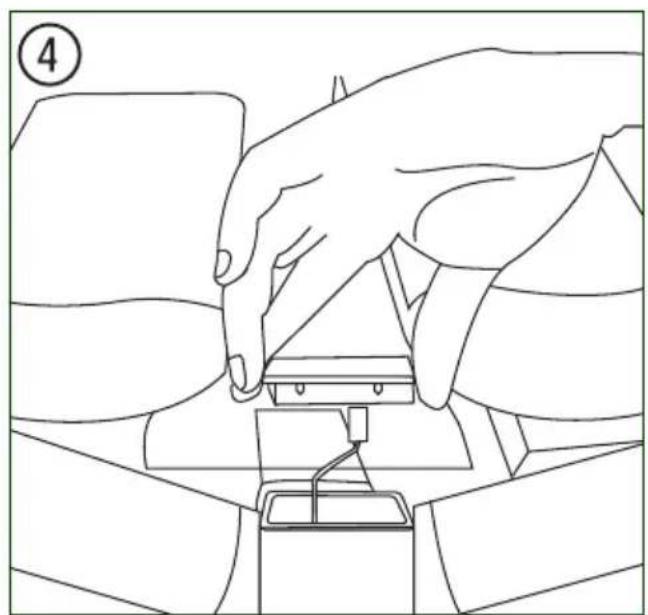
STEP4:
Insert the computer (22) into the main frame (1).
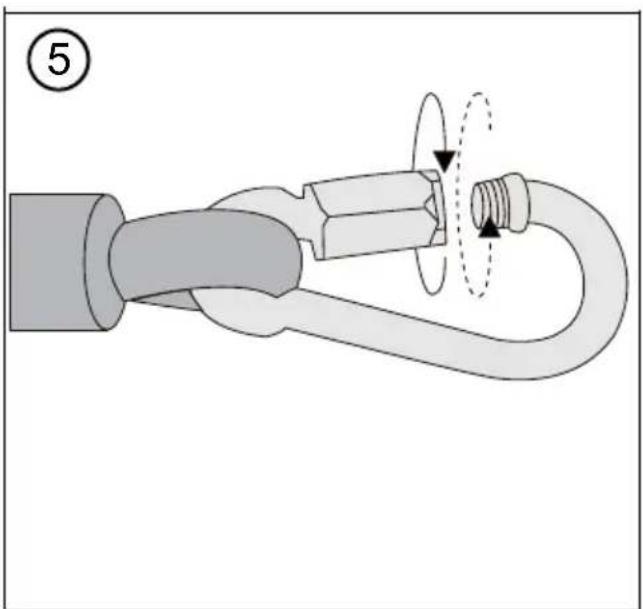
STEP5:
Attach the pullropes with carabiners to the eyelets in front of the pedals
6. USING THE PRODUCT
FIRST STEPS
IMPORTANT: Set up the side stepper on a horizontal, even and stable surface. We recommend placing a rectangular carpet or rubber padding under the side stepper. This will protect the floor, especially after use over an extended period. Make sure there is a safety clearance of at least 1 meters on all sides of the product.
ADJUSTING THE STEPPING HEIGHT:
Set knob (7)
The stepping height can be adjusted by turning the set knob (7). The higher the stepping height, the higher the difficulty level.
Turn right to increase the stepping height.
Turn left to decrease the stepping height.
Set the stepping height according to your ability. A lower stepping height is appropriate for beginners, a higher stepping height for advanced users for training and toning lower body muscles.
MOUNTING CORRECTLY:
IMPORTANT: We recommend to beginners to place the device in a door frame or in front of a high-backed chair before mounting the side stepper the first time. The door frame or chair back can be used to help maintain your balance and correct posture. Brace yourself on the door frame or chair back BEFORE MOUNTING THE STEPPER.
- Place one foot slowly on the pedal and push down until it reaches its deepest position.
Now place the same foot in the middle of the pedal.
Then place the other foot in the middle of the other pedal. - Begin pedalling slowly with both legs. Continue stepping until you develop a feeling for your balance and the bidirectional sequence of motion on the side stepper.
HINT: Your goal is to achieve an even, rhythmic movement on the side stepper. Do not try to pedal all the way down with each step.
7. COMPUTER
FUNCTIONS
Press the MODE button on the computer to toggle between functions. Press and hold the MODE button for 2 seconds to reset the computer to zero.
| SCAN: Press the M | ODE button to select SCAN. With SCAN activated, the computer automatically toggles between the functions shown in the lower monitor row. |
| TIME: Shows the time elapsed from the start of training. | |
| COUNT: Shows the number of steps from the start of training. | |
| REPS/MIN: Shows the average number of steps from the start of training. | |
| CALS: Shows your calorie consumption from the start of training (approximate value). | |
INSERTING THE BATTERY
- Remove the computer from the main frame and remove the battery from the back.
- Insert one LR44 AG13 battery. Heed correct polarity.
- Verify that all cable connections are secure. Reinsert the computer into the main frame.
Under normal operating conditions, the battery's service life is one year.
A battery replacement is necessary as soon as the display starts to fade or is completely faded. Wait 15 seconds before reinserting the battery.
NOTE: All saved data is lost when you replace the battery. If the stepping height is set too low, the computer may not count correctly. Tighten the set knob (7) to increase the stepping height.
8. TRAINING TIPS

IMPORTANT NOTES ON TRAINING
-
Please consult your physician before beginning training. Ask your physician about the extent of training appropriate for you. Improper or excessive training may result in damage to health.
-
Do not overstrain your own body. Do not train when you are tired or exhausted. If you are unaccustomed to physical activity, begin slowly.
Overstraining your body or improper posture may harm your health.
-
Cease training immediately if you feel any pain or discomfort.
-
Do not eat anything for a half hour before and after training.
-
Breathe evenly and calmly during training.
-
To prevent injury, begin each training session with warm-up exercises and end with a cool-down phase. You can use the exercises described in this manual. You can also find more exercises in relevant literature.
-
Be sure to drink enough fluids during training. Please note that it the recommended fluid intake of approx. 2 liters daily increases through physical strain. The fluids you drink should be at room temperature.
-
Use the product only wearing sports wear and appropriate shoes with nonslip soles. Do not wear loose clothing that could catch on the unit during training.
-
Check your pulse regularly. Establish your personal training frequency range to achieve the best training results. Take into consideration your age as well as your physical condition. The following table offers a reference point for establishing your ideal training pulse:
| Age Heart rate range 50-75% -ideal training pulse - (beats per minute) | Maximum heart rate 100% (220 beats – age) |
| 20 years of age 100-150 200 | |
| 25 years of age 98-146 195 | |
| 30 years of age 95-142 190 | |
| 35 years of age 93-138 185 | |
| 40 years of age 90-135 180 | |
| 45 years of age 88-131 175 | |
| 50 years of age 85-127 170 | |
| 55 years of age 83-123 165 | |
| 60 years of age 80-120 160 | |
| 65 years of age 78-116 155 | |
| 70 years of age 75-113 150 |
TRAINING FREQUENCY
At the beginning, we recommend training every other day on the side stepper. Beginners can start with a 5 minute program, then increase to 10 minutes and later to 30 (without interruption or divided into 3x 10 minute phases). If your fitness level is already very high, you can train every day. But always remember to listen to your own body.
STRETCHING EXERCISES
The stretches depicted on the following page are suited both for warming up and cooling down after training. Please note that in the warm-up phase, you should hold the stretches only briefly (approx. 5 to 10 seconds) before relaxing again. This increases muscle tension and prepares muscles for subsequent training.
During cool down, stretches should be held longer (at least 30 seconds) in order to reduce muscle tension after the strain of exercise.
As a general rule, never take stretching to the extreme.
If you feel any discomfort, release the stretch immediately, and do this stretch with less intensity in the future.
CORRECT TECHNIQUE
After mounting the side stepper (see „Mounting correctly“), it is important to note where each pedal's end stop is.
While training, do not push the pedals to their end stop with each step. Instead shift your body weight accordingly before the pedal reach the end stop.
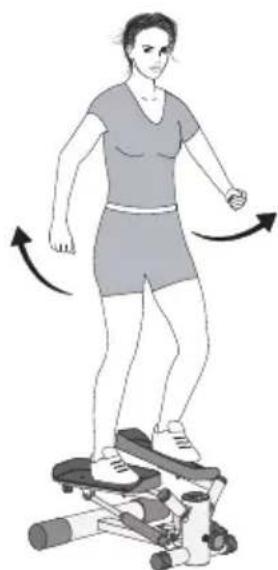
WORKOUT INSTRUCTIONS
Free swinging
Easy cardiovascular training.
Slowly begin swinging your arms at your sides, like when walking normally.
Swing your arms higher to increase the intensity of training. Do not swing your arms higher until you have found a comfortable, easy rhythm.
9. CLEANING & MAINTENANCE
-
Check the product regularly for wear or damage, and have any problems fixed by a professional immediately. If any defects become evident within the warranty period, please have your proof of purchase ready.
-
Always clean your device after training. Do not use any aggressive cleaning agents to clean the unit. Use a slightly damp cloth to remove and filth and dust.
-
Check all components regularly for wear and damage to guarantee the safety of the product. Pay special attention to wear parts.
10. NOTES ON DISPOSAL

Environmental protection:
Packaging materials are raw materials and can be recycled. Separate the packaging materials and dispose of them properly in the interest of the environment. Your local administration can provide additional information.
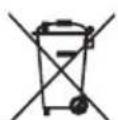
Batteries do not belong in household waste!
Dispose of batteries properly in the interest of the environment. Your local administration can provide information on collection points and opening hours.
11. COMPLAINTS & WARRANTY
Please do not hesitate to contact our service team in one of the following ways if you have technical questions, questions about our products or to order replacement parts:
Availability: Monday to Friday from 9:00 am to 6:00 pm
Service hotline: +442033184415 or +49 (0)40 - 780 896 - 34**
Email: Service@SportPlus.org
URL: http://www.SportPlus.org
*National fixed-line network, call charges depend on your phone company/your phone contract.
**Call charges depend on your phone company/your contract and may vary depending on your phone company. Please contact your network provider/phone company to enquire about current terms.
Please have the following information at hand when you call.
- User manual
- Model number (located on the title page of this manual)
Description of accessory parts - Accessory number
Proof of purchase with purchase date
Please note:
Do not ship your product to our address without being prompted to do so by our service team. The costs and risk of loss for unsolicited shipments will be borne by the sender. We reserve the right to refuse to accept unsolicited shipments or to return the corresponding merchandise to the sender carriage forward, that is, at the sender's expense.
WARRANTY TERMS
SportPlus guarantees that the product this warranty applies to was manufactured using high-quality materials and has been inspected with the utmost attention.
The operation and assembly of the product according to the user manual is a precondition of this warranty. The warranty can be voided due to improper use and/or improper transport of the product.
The warranty period is two years beginning on the date of purchase. If the product you have purchased is defective, please contact our service team within 24 months from the date of purchase. Excluded from the warranty are:
- Damage due to external force.
Interference, repairs or alterations by amateurs and by persons who have not been authorized by us. - Failure to observe the user manual.
If the afore-mentioned warranty terms are not met.
If the defect was caused by improper use or maintenance, neglect or accidents. - Wear and consumables - such as bearings and pads - are also excluded from the warranty.
This product is intended for private use only. There is no warranty for commercial use.