
X703DA4 - Browser ALPINE - Free user manual and instructions
Find the device manual for free X703DA4 ALPINE in PDF.
| Product Type | GPS navigator with touchscreen, radio receiver, Bluetooth, compatible with Android Auto and Apple CarPlay |
| Brand | Alpine |
| Model | X703DA4 |
| Weight (approx.) | 1.5 kg |
| Power supply | 14.4 V DC (11–16 V allowed) |
| Display | LCD TFT active matrix, LED backlight, resolution 800 × 480 px (according to comparable model) |
| Operating temperature | -20 °C to +60 °C |
| Maximum output power | 50 W × 4 |
| FM tuner | Range 87.5–108.0 MHz |
| MW tuner | Range 531–1602 kHz |
| LW tuner | Range 153–281 kHz |
| DAB/DAB+/DMB | Band III (174.93–239.2 MHz) and L Band (1452.96–1490.6 MHz) |
| USB | Version 2.0, up to 1500 mA, FAT16/32 file systems |
| HDMI | Input/output for compatible devices |
| Bluetooth | Profiles PBAP, A2DP, AVRCP, SPP; up to 5 devices |
| GPS | Frequency 1575.42 MHz, sensitivity -136 dBm max. |
| GLONASS | Frequency 1597.807–1605.6305 MHz, sensitivity -137 dBm max. |
| Main functions | GPS navigation, FM/MW/LW/DAB radio, USB/HDMI playback, hands-free, Android Auto, Apple CarPlay, voice commands (Siri/Google Assistant) |
| Maintenance and cleaning | Use a soft dry cloth; avoid solvents and abrasive products |
| Safety | Installation by a professional; do not use video while driving; respect volume and attention guidelines |
| Spare parts and repairability | Contact an authorized Alpine dealer or after-sales service |
| General information | Detailed manual on provided CD-ROM; keep serial number |
Frequently Asked Questions - X703DA4 ALPINE
User questions about X703DA4 ALPINE
0 question about this device. Answer the ones you know or ask your own.
Ask a new question about this device
Download the instructions for your Browser in PDF format for free! Find your manual X703DA4 - ALPINE and take your electronic device back in hand. On this page are published all the documents necessary for the use of your device. X703DA4 by ALPINE.
USER MANUAL X703DA4 ALPINE
KPATKOE CIPABOHOE PYKOBOJCTBO
SKROCONAINISTRUKCJA DLA UZYTKOWNIKA
EN
DE
FR
ES
IT
SE
NL
RU
PL


Contents
WARNING 2
CAUTION 3
Getting Started 4
Favourite Function 6
Registering Items 6
Android Auto (Optional) 7
Apple CarPlay (Optional) 7
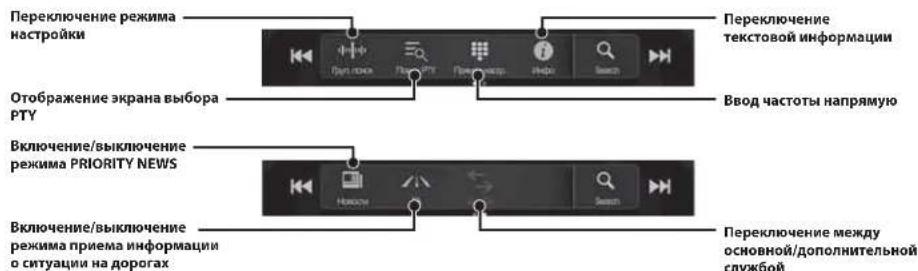
Radio/RDS Operation 8
DAB/DAB+/DMB Operation 9
USB Flash drive Operation (Optional) 10
HDMI Device (DVD Player) Operation (Optional) 11
iPod/iPhone Operation (Optional) 12
Hands-Free Phone Control 13
Map Functions. 14
Navigation Menu. 15
Setting a Destination 16
Specifications 17
IMPORTANT
Please record the serial number of your unit in the space provided below and keep it as a permanent record.
SERIAL NUMBER:
ISO SERIAL NUMBER: AL
INSTALLATION DATE:
INSTALLATION TECHNICIAN:
PLACE OF PURCHASE:
For details on all functions, refer to the Owner's Manual stored in the supplied CD-ROM. (As it is data CD, the CD cannot be used for playing back music and images on the player.) If required, an ALPINE dealer will readily provide you with a print out of the Owner's Manual contained in the CD-ROM.
WARNING

WARNING
This symbol means important instructions. Failure to heed them can result in serious injury or death.
INSTALL THE PRODUCT CORRECTLY SO THAT THE DRIVER CANNOT WATCH TV/VIDEO UNLESS THE VEHICLE IS STOPPED AND THE EMERGENCY BRAKE IS APPLIED.
It is dangerous for the driver to watch TV/Video while driving a vehicle. Installing this product incorrectly enables the driver to watch TV/Video while driving. This may cause a distraction, preventing the driver from looking ahead, thus causing an accident. The driver or other people could be severely injured.
DO NOT WATCHVIDEOWHILEDRIVING.
Watching the video may distract the driver from looking ahead of the vehicle and cause an accident.
DO NOT OPERATE ANY FUNCTION THAT TAKES YOUR ATTENTION AWAY FROM SAFELY DRIVING YOUR VEHICLE.
Any function that requires your prolonged attention should only be performed after coming to a complete stop. Always stop the vehicle in a safe location before performing these functions. Failure to do so may result in an accident.
DO NOT FOLLOW ROUTE SUGGESTIONS IF THE NAVIGATION SYSTEM INSTRUCTS YOU TO PERFORM AN UNSAFE OR ILLEGAL MANEUVER, OR PLACES YOU IN AN UNSAFE SITUATION OR AREA.
This product is not a substitute for your personal judgement. Any route suggestions by this system should never supersede any local traffic regulations or your personal judgement or knowledge of safe driving practice.
KEEP THE VOLUME AT A LEVEL WHERE YOU CAN STILL HEAR OUTSIDE NOISES WHILE DRIVING.
Excessive volume levels that obscure sounds such as emergency vehicle sirens or road warning signals (train crossings, etc.) can be dangerous and may result in an accident. LISTENING AT LOUD VOLUME LEVELS IN A CAR MAY ALSO CAUSE HEARING DAMAGE.
MINIMIZE DISPLAY VIEWING WHILE DRIVING.
Viewing the display may distract the driver from looking ahead of the vehicle and cause an accident.
DO NOT DISASSEMBLE OR ALTER.
Doing so may result in an accident, fire or electric shock.
USE ONLY IN CARS WITH A 12 VOLT NEGATIVE GROUND.
(Check with your dealer if you are not sure.) Failure to do so may result in fire, etc.
KEEP SMALL OBJECTS SUCH AS SCREWS OUT OF THE REACH OF CHILDREN.
Swallowing them may result in serious injury. If swallowed, consult a physician immediately.
USE THE CORRECT AMPERE RATING WHEN REPLACING FUSES.
Failure to do so may result in fire or electric shock.
DO NOT BLOCK VENTS OR RADIATOR PANELS.
Doing so may cause heat to build up inside and may result in fire.
USE THIS PRODUCT FOR MOBILE 12V APPLICATIONS.
Use for other than its designed application may result in fire, electric shock or other injury.
MAKE THE CORRECT CONNECTIONS.
Failure to make the proper connections may result in fire or product damage.
BEFORE WIRING, DISCONNECT THE CABLE FROM THE NEGATIVE BATTERY TERMINAL.
Failure to do so may result in electric shock or injury due to electrical shorts.
DO NOT ALLOW CABLES TO BECOME ENTANGLED IN SURROUNDING OBJECTS.
Arrange wiring and cables in compliance with the manual to prevent obstructions when driving. Cables or wiring that obstruct or hang up on places such as the steering wheel, shift lever, brake pedals, etc. can be extremely hazardous.
DO NOT SPLICE INTO ELECTRICAL CABLES.
Never cut away cable insulation to supply power to other equipment. Doing so will exceed the current carrying capacity of the wire and result in fire or electric shock.
DO NOT DAMAGE PIPE OR WIRING WHEN DRILLING HOLES.
When drilling holes in the chassis for installation, take precautions so as not to contact, damage or obstruct pipes, fuel lines, tanks or electrical wiring. Failure to take such precautions may result in fire.
DO NOT USE BOLTS OR NUTS IN THE BRAKE OR STEERING SYSTEMS TO MAKE GROUND CONNECTIONS.
Bolts or nuts used for the brake or steering systems (or any other safety-related system), or tanks should NEVER be used for installations or ground connections. Using such parts could disable control of the vehicle and cause fire etc.
DO NOT INSTALL IN LOCATIONS WHICH MIGHT HINDER VEHICLE OPERATION, SUCH AS THE STEERING WHEEL OR SHIFT LEVER.
Doing so may obstruct forward vision or hamper movement etc. and results in serious accident.

This symbol means important instructions. Failure to heed them can result in injury or material property damage.
HALT USE IMMEDIATELY IF A PROBLEM APPEARS.
Failure to do so may cause personal injury or damage to the product. Return it to your authorized Alpine dealer or the nearest Alpine Service Centre for repairing.
HAVETHE WIRING AND INSTALLATIONDONE BY EXPERTS.
The wiring and installation of this unit requires special technical skill and experience. To ensure safety, always contact the dealer where you purchased this product to have the work done.
USE SPECIFIED ACCESSORY PARTS AND INSTALL THEM SECURELY.
Be sure to use only the specified accessory parts. Use of other than designated parts may damage this unit internally or may not securely install the unit in place. This may cause parts to become loose resulting in hazards or product failure.
ARRANGE THE WIRING SO IT IS NOT CRIMPED OR PINCHED BY A SHARP METAL EDGE.
Route the cables and wiring away from moving parts (like the seat rails) or sharp or pointed edges. This will prevent crimping and damage to the wiring. If wiring passes through a hole in metal, use a rubber grommet to prevent the wire's insulation from being cut by the metal edge of the hole.
DO NOT INSTALL IN LOCATIONS WITH HIGH MOISTURE OR DUST.
Avoid installing the unit in locations with high incidence of moisture or dust. Moisture or dust that penetrates into this unit may result in product failure.
- The following screen examples of X903D/X803D-U/INE-W720D used in this manual are for reference only. They may differ from the actual screen displays.
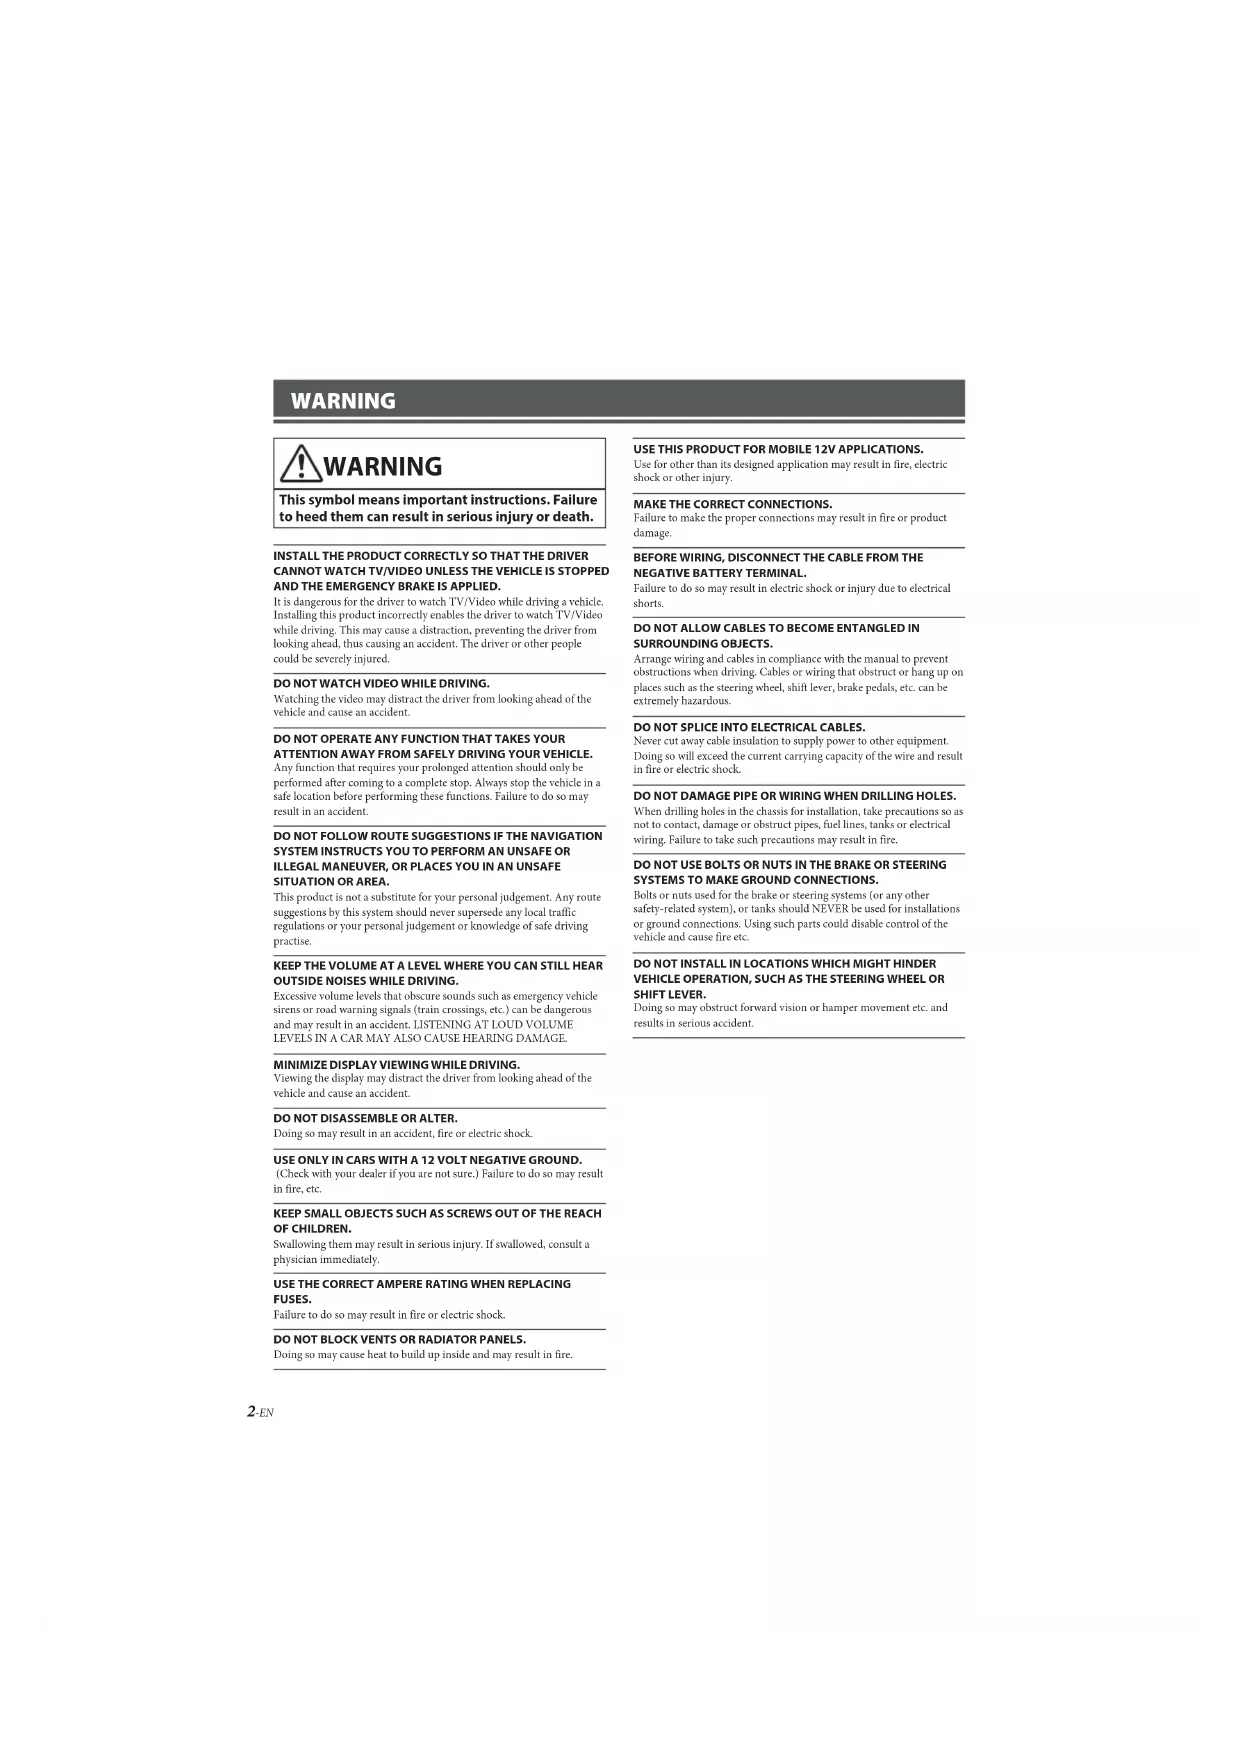
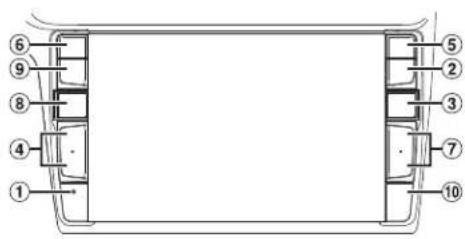
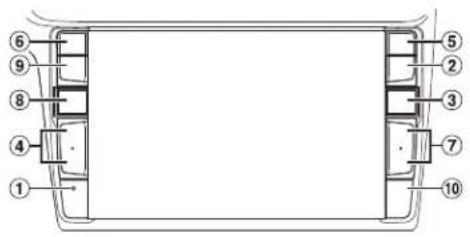
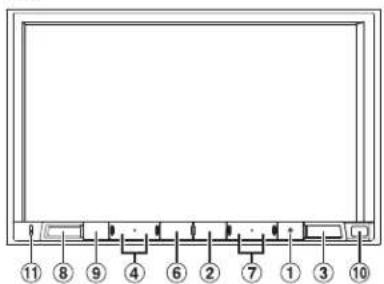
Getting Started
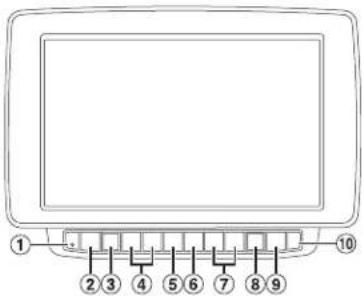
Location of Controls
The screen design used in the Owner's Manual may differ from the actual screen.
For X903D
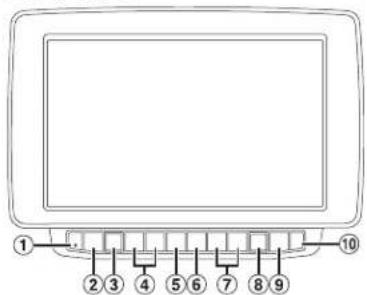
For X803D-U/INE-W720D
① RESET switch
The system of this unit is reset:
② MENU/(Power Off) button
Recalls the Menu screen. Press and hold this button for at least 5 seconds to turn the power off.
③ (N) button
Recalls the navigation map screen. Press again to switch to Navigation menu screen. Press and hold this button for at least 2 seconds to change to Go Home route screen. (If Home is not set yet, it will change to the Home setting screen.) For details of navigation operations, refer to "Navigation System OM" in the CD-ROM.
4/dr+UPDOWN) button
Press to adjust the volume.
(5) (PMONE) button (X903D only)
Recalls the Phone Menu screen. Press to start a conversation when a call is incoming.
⑥ or VOICE button
Depending on the connected smartphone, press to recall Siri function or voice recognition mode.
⑦ /
Press to seek up/down a station in radio mode or up/ down a track, chapter, etc., in other audio/visual sources.
(AUDIO)/(Favourite) button
Displays the Audio/Visual screen. If the Audio/Visual screen is already dispayed, changes the source. Press and hold for at least 2 seconds to recall the Favourite screen.
(9) (MATEE) button
Press to activate/deactivate the mute mode.
Remote Sensor
Point the remote control transmitter towards the remote sensor within a range of 2 metres.
① Microphone (X803D-U/INE-W720D only)
Used for Hands-free or Voice Control modes.
1 Turn the ignition key to the ACC or ON position.
The system is turned on.
2 Press and hold the MENU button for at least 5 seconds to turn the power off.
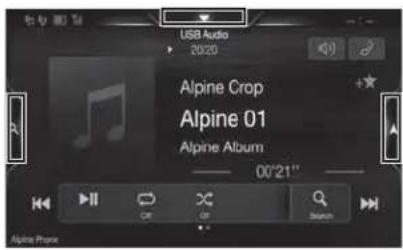
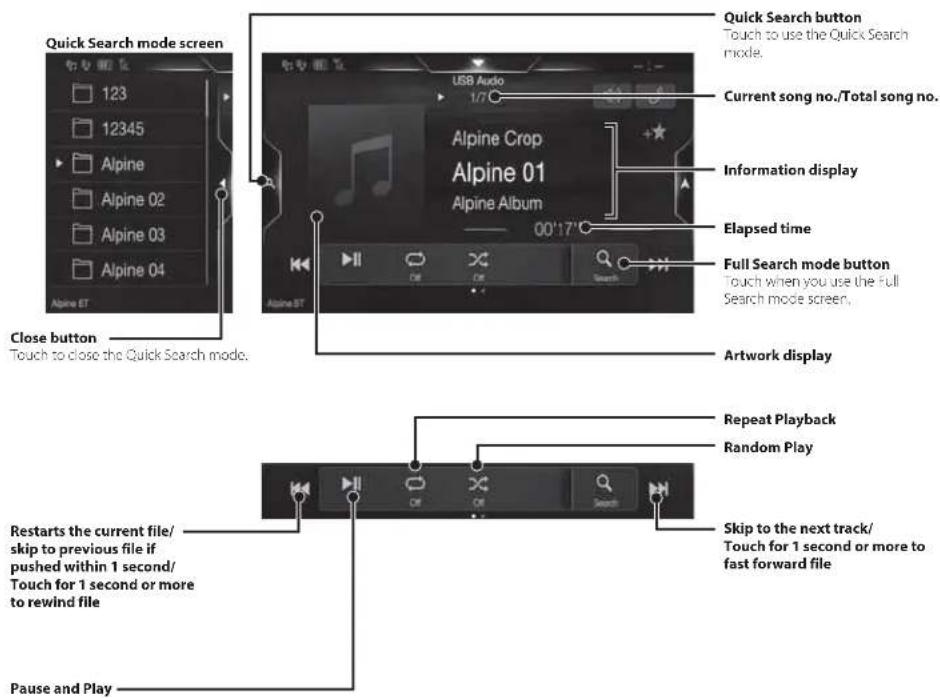
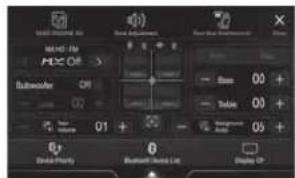
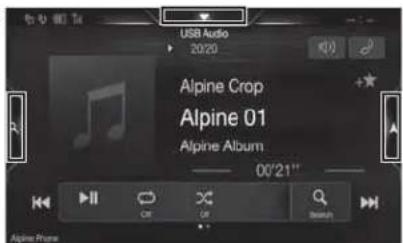
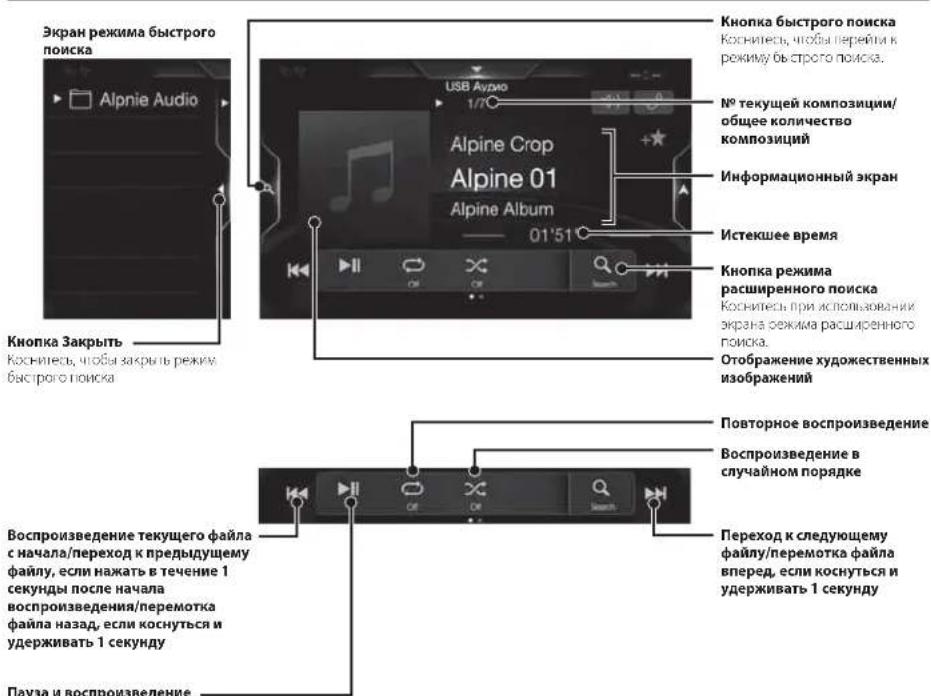
Switching the Audio Sources Screen to a Dedicated Screen
You can switch the Audio Sources screen to a dedicated screen by touching the icon on one of the three edges of the screen.
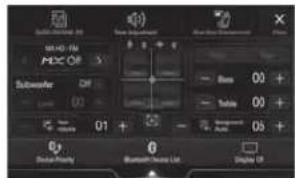
Shortcut Setup Screen
You can set the BASS ENGINE SQ, Tone Adjustment or Rear Seat Entertainment System.

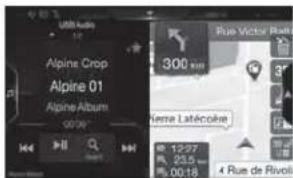
Audio Sources Screen (USB Audio)

Dual Screen
You can switch between the displayed screens on the Dual Screen.
Preset button or Quick Search mode Screen*
- The Search mode differs depending on the audio source. For details, see the operating instructions of the audio source.
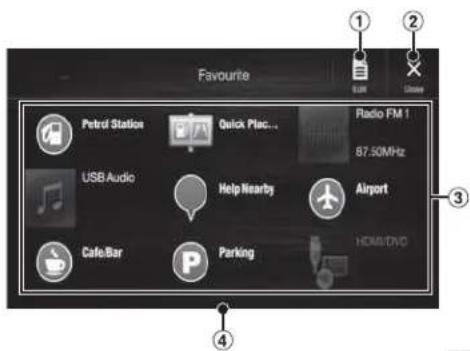
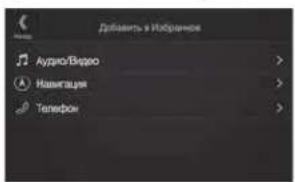
Favourite Function
This unit enables you to recall functions easily by registering frequently used items such as the Audio source, the navigation search function, etc. to the Favourite screen. You can recall any of these items easily.
1 Press and hold the / ( Favourite) button for at least 2 seconds.
The Favourite screen is displayed.
Favourite screen example
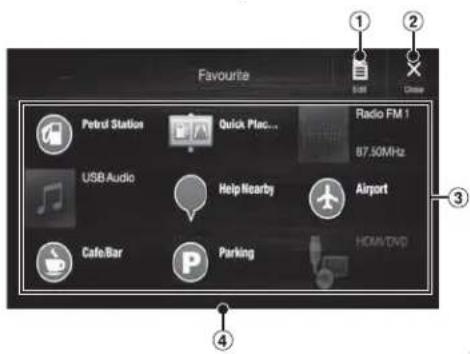
1 Changes to the Edit screen used for registering items or changing names.
② Close the Favourite screen
3 Favourite registration item
4 Indicates the location of the currently displayed Favourite screen.
Swipe to the left and right to change the pages. You can add up to 6 pages.
Owner's manual Registering items
Registering Items
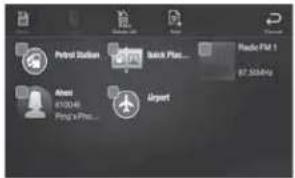
1 Touch [] Edit).
A checkbox is displayed on the upper left area of the registration icon and it changes to Edit mode.
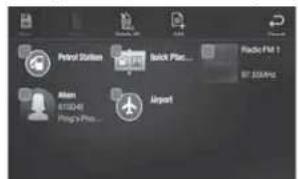
2 Touch[] [Add].
The items to be added (categories) are displayed.
3 Touch the desired item to be added (category).

4 Choose the desired item to be added.
For details on the items to be added, refer to "Editing the Favourite Screen" in the Owner's Manual.
- You can add up to 54 items.
- You cannot register an item more than once.
5 After editing is complete, touch [ ] (Save).
6 After the caption for the confirmation is displayed, touch [Yes].
7 Editing is complete and the screen switches to the Favourite screen.
If you touch (Cancel) while editing, a confirmation prompt will appear. Touch (Yes), the screen switches to the previous Favourite Edit screen.
Android Auto (Optional)
Android Auto is designed to make it easier to use apps from your phone while you're on the road. Navigate with Google Maps, listen to playlists or podcasts from your favourite apps, and more. Download the Android Auto App from the Google Play store before continuing. Connect your Android compatible Phone to begin using Android Auto.
1 Press the MENU button.
The Menu screen is displayed.
2 Touch [Android Auto].
The Android Auto screen is displayed.
For details operation of Android Auto, refer to "Android Auto" in the Owner's Manual (CD-ROM).
Owner's manual Apple CarPlay (Optional)
Apple CarPlay (Optional)
Apple CarPlay is a smarter, safer way to use your iPhone in the car. Apple CarPlay takes the things you want to do with your iPhone while driving and puts them right on this unit. You can get directions, make calls, send and receive messages, and listen to music, all in a way that allows you to stay focused on the road. Just plug in your iPhone to this unit and go.
For details, refer to Owner's Manual (CD-ROM).
Press for VOICE to activate Siri function of the iPhone.
You can make a call, play music, etc., by using Siri function of the iPhone.
You can also control Apple CarPlay on touchscreen.
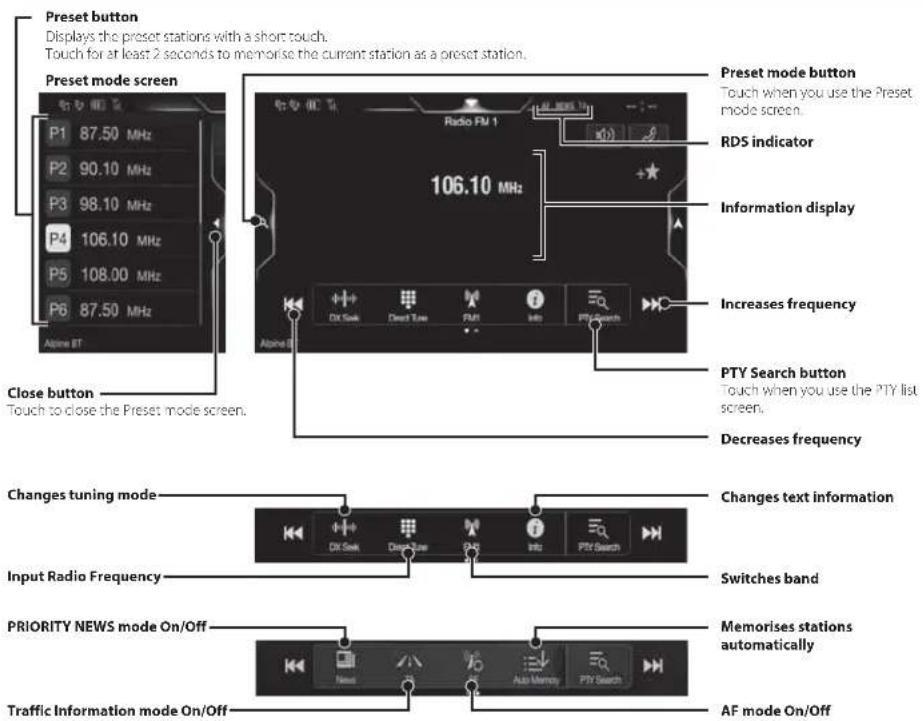
Owner's manual Radio/RDS
Radio/RDS Operation
DAB/DAB+/DMB Operation
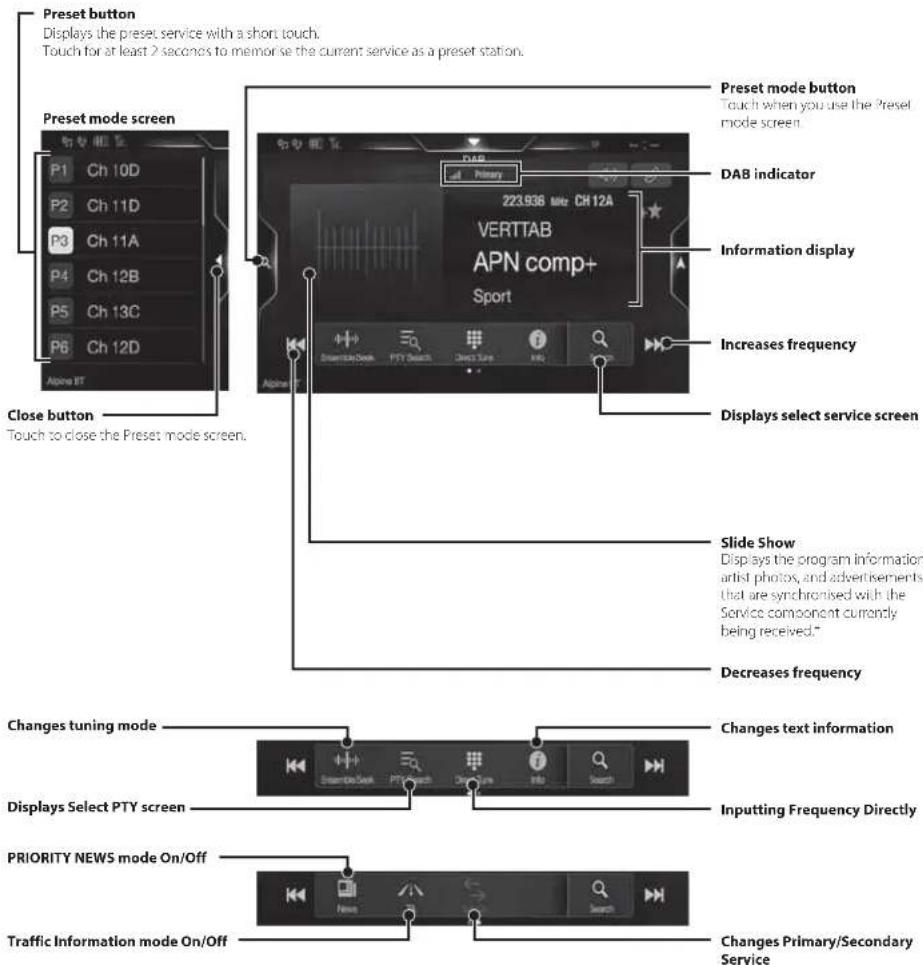
* They may not be displayed, depending on the Service component currently being received.
USB Flash drive Operation (Optional)
You can play back music files (MP3/WMA/AAC/FLAC) and video files (AVI/MKV/MP4) stored in a USB flash drive on the internal player of this system.
USB Audio main screen example
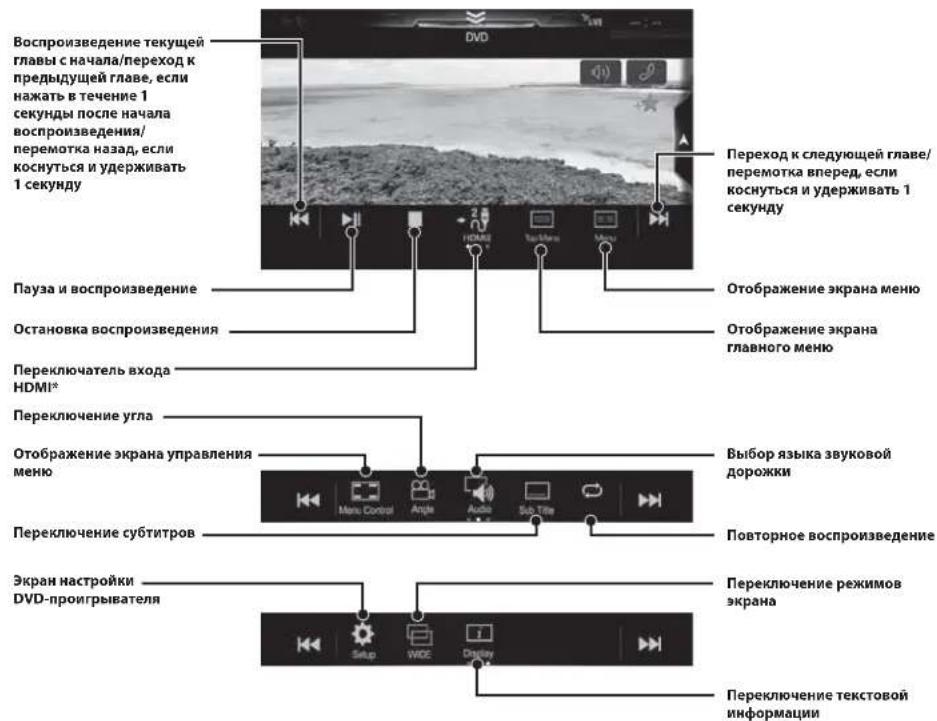
HDMI Device (DVD Player) Operation (Optional)
When you connect an optional DVE-5300 (DVD Player), you can operate it from the unit.
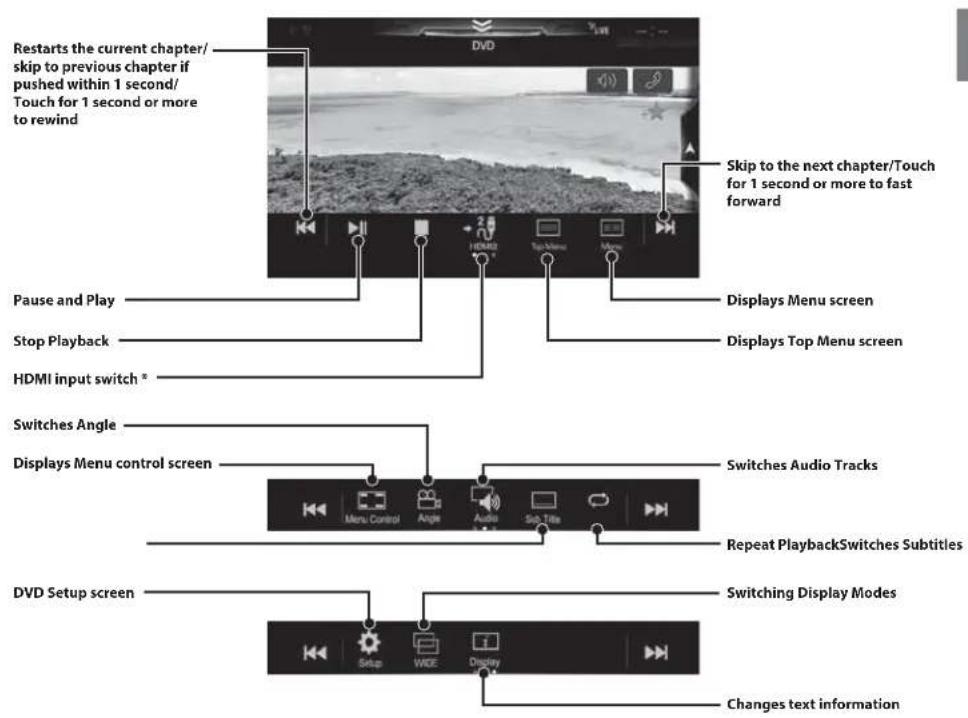
- If you connect an optional IIDMI selector module, you can connect two IIDMI devices. If the IIDMI selector is set to "On" when two HDMI devices are connected, the HDMI input switch button is displayed. The displayed button differs depending on the settings and the IIDMI input currently selected. For details, refer to "HDMI Setup" and "Setting the IIDMI Selector On/Off" in the OWNER'S MANUAL (CD-ROM).
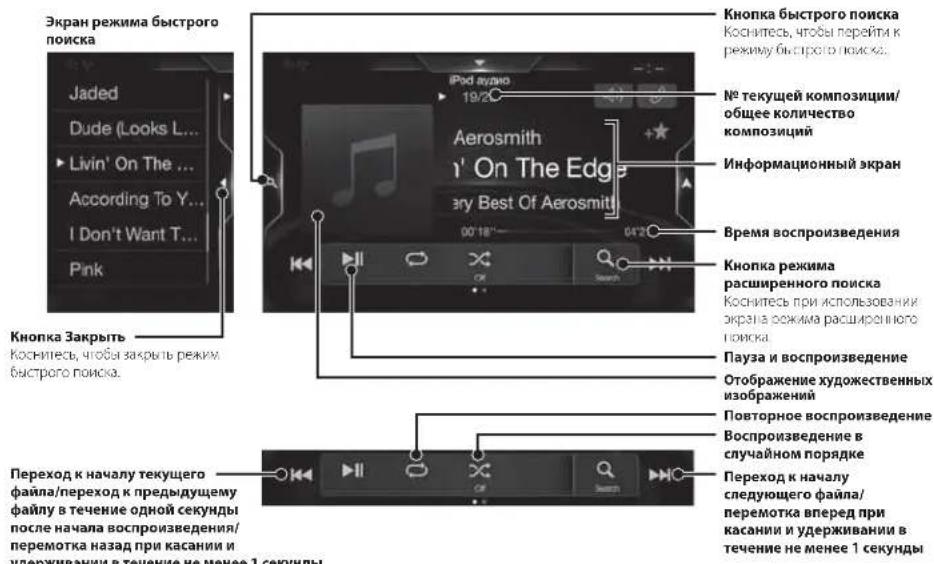
iPod/iPhone Operation (Optional)
A separately sold Lightning to USB cable (KCU-471i), etc., is required depending on the type of iPod/iPhone.
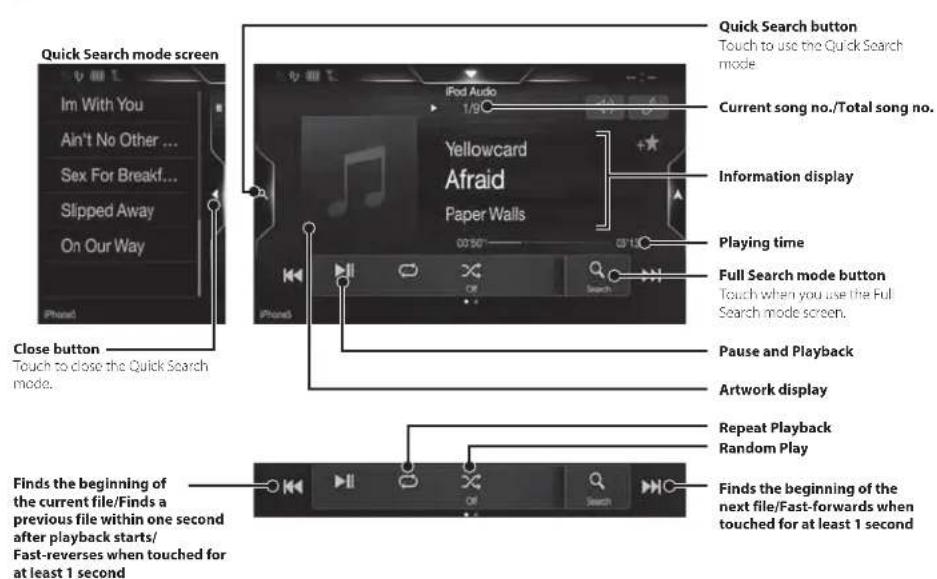
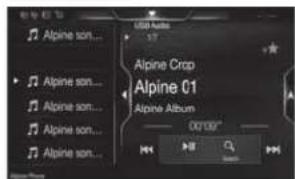
Audio mode
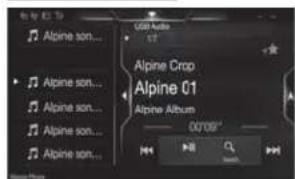
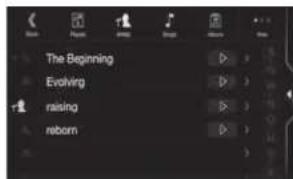
Searching for a Music File (Full Search Mode)
For example: Searching by Artist name
1 Touch [Artists] in the Full Search mode screen.
![ALPINE X703DA4 - Touch [Artists] in the Full Search mode screen. - 1](/content/2026/03/487785/images/b6d3c8a748b2f01f7603267aab07a45d332bdacdcdeb2e83711284916c202edf.jpg)
2 Touch the desired artist's name.
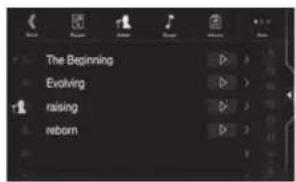
The Albuims search screen of the selected artist is displayed.
Touching I of the desired artist will play back all songs of the selected artist.
3 Touch the desired album's name.
All songs of the selected album are displayed.
Touching of the desired album will play back all songs of the selected album.
4 Touch the desired song's name.
The selected song is played back.
Hands-Free Phone Control
The unit can connect with up to two hands-free phones.
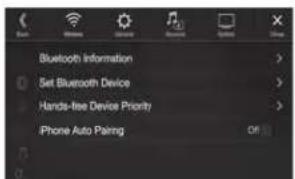
If you connect two hands-free phones to the unit, select "Hands-free Device Priority" in "Bluetooth Setup" to set the order of precedence. For details, refer to OWNER'S MANUAL in the AUDIO VISUAL SECTION (CD-ROM).
How to connect to a Bluetooth compatible device (Pairing)
1 Touch [Setup] button on the Menu screen.
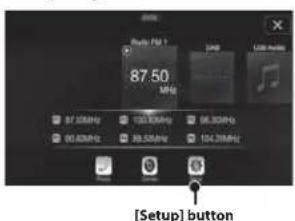
2 Touch [Bluetooth].
Make sure the "Bluetooth" setting is "On".
3 Touch [Set Bluetooth Device].
4 Touch [] to search for a new device.
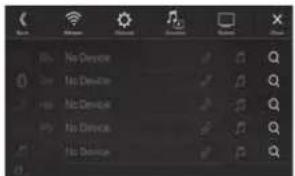
5 Touch [ ] (Audio), [ ] (Hands-free) or [ ] (Both) for the device you want to connect from the list.
Audio: Sets for use as an Audio device.
Hands-free: Sets for use as a Hands Free Device.
Both: Sets for use as both an Audio device and Hands Free Device.
6 When the device registration is complete, a message appears and the device returns to normal mode.
- You can register up to 5 Bluetooth compatible mobile phones.
- The Bluetooth registration process differs depending on the device version and SSP (Simple Secure Pairing). If a 4 or 6 character Passcode appears on this device, enter the Passcode using the Bluetooth compatible device. If a 6 character Passkey appears on this device, make sure the same passkey is displayed on the Bluetooth compatible device and touch "Yes."
Answering a Call
1 An incoming call triggers the ringtone and an incoming call display.
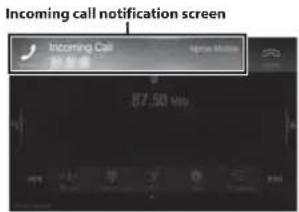
2 Touch incoming call notification screen.
The call starts.
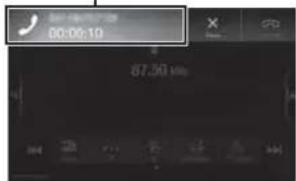
Call info area
Touch the call info area during a call changes to the Phone Operation screen. Use this screen to adjust the speech volume, etc.
Hanging up the Telephone
1 Touch [] (End Call).
The call finishes.
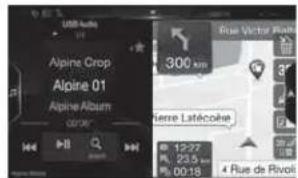
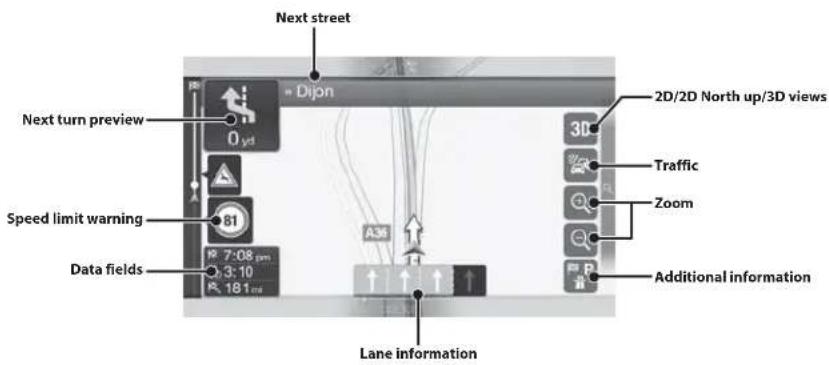
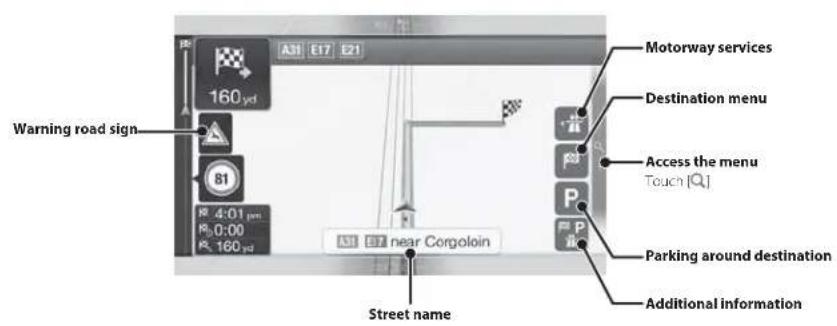
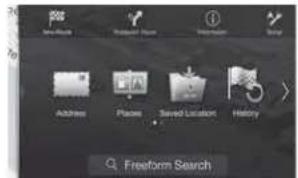
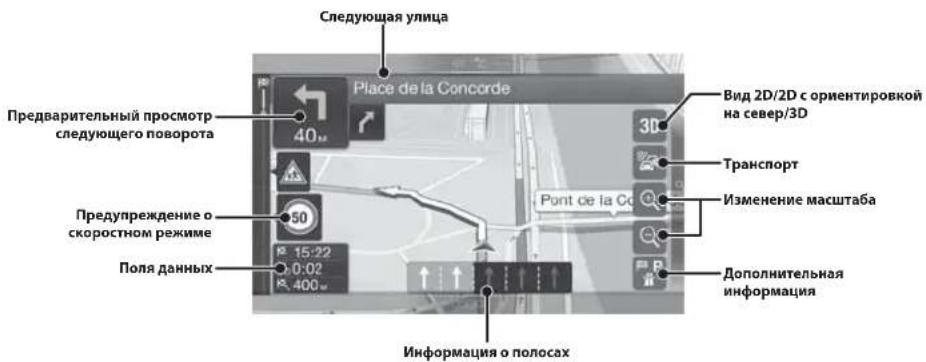
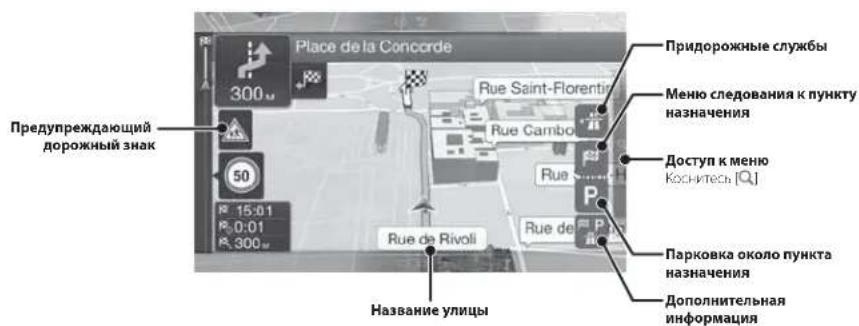
Map Functions
Below is an overview of different buttons and icons on the map display. For more detailed information about this screen, please see the Owner's Manual.
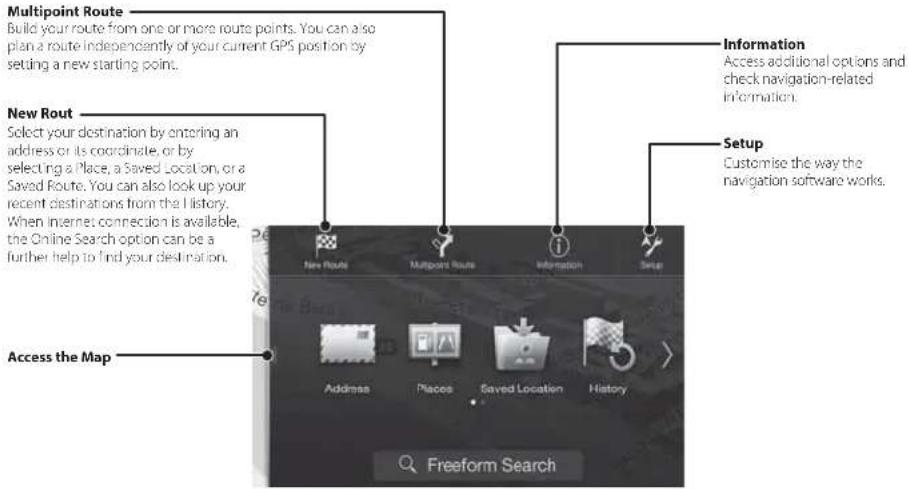
Navigation Menu
To access the Navigation Menu, touch on the right edge of the map screen. Alternatively, press the button.
Setting a Destination
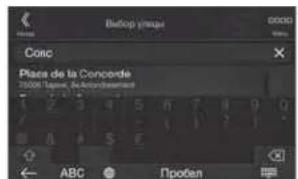
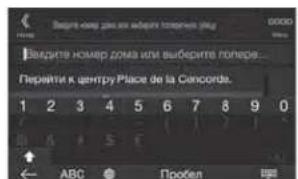
The following example describes how to search for a destination when choosing [Town/Postcode] from [Address].
- You can search and narrow down the Country/State by starting from [Country/State].
1 Touch [New Route] from the Navigation Menu.
2 Touch [Address].
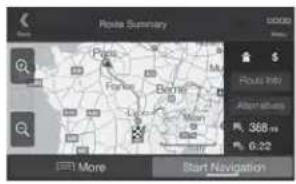
7 Touch [More] to modify the route parameters, or touch [Start Navigation] to start your journey.
3 Touch [Town/Postcode].
4 Enter the town name or postcode.
- Touch play the candidate list.
5 Enter the desired street name.

- Touch play the candidate list.
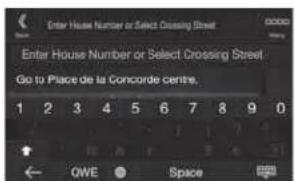
6 Enter the house number or crossing street.
The route is calculated, and a map appears, showing the entire route. Here you can check route information and route alternatives.
Owner's manual Specifications
Specifications
MONITOR SECTION
Screen Size 9^ (X903D)
8°(X803D-U)
(NE-W/20D)
LCDType Transparent type TNLCD
Operation System TFT active matrix
Number of Picture Elements 1,152,000 pcs
( 800 × 480 × 3( FGB) )
Effective Number of Picture Elements
99% or more
Illumination System LED
FM TUNER SECTION
Turing Range 87.5-108.0 MHz
Mono Usable Sensitivity 8.1 cBi (0.7 V / 75 ohms)
50 dB Quieting Sensitivity 12 dBf (1.1 uV/75 ohms)
Alternate Channel Selectivity 80 dB
Signal-to-Noise Ratio
Stereo Separation
Capture Ratio
2.0d8
MW TUNER SECTION
Tuning Range 531-1,602 kHz
Usable Sensitivity
25.1 μV/28 dBf
LWTUNERSECTION
Tuning Range 153-281 kHz
Sensitivity (IEC Standard)
31.6μW/30dBf
DAB SECTION
Tuning Range BAND III 174.93-239.2 MHz
Tuning Range L-BAND 1,452.96-1,490.6 MHz
Usable Sensitivity -103 dBm
Signal-to-Noise Ratio
Stereo Separation
85cB
USB SECTION
USB requirements: USB 2.0
Max Power Consumption 1,500 mA (CDP Support)
USB Class USB (Mass Storage Class)
File System FAT16/32
Number of Channels 2 Channels (Stereo)
Total Harmonic Distortion 0.008% (at 1 kHz)
Dynamic Range 95 dB (at 1 kHz)
Signal to Noise Ratio
Channel Separation 85 dB (at 1 kJz)
*1 Frequency response may differ depending on the encoder software/bit rate.
HDMI SECTION
Input Format 480pVGA
Output Format 480p
GPS SECTION
GPS Reception frequency 1,575.42 ±1 MHz
CPS Reception sensitivity
1,575.42±1MHz
-136 dB max.
GLONASS SECTION
GLONASS Reception frequency 1,597.807 MHz - 1,605.6305 MHz
CLONASS Reception sensitivity -137 dB max.
Bluetooth SECTION
Bluetooth Specification
Frequency band
Output Power
Profile
OPP (Object Push Profile)
PBAP (Phone Book Access Profile)
A2DP (Advanced Audio
Bluetooth V3.0
2.402-2.480MHz
14 dBm Max. (Power class 2)
FP (lands-Free Profile)
Distribution Profile)
AVRCP (Audio/Video Remote
SPP (Serial Port Profile)
Control Profile
GENERAL
Power Requirement 14.4 V DC
Operating temperature
(11.16 Allowable)
-4°f+140
(20°C to +60°C)
Maximum Power Output
Audio output level
Precut (Front, Rear): 4V/10k ohms (max)
Precout (Subwoofer) 4/10k ohms(max.)
Weight 1.51 kg (3 lbs, 5 oz) (X803D-U)
1.41kg(3bs-2oz) (NE-W720D)
CHASSIS SIZE
Width:198mm(7-13/16)(X803D-U)
178 mm (7°) (NE-W720D)
Height 125 mm (4-15/16") (X803D-L)
100mm(3-15/16)(NEW720D)
Depth 147 mm (5-3/4")
NOSE SIZE
Width 191 mm (7/12) (X803D-U)
171 mm (6 3/4") (NE-W72CD)
Height 121 mm (4-3/4) (X803D-U)
96 mm (3-3/4") (NE-W/720D)
Depth 19 mm (3/4")
X903D is sized exclusively for a certain car model.
Due to continuous product improvement, specifications and design are subject to change without notice.
- The I.C.D panel is manufactured using an extremely high precision manufacturing technology. Its effective pixel ratio is over 99.99% . This means that there is a possibility that 0.01% of the pixels could be either always ON or OFF.

- Windows Media, and the Windows logo are trademarks, or registered trademarks of Microsoft Corporation in the United States and/or other countries.
- Apple, iPhone, iPod, iPod nano, iPod touch, and Siri are trademarks of Apple Inc., registered in the U.S. and other countries. Apple CarPlay is a trademark of Apple Inc.
- Use of the Made for Apple and Works with Apple badges means that an accessory has been designed to connect specifically to the Apple product(s) identified in the Made for Apple badge and to work specifically with the technology identified in the Works with Apple badge, and has been certified by the developer to meet Apple performance standards. Apple is not responsible for the operation of this device or its compliance with safety and regulatory standards. Please note that the use of this accessory with an Apple product may affect wireless performance.
- Google, Android, Android Auto, Google Play and other marks are trademarks of Google LLC.
The Bluetooth® word mark and logos are registered trademarks owned by the Bluetooth SIG, Inc. and any use of such marks by Alpine Electronics, Inc. is under licence. Other trademarks and trade names are those of their respective owners.
The terms HDMI and HDMI High-Definition Multimedia Interface, and the HDMI Logo are trademarks or registered trademarks of HDMI Licensing, LLC in the United States and other countries. - MPEG Layer-3 audio coding technology licensed from Fraunhofer IIS and Thomson. Supply of this product only conveys a licence for private, non-commercial use and does not convey a licence nor imply any right to use this product in any commercial (i.e. revenue-generation) real time broadcasting (terrestrial, satellite, cable and/or any other media), broadcasting/streaming via internet, intranets and/or other networks or in other electronic content distribution systems, such as pay-audio or audio-on-demand applications. An independent licence for such use is required. For details, please visit http://www.mp3licensing.com
©2006-2018 TomTom. All rights reserved. This material is proprietary and the subject of copyright protection, database right protection and other intellectual property rights owned by TomTom or its suppliers. The use of this material is subject to the terms of a license agreement. Any unauthorized copying or disclosure of this material will lead to criminal and civil liabilities.
About the Rules of Bluetooth Electromagnetic Radiation Regulation

Declaration of Conformity
Inhalt
PBAP (Phone Book Access Profile)
A2DP (Advanced Audio
Distribution Profile)
AVCRP (AudioVideo Remote
Control Profile
SPP (Serial Port Profile)
ALLGEMEINES
Spannungsversorgung
14AV Gleichspannung
(11-16Vzulassig)
Betriebstempatur
20^ bis +60^
About the Rules of Bluetooth Electromagnetic Radiation Regulation

Declaration of Conformity
Table des matieres
DATE D'INSTALLATION:
TECHNICEN D'INSTALLATION:
LIEU D'ACHAT:
NE PAS COINCR LES CABLES AVEC DES OBJECTS VOISINS.
Distorsion harmonique totale 0.008% (a 1 kHz)
Spicification Bluetcooth Btueoth V3.0
Bande de finquence
Issuance de sortie
Profil
OPP (profil de push d'objects)
DIMENSIONS DU CHASSIS
100 mm (3-15/16°) (INE-W720D)
Profondeur 147 mm (3-3/4)
DIMENSIONS DU NEZ
171 mm (6-3/4) (NE-W720D)
96 mm (3-3/4) (INE-W/20D)
Profondeur 19mm(3/4")
About the Rules of Bluetooth Electromagnetic Radiation Regulation

Declaration of Conformity
Contenido
Distorsion armonica total 0,008% (a 1 kHz)
Rango dinamicco
PBA(Phone Book Access Profile)
A2DP (Advanced Audio
Distribution Profile)
AVICP(AudioVideoRemote)
Control Profile
SPP (Serial Port Profile)
GENERAL
Alimentacion 14,4VCC (11-16 V margen permisible)
Temperatura de functiOnamento
de-20°C a +60°C
About the Rules of Bluetooth Electromagnetic Radiation Regulation

Declaration of Conformity
Sommario
PBAP (Phone Book Access Profile)
A2DP (Advanced Audio
Distribution Profile)
AVICP(AudioVideoRemote)
Control Profile)
SPP (Serial Port Profile)
SPECIFICHE GENERALI
About the Rules of Bluetooth Electromagnetic Radiation Regulation

Declaration of Conformity
Innehåll
Enhetens system Återslalls.
② Knappen MENU/ (Ström av)
Visar mcnyskarmn
Knappen+ + eller/ (NPP/NER)
Stalla in destination
Foljande exempel visar hur du sksa kfter en destination nar du valt [Ort/Postn] frAn [Adress].
InstalInngsomrade 87,5-108,0 MlZ
Anvandber kansighet mono 8,1 dBf (0,7 V/75 ohm)
50 dB dampningskanslichet 12 d8f (1,1 V/7 chm)
Alternativkanalselectivitet80dB
Signa-brustorhallande
65
3
20dB
Stereoseparation
Iniangningsindex
1.0.15
MW TUNER-AVSNITT
Instalningsomrade 531-1602 kHz
Anvandbarkinsignet
25.1 μV/28 dBf
LWTUNER-AVSNITT
Instaliniogosirade 153-281 kHz
Konslichet (EC standard)
31.6μV/30dBf
DAB-AVSNITT
Mottagringsomfang BANDI 174,93-239,2 MHz
Mottagningsomfang L BAND 1452,96-1490,6 MHz
Anvandbar knslignet 103dBm
Signalbrusfohalle 95dB
Stereoseparation 85
USB-AVSNITT
USB-standard
Total harmonisk distorsion 0.008% (vid 1 kHz)
PBAP (Phone Book Access Profile)
A2DP (Advanced Audio
Distribution Profile)
AVRCP (Audio/Video Remote)
Control Profile
SPP (Serieport-Profil)
ALLMÄNT
Ingangsspanning
Drifttemperature
Maximaluteftekt 50W
About the Rules of Bluetooth Electromagnetic Radiation Regulation

Declaration of Conformity
Inhoud
(5) (PMONE)(alleen X903D)-knop
Type LCD Transparent type TNLCD
Besturingsystem TFT active matrix
Aftemberelk 153-281 kHz
Gevoeligheld (1C-standard) 31,6/7030 d8f
DAB-SECTIE
Atstemmingsfrequentie BAND II
174.93-239.2MH2
Afsmmingsfrequenie 1457,96-1490,6 MHz
Brukare Gevoeligheid 103 dBm
PBAP (Phone Book Access Profile)
A2DP (Advanced Audio
Distribution Profile)
AVCRP (AudioVideo Remote
Control Profile
SPP (Serial Port Profile)
ALGEMEEN
Stromverieste 14,4VDC
(11-16Vtoelaatbaar)
X903D is sized exclusively for a certain car model.
About the Rules of Bluetooth Electromagnetic Radiation Regulation

Declaration of Conformity
CopepxaHne
PPEyIpeKJeHHe 2
BHIMAHINE 3
PpncTynar K pa6ote 4
Функця"ИЗбраhhoe" 6
IobabneHne 3nemehTOB 6
Android Auto (npno6petaeTcra dononHntelbHo) 7
Apple CarPlay (npno6peTaetca dononHntelho) 7
Pa6ota c paiaio/RDS. 8
Pa6ota c DAB/DAB+/DMB. 9
Pa60Ta c 10
Pa6oTa cYcTpoiCtBOM HDMI (DVD-npOurpBaTeJeM) (npNo6peTaetca
dONHHTeBHO) 11
Pa6oTa c iPod/iPhone (npno6peTaeTcdoonHnHteBHo) 12
Функця телефona "Cbo6oHbIe pykn" 13
Функции KapT 14
Mehno Habirauu 15
YCTAHOBKa nyHKTa Ha3HaueHnA 16
Texnueckne xapaKTepeNCTIKN 17
BAKHO
3aHIMHTe cepHHb HOMep cBOero yCTPOINCTBA B IIpeIOCTABIIeHHOM IaJIee MeCTe N coXpaHITe erO JIAIbHeNIEIero HcNOB3OBAHn.
CEPIIHHH HOMEP:
CEPNHbH HOMEP ISO: AL
JATA YCTAHOBKN:
KTOYCTAHABJIBBAJI:
MECTO IPIPOBPEHNA:
IIOpOHyIOHfOpMaunIO BceX cyHKnXcM. BPyKOBoCTBe NOB30BaTeY, 3aNcAHOM HA npnlaemom KOMnAeT-DnCKe. (Tak KaK 3TO INhOpMaunHOHb CD-DCCK, erO HeJb3 NcNoB30BaTb DnBocPOn3BeHnna My3bIK nn H3o6paKeHn Ha npOnrpbBatene.) Pnp Heo6xOIMOCtn dInep ALPINE Bcerda CMOEET npeOCTaBt Bam neaTHyEOBcPcNIO PyKOBoCTBa Nb30BaTeY, 3aNCAHHOrO HA KOMNaKT-DnCKe.
PNEUPTPEXDEHNE

PNEyPPEKDEHNE
3TOT CUMBOI 063HaaET BAXHbIE HNCTpyKUIN.
IX Heco6IOeHMe MoKet npBecTe K TpaBMe UIN CMEpTeblHom YXcOyD.
YCTAHABJIBAIYE DAHHBII NPOJYKT TAKIM O6P3OM, YTOBb BOIMTEH HE MOF BNDETb 3KPAH, ECNI ABTOM0NlHE OCTAHOBIEH IN HE 3ADEJCTBOBAH CTORHOHbT TOPMO3.
IPOOAMOT RP OIOJIETHE TELBENHOOHIX HPOPTPAMM HIN HIN BOEO B IPOIOECE KOGJEHN OHACEN. HcnpABHHNA YCTAHOKBA 30TO IPOOYKTA IOBHOBJNT OBOHTIEIO PPOCMATPBATB TELBENOHIIBE IPOPTPAMM HIN HIN BOEO B IPOIOECE KOGJEHN. 30 TO MOKT OT BHOH, BOHTEH NOr YIIPANBEHHA ATOMOBH N INHPNECH N KECVAHOMY CNYAHO. BOITHTC HIN IACCAXMPB MORYT NONYUHTB CEPSE3ME IPaBMIA.
HE IPOCMATPNAIBAITE BUNEO BO BPEM YIPTABJIENEHIA ABOTOMBNIEM.
IIpOcMoT BnEO MoKo MoeKOT bIeBb OBOHOMa OT ypaAbeHbA HArMOHbMnI I pNRCHe K cHcAHTCmOy CuaH.
HE IPEIINHIMAJTE HIKAKHX DEICTBNI, KOTOPBJ MOYT OTBJIeB BAC OT BE3ONACHOFO BXDEHNR ABOTOM6NJ.
JIO6eIeCTHb,OTBNEKANHBEHNHMnHHe HnPdoONKHTeBHnB CPOK,JOIKHb BnHOHHTCnTOLko IOcNE HOHNOCTOACOBKn. Ipeepa BnHOHNCm TAKHX DeCTMH BCCrJa OCTaHABNBAHtE ATOMO6oNB B 6eO3nAcN MocTe. Hec6bKeIeH eTOro Tpe6oBaHH MoXeT pINBeCHn K aAbPH.
HE CNEUYITE PIPENIOKHEHM MAPIPVTA, ECNIHABINIACHOHAR CNTEMA PIPENIOKHT BBIIOJIHNTHBESE3ONAPCHBIM NIN 3AIPTPEUHEHHb MAHEBP, A TAKKEB CNYIAYX, ECNI PIPENIOKEHHH MAPIUPYT OKAKETCNOTEHMIJIbHO ONAPCHbIM INI INPMBEDT B ONACHYIO3OHY.
He CIEyTeI POIOCTbKO POIATaRcH NAOIIeOYrTOpCTBO, SAMIIEHN MOC6CTKHeHMe PEINHEH. IIOJIpeIHOJKeHn MAPIIpyraJAHNOI CHCTEMM He IOJIaKN SMIOeHAt BIOOc MeCtTHMe PpABHn IDOPOJHOH IOJIeHN KIN CO6CTBHeHoe PEINHEH H/MIH BeOIOIHCHy MOHepy BOJKiENH.
IOJDPKMBAITE FPGMOKCTb HA YPOBHE, IO3BOJIIOUcEM CbIaHTb BHEUHHe 3BYKu BO BPEM JDMKEHNA.
IpeMeepno BIOKoN yOoBn IrpOMOCh, 3aHpyAooon Taek 3bYk, KAK CHPN ABTOMOBnBn APABHIOI CTbXbN IopokhIne
IpePnDreTbeMbHe CHTAHn (IpipepeceCn X/Je TnT)
MOKcK b6bT OAPHMn HNPBCNTx AApBNH. HCIOJIb3OBAHIIIE
BbCOKO1O YPOBH INPOMKOCIN B ABTOMOBnDE MOKET
TAKKE BbBHbBAT DEFKCT CJYXA.
KAK MOKHO MENGHeBE OTBIEKAITECB HA NPOCMOTP DCIIJIEN BO BPMEB BXDEHNI.
IpOcMoT EOKaH MOKet OIOBHe BODiTe OT npAubEHHA BOATOMoHm H pINCHETK N KCTACTOMY CUYUHO.
HEPA36MPATbNHEU3MEHARrTb.
370MOKOTKHM3BMAHbAapHHyHIOCHITYAAHNO,HO3TOPaHHe HIN Yjap 36KTNDCKSHKTMOKO
NCIOIb3OBATb TOJIbKO B ABTOMOUIK C IVTAHIVEM BOPTOBO CETN+12 BOJbNT 3A3EMLEHIVEM OTPUATEJBHO IIOIOCA HA KYSOB ABTOMOSUIIA.
(B Cilyae comHen H npokocyIhpyrebc y cchoE O hepa.) Hec6bOeHHe 3TO rpe6oBnMoKet pnpBcCTN K Bo8HKnBOCtHIO orTH N T.I.
XPAHITE HEOBILI OBEKBTb, TAKME KAK BATAPEN, B HEOCTCYHBIX DIAI DETEIM MECTAX.
TIOJAHNE TAKHX 06bEeKTOH MoeKe I HaeHeC cepEeHyIpaHMy.EcEH peBEOHUPoHnIHIOOHOHNI 06bEeKTH,HEMeJeHEnHO OpaTHTeBC K hApY.
PIN3AIMEHE PINEOXXAPAHUTEJEI NCIOLBJYTE TOLEKBO AHANOHNHBEIO HOMHNAUY.
Hecoobdne HtOro TpeobbaHn MOeK IprbcN KosropaHIO H PpaekaiBHe 3bKPrTcckmTOKOM.
HE 3AOKPBbIbATE BEHTMILLAUMOHbIE OTBEPCCTMAJI NII PAHENI PADIATOPAO.
B I PpHTHHHOM CIIyAe HMOHOKEN HAJIEN HHTYPHEHHX,ETAEHJ, KOTOPKOB MPOEPTPNEKCTK BOSOPARIOH.
NIOJIb3yIte 3OT IPOJyKT ToJIbKO DJIABATOMOISNE C BOPTOBO BCTBO HANPRJKeHMEM 12B. HenpAnHbIOHe NIOJIbOBoHNaHE MOKET PnIBccT K BoSorPAnHO, OPOJAEKHeBJeKtPrUeCKHM TOKOM JIqYDM TpAMAH.
BbIIOHJIrNE TIPABUNbHbIE IOJIKJIOUeHJIA. HnepaJIbIHOe IOJIKJIOUeHMe KOET pINBeCTN K BoSTOPaIIHO NIK OPOKeJIDNO npOjEYtA.
NEPEDIOKIOJIUHOENIIMOPOBOBOOTCOEJINHNT KASEBLOTPORLIATELBHOIPOIIOCA6PATEN.
IIEe6oJIIOHJENHE 3TOIO Tpe6oBAHH MOKET IPORECH K HOPAKeHHIO 3EKeTpueckHM ToKOM H K TpaBMe DCIECTBHe KOPOTKORO 3AMkAHHa.
ENYCKAATCNEITENETHEA KABENECAH XHOJIAIMMUC PRADOM PREDMETAMI.
IpoBoHky K KaBcHn HeoOxoJMO pMaTeCHTb H CootHeCTBH N C yKalAHNm HpykoHOJIeTt, VTObHb IaKeKaTH BOMOKHXI
IpnHrTcHBr N IIOxM Bo BPcM BoKgHeN. KaBcHn H npOoKka,
KOTOPaB 6IOkHPyET DoCTY K PyENHOYM KoIEcy, PbUAYIpeKIOuOHHe
HepeIaY, HeJaHn TOpMOa H T.L., MOyT CTb HpMHNO OHACHO CHrAUY3a YPcEM.
HE CPALIIBAITE C 3JEKTPNUECKIMNKABENM.
HIXKOra He cseAHTe KABeBHyHOIIOJIINIOI IOIOJIIOJIIOII HITAIINrK I KpyTOO6OpOJIoAHIO. B POTNIOM CUYAE 6yETI INHIMHe, OIOYCTMnA HoRpyIO HO TOK JOI JANHOIIOHOIIOJOIA. H EPEYIbATE BOIOMOHO BOIOropaHc II HOPAKENIE OIOKTPNueckmTOKOM.
HE NOBPEJNTTE PTVBKNI IINIPOBOIDKY INP CBEPIHNIOTBPCTNI.
Ipn CpePENH yCTaONOoTHX OTBePCTH B KOpType PnIMHe Mepe InpCtIOPOKHOCT,IT06B 136eKb4b KOtACTA, HOpeKJENH INN 3AKynOPBNAHTRyTPOB 13TOHONBOPOOBIN H N3cKTPOnPOBOKN. HecO6OGENE 3TORTO Tp6OBOHIN MOKeT PpBCHT K BoSTOPANH.
HE NCIOJIb3yIe BOITbI NII TAIKNI TOPMO3HOI CNTEMBI INIINCNTEMBI PYNEBOFO YPABAEHIN DIA 3AEMENHIA.
BOHTHI HAI KAIKTHI IOTOPMOHOH CHTEMbI HIN CTCTMBApyBTO yypBaJIeHH (HIN NIOOBIpyrTOCB3AIOHc6Bc0aNCHoTHO CTCTMBAH 116KAOB HIKOJIHaIE cIeYET HNOJIOOOATBnPn cyTaNBOKe HIN 3a3eMeHHN.HcNIOIooAHNE TAKHIET MOKeT 6IoKHPoRABATHyipAAOBHHe ABTOMOHbEMnCtBpNHyHOB BoSTOPAHII.
HEYCTAHABINBAITEYCTPOICTBOBMECTAX,IDEOHO MOKET MEUATB PABOTE ABTOMOBUNHAPNIMEP, PRADOMCPOJEEMCNIPBUPROMPEPEKJPOEHNCKOPQENT.
B IPOTHHOM CAYUaeYCTPOBCTHO MOKET CO3IaTHb HOMEXH JINHepeHEIO630pa Hn3atpyDHTbJINKENHE, YTO MOKET INPHECTK K cepesniabapnn.

BHIMAHNE
3TOT CMMBOI O6O3Haayet BaxHbte HNCTpyKUIN.
IX Heo6BIOJeHMe MoKeT npBuCeT N TpaBMe UIN BBxOy I3 CTPO PpOdyKtA.
\PNBO3HMKHOBEHNI PNOBJEM HEMEJIEDHEHO NPEKPATNEHCNOJb3OBAHIMEPOJDKTA.
B npTHHOM CNYae 3TO MOKETI INBECCTH K NIOYIEHHIO TpaBMn HNN HOHPeKJIENHO IPOJYKA. BEPHIte IPOJYKT CBOEMY ARIOTPHOHNMOH YHepy Alpine HIN K BINKANHIN CEPHCHN HENTP Alpine MPMOHTA
PINOKJIAHBIPOBOOINCTAHOBKA DOLXHBbBtB BbIIOJIHEHBI CIEUAMNCTAMY.
IINI pIOKtaIKI pIOOIOH N yCTAOIOH DaIIHO rOyTPOBcTa
TpeOyIOc3 cneIHbIMHe TExHHckHE HABIK H OMI. B CEJIX
06bcNHNH EoONACHoCTn IaBIOIOH NpAOBt BcERJa
06paAHTReCb K JIOHepy, Y kOTOPOR 6bM npHOObeTeH 3r0T pIOyD.
NCIOJIb3VYTE TOJIbKO CNEIINAIM3NPOBAHNBIE YCTAHOOBHyBE KOMNOHEHTBI N TLIATEJIbHO INX 3AKPENJIYAE.
HCHOBHYBTEIOLKIO CHINIHINAPOBAHHE BCIOOMOTAEHNHIME KOMIOHEHTHM. HCHIOHOBAHE HEIEPYCMOTEHMX KOMIOHOHTEM MOKET B3B4ATB MHTYPHEHNE OPOEKEHINE YCTOPCETBa HIN CTATB PIPNHIHO ERO HENADEKHOYCTAHOKN. B PESyTATE MOKET HAPYHHTCB KPNIEHIE TAKHX KOMIOHOHTOB, PIPBOIDK NOBHNOKHOHENO OAOCHNT HIN C600 PPOYKTQA.
IPABUJIbHO IPOJIOKEHHAR IPOBOJKA HE JOJIKHAAI3N15BtCB NIN 3AUEMJrTBcOCTPbIMM METAJLIHNECKHMK PAKIM.
1IpoknAaHntae K6eBn H npOoKy DaNcKo To BnHuaHxNcAactE (HaapHmepe, HaapBaHnOHnx CnHbE) OocptbNx HnAoCtpeHHbx kpaek. 3JIO HOHOHET npOoTATbH TaenCmEHn Hn Hsakathe npOoD0. Eclnn IpOoTo pOoOHT Yepe3 MeTaHInueckoe OTBePCTHe, IcnohByTe peHHOBoe YyHOTHeNBcHoe KOBu, TRObI npOoTBPATbH HoRpeKeHHe NHOHINmMeTAHInueckHM Kpaem OTBeCPHe.
YE YCTAHABIMBAITE YCTPOIETBO MBECACTCM BIBCOKIMO YPOBEMB HJNAXHOCTU INI 3AJIBEHHOCTM.
H63eAHTy CTEAHANBHTBcYCTPOCTBO B MecTAX C BHCOKHM YPOBHE HNHOCHTHI HINAAHNEHOCTH. PpOHKAIIOJIe B yCPTPOCTBO HNAH HMBMOHYBHNBAHTbEIO HECIUPHOACTB
PpucTyna K pa6oTe
PacnoJoxKeHne 3JeMeHToB ynpaBHeHn
BHeHH BnE KpaHOB, HcNlOb3yEmbX B pyko3oDCTBe IIOb3o3aTeI, MoKET OTINuAeTCHOT peaHbX 3KpaHOB.
MoDenb X903D
Mogenb X803D-U/INE-W720D
1 KhoNkRAESET BOCCTHOBENHNCNTEMHTOPOTYVCTPOYCTBA
KhoNka MENU/ (otKnIOueHne NHTAHNA) NpeKIOueHne Ha 3KpAH MeHc. HAMMITE A yIepKnBae ly KNOky He MeHce 5 ceky, tOb6 otKIOuHcy nTATNAe.
Khonka (NAV) OKKHTMnEePnHaC KAPTOH HABINRAUHN. HABNITE epe p3, TROBHepeTNI KOKPAIy Me IHO HABINRAUHN. HAKMTNEuYepxmbaTe 3Ty KNKny He MeHee 2 CEkyH, TROBHepeTNI KHApMaIpyrTOB "DmO". (Fcnn npamepip"JOM"eHne YcHAnBoHn, OTo6paNTCRKApH yCTBOHKnMapAtpaT"OmO". JnNoIyHnBnONnHbOHnHnHpOmauN o paboT CnCTEMH HABINATn CM."PyKoBcOeTNOIbSOBaTeTaN CnCTEMH HABINATn HA nKcke CD-ROM
Khonka+nnn/(UP/DOWN) PeryIAPOBKa rpoMkoCTA
5 Khonka (PHONE) (Tolbko dmo Moden X903D) OtoopaKaeta kpaH MEHO TepoHa. HxMnE Jn HnHa paoa pnoiocytnnnn BmOba.
6 Khonka mnu VOICE BaaMIOCTO NOKHOHORo CmptfoHa HAKMTc 3Ty KONky IaBb0a FyHKnSiri nI npexkdo bpekm pacto3aabnnrtonoc.
7 Khonka HAMMITE,HTO6BnpeepnnoCnCKypaNOCTAHm BHA/BEEX8pKNNVcPAIOuNTHOTOBHpeEPN BHA/BEEXNoCnCKYDPOPOKeK,INABT.1.B.DpyROM VCTOHMHKByUHOJJeO.
8 KhonKa (AUDIO)/(N6paHnOe) OroopaKeHne AyaDyB/JeEO.LcnnKpaH ayDio/JeEO yye OtoopaKaTe, GdyI BbIaONHe CMeHa IcIOHnK. Haxmte INyepKnBaIte 3ry KOnkny He Me nee 2 cekHyTobblpeepnKkpanyV'6bpHnOoe
9 HAXMNTE,TOOCHBKTQHTHBbKKTQHTTB pEXNIM OKHIOHEHAR 3BYYK.
10 DnK Hapabote nepeadaHn nybta nctanHnHO npaBHeHnHa dAeHk Jy caccstnoHnJQ 2MTOOB
11 Mnkpofoh (Tolbko dIa MoDeneX803D-U/ INE-W720D) NcnoBbetyerBpeKIMaxCaoobnHbe cykn"nnr roococoro ynpabcnHia.
BkIOueHne (On) n BbIKIOueHne (Off) nTuHa
1 Nobeprhnte KIOU 3aXURAHnB B NOIOxHeHc ACC mnn ON.
CACTOMBAKIOHTCA
2 HauKmte u ydepxmbaTe KhoNkY MEnu B TeueHne He Meene 5 cekyH, YTO6bI bblKnOHTb yCTpoTcBO.
IpeekloueHHe 3KpaHa HCTOuHMKB 3ByKa Ha Heo6xoDmbln 3KpaH
MoxnopeKIOHb 3kpa HCTOHNKOB 38yKa Ha BbIeHHb 3kpaH, KOChyBmCb 3HaKa Ha ODHOM N Tpex KpaEB kpaHa.
KpaHnHaCTpoKn6bICTporo Bbl30Ba
BIMoxeetyctahOBHTBASS ENGINE SQ,perynipooay Tem6paHnH CNTEMy 3a2dHHXnRaccKIOPOB

Двонн Зкан
HaBIOHOMKDAHEMOXHOnepeKIOAHBCMekDyOto6pKaAMHIMKpaHAM.
3KpaHnCTOyHmKOB 3ByKa (USB Ayn)

Khonka npedbapntelbHoi nactpoiN uIeKpAe pexnma 6bictporo NocKa\*
*Pekum nouka paanuaemcn 8 tabucmcm om umoohka 36yka. Jn noynenon dononnumuun uopmauu cm, uncmpkyku nu no kcnayamaauu umoohka 36yka.
Функцу"ИЗбранhoe"
JaHHOc yctpoaON HOaONHT NOyAHTb NpOCTO JIOCTY K FyHKJIAm, Ia6BaJIHn HA ekpaH "Ia6paHOC" hACTO INoJIbEyEMBE OIEMHTb, HApIIMep nTOUHMK 3BvKa, FyHKUIO NOnCKa HABINaUNN T.1D, ETO IO3BOHET 6bICTPO BBy6PbHYKHN ANCMCHT.
1 Haxmte n yedeepkmbaute KhoNky P/(U36paHoe) He MeHee 2 cekyHa.
OTo6paanTcraAkpAH "136paHnHoe"
Ppimep 3KpaHa "M36paHHe"
① NepexoHa 3kpana "Peaktnp."nla do6abHeHn 3JeMeHTOB mNm3MeHeHn HaBaHn.
2 3akpbTne kpaHa "M6paHHoe"
3 ΘeMeHTbI,ДбaBHeHbIeHaЗкpaH"ИЗбpaHHoe"
4 Ykaaahne nonoxenra OTO6pKaemoro B Hactooun MOMENT 3KpaHNA "U36paHnoe". IPOBcTe BCBO IINBnPABO, "IO6b CMCHITb CTpaHNU. MoHNO DoabNT do 6 cTpaHNU.
PykoBODCTBO nonbOBAPOA NO6aBnHcAe nCmTob
O6abneHnE 3nemEnTOB
1Kochntecb[(PepaekTp.).
OToBpaTCHnKoBBCXHNCBOBObACTIN 3aKaDooBHeHnIPOCh3OpETpePckNueHne BpEeKn"PeKApT.
2KoCHNTecb[1]O6aBnTb).
Oobpa3nTcD o6aJIHembIe 1eMeHTbI (KaterOpIN).
3KoCHNTecb Tpe6yemoro 3nemeHtA,TO6bl do6aBntb erO (kateropn).
4 Bb6epnte Tpe6yembI 3IeMeH, TTo6bI do6abntb erO.
HINIIOYHEHHIOHOHTIEBHOH HFOOPMAUIO
OoobabreBbXeMeHemTax CM,pa3pen
"PoAKTNPOBaHHe 3KpaHa "V36paHHoc" B
pyko0dCTBe noJIb3OBaTeBA.
Moxho oobabt do 54 eMeHToB.
Ooobabtbe eMeHent 6onee Ondro paa He
ydaacto.
5 Nocne 3aBepueHn peJaKtupoBaHHN KOCHNTecb [Save).
6 Nocne OTo6paKeHnNoTBepeKdaOuSei HauNcKoCHNTecb [Yes].
7 PedaKtnpoBaHnne 6yJeT 3aBepWeHo npou3oJeiT nepeXoD K kpaHy "N36paHoe".
Ecn 00 epem pedakmuopoaan kocnmbc [Ommna), omobpaunnc nooepckane. Kocumecb [Yes],ymobn kpan nepeuen K npedbyemy kpan pekmuopaaon 3emennno kpana "M6panhoe.
Android Auto (npno6petaetcdoonolnhtelbho)
Android Auto nomoraactonb0aTbc npVIOKeHHMaHa TcEoHc, KOrJa BbB DOpore. OpncHTpyTeCb no Kapram Google, BKnOaHcre cncKn BocPOn3cEChnA, cnUaAte NoKaCTbN T.I. PpeJeHemnpOJOKtB, 3arpy3Ie npnoKeHHe Android Auto H3 Mara3Ha Google Play. POnkIOHITe TeteOH Android, 4to6bMcNb3oBab Android Auto.
1 Haxmte KhoNky MENU.
Oc6pa3nTcHekpaH MeHIO.
2 KocHmTecb [Android Auto].
OTo6pa3ntcaKpAnAndroidAuto.
-Длгпolyчелдлголителнйллсьрмалуа pabote npmaoxenl Android Auto cm. pasden"Android Auto B pykoobocctbe nonb3oate( CD-ROM).
PykoocnoBIO nonbObaTeAeAppleCarPlay (npnc6petaetra dononntenbHo)
Apple CarPlay (npno6peTaEcTcIOnoJIHmTeJbHo)
PnpnokeHne Apple CarPlay denaeT 60one 60fKeTnBHM n 63onacbHm npMHeHne yctpoCTBa iPhone aBTOMO6HNE. Cnmooupio npnoxehnApple CarPlay BO sPMAE BDOHN MOKHO bblpaTB HeoOxDMbIe ANEMtBu cYcPOrCTBA iPhone npepaTb HNecpcTeCBHNO Ha daHHoe ycPoITcBO.MokHO pKoJIaDbabT MapuPT, dNaTb TeneoONHBe 3BOHKn, NocbNaTb NnOyuaTb COo6eHnA tKaXe CNyTaMb My3BiKy n PnTOM octabatcb CopeIOToeHHBM HA doPore. IpOTo NOkIOHHTe CB0i IPhone K daHHOMy yctpoCTBy OTPAABNIIECCH Bpyt.
Iopob6hie cBedeHn CM. B CnpaBOuHKe BnaeHbua Ha KOMnKaT-DnCKe.
Haxmute VOICE nraaktaun yHKnn Siri yctpoCTba iPhone.
IcnoIb3yI cyHKuIO Siri ha IPhone,MOKHO OcyuieCTBnTb 3BOHKn,CnyuTaMy3bky MHoroe dpyroe.
ФункшЕнAppleCarPlayMOxHOTAKKeyynpabTbYepe3ceHCOPHbIkpan.
Pa6oTa c paamno/RDS
KhoKa npedBapntbHoh HacTpouKu
KopotkoepacHme cOcbpeHTnpedaeapntbHO HAcTpoEHBe CTAHJIK
KochuTech yynepxmae He meee 2 ckyhny Toobn TAnOMHb Te KdyIO CTAHyN IOcbaHTB E CnCKOpaTENHO HAcPOEHHHX
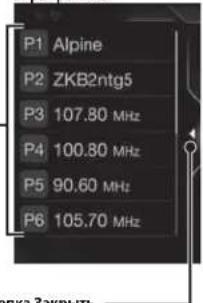
EkpaH peKMa
KhONka3aKpbItb
Kochimtecb, Tchobé 3aokbte kpkai pcknmae baoanbho HIOIPOPM
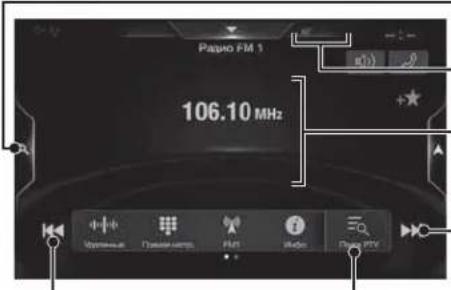
Khonka pexuma
npbnbaptnebnoHnactpoknKoAeCps (pnu cncnncnncnnnepnna PNPBAPBNHnHACPTPNN
INHnKaTOpRDS
HhopmaNoHHbIaKpaH
YBennenHeMe 4actoTbi
KHONKA NOMCKA PTY
Pa6ota c DAB/DAB+/DMB

*Onu moym he omobpaqamcb8 3abucumocmu on caykebnoo kcmnonenna, npunmaemoo b hacmonuM omenm.
Pa6ota c Φλη-нakonnteIem USB (npno6petaertcdoonnHTenbHo)
EcB 03MOXHOCTb 0ocponn3BOIDnTb aydnofoaIb (MP3/WMA/AA/C/FLAC) n BuaedeofaIb (AVI/MKV/MP4), BaHcAHHe Ha hauhakonntene USB, H aCtpoehHom Ieepa JHHoN CNTEm.
PpMep rnaBHorO 3KpaHa USB AynO
Pa6ota c yctpoiCTbOM HDMI (DVD-nponrpbIBaTeIeM) (npno6peTaetca dononHHTenbHo)
PnnoKIOHcHmDpONHHTCBHO npOurpbBAten DVE-5300(DVD-npOurpbBAtcn)M MoXHO ynpabTbc daHHOrO yCTPOBCTBa.
* Ipu nooknoeenu donoohumenebno moodyia "HDMI celenkmp" moKno nooknoaambe ycmpocnba HDM.Icua 0ra napamempa "HDMI celenkmp"ycmaohobeno 3nauehne "On" npu nooknoeenu dey xcmpoume HDMI,Knoka nepeknquemennexoda HDM.IBud omobpaamaem konknu 3abucum om mekyuux hcmpoeu u bboapannoo 8 daHHM MOMen exoda HDM.IJia nooyehner donoohmenebno unfopmaau cm.pasdeh "Haonpoka HDMI" u Bknquenue/bnknoeue fynkuuu "HDMI celenkmp" a PYKOBODCTBE IIO/IB3OBA TEJRA (CD-ROM).
Pa6ota c iPod/iPhone (npno6petaetcdaonolnhtelbho)
B 3aBcIMocTn OT Tna yCTpoiCTBa iPod/iPhone Tpe6yETc npno6petaembl dononHntelho Ka6enb USB paabemom Lightning (KCU-471) n t.
Peximaydno
POMCK My3bikalbHoro faina (peXMM pacuWpEHHO noncKa)
Hapumep: nonck no mchn nchohnta
1 KocHTecb [NcnonHnTeHn] Ha 3KpaHe pekima paacuuppeHHoro nonka.
![ALPINE X703DA4 - KocHTecb [NcnonHnTeHn] Ha 3KpaHe pekima paacuuppeHHoro nonka. - 1](/content/2026/03/487785/images/8f030294ff836820d3fe6af2340c436ae6f0341803b7372a3887cd23b626bdf3.jpg)
2Kochntecb HmEHn HxHKO mcNOnHHTeIa.
OxpoaHnAaBbMoBaBpaHoro
NCNONHTEN.
KoCHNTECu HHaHyKHOMNcNONHTENe,HTOBu
BOCPONBECTNE BCKOMNtMN BbPAHIO
NCNONHTEN.
3 KocHTecb naBaHnHaHyKHO aJIb6Oma.
ByyT OTo6paKeHbB BCE KOMIO3HmNn 1
BbOpaHOro AIBo0Ma.
KochTeCb]Ha HyKHom aIb6Ome,4TO6bl
BOcPcM3BcTn Bce KOMIO3HmN BuOpaHOro
aIb6Oma.
4 KocHTeCb Ha3BaHnry HxKHOI KOmIO3nUHN.
HaHHeTCA Bocnpa3eDHeBb6paHHoKOMIO3U.
1 BxOaHnBbI3OBcnpoBOKdaeTcPnHToHOM m0To6paKeHeHem BxOaJero 3BOHka.

3KpaH yBeDoMHeNnO BxOJaIeM 3BOHKe
2KochnTecb 3KpaHa yBEdomnEHHo BXOJaEM 3BOHKe.
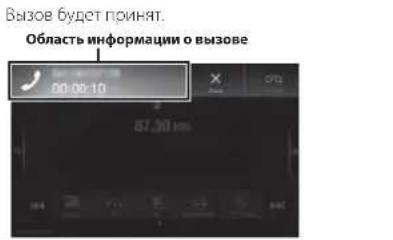
BOBPAWBA3OBAKCHATcB6hONACTNHFOPMaUN O B30BCDINRnepCxaHbEpaHynpAENCHI H TeneofoiOM.3NecbMOXIOHACPTPOTbPOMKOCTb N T
3aBepueHne Bbl30Ba
1Kochntecb[1]3abepunmb.
Bb3086byct3aBcPwch.
![ALPINE X703DA4 - 1Kochntecb[1]3abepunmb. - 1](/content/2026/03/487785/images/e48797ccae628b02191292beb6c9500917d560207fe40c27d0d7b0e2d7b52713.jpg)
ФункцмКapТ
Hnke npctabHe 063op paanHHbX KONOK HauKoHa KpaHe KapTb. Ia nonyehna dononHntbHO nHOpMaUNO daHHOM ekpae CM.pyKOBOCTBOIIOB3OBATEH.
Mehio Habiratau
IaDocTyNa KMeHIO"HaBnraZnaKocHTeCb [O]c npabOi CTOpHb OkpHa KapTb. MoKHO TaXke HaKaTb KhoNkY
A.
MhoronyhKToBbI MapuPyT
MapuPyT MOKHO TNOCTOHTN 03 OIOI ANH HOKONKHX TOAHI. MapuPyT MOKHO TAKOE CINHPOBTH HEBABACMOI OT TEKYILERO NOKOHAR CPS TYEN YCTAHOBK HOBOR HANALHOI TO-KHI.
Hobbi MapuyT
Babop nykta Hahnncnnyrnyb Bpa
aepca aHooepnHa. Bappa nky
HahaneHH Taee WOHO, YKaaae MeTO,
coepaHIOo McTOnTOckH AIN
coepaHHeHH MaOpuy KooM ToR,
MOHO TOOCmPTBc HBeAeNy RKnBt
HahaneHH BVCTOPA
Pma HauHH COEIMHNEC
InHepetetom WOHO,doONHIEHBO
obnHpy TaagayHXoepHHyra KTA
HahaneHH rYnO FOKCA E0
InHepetete.
DocynK Kapre

-нфорmaцьn
Octytyn K. KorotnyTefetBbHrapAmetPamNocBepkaNnnpopmnnnNnNnNnNn
Setup
HaepoKa paOra
HABATyIOI rpoPavMIIO
0eBcEHHH
YctahOBka nyHKta Ha3HaeyHm
PIMep Hxke OINCBaet npouecc noncka NyHKta HaHaeHnryTem BbOpa MeHIO [TopoD/INHeKc] B MeHIO [Aipec].
- Bbnohumnb noucu cyumb noocmpaah/uamama moho, hauae cmnlo [Cmpana/uamam].
1 KocHTecb [Hobbl MappyT] B MeHOBABURAUN.
2KochnTecb [Apec].
7 KocHTecb [More], qTo6bl n3MeHnTb napameTpbl mapuPyta, nI [Haatb HABnraqIO], qTo6bl HaaTaNb oe3dky.

3KocHnTeCb [TopoJnHNeKe].
4BBeINTeHa3BaHne ropoDA mnnnHNeKc.
Kochntecb 0TO6bOTOBpa3nB cNcOK naXoAaH3BaHui.
5 BbeDHTe HxHoe Ha3BaHne yHnUbI.
KoCHNTCCb 106bl OTO6pa3nB CINCK NOxOoRAH3BaH
6 BBeNTe Hmep doma nnepecekaioyuyu.
Mappyt 6byet bhiinch, n o0bpa3nTc KApTa, NOK33baouaBecb Mappyt. Iocne toro MOKHO 6byet npoeeprHnHooMauho Mappyta n anstepehATINBHe MappytHa
TexHnueckne XapaKTePncTmKn
MOHHTOP
Pazemep akpahan 9x903D)
8* (X803D-U)
7 (Nc-W720D)
TnLCDp03paHnnTN LCD
CncremaaepaaeknBHaMaTOMuaTFT
KONNCCTRO ANOCHTOB N3O6paXCHN
1152000 minkcene
(800×480×3(RGB))
DAHNTDEKOWKOONIECTBOXEMHOBUBOOPAKSHAHHEMEH99%
CnCTeMa nncBcRkn LEO
FM-TKOHEP
Haeon Hactpokn 87.5-109.0M
NoorBanyBCTBnHIOCTbONHOKaHa
8.1 d5ΦBr (0.7 MKB/75 cm)
TPOPOBaa yBCNTbHoc650dB
12abcbt(1,1MKB/75On)
V36mpaonbhoctb anbtopehnhoro KaHana
80dB
OIOHNEcHnVyM.65dB
HepexoHoe 3atyhaHe meekdy KaHaanamn Stereo
35dB
Ko300000000000000000000000000000000000000000000000000
MW-TIOHEP
Dyarabouhaoepn 531-1602K
Iopocobaa ybcTeBnBHOCTb 25,1MKB/28DboBT
LW-TIOHEP
川anaaohnactpoKn153-281Kq
HyBCTBNTBnBHOCTb(CTaHnDPTIEC)
316MK8/30D5ΦB1
DAB
HnAnaoHn HcTpoKn BAND III 174,93-239,2MfU
Jmanaoh HactpoKn L-BAND 1452,96-1490,6M
Hoporobas yBCTBANTBHOCTb -103,
OHouHHeCNHaVyM 95
PepexoHoe 3aIyXanHe 85
MCKDYCTEPCOKAHANAMU
USB
Ipe60aaK USB 2.0
MAXMAMBHAR NOTPCDBCMBOHMOHOCB
1500MA(HmepnSA CDP)
Knare USB
USB (KNAACC MACCBOO NAMTAU)
DaiNoBaCnCTeMa
FAT16/32
KoHHeTeB KAIJIIC
2 kaana (ctoeo)
HactoTHaXapakTeepnKa
5-2000014(±1dB)
CymMapHn KOaΦnueHT rapMOHueCKnx NcKaKeHHN
0.008% (npn 1 K²)
JHAMACeckn danaacn 95 cB (npn1 knt)
OTHIOHNCNTHAYM
Paeenee kana
85dB(npn1Ku)
1A TACOTTHIA XAPKETPCHTKMOXET OTNHTBcB 3aNNCHMCTHOr NTporpAMmIoro OeCEneHHYyCTPOCTBa KIOUPOBAA/CKOPCtH HepeAaHnGt.
HDMI
BxOHHHΦcPMA
780pVGA
BuxcHnOFOpMaT
480p
GPS
HACTOTA PONKWA GPS
1575.42±1M
HyBCB/TeNb-Hcctb npVema Gp
1.本次会议无否决、修改议案的情况。
MAKc.-136dB
GLONASS
Hactora npnemGLONASS 1597,807 Mhz-1605,6305Mtu
CyCTaNTenbHOCTb nomema GLONASS
maxc-137db
Bluetooth
TexnyecKne xapaktepnctnblueth
Bluetooth 3.0
HbHbHbHbOH 2402-2480M
BExoHARMOIOHOCT6 4MMAKc (NACC MOIOHOCT2)
HFP (npo0nbpapnHpy)
OPPnpoepnbn dna nepedaun
0aHOB)
PBA(np0nBnaOmbena
3aHCHM8Tepeo-HHXKHNrAX)
A2DP(pacuHoeHHbI npcΦ
paocpaahny
AVRCP (npocnno nctaHCHHO
yPabieHnayuHO/BneO)
SPP (npocnnb nocieo3e
nopra)
OBUUHE
NorpeMmMAHIOHOCTB 14,8 noTcHnHO TOKA
(onykaetc11-16B)
Paocay Temnepatypa on-20C 60
MaKcMnAbHbBbIXOHaH MaHHOCTb
50Br×4
yPOBENbBixOHOaYIO
PA3MEP BbICTYNAIOUENCACTN
191mm(X803D-U)
171 mm (NE W720D)
CCTa
95 mm (JNE-W720D)
1y6/Ha
19mm
Cpokcny63-3roda
IIO cboum paxmepaX903D noxdoum moIbko dI onpeoeneu modeu aomomoo
H3a Hnpepehozo copeepuehncnao hnoykae oeo mexuueckne xapakmepuimku uduaiun moymuz mehmtebce g3 nepeabumnohozo yeeoemohien.
I Hanen I.CD uZomobena no cbepxmoovnou mexnozua. Koueemcbo 0fkekmuBnx nuKceien npebmaem 99.99%.3mo oHaam, umo cyuecmoyem cepoxmocmb nauuHn 0.01% nuKceien, komopne e6e2a kIOUOHe bui aoe2a bkoUOHe.
Windows Media norotn Windows ABNOTCA ToapHbMM 3IHKAMM NIN 3apeNTpPONAHBMn ToapHbMM 3HAKAMM Microsoft Corporation B CUA H/ MN Dpynx CTpaHax.
Apple, iPhone, iPod, iPod nano, iPod Touch n Siri horter TopOBMMaKAMN KOpnpaunn Apple Inc. 3apcrncptpOABHHmB CLLA n dpytnx ctpahax. Apple CarPlay BnertcT TopRoB MApKO KOpnpaunn Apple Inc.
- OboaHaehn "Made for Apple" u "Works with Apple" (CobMecTmOcHb C Apple) cIIHauIOT, TTO daHHoe 3neKTPoCHHOYCTPOCTBO6 bHIO papaBotoHo cHJIaHbIO IIO NIOKnIOeHN K npOyKTAM Apple, yKaahHBM B OboaHaehn, H CePTNpUPOBaBH JpaPbAOpHKM HA COOTBETCBNC paBoHIX xapAKTePcHtMK CTAnDapTy Appe. Kopnpaunr Ape HC HeCCOT OTBETCBEHOCTH 3a paBoty 3TO TOTO yCTPOJCTBA n 3A ERO COOTBETCBNC CTAnDapTM TEXNIK 6BeOaCHOCTN HOPMaTbHM kTAM. ObpatNTe BIIMVAHINE II TO, TTO NIOIb3OBAHine DAHIHO YCTPOJCTAA C yCTPOJCTBOM Appe MOKET IOaIMHTb Ha paBoty 6ocIpBOAoHON CTTN.
Google,Android,Android Auto,Google Play mDpyme 3HAKA HBNOTCA TOBAPHMA 3HAKAMG Google LLC.
CnoaeBbI hak n noTnbl Bluteotha BnHIOCT 3apetntpnpoBaHbHM ToBPbHM 3hakmKopnoopaanu Bluetooth SIG, Inc. nncnohyotcKopnopauei Alpine Electronics, Inc. noJinceHBM.Dpytnc ToproBbE 3hakn TnpOobbe HauWCHOBAHnnPnHNDAeKAT COOTBEETCBYQUM 3nAenLgAM.
- TepMnHb HDMi HDMl High-Definition Multimedia Interface, a Take horotin HDMI anmortca ToapHnnn AHAKAM KOMPANHIM HDMl Licensing LLC, 3aperrncppoBaanBBIMCUIJA npyixcTpaHax.
JIueHnHa TeXhONrO KoipOBAHn 3ByKa MPEG Layer-3 npChyIe oFrAhnfoH IIS Thomson. PnIOCTABKE 3TOO pOpyKta IppeoCTABINETc HmEHN Ha HAcTHO, HCKOMMepCckoc KIOBbOBAHn HC nppeoCTABnTe TnEeHHN He NooppaYMeBaOTc KaKHeIoo npaba HA NcNOBbOAHne DAnHORO npOyKA B CEaENkx KOMMepCeCKoR (T.E. nIaN NOUeHHN np6Bn) paNIOBEuAAHn B peaBbHM BpeMeHN (H3eMIOHO, CNYTHIOBOrO, KAbEbIO rWIMn HIOHO), IMPOKO EBeAHHN INNtOKOBn IpepeaHn DaHHbX Uepc3 INTPcHET, INTPacTeN AINN INHbC cETN INN dOyTne CETnPACPeTEeHHNE AEIKPCCHHO CODpKaHn, TaKHe KApNIIOXCHN BxyKOBcnpOnBaDEeHHN 3a Nnaty NnNo Tpe6oBAHHN, DnTakoro NcNOBbOAHn Tpebyetra OtnElbHn NlueHn, DnNtOLyehn DononInHbIou MHFOMaUNI IOCCETHTe BeC-aIT http://www.mp3licensing.com
©2006-2018 TomTom. All rights reserved. This material is proprietary and the subject of copyright protection, database right protection and other intellectual property rights owned by TomTom or its suppliers. The use of this material is subject to the terms of a license agreement. Any unauthorized copying or disclosure of this material will lead to criminal and civil liabilities.
OOO(KoMaHaBbHaHa3a)
HΦopMaunOcebpNchbIXcHTpax
docTynHa Ha caIte www.alpine.ru
About the Rules of Bluetooth Electromagnetic Radiation Regulation

Declaration of Conformity

Spis tresci
Obsluga DAB/DAB+/DMB

m = 311
glośnómów acego)
OPP (Profil push obiectu)
PBA (Profil costepu do ksiagki
telefonicej)
14.4 V DC (prad staly)
Temperature accuracy

WYLACZNY DYSTRYBUTOR
HORN DISTRIBUTION S.A.
UL.KURANTOW34
02-873 WARSZAWA
TEL.: 0-22 331-55-55
FAX.: 0-22 331-55-00
WWW.ALPINE.COM.PL
Centralny Serwis:
About the Rules of Bluetooth Electromagnetic Radiation Regulation

Declaration of Conformity
DEVICES THAT EMIT RADIO WAVES. The following products and systems on your vehicle emit radio waves when in operation.
SIMPLIFIED EU DECLARATION OF CONFORMITY
Hereby, ALPINE ELECTRONICS, INC. declares that the radio equipment type X903D, X803D-U,
INE-W720D is in compliance with Directive 2014/53/EU. The full text of the EU
declaration of conformity is available at the following internet address:
http://www.alpine.com/e/research/doc/
Compliant with UNECE Regulation 10 (E-Mark)

| [EN] English | Hereby, Alpine Electronics, inc. declares that the radio equipment type X903D, X803D-U, INE-W720D is in compliance with Directive 2014/53/EU. The full text of the EU declaration of conformity is available at the following internet address: http://www.alpine.com/e/research/doc/ |
| [BG] Bulgarian | Спастоцanto Alpine Electronics, inc. ДекларURA, чу тои тту радиoc воръжених X903D, X803D-U, INE-W720D в съютевстVENCE сДи配电ТВА 2014/53/EC.Цяоctnett Текг на EC Декларигета за съютевстVENCE може за симери на сделенийntерnetа щ��с: http://www.alpine.com/e/research/doc/ |
| [CZ] Czech | Tímto Alpine Electronics, inc. prohlášujé,Že typárdívoho zařizení X903D, X803D-U, INE-W720D je v souladu se směnici 2014/53/EU.Uplnézněi EU prohlášeni o shodě je k dispozici na teto internetové adrese:http://www.alpine.com/e/research/doc/ |
| [DA] Danish | Hermed erklærer Alpine Electronics, inc., at radioudstyrstypen X903D, X803D-U, INE-W720D er i overensstemmelse med direktiv 2014/53/EU.EU-overensstemmelseserklaeringens fulde tekst kan findes på folgende internetadresse:http://www.alpine.com/e/research/doc/ |
| [DE] German | Hiermit erklärt Alpine Electronics, inc., dass der Funkanlagentyp X903D, X803D-U, INE-W720D der Richtlinie 2014/53/EU entspricht.Der vollständige Text der EU-Konformitätserkräung ist unter der folgenden Internetadresseverfügbar:http://www.alpine.com/e/research/doc/ |
| [EL] Greek | Мε την παρούσα o/η Alpine Electronics, inc., δηλώνει ὄτι o ραδίοεξόπλομός X903D, X803D-U, INE-W720D πλήροι την Μδηγία 2014/53/EE.To πλήρες κείνην της δηλωσός συμιόρφωός EE διατίθεται Θην ακόλουθηιο οστδιδίνοι:http://www.alpine.com/e/research/doc/ |
| [ES] Spanish | Por la presente, Alpine Electronics, inc. declara que el tipo de equiporadioeletrico X903D, X803D-U, INE-W720D es conforme con la Direcita 2014/53/UE.El textocomplete de la declaración UE de conformidad está disponible en la direction Internetseguidiente:http://www.alpine.com/e/research/doc/ |
| [ET] Estonian | Käesolevaga deklareerib Alpine Electronics, inc. et käesolev raadioeadme tüpp X903D, X803D-U, INE-W720D stavab direktivi 2014/53/EL nõuetele.ELi vastavusdeklaratsiooni täielik tekst on kattesaadav järgmisel internetiaadressil:http://www.alpine.com/e/research/doc/ |
| [FI] Finnish | Alpine Electronics, inc. vakuuttaa,että radiolaitetyppi X903D, X803D-U, INE-W720D on direktiivin 2014/53/EU mukainen.EU-vaatimustenmukaisuusvakuutukusen tääysmittainen teksti on saatavilla seuraavassainternetositteessa:http://www.alpine.com/e/research/doc/ |
| [FR] French | Le soussigné, Alpine Electronics, inc., déclaré que l'équipmentment radioé lectrique du type X903D, X803D-U, INE-W720D est conforme à la directive 2014/53/UE.Le texte complet de la déclaration UE de conformité est disponible à l'adresse internetsuivante:http://www.alpine.com/e/research/doc/ |
| [HR] Croatian | Alpine Electronics, inc. ovime izjavljube da je radijska oprema tipa X903D, X803D-U, INE-W720D u skladu s Direktivom 2014/53/EU. Cjeloviti tekst EU izjave o sukladnosti dostupan je na sljedećoj internetskoj adresi: http://www.alpine.com/e/research/doc/ |
| [HU] Hungarian | Alpine Electronics, inc. igazolja, hogy a X903D, X803D-U, INE-W720D tipusú rádióberendeze s megfélel a 2014/53/EU irányelvnek. Az EU-megfelelöségi nyilatkozat teljes szövege elérhető a kõvetkező internetes címen: http://www.alpine.com/e/research/doc/ |
| [IS] Icelandic | Hér, Alpine Electronics, inc. lýsr yfir að radiobūnaður tegund X903D, X803D-U, INE-W720D er i samræmi við tilskipun 2014/53/ESB. The fullur texti af ESB-samræmisyfirlysing er i bodi á eftirfarandi veffangi: http://www.alpine.com/e/research/doc/ |
| [IT] Italian | Il fabbricante, Alpine Electronics, inc., dichiarare che il tipo di appearecchiatura radio X903D, X803D-U, INE-W720D è conforme alla direttiva 2014/53/UE. Il testo completo della dichiarazione di conformità UE è disponibile al segmente indirizzato Internet: http://www.alpine.com/e/research/doc/ |
| [LT] Lithuanian | Aš, Alpine Electronics, inc., patvirtinu, kad radijo jrenginiu tipas X903D, X803D-U, INE-W720D atitinka Direktyva 2014/53/ES. Visas ES atitikties deklaracijos tekstas prieinamas šiuo interneto adresu: http://www.alpine.com/e/research/doc/ |
| [LV] Latvian | Ar šo Alpine Electronics, inc. deklare, ka radioiekarta X903D, X803D-U, INE-W720D atbilst Direktivai 2014/53/ES. Pilns ES atbilstías deklaracijas teksts ir pieejams šādā interneta vietnē: http://www.alpine.com/e/research/doc/ |
| [MT] Maltese | B'dan, Alpine Electronics, inc., niddikjara li dan it-tip ta' taghmir tar-radju X903D, X803D-U, INE-W720D huwa konformi mad-Direttiva 2014/53/UE. It-test kollu tad-dikjarazzjoni ta' konformità tal-UE huwa disponibli f'dan I-indsirizz tal-Internet li gej: http://www.alpine.com/e/research/doc/ |
| [NL] Dutch | Hierbij verklaar ik, Alpine Electronics, inc., dat het type radioapparatuur X903D, X803D-U, INE-W720D conform is met Richtlijn 2014/53/EU. De volledige tekst van de EU-conformiteitsverklaring kan worden geraadpleegd op het volgendie internetadres: http://www.alpine.com/e/research/doc/ |
| [NO] Norwegian | Herved Alpine Electronics, inc. erklaerer at radioutstyr type X903D, X803D-U, INE-W720D er i samsvar med direktiv 2014/53/EU. Den fullsendige teksten i EU-erklaering er tilgengelig på følgende internettadresse: http://www.alpine.com/e/research/doc/ |
| [PL] Polish | Alpine Electronics, inc. niniejszym oswiadczna, ze typ urzadzenia radiowego X903D, X803D-U, INE-W720D jest zgodny z dyrektywa 2014/53/EU. Pelny tekst deklaraciži zgodnosci UE jest dostepny pod nastupujacym adresem internetwym: http://www.alpine.com/e/research/doc/ |
| [PT] Portuguese | O(a) abaixo assinado(a) Alpine Electronics, inc. declara que o presente tipo de equipoamento de rádio X903D, X803D-U, INE-W720D está em conformidade com a Diretiva 2014/53/EU. O texto integral da declaração de conformidade está disponível no segunte endereço de Internet: http://www.alpine.com/e/research/doc/ |
| [RO] Romanian | Prin preventa, Alpine Electronics, inc. declara că tipul de echipamente radio X903D, X803D-U, INE-W720D este in conformitate cu Directiva 2014/53/EU. Textul integral al declaratiiei UE de conformitate este disponibile la următoarea adresă internet: http://www.alpine.com/e/research/doc/ |
| [SK] Slovak | Alpine Electronics, inc. týmto vyhlasuje, ze rárové zariadenie typu X903D, X803D-U, INE-W720D je v sulade so smernicou 2014/53/EU. Üplné EU vyhásieenie o zhode je k disposići na tejto internetovej adrese: http://www.alpine.com/e/research/doc/ |
| [SL] Slovenian | Alpine Electronics, inc. potruje, da je tip radijske opreme X903D, X803D-U, INE-W720D skladen z Direktivo 2014/53/EU. Celotno besedilo izjave EU o skladnosti je na voljo na naslednjem splenetnem naslovu: http://www.alpine.com/e/research/doc/ |
| [SV] Swedish | Härmed fösakrar Alpine Electronics, inc. att denna typ av radioutrustning X903D, X803D-U, INE-W720D överensstämmer med direktiv 2014/53/EU. Den fullständiga texten till EU-fösakran om överensstammelse finns på följande webbadress: http://www.alpine.com/e/research/doc/ |
| [TR] Turkey | Işbu beyanla, Alpine Electronics, inc. radyo ekipmani tipinin X903D, X803D-U, INE-W720D, Directive 2014/53/EU yönergesine uyduğunu ilan eder. EU uyumluk ilanınin tam metnine (Declaration of Conformity) aşaqidaki internet adresinden ulasilabilir. http://www.alpine.com/e/research/doc/ |
ALPINE
ALPINE ELECTRONICS MARKETING, INC.
1-7, Yukigaya-Otsukamachi, Ota-ku,
Tokyo 145-0067, JAPAN
Phone:03-5499-4531
ALPINE ELECTRONICS OF AMERICA, INC.
1500 Atlantic Blvd,
Auburn Hills, Michigan 48326 U.S.A.
Phone 1-800-ALPINE-1 (1-800-257-4631)
ALPINE ELECTRONICS OF AUSTRALIA PTY. LIMITED
161-165 Princes Highway, Hallam
Victoria 3803, Australia
Phone 03-8787-1200
ALPINE ELECTRONICS GmbH
Ohmstraße 4
Fletchamstead Highway, Coventry CV4 9TW, U.K.
www.alpine.co.uk
ALPINE ELECTRONICS FRANCE S.A.R.L.
A.Muang Samutprakarn, Samutprakarn 10280, Thailand
Designed by ALPINE Japan
Printed in Thailand (Y)
68-38492Z07-A(Y_A5)