HWC 154 EELW - Wine cellar HOOVER - Free user manual and instructions
Find the device manual for free HWC 154 EELW HOOVER in PDF.

| Product Type | Wine Cellar |
| Brand | Hoover |
| Model | HWC 154 EELW |
| Capacity | 40 bottles |
| Refrigerant | R600a (isobutane) |
| Insulation Gas | Cyclopentane |
| Recommended Temperature Ranges | Red wines: 15.5°C – 18.5°C; Dry white wines: 10°C – 15°C; Sparkling wines: 7.2°C – 9.5°C; Rosé wines: 9.5°C – 10.5°C |
| Display | Digital, selectable in °C or °F |
| Interior Lighting | LED, with ON/OFF switch |
| Number of Shelves | 3 removable chrome-plated steel shelves + 1 removable bottle rack (6 bottles) |
| Adjustable Feet | Yes |
| Door | Glass |
| Power Supply | Grounded outlet (voltage not specified, typically 220-240 V) |
| Safety | Use of flammable gas (R600a); do not block ventilation openings; do not use extension cord; unplug before maintenance |
| Cleaning | Interior: warm water and baking soda (2 tablespoons per liter); exterior: water and mild detergent |
| Defrosting | Manual if necessary; do not use sharp tools |
| Repairability | LED lighting: replacement by technical service; power cord: replacement by authorized center |
| Transport | Upright position; remove bottles and removable parts; tape door |
| Noise | Normal refrigerant circulation; possible vibrations, check stability with adjustable feet |
Frequently Asked Questions - HWC 154 EELW HOOVER
User questions about HWC 154 EELW HOOVER
0 question about this device. Answer the ones you know or ask your own.
Ask a new question about this device
Download the instructions for your Wine cellar in PDF format for free! Find your manual HWC 154 EELW - HOOVER and take your electronic device back in hand. On this page are published all the documents necessary for the use of your device. HWC 154 EELW by HOOVER.
USER MANUAL HWC 154 EELW HOOVER
natural_image
Simple line drawing of a rectangular cabinet or enclosure with vertical slats on the front panel (no text or symbols)CHŁODZIARKA DO WINA
Vinot é ka
APARATULUI
Vinska omara
BODEGA DE VINO
Vinkylaren
BORH ÚTÓ
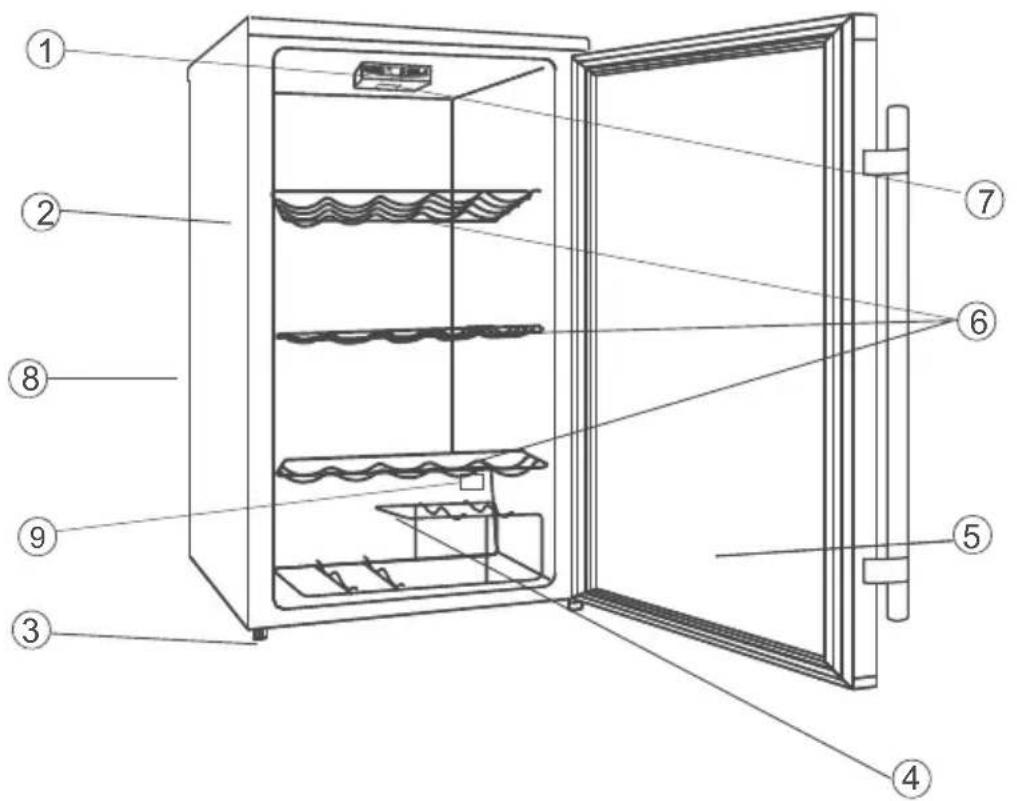
PARTS AND FEATURES
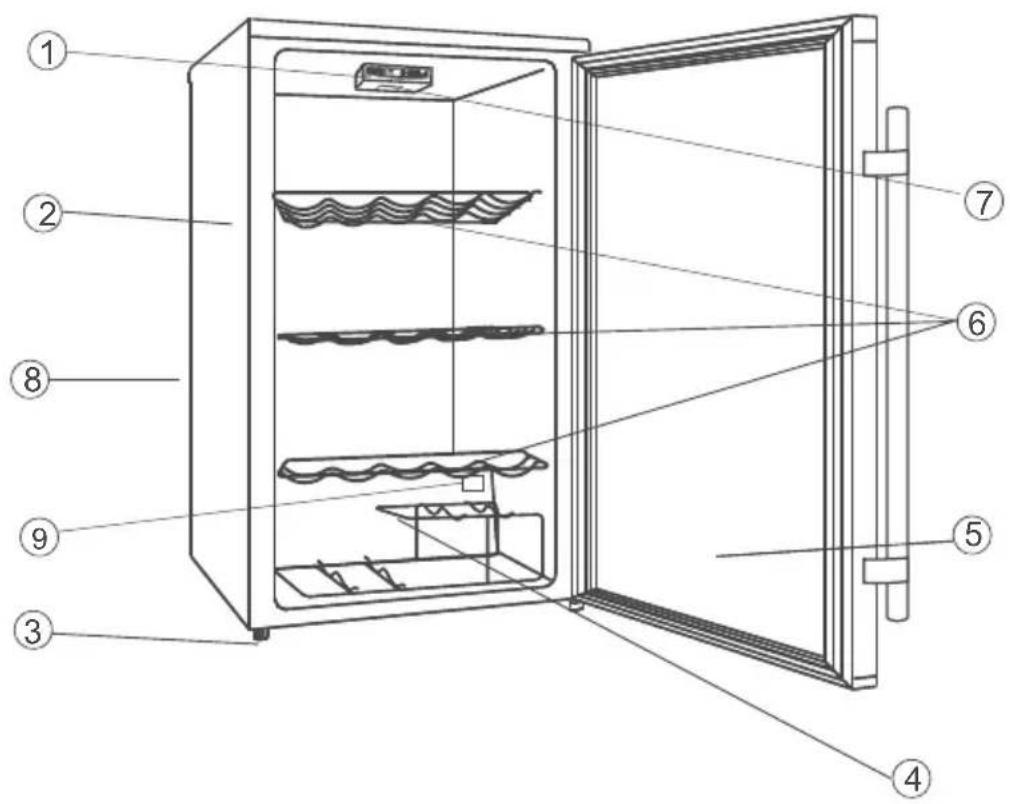
- Operation and Display Panel
- Cabinet
- Levelling Leg
- Wine Rack
- Glass Door
- Chrome Shelves
- Interior Lamp
- Electrical Control Assembly (at the back)
- Temperature Sensor
Thank you for purchasing this product.
Before using your refrigerator, please carefully read this instruction manual in order to maximize its performance. Store all documentation for subsequent usage or other owners. This product is intended solely for household use or similar applications such as:
- the kitchen area for personnel in shops, offices and other working environments
- on farms, by clientele of hotels, motels and other environments of a residential type
- at bed and breakfasts (B & B)
- For catering services and similar applications not for retail sale.
This appliance must be used only for purposes of storage of food, any other use is considered dangerous and the manufacturer will not be responsible for any omissions. Also, it is recommended that you take note of the warranty conditions.
SAFETY INFORMATION
The refrigerator contains a refrigerant gas (R600a:isobutene) and insulating gas (cyclopentane), with high compatibility with the environment, that are, however, inflammable.
We recommend that you follow the following regulations so as to avoid situations dangerous to you:
- Before performing any operation, unplug the power cord from the power socket.
- The refrigeration system positioned behind and inside the appliance contains refrigerant. Therefore, avoid damaging the tubes.
- If in the refrigeration system a leak is noted, do not touch the wall outlet and do not use open flames. Open the window and let air into the room. Then call a service center to ask for repair.
- Do not scrape with a knife or sharp object to remove frost or ice that occurs. With these, the refrigerant circuit can be damaged, the spill from which can cause a fire or damage your eyes.
- Do not install the appliance in humid, oily or dusty places, nor expose it to direct sunlight and to water.
- Do not install the appliance near heaters or inflammable materials.
• Do not use extension cords or adapters.
- Do not excessively pull or fold the power cord or touch the plug with wet hands.
- Do not damage the plug and/or the power cord; this could cause electrical shocks or fires.
- It is recommended to keep the plug clean, any excessive dust residues on the plug can be the cause fire.
- Do not use mechanical devices or other equipment to hasten the defrosting process.
- Absolutely avoid the use of open flame or electrical equipment, such as heaters, steam cleaners, candles, oil lamps and the like in order to speed up the defrosting phase.
- Do not use or store inflammable sprays, such as spray paint, near the appliance, it could cause an explosion or fire.
- Do not use electrical appliances inside the food storage compartments, unless they are of the type recommended by the manufacturer.
- Do not place or store inflammable and highly volatile materials such as ether, petrol, LPG, propane gas, aerosol spray cans, adhesives, pure alcohol, etc. These materials may cause an explosion.
- Do not store medicine or research materials in the appliance. When the material that requires a strict control of storage temperatures is to be stored, it is possible that it will deteriorate or an uncontrolled reaction may occur that can cause risks.
- Maintain the ventilation openings in the appliance enclosure or in the built-in structure, free of obstruction.
- Do not place objects and/or containers filled with water on the top of the appliance.
- Do not perform repairs on this appliance. All interventions must be performed solely by qualified
personnel.
- This appliance can be used by children aged from 8 years and above and by persons with reduced physical, sensory or mental capabilities or with a lack of experience and knowledge; provided that they have been given adequate supervision or instruction concerning how to use the appliance in a safe way and understand the hazards involved.
•Children should not play with the appliance. Cleaning and user maintenance should not be made by children without supervision
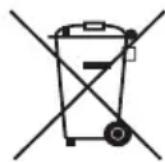
Scrapping old appliance
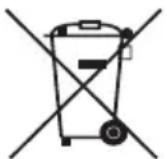
This appliance is marked according to the European directive 2012/19/EU on Waste Electrical and Electronic Equipment (WEEE).
WEEE contains both polluting substances (which can cause negative consequences for the environment) and basic components (which can be re-used). It is important to have WEEE subjected to specific treatments, in order to remove and dispose
properly all pollutants, and recover and recycle all materials.
Individuals can play an important role in ensuring that WEEE does not become an environmental issue; it is essential to follow some basic rules:
- WEEE should not be treated as household waste;
- WEEE should be handed over to the relevant collection points managed by the municipality or by registered companies. In many countries, for large WEEE, home collection could be present.
In many countries, when you buy a new appliance, the old one may be returned to the retailer who has to collect it free of charge on a one-to-one basis, as long as the equipment is of equivalent type and has the same functions as the supplied equipment.
Conformity

By placing the mark on this product, we are confirming compliance to all relevant European safety, health and environmental requirements which are applicable in legislation for this product.
Energy Saving
For better energy saving we suggest :
Installing tge appliance away from heat sources and not exposed to direct sunlight and in a well ventilated roo.
Avoid putting hot food into the refrigerator to avoid increasing the internal temperature and therefore causing continuos functionaliting of the compressor.
Do not excessively stuff foods so as to ensure proper air circulation.
Defrost the appliance in case there is ice to facilitate the transfer of cold.
In case of absence of electrical energy, it is advisable to keep the refrigerator door closed.
Open or keep the doors of the appliance open as little as possible
Avoid adjusting the setting to temperatures too cold.
Remove dust present on the rear of the appliance
Important Safety Instructions
- Read all instructions before using the appliance.
- Child entrapment and suffocation are not problems of the past. Junked or abandoned appliances are still dangerous... even if they will "just sit in the garage a few days."
• Before you throw away your old wine cooler:
take off the door, leave the shelves in place, so that children may not easily climb inside. - Never allow children to operate, play with, or crawl inside the appliance.
- Never clean appliance parts with flammable fluids. The fumes can create a fire hazard or explosion.
- Do not store or use gasoline or any other flammable vapors and liquids in the vicinity of this or any other appliance. The fumes can create a fire or explosion.
INSTALLATION INSTRUCTIONS
Before Using Your Wine Cooler
- Remove the exterior and interior packing, including protective foam on door panels.
-
Check to be sure the following parts are included:
-
3 slide out shelves
- 1 wine rack
- 1 Instruction manual
- Before connecting the appliance to the power source, let it stand upright for approximately 2 hours. This will reduce the possibility of a malfunction in the cooling system from handling during transportation.
- Clean the interior surface with lukewarm water using a soft cloth.
Installation of Your Wine Cooler
- Place your appliance on a floor that is strong enough to support the appliance when it is fully loaded. To level your appliance, adjust the legs at the front of the appliance.
- Allow 5 inches of space between the back and sides of the appliance, which allows the proper air circulation to cool the compressor.
- Locate the appliance away from direct sunlight and sources of heat (stove, heater, radiator, etc.). Direct sunlight may affect the acrylic coating and heat sources may increase electrical consumption. Extreme cold ambient temperatures may also cause the appliance not to perform properly.
- Avoid locating the appliance in moist areas. Too much moisture in the air will cause frost to form quickly on the evaporator.
- Plug the appliance into an exclusive properly installed-grounded wall outlet. Do not under any circumstances cut or remove the third (ground) prong from the power cord. Any questions concerning power and or grounding should be directed toward a certified electrician or an authorized Candy Products service center.
Improper use of the grounded plug can result in the risk of electrical shock. If the power cord is damaged, have it replaced by an authorized Candy Products service center.
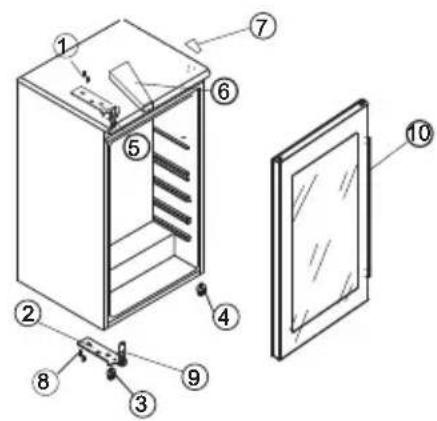
Reversing the Door Swing of Your Wine Cooler
This wine cooler has the capability of either opening the door from the left or right side. The unit is delivered to you with the door opening from the left side. Should you desire to reverse the opening direction, please follow these instructions.
NOTE:
Before reversing the door, the power must be shut off.
All parts removed must be saved to do the reinstallation of the door.
This wine cellar has been built with the door hinges on the right. If you wish to change the opening direction, follow the instructions below:
- Remove the upper hinge cover(6) first
- Remove the two screws (1) that hold the upper hinge (5) (right side) to the frame. Take away the upper hinge (5).
- Lift the door and place it on a padded surface to prevent scratching it.
- Remove the two screws(8) that hold the lower hinge(2) and Make sure to Remove the lower hinge(2).
- Remove the left front leg (4) and transfer it to the right side.
- Remove the hole cover plate(7) to the right side.
- Before placing this lower hinge(2), remove the bolt-pin (9) and reverse the direction of the lower hinge(2). Then install the lower hinge (2) onto the left side of the lower frame with two screws (8).
- Insert the bolt-pin(9) to the lower hinge (2).
- Set the door to its place making sure the door seat at the lower hinge(2).
- While holding the door in the closed position secure the upper hinge (5) in the top frame of left side with two screws (1). Please remember that do not tighten the two screws(1) until the top of the door is levelled with the counter top.
- Install the upper hinge cover(6) on the upper hinge..
- Changing the door handle from the left side to the right side.
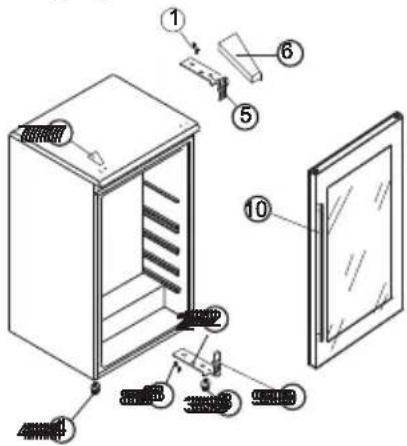
FIGURE 1
Door opening from left side

FIGURE 2
Door opening from right side
IMPORTANT SAFEGUARDS
Do not store food in wine cooler, as interior temperature may not get cool enough to prevent spoilage. As a natural result of condensation, in summer months or area of high humidity, the glass door may built up moisture on the outside. Just wipe it away.
It is recommended you install the wine cooler in a place where the ambient temperature is between 22-25 degree Celsius. If the ambient temperature in above or below the recommended temperature, conditions may cause the interior temperature to fluctuate.
If the interior light is left on, the temperature inside the wine cooler will be higher.
Recommended Temperatures for chilling Wine
Red wines: 15.5-18.5 C
Dry/White Wines 10-15 C
Sparkling Wines 7.2-9.5 C
Rose Wines 9.5-10.5 C
The above temperatures may fluctuate depending on whether or not the interior bulb is on or off or whether the bottles are located on the lower/middle or lower section.

HOW TO USE THE BUTTONS ON THE DISPLAY PANEL:
You can set the temperature as you desire by pushing the button or. When you push the two buttons for first time, the LED readout will show the original temperature set at previous time (the temperature preset at the factory is 50 F). The temperature that you desire to set will increase 1 F or 1 C if you push the once, on the contray the temperature will decrease 1 F or 1 C if you push the once.
When you store mostly red wines, the temperature which you control by pushing the above two buttons needs to be set between 15.5 to 18.5 C and the LED lamp beside "RED" will be lit red.
When you store mostly white wines, the temperature needs to be set at between 10 to 15°C and the RED lamp beside "WHITE" will be lit green. When you store mostly sparkling wines the temperature needs to be set at between 7.2 to 9.5°C and the LED lamp beside "SPARKLING" will be lit amber.
You can select temperature display setting from Fahrenheit to Celsius degree by pushing the button marked F/C. Fahrenheit degree indicator will appear in red color in the display marked °F and the Celsius degrees indicator will appear in yellow color in the display marked °C.
You can turn the interior light on or off by pushing the button marked ON/OFF symbol.
Shelves
Shelving is chrome plated. To accommodate different size bottles, they can be moved up or drown by sliding them out of the tracks. The shelves are designed to accommodate the maximum amount of bottles.
Wine Rack
There is an additional wine rack at bottom section of the unit where you can store up to 6 wine bottles. This rack is removable for cleaning purpose.
NOTE:
When you use the wine cooler for the first time or restart the wine cooler after it has been turned off for long time, there could be a few degrees variance between the temperature you select and the one indicated on the LED readout. This is normal and it is due to the length of the activation time. Once the wine cooler is running for a few hours everything will be back to normal.
Also, there is a 4 to 6 C variance between the top and bottom shelves of the wine chiller. Therefore, If you have set the wine cellar for red wine only and the temperature reads 16 C and you want to place a mix of white and red wines, you should place the wine bottles on the bottom shelves and the red wines on the top shelves.
CARE AND MAINTENANCE
CHANGING THE LIGHT BULB
LED lighting (Where present)
If the product is equipped with LED lights, please contact the Technical Assistance Service in case of replacement.
Compared to traditional light bulbs, the LEDs last longer and are environmentally friendly.
Cleaning Your Wine Cooler
• Unplug the wine cooler, and remove the bottles.
- Wash the inside with a warm water and baking soda solution. The solution should be about 2 tablespoons of baking soda to a quart of water.
- Wash the shelves and trays with a mild detergent solution.
- The outside of the wine cooler should be cleaned with mild detergent and warm water.
It may also be necessary to periodically wipe the bottom part of the storage area, as the wine cooler is designed to retain humidity, and condensation may collect there.
Maintenance of Your Wine Cooler
• Power Failure
Most power failures are corrected within a few hours and should not affect the temperature of your wine cooler if you minimize the number of times the door is opened. If the power is going to be off for a longer period of time, you need to take the proper steps to protect your contents.
Vacation Time
During long absences, remove all the bottles; unplug your wine cooler, clean your wine cooler, and leave the door open slightly to avoid possible formation of condensation, mold, or odors.
Moving Your Wine Cooler
- Remove all the bottles.
- Securely tape down all loose items inside your wine cooler.
• Turn the levelling screws up to the base to avoid damage.
Tape the doors shut. - Be sure the wine cooler stays in the upright position during transportation.
Troubleshooting
You can solve many common wine cellar problems easily, saving you the cost of a possible service call. Try the suggestions below to see if you can solve the problem before calling the servicer.
TROUBLESHOOTING GUIDE
| PROBLEM | POSSIBLE CAUSE |
| Wine cooler does not operate. | Not plugged in.The circuit breaker tripped or blown fuse. |
| Wine cooler is not cold enough. | Check to be sure the temperature control setting.External environment may require a higher setting.The door is opened too often.The door is not closed completely.The door gasket does not seal properly.The wine cooler does not have the correct clearances. |
| Compressor turns on and off frequently | The room temperature is hotter than normal.A large amount of warm wine has been added to the wine cooler.The door is opened too often.The door is not closed completely.The temperature control is not set correctly.The door gasket does not seal properly.The wine cooler does not have the correct clearances. |
| The light does not work. | The home circuit breaker or fuse has tripped.The wine cooler is unplugged.The bulb has burned out(see maintenance section for the replacement procedure).The switch is in the "OFF" position. |
| Vibrations. | Check to assure that the wine cooler is level. |
| The wine cooler seems to make too much noise. | The rattling noise may come from the flow of the refrigerant,which is normal.As each cycle ends, you may hear gurgling sounds caused by the flow of refrigerant in your wine cooler.Contraction and expansion of the inside walls may cause popping and crackling noises.The wine cooler is not level. |
| The door will not close properly. | The wine cooler is not level.The doors were reversed and not properly installed.The gasket is dirty.The shelves are out of position. |
Technical Specifications:
For detailed specifications, please refer to the nameplate at the back of the wine Cellar. The specifications are subject to change without prior notice due to products Improvement.
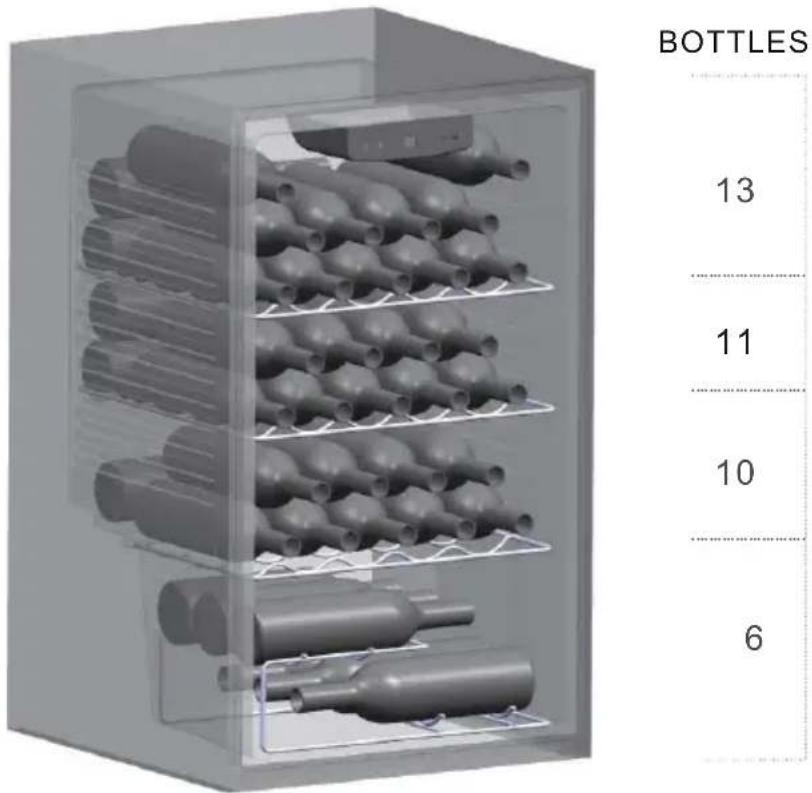
Bottle loading scheme
40 bottles
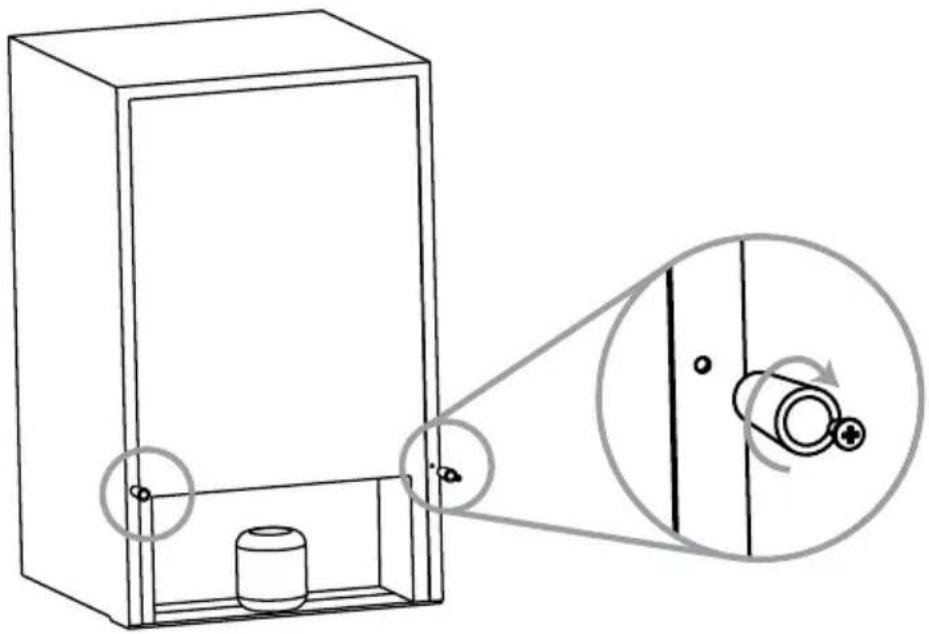
Assembling instruction for Spacer
natural_image
Technical line drawing of a mechanical device with a cylindrical component and a magnified inset showing rotational motion (no text or symbols)BRUGSVEJLEDNING
AFSKAFFELSE AF GAMLE APPARATER
natural_image
3D rendering of a multi-tiered storage unit with cylindrical bottles and mesh railings (no text or symbols visible)Flaske
13
11
10
6
natural_image
Technical line drawing of a mechanical device with a cylindrical component inside and an inset showing rotational motion (no text or symbols)KÄYTTÖOHJE
natural_image
3D rendering of a transparent cylindrical storage unit filled with multiple cylindrical bottles, showing internal structure without any text or symbols.Pullo
13
11
10
6
natural_image
Technical line drawing of a mechanical device with a cylindrical component inside and an inset showing rotational motion (no text or symbols)natural_image
3D rendering of a multi-tiered storage unit with cylindrical bottles and internal channels (no text or symbols visible)Bouteille
13
11
10
6
natural_image
Technical line drawing of a mechanical housing with a cylindrical component and a magnified inset showing rotational motion (no text or symbols)BESTANDTEILE UND FUNKTIONEN
- in Bed and Breakfasts
natural_image
3D rendering of a multi-tiered storage unit with cylindrical bottles and internal channels (no text or symbols visible)Flasche
13
11
10
6
natural_image
Technical line drawing of a mechanical housing with a cylindrical component and a magnified inset showing rotational motion (no text or symbols)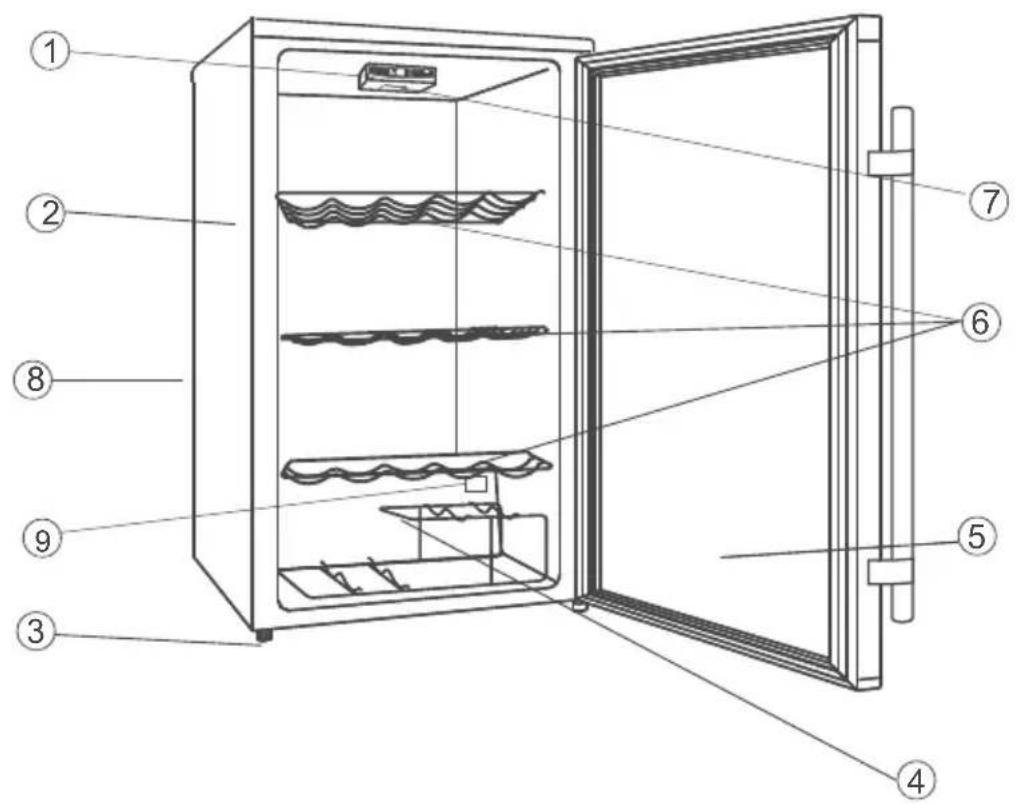
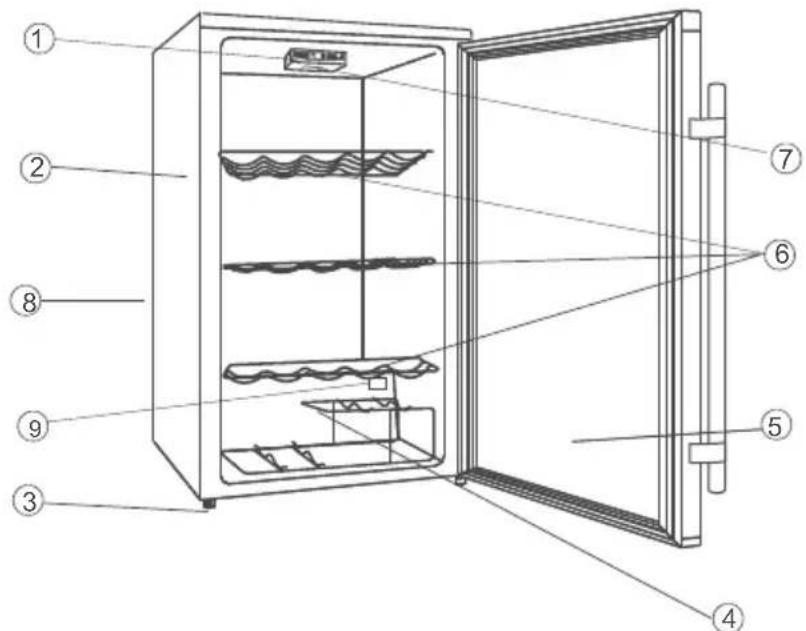
- Pannelloe displayoperativo
2.Vano - Gambadilivellamento
- Porta-vini
- Portelloinvetro
6.Ripianicromati
7.Luceinterna - Impiantoelettrico(sulretro)
9.Sensoretemperatura
natural_image
3D rendering of a multi-tiered storage unit with cylindrical bottles and mesh railings (no text or symbols visible)Bottiglia
13
11
10
6
natural_image
Technical line drawing of a mechanical device with a cylindrical component inside and an inset showing a rotating shaft (no text or symbols)BRUKERVEILEDNING
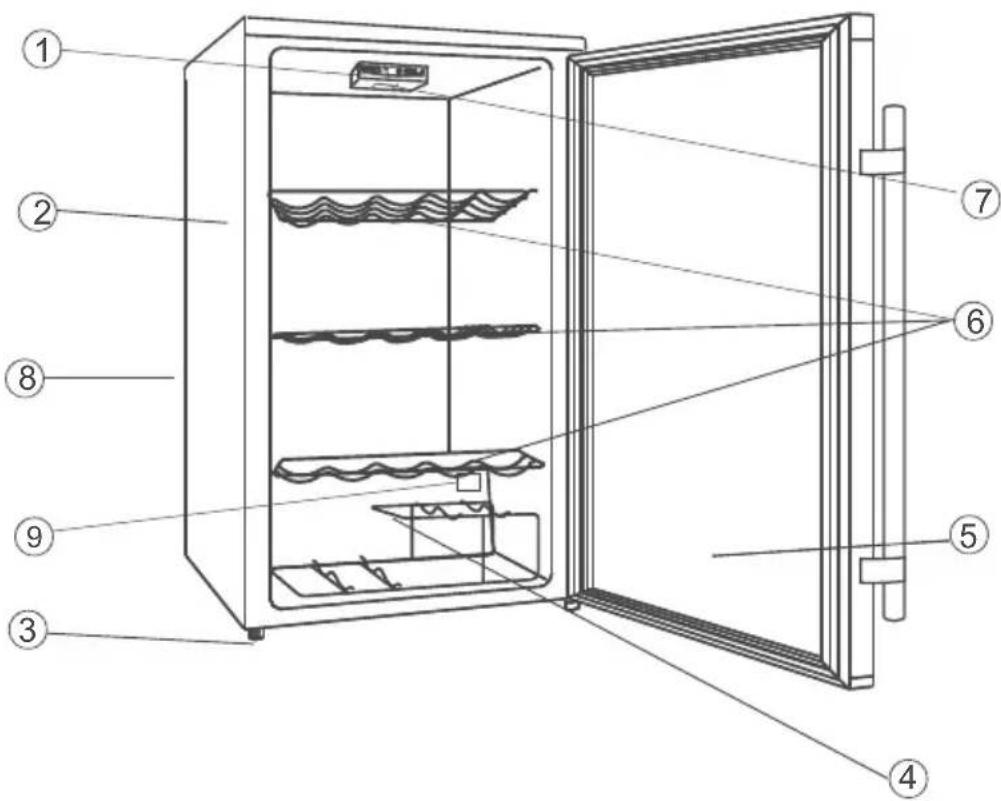
- Kabinett
- Justeringsfot
- Vinstativ
- Glassdør
- Hyller i krom
- Innvendig lampe
- Elektrisk kontrollenhet (på baksiden)
- Temperatursensor
STELL OG VEDLIKEHOLD
SKIFTE LYSPÅREN
LED-LAMPER
Hvis dette produktet er utstyrt med LED-LAMPER, ta kontakt med teknisk hjelpeservice hvis de må skiftes.
natural_image
3D rendering of a multi-tiered storage unit with cylindrical bottles and mesh railings (no text or symbols visible)flasker
13
11
10
6
natural_image
Technical line drawing of a mechanical housing with a cylindrical component and a magnified inset showing rotational motion (no text or symbols)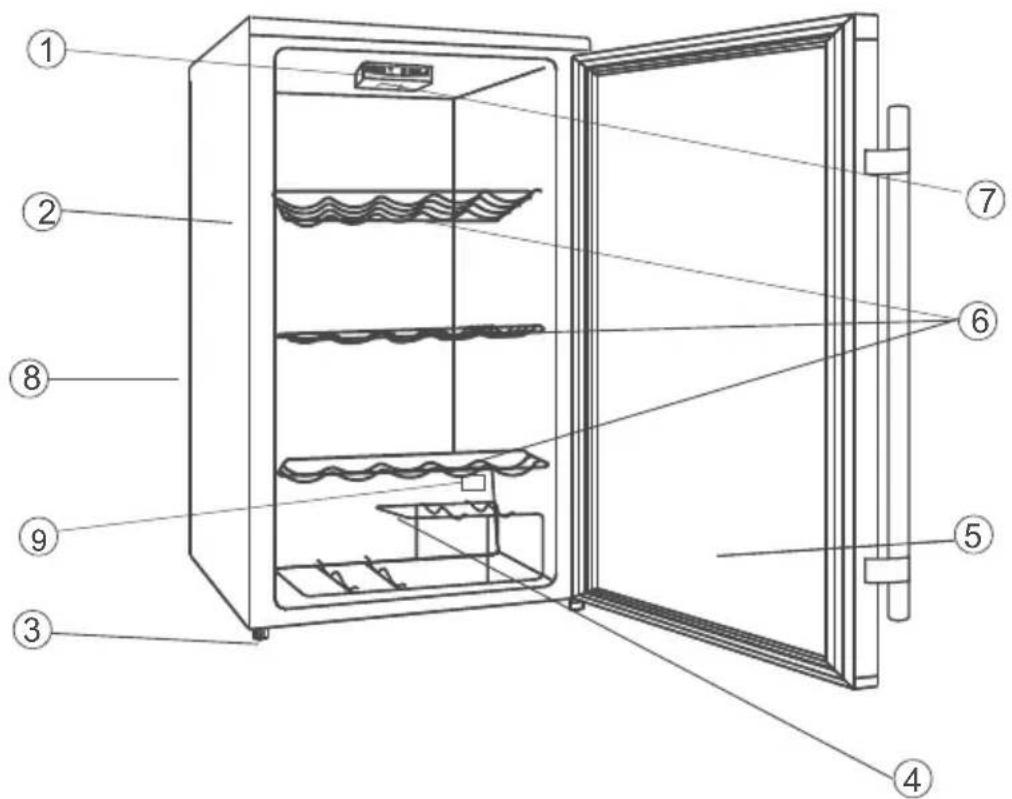
BELANGRIJKE WAARSCHUWING
natural_image
3D rendering of a transparent cylindrical storage unit filled with multiple cylindrical bottles, showing internal structure and no text or symbols.fles
13
11
10
6
natural_image
Technical line drawing of a mechanical assembly with a box and cylindrical component, showing a close-up inset of the internal components (no text or symbols)
natural_image
3D rendering of a multi-tiered storage unit with cylindrical bottles and internal channels (no text or symbols visible)Butelka
13
11
10
6
natural_image
Technical line drawing of a mechanical device with a cylindrical component and a magnified inset showing rotational motion (no text or symbols)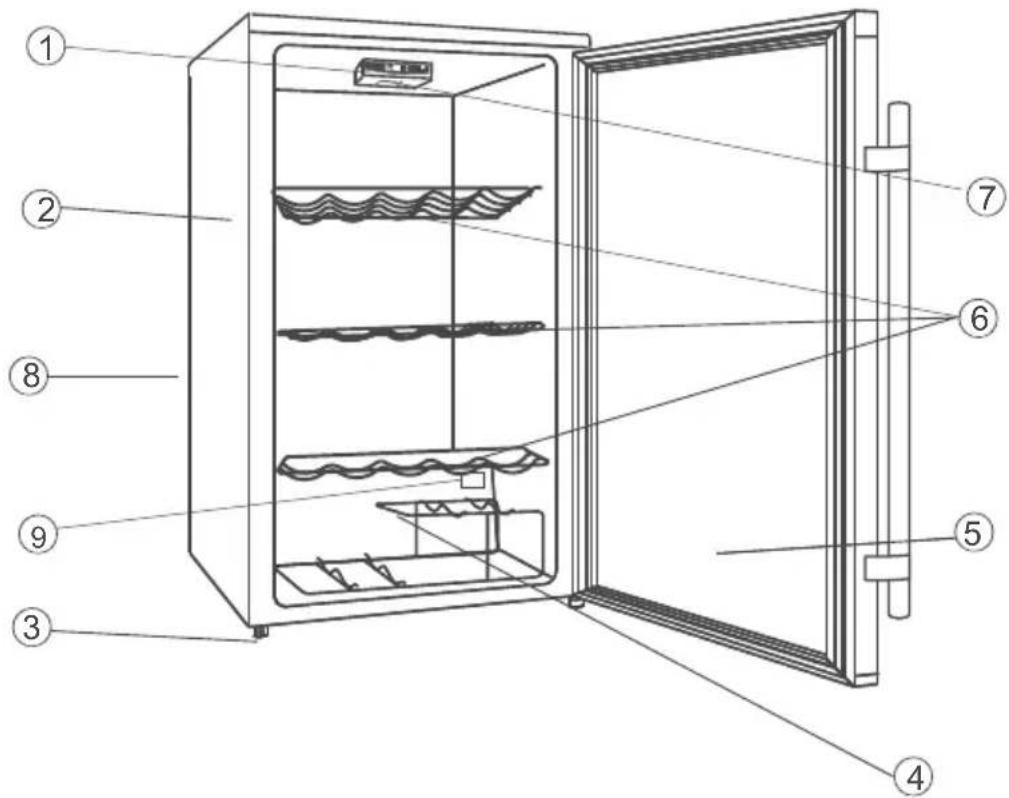
natural_image
3D rendering of a multi-tiered storage unit with cylindrical bottles and internal channels (no text or symbols visible)Láhve
13
11
10
6
natural_image
Technical line drawing of a mechanical housing with a cylindrical component and a magnified inset showing rotational motion (no text or symbols)P R I COMPONENT E I CARACTERISTICI
natural_image
3D rendering of a wine storage cabinet with multiple bottles arranged in rows (no text or symbols visible)flacon
13
11
10
6
natural_image
Technical line drawing of a mechanical assembly with a box and cylindrical component, showing a close-up inset of the internal components (no text or symbols)Čestitamo!
natural_image
3D rendering of a multi-tiered storage unit with cylindrical bottles and internal channels (no text or symbols visible)steklenica
natural_image
Technical line drawing of a mechanical housing with a cylindrical component and a magnified inset showing rotational motion (no text or symbols)PIEZAS Y CARACTERÍSTICAS
natural_image
3D rendering of a multi-tiered storage unit with cylindrical bottles and mesh railings (no text or symbols visible)Botella
13
11
10
6
natural_image
Technical line drawing of a mechanical device with a cylindrical component and a magnified inset showing rotational motion (no text or symbols)natural_image
3D rendering of a multi-tiered storage unit with cylindrical bottles and internal shelves (no text or symbols visible)Flaska
13
11
10
6
natural_image
Technical line drawing of a mechanical housing with a cylindrical component and a magnified inset showing rotational motion (no text or symbols)natural_image
3D rendering of a multi-tiered storage unit with cylindrical bottles and internal channels (no text or symbols visible)palack
13
11
10
6