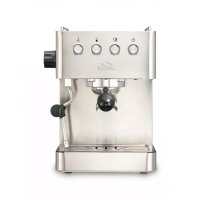
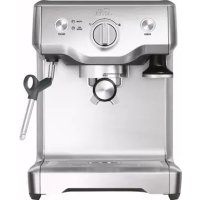
Grind & Infuse Compact 1018 - Coffee machine Solis - Free user manual and instructions
Find the device manual for free Grind & Infuse Compact 1018 Solis in PDF.
User questions about Grind & Infuse Compact 1018 Solis
0 question about this device. Answer the ones you know or ask your own.
Ask a new question about this device
Download the instructions for your Coffee machine in PDF format for free! Find your manual Grind & Infuse Compact 1018 - Solis and take your electronic device back in hand. On this page are published all the documents necessary for the use of your device. Grind & Infuse Compact 1018 by Solis.
USER MANUAL Grind & Infuse Compact 1018 Solis
GRIND & INFUSE COMPACT
Typ/Type/Tipo 1018
Bedienungsanleitung
Mode d'emploi
PROGRAMMARE LA QUANTITA DI CAFFE ESPRESSO
Procedure come sequel:
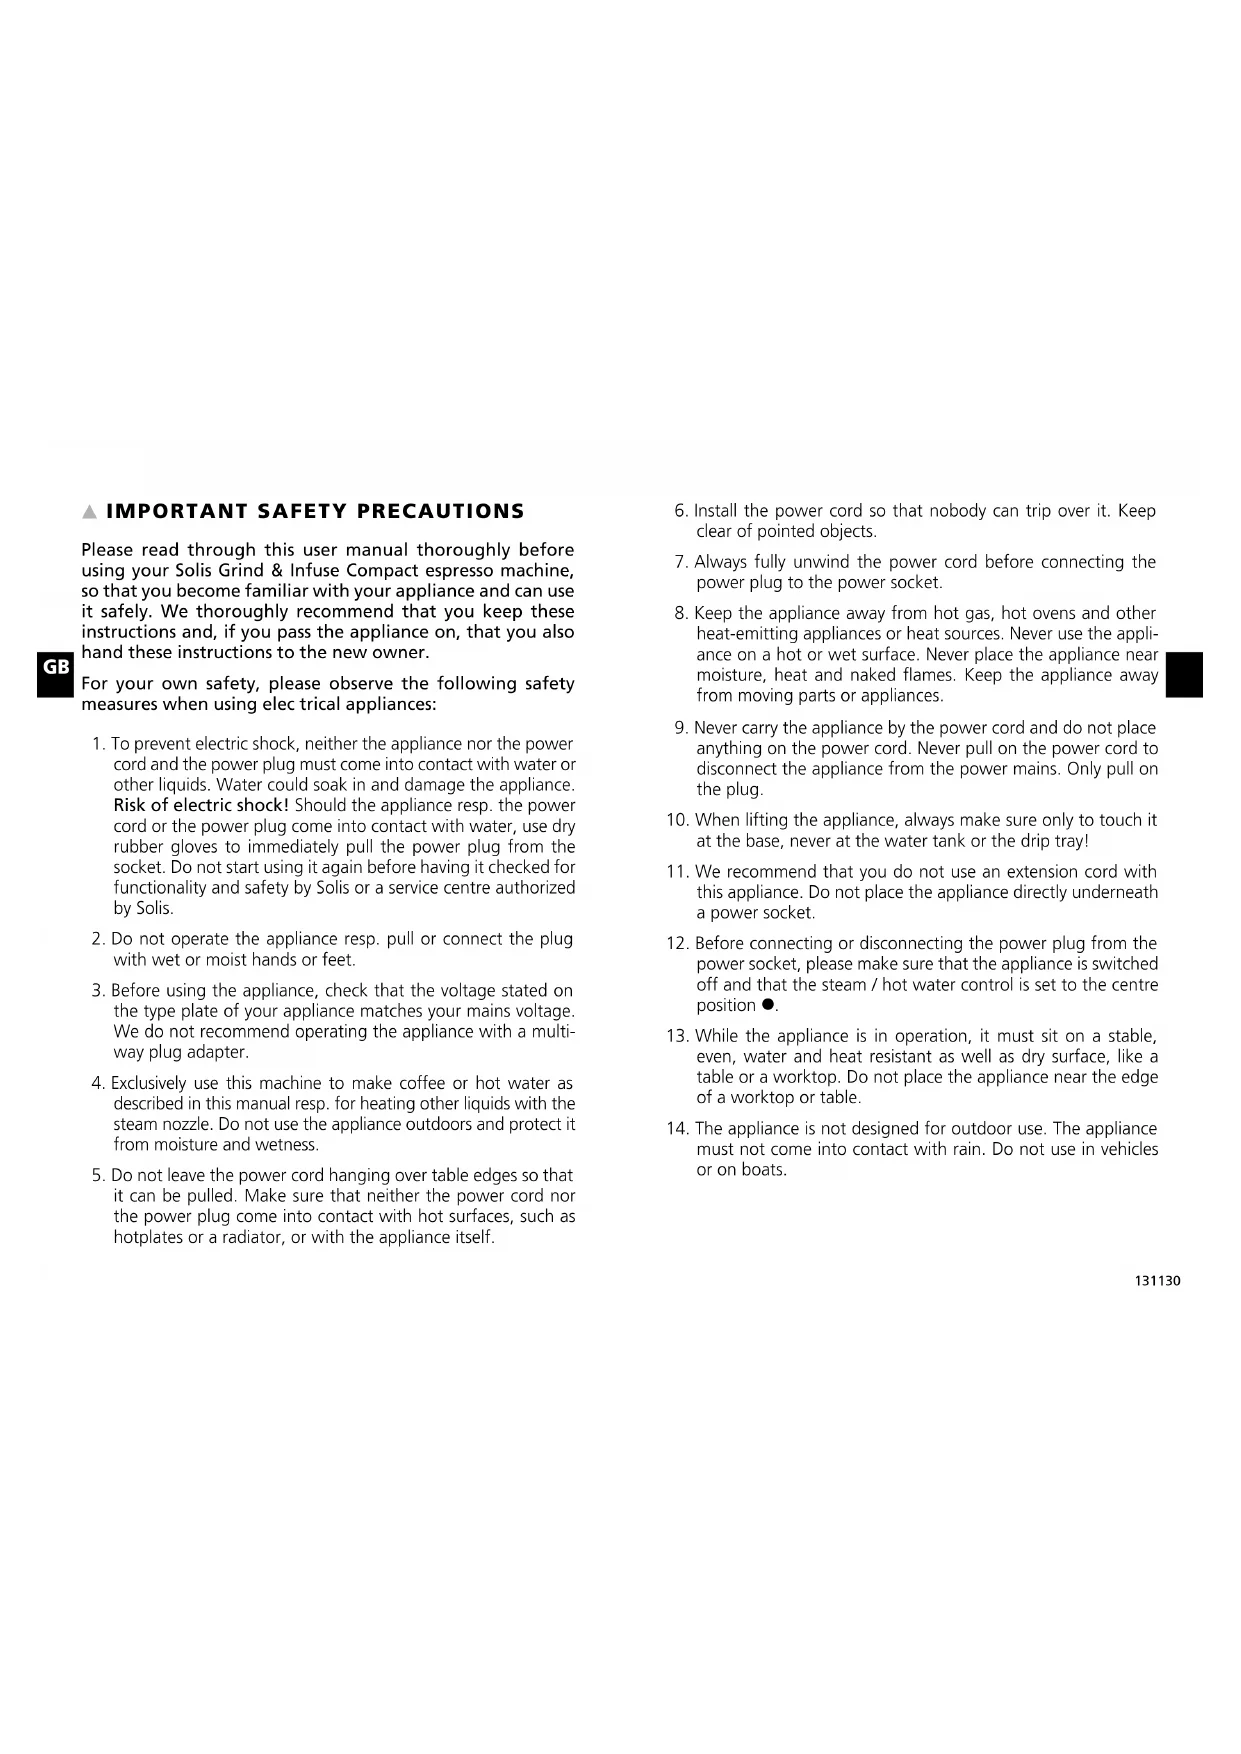
Please read through this user manual thoroughly before using your Solis Grind & Infuse Compact espresso machine, so that you become familiar with your appliance and can use it safely. We thoroughly recommend that you keep these instructions and, if you pass the appliance on, that you also hand these instructions to the new owner.
For your own safety, please observe the following safety measures when using electrical appliances:
- To prevent electric shock, neither the appliance nor the power cord and the power plug must come into contact with water or other liquids. Water could soak in and damage the appliance. Risk of electric shock! Should the appliance resp. the power cord or the power plug come into contact with water, use dry rubber gloves to immediately pull the power plug from the socket. Do not start using it again before having it checked for functionality and safety by Solis or a service centre authorized by Solis.
- Do not operate the appliance resp. pull or connect the plug with wet or moist hands or feet.
- Before using the appliance, check that the voltage stated on the type plate of your appliance matches your mains voltage. We do not recommend operating the appliance with a multiway plug adapter.
- Exclusively use this machine to make coffee or hot water as described in this manual resp. for heating other liquids with the steam nozzle. Do not use the appliance outdoors and protect it from moisture and wetness.
-
Do not leave the power cord hanging over table edges so that it can be pulled. Make sure that neither the power cord nor the power plug come into contact with hot surfaces, such as hotplates or a radiator, or with the appliance itself.
-
Install the power cord so that nobody can trip over it. Keep clear of pointed objects.
- Always fully unwind the power cord before connecting the power plug to the power socket.
- Keep the appliance away from hot gas, hot ovens and other heat-emitting appliances or heat sources. Never use the appliance on a hot or wet surface. Never place the appliance near moisture, heat and naked flames. Keep the appliance away from moving parts or appliances.
- Never carry the appliance by the power cord and do not place anything on the power cord. Never pull on the power cord to disconnect the appliance from the power mains. Only pull on the plug.
- When lifting the appliance, always make sure only to touch it at the base, never at the water tank or the drip tray!
- We recommend that you do not use an extension cord with this appliance. Do not place the appliance directly underneath a power socket.
- Before connecting or disconnecting the power plug from the power socket, please make sure that the appliance is switched off and that the steam / hot water control is set to the centre position
- While the appliance is in operation, it must sit on a stable, even, water and heat resistant as well as dry surface, like a table or a worktop. Do not place the appliance near the edge of a worktop or table.
-
The appliance is not designed for outdoor use. The appliance must not come into contact with rain. Do not use in vehicles or on boats.
-
Keep a minimum safety distance of 20cm between the appliance and walls, curtains or other materials and objects and make sure that the air around the appliance can circulate freely.
- Never cover the appliance with cloths or the like while it is in use. Do not place anything on top of the appliance, except for cups to preheat them.
- Always switch off the appliance by pressing the ON/OFF switch and unplug it if the appliance is not in use or left unattended, and before cleaning. We recommend the use of a residual current device (RCD safety switch) to provide additional protection during the use of electrical appliances. It is advisable to use a safety switch with a rated residual operating current of 30mA maximum. For professional advice consult an electrician.
- Do not make any adjustments to the appliance, cord, plug or accessories.
- Incorrect use may cause injury!
- Never reach for an appliance that has fallen into water or other liquids. Always use dry rubber gloves to pull the plug before taking it out. Do not start using it again before having it checked for functionality and safety by Solis or a service centre authorized by Solis.
- Never place the appliance in such a way that it might fall into water or come into contact with water (e.g. in or next to a sink).
- Never submerge the appliance itself or parts of the appliance (except for the water tank) like power cord or plug in water, or bring it into contact with water or other liquids.
- Place the appliance so that it is never exposed to direct sunlight.
-
Never put sharp or pointed objects and tools into the appliance openings. The appliance may become damaged - danger of electric shock!
-
Always switch the appliance off with the ON/OFF switch and disconnect the power plug before attaching or removing parts. This also applies when removing the water tank or filling water into the water tank without taking the water tank off the appliance.
- Do not shake or relocate the appliance while it is in operation. Always switch the appliance off and pull the plug before moving it.
- Only use the appliance as described in this manual. Only use with the provided accessories or accessories recommended by Solis, incorrect accessories or misuse can lead to damage of the appliance, to fire, electric shock or personal damage.
- Never use the appliance with a remote control or an external timer switch.
- Always make sure that the appliance is correctly assembled before connecting it to a power socket and starting to use it.
- This appliance is only for household use and is not suitable for commercial use.
- Remove and discard all packaging materials and potential stickers or labels (except for the type plate) before using the appliance for the first time.
- Check the appliance before each use and ensure that the appliance, power cord and plug are not damaged and no parts have come loose.
-
In order to avoid electric shock, do not use the appliance if the power cord or plug are damaged or the appliance is otherwise faulty, dropped or damaged or if parts have come loose. Never attempt repairs yourself, except cleaning and descaling the appliance, but take your appliance to Solis or a Solis approved service centre in order to get it inspected or mechanically and electrically repaired, in order to avoid a hazard.
-
People with limited physical, sensorial or mental capabilities as well as unknowing or inexperienced people and children must not use the espresso machine except when supervised or thoroughly instructed on how to use the appliance by a person responsible for their safety. Additionally, they must be aware of the dangers arising from the appliance and know how to operate it safely. Cleaning and user maintenance shall not be made by children unless they are older than 8 and supervised. Under no circumstances must the appliance be used or cleaned by children under the age of 8. The appliance and its power cord have to be kept away from children under the age of 8.
- Always keep the appliance and power cord out of the reach of children. Also keep the cleaning tool away from children - risk of swallowing and injury!
- Children must be supervised, so that they do not play with the appliance.
- Pull the plug after every use. Only then, the appliance is fully switched off.
- Use only cold tap water in the water tank. Do not use any other liquid. Under no circumstances fill the water tank with carbonated water. Do not overfill the water tank (respect the MAX marking) and never fill the tank with warm or hot water.
- Never operate the espresso machine while the water tank is empty, the pump might overheat!
- Always make sure to correctly insert the portafilter into the brewing head before using the appliance to make coffee.
-
Never touch the hot appliance parts like the steam / hot water wand, the metal part of the portafilter, the brewing head or the filter insert during or shortly after use. Only touch the heat insulated handles, buttons or selectors.
-
If you wish to make another cup of coffee, wait at least 10 seconds after the coffee extraction has finished before taking off the portafilter. The appliance has to be switched back to the operating mode before the portafilter is removed, meaning all function buttons constantly have to glow white. CAUTION: The portafilter, the brewing head, the filter insert and the coffee dregs mixed with hot water are very hot!
- Never take the portafilter off while the appliance performs a brewing process - the appliance is pressurised!
- If water keeps running from the top of the portafilter during use, the portafilter might be clogged up. In this case, switch the appliance off and let it cool down before carefully twisting the portafilter out of the machine - the remaining pressure could cause hot splashes. Then, clean the filter insert as described in the chapter "Cleaning".
- The water tank must never be removed while the appliance is completing a function!
- Never point the steam / hot water wand towards people, animals or steam- resp. moisture sensitive items! The escaping steam resp. the water is very hot and could cause scaldings! Touch the steam / hot water wand only by the thermo-insulated loop.
- Do not leave the espresso machine unattended when in use. This applies especially when children are nearby.
- CAUTION: The appliance becomes very hot during use! Allow the appliance to cool down before removing or attaching parts, moving, relocating or cleaning it.
- Only cups may be placed on the cup tray. Do not place any other items on the appliance.
-
Fill the filter insert in the portafilter only with ground coffee, never with any other substances.
-
Never use the appliance while the bean container is empty. Only fill whole coffee beans into the bean container, never fill it with ground coffee. Do not activate the grinder without having placed the lid on the bean container first. Keep fingers, hands, hair, clothing, jewellery and tools away from the bean container during use. If you want to adjust the grind size, do so only while the grinder is running!
-
Keep the appliance and accessories clean. Please refer to the information given in the manual.
- Oils or lubricants must not be used with this appliance.
- The ambient temperature for use and storage should not come below 0^ - the espresso machine might be damaged.
- The coffee-maker shall not be placed in a cabinet when in use.
-
This appliance is designed for domestic use as well as for similar uses, e.g. in:
-
employee kitchens in shops, offices or other working environments,
-farm houses,
hotels, motels and other holiday homes / residencies (to be used by customers),
bed & breakfast houses,
it is not designed for commercial use.
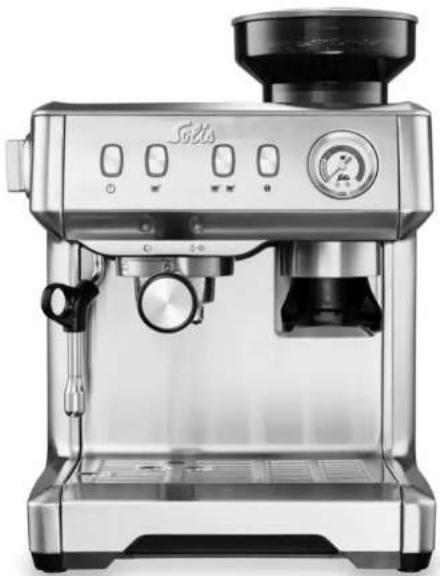
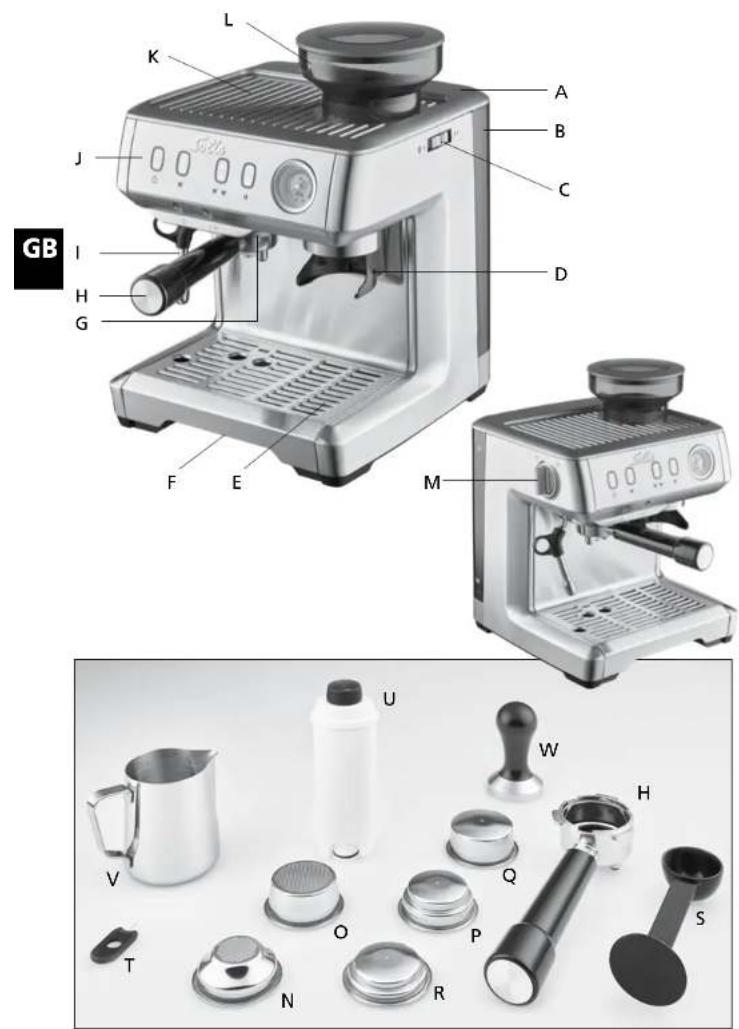
APPLIANCE DESCRIPTION
A Water tank lid
B Water tank for 2,5 litres, removable, with MIN and MAX marking and water filter bracket
C Grind size adjustment rotary wheel
D Portafilter bracket, with the grinder and the coffee ejection port above
E Drip grid, removable
F Drip tray, removable, with inlying red float gauge, indicating that the drip tray is full
G Brewing group with brewing head
H Portafilter with two outlets
I Adjustable steam / hot water wand with thermo-insulated loop and detachable steaming nozzle
J Control panel with function buttons (refer to separate instructions)
K Cup tray
L Bean container with lid
M Steam / hot water control
■ ACCESSORIES
H Portafilter with two outlets
N Single wall filter insert for one cup
O Single wall filter insert for two cups
P Double wall filter insert for one cup
Q Double wall filter insert for two cups
R Filter insert for compact 44 mm pods
S Plastic tamper with measuring spoon
T Cleaning tool
U Solis water filter
V Stainless steel milk jug
W Metal tamper
THE CONTROLS, FUNCTION BUTTONS, LIGHTS AND THE PRESSURE DISPLAY ON THE CONTROL PANEL
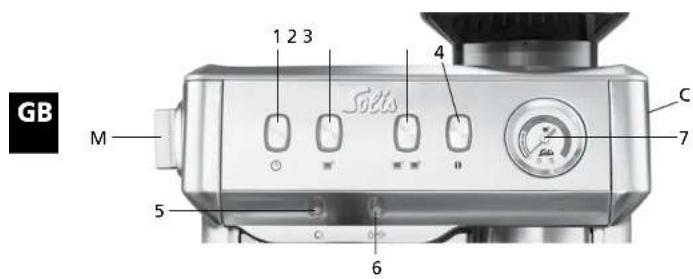
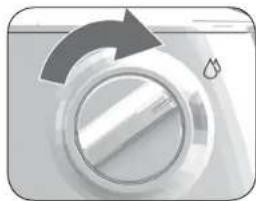
M STEAM / HOT WATER CONTROL
The steam / hot water control should be set to the neutral position in the centre as a starting position, meaning before the appliance is switched on or off. In this position, espresso can be prepared.
- When the appliance is switched on and you turn the steam / hot water control to the left, to the position, the steam / hot water light starts flashing and steam escapes from the steam / hot water wand. Use it to steam milk or heat beverages. Steam is discharged through the wand for as long as the control is set to the corresponding position. You can find detailed information on pages 156-157.
- When the appliance is switched on and you turn the steam / hot water control to the right, to the position, the steam / hot water light lights up constantly and hot water is discharged through the steam / hot water wand. Hot water is discharged through the wand for as long as the control is set to the corresponding position. You can find detailed information on page 157.
1 ON/OFF BUTTON
Use this button to switch the machine on or off. When you switch on the machine, the function light in the On/Off switch flashes. As soon as the machine has reached the operating temperature, all four function lights of the buttons and , , , ) light up constantly. Caution: During the heating process, the machine performs an automatic rinsing cycle to clean and preheat the components. Hot water escapes from the brewing head. During this process, keep your hands and other body parts as well as any items away from the area underneath the brewing head resp. the potentially inserted portafilter.
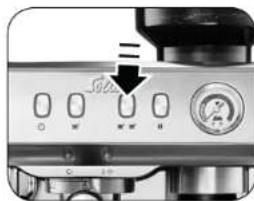
2 COFFEE EXTRACTION BUTTON FOR 1 CUP
Use this button to start coffee extraction for 1 cup (briefly press button) or to individually adjust the amount of coffee (press and hold button). You can find detailed information on page 153.
3 COFFEE EXTRACTION BUTTON FOR 2 CUPS
Use this button to start coffee extraction for 2 cups (briefly press button) or to individually adjust the amount of coffee (press and hold button). You can find detailed information on page 153.
4 GRINDING FUNCTION BUTTON 0
Use this button to activate the grinding function: Pressing the button once grinds coffee powder for one cup, pressing the button twice in a row grinds coffee powder for two cups. Additionally, you can use this button to individually adjust the amount of ground coffee. You can find detailed information on page 151.
5 DESCALING WARNING LIGHT C
If this button lights up, a descending cycle has to be performed. You can find detailed information on pages 164-165.
6 FUNCTION LIGHT FOR STEAM / HOT WATER FUNCTION
This function light flashes when the steam / hot water control is set to the steam position
This function light lights up constantly when the steam / hot water control is set to the hot water position.
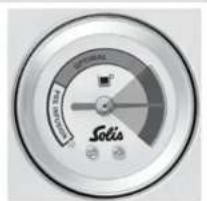
7 PRESSURE GAUGE (MANOMETER)
The pressure gauge indicates if the relation of water quantity, ground coffee quantity and grind size is well balanced so that optimal espresso is prepared.
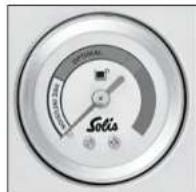
1. phase: Pre-infusion (pre-brewing phase)
At the start of the brewing process, the ground coffee is moistened. The machine works at low pressure, the pressure gauge should indicate a value somewhere in the PRE INFUSION range.
2. phase:Espresso extraction (brewing phase)
In the second phase, the pressure is continually increased. The extraction pressure is ideal when the pressure needle indicates a value somewhere in the OPTIMAL range.
The needle is in the PRE INFUSION range throughout the extraction phase: If the needle is in the PRE INFUSION range during extraction, the water is forced through the portafilter at insufficient pressure (too quickly). The coffee turns out watery and has a lightly coloured or not enough crema and may taste acid. Reasons for this might be: too coarsely ground coffee, insufficient amount of ground coffee in the portafilter, the ground coffee has not been tamped firmly enough or too old ground coffee.
The needle is in the red area throughout the extraction phase:
If the needle is in the red area during extraction, the water is forced through the portalfilter at excessive pressure (too slowly). The coffee turns out bitter and has a dotted or irregular crema. Reasons for this might be: too finely ground coffee, too much ground coffee in the portalfilter or the ground coffee has been tamped too firmly.
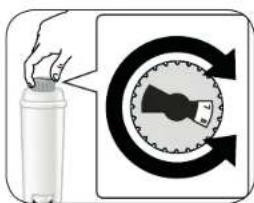
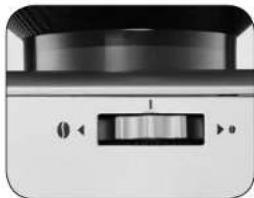
C GRIND SIZE ADJUSTMENT ROTARY WHEEL
- Use the rotary wheel to adjust the grind size of the coffee beans. Settings between 1 and 11 are possible. The higher the number, the coarser the grind will be. This means that the grind is finest in the setting 1 and coarsest in the setting 11. We recommend starting with the setting 8 and experimenting with different settings to determine which grind size you like the best. The grind size has a crucial effect on the taste and the crema of the espresso.
CAUTION: The grind size must only be adjusted while the grinder is running.
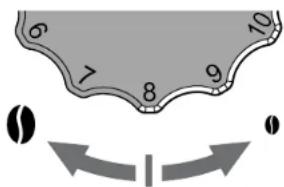
- Turn the rotary wheel to the left for a coarser grind (and to the right for a finer grind ()
NOTE: After the grind size is adjusted, the coffee powder is not immediately ejected in the newly selected grind size. This is because there will always be previously ground coffee remaining in the ejection channel. Therefore, you should use the grinding function a few times before changing the setting again.
BEFORE FIRST USE
A. CLEANING THE APPLIANCE
- Carefully take the appliance out of its packaging and remove all stickers, labels (except for the type plate) and packaging materials.
Take all accessories out of the packaging and remove all accessories from the appliance. - Remove the water tank. Never lift the water tank just by its lid. Instead, take hold of it on both sides to lift it up.
Clean the water tank with the lid, the tampers and the filter inserts as well as the portafilter, the milk jug and the lid of the bean container with warm water and some mild liquid dishwashing soap. After that, rinse with clear water and dry. - Wipe the chassis of the espresso machine, the inside and outside of the bean container and the drip tray with the drip grid with a soft, slightly moist towel and dry everything.
Make sure that the steam / hot water control is turned shut, meaning it is set to the position in the centre (●-position).
CAUTION: The chassis of the espresso machine, the grinder, the power cord and the power plug must never be submerged in water or any other liquids or come into contact with them!
NOTE: The parts of the espresso machine and the accessories are not dishwasher safe.
B. WATERING THE SOLIS WATER FILTER AND INSTALLING IT IN THE TANK
Thanks to the Solis water filter, the limestone deposits in the espresso machine are reduced, increasing the life cycle of the machine and improving the performance concerning the brewing pressure and brewing temperature as well as refining the aroma of your coffee.
CAUTION: Only use Solis water filters for this appliance (art. no. 700 86) and never use the appliance without a water filter!
Take the water filter out of the packaging.
- Adjust the blue cap so that the number of the next two months can be read in the opening. These are the months during which the water filter will be in use. Like that, you know when the water filter has to be replaced (e.g. in July, set the month number "7/8" for July/August).
NOTE: When the espresso machine is used in a normal way, the life cycle of the water filter is 2 months. If the machine is only used irregularly or not at all while the water filter is installed, the life cycle is only 3 weeks!
To start using the water filter, let at least half a litre of cold tap water run through the opening of the water filter, until water escapes from the openings on the side for at least one minute.
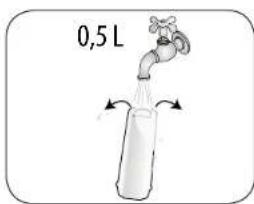
Take the rinsed water tank off of the appliance, fold open the lid towards the curved side of the tank and fill the water tank with cold tap water up to the MAX marking.
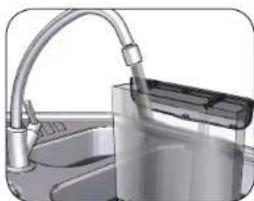
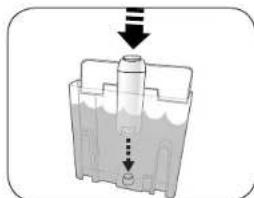
- Submerge the water filter in the tank: It should be fully submerged in water for at least 10 seconds. Slightly tilt the water filter towards one side and gently squeeze the water filter so that the remaining air can escape.
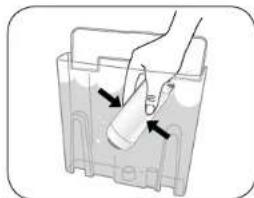
- Now, install the water filter into the designated bracket on the bottom of the water tank with the blue date cap facing upwards. Push the water filter down to make sure that it is properly installed.
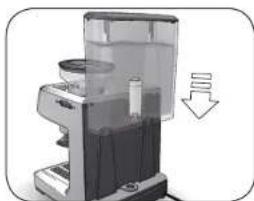
- Close the tank lid and place the water tank on the back of the appliance with both hands so that it slides down both guide rails, lying flat against the back of the appliance.

C. RINSING THE MACHINE
In order to rinse the inside of the machine, you should let a tank full of water run through the machine before the initial startup. Proceed as follows:
1. After the Solis water filter has been installed in the water tank, insert the full water tank into the machine.
Tip: You can also leave the water tank in the appliance during subsequent fillings and refill it with water from above. Remember that the appliance must be disconnected from the power supply, i.e. the power plug must be disconnected. Also make sure to pour the water only into the tank. Spilled water has to be wiped away with a towel immediately.
- Plug the power plug into a suitable power socket. The steam/hot water control must be in the central position.
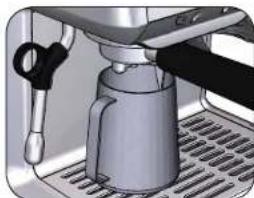
- Screw the portafilter without the filter insert into the brewing head. The handle of the portafilter is first positioned to the left, below the symbol, and is then turned to the right all the way to the stop below the symbol.
- Press the On/Off button, the function light in the button starts to flash. Once the operating temperature is reached, the function lights of all four buttons and light up constantly.
NOTE: During the heating-up phase, approx. 60ml of hot water are discharged through the portafilter resp. the brewing head! Make sure that you do not hold your hands or other parts of your body or heat-sensitive or water-sensitive objects under the brewing head during this time. This rinsing process starts only if the appliance was allowed to cool down entirely. If the appliance is still slightly warm, the rinsing cycle is automatically skipped.
NOTE: Always make sure that the steam/hot water control is in the central position, otherwise the appliance will not heat up. In this case, the function light of the On/Off button flashes quickly.
Note: When the hydraulic circuit of the appliance is empty, all four buttons flash simultaneously. To prepare the appliance for further use, please refer to chapter "Water tank runs empty during use" on page 155.
- Place the supplied milk jug under the portalfilter, on the drip tray.
- Press the button. Wait for water to run through the portafilter and then for the water flow to stop.
- Place the empty milk jug under the steam / hot water wand.
- Turn the steam / hot water control to the right, to the hot water function
-
Wait for hot water to run through the steam / hot water wand. Stop the hot water function by returning the steam / hot water control to the central position
-
Repeat steps 5 through 9 until the water in the water tank is used up.
Now, your appliance is ready for use.
NOTE: Always rinse your machine as described if your appliance was not in use for a couple of days. The water tank is empty of water if you can hear a vibration and a louder pumping noise. All four function lights of the buttons (O and flash simultaneously. To make the appliance ready for use again, please read the chapter "Water tank runs empty during use" on page 155.
STARTING UP: MAKING ESPRESSO
NOTE: Check the water level in the water tank before every use. Change the water daily. Follow the MIN- and MAX-markings on the tank. Do not use any distilled or carbonated water, soda or other liquids.
1. CHOOSING THE RIGHT FILTER
Single wall filter inserts
GB
The single wall filter inserts are ideal for freshly ground coffee and if you want to try to make your espresso as professionally as possible. Thanks to the single wall filter inserts, you can experiment with grind size, dosage and tamping pressure to influence the taste of your coffee to make the ideal coffee for yourself.
There is one single wall filter insert for one cup and one for 2 cups.
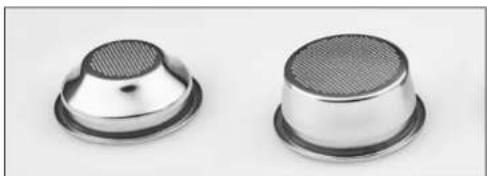
1 cup 2 cups
Double wall filter inserts
The double wall filter inserts are ideal e.g. for pre-ground coffee and if you want to make sure that the espresso turns out good without much experimentation. Double wall filter inserts optimise the extraction pressure, making sure that the espresso tastes nice.
There is one double wall filter insert for one cup and one for 2 cups.
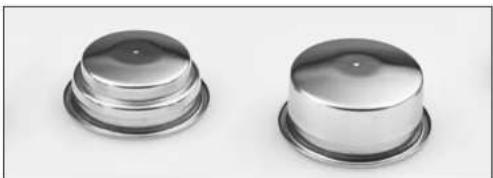
1 cup 2 cups
Filter for compact 44 mm pods
If you want to use compact pods, use the filter insert for pods.
Place the coffee pod in the centre of the filter insert as precisely as you can and place the pod handling paper inside the filter. Read the instructions on the packaging of the pods.

- Push the selected filter insert into the portafilter so that it locks into place.
2. RINSING AND PRE-HEATING THE MACHINE
To make the first cup of espresso a hot pleasure, we recommend briefly rinsing the machine and the portafilter with an empty filter insert. Of course, this is not necessary if you have just carried out the rinsing process described in the chapter "Before first use" or if you have already prepared an espresso.
- Switch the appliance on with the On/Off button. The On/Off button flashes, the appliance heats up and then performs an automatic rinse cycle to clean and preheat the components. Hot water escapes from the brewing head. Make sure that you do not hold your hands or other body parts or heat-sensitive resp. water-sensitive objects under the brewing head during this process. As soon as the operating temperature is reached, the function lights of all buttons (and light up constantly.
To preheat the portafilter and the filter insert, place the filter insert in the portafilter without filling it with coffee powder. Turn the portafilter into the brewing head as described below. If you also want to warm up the cups, place them underneath the portafilter. Push the button and wait for the function to finish. - Turn the portafilter out of the brewing head and carefully dry the portafilter and the filter insert before pouring ground coffee into the filter insert.
CAUTION: It is normal for small amounts of steam to escape from the brewing head or portafilter during the heating phase.
3. GRINDING COFFEE INTO THE FILTER INSERT AND TAMPING IT
NOTE: The heating function of the appliance is stopped and the extraction functions for espresso, hot water and steam are unavailable while the grinding function is in operation.
- Check if the grind size rotary wheel is set to the desired number. Generally, a higher number represents a coarser grind. For more information, refer to page 142. We recommend starting with the setting "8" and gradually experimenting with different grind sizes until the extracted espresso perfectly suits your taste.
CAUTION: The grind size must only be adjusted while the grinder is running.
- Fill the bean container with fresh whole coffee beans. Close the container with the lid. Do not overfill the container with beans to make sure that the lid can be completely closed.
Tip: If you fill the container with a little less coffee beans, the coffee beans remain in the original packaging stay fresh for longer.
- Place a filter insert of your choice in the portafilter (do not use the filter insert for pods).
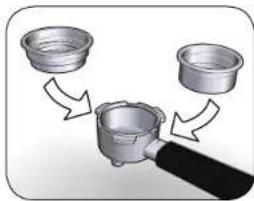
- Push the portafilter with the filter insert into the bracket underneath the grinder.
- Press the grinding button (1) Press the grinding button once to grind the amount of coffee required for one cup. Press the grinding button twice to grind the amount of coffee required for two cups. ATTENTION: For two cups, the grinding button has to be pressed twice within a timeframe of 1,5 seconds! During the grinding process, the function light of the grinding button flashes rapidly.
NOTE: If you want to stop the grinding before the pre-set time has elapsed, press the grinding button again.
PROGRAMMING THE AMOUNT OF GROUND COFFEE
Just like the grind size, the amount of ground coffee is crucial to the coffee taste and the crema. Here, too, you can change and individually adjust the factory settings.
For 1 cup: Press and hold the grinding button until the amount of ground coffee in the filter insert suits you perfectly. This new time setting is then saved and the next time you briefly press the button, the new amount of ground coffee is ejected.
For 2 cups: Press the grinding button twice and on the second press of the button, hold it until the amount of ground coffee in the filter insert suits you perfectly. This new time setting is then saved and the next time you briefly press the button twice, the new amount of ground coffee is ejected.
NOTE: Depending on the grind size, a different amount of ground coffee is ejected. Therefore, every time you adjust the grind size, the amount of ground coffee has to be reprogrammed manually as well if you want to deviate from the standard setting.
- Pull the portafilter out of the bracket and gently knock the portafilter against the worktop to evenly spread the ground coffee around the filter insert. Use the tamper to tamp the ground coffee into the filter insert. Make sure that the ground coffee does not exceed the edge of the portafilter, otherwise the portafilter cannot be screwed into the brewing group.
- Remove any excess coffee powder on the edge of the portafilter to make sure it can be properly inserted into the brewing head.
CAUTION: If the edge of the portafilter is not clean, the portafilter cannot be screwed tightly into the brewing head and water might run out past the portafilter.
CAUTION: When using compact 44 mm pods, simply place them in the centre of the corresponding filter insert (R). In that case, tamping is not necessary.
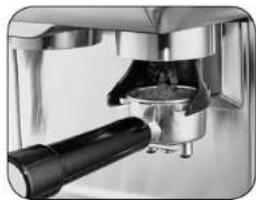
4. INSERTING THE PORTAFILTER
Make sure that the steam / hot water wand is pushed all the way back.
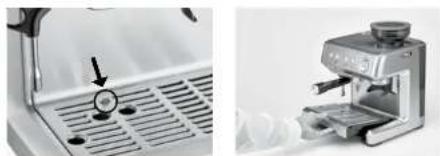
Now, press the button without the portafilter inserted to remove coffee residues from the brewing head. You can press the button again after a few seconds to stop the flow of the water.
- Insert the portafilter with the filter insert and the ground coffee resp. the pod into the brewing head: At the start, the handle is positioned on the left side, underneath the symbol on the brewing head.
Press the portafilter up and against the brewing head and turn the handle all the way to the right, so that the handle is at a 90^ angle to the machine, positioned underneath the symbol on the brewing head.
CAUTION: You should be able to turn the portafilter all the way to the right without much effort. Should this not be the case, you have to remove the portafilter again and reduce the amount of coffee powder to allow the portafilter to be easily screwed in. As the portafilter is under high pressure while the coffee is being brewed, it might come loose if it is not screwed in all the way. Disregard means a high risk of burning.
5. MAKING ESPRESSO
- Place one or two empty cups (ideally pre-heated on the cup shelf or with a previous rinse cycle) on the drip grid, underneath the spouts of the portafilter.
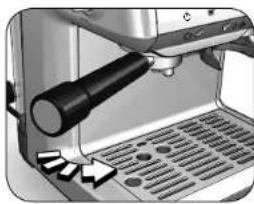
- When the lights of the four function buttons light up constantly, press the button. The espresso extraction starts, the function light of the button that was pressed lights up.
NOTE: Check if the needle of the pressure gauge first is positioned in the PRE INFUSION range and then rises to the OPTIMAL range while the espresso is extracted. Please read the chapter "pressure gauge - manometer" on page 141/142.
If you want to stop the coffee extraction before the machine stops it automatically, press the corresponding button (or or
PROGRAMMING THE AMOUNT OF ESPRESSO
You can not only program the grind size and the amount of ground coffee but also the duration of the coffee extraction, meaning the amount of espresso in your cup. Obviously, this also affects the strength and the crema of your espresso.
You have to adjust the amount of coffee while the espresso is running into the cup.
How to program the amount of coffee:
Press and hold the or buttons until the desired amount has been issued instead of just pressing the buttons briefly. Then, let go of the button, the new amount of coffee has been saved.
CAUTION:
Never leave the espresso machine unattended while brewing espresso!
Never touch the hot surfaces of the espresso machine. You could scald yourself! Especially the portafilter, the brewing head, the filter insert and the steam / hot water wand are very hot during and after use!
Never remove the portafilter while coffee is being dispensed!
After coffee extraction, wait for at least 10 seconds before screwing the portafilter out of the brewing head. To do that, slowly turn the portafilter to the left to prevent splashes of hot water or coffee.
Briefly let water run through the brewing head - without the portafilter inserted - to clean the inside of the machine and prevent limestone deposits. To do that, press the button and let the water run for a few seconds, then press the button again to stop the running water.
SPECIAL NOTES ON THE USE OF PODS
If you want to use pods for making your espresso, place them in the centre of the filter insert for pods (R). Make sure that all of the pod paper is in the filter insert and that no paper protrudes over the edge of the filter insert. Please follow the instructions on the pods packaging. Turn the filter insert into the brewing head as described above.
CAUTION: If the pod is not placed in the centre of the filter insert, the portafilter cannot be completely screwed into the brewing head and a few drops of hot water may drip from the portafilter.
If you unscrew the portafilter from the brewing head after the coffee has been extracted, the pod may stick to the brewing head. To remove it from there, tilt the portafilter slightly and tap the pod to release it so that it falls into the portafilter.
6. REMOVING THE FILTER INSERT FROM THE PORTAFILTER
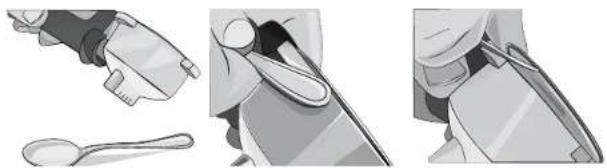
- When the portafilter with the filter insert has cooled down slightly, you can remove the filter insert using a teaspoon handle. Slide the handle underneath the filter edge and lever the filter insert out of the portafilter.
7. PREPARE MORE ESPRESSI
Your Solis Grind & Infuse Compact espresso machine is equipped with an electronic system that allows you to brew several espressi in a row, always ensuring the perfect brewing temperature. If you press the corresponding button (or respective function light flashes until the appliance has cooled down again. As soon as the function light is constantly illuminated, the espresso is extracted.
ENERGY-SAVING FUNCTION: AUTOMATIC SHUTDOWN
Your Solis Grind & Infuse Compact espresso machine is equipped with an automatic shutdown to save energy. This switches the machine off automatically if it is not used for approx. 30 minutes. If you want to put the appliance back into operation, press the On/Off button and wait until all four function lights of the buttons (O and p) light up constantly again.
WATER TANK RUNS EMPTY DURING USE
Always check the water level in the water tank and fill the water tank daily. When the tank runs empty, your appliance vibrates and the operating noise becomes noticeably louder. The four function lights of the buttons (O and I, F, F, F, F, F, F, F, F, F, F, F, F, F, F, F, F, F, F, F, F, F, F, F, F, F, F, F, F, F, F, F, F, F, F, F, F, F, F, F, F, F, F, F, F, F, F, F, F, F, F,
In this case, switch off the appliance with the On/Off button and disconnect the power plug. Remove the portafilter from the brewing group. Fill the tank with fresh, cold tap water up to the MAX marking and reconnect the power plug. Switch the appliance on again with the On/Off button. Check that the steam / hot water control is in the central position. Wait until the function lights of the four buttons (O and light up constantly again and the appliance has reached its operating temperature.
- Place the milk jug under the steam/hot water wand.
Turn the steam/hot water control to the right, to the hot water function
The steam/hot water function light illuminates constantly. Leave the hot water function switched on until the circuit has filled up with water and the hot water runs normally out of the steam/hot water wand.
Then, turn the steam/hot water control back to the central position. If the four function lights (O and , s) flashing, please repeat this process.
The appliance can be put back to normal use.
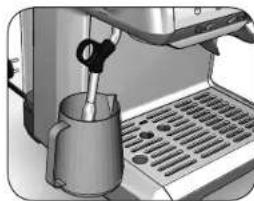
STEAMING MILK FOR CAPPUCCINO / CAFFE LATTE
The steam / hot water wand with the steaming nozzle of your Solis Grind & Infuse Compact espresso machine turns fresh, cold milk into creamy, warm frothed milk. Use it to create delicious cappuccino or latte.
Please proceed as follows:
GB
In a larger cup, make an espresso.
Wait 10 seconds and turn the portalifiter out of the brewing head.
ATTENTION: The portafilter must always be removed before the steam or hot water function is switched on!
It is completely normal for some steam to escape from the brewing head.
Only touch the steam/hot water wand by the rubber loop!
To flush any residual water out of the steam wand, place a tall container underneath the steam/hot water wand.
When all four function lights of the buttons and constantly illuminated, turn the steam/hot water control to the left to the steam function. The steam/hot water function light flashes to indicate that steam is being released. First, a small amount of hot water escapes, then a strong jet of steam follows. Stop the steam function by turning the steam/hot water control to the central position. Pour away the water in the container.
Pour fresh, cold milk from the refrigerator into the milk jug. Remember that the volume of cold milk will double when it is frothed.
Lower the steam/hot water wand deep into the milk and slowly turn the steam/ hot water control to the left to the steam function. The corresponding function light flashes. Steam escapes, quickly frothing the milk. Move the milk jug up and down, gently turning it until a nice, creamy milk froth has formed.
- Turn the steam/hot water control back to the central position ● to stop the steam function.
Take the milk jug away and gently tap it onto a work surface to allow any air bubbles to escape and gently shake the jug to even out the consistency.
Wipe the steam/hot water wand clean with a damp cloth. Using the loop, swivel the wand over the drip tray and turn the steam/hot water control back to the steam function. Let some steam escape into the drip tray to flush the residual milk out of the wand. Then turn the steam/hot water control back to the central position.
Pour the frothed milk directly onto the espresso.
CAUTION: Never touch the hot surfaces of the espresso machine especially the one of the steam / hot water wand during and after the steam function. You could scald yourself! Never point the steam / hot water wand towards persons, animals or steam and moisture sensitive furniture! The escaping steam is very hot and could cause scaldings!
HEAT WATER OR BEVERAGES USING THE STEAM FUNCTION
You can also use the steam function and the steam / hot water wand to heat water or beverages (e.g. hot chocolate).
HOT WATER FUNCTION
If you turn the steam / hot water control to the right to the hot water function hot water is discharged through the wand. Use it e.g. to make tea or refilling the water cycle with water after the water tank has run dry.
Please proceed as follows:
CAUTION: The portafilter always has to be removed before the steam or hot water function is switched on!
- Place a container or the milk jug underneath the steam / hot water wand.
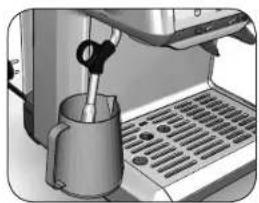
Turn the steam / hot water control to the right to the hot water function The steam / hot water function light constantly lights up white, indicating that hot water is being discharged. The hot water escapes through the steam / hot water wand.
To stop the hot water function, return the steam / hot water control to the central position. The corresponding function light goes out.
CAUTION: Never touch the hot surfaces, especially not the steam / hot water wand, while the hot water function is active. You could burn yourself!
TIPS FOR THE PERFECT ITALIAN ESPRESSO
The coffee beans, the grind size, the amount of ground coffee, the pressure at which the coffee powder was tamped into the filter insert as well as the extraction time are crucial factors for a perfect espresso. Furthermore, they determine whether it is stronger or less strong and which kind of crema develops. You can experiment with these factors to create the espresso that perfectly suits your taste.
If you choose a finer grind size, you have to fill a larger amount of coffee into the filter insert. However, you have to tamp the coffee less firmly. Otherwise, the water will not be able to flow through the ground coffee even when the pressure is high.
If you select a larger grind size, you should fill a smaller amount of coffee into the filter insert. If you do that, you have to tamp the coffee more firmly. Otherwise, the water runs through the ground coffee too quickly.
The ground coffee always has to be tamped.
Always store the coffee beans in an airtight, closed container, protected from moisture and in cool surroundings. A vacuum pack would be perfectly suited. Buy coffee beans in small packaging units to reduce storage time and do not keep more than a weeks' worth of beans.
| Grind size | Dosage Tamping Cycle time | |||
| Strong espresso, bitter, small amount | Too fine | Too much ground coffee | Too firm | More than 20 seconds (■) More than 30 seconds (■●) |
| Optimally balanced espresso | Optimal | 8-10 g (1 cup) 15-18 g (2 cups) | Optimal | 13-18 seconds (■) 20-30 seconds (■●) |
| Watery espresso | Too coarse | Too little ground coffee | Too light | Less than 10 seconds (■) Less than 20 seconds (■●) |
Remember: The pressure gauge needle should always be within the OPTIMAL range during extraction. See also the information on pages 141/142 and 159.

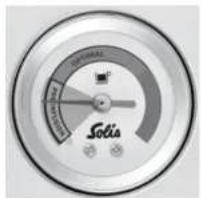
Optimal pressure Pressure too low Pressure too high
Espresso is dispensed after 4-7 seconds
The espresso flows out slowly, the temperature is high. The crema is brown and dense
The espressor is dark brown
Espresso is dispensed after 1-3 seconds
The espresso flows out quickly and is watery
Thecrema is light and thin The espresso is light brown, it tastes bitter and not intense.
Espresso is dispensed after 7-8 seconds
The espresso flows out slowly and not all the way to the end The crema is dark or entirely missing
The espresso is dark brown, it tastes bitter and burnt
After the espresso is extracted, remove the portafilter and let water run through the brewing head to clean the internal water circuit and preventing quick calcification.
Select a finer grind size or increase the amount of ground coffee resp. tamp the ground coffee into the filter insert more firmly.
Select a larger grind size or reduce the amount of ground coffee resp. tamp the ground coffee into the filter insert less firmly.
IF THE GRINDER IS BLOCKED
Should the grinder be blocked, this might be caused by contaminated coffee beans (e.g. little stones).
Please proceed as follows:
- Switch the appliance off with the On/Off button and disconnect the power plug to resolve the blockade.
- Remove the ground coffee left in the portafilter.
Turn the grind size rotary wheel to the left (1) to select the largest grind size: 9, 10 or 11. Remove all coffee beans out from the bean container. Coffee beans that might be stuck in the bean container can be removed with a vacuum cleaner.
The contaminations that have caused the blocking fall out of the grinding cones.
- Reconnect the appliance to the power mains and switch it on with the On/Off button.
- Place a container underneath the grinder resp. the bracket.
- Briefly press the grinding button (O once.
If the motor of the grinder can turn freely, ground coffee falls into the container. Throw this ground coffee away.
- Press the grinder button again and turn the rotary wheel back to the previous grind size setting. If the ground coffee is too coarse, you might need to throw that ground coffee away as well.
Now, make espresso like you normally do.
CAUTION: If the grinder is still blocked and can not be made to run, press the On/Off button again and switch the appliance off.
Repeatedly, turn the grind size rotary wheel left and right. Try again to activate the grinder. Should the grinder still be blocked after multiple attempts, please contact Solis or a service centre authorised by Solis.
CLEANING AND MAINTENANCE
CAUTION: Unless explicitly stated otherwise, the appliance has to be switched off and allowed to cool down with the power plug disconnected before every cleaning cycle.
Do not use abrasive or aggressive cleaning agents, rough sponges or cloths as they might scratch the surface.
ATTENTION: Never immerse the espresso machine casing, the grinder, the power cord or the power plug in water or other liquids or allow the parts to come into contact with them!
NOTE: The espresso machine parts and accessories are not dishwasher safe.
CLEANING THE FILTER INSERTS AND THE PORTAFILTER
It is recommended that the portafilter, with an empty filter insert inside, is regularly screwed into the brewing head and rinsed with hot water. Press the or button to flush hot water through the portafilter to remove potential coffee residues and contaminations.
CAUTION: Be careful when removing the portafilter afterwards, as the potentially remaining pressure might cause hot water splashes.
Use the small needle of the cleaning tool to clean the hole of the double wall filters. The pin is not intended for the single wall filters. Carefully push the needle straight into the hole to avoid breaking it.
- Place the dirty portafilter and the filter inserts in a container with mild detergent and hot water up to the portafilter handle.
After that, thoroughly clean and dry everything.
CAUTION: The portafilter and the filter inserts must not be cleaned in the dish washer!
THOROUGH CLEANING WITH THE SOLITABS CLEANING TABLETS EVERY 3 MONTHS
You should thoroughly clean the filter inserts and the portalfilter approximately every third month with the SOLITABS cleaning tablets (art. no. 993.02) to remove coffee grease and other contaminations.
Please proceed as follows:
- Connect the power plug and switch the appliance on with the On/Off button. Wait for all four function lights to light up constantly.
- Place the filter insert (double wall, 1 cup) in the portafilter and put a SOLITABS cleaning tablet as well as the white coin into the empty filter insert.
Screw the portafilter into the brewing head. - Push the button to let hot water run out of the portafilter.
-
Push the button again if water runs out of the portafilter to stop the water flow.
-
Let the tablet dissolve and act for at least 15 minutes.
Press the button again and wait for one minute. Repeat this process five times.
After that, screw out the portafilter. Remove the filter insert and the white coin and rinse the portafilter and the filter insert thoroughly under running water. Dry both parts. - Switch the appliance off with the On/Off button, disconnect the power plug and clean the brewing head with a soft, moist towel or sponge to remove all cleaning tablet residues.
Proceed in the same way for all filter inserts that you have used.
CLEANING THE BREWING HEAD AND THE BREWING GROUP
Coffee grease and other contaminations can also collect on the brewing head and the brewing group. Remove them with a toothpick or a soft, moist sponge or towel when the appliance is disconnected and switched off, or let hot water run through while the appliance is switched on and the portafilter is not screwed in.
CLEANING THE ACCESSORIES
Clean the milk jug after every use in hot dish water.
Regularly clean the lid of the bean container with warm dish water and subsequently rinse it with clear water. Then, dry it carefully and place it back on the bean container.
CLEANING THE STEAMING NOZZLE OF THE STEAM / HOT WATER WAND
CAUTION: The appliance has to be switched off, unplugged and cooled down before the steam / hot water wand with the steaming nozzle is cleaned!
- Unscrew the steaming nozzle from the steam / hot water wand. Rinse the steaming nozzle carefully in warm water and then re-rinse it with clear water.
- Should the nozzle be blocked, insert the big needle of the cleaning tool into the opening of the nozzle. If the nozzle still is clogged, first place the nozzle in a glass of hot water, then use the needle again to remove the blockage.
Screw the nozzle back onto the steam/hot water wand.
After each cleaning cycle and before starting to use the appliance again, you should activate the steam function for a couple of seconds to clean the nozzle of any residues.
CLEANING THE CHASSIS, THE CUP SHELF, THE BEAN CONTAINER AND THE WATER TANK
Clean the chassis, the cup shelf, the empty bean container and the water tank with a soft, slightly moist towel and dry all parts with a dry towel.
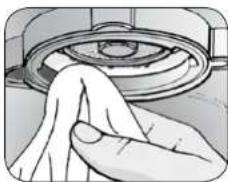
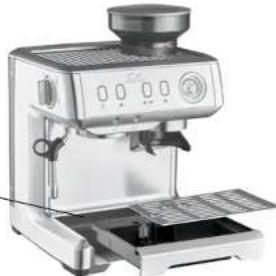
CLEANING THE DRIP TRAY WITH DRIP GRID
Remove, empty and clean the drip tray with the drip grid at regular intervals but every time it is full and the red float gauge is visible between the drip grid.
- Remove the drip grid and pull the drip tray out to the front. Hand wash the drip tray and the drip grid with mild detergent and warm water. Do not use any aggressive cleaning agents or scouring sponges. Rinse the tray and the grid with clear water and carefully dry both parts.
CAUTION:
Drip tray and drip grid are not dishwasher safe.
Reinstall the drip tray and place the grid back on the drip tray.
Tip: The black cover behind the grid can be removed for cleaning.
CLEANING THE GRINDER
We recommend regularly cleaning the grinder with GRINDZTM (art. no. 993.08) to clean it from coffee grease and oil. This is to preserve the quality of the ground coffee.
DESCALING
If your appliance requires a descending cycle, the warning light starts flashing. In this case, please perform a descending cycle as soon as possible. After approx. 2 litres more have been extracted, the warning light lights up permanently. Now at the latest, the descending cycle has to be promptly performed.
ATTENTION: In the event of an alarm, you should descale your machine immediately in order to prevent the functionality from being reduced or the coffee quality from degrading. Repairs to the espresso machine relative to timescale problems are not covered by the warranty if the descaling procedure described below is not performed regularly.
Solis recommends descending your Solis Grind & Infuse Compact espresso machine with a mixture of SOLIPOL® special and water. Please use only SOLIPOR® special (art. no. 703.02) for descending the machine. Damages caused by the use of improper descending agent are not covered by warranty.
When the descending alarm is displayed, please proceed as follows:
- Switch the appliance off with the On/Off button and disconnect the power plug. Turn the portafilter out of the brewing head.
- Remove the water tank from the appliance and empty it out. Remove the Solis water filter from the tank. Fill the water tank with 1.25 litres of water and 1.25 litres of SOLIPOL special so that the tank is filled with 2.5 litres of descaling solution. Place the water tank back on the rear of the appliance. Empty the drip tray and reinsert drip tray and grid.
- Place a large 2,5 litres container (e.g. a bowl or a baking mould etc.) on the drip grid underneath the brewing head. The steam / hot water wand has to be directed into the container.
- Insert the plug. While the machine is switched off, simultaneously press and hold both espresso buttons ( and and then immediately press and hold the On/Off switch for 3 seconds. The descaling program starts and the descaling solution in the tank runs through the brewing head and through the steam / hot water wand. During the descaling process, the function lights of the two espresso buttons ( and flashing as well as the descaling warning light. Limestone residues are removed from the water circuit.
- After multiple cycles and pauses, the descending program is completed. The two function lights of the espresso buttons ( and out. Tip: The container can be emptied out during the pauses (in case it does not hold 2,5 litres).
-
Take the water tank off and pour away the descending solution if there is any left. Rinse the water tank multiple times under running water. Refill the clean water tank with fresh, cold tap water.
-
Now, the machine has to be rinsed to remove the descending agent residues. Empty the container and the drip tray. Reinstall the drip tray and the grid. Place the container back underneath the brewing head resp. the steam / hot water wand.
- Press and hold both espresso buttons ( and ) simultaneously for approx. 3 seconds until they start flashing, then release them. The rinsing process starts and the water runs through the brewing head and the steam / hot water wand. During the rinsing process, the buttons () and () as well as the descaling warning light are flashing. After multiple cycles and pauses, the rinsing process is completed and the appliance switches off.
- Take the water tank off, empty it out, rinse it with clear water and reinstall the water filter. Then, refill the water tank with fresh water and place it back on the appliance. Empty the drip tray and clean it.
- If you switch the appliance back on with the On/Off button, the descending warning light has gone out. If the descending warning light still glowing, please repeat the descending process.
NOTE: Please wipe potential splashes of descending solution on the appliance casing away immediately, as the agent might damage the surface.
NOTE: If the descending procedure is not completed correctly (e.g. no electricity), we recommend to complete the procedure and rinse properly the appliance.
WARNING: Never submerge the power cord, the power plug, the grinder or the appliance in water or any other liquid. During descaling, never remove the water tank or allow it to empty completely.
STORING THE SOLIS GRIND & INFUSE COMPACT ESPRESSO MACHINE
Store the cooled down, cleaned and dry machine in an upright position, ideally in the original packaging. Do not place any items on the appliance.
TROUBLESHOOTING
CAUTION: Should there be any problems or impairments to the functionality of the appliance, immediately switch the appliance off and disconnect the power plug.
| Problem Possible cause | Use Solution | |
| The machine does not dispense any hot water. | Air has intruded into the water circuit and causes the pump to run idly.The steaming nozzle opening is clogged. | Make sure that the water tank is correctly installed and that the water level does not stand underneath the MIN marking. Repeat the steps described in "Before first use" / "C. Rinsing the machine" resp. "Water tank runs empty during use" (p. 155).Remove potential residues on the opening with the large needle of the cleaning tool. |
| The machine does not dispense steam. | There is only little water in the tank so that the pump can not suck in any water.The steaming nozzle opening is clogged. | Check the water level in the water tank. If necessary, fill the tank up to the MAX marking.Remove potential residues on the opening with the large needle of the cleaning tool. |
| Steam escapes from the edges of the portafilter. | Espresso is being dispensed while the steam function is activated. | Stop the espresso extraction by pressing the activated espresso button again.Turn the steam / hot water control to the position in the centre ● to deactivate the steam function. Wait for all four function lights to light up constantly and start another espresso extraction. |
| Coffee runs out from the edges of the portafilter. | Too much ground coffee in the filter insert, preventing the portafilter from being fully turned into the brewing head. | Carefully and slowly turn the portafilter out of the brewing head. Please note that the pressure could cause hot splashes. Clean the brewing head with a soft, moist sponge or towel. Reduce the amount of ground coffee and restart the espresso extraction. Please refer to the tips given on p. 158/159. |
| Problem Possible cause Solution | |
| Coffee runs out from the edges of the portafilter. | Ground coffee is stuck to the brewing head.The holes in the filter insert are clogged. |
| The espresso is watery and cold. | The grind size is too coarse.If this is the first espresso you are making, the filter insert might still be cold. |
| The grinder is blocked or loud. | There are impurities among the coffee beans. |
| The appliance is switched on and the function light of the On/Off button flashes rapidly. | The steam / hot water control is not set to position in the centre ●. |
| Too large amount of espresso was dispensed. | The extraction amount for 1 or 2 cups was not correctly set. |
| Too large amount of ground coffee in the filter insert. | The amount of ground coffee for 1 or 2 cups was not correctly set. |
| The machine makes loud noises while the steam function is active. | The loud noises originate from the water pump which works at high pressure when steam is dispensed. |
| Espresso is not dispensed and flows out too slowly. | The holes in the sieve of the brewing head are clogged.The openings of the filter inserts are clogged.The grind size is too fine.The ground coffee was tamped too strongly.The dispensed amount of espresso is too small.The water tank is not installed correctly.There is too little water in the tank so that the pump can not suck in any water EMPTY water tank |
| The machine makes unusual noises while making espresso. | There is too little water in the tank so that the pump can not suck in any water. |
| The machine does not dispense any hot water or steam. | The steaming nozzle is clogged. |
| Problem Possible cause Solution | |
| Milk is not prop- erly steamed. | Not enough steam. Remove potential residues from the opening of the steaming nozzle using the large needle of the cleaning tool. |
| The appliance stops the opera- tion. | The protection mecha-nism of the electric grind- er motor was triggered. Switch the appliance off, pull the power plug and let the appliance cool down for approx. 60 minutes. |
Should none of the above stated reasons apply, please contact Solis or a service centre authorised by Solis.
COFFEE AND SUPPLIES
The following accessories, coffee variants and consumables are available for your Solis Grind & Infuse Compact espresso machine:
Art.no.700.86 SOLIS Water filter
Art.no.703.02 SOLIPOL special Descalng agent (1'000 ml)
Art. no. 993.08 SOLIS GRINDZ™ Grinder cleaner
Art.no.993.02 SOLITABS Cleaning tablets (10 pcs.)
Art. no. 978.40 SOLIS Coffee grinder knock-out drawer
Art. no. 907.26 SOLIS Professional metal tamper
Art.no.907.22 SOLIS Tamper mat
Art.no.907.23 SOLIS Espresso cup riser
Art. no. 907.25 SOLIS Digital Pocket Scale electronic precision scale
Art.no.992.04 SOLIS Intense Espresso coffee beans (500g)
Art. no. 992.60 SOLIS Smooth Crema coffee beans (500 g)
Art.-Nr. 992.12 SOLIS Intense Espresso 44 mm Pods (100 pcs. à 7 g)
Art.no.992.13 SOLIS Smooth Crema 44 mm pods (100 pcs. a 7 g)
The accessories and consumables for your Solis Grind & Infuse Compact
espresso machine are available from good specialist retailers or from Solis.
You can find contact addresses at the end of this manual.
TECHNICAL SPECIFICATIONS
Model-No. 1313, Type 1018
Product description Espresso machine
Voltage/Frequency 220-240 V/50-60 Hz
Output 1600 Watt
Measurements approx. 28× 30× 39 cm (length × depth × height)
Weight approx. 7,6kg
Technical changes reserved.
DISPOSAL

EU 2012/19/EU
Information for correct disposal of the product in accordance with the European Directive EU 2012/19/EU.
At the end of its working life this equipment must not be disposed of as an household waste. It must be taken to special local community waste collection centres or to a dealer providing this service. Disposing of electrical and electronic equipment separately avoids possible negative effects on the environment and human health deriving from an inappropriate disposal and enables its components to be recovered and recycled to obtain significant savings in energy and resources. In order to underline the duty to dispose of this equipment separately, the product is marked with a crossed-out dustbin.
Solis of Switzerland Ltd reserves the right to carry out technical and visual changes and modifications to improve the product at any time.
SOLIS HELPLINE
This item stands out due to its long-life cycle and reliability. Despite this though, if a malfunction ever occurs, simply give us a call. Often a breakdown can be easily and quickly remedied with the right tip or technique without having to straight away send off the device for repair. We will give you all the advice and practical support you require. The contact addresses can be found at the end of this manual.
Keep the original packaging in a safe place so that you may use it in the event that transportation or shipping of the product becomes necessary.
BELANGRIJKE VEILIGHEIDSINFORMATIE
APPARAATBESCHRIJVING
2 TOETS 1 KOPJE KOFFIE ZETTEN
3 TOETS 2 KOPJES KOFFIE ZETTEN
5 WAARSCHUWINGSLAMPJE VOOR ONTKALKING C
WATERRESERVOIR LOOPT Tijdens DE WERKING LEEG
Depresso is donkerbruin
Art-nr. 907.22 SOLIS tamperbasis
Solis customer service
Please contact us in advance of sending in products for return or repair. We will gladly give you the respective address. Alternatively, you can simply visit www.solis.com.
Solis Klantendienst Helpline
Address for return shipment of
goods differs - please refer to:
Address for return shipment of
goods differs - please refer to
www.solis.com

@
W
41-91-802 90 10
support.ch@solis.com
www.solis.com