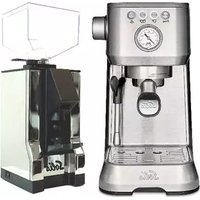
Barista Perfetta Plus 1170 - Coffee machine Solis - Free user manual and instructions
Find the device manual for free Barista Perfetta Plus 1170 Solis in PDF.
| Product type | Espresso coffee machine |
| Brand | Solis |
| Model | Barista Perfetta Plus 1170 |
| Dimensions (W × D × H) | 18.7 × 37.2 × 32.1 cm |
| Weight | 5.7 kg |
| Power supply | 120 V~, 60 Hz, 1550 W |
| Water tank capacity | 1.7 L |
| Ideal brewing pressure | 8-12 bar (pressure gauge indicator) |
| Main functions | Espresso, cappuccino, latte, hot water, steam |
| Programmable settings | Brew temperature, auto shut-off (10/30/120 min), water filter |
| Included accessories | Single and double wall filters (1 cup, 2 cups), 44 mm pod filter, portafilter, tamper, dosing scoop, 350 ml stainless steel milk pitcher, cleaning tool, rubber part, MAVEA Intenza water filter cartridge with test strip |
| Display | Pressure gauge indicator, LED buttons (brew, steam, program) |
| Safety | Auto shut-off, overheat protection, portafilter lock, electrical instructions |
| Maintenance | Automatic descaling with alarm, automatic cleaning cycle, steam wand cleaning |
| Repairability | Authorized Solis / Seattle Coffee Gear after-sales service (chat, email, phone) |
| Warranty | Manufacturer's warranty subject to proper use and regular maintenance |
Frequently Asked Questions - Barista Perfetta Plus 1170 Solis
User questions about Barista Perfetta Plus 1170 Solis
0 question about this device. Answer the ones you know or ask your own.
Ask a new question about this device
Download the instructions for your Coffee machine in PDF format for free! Find your manual Barista Perfetta Plus 1170 - Solis and take your electronic device back in hand. On this page are published all the documents necessary for the use of your device. Barista Perfetta Plus 1170 by Solis.
USER MANUAL Barista Perfetta Plus 1170 Solis
natural_image
Modern espresso machine with Prog. and Solis branding, featuring a dial indicator and lock mechanism (no text-heavy elements)▲ ENGLISH 04
▲ FRANÇAIS 38
▲ ESPAÑOL 74
EN
▲ IMPORTANT SAFEGUARDS
Please read through this user manual thoroughly before using your Solis Barista Perfetta Plus espresso machine, so that you become familiar with your appliance and can use it safely. We thoroughly recommend that you keep these instructions and, if you pass the appliance on, that you also hand these instructions to the new owner.
For your own safety, please observe the following safety measures when using electrical appliances:
-
To prevent electric shock, against fire, and injury to persons neither the appliance nor the power cord and the power plug must come into contact with water or other liquids. Water could soak in and damage the appliance. Risk of electric shock! Should the appliance resp. the power cord or the power plug come into contact with water, use dry rubber gloves to immediately pull the power plug from the socket. Do not start using it again before having it checked for functionality and safety by Solis or a service centre authorized by Solis.
-
Do not operate the appliance resp. pull or connect the plug with wet or moist hands or feet.
-
Before using the appliance, check that the voltage stated on the type plate of your appliance matches your mains voltage. We do not recommend operating the appliance with a multi-way plug adapter.
-
Exclusively use this machine to make coffee or hot water as described in this manual resp. for heating other liquids with the steam nozzle. Do not use the appliance outdoors and protect it from moisture and wetness.
-
Do not leave the power cord hanging over table edges so that it can be pulled. Make sure that it does not come into contact with hot surfaces, such as hotplates or a radiator, or that they come into contact with the appliance.
-
Install the power cord so that nobody can trip over it. Keep clear of pointed objects.
- Always fully unwind the power cord before connecting the power plug to the power socket.
- Keep the appliance away from hot gas, hot ovens and other heat-emitting appliances or heat sources. Never use the appliance on a hot or wet surface. Never place the appliance near moisture, heat and naked flames. Keep the appliance away from moving parts or appliances.
- Never carry the appliance by the power cord and do not place anything on the power cord. Never pull on the power cord to disconnect the appliance from the power mains. Only pull on the plug.
- To reduce the risk of injury, do not drape cord over the counter top or table top where it can be pulled on by children or tripped over unintentionally. We recommend that you do not use an extension cord with this appliance. Do not place the appliance directly underneath a power socket.
- Always ensure the appliance is turned off before plugging in or unplugging the appliance from the power socket.
- While the appliance is in operation, it must sit on a stable, even, water and heat resistant as well as dry work surface, like a table or a worktop. Do not place the appliance near the edge of a worktop or table.
- The appliance is not designed for outdoor use. The appliance must not come into contact with rain. Do not use in vehicles or on boats.
- Keep a minimum safety distance of 20 cm between the appliance and walls, curtains or other materials and objects and make sure that the air around the appliance can circulate freely.
- Never cover the appliance with cloths or the like while it is in use. Do not place anything on top of the appliance, except for cups to preheat them.
EN
- Allow to cool before putting on or taking off parts, and before cleaning the appliance. Always switch off the appliance by pressing the ON / OFF button and unplug it if the appliance is not in use or left unattended, and before cleaning. We recommend the use of a residual current device (RCD safety switch) to provide additional protection during the use of electrical appliances. It is advisable to use a safety switch with a rated residual operating current of 30 mA maximum. For professional advice consult an electrician.
- Do not make any adjustments to the appliance, cord, plug or accessories.
- Incorrect use may cause injury!
- Never reach for an appliance that has fallen into water or other liquids. Always use dry rubber gloves to pull the plug before taking it out. Do not start using it again before having it checked for functionality and safety by Solis or a service centre authorized by Solis.
- Never place the appliance in such a way that it might fall into water or come into contact with water (e.g. in or next to a sink).
- Never submerge the appliance itself or parts of the appliance (except for the water tank) like power cord or plug in water, or bring it into contact with water.
- Place the appliance so that it is never exposed to direct sunlight.
- Never put sharp or pointed objects and tools into the appliance openings. The appliance may become damaged – danger of electric shock!
- Always switch the appliance off with the ON/OFF button and disconnect the power plug before attaching or removing parts. This also applies when refilling the water tank without taking the water tank out of the appliance.
-
Do not shake or relocate the appliance while it is in operation. Always switch the appliance off and pull the plug before moving it.
-
Only use the appliance as described in this manual. Only use with the provided accessories or accessories recommended by Solis, incorrect accessories or misuse can lead to damage of the appliance, to fire, electric shock or personal damage.
- Never use the appliance with a remote control or an external timer switch.
- Always make sure that the appliance is correctly assembled before connecting it to a power socket and starting to use it.
- This appliance is only for household use and is not suitable for commercial use.
- Remove and discard all packaging materials and potential stickers or labels (except for the type plate) before using the appliance for the first time.
- Check the appliance before each use and ensure that the appliance, power cord and plug are not damaged and no parts have come loose.
- In order to avoid electric shock, do not use the appliance if the power cord or plug are damaged or the appliance is otherwise faulty, dropped or damaged or if parts have come loose. Never attempt repairs yourself, except cleaning and descaling the appliance, but take your appliance to Solis or a Solis approved service centre in order to get it inspected or mechanically and electrically repaired, in order to avoid a hazard.
- People with limited physical, sensorial or mental capabilities as well as unknowing or inexperienced people and children must not use the espresso machine except when supervised or thoroughly instructed on how to use the appliance by a person responsible for their safety. Additionally, they must be aware of the dangers arising from the appliance and know how to operate it safely. Cleaning and user maintenance shall not be made by children. Under no circumstances must the appliance be used or cleaned by children. The appliance and its power cord have to be kept away from children.
EN
- Always keep the appliance and power cord out of the reach of children.
- Children must be supervised, so that they do not play with the appliance.
- Pull the plug after every use. Only then, the appliance is fully switched off.
- Use only cold tap water in the water tank. Do not use any other liquid. Under no circumstances fill the water tank with carbonated water.
- Never use the espresso machine without water in the water tank.
- Always make sure to correctly insert the portafilter into the brewing head before using the appliance to make coffee.
- Never touch the hot appliance parts like the steam / hot water outlet, the metal part of the portafilter or the filter during or shortly after use. Only touch the heat insulated handles, buttons or selectors.
- If you wish to make another cup of coffee, wait at least 10 seconds after the coffee extraction has finished before taking off the portafilter. The appliance has to be switched back to operation mode before the portafilter is taken off, meaning the two button surrounds for 1 cup and 2 cups have to light up white constantly. CAUTION: The portafilter, the brewing head, the filter and the coffee dregs mixed with hot water are very hot!
- Never take the portafilter off while the appliance performs a brewing process or steams milk – the appliance is pressurised!
-
The water tank, too, must never be removed while the appliance performs a brewing process!
-
Never point the steam / hot water wand towards persons, animals or steam and moisture sensitive furniture! The escaping steam resp. the water is very hot and could cause scaldings!
- Do not leave the espresso machine unattended when in use. This applies especially when children are nearby.
- CAUTION: The appliance becomes very hot during use! Allow the appliance to cool down before removing or attaching parts, moving, relocating or cleaning it.
- Only cups and tamper may be placed on the cup tray. Do not place any other items on the appliance. CAUTION: After prolonged use, the cup shelf gets so hot that you might burn yourself on it!
- Keep the appliance and accessories clean. Please refer to the information given in the manual.
- Oils or lubricants must not be used with this appliance.
- The ambient temperature for use and storage should not come below 0^ C.
- The coffee-maker shall not be placed in a cabinet when in use.
- Do not use appliance for other than intended use.
SAVE THESE INSTRUCTIONS.
EN
text_image
A B C D K J L M E F N I G H
text_image
Exploded view diagram of a kitchen appliance with labeled parts including thermos, kitchenware, and accessories
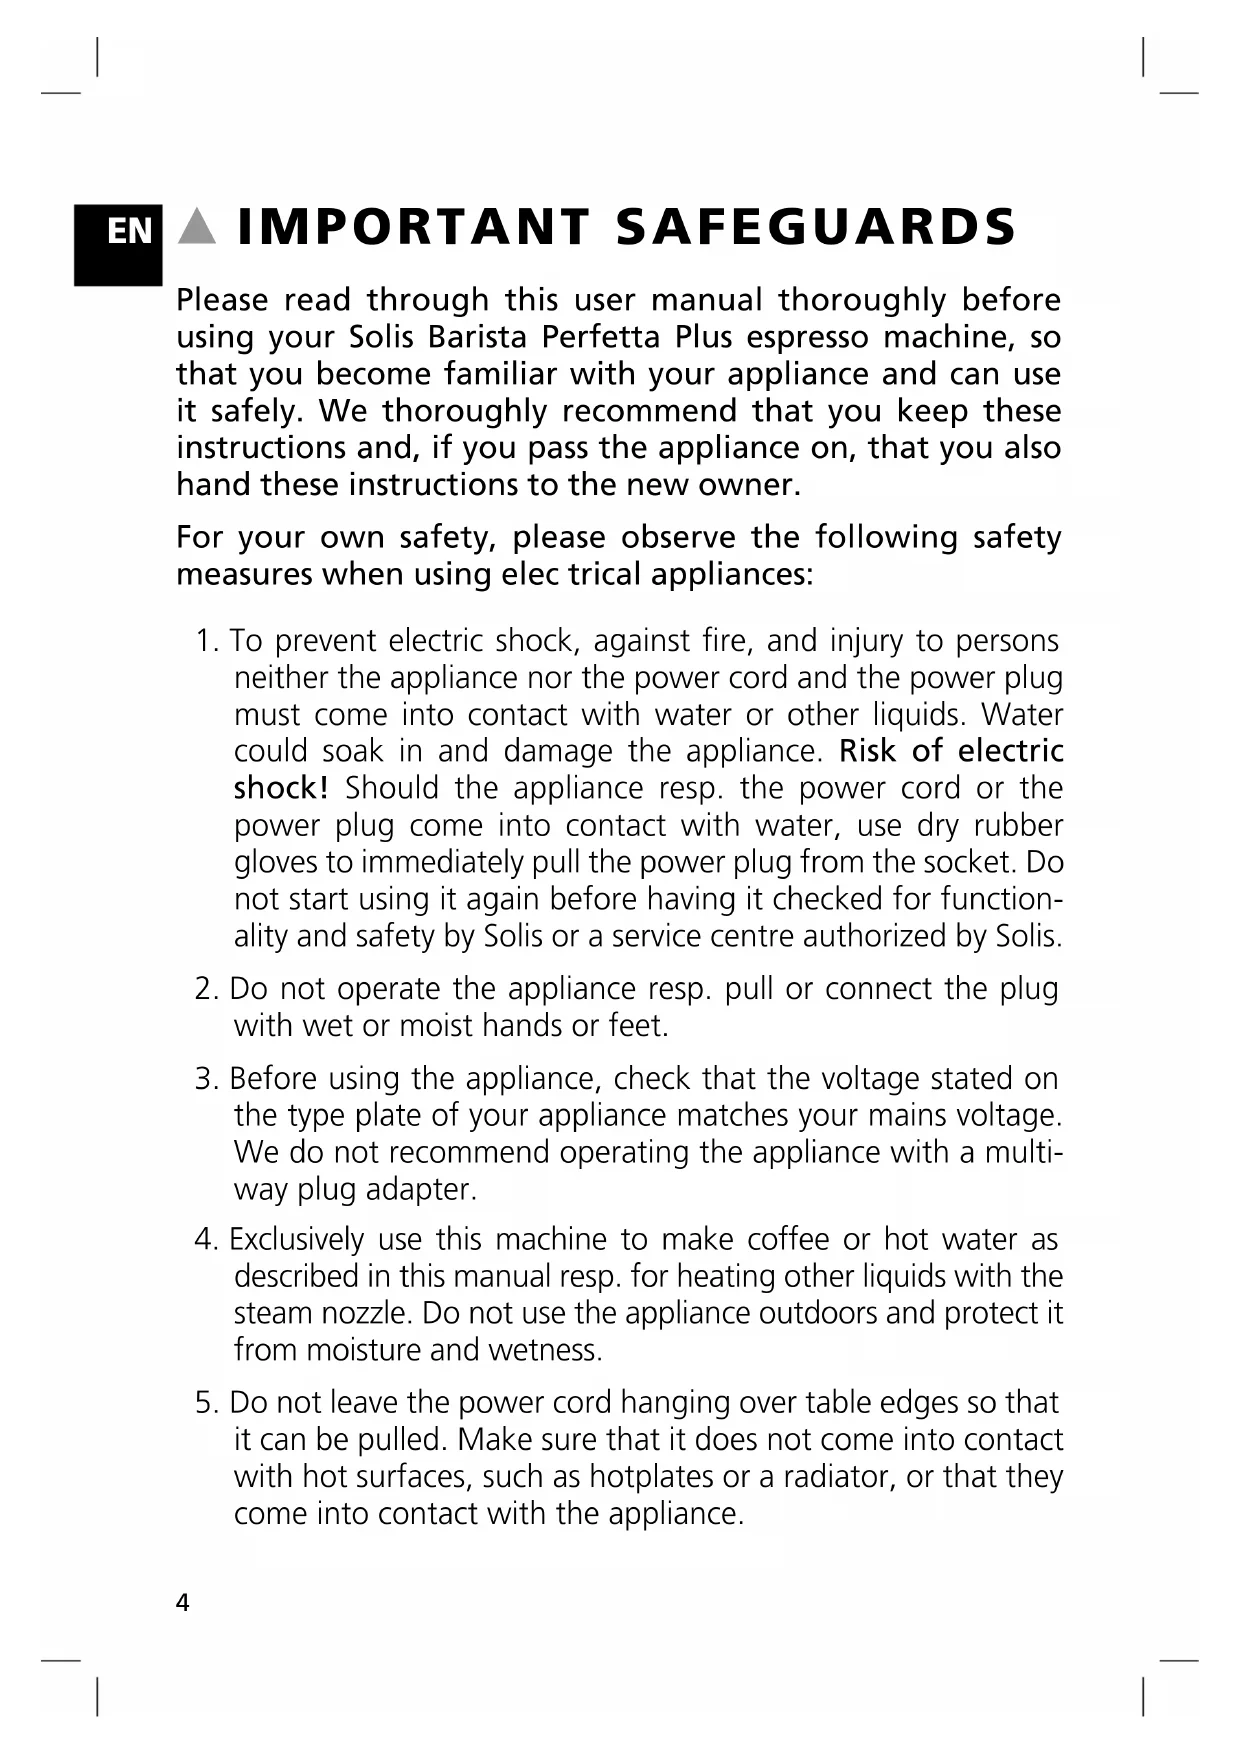
APPLIANCE DESCRIPTION
EN
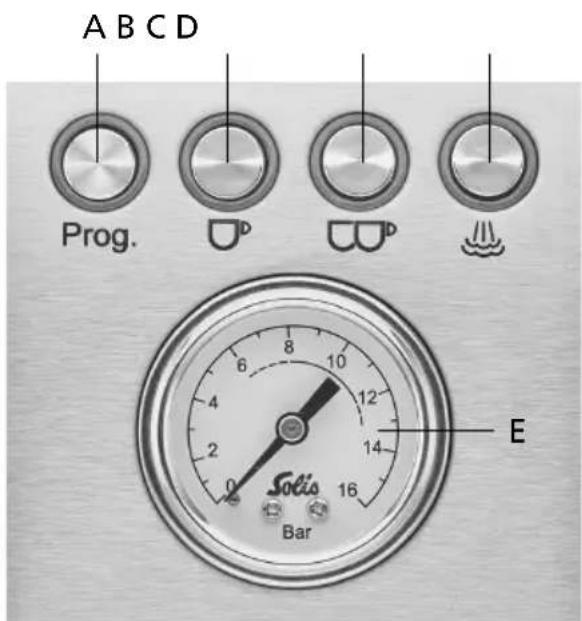
A Programming button "Prog." for programming the settings
B Coffee extraction button for 1 cup
C Coffee extraction button for 2 cups
D Steam button
E Pressure gauge (manometer)
F Brewing group with brewing head
G Drip grid, removable
H Drip tray, removable, with inlying red float gauge to indicate when the drip tray is full.
I Moveable steam / hot water wand, with thermo-insulated handle and removable steaming nozzle
J Cup tray
K Water tank lid, removable
L 1,7 litre water tank, removable, with Min- and Max-markings, handle and filter cartridge bracket
M Steam / hot water control
N ON/OFF button To turn the espresso machine on and off
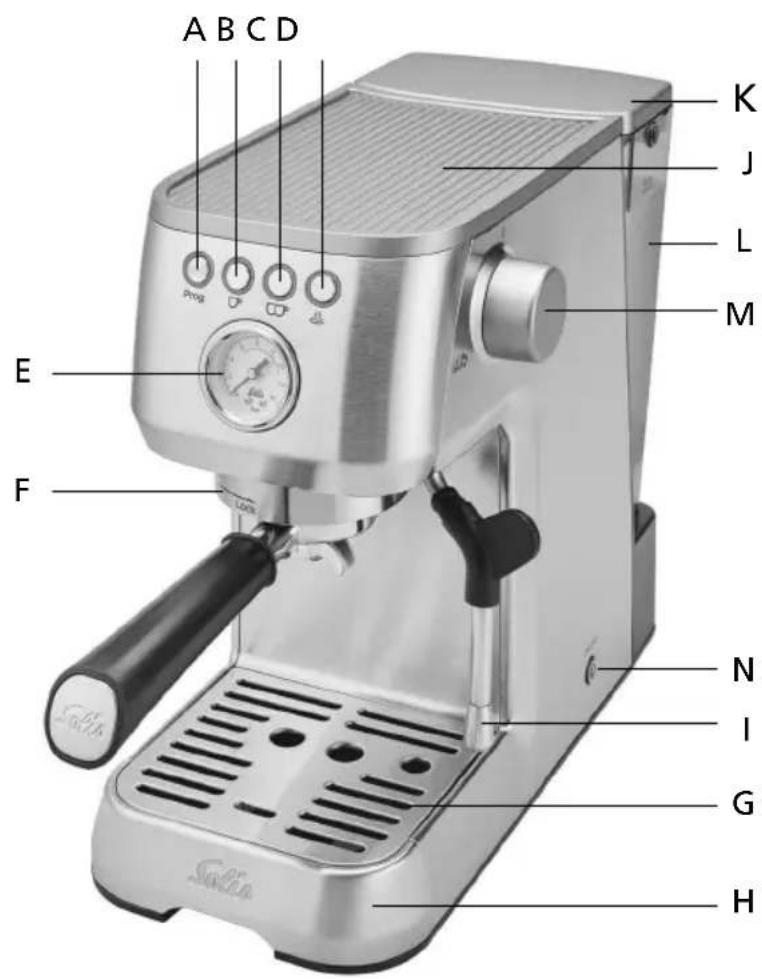
ACCESSORIES
O Single-wall filter for one cup (54 mm)
P Single-wall filter for two cups (54 mm)
Q Double-wall filter for one cup (54 mm)
R Double-wall filter for two cups (54 mm)
S Filter for compact 44 mm pods
T Portafilter with double outlet (removable)
U Stainless steel milk jug, capacity 350 ml
V Tamper
W Measuring spoon
X Cleaning tool and cleaning brush
Y Rubber insert for brewing group cleaning
Z MAVEA Intenza water filter cartridge with test strip
EN

THE FUNCTION BUTTONS, THE CONTROLS AND THE PRESSURE GAUGE
text_image
A B C D Prog. D D E Sotis 16 Bar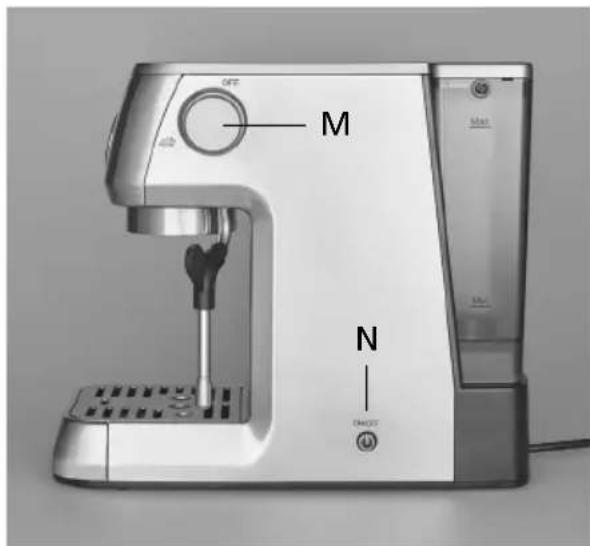
text_image
M N OKT OKT OKTA PROGRAMMING BUTTON Prog.
- With this button, you can make the following settings:
- adjust the brewing temperature
- set the automatic shutdown
– program whether or not there is a water filter installed, lengthening the descaling interval - reset the appliance to factory settings
You can learn exactly how to make the settings in the section "Adjusting the appliance" on pages 17–21 of this manual.
B COFFEE EXTRACTION BUTTON FOR 1 CUP
- With this button, you can adjust the extraction volume for 1 cup. If the amount has already been set, you can start dispensing coffee by briefly pushing the button. Refer to page 24 for detailed instructions.
C COFFEE EXTRACTION BUTTON FOR 2 CUPS 📄
- With this button, you can adjust the extraction volume for 2 cups. If the amount has already been set, you can start dispensing coffee by briefly pushing the button. Refer to page 24 for detailed instructions.
D STEAM BUTTON
- You can activate the steam function with this button, making the appliance heat up to produce steam for making steamed milk or heating beverages.
EN
M STEAM / HOT WATER CONTROL
- If the steam function has been activated and the button lights up constantly, you can open the steam / hot water control all the way up in a counter clockwise direction to let steam escape from the steam / hot water wand. Use it to steam milk or heat beverages. Steam escapes from the wand for as long as the control is open. Refer to pages 25–27 for detailed instructions.
- If the steam function has not been activated and the appliance is in coffee extraction mode instead, opening up the steam / hot water control activates the hot water function. Refer to page 27 for detailed instructions.
NOTE: The espresso machine is too hot to make coffee immediately after producing steam. This is indicated by either the steam button lighting up constantly (meaning the appliance is still in steam mode) or by the two coffee extraction buttons flashing, meaning the appliance is cooling down. If you press one of the two coffee extraction buttons in this moment, the appliance performs a rinse cycle (steam escapes into the drip tray), so that the boiler temperature decreases for coffee extraction.
N ⏻ ON/OFF BUTTON (ON SIDE OF APPLIANCE)
- Once you have started the machine with this button, the 4 button leds will flash 2 times and the heating-up phase starts. The ▶ and □ buttons will continue flashing till the temperature is sufficient for coffee extraction, than these two buttons constantly light up white.
E PRESSURE GAUGE (MANOMETER)
- The pressure gauge measures the pressure, at which the water is forced through the ground coffee in the portafilter. The extraction range is ideal when the manometer needle stands between 8 and 12 during extraction, especially for espresso coffee. Then, the espresso coffee has a fine and even crema.
- If the needle is below 6 during extraction, the water is forced through the portafilter at insufficient pressure (too quickly). The coffee turns out watery and has a lightly coloured or not enough crema and may taste acid. Reasons for this might be: too coarsely ground coffee, insufficient amount of ground coffee in the portafilter, the ground coffee has not been tamped firmly enough or too old coffee.
- If the needle is above 13 during extraction, the water is forced through the portafilter at excessive pressure (too slowly). The coffee turns out bitter and has a dotted or irregular crema. Reasons for this might be: too finely ground coffee, too much ground coffee in the portafilter or the ground coffee has been tamped too firmly.
EN
BEFORE FIRST USE
A. CLEANING THE APPLIANCE
- Carefully remove the appliance from the packaging and remove all stickers, labels (except for the type plate) and packaging materials.
- Remove all accessories from the packaging and from the appliance.
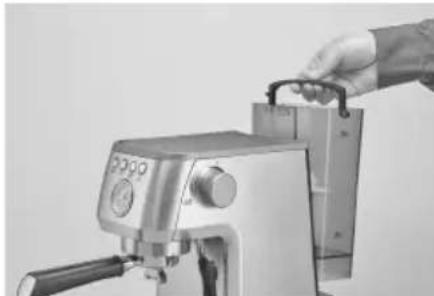
- Remove the water tank.
- Clean the water tank with the lid, the tamper, the measuring spoon and the filter as well as the portafilter, the milk jug and the rubber insert with warm water and some mild dishwashing liquid. After that, rinse with clear water and dry.
natural_image
Close-up of a hand operating a stainless steel coffee machine with a handle (no visible text or symbols)- Also, wipe the casing of the espresso machine and the drip tray with the drip grid clean with a soft, damp cloth and dry all parts.
- Make sure that the steam / hot water control is turned off (OFF position, turn all the way in a clockwise direction).
CAUTION: The appliance chassis, the power cord and the power plug must never be submerged in or come into contact with water or any other liquid!
NOTE: The parts of the espresso machine and the accessories are not dish-washer safe.
B. INSTALLING THE MAVEA INTENZA WATER FILTER CARTRIDGE INTO THE TANK
Thanks to the MAVEA Intenza water filter cartridge, limescale deposits are reduced, leading to a prolonged machine lifetime and optimal performance concerning the brewing pressure and brewing temperature as well as a more intensive aroma of your coffee.
You can select whether or not you have a water filter inserted in the appliance settings menu, meaning it is possible to operate the appliance without a water filter. However, using a water filter not only extends the descaling interval but also increases the lifetime of your machine. It also improves the taste of your coffee. Therefore, we generally recommend inserting the MAVEA Intenza water filter cartridge and replacing it when the appliance prompts you to do so.
1. Setting the water quality on your MAVEA Intenza water cartridge
To make sure that the Original Intenza Aroma Ring is optimally adjusted, you can test your water quality with the included test strip. Hold the test strip briefly into your tap water, wait one minute and read your water quality from the test strip.
Now, set the ring on the bottom of the cartridge to the corresponding position (letter A, B or C).
A: for regions with soft water
B: for regions with medium hard water
C: for regions with hard water (default setting)
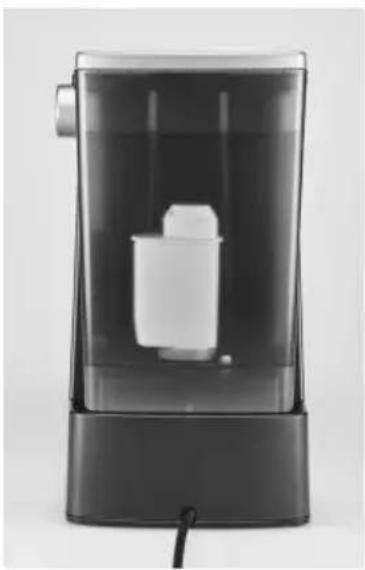
2. Installing the water filter cartridge
- Place the cartridge upside down in a jug of cold water and gently squeeze the cartridge to remove potential air bubbles.
Take the water tank off of the appliance and vertically place the cartridge in the purpose-built bracket on the inside of the tank. The Original INTENZA Aroma Ring with the letters has to be on the bottom side. To ensure best quality, make sure that the cartridge is firmly inserted and that the seal is in the correct position.
- Fill the tank up to the Max-marking with cold tap water. Place the lid on the tank.
- Place the water tank back on the appliance.
natural_image
Black and white photo of a modern cylindrical water dispenser with a small container inside, no visible text or symbols.IMPORTANT: When using a cartridge for the first time, each MAVEA Intenza water filter cartridge has to be rinsed with half a litre of water. To rinse the cartridge, activate the automatic rinse program by adjusting the appliance to an inserted water filter. Proceed as described in section “Adjusting the appliance / Water filter programming” on page 17.

EN
OPERATING AND SAFETY INFORMATION
- The MAVEA Intenza water filter cartridge is designed for use only with municipally treated tap water (note: this water is constantly controlled and according to legal regulations safe to drink) or with water from private supplies which has been approved as safe to drink. If an instruction is received from the authorities that mains water must be boiled, the filtered water must also be boiled. When the instruction to boil water is no longer in force, the entire coffee machine must be cleaned and a new cartridge inserted.
- Filter cold water only.
- Store replacement fiter cartridges in a cool and dry place in their original, sealed packaging.
- Clean the water tank regularly.
- For certain groups of people (e.g. people with weakened immune systems, babies) it is generally recommended to boil tap water. This also applies to filtered water.
Note for people with kidney disease or dialysis patients: during the filter process, the potassium content may be increased slightly. If you suffer from kidney disease and/or follow a potassium restricted diet, we recommend prior agreement with your doctor. The amount of released potassium in 1L of filtered water is lower then potassium contained in either an apple or a banana. - As water is a foodstuff, the water in the tank must be used up within 1 day.
- Should your machine not be in use for a prolonged period (e.g. holiday) we recommend that you discard any water left inside the tank and leave the cartridge inside. Before using the machine again, take out the cartridge, clean the water tank and reinitiate the cartridge as described in the instructions above.
- Should your machine require descaling, always remove the water filter cartridge from the water tank. After the descaling procedure clean thoroughly the whole water tank and reinitiate the cartridge as described in the instructions above.
- MAVEA cannot accept any responsibility or liability if the above recommendations for the use and changing of the MAVEA Intenza water filter cartridge are not respected.
C. ADJUSTING THE APPLIANCE
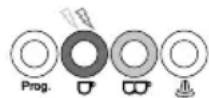
1. Programming the appliance for a water fi lter
After having inserted the MAVEA Intenza water fi Iter cartridge as described in the section "Installing the water fi Iter cartridge" on page 15, program the appliance so that the water fi Iter is rinsed with 500ml of water and the descaling intervals are adjusted. With a water fi Iter inserted, the intervals between two descaling cycles are more than twice as long.
| Switch the appliance on with the ON/OFF button. Wait for both coffee buttons to constantly fl ash white, indicating that the appliance is in operation mode. Place a container that holds at least 500 ml under the brewing group. |  |
| Press the Prog. button to switch to programming mode. The Prog. button fl ashes quickly, a signal sounds and the other three buttons fl ash alternately. | 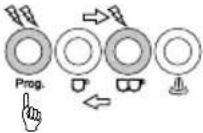 |
| Press the 📁button. Now, only the two coffee buttons 🎨/ 🎨ash alternately, the Prog. button keeps fl ashing quickly. | 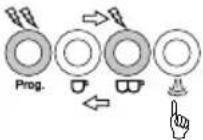 |
| Press the 📁button to confi rm that the water fi lter is inserted. (○ = yes, ○no) | 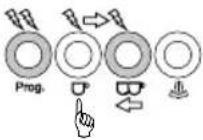 |
| Once the 📁button lights up constantly and the Prog. button fl ashes quickly, the setting is made. |  |
| Now, press the Prog. button to activate the automatic rinse cycle. The program increases the descaling interval of the machine. | 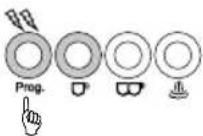 |
| The automatic rinse cycle is performed, 500 ml of water are fl ushed through the brewing group. The Prog. and 🎨buttons fl ash quickly during the rinse cycle. | 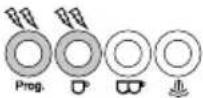 |
| When the automatic rinse cycle has been completed, the Prog. button fl ashes twice, the setting is saved and com- pleted, a signal sounds twice. | 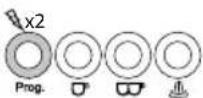 |
| Empty the container containing the hot water from the au- tomatic rinse cycle. The appliance switches back to operation mode. |  |
EN
EN
Programming the appliance for use without water filter:
- The default setting is that no water filter is inserted. However, we recommend inserting the included MAVEA Intenza water filter cartridge in any case and performing the previously specified programming.
- If for some reason you do not want to insert a water filter, you can leave the default setting. If you have stopped using a water filter, proceed as described on page 17, but push the 📌 button in the 4. step. Then, press the Prog. button to confirm the programming. The Prog. button flashes twice, the setting is saved and completed and a signal sounds twice. The “no water filter” programming disables the water filter replacement alarm and decreases the descaling interval time.
ATTENTION: Do not run the machine without MAVEA Intenza water filter cartridge with setting 'yes'. Any damage caused by limescale will not be covered by warranty.
In general:
Pushing the Prog. button gets you to programming mode.
Subsequently pushing the 🎨 button gets you to the water filter settings menu.
After that, you can perform the following settings:
o is the setting for "with water filter"
CO^ is the setting for "no water filter"
ATTENTION:
If the ▶ button alternately flashes white and red and simultaneously the ▶ button constantly lights up white, the water filter replacement alarm has been triggered!
In this case, empty out the water tank, replace the old water filter cartridge with a new one and proceed as described on page 31!
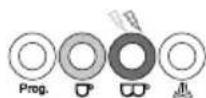
2. Setting the brewing temperature
You can set a low, medium or high brewing temperature.
The default setting is medium. You can reduce or increase this standard temperature.
| In operation mode, push the Prog. button to switch to programming mode. The Prog. button fl ashes quickly, a signal sounds and the other three buttons fl ash alternately. | 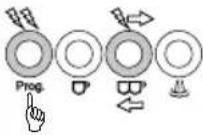 |
| Push the button. The machine indicates the current brewing temperature with the button illumination. | 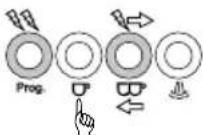 |
| Now, set the desired brewing temperature: | |
| Push the button:Standard temperature setting | 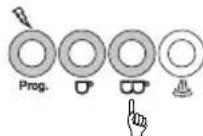 |
| Push the button:Low temperature setting |  |
| Push the button:High temperature setting | 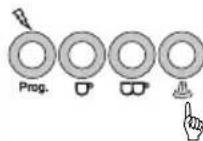 |
| Push the Prog. button again to save the setting. The Prog. button fl ashes twice and a signal sounds twice. | 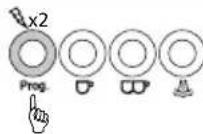 |
| After that, the appliance returns to operation mode. | 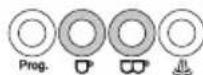 |
In general:
Pushing the Prog. button gets you to programming mode.
Subsequently pushing the ⬆ button gets you to the brewing temperature settings menu.
After that, you can perform the following settings:
is the setting for "low temperature"
ω is the setting for "medium temperature" (default setting)
is the setting for "high temperature"
Push the Prog. button to save the program.
EN
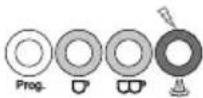
3. Setting the automatic shutdown
You can adjust whether you want the appliance to switch to standby mode after 10 minutes, 30 minutes or 120 minutes. The default setting is 10 minutes. The standby mode itself lasts for 20 minutes (not adjustable), after that, the appliance switches itself off.
| In operation mode, push the Prog. button to switch to programming mode. The Prog. button fl ashes quickly, a signal sounds and the other three buttons fl ash alternately. | 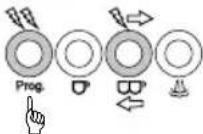 |
| Push the button. The machine indicates the current automatic shutdown setting with the button illumination. | 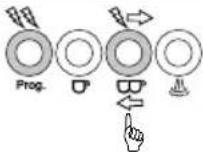 |
| Now, set the desired changeover time: | |
| Push the button to set a changeover time of 10 minutes | 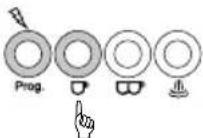 |
| Push the button to set a changeover time of 30 minutes | 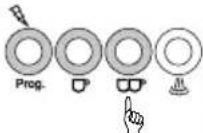 |
| Push the button to set a changeover time of 120 minutes | 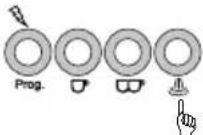 |
| Push the Prog. button again to save the setting. The Prog. button fl ashes twice and a signal sounds twice. |  |
| After that, the appliance returns to operation mode. | 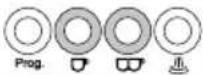 |
In general:
Pushing the Prog. button gets you to programming mode.
Subsequently pushing the 📄 button gets you to the automatic standby changeover time interval settings menu.
After that, you can perform the following settings:
☐ is the setting for "10 minutes" (default setting)
ω is the setting for "30 minutes"
is the setting for "120 minutes"
Push the Prog. button to save the program.
4. Resetting the appliance (Restore default settings)
If you want to reset your appliance, please proceed as follows:
| In operation mode, press and hold the Prog. button for 10 seconds. All 4 buttons fl ash three times.Default settings are restored. A triple signal sounds. | 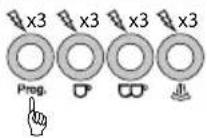 |
| After that, the appliance returns to operation mode. | 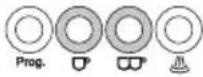 |

MAKING ESPRESSO WITH YOUR SOLIS BARISTA PERFETTA PLUS
NOTE: Check the water level in the water tank before every use. Change the water daily. Follow the Min- and Max-markings on the tank. Do not use any distilled or carbonated water, soda or other liquids.
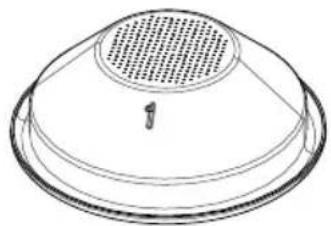
1. CHOOSING THE RIGHT FILTER
Single wall fi Iter
The single wall fi lters are ideal for freshly ground coffee. Thanks to the single wall fi lter, you can experiment with grind size, dosage and tamping force to influence the taste of your coffee and make optimal espresso.
There is a single wall fi Iter for 1 cup and one for 2 cups.
natural_image
Line drawing of a dome-shaped object with a perforated top and a small number 1 on the base (no text or symbols)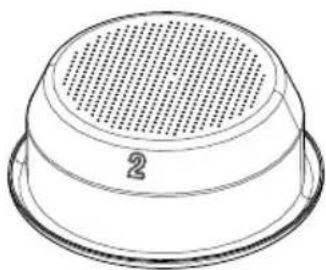
natural_image
Line drawing of a perforated metal bowl with a circular vent, labeled with the number 2 (no text or symbols on the object itself)1 cup 2 cups
EN
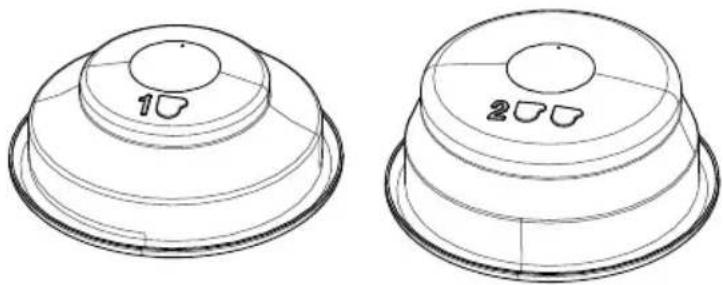
Double wall filter
The double wall filters are ideal for pre-ground coffee. They optimise the extraction pressure and thus help make the espresso enjoyment optimal.
There is a double wall filter for 1 cup and one for 2 cups.
natural_image
Two technical line drawings of a dome-shaped object with circular cutouts, no text or symbols present1 cup 2 cups
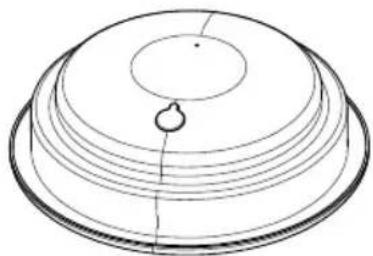
Filter for compact 44 mm pods
If you want to use compact pods, use the filter for pods.
Place the coffee pod in the centre of the filter as precisely as you can and place the pod handling paper inside the filter. Read the instructions on the packaging of the pods.
natural_image
Diagram of a dome-shaped structure with concentric layers and a central hole (no text or symbols)2. TIPS FOR THE PERFECT ESPRESSO
EN
Storage
- To prevent coffee aromas from evaporating quickly, it is best to store your coffee airtight in its original packaging in a cool and dark place. But never in the refrigerator, as it is humid and the coffee absorbs the ambient odours.
Preheating the machine
- Before the first use, the appliance parts, the portafilter and the cup should be warmed up so that you can immediately enjoy a cup of hot coffee. Mount the portafilter with the filter inserted but without the coffee powder to the brewing group. Use the same cup with which you later prepare the coffee. Press one of the two coffee buttons to let hot water run through the portafilter into the cup.
ATTENTION: There may still be hot water in the portafilter. Be careful not to scald yourself.
- As long as the appliance parts are still hot, only the cups need to be pre-heated. The cup tray warms up during operation. It can be used for preheating cups. You can also rinse the cups with a little hot water.
Grinding
- For a perfect coffee, the coffee beans should be freshly ground with a grinder. There is no such thing as the right grind size, as factors such as variety of coffee bean, amount of coffee powder and tamping pressure also play an important role. Experiment to make your personal favourite coffee.
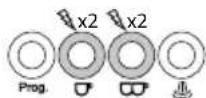
Dosage
- Wipe the filter in the portafilter clean with a dry cloth. Fill the filter for one cup with the measuring spoon of coffee powder (approx. 8–9 g) resp. twice the amount (approx. 16–18 g) for two cups of coffee. Distribute the coffee powder evenly in the filter.
ATTENTION: Don't overfill the filter with coffee powder to avoid a contact with the group head and ensure a consistent extraction and a proper seal in the group head.
Tamping
- Use the tamper (V) to tamp the coffee powder. Like that, it can provide the necessary resistance to the water flowing through. Make sure that the tamper is pushed down straight so that a horizontal bed of coffee is formed.
- Remove coffee residue from the edge of the portafilter so that it can be correctly inserted into the brewing head.
ATTENTION: If the edge of the portafilter is not clean, the portafilter can not be inserted tightly into the brewing head and water may leak out next to the portafilter.
NOTE: When using compact 44 mm pods, simply place them in the center of the corresponding filter (S). Tamping is not necessary in this case.
EN
Dispensing the coffee
- Rinse the brewing group for a few seconds by pressing one of the coffee buttons. This will remove old coffee residues. Then, insert the portafilter into the brewing group so that you align the handle of the portafilter with the "Insert" symbol, lock the portafilter into place and turn the handle to the right until you feel a resistance and the handle stands at approx. 90° to the machine, under "Lock". Place one or two cups (preferably preheated) under the outlets of the portafilter.
- As soon as the machine has reached the temperature for dispensing coffee, the two coffee buttons ▼ and □ constantly light up white. Press one of the coffee buttons and the machine starts the process and automatically cancels the dispensing process.
After each coffee brew
- Carefully remove the portafilter from the brewing head. Use a knock-out bowl to knock the coffee grounds out of the filter. Please do not pour the coffee grounds down the drain, as this might clog the sewage pipes.
ATTENTION: The portafilter, filter and especially the coffee grounds are very hot! Be very careful when removing it, you could scald yourself. Rinse the filter and the portafilter carefully under running water. Dry both parts with a cloth.
- Regularly check whether the drip tray is full and has to be emptied to prevent overflow which could damage the underlying surface. The drip tray must be emptied at the latest when the red float gauge between the drip grid becomes visible.
3. PROGRAMMING THE COFFEE AMOUNT FOR 1 CUP OR 2 CUPS
During the first coffee preparation, you can program the extraction volume for 1 cup or 2 cups. Please proceed as follows:
- Wait until both coffee buttons constantly light up white.
- Press and hold the ☐ or button for at least 5 seconds. As long as you keep the button pressed, coffee will run into the cup after a brief pre-brewing phase. When the desired quantity has been dispensed, release the button, the coffee dispensing stops, two signals sound and the dispensed quantity is saved. During programming and coffee dispensing, the Prog. button and the coffee button you have used flash. After dispensing, only the two coffee buttons light up constantly and indicate that the machine is in operation mode.
- The next time you prepare coffee with the same coffee button, just press the coffee button briefly and the stored quantity will be brewed.
- By changing type of coffee and/or amount of coffee powder, you may need to re-adjust the volume.
ATTENTION:
- The machine stops automatically after approx. 1 minute or after 300 ml of coffee have been dispensed.
- If you want to change the saved amount, simply press and hold the coffee button again until the new amount has been dispensed and saved.
• You can stop the extraction at any time by pushing the coffee button again.
In general:
As long as the two coffee buttons are flashing, the machine is heating up.
As soon as both coffee buttons constantly light up white, the machine is ready for use.
While a coffee is being prepared, the pressed button flashes. If the coffee is prepared for the first time and the coffee button is held down until the desired volume is in the coffee cup, the Prog. button and the pressed coffee button flash during this time.
- If you want to brew another cup remove the portafilter, tap the coffee grounds out of the filter and rinse the portafilter clean with clear hot water. CAUTION: The portafilter and the filter are hot! Afterwards dry the filter with a clean towel. The filter is now ready for use again.
CAUTION:
Never leave the espresso machine unattended while brewing espresso!
Never touch the hot surfaces of the espresso machine. You could scald yourself! The portafilter, the filter and the steam / hot water outlet are especially hot during and after use!

STEAMING MILK FOR CAPPUCCINO / CAFFE LATTE
The stainless steel steam / hot water wand with steaming nozzle of your Solis Barista Perfetta Plus turns fresh, cold milk into creamy, warm, frothy milk to produce a delicious cappuccino or caffe latte.
Proceed as follows:
• First, make an espresso in a bigger cup.
- To activate the steam function for steaming milk, press the steam button the operation mode (when both coffee buttons light up white): the button starts flashing for as long as the machine is heating up for the steam function, the two coffee buttons are meanwhile off. As soon as the steam button is constantly lit up white, the steam function is ready for operation.
- Pour fresh, cold milk into the milk jug up to the bottom end of the spout. Keep in mind that the volume of cold milk doubles when it is steamed up.
- As soon as the steam button is constantly lit up white, move the steam/hot water wand with the thermo-insulated rubber handle so that it is positioned above the holes in the drip grid.
- Open the steam/hot water control all the way for a few seconds to flush out any residual water in the steam wand. Turn off the control again.

EN
- Lower the frothing nozzle of the steam/hot water wand a few millimetres into the milk, then turn the steam/hot water control all the way up. Steam escapes and the steam button flashes during the steam function.
- When the milk is sufficiently steamed or as soon as your hand can not touch the milk jug for longer than 3 seconds (ideal temperature of approx. 65 °C is reached), turn off the control. Only then remove the milk jug. The steam button constantly lights up white again.
- Wipe the steam/hot water wand clean with a damp cloth. Lower the steam/hot water wand with the thermo-insulated rubber handle down to the holes in the drip tray, turn the steam/hot water control back to the highest steam position and allow some steam to escape into the drip tray to flush the milk residue out of the steam/hot water wand. Turn off the control.
• Pour the steamed milk directly onto the espresso.
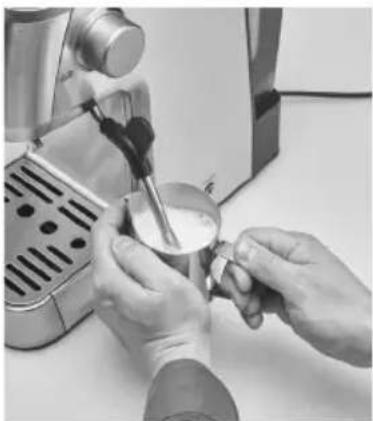
natural_image
Person pouring milk from a espresso machine (no visible text or symbols)CAUTION: Never touch the hot surfaces of the espresso machine especially the one of the steam / hot water wand during and after the steam function. You could scald yourself! Never point the steam / hot water wand towards persons, animals or steam and moisture sensitive furniture! The escaping steam is very hot and could cause scaldings!
NOTES:
• A steam release of not more than 60 seconds is recommended.
- As long as the steam button is constantly lit, you can activate the steam function at any time. After approx. 40 seconds, the machine exits the steam mode and slowly cools down to again reach the temperature for dispensing coffee. This might take a few minutes. During this time, the two coffee buttons flash. To speed up the cooling process, press one of the two coffee buttons. The cooling-rinsing cycle is performed, steam escapes into the drip tray and the two coffee buttons flash white. As soon as the two coffee buttons constantly light up white, coffee can again be prepared. If you want to return to the steam function, press the steam button and wait a few seconds until the steam button constantly lights up white.
In general:
If the steam button flashes, the appliance is heating up for the steam function.
If the steam button is constantly lit up white, the steam function can be activated by turning the steam/hot water control.
If the two coffee buttons flash, the appliance cools down again for coffee dispensing or a cooling-rinsing cycle is performed.
If the two coffee buttons are constantly lit up white, coffee can be prepared resp. the machine is in operation mode.

HEAT WATER OR BEVERAGES USING THE STEAM FUNCTION
EN
You can also use the steam function and the steam / hot water wand to heat water or beverages (e. g. hot chocolate).

HOT WATER FUNCTION
You can also use the steam / hot water control (M) to prepare hot beverages (e.g. tea) by pouring hot water out the steam / hot water wand.
Proceed as following:
- Place a container under the steam / hot water wand.
- Counter clock wisely turn the steam / hot water control all the way up, hot water runs through the steam / hot water wand into the container. The two coffee buttons flash white.
- To stop the flow of hot water, turn off the steam / hot water control. The two coffee buttons constantly light up white, the appliance is ready for use
CAUTION: Never touch the hot surfaces of the espresso machine especially the one of the steam / hot water wand during and after the hot water function. You could scald yourself!
ENERGY SAVING FUNCTION: AUTOMATIC SHUTDOWN
In order to save energy, the Solis Barista Perfetta Plus espresso machine automatically switches to standby mode if it has not been used for several minutes.
You have previously set the duration of this period in the setting "Setting the automatic shutdown", please refer to page 20.
The appliance will remain in standby mode for 20 minutes before switching off.
To reactivate the unit in standby mode, simply press any button.
EN
CLEANING AND MAINTENANCE
ATTENTION: Every time before cleaning, switch off the appliance, disconnect the mains plug from the power outlet and let the appliance cool down.
Do not use abrasive or aggressive cleaning agents, rough sponges or cloths as they might scratch the surface.
ATTENTION: Never immerse the espresso machine casing, the power cord or the power plug in water or other liquids or allow the parts to come into contact with them!
NOTE: The espresso machine parts and accessories are not dishwasher safe.
CLEANING THE FILTER AND THE PORTAFILTER
- Use the small needle of the cleaning tool to clean the hole of the dual wall filters. The pin is not intended for the single wall filters.
- Up to under the handle of the portafilter, place the dirty portafilter and the filter in a container with mild detergent and hot water.
CLEANING THE STEAMING NOZZLE OF THE STEAM / HOT WATER WAND
- Unscrew the steam nozzle from the steam / hot water wand. Rinse the steam nozzle carefully in warm water and then re-rinse it with clear water.
- Should the nozzle be blocked, insert the big needle of the cleaning tool into the opening of the nozzle. If the nozzle still is clogged, first place the nozzle in a glass of hot water, then use the needle again to remove the blockage.
- Screw the nozzle back onto the steam/hot water wand.
■ CLEANING THE CASING, THE CUP TRAY AND THE WATER TANK
Clean the casing, the cup tray and the water tank with a soft, slightly moist cloth, then dry it with a dry cloth.
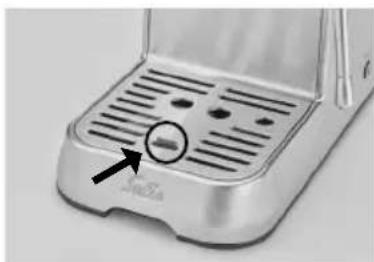
CLEANING THE DRIP TRAY WITH DRIP GRID
- Remove, empty and clean the drip tray with the drip grid at regular intervals but every time it is full and the red float gauge is visible between the drip grid.
natural_image
Close-up of a metallic automotive door with ventilation grilles and a small circular mark highlighting a feature (no text or symbols visible)- Remove the drip grid and pull the drip tray out to the front. Hand wash the drip tray and the drip grid with mild detergent and warm water. Do not use any aggressive cleaning agents or scouring sponges. Rinse the tray and the grid with clear water and carefully dry both parts.
EN
CAUTION: Drip tray and drip grid are not dishwasher safe.
• Reinsert the drip tray and place the grid back on the drip tray.
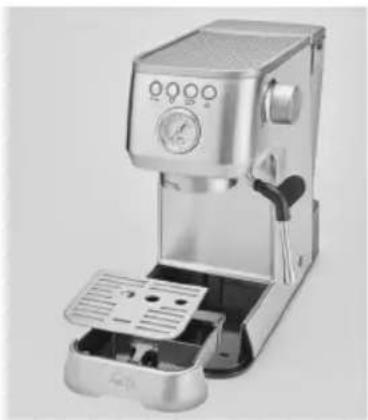
natural_image
Modern stainless steel coffee maker with control panel and open lid (no visible text or symbols)- CLEANING THE BREWING HEAD AND THE BREWING GROUP - PERFORMING THE CLEANING CYCLE
If the appliance emits a cleaning alarm (button alternately flashes white and red and the button is lit white), you will have to clean the brewing head with the included rubber insert (Y) and a for espresso machines suitable cleaning tablet (e.g. URNEX Cafiza) to thoroughly remove coffee grease and other residues.
Proceed as following:
-
First empty the drip tray and place it back into the appliance. Fill the water tank up to the Max-marking with water. Place a container under the brewing group.
-
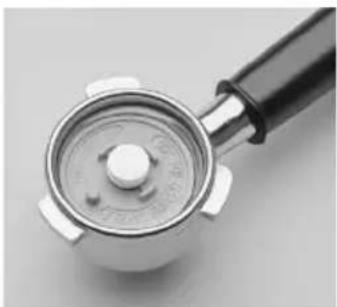
Now, place one of the filters for 2 cups in the portafilter. Place the rubber insert (Y) in the filter and put a cleaning tablet on top. Insert the portafilter into the brewing group.
natural_image
Close-up of a metallic mechanical lever handle with a black handle and white dial (no text or symbols visible)-
Now press the Prog. button, the Prog. button and the 📌 button flash red.
-
Now press the 📌 button to start the automatic cleaning cycle.
-
During the automatic cleaning cycle, the 🎨 and Prog. buttons flash rapidly. The cleaning cycle lasts less than 10 minutes, approx. 500 ml of water are led through the brewing group. During this time the buttons cannot be operated.
-
As soon as the cleaning is finished, two signals are sounded and both coffee buttons constantly light up white, the other buttons are not lit up.
-
Remove the portafilter from the brewing group. Rinse the portafilter, the rubber insert, the filter and the drip tray with warm water. Re-stow the rubber insert for the next use.
EN
STORING THE SOLIS BARISTA PERFETTA PLUS ESPRESSO MACHINE
Store the cooled down, cleaned and dry machine in an upright position, ideally in the original packaging. Do not place any items on the appliance.

DESCALING
If your machine requires a descaling cycle, the machine will emit a descaling alarm: In operation mode, the steam button flashes red and both coffee buttons constantly light up white.
In this case, the machine can still be used, but none of the settings (except for the coffee quantity) are available at this moment.
ATTENTION: In the event of an alarm, you should descale your machine immediately in order to prevent the functionality from being reduced or the coffee quality from degrading. Repairs to the espresso machine relative to limescale problems are not covered by the warranty if the descaling procedure described below is not performed regularly.
Solis recommends descaling your Solis Barista Perfetta Plus espresso machine with a mixture of a descaling agent and water. Please use only for espresso makers suitable descaling agents (e.g. URNEX Dezcal powder) for descaling the machine. Damages caused by the use of improper descaling agent are not covered by warranty.
When the descaling alarm is displayed, please proceed as follows:
-
Remove the water tank from the appliance and empty it out. Remove the MAVEA water filter from the tank. Follow the instructions for use of the descaling agent and put the descaling solution in the water tank. Place the water tank back on the rear of the appliance. Empty the drip tray and reinsert drip tray and grid.
-
Place a large container under the brewing head and place the empty milk jug under the steam/hot water wand.
-
While the descaling alarm is displayed, press the Prog. button, now the Prog. button and the steam button flash red.
-
Now, press the steam button to start the automatic descaling program. The Prog. button and the steam button flash quickly. The descaling program lasts less than 15 minutes with few cycles. During one of these cycles, turn on the steam/hot water control (M) to allow steam to escape so that the steam wand is also descaled. Then, turn the control back to the OFF position. During the pauses, the tank can be emptied, making it possible for the tank to hold less than 1 litre to make sure that the tank can stand on the drip grid. Drip tray and grid must not be removed.
-
After these cycles, the descaling process ends, a double signal sounds, the Prog. button and the steam button flash more slowly again. Now the machine has to be rinsed to remove the descaling residues.
-
Refi ll the water tank with minimum 1.2 litres of tap water. Empty both containers and the drip tray. Replace the drip tray and grid. Place the two containers back under the brewing head resp. under the steam/hot water wand.
- Press the steam button, approx. 1 litre of water will run through the brewing group without a pause. During this rinsing process, open the steam/hot water control once to the maximum position for minimum 20 seconds so that the steam/hot water wand is also rinsed. Then, turn the steam/hot water control back to the OFF position so that the remaining water runs through the brewing group. During the rinsing process, the Prog. button and the steam button flash quickly again.
- When the rinsing process is complete, both coffee buttons light up white again, the other buttons are not lit up and a signal sounds twice.
- Remove the water tank again, empty it out, rinse it with clear water and reinsert the water filter. Empty the drip tray and rinse it.
NOTE: Please wipe potential splashes of descaling solution on the appliance casing away immediately, as the agent might damage the surface.
NOTE: If the descaling procedure is not completed correctly (e.g. no electricity), we recommend to complete the procedure and rinse properly the appliance.
WARNING: Never submerge power cord, power plug or the appliance itself in water or any other liquid. During descaling, never remove the water tank or allow it to empty completely.

THE ALARM SIGNALS
ATTENTION! In general: If a button fl ashes red, it represents an alarm signal!
NOTE: The appliance remains operational and coffee can still be dispensed. Only the settings are unavailable while an alarm is emitted.

WATER FILTER HAS TO BE REPLACED: BUTTON FLASHES WHITE / RED
For the water filter alarm, the button alternately fl ashes white and red, the button lights up white.
Once the water fi lter alarm is emitted, please proceed as follows:
- Press the Prog. button.
- Remove the water tank, remove the water fi liter, rinse the water tank and insert a new fi liter. Fill the tank with cold water up to the Max-marking and reinstall the water tank. Please refer to page 14–15 for information on how to install the MAVEA Intenza water fi liter.
- Place the container under the brewing group.
- Press the ☐ button to activate the automatic rinse cycle. 500 ml of water are fed through the appliance.
- Once the ☐ and ☐ buttons constantly light up white, the appliance is back in operation mode.
EN
CLEANING CYCLE HAS TO BE PERFORMED: 🎨 BUTTON FLASHES WHITE / RED
For the cleaning alarm, the 📄 button alternately fl ashes white and red, the ⭕ button lights up white.
Please refer to page 29 for information on how to perform the cleaning cycle.
■ DESCALING CYCLE HAS TO BE PERFORMED: BUTTON FLASHES RED
For the descaling alarm, the 🎨 button fl ashes red, both coffee buttons light up white.
Please refer to pages 30–31 for information on how to perform the descaling cycle.
ATTENTION: It is possible that multiple alarm signals are displayed at the same time.
In such a case, each alarm should be fixed individually according to the description in the manual, until all alarms have gone out and both coffee buttons constantly light up white again.
ALARM SIGNAL "COFFEE DISPENSING NOT POSSIBLE": BOTH COFFEE BUTTONS FLASH TWICE AND TWO SIGNALS ARE SOUNDED
Possible reasons and fixes:
When water tank is empty the machine will stop to brew coffee or pouring hot water or steaming after a few seconds.
Fill the water tank up to the Max marking and press one of the two coffee buttons. The two coffee buttons constantly light up white if the appliance is ready for use again.
IMPORTANT: Please always fill the tank with water after the fi Iter has been installed and start the settings and the rinse cycle for the new fi Iter as described on page 17.
Coffee dispensing is not possible because the coffee is ground too finely: The pump stops if no coffee is dispensed after 60 seconds and two signals are sounded.
Change out the ground coffee in the filter, the coffee powder has to be less finely ground.
| Problem Possible cause | Solution | |
| Machine doesn't work. | Machine is not switched on or power plug is not plugged in.Short circuit / power outlet is without power.The espresso machine is faulty. | Make sure that the power plug is plugged in, that the ON/OFF button has been pressed and that both coffee buttons light up white.Check the power supply.Contact service center. |
| Coffee does not or only slowly run out of the porta-filter. | Water tank is empty.The water tank is not installed correctly.Coffee is ground too finely.Too much coffee in filter.Ground coffee is tamped too strongly.Filter is clogged up.The machine is set to steam / hot water mode, meaning the steam button has been pressed (the steam button is lighting up or blinking and the coffee buttons and are not lighting up).The steam / hot water control is open.The espresso machine is faulty. | Fill water tank.Correctly install the water tank.Ensure appropriate degree of grinding.Ensure appropriate amount.Tamp ground coffee less strongly.Clean the filters.Press one of the coffee buttons and wait for the two coffee buttons to constantly light up white.Turn off the control.Contact service center. |
| Coffee runs through too quickly. | Coffee is ground too coarsely.Too little coffee in filter.Ground coffee is not tamped strong enough. | Ensure appropriate degree of grinding.Ensure appropriate amount.Tamp ground coffee more strongly. |
| Problem Possible cause | use Solution | |
| Coffee is cold. Cups | not pre-warmed.Machine is not pre-warmed.Brewing temperature is too low. | Pre-warm cups with warm water.Let water run through the appliance with the inserted portafilter (with filter but without ground coffee) before extracting the first coffee to warm up all appliance parts.Change brewing temperature. |
| Water is pooled under the espresso machine. | The drip tray is filled with water.The espresso machine is faulty. | Empty and clean drip tray.Contact service center. |
| The espresso tastes sour. | The ground coffee was stored in a warm, humid room for extended periods of time and is spoiled. | Always use freshly ground coffee and store the unopened packs in a cool, dry room. After opening, reseal the pack as airtighly as possible. |
| The steam fails to steam the milk. | The steam button has not been pressed / is still blinking.The milk jug is too big or the jug shape is unsuitable.You have used milk with less than 3.3% of milk protein. | The machine is only able to produce steam after reaching its operating temperature. The steam function is active, if the steam button lights up white constantly while the coffee buttons and are simultaneously turned off. The steam / hot water control has to be turned on to the maximum position.Always use a tall, slim container ideally made from stainless steel.Use milk with more than 3.3% of milk protein. |
| Problem Possible cause | Use Solution | |
| Not producing steam. | Steam function was used for more than 2 minutes.Steam / hot water wand is clogged.Water tank is empty.Steam button was not pressed / steam/hot water control was not turned on.The espresso machine is faulty. | Turn steam / hot water control off for at least 1 minute.Clean the steam / hot water wand and steaming nozzle.Fill the water tank.Press the steam button and wait until it stops blinking. Turn the steam / hot water control to the maximum position.Contact service center. |
| Hot water function is not working. | Water tank is empty.Pre-heating phase was not completed.Steam / hot water control is not turned on.Hot water function was used for more than 2 minutes consecutively.The espresso machine is faulty. | Fill the water tank.Wait until the 1 and 2 cup buttons are lighting up constantly.Turn the steam / hot water control to the maximum position.Turn steam/hot water control off for at least 1 minute.Contact service center. |
| Coffee is dripping out of the rim of the portafilter. | Too much coffee in the filter.Coffee ground is sticking to the sealing ring of the brewing head.Pods has the handling paper out of the pod filter.Portafilter is not completely closed.The espresso machine is faulty. | Make sure to use the correct amount of coffee.Turn off the machine, wait until it has cooled down and then clean the filter, the portafilter and the brewing head with its sealing ring.Place the pod with handling paper completely in the filter.Insert the portafilter and turn the handle to the right until you feel some resistance.Contact service center. |
Should none of the above-stated reasons apply, please refer to Solis or an authorised Solis service center.
| EXPLANATIONS TO THE BUTTON LIGHTS | ||||
| Prog. Button | button | button | button | Explanation |
| flashes twice | flashes twice | flashes twice | flashes twice | Appliance just switched on |
| off flashes | flashes off | - Pre-heating phase | - Hot water dispensing- Steam function: Automatic rinse cycle is performed resp. cool down phase.- Temperature too high for coffee function after steam dispensing.Wait for appliance to cool down | |
| off alight | alight off | Operation temperature | reached, ready for use | |
| off flashes | off off Coffee dispensing | |||
| off off flashes | off off Coffee dispensing | |||
| off off off | flashes Pre-heating phase of steam function / steam function in use | |||
| off off off | alight Steam function ready | |||
| off flash alternately Standby mode | ||||
| off flashes | white/red | alight off Water filter alarm | ||
| off alight | flashes | white/red | off Cleaning alarm | |
| off alight | alight flashes | red | Descaling alarm | |
| off flashes | quickly | flashes quickly | off Coffee dispensing not possible (water tank empty) | |

ACCESSORY
EN
The following accessory is available for your Solis Barista Perfetta Plus espresso machine:
Art. no. 960.97 SOLIS Scala Plus coffee grinder

TECHNICAL SPECIFICATIONS
Model-No. Type 1170
Product description Espresso machine
Voltage/Frequency 120 V\~60 Hz
Output 1550 Watt
Measurements 18,7 × 37,2 × 32,1 cm (length × depth × height)
Weight 5,7 kg
Technical changes reserved.
HELPLINE
This item stands out due to its long-life cycle and reliability. Despite this though, if a malfunction ever occurs, simply contact us. Often a breakdown can be easily and quickly remedied with the right tip or technique without having to straight away send off the device for repair. We will give you all the advice and practical support you require. Live chat on: www.seattlecoffeegear.com / E-Mail: support@seattlecoffeegear.com / phone: 866-372-4734.
Keep the original packaging in a safe place so that you may use it in the event that transportation or shipping of the product becomes necessary.
F
▲ CONSIGNES DE SECURITE IMPORTANTES
text_image
A B C D Prog K J L M E F N I G H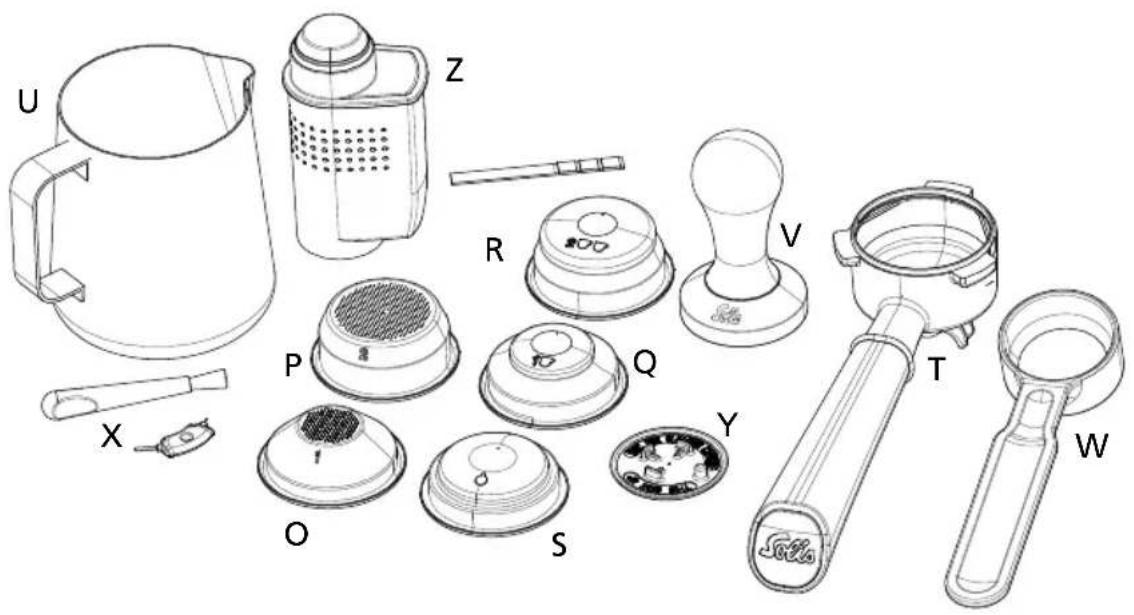
text_image
Technical diagram of a portable kitchen appliance with labeled parts including kettle, blender, and water filter▲ DESCRIPTION DE L'APPAREIL
natural_image
Close-up of a hand operating a modern espresso machine with a handle (no visible text or symbols)natural_image
Black and white photo of a modern cylindrical device with a transparent interior and a small white object inside (no visible text or symbols)natural_image
Line drawing of a dome-shaped object with a perforated top and a labeled base (no text or symbols)
natural_image
Line drawing of a dome-shaped object with perforated top surface and labeled number 2 (no text or symbols beyond basic markings)1 tasse 2 tasses
natural_image
Line drawing of a circular mechanical component with a central hole and a small '10' mark (no text or symbols)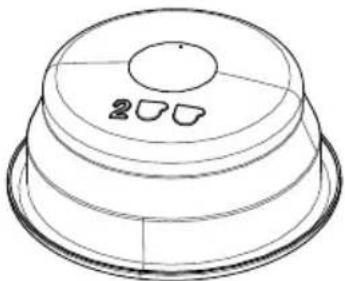
natural_image
Line drawing of a layered dome-shaped object with circular top and two small cutouts on the side (no text or symbols)1 tasse 2 tasses
natural_image
Diagram of a dome-shaped structure with concentric layers and a central hole (no text or symbols)2. CONSEILS POUR UN ESPRESSO PARFAIT
La conservation
natural_image
Close-up of hands using a small metal spoon to prepare milk from a coffee machine (no visible text or symbols)natural_image
Close-up of a stainless steel coffee maker's base with a circular mark and arrow pointing to a textured surface (no visible text or symbols)
natural_image
Modern espresso machine with control panel and open base (no visible text or symbols)
NETTOYAGE DE LA TETE ET DU GROUPE DE PERCOLATION - EFFECTUER UN CYCLE DE NETTOYAGE
F
natural_image
Close-up of a metallic mechanical component with a black handle and circular dial (no visible text or symbols)text_image
A B C D K J L M E F N I G H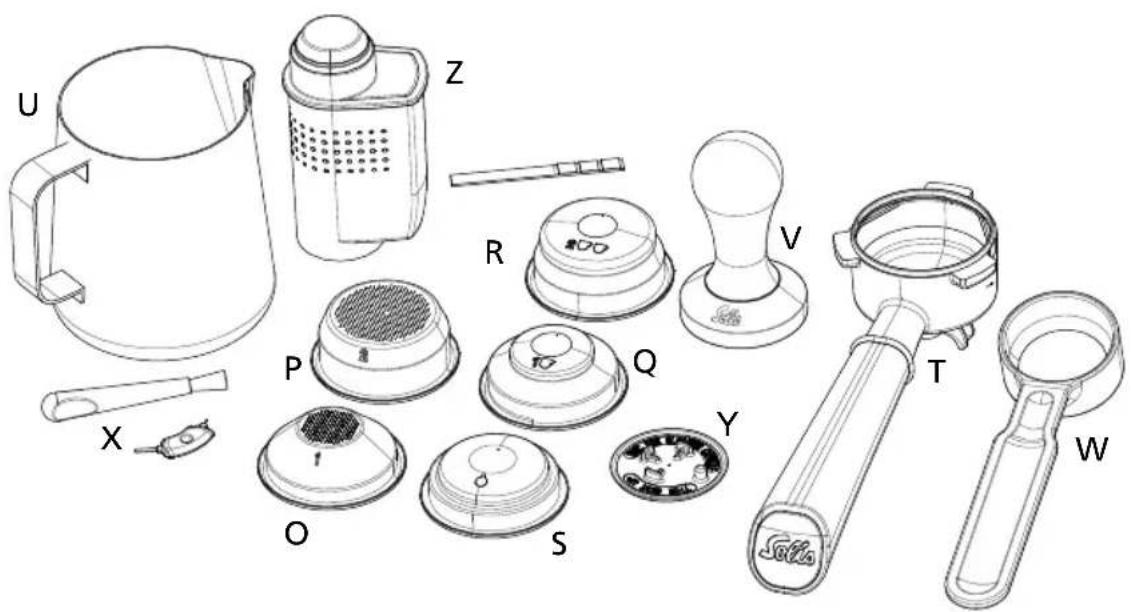
text_image
Technical diagram of a kitchen appliance with labeled parts including kettle, heater, and blendertext_image
OFF M N OKnatural_image
Close-up of a hand operating a beige microwave oven machine (no visible text or symbols)natural_image
Black and white photo of a modern water dispenser with a small container inside, no visible text or symbols.natural_image
Technical line drawing of a dome-shaped object with a perforated top and base, no text or symbols present.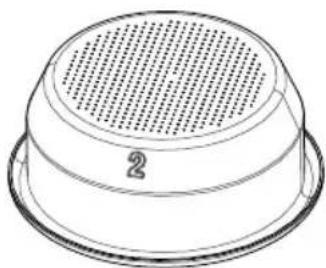
natural_image
Line drawing of a circular perforated object with a base labeled '2' (no text or symbols beyond the number)1 taza 2 tazas
natural_image
Two technical line drawings of a dome-shaped object with circular cutouts, no text or symbols present.1 taza 2 tazas