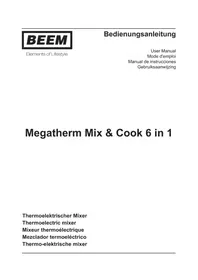
Thermostar MiXX & Cook - Food Processor BEEM - Free user manual and instructions
Find the device manual for free Thermostar MiXX & Cook BEEM in PDF.
| Product type | Multifunction food processor with cooking function |
| Brand | BEEM |
| Model | Thermostar MiXX & Cook |
| Dimensions (W x D x H) | 379 x 263 x 332 mm |
| Weight | 5.82 kg |
| Bowl volume (cold) | 2 L |
| Bowl volume (hot) | 1.5 L |
| Rated voltage | 220-240 V AC, 50-60 Hz |
| Rated power (mixer only) | 550 W |
| Rated power (mixer + cooker) | 1200 W |
| Max. operating time (without heating) | 3 min |
| Max. operating time (with heating) | 1 h |
| Noise level | < 70 dB |
| Ambient operating temperature | 0 to 35 °C |
| Protection class | I, IPX0 |
| Adjustable temperature range | 30 to 120 °C (in 10 °C increments) |
| Adjustable speed range | 1 to 10 |
| Integrated scale | Yes, up to 5 kg (accuracy 1 g) |
| Timer / Delay start | Up to 24 h |
| Main functions | Chopping, slicing, mixing, kneading, cooking, heating, steaming, pulse function |
| Included accessories | Mixing bowl, lid with measuring cup, steam tank, steam tray, steam lid, spatula, mixing accessory, steamer basket |
| Dishwasher safe | Approved parts: blade mixer, steam tank, spatula, measuring cup, steamer basket, lid (bowl not compatible) |
| Manufacturer warranty | Warranty extension possible, see BEEM website |
Frequently Asked Questions - Thermostar MiXX & Cook BEEM
User questions about Thermostar MiXX & Cook BEEM
0 question about this device. Answer the ones you know or ask your own.
Ask a new question about this device
Download the instructions for your Food Processor in PDF format for free! Find your manual Thermostar MiXX & Cook - BEEM and take your electronic device back in hand. On this page are published all the documents necessary for the use of your device. Thermostar MiXX & Cook by BEEM.
USER MANUAL Thermostar MiXX & Cook BEEM
Thermostat MiXX & Cook
Multi-function appliance Instruction manual EN 21
For your own safety, please read these safety notes carefully before first use.
- The appliance is intended for chopping, mincing, mixing, cooking, heating, and steaming of food and for kneading of dough for use in households or similar use, like for example staff kitchens in shops, offices, or similar work environments, farms, guests in hotels, motels, and comparable residential-like environments and bed-and-breakfasts.
- This appliance may not be used by children. Keep the appliance and its power cord away from children.
- This appliance can be used by persons with reduced physical, sensory, or mental capabilities or lack of experience and knowledge, if they have been given supervision or instruction concerning safe use of the appliance and understand the hazards involved.
Children shall not play with the appliance.
The temperature of accessible surfaces may be high when the appliance is in use. - Disconnect the power plug in case of a fault occurring during operation, before cleaning or moving the appliance, in case of a power failure, and after use.
- Do not immerse the appliance, the mixing bowl, or the power plug in water or any other liquid.
Before use, check the appliance,
the power cord, and the power plug for visible external damage. Do not use the appliance in case of damage.
- If the appliance or its supply cord is damaged, it must be repaired or the supply cord replaced by the manufacturer, its service agent or similarly qualified persons to avoid hazard. Improper repair may result in serious danger and will void any warranty claim.
- Do not touch the cutting edges of the mixing knife. They are very sharp. Hold the mixing knife only at the upper end when removing or inserting it.
Refer to the chapter "Cleaning and Maintenance" for cleaning of the surfaces coming into contact with food. - Do not reach through the opening in the lid of the mixing bowl while the appliance is running.
- Observe the filling level marks and do not exceed the max. filling quantity.
Use the appliance only with a clean mixing bowl lid. Take care that the edge of the mixing bowl is not dirty. Check the seal of the lid regularly for possible damage. -
Never try to force the mixing bowl lid open. Open the mixing bowl lid only when the speed is zero.
-
Pay attention to splashes of hot mixture sometimes coming out of the mixing bowl lid opening. Place the measuring cup correctly under the mixing bowl lid opening and leave it there, especially when you are processing hot food (for example marmalade, soup).
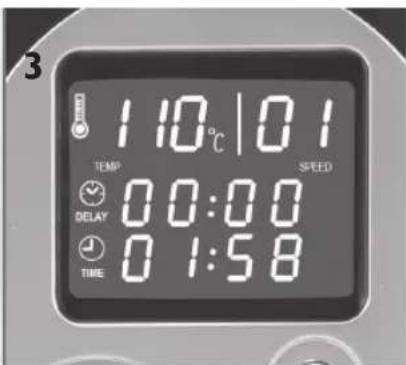
- Do not heat or boil larger mixture quantities at the temperature levels 110 to 120^ C to prevent burning.
Use only the speed level I at the temperature levels I10 to 120^ Higher speeds can cause splashing of hot mixture or foaming over of hot liquid. - Set the appliance onto a level surface resistant to heat and water.
- Remove the mixing bowl carefully to prevent spilling the contents, especially when there is hot food in the bowl.
- Pay attention to correct fit of the lid on the mixing bowl.
- Please note that hot steam escapes from the steaming top during operation.
- Hold the steaming top only at the two handles on both sides.
- Never use the steaming top without the lid.
- When opening the lid, always hold it so that you do not come into contact with the rising steam or the dripping hot liquid.
-
Please note that hot steam continues to escape from the lid opening of the mixing bowl when the steaming top is removed.
-
When working with the steaming top, keep children away from the appliance and warn them about the steam generation and the hot condensate.
Always make sure that a sufficient number of steam openings in the steaming top, the tray, and the steaming top lid remain unobstructed. Otherwise uncontrolled steam discharge may occur. - Fill hot liquids with extreme care into the mixing bowl, as they may be ejected from the mixing bowl by sudden vaporization.
- Never heat the empty mixing bowl.
- Turn on rotation only after the stirring attachment has been attached correctly.
The spatula may not be used when the stirring attachment is used. - Do not add food that could damage or block the stirring attachment with running appliance and use of the stirring attachment.
- Use only original spare parts and accessory parts of the manufacturer or such parts expressly recommended by the manufacturer. Otherwise the warranty or guarantee becomes invalid.
Only use the supplied lid to close the mixing bowl.

Safety instructions
- Use only the measuring cup to close the opening in the mixing bowl lid. Do not cover the mixing bowl lid with towels or similar items.
- Use only the supplied spatula with the safety collar to stir the mixture in the mixing bowl. Never use other objects (spoons, cooking spoons, or similar) for stirring. Such objects could get into the rotating mixing knife and could cause injuries.
Always close the mixing bowl lid before you insert the spatula into the lid opening. - Set the appliance onto a non-slip, clean, and level work surface that cannot be heated, so that it will not slip off. Keep a sufficient distance from the edge of the work surface to keep the appliance from falling down.
- Do not leave the appliance unattended during operation.
- The exiting steam may not be directed directly towards objects susceptible to moisture and heat or appliances and installations containing electrical components.
-
Never operate the appliance in a hot, very damp, or wet environment. Never place the appliance or the power cord on hot surfaces or near open flames.
Take care that the silicone ring sits correctly on the knife unit. Take care that the mixing knife is fixed to the mixing bowl foot.
Take care that the ventilation slits of the appliance at the rear and the bottom always are kept free of grease, food residue, or similar. -
Operate the appliance only on AC and on an outlet installed correctly by a specialist. The voltage of the outlet and the mains frequency must be the same as listed on the nameplate (at the bottom of the power unit).
Always make sure that the contact pins at the bottom of the mixing bowl are clean and dry before setting the mixing bowl onto the appliance. Wipe them dry and clean if required.
Overview
ContentsDear customer!
Congratulations on the purchase of your BEEM Thermostar MiXX & Cook. Read all instructions carefully before using the appliance, and keep the operating instructions for later use. Always include the operating instructions when transferring the appliance to a third party.
Symbols used

Indicates a dangerous situation that can lead to injuries or material damage.

The temperature of accessible surfaces can be high when the appliance is in operation.

Read all instructions carefully before you use the appliance and keep the operating instructions for later use.
Safety instructions 21
Symbols used 24
Overview 25
Scope of delivery 25
Function 26
Before initial use 26
Using the Appliance 27
Bowl Setting and Removal 27
Inserting Seal Rings 27
Using the Scales 28
Time Adjustment 28
Chopping, Mincing, Kneading, Mixing,
Crushing 29
Pulse Function 30
Stirring with the Stirring Attachment 31
Heating, Cooking 33
Using the Steamer Basket 34
Using the Steaming Top 35
Setting the Timer 36
Cleaning and maintenance 37
Cleaning 37
Cleaning the Seal Rings 37
Weighing Surface and Spatula 37
Removal and Insertion of the Knife Unit 38
Troubleshooting 39
Technical data 39
Warranty/guarantee 40
Declaration of conformity 40
Disclaimer 40
Disposal 40
Overview
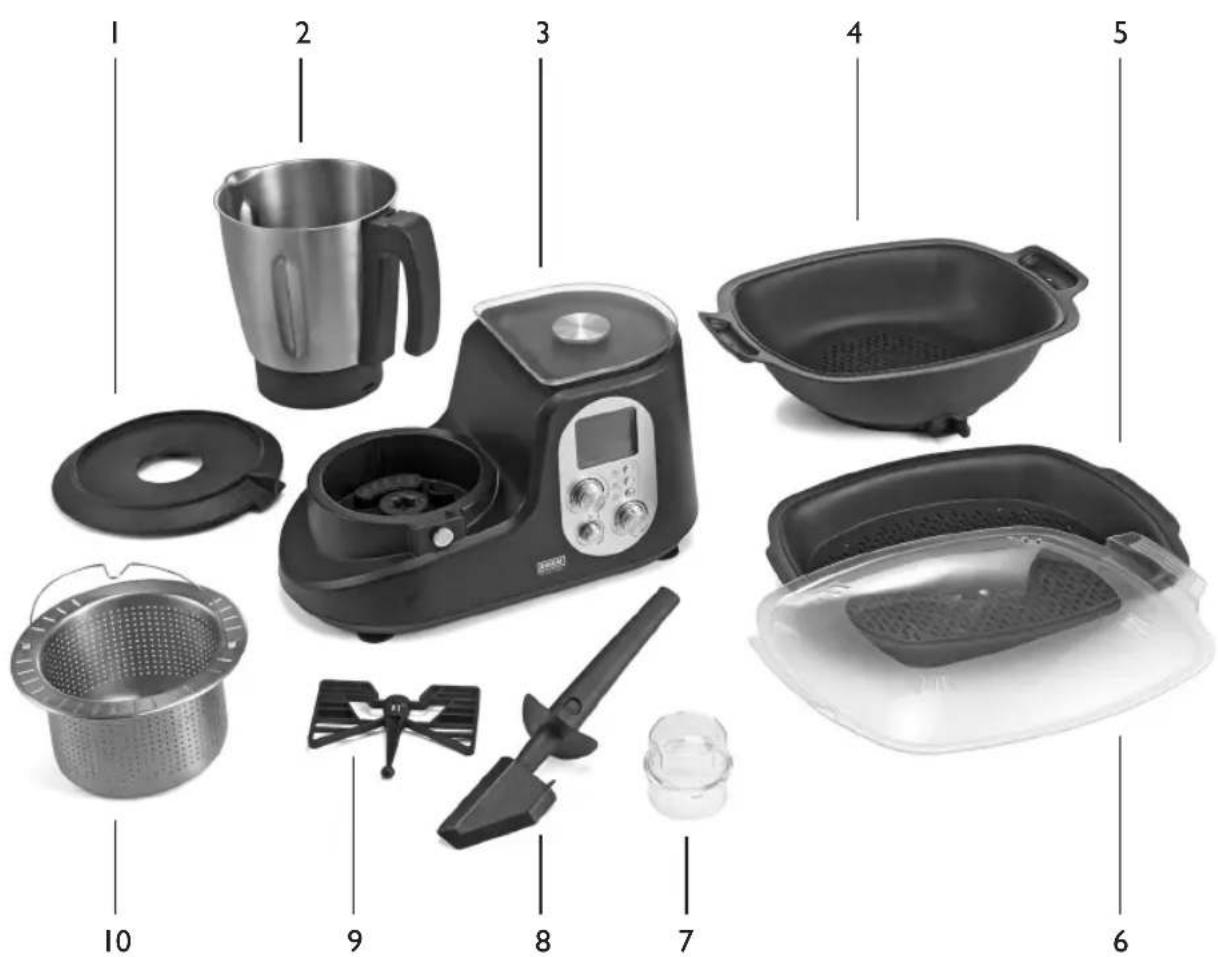
Scope of delivery
Check the scope of delivery for completeness and visible damage.
I Lid with replenishing opening
2 Mixing bowl
3 Base unit with integrated scales
4 Steaming top
5 Tray for the steaming top
6 Lid for the steaming top
7 Lid of the replenishing opening/ measuring cup
8 Spatula
9 Stirring attachment
10 Steamer basket


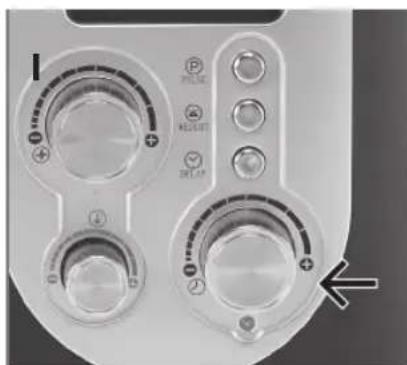
Function
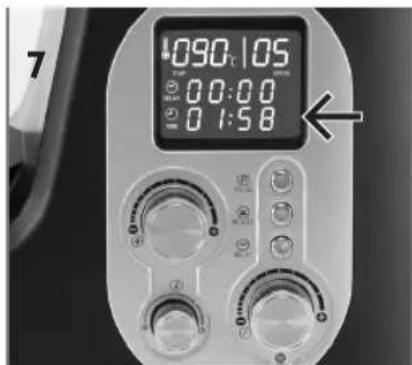
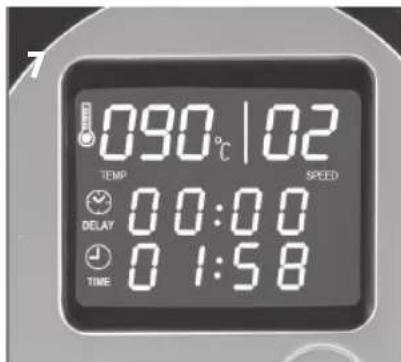
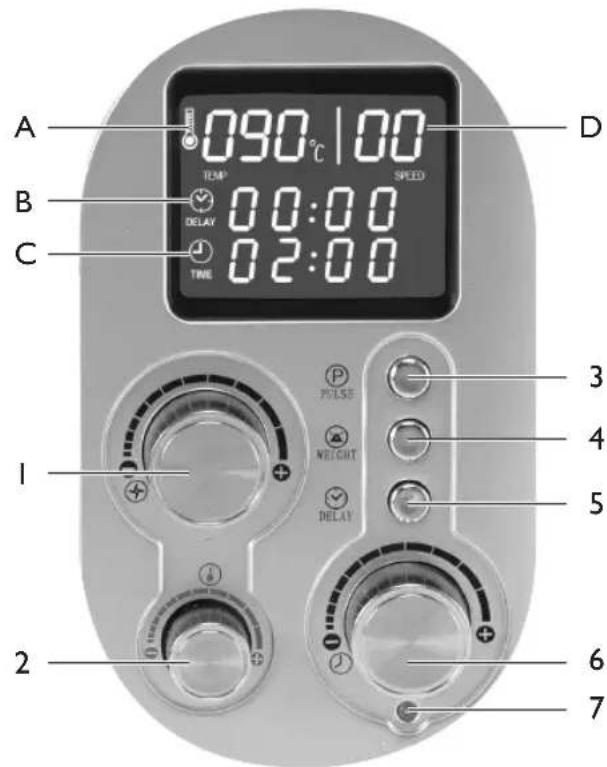
A Temperature display
B Timer display (h:min)
C Time display (min:sec)
D Speed display
I Speed control (steps I to 10)
2 Temperature regulator (30°C to 120°C in steps of 10°C)
3 Pulse Function
4 Activation/Deactivation of the scales
5 Delay (delayed start)
6 Time setting
7 Signal lamp
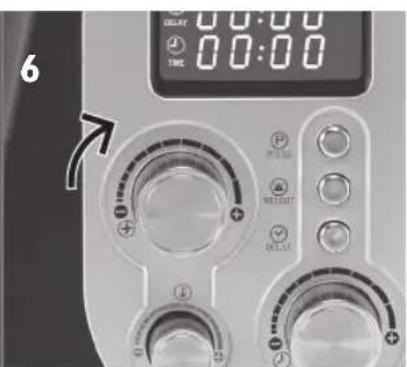
ATTENTION:
The display goes out in standby mode (5 minutes after the end of preparation). Turn the speed control to 0. The appliance now is ready again for operation.
Before initial use
Clean the appliance as described in the section "Cleaning and Maintenance" to remove any production residue. Insert the plug into a power socket for use of the appliance.
Using the Appliance
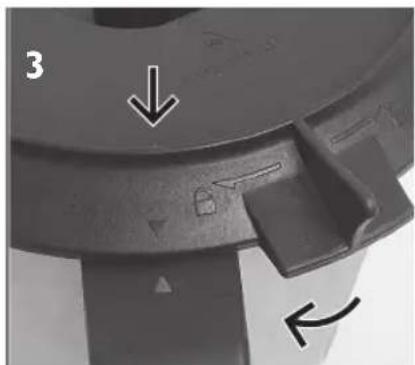
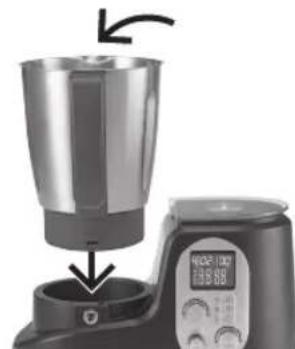
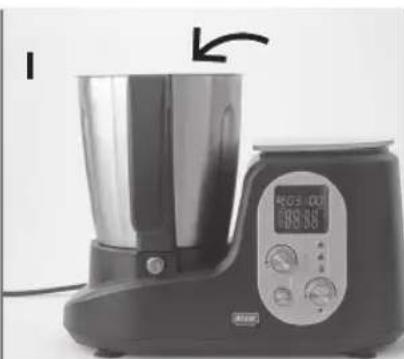
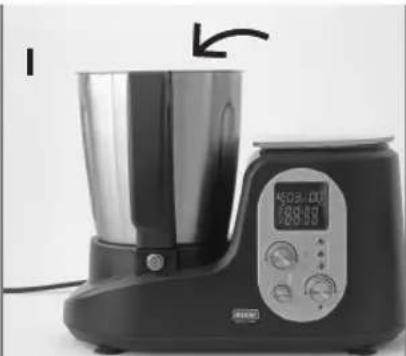
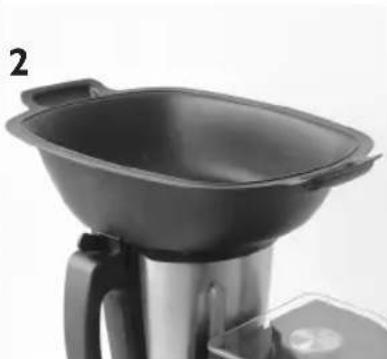
Bowl Setting and Removal
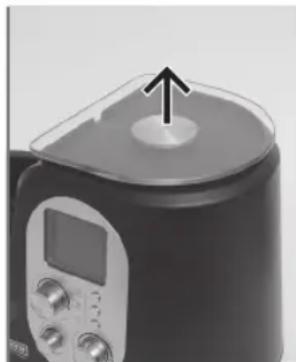
1
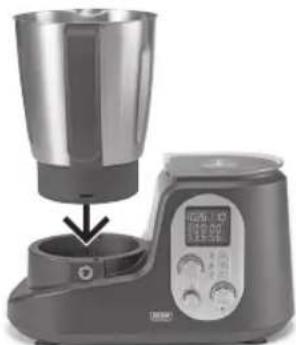
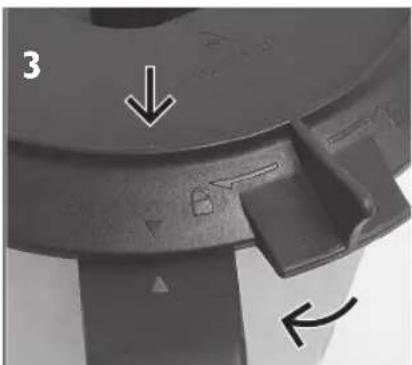
Set the bowl into the appliance from above. The handle points to the front. The bowl engages with an audible click.

For removal of the bowl, press the release E and remove the bowl from the appliance in upward direction.
Note:
Observe the MAX quantity of 2 L. Hot food max. 1.5 L
Min. quantity ca. 300 ml, so that the knife can catch the food.
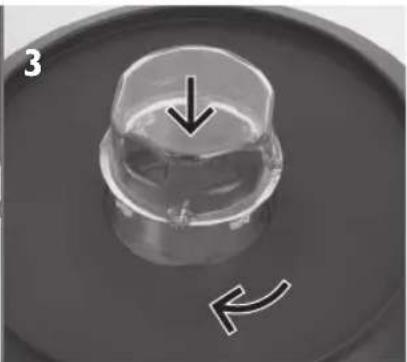
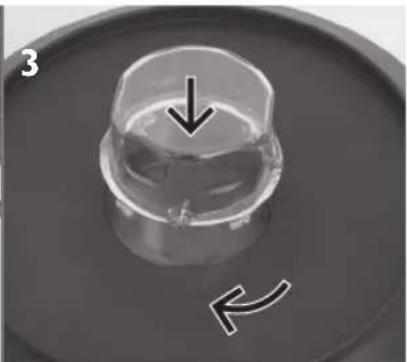
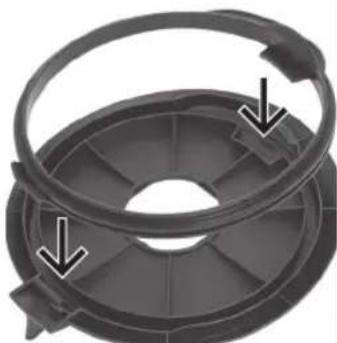
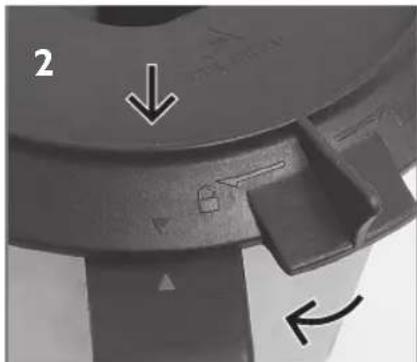
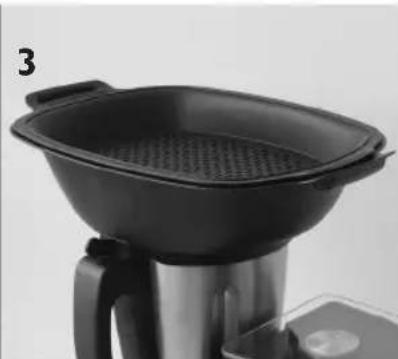
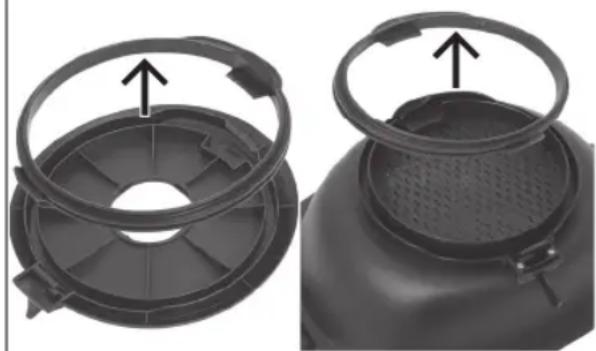
Inserting Seal Rings
1

Align the seal ring of the lid as shown and insert it into the provided opening.
2
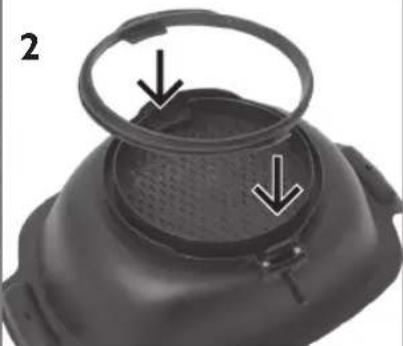
Align the seal ring of the steaming top as shown and insert it into the provided opening.
Note:
Please note the the seal rings are not identical.
Using the Appliance
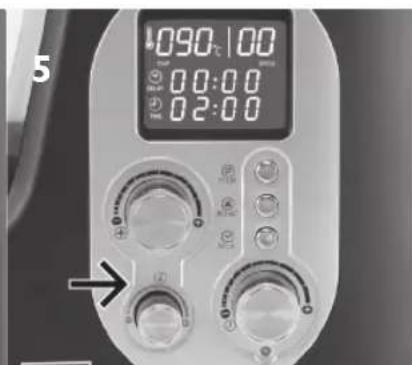
Using the Scales
Press the button 4 to activate the scales. Wait until the bottom display line stops flashing and displays "00:00".
Place the food or the container CENTERED onto the scales. The weight can be read on the display.

Press the button 4 again to deactivate the scales or twice to reset the scales to 0.
Note:
The scales operate only when no program is running. The weight increases in steps of 1 gram to max. 5000g (5kg)
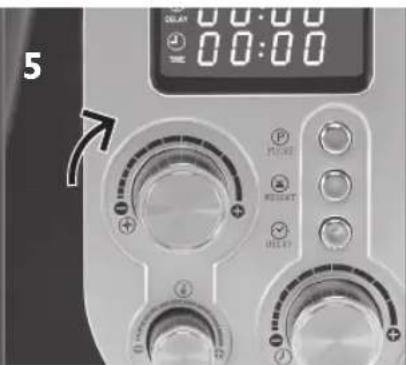
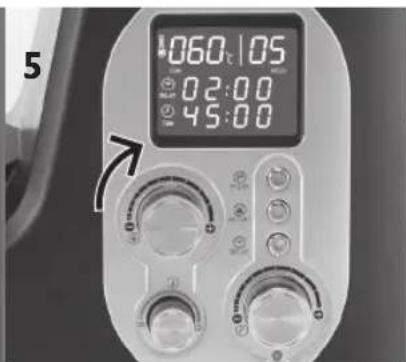
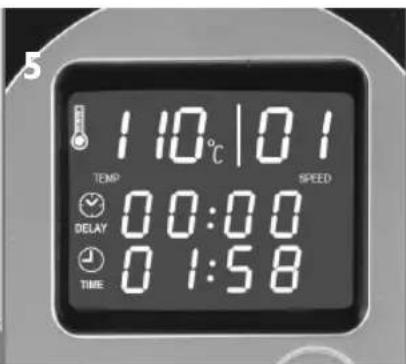
Time Adjustment
Turn the rotary knob 6 to adjust the time.
The time runs backward.

Preparation Interval time
Up to I min I sec
1 to 10 min 30 sec
10 to 60 min I min
Note:
An acoustical signal sounds 10 seconds before the set time runs out, and the display flashes when the operation time has run out. Another signal sounds every 30 seconds, and 5 minutes later the display goes out.
Using the Appliance
Chopping, Mincing, Kneading, Mixing, Crushing
1

Fill the food into the bowl and set the bowl onto the appliance.

Set the lid onto the bowl and lock it.
Set the lid of the replenishing opening and lock it.

When automatic stop is desired, use the rotary knob 6 to set the time (under 1 hour).
Set the speed (1 to 10). The appliance starts the preparation.
Note:
The max. limit for the dough weight is 800g
- When no time is set for the operation, the time runs forward.
Note:
Steps I to 4 for kneading and stirring with and without stirring attachment.
Steps 5 to 10 for chopping, mincing, mixing, and crushing of ice.
- When mincing hard food like nuts or coffee beans or crushing ice, the max. operation time is 40 seconds. Let the appliance cool for at least 10 minutes before operating it again.
The suitable speeds for dough kneading are the steps I to 4.
Using the Appliance
Pulse Function
This function is suited especially for crushing ice and for mixing beverages.
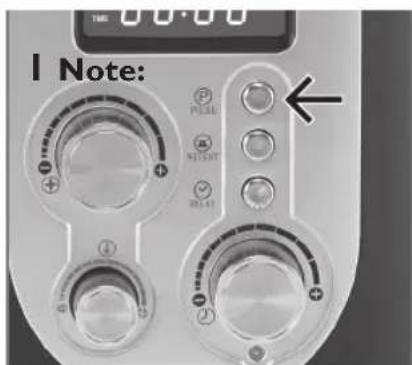
Press the pulse button. The contents of the bowl will be stirred at high speed while the button is being pressed.
The pulse button cannot be operated during the cooking function.
The pulse button is deactivated when the contents of the bowl are above 60^
Using the Appliance
Stirring with the Stirring Attachment
The stirring attachment is suited for the preparation of creams, mayonnaise, stiff egg-white, and cream.
Set the stirring attachment onto the pin of the knife unit. The stirring attachment locks with an audible click.

Fill the food into the bowl and set the bowl onto the appliance.
Set the lid onto the bowl and lock it.

Set the lid of the replenishing opening and lock it.
Stirring can be done even without setting a time. When automatic stop is desired, use the rotary knob 6 to set the time (under 1 hour).
Set the speed (1 to 10), 1 to 4 with the heating function.
Using the Appliance
The clock runs backward during the preparation.

To remove the stirring attachment, pull it off in upward direction while turning it slightly to and fro.
Note:
- Close the lid of the replenishing opening for very slow filling. A small slit is created. Add the liquid slowly onto the lid of the bowl. It now runs even more slowly into the bowl, so that for example the oil for mayonnaise drips even more slowly into the bowl.
- Stir with the stirring attachment with the speed settings 1 to 10, with the heating function max. up to step 4.
- Permanent stirring works with simultaneous time setting. When you set the time first and then the speed, the clock runs backward and the appliance is switched off automatically. When you set the speed, the clock runs forward and the appliance must be switched off manually after the desired duration.
Using the Appliance
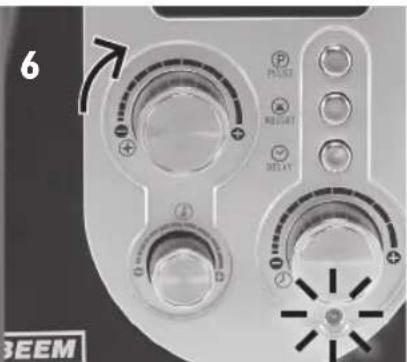
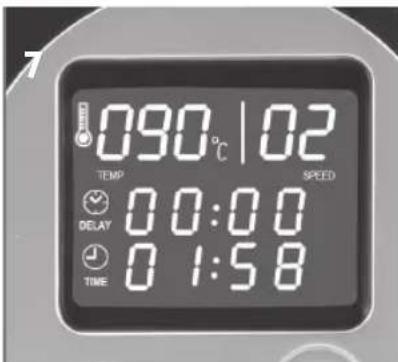
Heating, Cooking
1

Fill the food into the bowl. Set the bowl onto the appliance.

Set the lid onto the bowl and lock it.
Set the lid of the replenishing opening and lock it.

Set the time (under 1 hour) with the rotary knob 6.
Set the temperature (30^ to 120^)

Set the speed (1 to 4), the signal lamp 7 lights when the appliance is heating.
The clock runs backward during the preparation.
Notes:
The heating function works only in connection with time setting.
Time and temperature can be varied at any time.
While the heating function is active, the speed can be adjusted only up to step 4.
Using the Appliance
Note:
The appliance is suited especially for the preparation of baby foods, marmalade, soups, and sauces.
Using the Steamer Basket
Use the steamer basket for cooking of rice, potatoes, and vegetables.

Fill at least 500ml of water into the bowl. This quantity is sufficient for a steaming duration of ca. 30 minutes.

Set the steamer basket with the food into the bowl.

Close the bowl and set the appliance to 100 to 120^ as described under "Heating, Cooking". Possibly reduce the speed to 1.
The spur can be used to remove the steamer basket by the handle.
Note:
For rice, use at least 1 L of water and max. 250 g rice.
Using the Appliance
Using the Steaming Top
Suited especially for fish, vegetables like asparagus and broccoli florets, and dumplings.

Fill at least 500ml of water into the bowl. This quantity is sufficient for a steaming duration of approx. 30 minutes.

Set the steaming top onto the bowl and lock it.

Fill the food onto the tray and set the tray into the steamer basket.

Set the lid onto the steaming top.

Close the bowl and set the appliance to 100 to 120^ Possibly reduce the speed to I.
Note:
The seal ring must be inserted at the bottom of the steaming top.
Using the Appliance
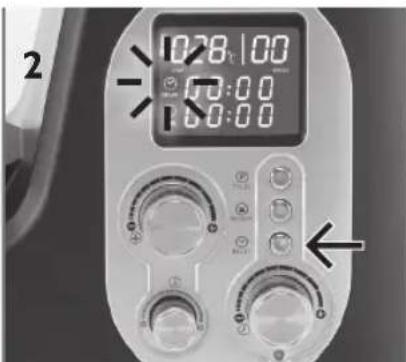
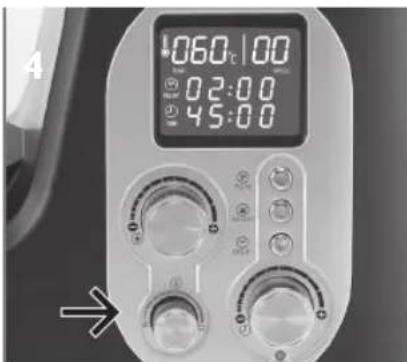
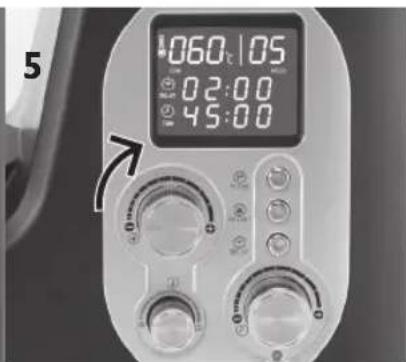
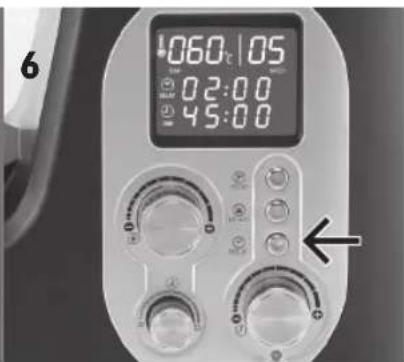
Setting the Timer
You can use the timer to start the preparation with a delay of up to 24 hours.
Timer Interval Up to 1 h 5 min Up to 24 h 10 min
1

Fill the bowl (or the steaming top respectively) with the food and set it onto the appliance.

Pres the button "Delay", the display flashes.

Set the desired delay time (in min) with the rotary knob 6 and press "Delay" again. Set the operation time with the rotary knob 6.

Possibly set the temperature with the rotary knob 2 (30^ to 120^)
Set the stirring speed with the rotary knob I: I to 10, except when heating/cooking food at the same time (I to 4).

Press the button "Delay". The programming now is activated.
Cleaning and Maintenance
Cleaning

Warning:
Switch off the appliance before cleaning, pull the power plug, and let the appliance cool down.
I. Empty the bowl after each use.
2. Clean the inside and the outside of the bowl with dishwater. Do not insert the bowl into water to prevent damage to the contacts at the bottom of the bowl. Wipe the contacts with a damp cloth.
3. In case of very persistent soiling, fill some dishwater into the bowl and run the appliance for a few seconds at speed 1.
4. Remove the knife unit and the silicone seal and clean both in warm dishwater. ATTENTION: They blades are very sharp!
5. Do not use abrasive detergents, metal brushes, or other scratching objects.
6. Dry all parts thoroughly after cleaning.
7. Wipe the base unit with a moistened cloth.
8. The paddle mixer, the steaming top, the spatula, the lid of the replenishing opening, the steamer basket, and the lid can be cleaned in a dishwasher.
Cleaning the Seal Rings

Remove the seal rings. After cleaning, insert the seal rings as described in the chapter "Inserting Seal Rings".
Weighing Surface and Spatula

The weighing surface can be removed for cleaning underneath it (pull the scales uniformly up on all sides).

Press from both sides onto the knob to disassemble the spatula.
The silicone collar (a) can be stripped off to the front.
Cleaning and Maintenance
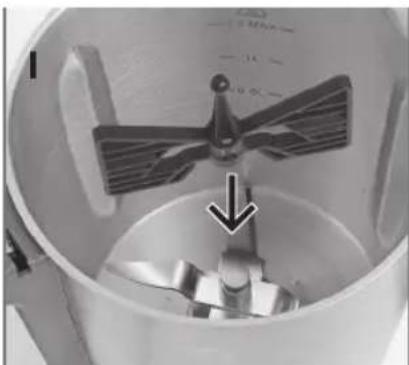
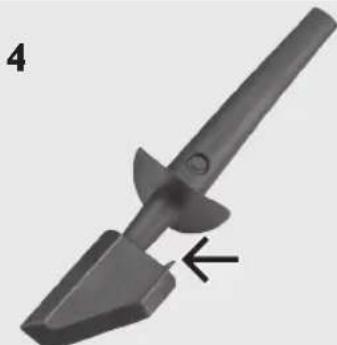
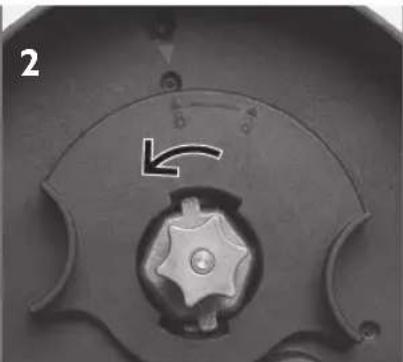
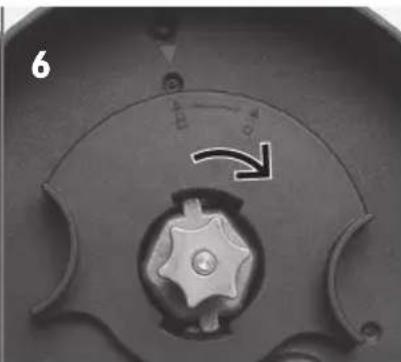
Removal and Insertion of the Knife Unit

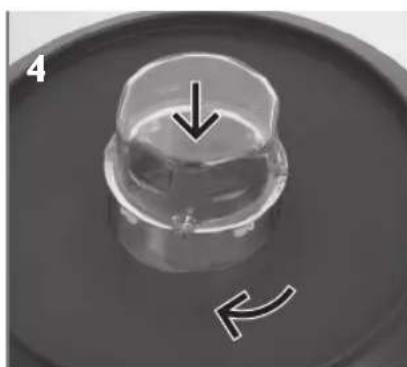
Hold the knife unit at the threaded part, so that it will not drop out of the bowl.
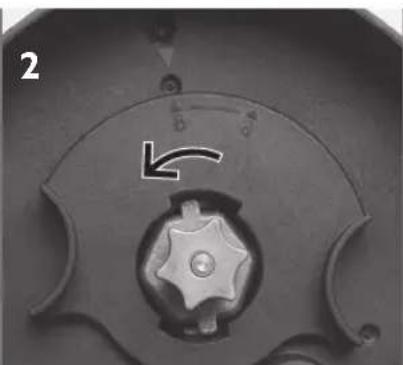
For removal of the knife unit, turn the tightening knob counterclockwise to unlock the knife unit.
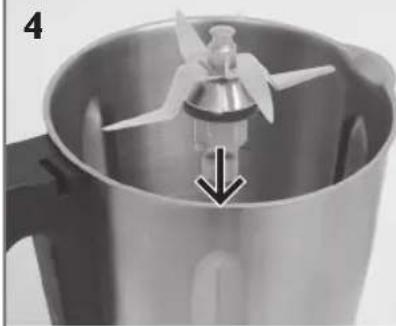
3

After cleaning, set the silicone ring again to the knife unit and push it all the way up.

4

Insert the knife unit from the top into the opening of the bowl.
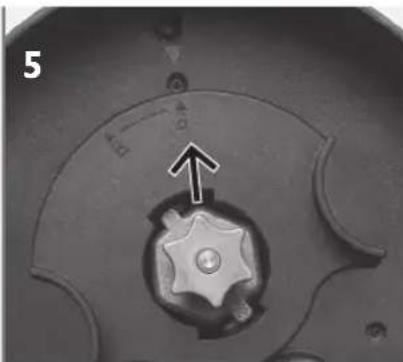
5
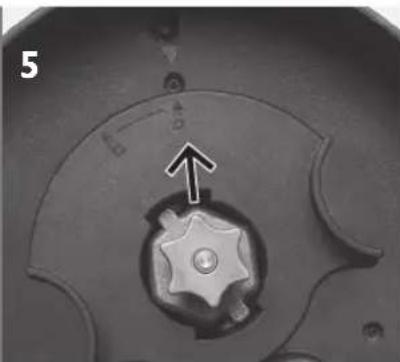
Set the tightening knob onto the knife unit at the bottom of the bowl. Pay attention to the markings.
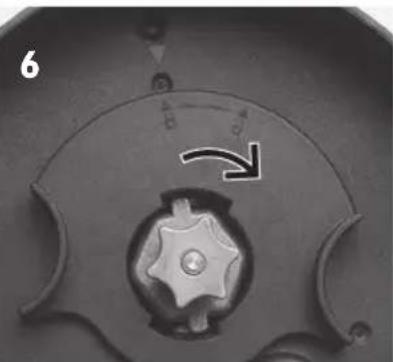
Turn the tightening knob clockwise until the knife unit is locked securely and the marking points towards "Closed".

Warning:
The blades are very sharp. Always hold the knife unit only at the threaded part.
- When the silicone ring is not set correctly onto the knife unit or is not installed at all, liquid may enter into the housing and may damage the appliance.
Cleaning and Maintenance
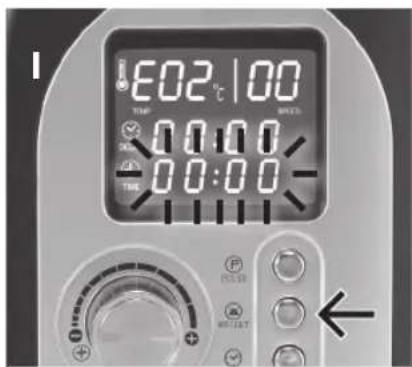
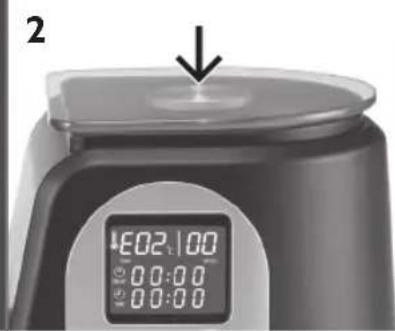
Troubleshooting
| Fault code Cause | Cause | |
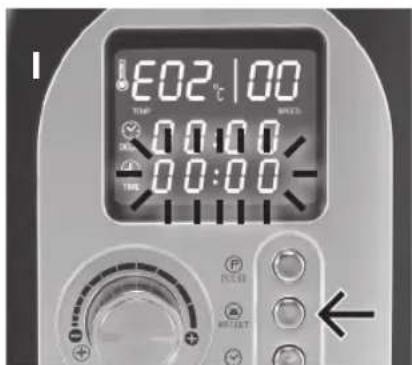
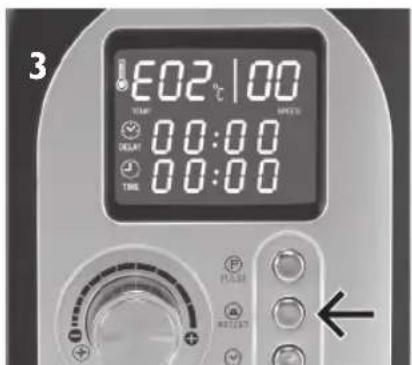
| E02 | Bowl not set correctly to the appliance. | Check the fit of the bowl. |
| E03 | Lid of the bowl not set correctly. | Check the fit of the lid of the bowl. |
| E04 | Contact customer service. | |
Technical data
| Model: Thermostat MiXX & Cook Multi-function appliance | |
| Type number: MC63.001 | |
| Dimensions (L x W x H): | 379 x 263 x 332 mm |
| Weight: 5.82 kg | |
| Volume 2 liters cold | 1.5 liters warm |
| Rated voltage: 220 to 240 | V AC |
| Frequency: 50 to 60 Hz | |
| Power rating: Mixer 550 W | Mixer & Cooker I200 W |
| Max. operation time | 3 min without heating function 1 h with heating function |
| Protection class: I | |
| Protection type: IPX0 | |
| Sound level: < 70 dB | |
| Ambient temperature when operated correctly: 0 to 35 °C | |
Warranty/guarantee
In addition to the statutory warranty obligation, BEEM also grants an extended manufacturer's guarantee for some products. Provided this is granted, the corresponding details for each product can be found either on the product specific packaging, advertising material, or on the BEEM website for the respective product. You can find the detailed guarantee and warranty conditions, available accessories and spare parts, as well as operating instructions in various languages on our web page www.beem.de. Please contact your supplier if you have any questions on guarantee conditions, ordering accessories or service handling outside of Germany.
Declaration of conformity
BEEM hereby declares that this device complies with the fundamental requirements and other relevant provisions of directives 2004/108/EG, 2006/95/EG, 2009/125/EG and 2011/65/EU.
Disclaimer
We shall not be liable for damages and consequential damages in case of:
- Failure to observe the instructions in the instruction manual,
use for other than the intended purpose,
improper or unsuitable handling,
incorrectly performed repairs, - unauthorized modifications,
use of non-original parts or spare parts, - use of unsuitable supplementary or accessory parts.
Disposal

The crossed-out wheeled bin logo requires the separate collection of waste electric and electronic equipment (WEEE). Electric and electronic equipment may contain dangerous

and hazardous substances. Do not dispose of this appliance as unsorted municipal waste. Return appliance and packaging to a designated collection point for the recycling of WEEE. By doing so, you will help to conserve resources and protect the environment. Contact your retailer or local authorities for more information.

OrIaBaeHneYBaXaEmbI NOKyNaTeA,
I03ApabAem Bac c npno6peTeHnem MHOyHKUHOHaBHO rnp6opa BEEM Thermostar MiXX & Cook. BHNMaTeaBHO npOHTte BCE nHCTpyKuIN nepeA erO npMeHeHnEM u COxpaHnTE 3TN nHCTpyKuIN AAn CnpABKn B 6yduem. Pn nepeDaue np60pa TpeTbM Anzam O6raTeAho npNKAAdbBaIte HNCTpyKuIO NO EKcNAyatau.
NcnoAb30BaHHbIe CMMBOAbI

Onachbie cHTyaun, KOToPbIe MOryT pNBeCTn K TpaBMam HAn MaTePnaAbHOMy yUep6y.

Bo Bpem 3KcNayataun np6opa MoKeT 6bItb BBICOKa TempepaTypa Ha eO AOCTyINbIX NOBepxHOCTX.

BHHMaTeAeHbNo npOHTne Bce HnCTpyKuN npea npImeHeHnem np60pa ncoxpaHnTe 3TN nHCTpyKuN dA r cPabKn B 6yAuem.
Hnctpykun no 6e3onacchoctn 121
Ncnoa3oBaHHbIe CmBOAbI 124
O63op 125
KomnaekT noctabkn 125
ΦyHKUH 126
IpeepaepBbIM npImeHHeHem 126
Icnoa30BaHne np6opa 127
YCTaHOBka n ChrTne yauu 127
BCTaBA yIaONTHHTeABHbIX KOAEu 127
Hcnoa3OBaHne BEcoB 128
HactpoIka BpeMeH 128
N3MeIbYeHne, py6ka, 3aMeuBaHne, nepemeeuBaHne, Apo6AeHne 129
Hmnyabchaj yHKun 130
IpeMeuBaHne c nOmoBIO npncnoc6AeHHaA nepeMeuBaHHa 131
Pa3orpeB, Bapka 133
IcnoAb3OBaHne npoBOK KOp3nHbI 134
IcnoAb3OBaHne npoBOy qaun 135
HactpoKa TaMepa 136
OuHCTka H o6cayxHBaHne 137
OuHcTka 137
OuNTKa yIaOTHTeAbHbIX KOAEU 137
IobepxHocTb BecOB nAonatka 137
YdaHHe N BCTaBka HOKeBOrO yCTPOIcTbA 138
YcTaPaHHe HeNCnPaBHOCTe 139
TexHueckne xapaKTepeNtIKn 139
TapaHTnHbIe 06a3aTeAbcCTBa 140
AeklaapauOcoOTBeTCTBNN 140
OTka3 OT OTBeTCTBHeHHOCTn 140 YTHaHaZna
0630p
KOMNAeKT NOCTaBKn
PpOBepbTe KOMnAeK T NOCTaBKn No CNsCKy N Ha BnAHMble NOBpeXdEHHa.
I KpbiWka C OTBepCTHem AAR 3aIOAHeHn
2 CmecnTeaHaJa aHa
3 Ba3OBbI 6AOK CO BCTPOeHHbIMN BEcAMN
4 Napobaa
5NoaONApaOBOnaHn
6 KpbiWka AAn npoBOu yaun
7 Kpbiuka AAn OTBepCTnem AAn 3aNoAHeHHa/MepHbI CTaKaHnK
8 Αοηατα
9 Pnncno6aehne Aa nepeMeunBaHn
10 NapoBaKop3nHa
Функции
A OTo6paXeHHe TempePaTypbI
B OTo6paKeHHe TaIMePa (U:MnH)
C OTo6paXeHHe BpeMeHH (MnH:c)
D OTo6paKeHne ckOpoCTn
I PeryAraTOp ckopoCTn (ypoBeHb I-10)
2 PeryaTop TemnepaTypbI (ot 30 °C 120 °C c warom 10 °C)
3 UmnyAcbHae yHKuH
4 AKTnBaun/DeakTnBaun BECOB
5 3aepkka (OTAOKEHHbI cTapT)
6 Hactpoika BpeMeHH
7 CnHaabHaaAMna
BHIMAHNE:
BpeKIme OxNdaHnA dncnAe rachet (Yepe3 5 MmHyT nocAe OKOHuaHnra roTOBKn).
IobepHnte peryAotop ckopocn Ha 0. Tenepb np6op cHOba roTOB ka6ote.
Ipea nepBbIM npImeHneM
OuHCTnTe np6op corAacHO pa3AeLy "OuHCTka H yxoA", YTO6bl ydaANTb BCE npOn3BOAcCTBeHHble ocTaTKN. AAn HCNoAusbAHn np6oopa BCTaBbTe BNAKy B ceTeByIO PO3eTKy.
HcnoAb30BaHne np6opa
YCTaHOBka N CHaTne YaShN
1

YCTAHOBHTe yawy CBepxv B np6Op.Pyka HnpaBHeHa BnepeA.Ya7a BCTaET Ha MecTO CO UeAUKOM.

Ara ydaennaa HaxMMte Ha pbuarg E n CHMNTe yaW cy np6opa BHaPpABeHN BBepx.
PnmuMeaHne:
CaeHnTe 3a MaKcMaAb-HbIM O6beMOM,paBHBIM 2A.MaKcMaAbHbIbO6b-em Ropaynx PPOyKTOB COCTABAAET I,5A.
MHHMaAbHbI O6bem -OKOAO 300MA,TO6bI HOXMO3aXBaHTb NnUy.
BcTaBka yIaOTHTeAbHbIX KOaEc
1
Pacnoaoxnte ynaOTnTeAhoe KOaHcO KpbIuKn, KaN pokaHa Ha PncyHke, N BCTaBbTe ero B npeAcMOTpeHHoe OTBepCTne.

PacnooKnte yIaOTnTeAhoe KOaHIO napOBOnuAsn, KaN NOKa3aHO HaPncyHKe, IN BCTaBbTe erO BNpeDyCMOTpeHHoe OTBepCTne.
Pnmeuahne:
O6paTHTe BHHMaHHe Ha To, yTO yNtOHnTeAhbHbIe KOaHa He OAnHaKOBblc.
IcnoAb3OBAHne np6opa
HcnoAb30BaHne BeCOB
4TO6bl BKAIOUHTb BEcbl, HAKMNTe Ha KNONky 4. NDOXKANTe, 4TO6bl HNXHRA CTPOKa AHCnAe IpeEcTaa MmraTb HHa Hei OTo6pa3NtOocb "00:00".

IIOAOXHTeB LCEHTPBecOB Nnuy Hn NOCTaBBTe EMKocTb.Bec OTO6pa3NTcHaAHCnAee.
CHOBA HAXMITE Ha KHONKY 4, YTO6bl OTKAIOHTb BEcbl, HAN HAXMITE Ha Hee DABXAbI, YTO6bl c6pocHTb NOKa3AHn BEcOB Ha 0.
BBeAHTe npOaYkTbI B yauy uycTaHOBHTe ee Ha npu-6op.
YcTaHOBnTe KpbIuKy Ha 3aSy n 3aΦnKcnpye ee.
YcTaHOBnTe KpbIuKy OT-BepCTnAa 3aNoAHeHnN 3aΦnKcpynte ee.

IepemeunbaHne moKet BblnoAHTbcAaKe 6e3 HactpoKn BPemEn. Ean Tpe6yeTc ABtOMaTnueCKaOCTaHOBka, NcNoAb-3ynte pyky 6Aa 3aHaHN BPemHn (Ao I yaca).

Hactpoite cKOpocb (ot I 10),nn ot I 4 npn nCNOAb3ObaHH fYHKcHn NOaORpeBa.
IcnoAb3OBAHne np6opa
Bo Bpem npuroTOBaeHna cacbl NdyT BO6paTHOM Ha- npaBaeHH.

Aya aen npncnoco6aehna nepemeWbAHn BbTAnHTeeroB HappaBaeHN BBepx, OAOBpeMeHHO CaeRka NOBopaHBAI3 CTOpOHbIBCTOPOHy.
PpHmeeaHne:
A OueHb MeaehHO 3aONAHHeHHa KpOHTe KpbIHKy OTBepCTna Aa 3aONAHHeHH. O6pa3yeTc Hb He6oBwaa 8b. MeaehHo HaNBaTe XnKocTb Ha KpbIHKy aWu. Tenepb OHa MeaehHee 3aTEKaET B aWy, YTO No3BOAAET, HApPIMep, AOIOAHHTeABHO yMeHbNTb CKOPoCTb KaNaHH MaCaa Aa MaNoHe3a.
- IepemeuBaTb C NOMOsbIO pncnoc6eHna AAnpeMeunBaHna CaeAyeT cHaCTpOkoN CKOpOCTn OT 1do 10, npn 3tOM BO BpeM BAInoAHeHn FyHKUIN NDoOrpeBa HAcTpaUNBaetc yPOBeHcCKOpOCTn Do 4.
- NocToHHoe nepMeunBaHne BbINOAnHareTc C OADHOpeMeHHo HAcTpOIOBpeMeHN. Pn nepBOH HAcTPOKe BpeMeHN, a 3aTeM n CKOpOCTn, Yacbl NaHHaOT OTChNTbIBaTB BpeMa B o6paTHOM HApPaBaeHN, n np6Op OTKIAOuaeTc ABTomaHTueckn. Pn HAcTPOKe CKOpOCTn Yacbl NAty TBpeA, n No NCTeUeHN HJxHOrO nepNOa BpeMeHN pnp6Op Notpe6yeTc OTKIAOHTb BpyHyIO.
HcnoAb30BaHne np6opa
Pa3orpeB, Bapka
1
BBeAHTe npoAkyTbI B yawy. YcTaHOBnTe yawy Ha npu-6op.
YcTaHOBnTe KpbIuKy Ha 3aSy n 3aΦnKcnpyIte ee.

YcTaHOBHTe KpbIuKy OT-BepCTnAa 3aNoAHHeHnN 3aΦNKcpyNe ee.

3aAaTe Bpem (O I yaca) C NOMObIO pyKn 6.

3aAte TemepaTyP (oT 30^_ 0120^)
HacptpoTe ckopoctb (otIdo4)npnHarpeBaHHn npnbopa ropnt CnHaBnaAamna 7.
Bo Bpem npiroTOBaeHnnaCbI NAtB O6paTHOM Ha- npaBaeHH.
PnmeuHn:
- yHKnHaRpeBa pa6oTaET ToAko npn 3aHaHn BpeMeHN.
BpeMa n TempepaTyPOxHO H3MeHHTb B AIO6oe BpeMa.
Bo BpemBbINOHeHHaYHKuHnHaRpeBaCKOpocTb MOxHO OTperyAnpoBaTb ToAboKO O yPOBHa 4.
IcnoAb3OBAHne np6opa
PpimmeaHne:
Pn6op oc6eHNO XopoO NOxOANT AAn PnroTOBaeHHAetCKoro NHTaHn, MApMeaa, cyOB n COycob.
IcnoAb3OBAHHe napOBoKOp3HHbI
Icnoa3ynte npoByIO KOp3HNY ABApKn Pnca, KapToOeA IN OBOUen.
3aNoAHnTe yaWy BDOJ He MeHee Yem Ha 500 MA. AaHHoro KOAnYeCTBa AOCTaTOUHO ABy BAPKN Ha napy B TeueHne OK. 30 MNHT.

YcTaHOBInTe npoByIO KOp3nHy C nIeB uAly.
3aKpoTe yawu HacTpoTe np6op Ha 100- 120^, kak onncahOB pa3eJe "Pa3orpeB, Bapka". Bo3MOxHO, nOHaO6ntcR cnH3NTb ckopoCTb AO I.

Ara n3BaeHn npoBOJ KOp3HHb 3a pyKy MoXHO NCNOAb3OBaTb HnI.
PnmeaHne:
AII npiroTOBaeHn pica HcnoAb3yIte He MeHee I A BOAbI MAcC. 250 r pHa.
HcnoB3OBAHne np6opa
HcnoAb3OBAHne napOBOn YaShN
Oco6eHNO xopoio NOAOANT AAn npiroTOBaeHn py6bl, TaKnx OBOueN, KaK cnapka n coUBeTn 6pOKoA, a TAKKe KAEcOK.
3aNoAHnTe yAuy BDOH He MeHee Yem Ha 500 MA.AaHHoro KOAnueCTBa AOCTaTOUHO ABy BAPKN Ha npy B TeueHne OK.30 MNHT.
IocTaBbTe npoByu yawy Ha CmecHTeAbyu yawy n 3aΦNKcnpynte ee.
3acbnte nHy Ha NOAOH uYcTaHOBnTe ero Ha napOBYIO KOp3nHy.

YcTaHOBnTe KpbIuKy Ha npOByIO uSy.
3aKpOte yawy n HacTpoTe np6Op Ha 100- 120^. Bo3MOxHo, NOHaO6ntcA CHN3NTb CKOPoCTb AO I.
Pnmeuahne:
Heo6xOaHMO BCTaBHTb yIaOTHTeAho KoAbo B AHO npoBOy aShn.
IcnoAb3OBAHne np6opa
Hactpoika TaMepa
Moxho HcnoAbaTaMep AHaHaA npiroTOBaeHHc 3aepKoH 24acob.
Taimep HHTepBaA
A0145MH
24 10MH
1

3aNoAHnTe CmecnteAbHyu yauy (HAn, COOTBeTCTBeHNHO,napOByU Yauy) Nnuei H yctaHOBnTe Ha np6Op.
HaXMMTe Ha KHOJky "Delay" (3aepKka), noCae yero AncPAne HauHET MInrTaB.

3aAaTe HxHoe Bpem
3aepKn (BMHyTaX)
C NOMOuBIO pyKN 6
CHOBa HaxMITE Ha KHOJky
"Delay".3aAaTe BpeM
pa60TbIC NOMOuBIO pyKN 6.
Pn Heo6xoAnMoCTn
HaCToPe Te Tempeatypy C
NOMOuBPOpyk2
(OT 30 ^ C 120°C).
3aAaTe cKOpocb nepemMeuBaHnC NOMOsbIOpyKnI:ot Ido10,KpomeOAHOBPemEHORo pa3OrpeBa/BapKn Niun (B 3TOMcayue ot I do 4).
HaXMMTe Ha KHOKNy "Delay".IporpaMMNPOBaHHe aKTHBnPOBaHO.
OuHCTka n 06cayxKbAHne
OuHCTKa

BHHMaHHe:
BbIKIOUOHTe np6Op nepeo ouHCTKoi, n3BIAKeNTe BNAky shypa NHTAHn H3 p03eTKn CeTn 3AekTpONHTAHn N daNTe np6Opy OCTbITb.
I. NocAe KaXdOro HcNoAb3OBaHnA ONo- pOxHnTe yawy.
2.ПомоITE BHTpeHHIOи HapyxHyIO NOBepxHOCTN YAaIN BOAO AIA MbITbI NOcyAbI. He norpykaite yawy B BoAy AIA IpeAOTBpaueHn IOBpeXKeHn KONTAKTOB Ha ee AHe. IpoTpTe KOHTaKTbI BAaXHOJ TKaHbIO.
3. B cayae ouheb yctoynBbix 3aqr3HeHn 3aaleIte HEMHO BObl AIA MbITbIPOcybl B yaWu 3aNyCTnte np6Op Ha HeckoAbo KckyHa ckOPOCTn I.
4. YdaHTe HOKeBOe yCTPOcTBo n CnAnKOHOBOe yNtOHeHne, a 3aTeM npOMoIte Hx B TeNIOB OBe DAЯ MbITbI NOcyAbI. BHIMAHNE: Ae3Bna OueHb OcTpblE!
5. He nCnoAa3yIte a6pa3nBHbIe MOIOuIne cpeAcTba, MeTaAauueckNe IeTKN HAn ApyrHe uapaanOuIne PpeMetbl.
6. Поса оунстк TцаTeьно npocuHTe BCE DeTaH.
7. IpoTpTe 6a3OBbIb 6AoK CMOueHHoH TkaHbIO.
8. Αοπa cTHyO MeaAky, NaobvO uAwy, AOnaTKy, KpbIuKy OTBepCTnA 3a- nOAnHeHn, NaobvO KOp3nHy N KpbIuKy MoXHO MbITb B NOCyAdOMoeH0n MaunHe.
OuHCTka yIaOTHTeAhbIX KOaEc
YdaANTe yNANTHNTeAbHbIe KOa. IocAe ONUCTKN BCTaBbTe yNANTHTeAbHbIE KOa, KaONHCaHO BraBe "BCTabKa yNANTHTeAbHbIX KOaE".
NobepxHocTb BEcOB N AOnaTKa
IObepxHOCTb BeCOB MOXHO CHrTb, UTo6bl POn3BeCTn OChtky NOA Hei (paBHOMePHO IOnHARb BEcBi CO BCex CTOpOH).

HaKMnte Ha pyKoRTky c 06enx CTOpOH, yTO6bl pa3O6paTb AOnaTky. CnHKOHOBOe KOaIO (a) MOXHO CHrTb HAnPaBaeHH BnepeA.
OuHCTKa H O6cAyyKbAHHe
YdaaleHne H BCTaBka HOXeBOrO yCTpoNCTBa

YdepKnBaTe HOKeBOe YcTPOIcTBO 3a pe3b6OByIO qACTb TAK, YTO6bl OHO He BblnAIO H3 YaSh.
Aa CHaTHn HOKeBOrO yCTPOHCTBa, uTO6bl ero pa36AoKnPoBaTb, NOBepHnTe 3aTARNaIOyU pyuKy npOTNB YacBOON CTpeAKN.
3

Iocae OunchKn CHOBA yCTaHOBHTe CAnKOHOBOE KOAbO Ha HOKeBOe YCTPOINCTBO H NPOTOAKHnTe erO ao ynopa.
4
BBeAnTe HOKeBOe yCTpoNCTBO CBepxv B OTBepctneaAsn.
5
YCTaHOBnTe 3aTgHbAoIyIO pyKy Ha HOKeBOe YCTPOINCTBO Ha DHe YaShN. O6paTHe BHHMaHHe Ha MapKnPOBky.
6
IOBepHnTe 3aTARnBaHOyU pyky no yacobOu CTpeAke AO HaExKHOI OHKeBOr YoCTPOuCTBa, npH 3tOM MapKnPOBka 6yDet yKa- 3bIBaTB Ha "Closed" (3aKpbITo).

BHHMaHHe:
- Αe3BnO ouHb ocTpblE. Bcerda AepXnTe HOKeBOe yCTpOInCTBO TOaBko 3a pe3b6OByIO qACTb.
ECAHCHANKOHBOe KOAbOHa HaTeTo Ha HOKeBOe ycTPOcTBo HEnPaBnAbHO HAn OTCyTCTByET, KNaKOCTb MOxET PpOHKNHyTb B KopNc H NOBpeAHTb np6Op.
OuHCTka n 06cayxKbAHne
YcTpaHHe HEnCnPaBHOCTe
KoA HencpapB- PnpHnHa Cnoco6 yctpaHeHHa HOCTN
E02 YaHa He yCTaHOBLaHa npaBnAbHo Ha npH6ope.
E03 KpbuKa Yaun He yctaHOBeHa npaBnAbHO.
E04 O6paTnTeCb B cayk6y pa6oTbI C
PpOBepbTe yCTaHOBky aShn.
PpOBepbTe yCTaHOBky KpbIuKn YauN.
NOKyNaTeAaMn.
TexHnueckne xapaKTepeNCTnKN
MoAeIb:ThermostatMiXX&Cook MHorOΦyHKUHOHaIbHbI np6Op
Homep Tnna: MC63.001
a6a p u n T h b i e p a3 M e p b i ( × × )
Bec: 5,82 Kr
EMKoCTb 2 ANTPa XOAnOpHbIX nPOaYKTOB 1,5 ANTPa ropauNX nPOaYKTOB
HomHaBHe HaPja- XeHHe: 220 - 240 B nepem. Toka (AC)
Yactota:OT50Ao60T
HOMHaBHa MOp- 550 Bt HocTb: Mkcep n BaOpHuAnpapat: I200BT
MaKc.BpeMpa6Otbl 3 MInHyTbI 6e3 fYHKuHn HArpeBa I c fYHKuHn HArpeBa
Kaacc 3aunTbI: I
Tn3aunTbI:IPX0
yPOBeHb 3BYKOBoBix wymOB: < 70
TemnepaTpykaIOUeI CpeAbI npn npaBnABHOH 3KcnAyaTaun:OT0Ao35°C
TapaHTHbIe 06a3aTeAbcTBA
Kpome npdeAcmOTpeHHo3aKOHOM 68a3aTeBHO rapaHTn, KOMNaHnBEEM AHeKOTOpbIX n3DeAnD0NoAHnTeBHO npdeOCTabAAET pacWnpeHHyO rapaHTIO H3ROTOBHTA. EcAn TaKaRrpaANTn npdeOCTabAAETC, COOTBeTCTBYIOUne DaHHbIe Yka3aHbHa yNakOBKe KOHKpeTHORO n3-DeAIA, B PeKAAMHbIX MaTePnaAax HA Be6caIte KOMNaHN DAaDAHHORo TOBapa. Ha Be6-CTpaHnce www.beem.de npnbEAEHbI NOAPo6HbIe CBeAENn O6YCAOBnX rapaHTNI N O6ra3aTeABCTB, O AOCTynbIX HHOPMaUNOHbIX PecypcaX n 3aNaChbIX qactx, a TaKke INHCTpyKUnn NO 3KcnAyaTaunn Ha HeCKoAKnX RaBikax. YTo6bl y3HaTb YCAOBnI npdeOCTaBAAHENr rapaHTn, 3aka3aTb 3aNaChbIe YAcTN Hn 3aDaTb BONPOcbI O cepBnCHOM 06CAYKnBaHN 3a npdeAamn TepMaHN, 6paNTecb B MeCThoe TOPBOE npdeCTaBtAEbCTBO.
Aeklaapauia O COOTBeTCTBHN
HactoIUM KOMnAHnBEEM 3aBAreT,TO DaHHbI INp6Op COOTBeTCTByeT OCHOBbIM Tpe6OBaHNm IpyrIm Heo6xOaMbIM NOAOKeHNm AnpeKTHB 2004/108/EG, 2006/95/EG, 2009/125/EG n 2011/65/EU.
OTka3 OT OTBetCTBeHHOCTH
MbHe Hecem OTBcTCTBeHHocTH 3a NOBpeKdEHHN KOCBeHHbI yuep6 B CAYae:
Heco6AIODeHnHnCTpyKcn,
COaepKaunxcBpyKOBOACTBE NOAb3OBaTeA, npImeHnBueAx, OTAnuHbIX OTyCTaHOBaeHHbIX,
He npabHbHO Hn HenoO6aUoero 06paueHn,
He npabHbHO BbINOaHeHHoro pmoHTa,
HecaHKUHOHPOBaHHbIX MOAnKauN,
- HcnoB3OBaHn HeIOaHHbIX AeTaAeHnn 3aNaChbIX YacteN,
HNTeAbHbIX
YTHAN3aun

IpepeepKHytbn 3HaQOK MycOpHOro KOHTeINHepa Ha KOaecnKaX yKa3bIBaet Ha Heo6xOAnMoCTb pa3AeAhORO c6opa OTPa6OtaHHORO 3AekTpueckoro N 3AekTPOHHORO 06OpyAOBa

Hnra(WEEE).3Aektpnueckoe n 3AektpoHHOeOBOpyOBAHHe MoKet CoApKaTb OAnchIe N BpeAHbIe BeUeCTBa. He Bbl6paCbIbAHTe 3TOT np6Op kaHecOpTpOBAHbIe 6blTOBbIe OTXoAbI. CdaIte np6Op BMeCTe CynakOBKO B HaaHaeHHbI INYHK Tc6opa AAnpepea60TKN OTPa6OtAHORO 3Aektpnueckoro n 3AektpoHHOrO OBOpyOBAHn. TaKIM O6pa3OM Bbl NOMoxTe c6pepbceypcbI n 3aunITnb OKpyxao- yuO cpeMy. AAnnoyehn AOnoAHHTeAB-HOHnHΦopMaunn O6patNTecb K CBOemy PO3HNHOMy pOdaBuY HAN B MeCTHBie OprAhbl BAactn.