USER MANUAL 10030978 Klarstein
natural_image
Row of white icons representing kitchen appliances including blender, kettle, refrigerator, washing machine, air conditioner, and microwave (no text or symbols)
natural_image
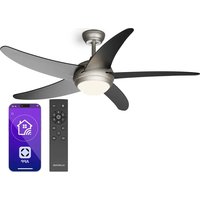
Line drawing of a standard 15-inch outdoor fan with a mounted screen and remote control (no text or symbols)
Zusammenbau
natural_image
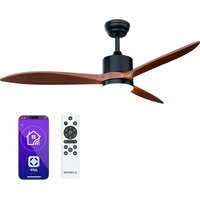
Technical line drawing of two mechanical components with mounting holes and a separate inset view labeled '2' (no text or symbols on the diagram itself)

natural_image
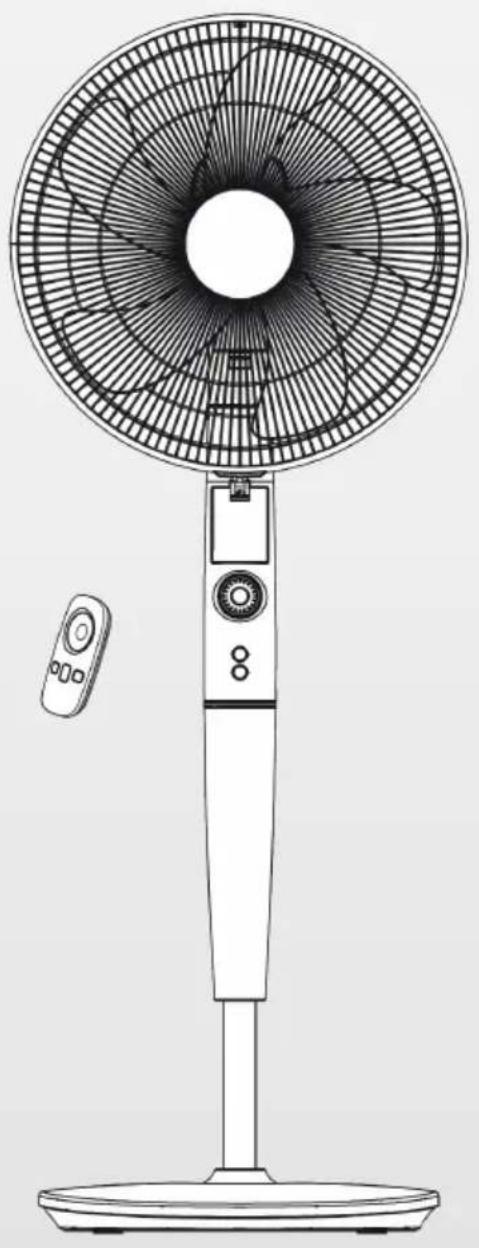
Technical line drawing of a mechanical assembly with two parts and a directional arrow indicating movement (no text or symbols)
natural_image
Simple line drawing of a mechanical component with no text or symbols
Neigungseinstellung
natural_image
Symbol of a trash bin crossed out by two crossed lines, with no text or labels present.
Congratulations on purchasing this equipment. Please read this manual carefully and take care of the following hints to avoid damages. Any failure caused by ignoring the mentioned items and cautions mentioned in the instruction manual are not covered by our warranty and any liability.
Contents
Technical Data 10
Safety Instructions 10
Product Description 11
Assembly 11
Use and Operation 13
Cleaning and Care 16
Hints on Disposal 16
Declaration of Conformity 16
Technical Data
| Item numberr 10030977, 10030978 | |
| Power supply 220-240 V ~ 50 Hz | |
Safety Instructions
- Read Rules for Safe Operation and Instructions Carefully.
- If the supply cord is damaged, it must be replaced by manufacturer or its service agent or a similarly qualified person in order to avoid a hazard.
- Indoor use only.
- To protect against the risk of electrical shock, do not immerse the unit, cord or plug in water or other liquid.
- This appliance can be used by children aged from 8 years and above and persons with reduced physical, sensory or mental capabilities or lack of experience and knowledge if they have been given supervision or instruction concerning use of the appliance in a safe way and understand the hazards involved.
- Children shall not play with the appliance. Cleaning and user maintenance shall not be made by children without supervision.
- Young children should be supervised to ensure that they do not play with the appliance.
- When the appliance is not in use and before cleaning, unplug the appliance from the outlet.
- When the fan was assembled, the rotor blade guard shall not be taken off anymore.
- Never insert fingers, pencils, or any other object through the grille when fan is running.
- Disconnect fan when moving from one location to another.
- Be sure fan is on a stable surface when operating to avoid overturning.
- DO NOT use fan in window, rain may create electrical hazard.
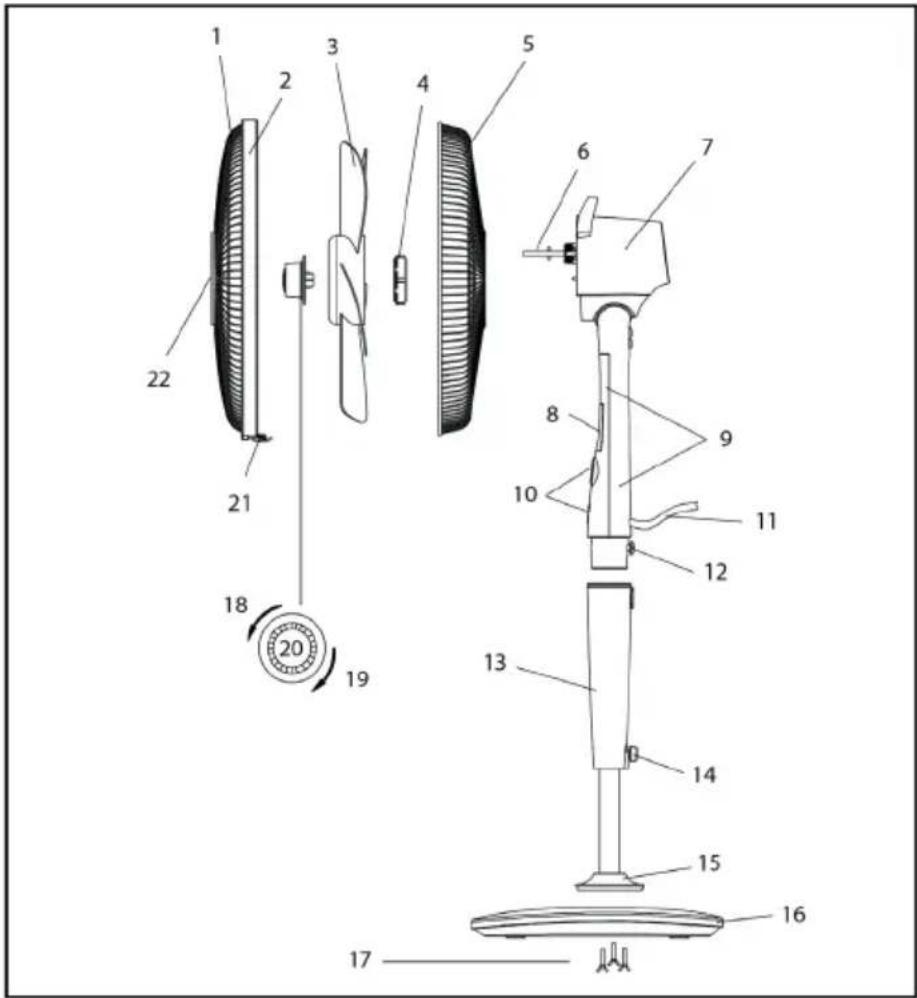
Product Description
1 Front grill
2 Circlip
3 Blade
4 Plastic nut
5 Rear grill
6 Shaft
7 Motor
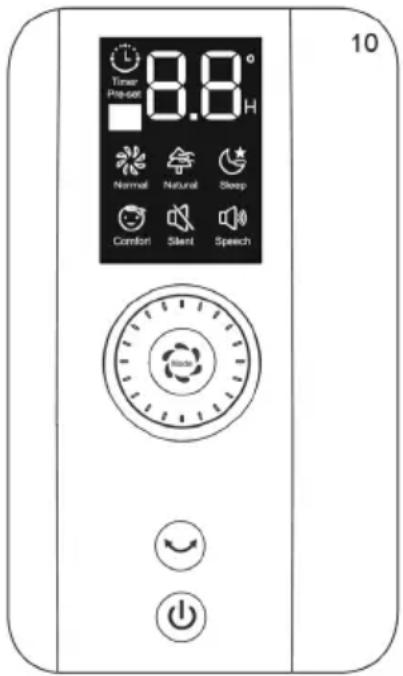
8 Display
9 Fan body
10 Control panel
11 Power cord
12 Screw
13 Pole
14 Female terminals
15 Column cover
16 Base
17 Butterfly screws
18 Tighten
19 Loose
20 Spinner
21 Clip
22 Center piece
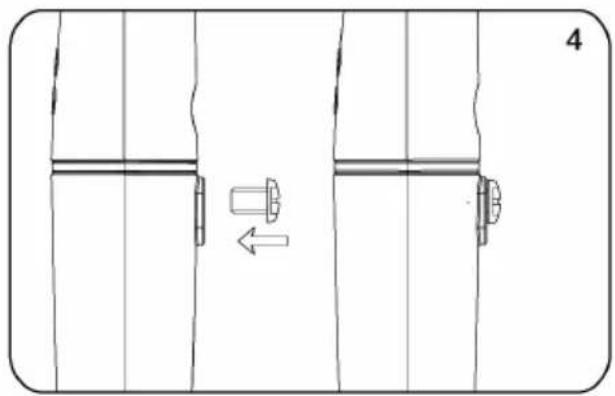
Assembly
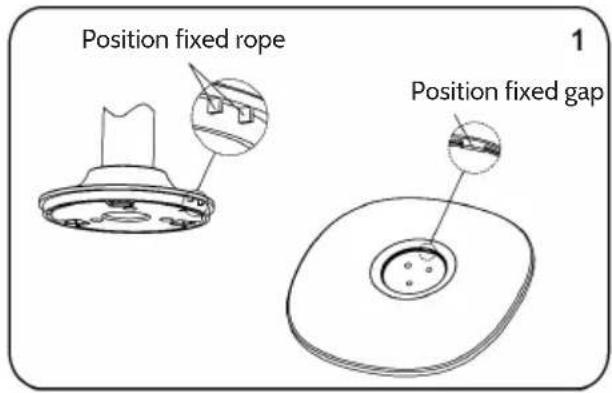
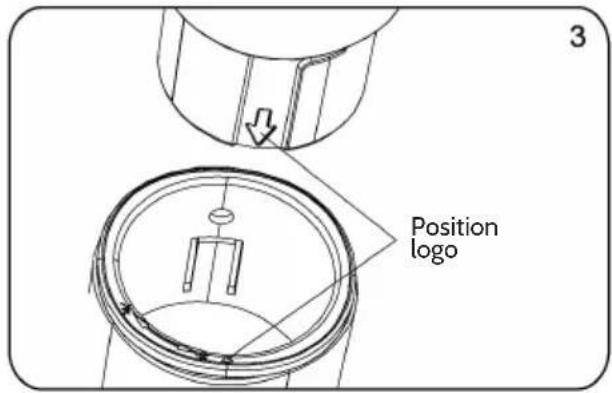
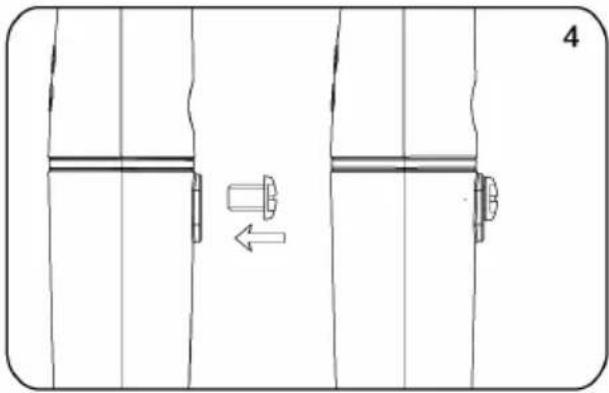
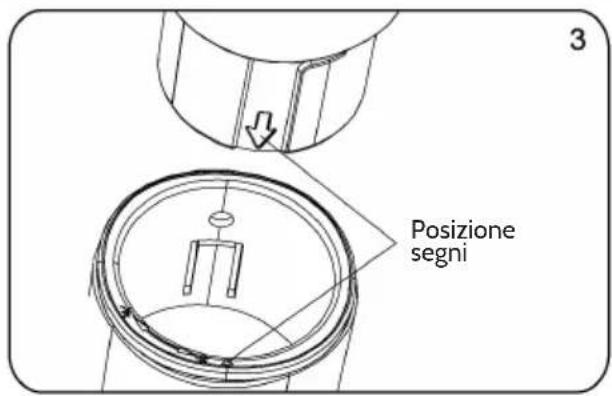
- Take out the base tube, three butterfly screws for fixed base and the round base from the packing carton;
- Insert the tube to the round base, be sure to make the positioning screw align with the base;
- Screw the three butterfly screws into the holes on the tube and tighten them;
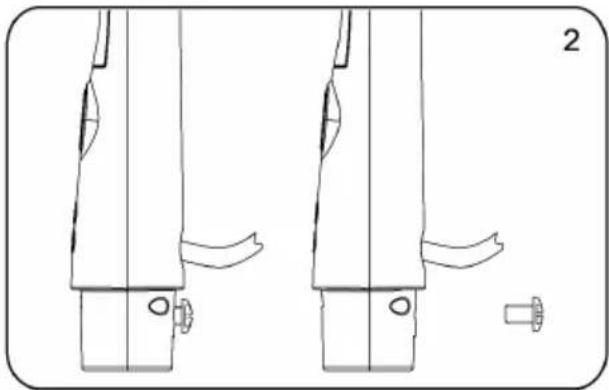
- Loosen the fastening knob, adjust the height of inner tube and tighten the knob;
- Take out the control part of the fan from the packing carton, loosen the fastening screw at the back of the box, insert the inner tube into the bottom hole, make sure that the fastening screw and the fastening knob in the same position.
Base Assembly:
natural_image
Technical line drawing of two mechanical components with mounting holes and a separate view labeled '2' (no text or symbols on the diagram itself)
natural_image
Technical line drawing of a mechanical assembly with two parts and a directional arrow indicating movement (no text or symbols)
Grill and Fan Assembly:
natural_image
Simple line drawing of a mechanical component with no text or symbols
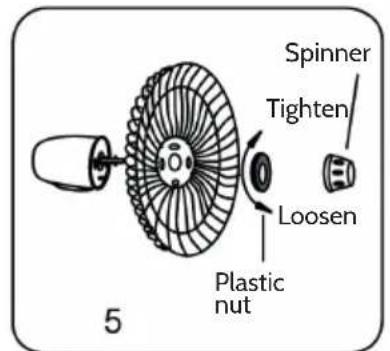
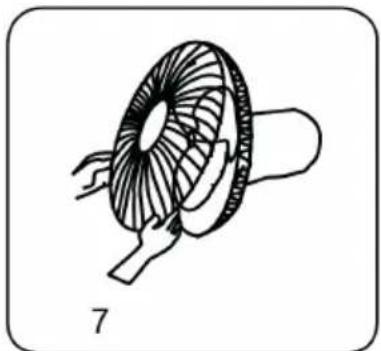
- Unscrew the spinner clockwise (or take the spinner out from the bag) and the plastic nut counterclockwise to remove both of them. Fix the rear grill to the motor then tighten the plastic nut again.
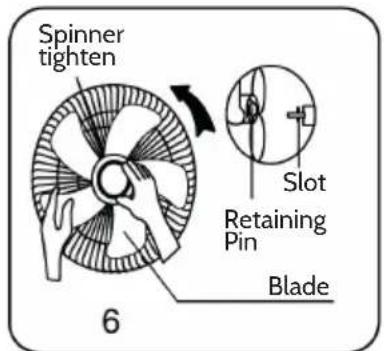
- Insert the blade into shaft, and make sure the rotor shaft pin is fitted into groove of the blade. Turn the spinner counterclockwise to tighten the blade.
- Fix the front grill and the rear grill with circlip clip and then use the fasten clip to tighten the fan grill.
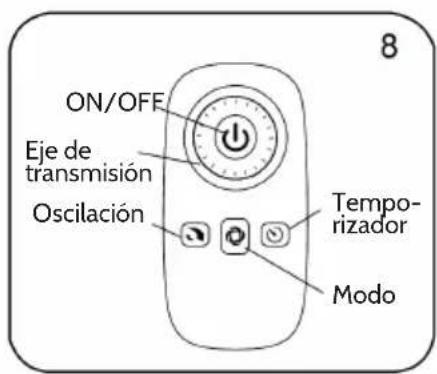
Use and Operation
Getting started
Plug in the power adapter, after a „beep“ tone, the fan is on standby.
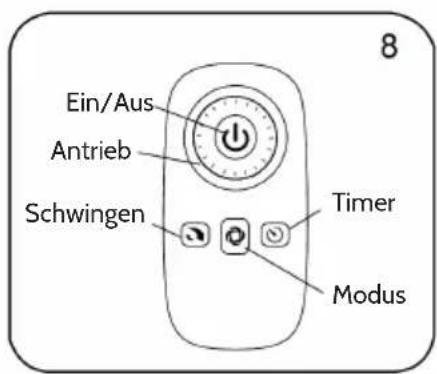
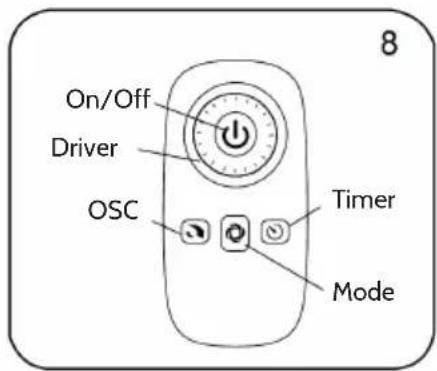
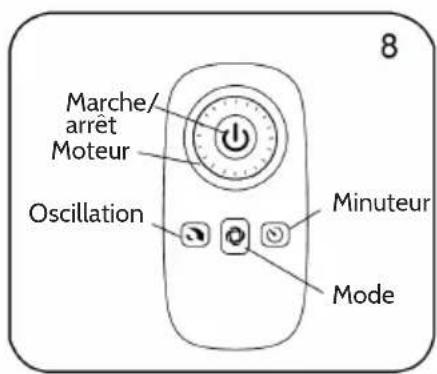
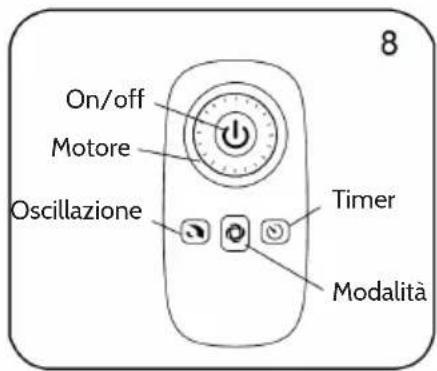
Keys and Functions
 | ON/OFF KEYPress this button under standby mode,the fan starts at memorial speed which it worked last time.Press this button when the fan is working,it will be turned off to standby state. |
 | DRIVE PLATEWhen you rotate the drive plate clockwise,the speed increases from the following manner:normal wind 01......When you rotate the drive plate counter-clockwise,the speed decreases from the following manner:normal wind 26... |
 | MODE KEYRepeat press this button, the wind will be switched in order of “normal wind - natural wind - sleep wind - comfort - silence - normal wind - ... ,..Normal wind: The wind speed is constant set by the wind level, when the „normal wind“ icon is lit, 01 - 26 levels are normal windNatural wind:Fan will simulate natural wind according to pre-programmed manner, the wind speed changes in accordance with the program, which makes people feeling idle, naturally and it likes to be in the nature.Sleep wind:The wind weakens step by step during the preset time until stop. And then the fan switches automatically off so that man can drop asleep.Comfortable wind:The speed will be changed with the room temperature intelligently. If the temperature is lower than 20°C,the fan will stop working.If the temperature is higher than 20°C, the fan will work again. When you choice comfortable wind, the icon will be lighted and the IDM display“00”.Silence:Press this key to make the fan switch to the mute mode, in which the noise is low and the mute indicator “will be on. Press this key again, the fan will switch to the normal air mode and work at the low speed.OSC KeyAfter the fan starts, repeatedly touch this button to start or stop oscillation. |
 | PRO Key (Timer)Under power-on state, timed power-off can be set. Press the PRO button; it starts the timing power-off state. „Timing“ and icon displayed on the fan display will flash once per second.Rotate the driving plate clockwise, the fan display will change: 0.5 >1.0 >... >12.0 >00.Rotate the driving plate anti-clockwise, the fan display will change: 7.5 >... >0.5 >00 >12.0 >...When set a time, 5 seconds without any operation, the timing on the display flashes twice and beep to refer successfully settings, if there is any button operation in five seconds (except for on/off button), the time is successfully set and the fan returns to current state immediately, „Timing“ and icon stops flashing, if the timing button is pressed in five seconds then timing is cancelled. If there is time setting, then “Timing” and icon is lit, if not, it is off. When setup is successful, the display returns to display the wind level.Under standby mode, press the PRO button to set power-on time, „PRO“ and icon is lit, the operation mode please refers to timed power-off; rotate the drive plate to adjust the time. After adjustment, the set time will be displayed on the screen. To cancel a time setting, user only need to repeatedly press the PRO button.Note: Under working state, press forward/timing button to enter the timing status, user can check the set time, and user can re-set the time in five seconds; if no operation within five seconds, the time shown on the screen flashes twice and returned to the wind level. |
Control Panel and Functions
On/Off:
Same as them on remote control.
Function button:
Under working state, short press the function button, the fan will alternate between oscillation and fix; Long press the button, the fan enters into the timing function, refer to the operating instructions of PRO button on remote control (To cancel the timer, long press function button).
Under standby mode, short press of the function button is invalid; Long press the function button, the fan enters into the appointment starting function, refer to the operating instructions of PRO button on remote control (To cancel the timer, long press function button).
Tilt Adjustment
To adjust the air flow upward or downward, push the guards lightly to the desired direction.
Height Adjustment
- Lowing: lift up the head with a hand, unscrew the fastening knob counterclockwise with the other hand, slowly lower the head to an appropriate height, and tighten the knob clockwise.
- Rising: lift up the head with a hand, unscrew the fastening knob counterclockwise slowly with the other hand, rises up the head to a proper height, and tighten the knob clockwise.
Screen-off Function
Press the "On/Off" button for three seconds, the screen will turn off and the fan is still running. Press any button [not include „On/Off" button), the screen will light up. Remote control does not have this feature.
Forced Shutdown
The fan will be turned off when there is no operation within 12 hours.
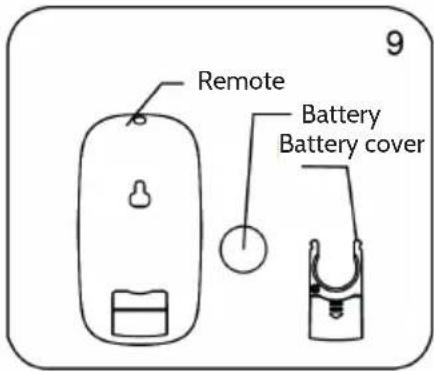
Inserting Batteries in the Remote Control
Batteries should be installed before using the remote control. It uses a 3-volt button battery. Open the battery cover; install a new battery, pay attention to the battery polarity (+ and -); Close the battery cover.
How to use the Remote Control
- The remoter controller must point to the receiving window of the fan box when it is used;
- The remoter controller can be normally used within five meters and 30 degrees from the fan;
- Avoid direct sunlight on the receiving window, so as not to affect the receiver's effect;
- Remove the built-in batteries when do not use the remote control for a long time or before the batteries are leaked.
Overheat Protection of the Motor
The motor has a thermal-fuse that burns out and the fan switches off and temperature of the motor is no longer going up so that plastic parts of the fan don't subject to deformation so far so to be burned by the overheat if the motor is overheat for any unexpected reason.
Cleaning and Care
The fan requires little maintenance. Do not try to fix it by yourself. Refer it to qualified service personnel if service is needed.
- Before cleaning and assembling, fan must be unplugged.
- To ensure adequate air circulation to the motor, keep vents at the rear of the motor free of dust. Do not disassemble the fan to remove dust.
- Please wipe the exterior parts with a soft cloth soaking a mild detergent. Do not use any abrasive detergent or solvents to avoid scratching the surface.
- Do not use any of the following as a cleaner: gasoline, thinner.
- Do not allow water or any other liquid into the motor housing or interior parts.
Hints on Disposal
natural_image
Symbol of a trash bin crossed with a diagonal line, no text or numbers present
According to the European waste regulation 2012/19/EU this symbol on the product or on its packaging indicates that this product may not be treated as household waste. Instead it should be taken to the appropriate collection point for the recycling of electrical and electronic equipment. By ensuring this product is disposed of correctly, you will help prevent potential negative consequences for the environment and human health, which could otherwise be caused by inappropriate waste handling of this product. For more detailed information about recycling of this product, please contact your local council or your household waste disposal service.
Producer: Chal-Tec GmbH, Wallstraße 16, 10179 Berlin, Germany.

This product is conform to the following European Directives:
2014/30/EU (EMC)
2014/35/EU (LVD)
2011/65/EU (RoHS)
206/2012/EU (ErP)
Estimado cliente,
Montaje
natural_image
Technical line drawing of two mechanical components with mounting holes and a separate view labeled '2' (no text or symbols on the diagram itself)

natural_image
Technical line drawing of a mechanical assembly with two views and a central component, no text or symbols present
natural_image
Simple line drawing of a mechanical component with no text or symbols
natural_image
Symbol of a trash bin crossed with a diagonal line, no text or numbers present
Montage
natural_image
Technical line drawing of two mechanical components with mounting holes and a separate view labeled '2' (no text or symbols on the diagram itself)

natural_image
Technical line drawing of a mechanical assembly with two views and a central component, no text or symbols present
natural_image
Simple line drawing of a mechanical component with no text or symbols
natural_image
Symbol of a trash bin crossed with a diagonal line, representing no waste or discharge (no text or labels)
Assemblaggio
natural_image
Technical line drawing of two mechanical components with mounting holes and a separate view labeled '2' (no text or symbols on the diagram itself)
natural_image
Technical line drawing of a mechanical assembly with two parts and a central shaft, no text or symbols present
natural_image
Simple line drawing of a mechanical component with no text or symbols
natural_image
Symbol of a trash bin crossed with a diagonal line, no text or numbers present