
PCLKLSA2 - Other camera accessories SONY - Free user manual and instructions
Find the device manual for free PCLKLSA2 SONY in PDF.
| Product type | Software kit and connection cable for LISSA audio system |
| Brand | Sony |
| Model | PCLKLSA2 |
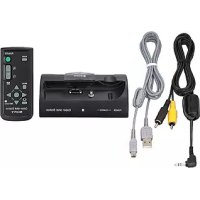
| Kit contents | 1 i.LINK cable (4-pin), 1 Digital Link Manager CD-ROM, 1 instruction manual, 1 warranty card |
| CD-ROM case dimensions | Approx. 142 x 125 x 10 mm |
| Total weight | Approx. 150 g |
| Required operating system | Windows 98 Second Edition, Windows 2000, Windows Me |
| Minimum configuration | IBM PC/AT compatible PC, Pentium 200 MHz processor, 64 MB RAM, 20 MB disk space, CD-ROM drive, i.LINK port |
| Screen resolution | VGA 640 x 480 pixels, 65,536 colors |
| Included software | Digital Link Manager (version 2.0E), Adobe Acrobat Reader 4.0 (English) |
| Main functions | Audio playback from the computer via STR-LSA1, control of LISSA devices (STR-LSA1, CDP-LSA1, MDS-LSA1) via i.LINK, MD recording, title editing, playlist creation, radio presetting |
| LISSA device compatibility | STR-LSA1, CDP-LSA1, MDS-LSA1 |
| Connection type | i.LINK (IEEE 1394) |
| i.LINK cable length | Approx. 1.5 m |
| Power supply | Not applicable (software and passive cable) |
| Maintenance | Keep the CD-ROM in its case, avoid scratches and dust |
| Safety | Do not connect/disconnect i.LINK cables while software is running |
| Reparability | Spare parts not available, replace the entire kit if defective |
| Warranty | Limited manufacturer warranty (see warranty card) |
Frequently Asked Questions - PCLKLSA2 SONY
User questions about PCLKLSA2 SONY
0 question about this device. Answer the ones you know or ask your own.
Ask a new question about this device
Download the instructions for your Other camera accessories in PDF format for free! Find your manual PCLKLSA2 - SONY and take your electronic device back in hand. On this page are published all the documents necessary for the use of your device. PCLKLSA2 by SONY.
USER MANUAL PCLKLSA2 SONY
Digital Link Manager
Version 2.0E
Operating Instructions GB
Mode d'emploi FR
Bedienungsanleitung DE
Manual de instructaciones ES
- Duplication of any or all of the contents of this software and instruction manual or lending of this software to third parties without the express permission of the copyright holder is strictly prohibited by copyright law.
- Sony cannot be held liable in any way for monetary losses, lost profits or claims from third parties arising from the use of this software.
- Should any manufacturing defects occur, Sony's responsibility shall be limited solely to replacing said defective merchandise.
- This software is approved for use only with the specified equipment.
- Sony reserves the right to change software specifications without prior notice.
Program © 2000-2001 Sony Corporation
Documentation © 2001 Sony
Corporation
© 2001 Sony Corporation All rights reserved.
- Microsoft, MS-DOS and Windows are the registered trademarks of U.S. Microsoft Corporation in the U.S. and other countries.
- IBM and PC/AT are the registered trademarks of U.S. International Business Machines Corporation.
- All other names of systems, products and services are trademarks of their respective owners. In the manual, the ^TM or mark are not specified.
- Adobe® and Adobe® Acrobat® Reader are trademarks of Adobe Systems Incorporated.
- Nand registered trademarks of Sony Corporation.
Table of contents
Getting started
Overview 3
System requirements. 4
Preparation
Checking the supplied items. 5
Notes regarding the use of the software 5
Installing a software 6
Installing the Digital Link Manager. 6
Installing the Adobe Acrobat Reader 11
Uninstalling a software 12
Connections 13
Starting the software 14
Quitting the software 15
Additional Information
Using the on-line manual 16
Using the Help 17
Troubleshooting 18
About this manual
This manual explains how to install the Digital Link Manager and how to use the online manual and Help.
The latest information about this software can be found in the "Readme.txt" file in the supplied CD-ROM.
Windows98 Second Edition is the operating system used for illustration purposes in this manual.
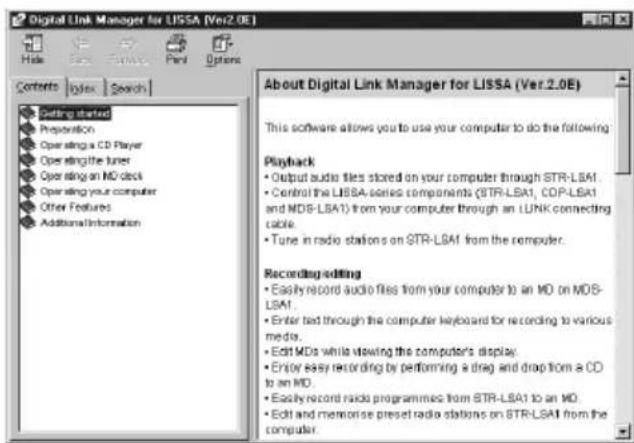
Overview
This software allows you to use your computer to do the following:
Playback
- Output audio files stored on your computer through STR-LSA1.
- Control the LISSA-series components (STR-LSA1, CDP-LSA1 and MDS-LSA1) from your computer through i.LINK connecting cables.
- Tune in radio stations on STR-LSA1 from the computer.
Recording/editing
- Easily record audio files from your computer to an MD on MDS-LSA1.
- Enter text through the computer keyboard for recording to various media.
- Edit MDs while viewing the computer's display.
- Enjoy easy recording by performing a drag and drop from a CD into an MD.
- Easily record radio programmes from STR-LSA1 to an MD.
- Edit and memorise preset radio stations on STR-LSA1 from the computer.
Other operations
- Create play lists for audio files stored on your computer.
- Check a variety of information with the computer's display.
- Make the settings for each connected component from your computer.
- Adjust the sound from the computer.
System requirements
Digital Link Manager (Ver. 2.0E) requires the following hardware and software.
□IBM PC/AT (or compatible) personal computer (This software does not run on the Macintosh.)
Recommended models:
VAIO notebooks sold in Europe
— i.LINK connector (or i.LINK card)
— Free hard disc space:
20 MB or more
Video board and display driver:
VGA (640·480 pixels), 65,536 colours or more
- CD-ROM drive (for software installation)
- Windows Media Player (Ver. 6.4 or later)
OS:Windows98 Second Edition/Windows2000/
WindowsMe (This software does not run on
Microsoft Windows3.1, Windows95 or
WindowsNT.)
Video monitor: VGA (640·480 pixels), 65,536 colours or more
Notes
- This software can be used only with the LISSA-series components (STR-LSA1, CDP-LSA1 and MDS-LSA1).
- We recommend that this software be used within a configuration consisting of one STR-LSA1, one CDP-LSA1 and one MDS-LSA1.
- This software does not support the transmission of music data from the above components to your computer.
Checking the supplied items
Make sure that you have received the following supplied items with the PCLK-LSA2. If anything is missing, please contact the shop where you purchased this kit or your nearest Sony dealer.
- i.LINK connecting cable (1)

- Digital Link Manager CD-ROM (1)
- Operating instructions
Warranty card
Notes regarding the use of the software
- To install the software, be sure to follow the procedure "Installing a software" on page 6.
- Do not connect or disconnect i.LINK connecting cables while the software is starting up or while sound is being output.
Installing a software
Follow the procedures given below to install a software onto your computer's hard disc. Set the computer to the operation mode before proceeding.
Notes regarding the installation of the software
- Be sure to install this software before connecting a LISSA-series component (STR-LSA1, CDP-LSA1 or MDS-LSA1) to your computer. If not, this software may not function properly (page 9).
- Be sure to install this software when you log on as the administrator or a user with authority to use all functions.
Installing the Digital Link Manager
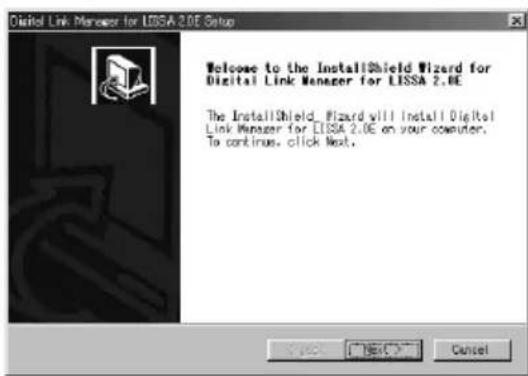
1 Insert the supplied CD-ROM into the computer. The setup window appears. Carefully read the precautions which appear.
If the window does not appear, do the following operations.
1 Click "Start", point to "Settings", and then click "Control Panel". The control panel is opened.
2 Double-click "Add/Remove Programs". The "Add/Remove Programs Properties" window (or "Add/Remove Programs" window for Windows2000) appears.
3 (for Windows98 Second Edition/WindowsMe) Click "Install ..., and then click "Next" after the "Install Program From Floppy Disk or CD-ROM" window appears. (for Windows2000) Click "Add New Programs", click "CD or Floppy" in the "Add/Remove Programs", and then click "Next" after the "Install Program From Floppy Disk or CD-ROM" window appears. The installer on the CD-ROM will be detected automatically and the "Run Installation Program" window appears.
4 Check that "X:\Setup.exe" (X means the drive name of the CD-ROM) is displayed in the "Command line for installation program" and click "Finish". The installer starts up.
After a while, the setup programme is started.
2 Click "Next".
The window for selecting a destination appears.
To change a destination folder, click "Browse ..." and select the folder in which you want to install this software.
3 Click "Next".
Select from the list the desired language version of the on-line manual to be installed.
4 Click "Next".
The process of installing the software on the hard disc starts.
The Digital Link Manager folder is created in the folder in which this software is installed.
5 Click "Finish" after the window for finishing the installation procedure appears.
The "Readme.txt" file is opened.
Be sure to read the precautions which appear.
(continued)
Installing the Digital Link Manager (continued)
6 Close the "Readme.txt" file.
The window for restarting the computer appears.

7 Eject the CD-ROM, click "Finish", and then restart the computer. This completes the setup process.
Be sure to restart the computer. If not, the software will not function properly.
Notes
- Installing the software creates a folder. Because this software uses this folder, please do not erase, move, or change the contents of this folder.
- When you connect a LISSA-series component (STR-LSA1, CDP-LSA1 or MDS-LSA1) to your computer for the first time, and the operating system on your computer is Windows2000, a message may appear requesting that you insert the supplied CD-ROM. Follow the on-screen instructions at this time.
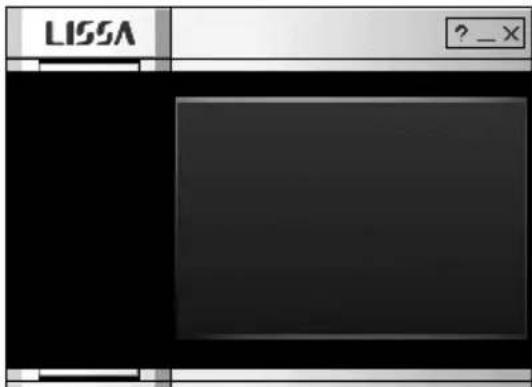
If nothing appears in the Audio Rack View when you start up the software for the first time
When you start up the Digital Link Manager, the icons of the connected components will not appear in the Audio Rack View and the window shown below will appear if:
-
you connected the LISSA-series components to your computer before you installed the Digital Link Manager.
-
you connected the LISSA-series components to your computer after you installed the Digital Link Manager, but you did not restart the computer.
If the window appears when you are using Windows98 Second Edition/WindowsMe
1 Disconnect all i.LINK devices from the computer.
2 Do the procedure "Uninstalling a software" on page 12 to uninstall the software.
3 Do the procedure "Installing the Digital Link Manager" on page 6 to re-install the software.
4 Restart the computer.
5 After you restart the computer, connect the LISSA-series components to the computer.
(continued)
Installing the Digital Link Manager (continued)
If the window appears when you are using Windows2000
1 Disconnect all i.LINK devices from the computer, and then reconnect only the LISSA-series components to the computer.
2 Right-click "My Computer", select "Properties", click the "Hardware" tab, and then click "Device Manager" to open the "Device Manager" window. It is necessary to do the procedure below to update the device drivers indicated as "Microsoft DV Camera and VCR" in the "Imaging devices".
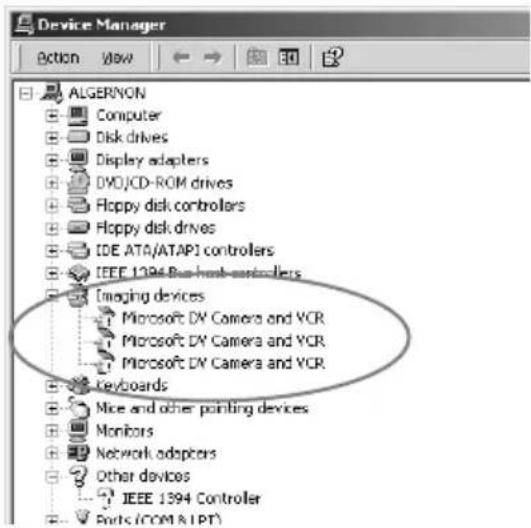
3 Double-click "Microsoft DV Camera and VCR" in the "Imaging devices", click the "Driver" tab in the "Properties" window, and then click "Update Driver ..." to update the driver.
The "Upgrade Device Driver Wizard" window appears.
4 Click "Next".
5 After verifying that "Search for a suitable driver for my device (recommended)" is checked in the "Install Hardware Device Drivers" window, click "Next".
6 After verifying that the "Optional search locations" items are not checked in the "Locate Driver Files" window, click "Next".
The search for driver files is started.
7 Uncheck "Install one of the other drivers" in the "Driver Files Search Results" window, and then click "Next".
The "Digital Signature Not Found" window appears.
8 Click "Yes".
The driver is upgraded.
9 Click "Finish".
10 Repeat steps 3 through 9 to upgrade all the "Microsoft DV Camera and VCR" drivers.
11 Restart the computer.
Installing the Adobe Acrobat Reader
You must install the Adobe Acrobat Reader in your computer in order to open the on-line manual.
Only the English version of the Adobe Acrobat Reader 4.0 is provided in the Acrobat directory on the supplied CD-ROM. Different language versions of the Adobe Acrobat Reader 4.0 are available at the Adobe website (http://www.adobe.com/). Download the desired version from the website and install it.
The following procedure is for installing the English version of the Adobe Acrobat Reader 4.0.
1 Double-click "ar405eng.exe" in the Acrobat directory. The Set up Adobe Acrobat Reader appears. Carefully read the precautions which appear.
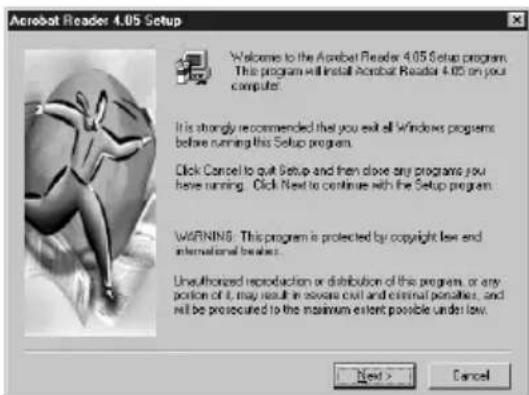
If you do not want to install it, click "Cancel".
Note
When you have already installed the Adobe Acrobat Reader 3.0 in your computer, "Warning" appears.
In this case, uninstall the Adobe Acrobat Reader 3.0 and restart your computer. Installing the Adobe Acrobat Reader 4.0 after restart, "Warning" does not appear.
2 Follow the instructions that appear in the display to install the software.
Uninstalling a software
If you do not need the Digital Link Manager or Adobe Acrobat Reader, uninstall a software as follows:
1 Select the control panel and display it.
Click "Start", point to "Settings", and then click "Control Panel" to open the control panel.
2 Double-click "Add/Remove Programs".
The "Add/Remove Programs Properties" window (or "Add/Remove Programs" window for Windows2000) appears.
3 Click "Digital Link Manager for LISSA 2.0E" or "Adobe Acrobat Reader 4.0" in the programme list below.
4 Click "Add/Remove" (or "Change/Remove" for Windows2000).
5 Click "OK" in the "Confirm File Deletion" window.
Uninstaller starts up and the software selected in step 3 is deleted automatically.
Connections
Do not connect an i.LINK component to your computer before installing this software.
Connect a LISSA-series component to your computer with an i.LINK connecting cable.
(for Windows2000) If the "Digital Signature Not Found" window appears on the monitor when you connect a LISSA-series component after installing the software, be sure to click "Yes".
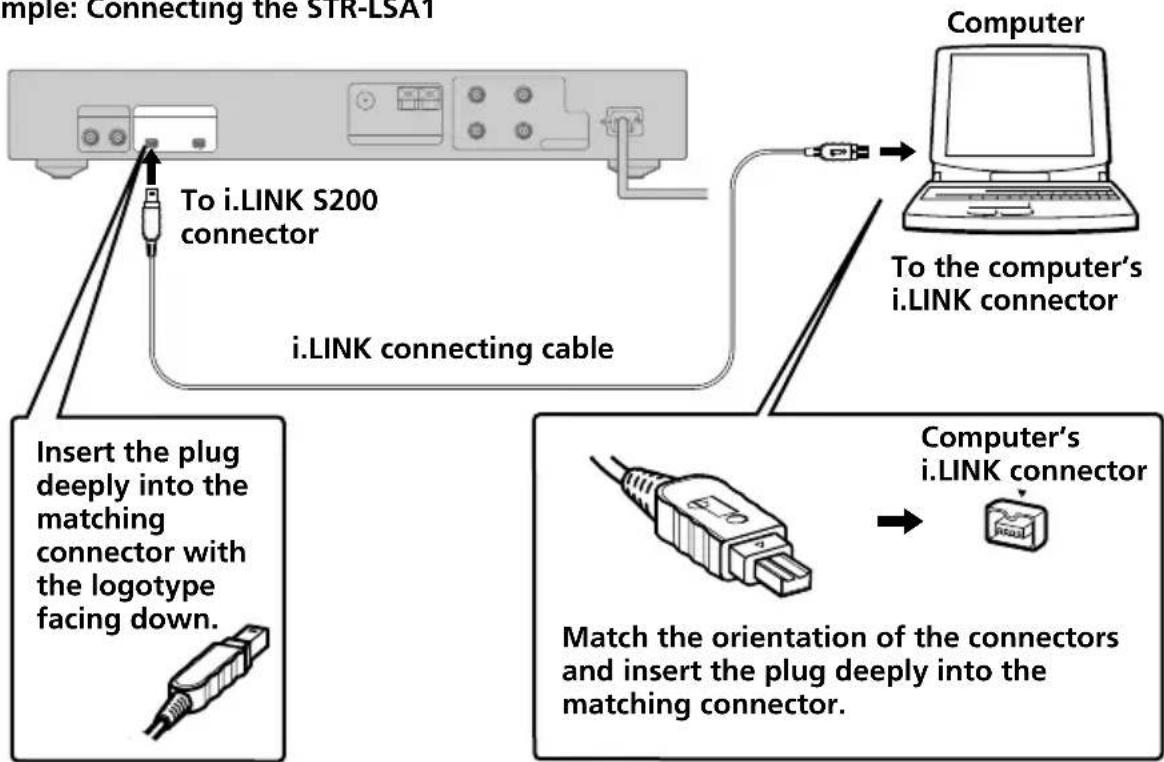
Example: Connecting the STR-LSA1
Notes
- Different models of personal computers refer to their i.LINK connectors with different connector names. For further information, refer to the instruction manual of your computer.
- Match the orientation of the cable plug with that of the connector on the main unit when plugging the cable into the computer. The orientation of the connector differs according to a computer.
- Be sure to plug in the cable straight. Plugging in the cable at an angle may damage the jack or the plug.
- Do not insert any metal objects into an i.LINK connector. Short-circuit may occur resulting in damage.
- It may not be possible to use the supplied i.LINK connecting cable with certain VAIO series models. If your model is one of these, please use the optional i.LINK connecting cable (4 pins-6 pins).
Starting the software
Notes
- Before starting the software, be sure to set all the power control functions in the "Power Properties" window to off.
- Do not turn on or off the computer during recording on MDS-LSA1. If you do so, the recording may not be done properly.
- Only the following buttons on the deck or remote can be used to operate MDS-LSA1 while the software is running:
■,△,DISPLAY, II, ,II, 山 / 山 I, 山 /
-
MDS-LSA1 will not be automatically attached* if you start the software while MDS-LSA1 is in the middle of the CD Synchro-Recording. To attach this component, start the software after first stopping the CD Synchro-Recording, or wait until the CD Synchro-Recording ends and then use the right-click menu in the Audio Rack View to attach the component.
-
When you select "Attach", the specified component is attached to the i.LINK configuration, allowing you to check the condition of the component and control it.
- Only one STR-LSA1 can be attached at a time.
Click "Start", point to "Program", point to "Digital Link Manager for LISSA 2.0E", and then click "LISSA".
This software is then started and the Digital Link Manager Main Window appears.
When you start the software, the following display appears (when MD is selected as the sound source):
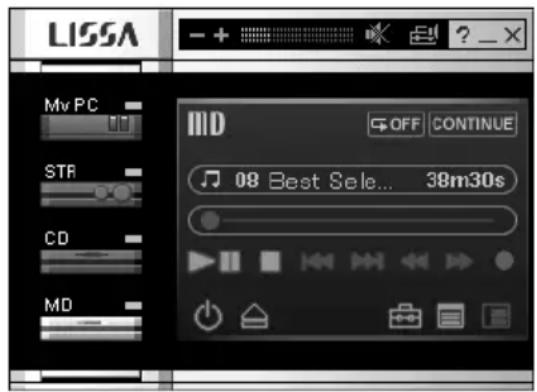
If nothing appears in the Audio Rack View when you start up the software for the first time, see page 9.
Quitting the software
Click in the Main Window.
Using the on-line manual
After installing the software, you can use the on-line manual. Before you use the on-line manual, Adobe Acrobat Reader (Adobe Systems Incorporated) must be installed in your computer. If it is not, do the procedure "Installing the Adobe Acrobat Reader" on page 11. With the computer turned on, do the following:
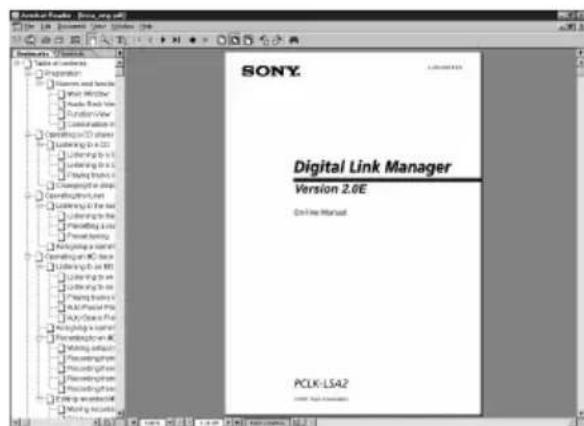
To open the on-line manual, click "Start", point to "Program", point to "Digital Link Manager for LISSA 2.0E", and then click "On-line manual".

The cover page appears in the display.
Using the Help
After installing the software, you can use the Help.
Note
Help exists only in English.
Operating instructions in other languages can be found in the on-line manual (page 16).
Opening the table of contents of Help
Click the Help button on the Main Window, and the table of contents of the Digital Link Manager will be opened.
- Double-click and the titles of the items contained in it appear.
- Click 2 and the explanation of the item appears.
- Click an underline in the explanation, and the page of the related explanation appears.
Searching by Keywords
Click the "Index" tab in the search topic window shown above, and the table of contents disappears and the list of keywords appears.
To search for a keyword, enter the word by which you want to search or scroll the list of keywords.
To view the explanation on a keyword, select the keyword from the list of keywords and click "Display".
Searching for topics by a keyword
1 Click the "Search" tab in the search topic window shown above.
2 Enter a word that is related to the desired topic, and then click "List Topics". The topic items that are found appear in the "Select Topic to display:" list window.
3 Select a topic item and click "Display". The corresponding topic appears in the left frame of the window.
Troubleshooting
If you experience any of the following difficulties while using this software, use this troubleshooting guide to remedy the problem. Should any problem persist, consult your nearest Sony dealer. Please also refer to your computer's manual, as well as the "Readme.txt" file installed on the hard disc with the software.
Problem Cause/countermeasure
| No screen response or screen error. →Turn off and on the i.LINK components, and then restart the Digital Link Manager. →Start up another software often used and check if the computer functions properly. →After uninstalling (page 12), try re-installing (page 6). | |
| No sound is output when you use this software to operate a LISSA-series component for the first time. (for Windows98 Second Edition/WindowsMe) | →Restart the computer. |
| Character input, recording, editing, etc. cannot be done. | The MD write protect tab may be set for write protect. →Slide the write protect tab so that recording is possible. The MD may probably be a commercial playback-only MD (an MD with prerecorded tracks). →Character input, recording, editing, etc. are not possible in commercial playback-only MDs. |
| An i.LINK component does not respond. | →Make sure that i.LINK connecting cables are connected properly (page 13). →Disconnect i.LINK connecting cables and then reconnect them. |
| Displayed name of MD or CD does not match the disc's data. | →Restart the Digital Link Manager. |
Documentation © 2001 Sony Corporation
Program © 2000-2001 Sony Corporation
Documentation © 2001 Sony
Corporation
VGA (640·480 pixeles), 65.536 colocores o mas
Notas

- Digital Link Manager
- Version 2.0E
- Table of contents
- Getting started
- Preparation
- Additional Information
- About this manual
- Overview
- Playback
- Recording/editing
- Other operations
- System requirements
- Notes
- Checking the supplied items
- Notes regarding the use of the software
- Installing a software
- Notes regarding the installation of the software
- Installing the Digital Link Manager
- Click "Next".
- Click "Next".
- Click "Next".
- Click "Finish" after the window for finishing the installation procedure appears.
- Installing the Digital Link Manager (continued)
- If nothing appears in the Audio Rack View when you start up the software for the first time
- Installing the Adobe Acrobat Reader
- Note
- Uninstalling a software
- Connections
- Starting the software
- → Click "Start", point to "Program", point to "Digital Link Manager for LISSA 2.0E", and then click "LISSA".
- Quitting the software
- Using the on-line manual
- Using the Help
- Opening the table of contents of Help
- Searching by Keywords
- Searching for topics by a keyword
- Troubleshooting
- Problem Cause/countermeasure
- Notas
Brand : SONY
Model : PCLKLSA2
Category : Other camera accessories