W 1080115 - Sander METABO - Free user manual and instructions
Find the device manual for free W 1080115 METABO in PDF.

| Technical specifications | METABO W 1080115 sander |
|---|---|
| Type of sander | Orbital sander |
| Power | 350 W |
| No-load speed | 12000 rpm |
| Pad diameter | 125 mm |
| Weight | 1.5 kg |
| Usage | Ideal for sanding wood, metal, and plastic surfaces |
| Maintenance | Regular cleaning of the dust filter, checking the condition of abrasives |
| Safety | Use safety glasses and a dust mask |
| General information | 3-year warranty, spare parts available |
Frequently Asked Questions - W 1080115 METABO
User questions about W 1080115 METABO
0 question about this device. Answer the ones you know or ask your own.
Ask a new question about this device
Download the instructions for your Sander in PDF format for free! Find your manual W 1080115 - METABO and take your electronic device back in hand. On this page are published all the documents necessary for the use of your device. W 1080115 by METABO.
USER MANUAL W 1080115 METABO
(Director Innovation, Research and Development)
*4) Metabowerke GmbH - Metabo-Allee 1 - 72622 Nuertingen, Germany


(M 14) 6.30706


(M14)316047600
Original instructions
1. Conformity Declaration
We, being solely responsible: Hereby declare that these angle grinders, identified by type and serial number 1 ), meet all relevant requirements of directives 2 and standards 3 . technical documents for 4 - see Page 3.
2. Specified Use
The angle grinders, when fitted with original Metabo accessories, are suitable for grinding, sanding, separating and wire brushing metal, concrete, stone and similar materials without the use of water.
The user bears sole responsibility for damage caused by improper use.
Generally accepted accident prevention regulations and the enclosed safety information must be observed.
3. General Safety Instructions

For your own protection and for the protection of your electrical tool, pay attention to all parts of the text that are marked with this symbol!

WARNING - Reading the operating instructions will reduce the risk of injury.

WARNING Read all safety warnings and instructions. Failure to follow all safety warn-and instructions may result in electric shock, nd/or serious injury.
Keep all safety instructions and information for future reference. Pass on your electrical tool only together with these documents.
4. Special Safety Instructions
4.1 SafetyWarnings Common for Grinding, Sanding, Wire Brushing or Abrasive Cutting-Off Operations:
Use
a) This power tool is intended to function as a grinder, sander, wire brush or cut-off tool. Read all safety warnings, instructions, illustrations and specifications provided with this power tool. Failure to follow all instructions listed below may result in electric shock, fire and/or serious injury.
b) Operations such as polishing are not recommended to be performed with this power tool. Operations for which the power tool was not designed may create a hazard and cause personal injury.
c) Do not use accessories which are not specifically designed and recommended by the tool manufacturer. Just because the accessory
can be attached to your power tool, it does not assure safe operation.
d) The rated speed of the accessory must be at least equal to the maximum speed marked on the power tool. Accessories running faster than their rated speed can break and fly apart.
e) The outside diameter and the thickness of your accessory must be within the capacity rating of your power tool. Incorrectly sized accessories cannot be adequately guarded or controlled.
f) The arbour size of wheels, flanges, backing pads or any other accessory must properly fit the spindle of the power tool. Accessories with arbour holes that do not match the mounting hardware of the power tool will run out of balance, vibrate excessively and may cause loss of control.
g) Do not use a damaged accessory. Before each use inspect the accessory such as abrasive wheels for chips and cracks, backing pad for cracks, tear or excess wear, wire brush for loose or cracked wires. If power tool or accessory is dropped, inspect for damage or install an undamaged accessory. After inspecting and installing an accessory, position yourself and bystanders away from the plane of the rotating accessory and run the power tool at maximum no-load speed for one minute. Damaged accessories will normally break apart during this test time.
h) Wear personal protective equipment. Depending on application, use face shield, safety goggles or safety glasses. As appropriate, wear dust mask, hearing protectors, gloves and a workshop apron capable of stopping small abrasive or workpiece fragments. The eye protection must be capable of stopping flying debris generated by various operations. The dust mask or respirator must be capable of filtrating particles generated by your operation. Prolonged exposure to high intensity noise may cause hearing loss.
i) Keep bystanders a safe distance away from work area. Anyone entering the work area must wear personal protective equipment. Fragments of workpiece or of a broken accessory may fly away and cause injury beyond immediate area of operation.
j) Hold power tool by insulated gripping surfaces only, when performing an operation where the cutting accessory may contact hidden wiring or its own cord. Cutting accessory contacting a "live" wire may make exposed metal parts of the power tool "live" and shock the operator.
k) Position the cord clear of the spinning accessory. If you lose control, the cord may be cut or snagged and your hand or arm may be pulled into the spinning accessory.
I) Never lay the power tool down until the accessory has come to a complete stop. The
spinning accessory may grasp the surface and pull the power tool out of your control.
m) Do not run the power tool while carrying it at your side. Accidental contact with the spinning accessory could snag your clothing, pulling the accessory into your body.
n) Regularly clean the power tool's air vents. The motor's fan will draw the dust inside the housing and excessive accumulation of powdered metal may cause electrical hazards.
o) Do not operate the power tool near flammable materials. Sparks could ignite these materials.
p) Do not use accessories that require liquid coolants. Using water or other liquid coolants may result in electrocution or shock.
4.2 Kickback and RelatedWarnings:
Kickback is a sudden reaction to a pinched or snagged rotating wheel, backing pad, brush or any other accessory. Pinching or snagging causes rapid stalling of the rotating accessory which in turn causes the uncontrolled power tool to be forced in the direction opposite of the accessory's rotation at the point of the binding.
For example, if an abrasive wheel is snagged or pinched by the workpiece, the edge of the wheel that is entering into the pinch point can dig into the surface of the material causing the wheel to climb out or kick out. The wheel may either jump toward or away from the operator, depending on direction of the wheel's movement at the point of pinching. Abrasive wheels may also break under these conditions.
Kickback is the result of power tool misuse and/or incorrect operating procedures or conditions and can be avoided by taking proper precautions as given below.
a) Maintain a firm grip on the power tool and position your body and arm to allow you to resist kickback forces. Always use auxiliary handle, if provided, for maximum control over kickback or torque reaction during start-up.
The operator can control torque reactions or kickback forces, if proper precautions are taken.
b) Never place your hand near the rotating accessory. Accessory may kickback over your hand.
c) Do not position your body in the area where power tool will move if kickback occurs.
Kickback will propel the tool in direction opposite to the wheel's movement at the point of snagging.
d) Use special care when working corners, sharp edges etc. Avoid bouncing and snagging the accessory. Corners, sharp edges or bouncing have a tendency to snag the rotating accessory and cause loss of control or kickback.
e) Do not attach a saw chain woodcarving blade or toothed saw blade. Such blades create frequent kickback and loss of control.
4.3 SafetyWarnings Specific for Grinding and Cutting-Off Operations:
a) Use only wheel types that are recommended for your power tool and the specific guard designed for the selected wheel. Wheels for which the power tool was not designed cannot be adequately guarded and are unsafe.
b) The guard must be securely attached to the power tool and positioned for maximum safety, so the least amount of wheel is exposed towards the operator. The guard helps to protect the operator from broken fragments, accidental contact with the wheel and sparks that could ignite clothing.
c) Wheels must be used only for recommended applications. For example: do not grind with the side of cut-off wheel. Abrasive cut-off wheels are intended for peripheral grinding, side forces applied to these wheels may cause them to shatter.
d) Always use undamaged wheel flanges that are of correct size and shape for your selected wheel. Proper wheel flanges support the wheel thus reducing the possibility of wheel breakage. Flanges for cut-off wheels may be different from grinding wheel flanges.
e) Do not use worn down wheels from larger power tools. Wheels intended for larger power tools are not suitable for the higher speed of a smaller tool and may burst.
4.4 Additional SafetyWarnings Specific for Abrasive Cutting-Off Operations:
a) Do not "jam" the cut-off wheel or apply excessive pressure. Do not attempt to make an excessive depth of cut. Overstressing the wheel increases the loading and susceptibility to twisting or binding of the wheel in the cut and the possibility of kickback or wheel breakage.
b) Do not position your body in line with and behind the rotating wheel. When the wheel, at the point of operation, is moving away from your body, the possible kickback may propel the spinning wheel and the power tool directly at you.
c) When wheel is binding or when interrupting a cut for any reason, switch off the power tool and hold the power tool motionless until the wheel comes to a complete stop. Never attempt to remove the cut-off wheel from the cut while the wheel is in motion otherwise kickback may occur. Investigate and take corrective action to eliminate the cause of wheel binding.
d) Do not restart the cutting operation in the workpiece. Let the wheel reach full speed and carefully reenter the cut. The wheel may bind, walk up or kickback if the power tool is restarted in the workpiece.
e) Support panels or any oversized workpiece to minimize the risk of wheel pinching and kickback. Large workpieces tend to sag under their own weight. Supports must be placed under the workpiece near the line of cut and near the edge of the workpiece on both sides of the wheel.
f) Use extra caution when making a "pocket cut" into existing walls or other blind areas. The
ENGLISHen
protruding wheel may cut gas or water pipes, electrical wiring or objects that can cause kickback.
4.5 SafetyWarnings Specific for Sanding Operations:
a) Do not use excessively oversized sanding disc paper. Follow manufacturers recommendations when selecting sanding paper. Larger sanding paper extending beyond the sanding pad presents a laceration hazard and may cause snagging, tearing of the disc or kickback.
4.6 SafetyWarnings Specific for Wire Brushing Operations:
a) Be aware that wire bristles are thrown by the brush even during ordinary operation. Do not overstress the wires by applying excessive load to the brush. The wire bristles can easily penetrate light clothing and/or skin.
b) If the use of a guard is recommended for wire brushing, do not allow any interference of the wire wheel or brush with the guard. Wire wheel or brush may expand in diameter due to work load and centrifugal forces.
4.7 Additional Safety Instructions

WARNING - Always wear protective goggles.
Use elastic cushioning layers if they have been supplied with the abrasive and if required.
Observe the specifications of the tool or accessory manufacturer! Protect the discs from grease or impacts!
Grinding wheels must be stored and handled with care in accordance with the manufacturer's instructions.
Never use parting grinder discs for roughing work! Do not apply pressure to the side of parting grinder discs.
The workpiece must lay flat and be secured against slipping, e.g. using clamps. Large workpieces must be sufficiently supported.
If accessories with threaded inserts are used, the end of the spindle may not touch the base of the hole on the grinding tool. Make sure that the thread in the accessory is long enough to accommodate the full length of the spindle. The thread in the accessory must match the thread on the spindle. See page 3 and chapter 14. Technical Specifications for more information on the spindle length and thread.

During machining, of metals in
particular, conductive dust can form
deposits inside the machine. This can lead to the transfer of electrical energy onto the machine housing. This can mean a temporary danger of electric shocks. This is why it is necessary when the machine is running to blow compressed air through the rear ventilation slots of the machine regularly, frequently and thoroughly. Here, the machine must be held firmly.
We recommend using a stationary extractor system and connecting a residual current circuit-breaker (FI) upstream. When the angle grinder is shut down via the FI circuit-breaker, it must be checked and cleaned. See chapter 9. Cleaning for more information on cleaning the motor.
Dust from material such as paint containing lead, some wood species, minerals and metal may be harmful. Contact with or inhalation of the dust may cause allergic reactions and/or respiratory diseases to the operator or bystanders.
Certain kinds of dust are classified as carcinogenic such as oak and beech dust especially in conjunction with additives for wood conditioning (chromate, wood preservative). Material containing asbestos must only be treated by specialists.
- Where the use of a dust extraction device is possible it shall be used.
- The work place must be well ventilated.
- The use of a dust mask of filter class P2 is recommended.
Follow national requirements for the materials you want to work with.
Materials that generate dusts or vapours that may be harmful to health (e.g. asbestos) must not be processed.
When working in dusty conditions, ensure that ventilation openings are not blocked. If it becomes necessary to remove dust, first disconnect the power tool from the mains supply (use non-metallic objects) and avoid damaging internal components.
Damaged, eccentric or vibrating tools must not be used.
Avoid damage to gas or water pipes, electrical cables and loadbearing walls (static).
Connect a FI circuit-breaker with max. release current (30 mA) upstream when using the machine outdoors!
Pull the plug out of the socket before any making adjustments, converting or servicing the machine.
A damaged or cracked additional handle must be replaced. Never operate a machine with a defective additional handle.
A damaged or cracked safety guard must be replaced. Never operate a machine with a defective safety guard.
This power tool is not suitable for polishing work. Improper use of the machine will void the warranty! The motor may overheat and damage the electric power tool. We recommend using our angle polisher for polishing work.
5. Overview
See page 2.
1 Clip to tighten/release the (tool-free) clamping nut manually *
2 Clamping nut (tool-free) *
3 S u p p o r t f l a n g e
4 Spindle
5 Spindle locking button
6 S I i dn/olfhswgtch
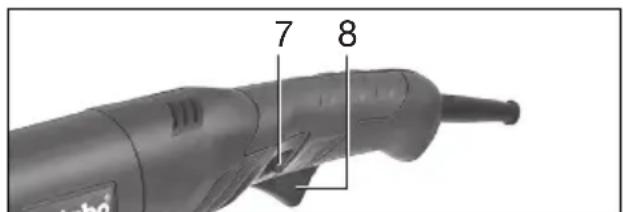
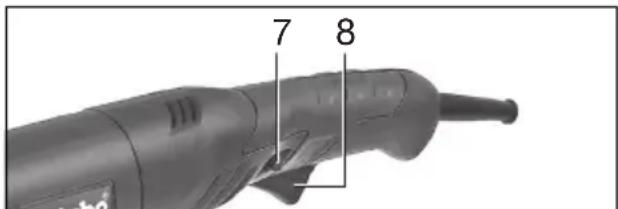
7 Lock (to prevent the machine from being switched on unintentionally, or for continuous operation) *
8 Trigger ( for switching on and off) *
9 Additional handle
10 Safety cover
11 Clamping nut
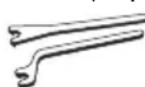
12 2-hole spanner
13 Clamping screw
* depending on equipment/not in scope of delivery
6. Commissioning
Before plugging in, check to see that the rated mains voltage and mains frequency, as stated on the rating label, match your power supply.
6.1 Attaching the additional handle
Always work with the additional handle attached (9)! Attach the additional handle on the left or right of the machine and secure.
6.2 Install safety guard
For safety reasons, always use the safety guard provided for the respective wheel! See also chapter 11.
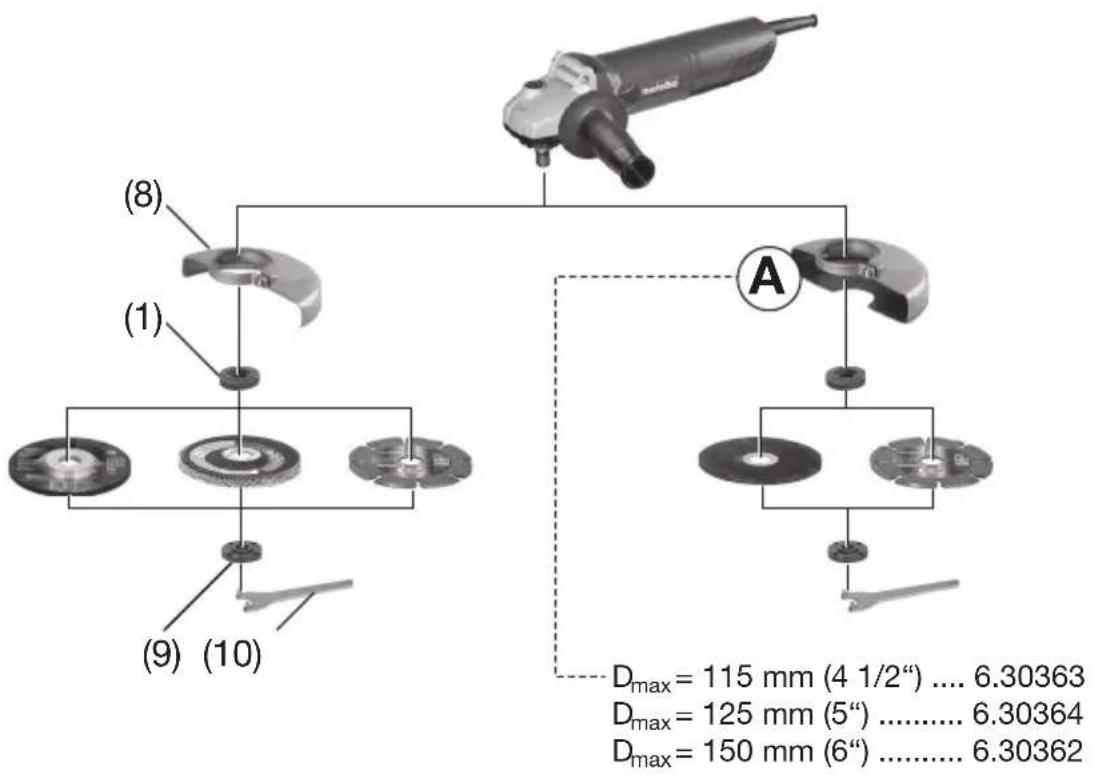
Safety guard for grinding
Designed for work with roughing wheels, flap sanding pads, diamond cut-off wheels.
See page 2, illustration C.
- Slacken the screw (13). Place the safety guard (10) in the position indicated.
- Turn the safety guard until the closed section is facing the operator.
- Tighten the screw (13), ensuring that the anti-twist device engages in the slots.
- Make sure that the guard is seated securely: you should not be able to turn the safety guard.
Use only accessories that are covered by at least 3.4mm by the safety guard.
7. Attaching the grinding wheel
Disconnect the mains plug before changing any accessories. The machine must be switched off and the spindle at a standstill.
For reasons of safety, attach the parting guard before performing parting work (see chapter 11. Accessories).
7.1 Locking the spindle
- Press in the spindle locking button (5) and turn the spindle (4) by hand until the spindle locking button engages.
7.2 Placing the grinding wheel in position
See page 2, illustration A.
- Place the supporting flange (3) on the spindle (see illustration above). The flange should not turn on the spindle when properly attached.
- Place the grinding wheel on the support flange (3) (see illustration above). The grinding wheel must lay flat on the supporting flange. The metal flange on the parting grinder disc must lay flat on the support flange.
Note: The support flange (3) is secured to prevent it from falling off. To remove: use some force if necessary.
7.3 Securing/releasing the (tool-free) clamping nut (depending on features)
Only tighten the (tool-free) clamping nut (2) manually.
For the machine to operate, the clip (1) must always lie flat on clamping nut (2).
To secure the (tool-free) clamping nut (2):
Do not use the (tool-free) clamping nut if the accessory has a clamping shank thicker than 6 mm! In this case, use the clamping nut (11) with 2-hole spanner (12).
- Lock the spindle (see chapter 7.1).
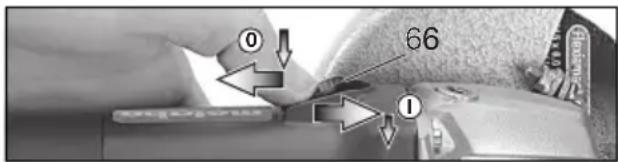
- Flip up the clip (1) on the clamping nut.
- Fit the clamping nut (2) on the spindle (4). See illustration on page 2.
- (1) Tighten the clamping nut on the clip manually in a clockwise direction.
- Flip down the clip (1) again.
To release the (tool-free) clamping nut (2): - Lock the spindle (see chapter 7.1).
- Flip up the clip (1) on the clamping nut.
- Unscrew the clamping nut (2), turning it anticlockwise manually.
Note: If the clamping nut is very tightly secured (2), you can also use a 2-hole spanner to unscrew it.
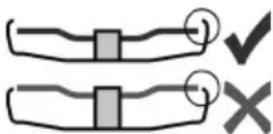
7.4 Securing/releasing the clamping nut (depending on features)
Securing the clamping nut (11):
The 2 sides of the clamping nut are different. Screw the clamping nut onto the spindle as follows:
See page 2, illustration B.
- A) For thin grinding wheels:
The edge of the clamping nut (11) faces upwards so that the thin grinding wheel can be attached securely.
B) For thick grinding wheels:
The edge of the clamping nut (11) faces downwards so that the clamping nut can be attached securely to the spindle.
- Lock the spindle. Turn the clamping nut (11) clockwise using the 2-hole spanner (12) to secure.
Releasing the clamping nut:
- Lock the spindle (see chapter 7.1). Turn the clamping nut (11) anticlockwise using the 2-hole spanner (12) to unscrew.
8. Use
8.1 Switching On and Off

Always guide the machine with both hands.

Switch on first, then guide the accessory towards the workpiece.

The machine must not be allowed to draw in additional dust and shavings. When switching
the machine on and off, keep it away from dust deposits. After switching off the machine, only place it down when the motor has come to a standstill.

Avoid inadvertent starts: always switch the tool off when the plug is removed from the s socket or if there has been a power cut.

In continuous operation, the machine continues running if it is forced out of your hands. Therefore, always hold the machine with your hands using the handles provided, stand in
safe position and concentrate.
Machines with slide switch:

Switching on: Push the slide switch (6) forward. For continuous activation, now tilt downwards until it engages.
Switching off: Press the rear end of the slide switch (6) and release.
Machines with Paddle Switch (with dead man function):
Switching the angle grinder ON just for a moment:
Switching on: Press in the lock (7) and then press the trigger switch (8). Let go of the lock (7).
Switching off: Release the trigger switch (8).
Continuous operation (depends on machine features):
Switching on: Press in the lock (7) and hold in place. Press and hold the trigger switch (8). The machine is now switched on. Now press in the lock (7) a second time to lock the trigger switch (8) in position (continuous operation).
Switching off: Press and release the trigger switch (8).
8.2 Working instructions
Grinding:
Press down the machine evenly on the surface and move back and forth so that the surface of the workpiece does not become too hot.
Roughing: position the machine at an angle of 30^ - 40^ for the best working results.
Separating:
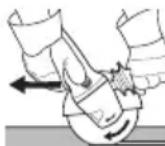
Always work against the run of the disc (see illustration). Otherwise there is the danger of the machine kicking back from the cut out of control. Guide the machine evenly at a speed
suitable for the material being processed. Do not tilt, apply excessive force or sway from side to side.
Sanding:
Press down the machine evenly on the surface and move back and forth so that the surface of the workpiece does not become too hot.
Wire brushing:
Press down the machine evenly.
9. Cleaning
Motor cleaning: blow compressed air through the rear ventilation slots of the machine regularly, frequently and thoroughly. Here, the machine must be held firmly.
10. Troubleshooting (WE 1450)
Restart protection: The machine does not start. The restart protection is active. If the mains plug is inserted with the machine switched on, or if the current supply is restored following an interruption, the machine does not start up. Switch the machine off and on again.
11. Accessories
Use only genuine Metabo accessories. See page 4. Use only accessories which fulfil the requirements and specifications listed in these operating instructions.
A Safety guard for cut-off grinding
Designed for work with cut-off wheels, diamond cut-off wheels.
Install as described under "Safety guard for grinding" (chapter 6.2).
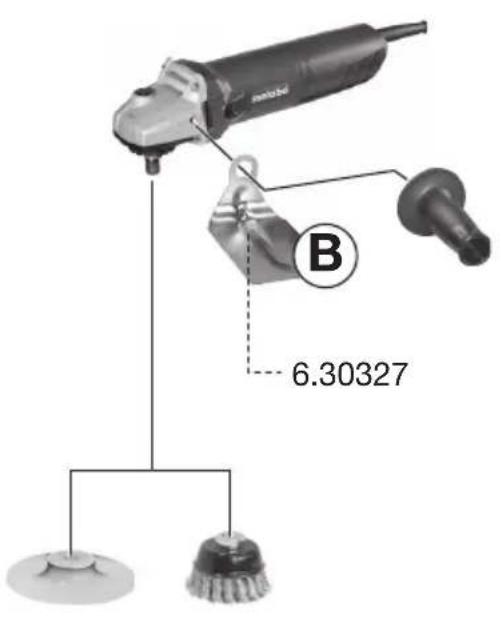
B Hand guard for sanding and wire brushing operations
Designed for work with support plates, sanding pads, wire brushes.
Install hand guard under the additional side-mounted handle.
C Adjusting nut (11)
D Clamping nut (tool-free) (2)
For a complete range of accessories, see www.metabo.com or the accessories catalogue.
12. Repairs

Repairs to electrical tools must be carried out by qualified electricians ONLY!
Contact your local Metabo representative if you have Metabo power tools requiring repairs. For addresses see www.metabo.com.
You can download a list of spare parts from www.metabo.com.
13. Environmental Protection
The sanding dust generated may contain hazardous materials: do not dispose of with the household waste, but at a special collection point for hazardous waste.
Observe national regulations on environmentally compatible disposal and on the recycling of disused machines, packaging and accessories.

Only for EU countries: Never dispose of power tools in your household waste! In accordance with European Guideline 2002/
96/EC on used electronic and electric equipment and its implementation in national legal systems, used power tools must be collected separately and handed in for environmentally compatible recycling.
14. Technical Specifications
Explanation of details on page 3. Subject to changes serving technical progress.
D_max =max.diameter of accessory tmax,1 =max.permitted thickness of clamping shank on accessory when using clamping nut (11)
t_max,3 = max permitted thickness of accessory
M = S p i n d I e t h r a d
I=Length of the grinding spindle n = Rated speed (maximum speed)
P1 =Nominal power input
P2 =Power output
m = Weight without mains cable
Measured values determined in conformity with EN 60745.
Machine in protection class II
Alternating current
The technical specifications quoted are subject to tolerances (in compliance with the relevant valid standards).
A Emission values
These values make it possible to assess the emissions from the power tool and to compare different power tools. Depending on the operating conditions, the condition of the power tool or the accessories, the actual load may be higher or lower. For assessment purposes, please allow for breaks and periods when the load is lower. Based on the adjusted estimates, arrange protective measures for the user e.g. organisational measures.
Vibration total value (vector sum of three directions) determined in accordance with EN 60745:
a_h,AG = Vibration emission value (surface grinding)
ah,DS =Vibration emission value (disc sanding)
K_h,AG/DS = Uncertainty(vibration)
Typical A-effective perceived sound levels:
LDA =Sound pressure level
P1 =Puissance absorbée
Dra at spannmattern (11):
Spannmattern har 2 olica sidor. Skruva pa spannmattern pa spindeln sa har:
Se sid. 2, bild B.
A) Pà tunna slipskivor:
PnO6pa6OTKe MaTepeHaIOB, BOCo6eHHoCTN MetaIIOB, BHyTpN
3JIeKTPoHnHCTpyMeHTa MoKeT HaKaIINBaTbC8 TOKOpPOBQJaA nbl. 3TO MoKeT npNBecTn K 3JIeKTPnueckOMy pa3p4yHa Kopnyc. IIO 3ToI npuHHe MoKeT BO3HnKHyTb ONaCHOCTb NopaHexHHaJIeKTPnueckHM TokOM. IooTOMy Heo6XODnMo peYJrPHO (N DOCTaTOUHO qACTO) TuaTeNbHO pOdyBaTb pa60TaHouHn INHCTpyMeHT CxHaTbIM BO3dYxOM uepe3 erO 3aDHne BEHTnIIaHOnHbIe ucln. Ppi 3Tom DeprKeHte erO Kpenko.
KOMpanaHnpeKomeHnyETNCNoJIb3OBAtB cTaUHOHApHyU yCTaHOBky dJaYdaJIeHNr PbIIN n PpeDbapHTeJbHO BkIIOuATb aBTOMaT 3aIITbI OT TOKa yTeKn (FI). B Clyae OTKIIOUeHNr yTLOBOI WInΦMaunHbI aBTOMaTOM 3aIITbI FI INCTpyMeHT CJeDyET npOBepHTb N OChNTb. YNCTKa DBnIaTeJIa CM. Tlaby 9. OUnCTka.
Пьль, ВОЗнkaюцая пи образовке MaTeрnaIOB, COdeржаших CBиHeц, HeKOTOpbIX ВИДOB ДрЕВECИнbl, МИХepaIOB И МеталIOB, MOЖET ПпEDCTaBLЯТь COБОй ONaCHOCTь Для ЗДОРБь.ВдыАнUEЧАЦТУТКОД ПьИ NIIH KOHTaKT C HeN MOЖET CTaTB ПprUHNoH NOЯВLEHIN АЛLEРгИчecнx peakuzn N/ИлN 3a6OJIeBaHIn ДыIxATElBhIx ПуTeI.
HeKOTOpbIe BnIbI nbIIN (HaNPmEp nbIb, BO3HnKaIOUaI npI o6pa6Ote dy6a nIb6yKa) CHTaOTc KaHcEpoREHHbIMN,OCo6eHHO B KOMbHaCUN C DOIOJIHNTeJIbHbIMN MaTePnaJAMN, NcNoJIb3yeMbIMN dIra O6pa6OTKn DpeBecnHbI (COJIb XpOMOBON KNCJOTbl, CpeDCTBa 3aUHTbl DpeBecnbl).O6pa6OTKa MaTePnaJOB C CoDEpKaHHeM ac6EcTa DoJIHHa BblNOJHrTbcR TOJIbKO CneuHaJIHCTAmN.
- IIO BO3MOXHOCTN HcNoJIb3yIte NOpXOJaUHn NblneOTcAcBIAuOuN annapaT.
-06ecneyTe xopooyu BeHTnlaqno pa6oey 3OHbl.
- PeKOMeHnyetcHocHTb peCnnpaTOp c Φnltpom Klaacca P2.
Co6JIIOJaTe DeIeCTByIOUne HaaIOHOJIbHbIe npednncAHn no 06pa6OTke MaTePnaNoB.
He donyckaetc o6pa60tKa MaTePnaIIOB, BbIeJIaIOUx ONaChbIe IJIa 3DOpOBbI NJIb NJI npbl, (B YactHOCTN, ac6ecTa).
CleIte 3a Tem, yTo6bI By cIobnax
3aIbIeHHOCTn pa60TaII BCE BEHTJIaIOHhIe OTBepCTn. Pn Heo6xOJIMOCtN OChCTn
IHCTpyMeHTa OT bIIN OTKIOUHTe erO OT CETn I
CleIte 3a Tem, yTo6bI Pn OChTKe He
IpOn30WlIO NOBpeJdeHm BHyTpEHHIX DeTalei (ICNoJIb3yIte HEmTaJIInuecKHe IppeMeTbl).
He donyckaeTc npimHeHne NOBpeXdeHHbIX, DeΦOpMnPOBaHHbIX INI Bn6pnpUoNx pa6OuNX IHCTpyMeHTOB.
He donyuchai Te noBpeKdEHH ra30- nIN BOJOpPOBOIDOB, IHHN 3JIeKTPoNTaHnI IN HeCyUxN CTeH.
Pn HcnoJb3OBAHn IHCTpyMeHTa Ha OTKpbITOM BO3dyxpeBapNTeJbHO BKNIOHTe aBTOMaT 3aunTbI F C MaKc. TOKOM OTKIOUeHn (30 MA)!
До npobeDEHЯ KaKnx-Либо HacTpoEK,пеошацEHЯ ИИnpa6OT NO TeXHuecKOMy 06CnyKINBaHIO BbIHMaITe CeTeByIO BnIKy I3 po3eTKN.
IobpeKdennhyu HnHnNotpeckabWyocraDOnoJIHTeJIbHyIO pyKOaTHcJeDyET 3aMeHHTb.He nCnoJIb3yInTe HNCTpyMeHT C DeΦeKTHOJ DOnoJIHTeJIbHOH pyKOaTKoI.
NobpeKdEHHbI HnH NtpeckabWmnc 3aunTHbI KOKyX CJeDyET 3aMeHNTb. He nCnoJb3yIte HHCTpyMeHT C DeΦeKTHbIM 3aUHTbIM KOxYOM.
3NeHTpOHcTpymEtblc nepeKIOuateJeM:
BkIoueHne: nepeDnHbTe nepeKIOuataJIb (6) BnpeJ. Ia HnpepbIBHO paobTbHaKMITE nepeKIOUaTeJB BH3 DO fHKcaun.
BbIKIIOUeHHe:HaKMHTe Ha 3aIHN KOHeu nepeKIIIOuAteTn (6), a 3aTeM OTNyCTnTe.
3JIeKTHpOHNcTpymEHTbIC npedoxpaHHTeNbHbIM BbIKIOUaTeJeM (c yHNKUne6e3OnacHO 0ctaHOBa):
KpaTHOBpeMeHHoe BKHIOueHne:
BkIIOueHHe: ChauaHaJHMnTe 6loKnpaTop (7), 3aTeM — HaJHMHO npeKJIouaTeIb (8). OTnycTnte 6loKnpaTop (7).
BbIKJIIOUeHHe:OTnycTnTe HaKIMHOI nepeKIIIOuHaTeJIb (8).
HenpepbBbI peKm pa60tbl (B 3aBnCmOCTN OT KOMnleHTaun):
BkIIOUeHHe:HaKMnTe n ydepKINBaIte 6JOKnPaTOp (7) HaKaTbIM. HaKMnTe n ydepKINBaIte HaKIMHOI nepeKlIOuATEJIb (8).3JeKTponHCTpyMeHT BkIOueH. Tepeb HaKMnTe 6JOKnPaTOp (7) eue pa3, YTObbl 3a6JIOKnPOBaTb HaKIMHOI nepeKlIOUaTeJIb (8) (HenpepbIBhI peKHM pa6Otbl).
BbIKIOUeHHe:HaKMITE nOTnyCTHTe HaKIMHOI nepeKIOUaTeJIb (8).
8.2 Yha3aHnno 3KcIpyatau
山nfoBaHne:
PnHKMaIte HNCTpyMeHCT C yMEpeHHbIM ycNJHEM n nepeBnraTe ero nO NOBepxHOCTn B3aN n BnepeD, YTO6bIO NOBepxHOCTb 6pa6aTbIBaEMoJ DeTaJIH He neperpeBaJacb.
O6dnpoohoe wHIObAHne: dIynoJyueHnXopoWero pe3yIbTaTa pa6oTaIte CycTahOBouHbIM yrIOM 30^ - 40^
A6pa3NBHOe OTpe3aHHe:

Pn a6pa3NBOM OTpe3aHnB Ccerda pa6oTaIe BO BCTpeyHOM HapBaJIeHN (CM. pncyHok). Haue HHCTpyMeHT MOKeT HeOxNdaHHO
BbICHOHTb n3 npOnnla. Pa6oTaIte c UMepeHHoN, COOTBeTCTBYIOUeN
6bpaTaBbAeMOMy MaTePnAly nOaYe. He nepeKaunBaIte, He HaKImaIte, He packaUnBaIte.
IJIHIOBAHHe C HcNoJIb3OBAHHem HaJdaUHO 6yMaHn:
PnKMaIe HNCTpyMeH T C yMepeHHbIM ycIIInEM n nepeBnraTe ero no NOBepxHOCTu B3aN IN Bnepei,HTO6bl NOBepxHOCTb 6pa6aTbIBaEMOn DeTaJIH He neperpeBaJacb.
Pa60TbC hapdoueTHaMn:
ymepenHNO npnKMaIte HNCTpymeNT.
9.Чистова
Ynctka DnurataJIa:peRyIpaHNO (IOCTaTOUHO yacto) n TuaTeJIbHo npOduBaIte HNCTpyMeHT CkHaTbIM BO3dYxOM Yepe3 3aDHe
BeHTnJIaCIOHHbIe ⅢeJI. PpN 3TOM depKHTe erO KpeNko.
10. YcTpaHenne HencnpaBHOCTeN (WE 1450)
3aunTa OT NOBTOPO NcKa: 3JeKTPoHnCTpMent He pa6Otae. Cpa6OtaJa 3aunTa OT NOBTOPO NcKa. EcIn npi BKNIOUeHHOM INCTpMente CeTeBaBnHa BCTaBnIeTcR B p03eTHy IIN BOCCTaHOBnIacb
PYCCHNru
IOna4a 3JIeKTPoNtAHnI NOcIe C6O, INHCTpyMeHT He 3aNyckaeTc. BbIKIOUHTe N CHOBA BKIOUHTe INHCTpyMeHT.
11. Прпнадлжноctи
IcnoJIb3yIe ToJIbHO opnHaJIbHbIe npHaJdJIeK-HocTn Metabo. Cm. c. 4.
IcnoJb3yIte TOLbKO Te npHaJdJeKHOCTN, KOTOpBIE OTBeuAOT Tpe6ObaHnM nnapaMeTpam, IpeueHCJIeHHbIM B DaHHOM pyKOBOdCTBE NO 3KcNlyaTaun.
A 3aunThbI KOHyx IJIa a6pa3NBHO pe3HH
PpeHa3HaueH nnpa6oTbICOTpe3HbIMN Kpyramn, aIma3HbIMN OTpe3HbIMN Kpyramn.
YcTaHOBka aHaIoruHna OnncAHIO B pa3deJe
3aunthbikokxynlaunfoabaHna" (rna6.2).
B 3aunTHna CHo6a Jnla WJInΦOBaTeJIc HAnDaHNo 6yMaRo, pa60t c KapdoetKamn
PpeHa3NaueHaIy pa6oT c onopHOn TapeKo, WInΦOBaJIbHOu TapeKo, KApDoUeTKamN.
3aunTHa cKo6a dIy yCTaHOBn nOd 6OKOBYIO DOnOHHTeBHyIO pyKoRTKy.
C 3aKHMHa rAHa (11)
D 3aHHMaHa raHka (6e3 KJIIOuA) (2)
IoiHbI accOPTmEHT npHaJTeJHKoCTe CMOTpIte Ha caIte www.metabo.com IIN B KaTALore npHaJTeJHKoCTe.
12. PemoHT
K peMOHTy 3JIeKTPoINHCTpyMeHTa DONYCKAIOTC TOnbKO KBaIINΦNcnpOBaHHbie CNEUAnIChbl-3JIeKTPnK!
IЯ peMOHTa 3JIeKTPoHnHCTpyMeHTa npOn3BOJcTbMa Metabo o6paauNTeCb B 6LNaJWee npeDCTaBnTeNbCTBO Metabo.
AДPEC CM. Ha caIte www.metabo.com.
Cnncn 3anaChbix qacte moKHO cKaaTaHa caIte www.metabo.com.
13. 3auntata okpyhaioe cpebl
YTNIN3aUIO UINFOBAJBHO NbIIN BbINOJHnTe OTDeJIbHOOTbIOBbIX OTXODOB HA COOTBETCTByIOuE INLOUADKe DIA CNEQTXODOB, T. K. BCOCTBaNbIIN MOryTH HxOHTbcr BpeHbIe BeueCTBa.
BbInHnIe HaunOHaIbHbIe npaBnla yTnIIN3aunn I nepepa6OTKn OTCJyKHNBWeRo 3JeKTPoNHCtpymEnTa, yNaKOBnN nPnHaIeXHocTe.

ToIbko DnIaCTpaH EC: He BbIbpaCbIbAaIte 3JIeKtponHcTpymEt BMeCTe C bItOBbIMN OTXoJam! CorlaCHO dIupeKtNBe 2002/96/
EG 06 ytnin3aun CTapbIX 3eKtponp6opOB IN 3eKTPOHORO 6OpUdoBAHIN COOTBETCTBYIOUM HauNoHaJIbHbIM HopMaM 6bIBWne B yIOTpe6leHN 3eKTPoPn6OpbIn 3eKTPoHnCtpyMeHTbI NOJekKaT pa3deJbHOyTNIN3aun C cJeBIO INNOCLeNyUcE N KOJIoRnueckn 6e3OnaCHO nepepa60TK.
14. Texnuechne xapaKTepncTHKN
IorcheHnK daHbIM Ha c. 3. OcTaBJIem 3a co6oI npaBO Ha TEXHueCKHe N3MeHeHn.
Dmax =MaKc.Диametp pa6oyero INHCTpyMeHTa tmax,1 =MaKc.ДOnyCTmMa TOnuHa pa6oyero INHCTpyMeHTa BДиana3OHe 3aJIMa npn NCNoIb3OBAHH 3aJIMHOJ raKn (11)
t_max,3 = .ДоустMuЯТолиña pa6чeroИНЧтPyMeHTe
M pe3b6a wHnHdela I = dInHa WnHdela
n =yactotaBpaueHnXoIOCTORO XoDa (MaKc.yactotaBpaueHn)
P1 =HOMINHaBHaNOTpe6JReMaMOUHOCTb
P2 =BbIXOHaRA M0UHOCTB
m =Macca6e3ceTeBOrKa6eJr
Pe3yIbTaTbI n3MepeHn noJyueHb B COOTBeTCTBn CO cTaHapTom EN 60745.
3NeKtpoHcTpymeHT KlaCca 3aunTbI II
~NepemehHbI TOK
Ha yka3aHHbIe TexHnueckne xapaKTepeNtIKn pacnpocTpaHJOTc DOyCKn, npEpyCMOTpeHHbIE DeiCTByIOUIMN CTaHdApTaMn.
3haeHnIyMaN Bn6paun
3HTn 3HaueHnI NO3BOJIOU OeHNBaTb N CpaBHBaTb Wm IN Bn6paunIO, CO3daBaemble npi pa6ote pa3nHybIX 3JIeKTPoHnCTpymeHTOB. B 3aBnCIMOCtN OT YcIOBn 3KcNlyaTaun, COCTOHHN 3JIeKTPoHnCTpymeHTA nn PA6OuNX (CMeHHbIX) INCTpyMeHTOB fakTNuechKa Harpy3Ha MOKeT 6bITb Bblwe nn Hxke. PnO nppeJeHn INPImepHO rpoBH YAma IN Bn6paunYHTbBAInTe nepepbIBb I BA6OTE n 4a3bl pa60TbC NOHNJKeHHo (WymOBO) harpy3KO. ONpeDeHnTE nepuehOpraHHzauONHbIX MEP No 3aunTe POIb3OBaTeIc yyeTOM Tex IIN INHbIX 3HaueHn Wyma IN Bn6paun.
CymMapHoe 3NaueHHe Bn6paunn (BeKTopHa Cymma TpEx HaPaBLeHn) paCCHTbIbAeTcR B COOTBeTCTBn CO CTaHdApTom EN 60745:
ah,AG =3MnCCNOHHOe 3HaueHne Bn6paun (WNIΦOBaHne NOBepxHOCTN)
ah,DS =3MnCCNOHHOe 3NaueHne Bn6paun (WlnΦOBaHne CO WlnΦOBAJbHBIM TapeIkamn)
Kh,AG/DS=Ko3ΦΦnUeHT nOprpeuHocTn (Bn6paun)
YpOBeHbIyMaNoMeToyA:
LDA =ypOBeHb 3ByKOBOr DaBHeHHA
LWA =yPOBHeB 3ByKOBO MOUHOCTH
KpA, KwA= KOaΦnUneHT nOprpeHocTn
HaedeBaIte 3auntHbIe HayuHHK!

HΦopmaζηДЯ NOhynatela:
Ceptnuikat COOTBETCTBNA:
No TC BY/112 02.01.003 04832, cpoK DeiCTBnA C 19.06.2014 no 20.01.2019 r., BblaH
peCny6bHKaHcKm yHHTapHbIM npEiPnTHeM
"BeIopycckn IocyadapCTBeHHb INHCTHTyT
MeTpOIoRn"; Pecny6bIka BeIapycb, 220053, r.
MInhck, CtapOBuIeHcKn TpaKT, 93; TeI.: +375172335501; aTTecTa aKKpeDiHaTaun: BY/112 003.02 ot 15.10.1999.
Ctpana H3roTOBJeHn:KntaI
ПОНЗВОДИТЕЛБ: "Metabowerke GmbH", Metaboallee 1, D-72622 Nuertingen, Германя
3aBO-н3rTOBHTeJIb:
"Metabo Powertools (China) Co. Ltd." Bldg. 7, 3585 San Lu Road, Pujiang Industrial Park, Min Hang District, KHTa
HmnpTeB Pocnn:
OOO"MeTa6o EBypa3nra
Pocsn,127273,MochBa
yI. Bepe3oBa aIJIe, I 5 a, cTp 7, oΦnc 106 TeJ.: +7 495 980 78 41
DaTApOn3BODCTBa 3aunHΦpOBAHa B 10-3NaUHOM cepnHOM HOMepe INHCTpyMeHTa, yKa3aHHOM Ha ero shnIbDnke. 1 Ra unpa o6o3NaHaet rOd, HanpImep «4» o6o3NaHaeT, uTo n3DeJIne npOn3BeDeHO B 2014 roy. 2 Ra n 3 Ra unφpbI o6o3NaHaOT HOMep Mecaa B rOdy pOn3BODCTBa, HanpImep «05» - MaJ
TapaHTnHbI cpoK:1 roD c daTbI npOdaXn CpoK cnyX6bl HnCTpyMeHtA:5 letC daTbI n3rTOBJIeHHa