
VPLVW5000ES - Projector SONY - Free user manual and instructions
Find the device manual for free VPLVW5000ES SONY in PDF.
| Product type | 4K Laser Video Projector (SXRD) |
| Display technology | 3× SXRD (LCOS) + Laser Light Source |
| Native resolution | 4096 × 2160 (4K) |
| Main functions | 2D/3D projection, motorized lens adjustment (focus, zoom, shift), preset calibrated modes, HDR compatibility (if applicable), HDMI connectivity |
| Light source | 80 laser diodes of 4.0 W (438-452 nm) + 20 laser diodes of 2.9 W (458-472 nm) |
| Laser class | Class 3R laser product (IEC 60825-1:2014) |
| Power consumption | Not specified in the manual; use a 3-wire grounded power cord |
| Connectivity | HDMI inputs, LAN port, remote control connector (Bluetooth for 3D glasses) |
| Maintenance and cleaning | Do not block ventilation openings; internal cleaning and part replacement only by Sony authorized technician |
| Safety | Do not look into the lens during operation; avoid use of optical instruments; unplug before maintenance; use an approved support for ceiling mount |
| Spare parts and repairability | Entrust any repair to a qualified Sony technician; no user-serviceable parts; remote control batteries replaceable (AA/R6) |
| Included accessories | Remote control RM-PJ24, AA batteries (2), power cord, plug holder, quick reference guide, instruction manual on CD-ROM |
| General information | Projector designed for fixed or ceiling installation; max altitude 1500 m (enable high altitude mode); avoid dusty or humid environments |
| Weight | Not specified; estimated ~15-20 kg (high-end projector) |
| Dimensions (W × D × H) | Not specified; typical dimensions for a 4K laser projector: ~500 × 200 × 500 mm |
Frequently Asked Questions - VPLVW5000ES SONY
User questions about VPLVW5000ES SONY
0 question about this device. Answer the ones you know or ask your own.
Ask a new question about this device
Download the instructions for your Projector in PDF format for free! Find your manual VPLVW5000ES - SONY and take your electronic device back in hand. On this page are published all the documents necessary for the use of your device. VPLVW5000ES by SONY.
USER MANUAL VPLVW5000ES SONY
This Quick Reference Manual explains the installation and basic operations for projecting pictures. It also describes important notes and cautions to which you have to pay attention when handling and using this unit.
Refer to "About Indicators," as necessary.
For details on the operations, refer to the Operating Instructions contained in the supplied CD-ROM.
Step 1
Preparing. Page 13
Step 2
Installing the Unit.. Page 14
Step 3
Connecting the Unit.. Page 15
Step 4
Selecting the Menu Language Page 17
Step 5
Projecting.. Page 18
Error Handling About Indicators.. Page 19
English
Before operating the unit, please read this manual thoroughly and retain it for future reference.
When using the product, do not use it for purposes other than those described in the instruction manual.
WARNING
To reduce the risk of fire or electric shock, do not expose this apparatus to rain or moisture. To avoid electrical shock, do not open the cabinet. Refer servicing to qualified personnel only.
WARNING
THIS APPARATUS MUST BE EARTHED.
WARNING
When installing the unit, incorporate a readily accessible disconnect device in the fixed wiring, or connect the power plug to an easily accessible socket-outlet near the unit. If a fault should occur during operation of the unit, operate the disconnect device to switch the power supply off, or disconnect the power plug.
CAUTION
About the LAN connector
For safety, do not connect the connector for peripheral device wiring that might have excessive voltage to this port.
WARNING
- Use the approved Power Cord (3-core mains lead) / Appliance Connector / Plug with earthing-contacts that conforms to the safety regulations of each country/ region if applicable.
- Use the Power Cord (3-core mains lead) / Appliance Connector / Plug conforming to the proper ratings (Voltage, Ampere).
If you have questions on the use of the above Power Cord / Appliance Connector / Plug, please consult a qualified service personnel.
Caution
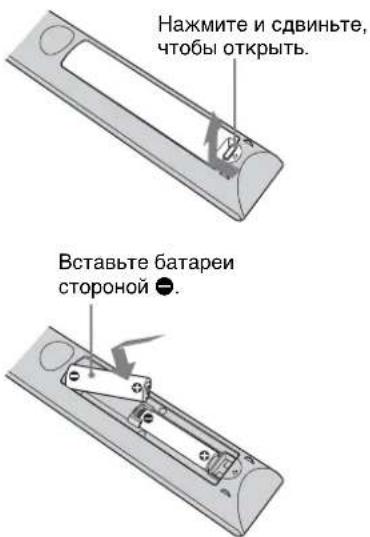
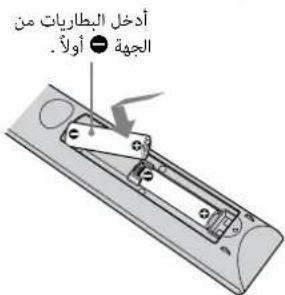
Two size AA (R6) batteries are supplied for Remote Control.
To avoid risk of explosion, use size AA (R6) manganese or alkaline batteries.
CAUTION
- Danger of explosion if battery is incorrectly replaced. Replace only with the same or equivalent type recommended by the manufacturer.
- When you dispose of the battery or the product, you must obey the law in the corresponding area or country. Do not dispose of the battery or the product in a fire or a hot oven, or mechanically crush or cut the battery. It may
explode or cause a fire. Do not subject the battery to extremely low air pressure that may result in an explosion or the leakage of flammable liquid or gas.
- Do not place the battery in a high temperature place, such as under direct sunlight or near fire. It may ignite, explode, or cause a fire. Do not immerse or wet the battery in water or seawater. This may cause an electric shock.
About 3D Glasses
The 3D Glasses communicate with the projector via Bluetooth technology to display 3D signals.
(a) frequency band(s) in which the radio equipment operates:
2.4 - 2.4835 GHz
(b) maximum radio-frequency power transmitted in the frequency band(s) in which the radio equipment operates: 4.30 dBm (E.I.R.P.)
For the customers in the U.S.A.
This equipment has been tested and found to comply with the limits for a Class B digital device, pursuant to part 15 of the FCC Rules. These limits are designed to provide reasonable protection against harmful interference in a residential installation. This equipment generates, uses and can radiate radio frequency energy and, if not installed and used in accordance with the instructions, may cause harmful interference to radio communications. However, there is no guarantee that interference will not occur in a particular installation. If this equipment does cause harmful interference to radio or television reception, which can be determined by turning the equipment off and on, the user is encouraged to try to correct the interference by one or more of the following measures:
- Reorient or relocate the receiving antenna.
- Increase the separation between the equipment and receiver.
- Connect the equipment into an outlet on a circuit different from that to which the receiver is connected.
- Consult the dealer or an experienced radio/TV technician for help.
You are cautioned that any changes or modifications not expressly approved in this manual could void your authority to operate this equipment.
All interface cables used to connect peripherals must be shielded in order to comply with the limits for a digital device pursuant to Subpart B of part 15 of FCC Rules.
If you have any questions about this product, you may call; Sony Customer Information Service Center 1-800-222-7669 or http://www.sony.com/
Declaration of Conformity
Trade Name: SONY
Model: VPL-VW5000
Responsible party: Sony Electronics Inc.
Address: 16535 Via Esprillo, San Diego, CA
92127 U.S.A.
Telephone Number:858-942-2230
This device complies with part 15 of the FCC Rules.
Operation is subject to the following two conditions: (1)
This device may not cause harmful interference, and (2) this device must accept any interference received, including interference that may cause undesired operation.
This transmitter must not be co-located or operating in conjunction with any other antenna or transmitter.
For the customers in Canada
CANICES-3(B)/NMB-3(B)
For the customers in Canada
This device complies with Industry Canada licence-exempt RSS standard(s). Operation is subject to the following two conditions: (1) this device may not cause interference, and (2) this device must accept any interference, including interference that may cause undesired operation of the device.
For the customers the U.S.A. and Canada Radiated Exposure Statement:
The product complies with the US/Canadian portable RF exposure limit set forth for an uncontrolled environment and is safe for intended operation as described in this manual. The further RF exposure reduction can be achieved if the product can be kept as far as possible from the user body or if the device is set to lower output power if such function is available.
For the customers the U.S.A. and Canada
CAUTION
Use of controls or adjustments or performance of procedures other than those specified herein may result in hazardous radiation exposure.
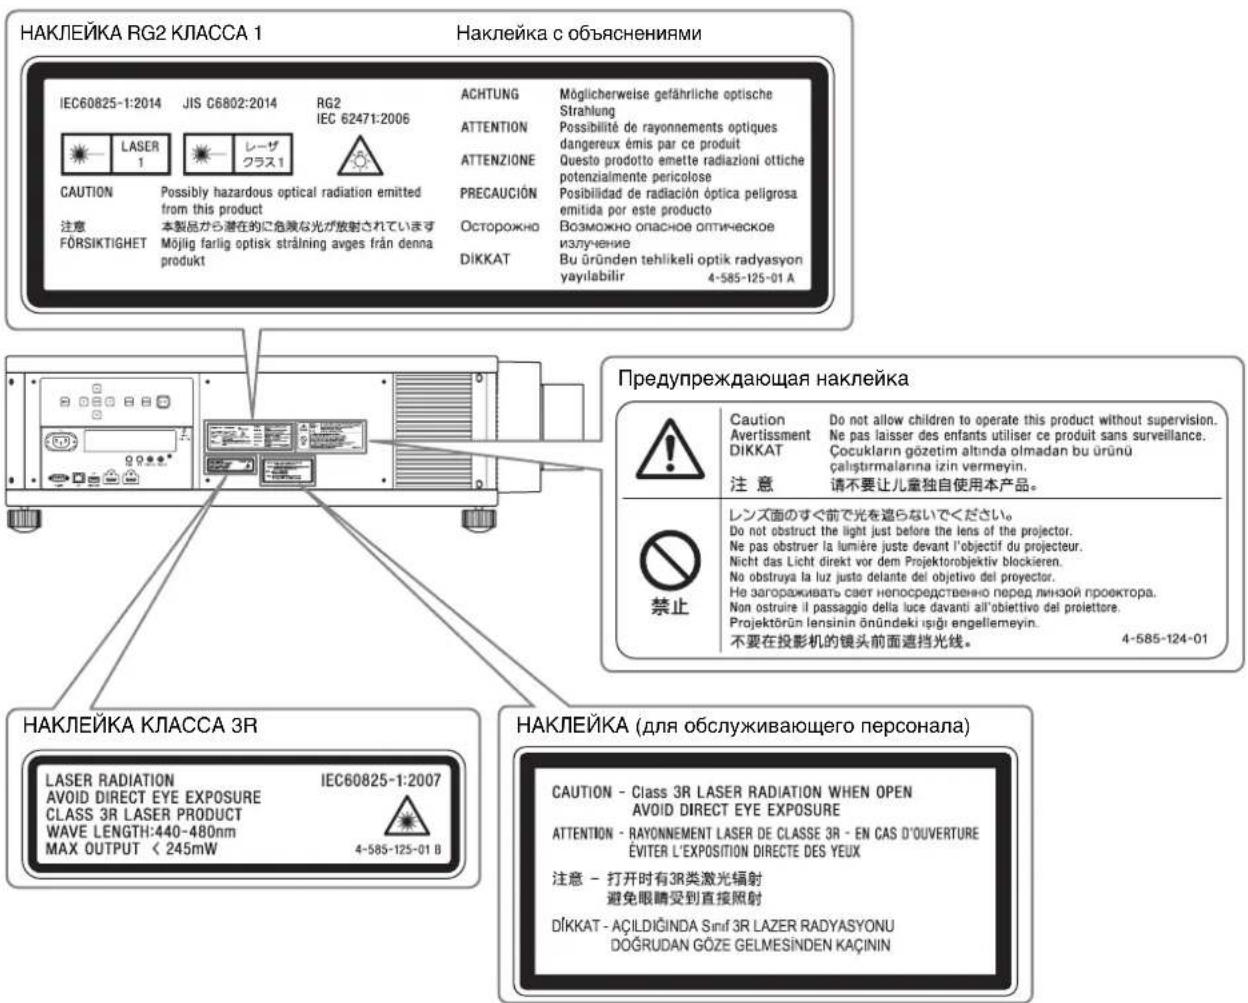
This product is classified as a CLASS 3R LASER PRODUCT.
LASER RADIATION
IEC60825-1:2007
AVOID DIRECT EYE EXPOSURE
CLASS 3R LASER PRODUCT
WAVE LENGTH:440-480nm
MAX OUTPUT < 245mW

4-585-125-01B
This CLASS 3R PRODUCT LABEL is located on the left side.
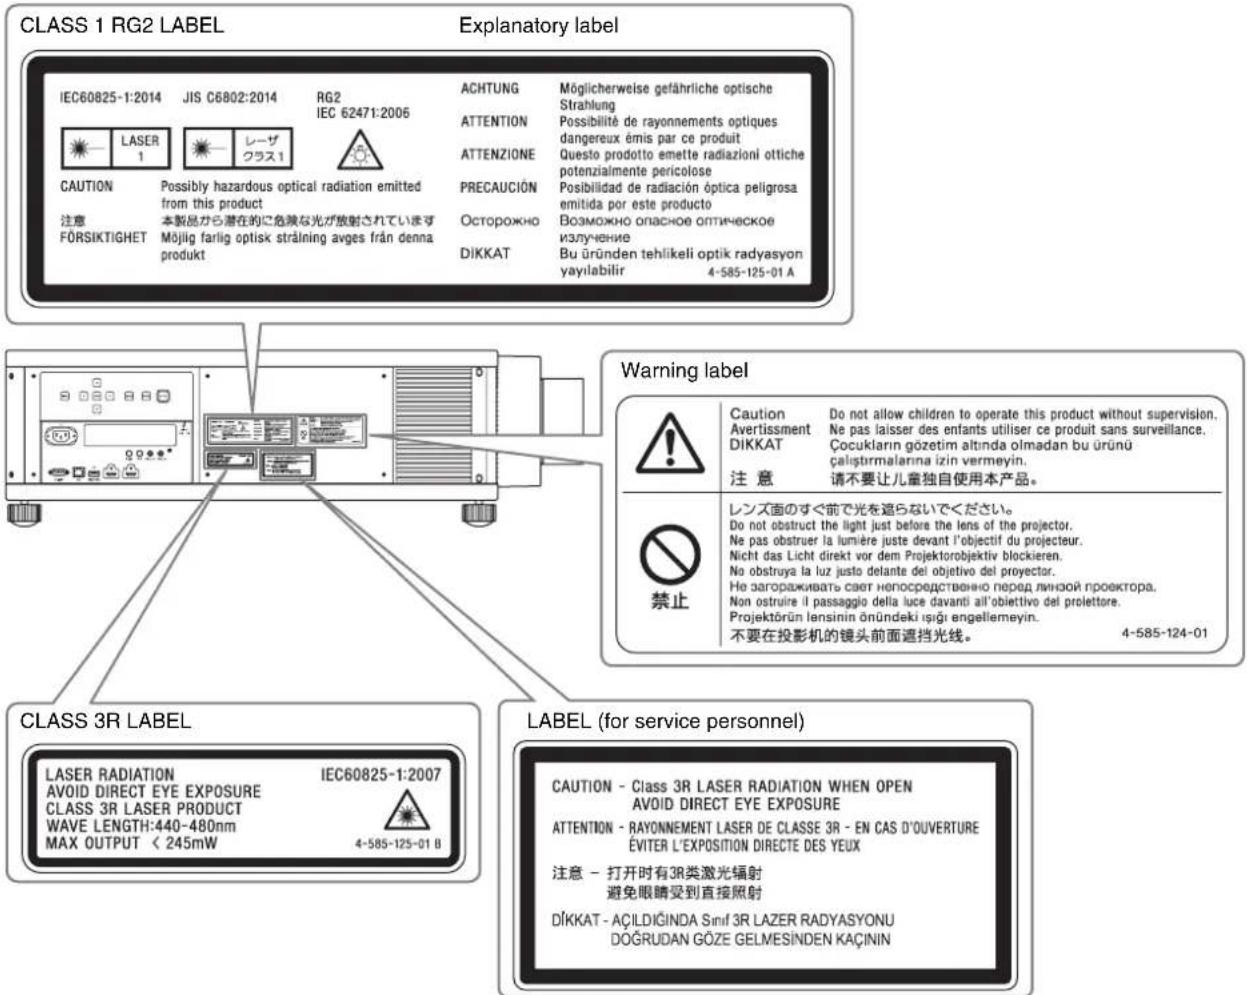
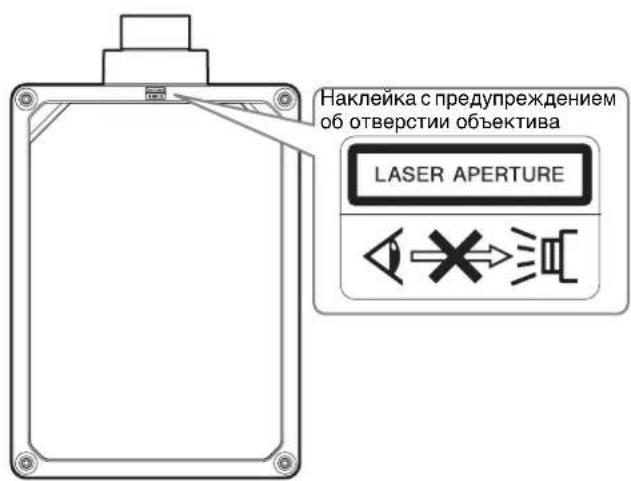
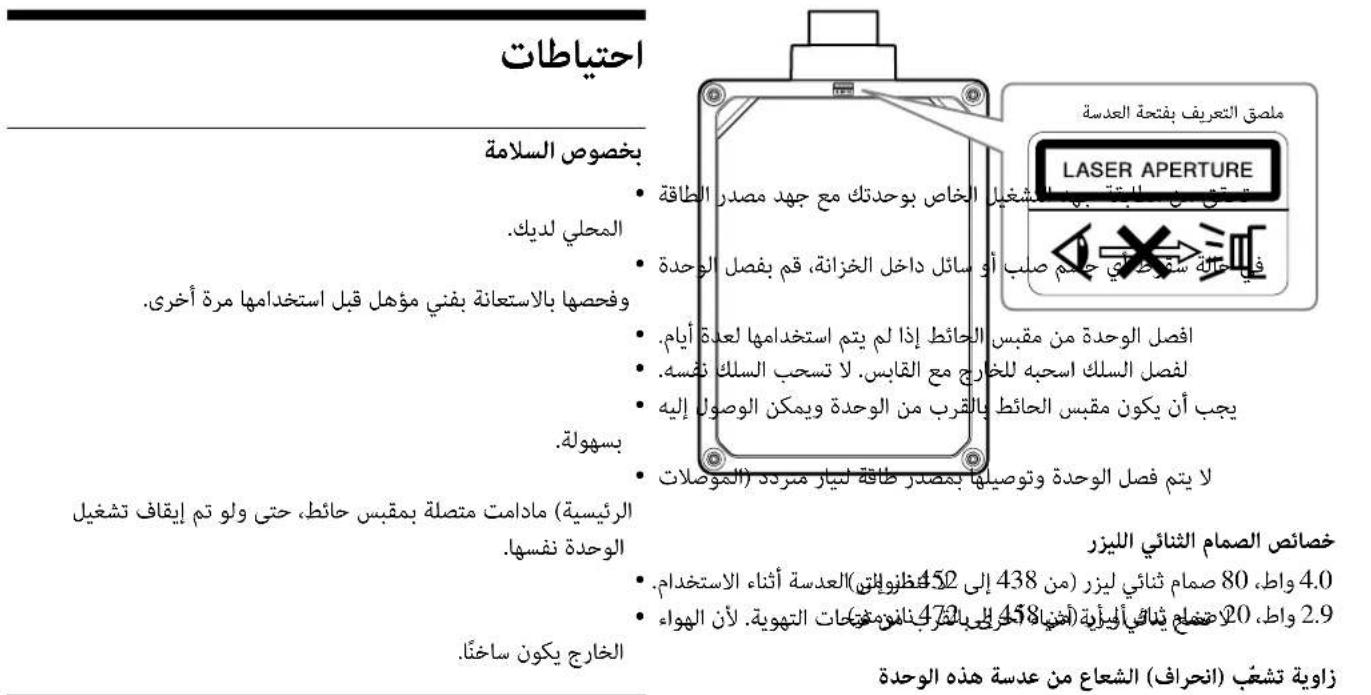
LASER APERTURE
This APERTURE LABEL is located on the top cover.
WARNING
LASER RADIATION
AVOID DIRECT EYE EXPOSURE
CLASS 3R LASER PRODUCT
CAUTION
Do not look into the lens while in use.
CAUTION
Do not allow children to operate this product without supervision.
CAUTION
The use of optical instruments with this product will increase eye hazard.
For the customers in other countries/regions
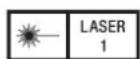
CLASS 1 LASER PRODUCT
RG2 IEC 62471:2006

CAUTION
Possibly hazardous optical radiation emitted from this product.
The markings are located on the left side.
This product is assigned to Risk Group 2 according to the IEC 62471:2006.
WARNING: Do not look into the lens while in use.
Caution
Use of controls or adjustments or performance of procedures other than those specified herein may result in hazardous radiation exposure.
Caution
The use of optical instruments with this product will increase eye hazard.
LASERPRODUKT AV KCLASS 1
RG2 IEC 62471:2006

FÖRSIKTIGHET
For the customers in Europe
| Bulgarian | Спастоцуо, Sony Corporation дослариа, чы Това оборуна с в сьответспс и в посядддддддддддддддддддддддддддддддддддддддддддддддддддддддддддддддддддддддддддддддддддддддддддддддддддд徳 http://www.compliance.oryeu |
| Croatian | Sony Corporation ovime izjavljupe da je ova oprema u skladu s Direktivom 2014/53/EU.Cjeloviti tekst EU izjave o sukladnosti dostupanje na sljedecoj internetskoj adresi: http://www.compliance.oryeu |
| Czech | Sony Corporation tímo prohlášuje, ze toto zařízení je v souladu se směrnicić 2014/53/EU.Uplné zněni EU prohlášeni o shodě je k disposzici na teto internetové adrese: http://www.compliance.oryeu |
| Danish | Hervcd crklær Sony Corporation, at dette udstyr er i overensstemmelse med direktiv 2014/53 / EU.Den fulde ordlyd af EU-overensstemmelseserklaeringen er tilgængelig på folgende internetadresse:http://www.compliance.oryeu |
| Dutch | Hierbij verkaart Sony Corporation dat deze radioapparatuur conform is met Richtlijn 2014/53/EU.De volledige tekst van de EU-conformiteitsverklaring kan worden geraadpleegd op het volgende internetadres:http://www.compliance.oryeu |
| English | Hereby, Sony Corporation declares that this equipment is in compliance with the UK relevant statutory requirements.The full text of the declaration of conformity is available at the following internet address:https://compliance.ory.co.ukHereby, Sony Corporation declares that this equipment is in compliance with Directive 2014/53/EU.The full text of the EU declaration of conformity is available at the following internet address:http://www.compliance.oryeu |
| Estonian | Käesolevaga deklareerib Sony Corporation, et käesolev seade vastab direktivi 2014/53/EL nõuetele.ELi vastavusdeklaratsiooni tãielik tekst on kättesaadav järgmisel internetiaadressil: http://www.compliance.oryeu |
| Finnish | Sony Corporation vakuuttaa, että tãma laite on direktivin 2014/53/EU mukainen.EU-vaatimustenmukaisvuusvuutukusen tãysmittainen teksti on saatavilla scuraavassa internetosotittcessa:http://www.compliance.oryeu |
| Greek | Mε την παρούσα Sony Corporation δηλώνει στι, αυτή η συσκενή πληροί τους ὄρους της Μθηγίας 2014/53/EU.To πλήρες κείμεντη δηλωση συμόρωσης EE διατίθειαι στην ακόλουθη έτοσελίδα στο διαδίκτον:http://www.compliance.oryeu |
| Hungarian | A Sony Corporation igazolajha, hagy cz a készülék megfelcl a 2014/53/EU irányelvnck.AZ EU-megfeleloó ségi nyilatkozat teljes szövege elérhető a következo internetes címen:http://www.compliance.oryeu |
| Latvian | Ar šo Sony Corporation deklare, ka ši ikëkärta atbilst direktfvai 2014/53/ES.Pilns ES atbilsftbas deklaracijas teksts ir pieejams šādā interneta viétrne: http://www.compliance.ory.eu |
| Lithuanian | Mes, Sony Corporation, patvirtiname, kad sis irenginys atitinka direktvyq 2014/53/ES.Varas ES atitikties deklaracijos tekstas pasiekiamas šiuo internetiniu adresu: http://www.compliance.oryeu |
| Norwegian | Hervcd erklær Sony Corporation at utstyrstypen er i samsvar med direktiv 2014/53/EU.EU-erklearing fulltekst finner du på Internet under: http://www.compliance.oryeu |
| Polish | Sony Corporation niciejszym oswiadcz, ze to urzadzenia jest zgodne z dyrektywą 2014/53/UE.Pehny tekst deklaracji zgodnosci UE jest dostepny pod nastepujacym adresem internetowym:http://www.compliance.oryeu |
| Portuguese | O(a) abaixo assinado(a) Sony Corporation declara que o presente equipamento está em conformidade com a Diretiva 2014/53/UE.O texto integral da declaração de conformidade está disponível no segunte endereço de Internet:http://www.compliance.oryeu |
| Romanian | Prin prezenta, Sony Corporation declaraă că acest echipament este in conformitate cu Direciva 2014/53/UE.Textul integral al declarației UE de conformitate este disponibl la următoarea adresă internet:http://www.compliance.oryeu |
| Slovak | Sony Corporation támto vyhlasuje, ze zariadenie je v súlade so smernicou 2014/53/EU.Uplné vyhlasenie EU o zhode je k disposzicii na tejo internetovej adrese: http://www.compliance.oryeu.P |
| Slovenian | Sony Corporation potrjue, da je ta oprema skladna z Direktivo 2014/53/EU.Celotno besedilo izjave EU o skladnosti je na voljo na naslednjem spljetnam naslovu: http://www.compliance.oryeu |
| Swedish | Härmed fösakrar Sony Corporation attenna utrusting overensstämmer med direktiv 2014/53/EU.Den fullständiga tekten till EU-fösakran om overensstammelse finns på foljande webbadress:http://www.compliance.oryeu |
| Turkish | Sony Corporation, bu cihazın 2014/53/EU Direktifi ile uyumlu olduguṇu bayenan eder.AB uygunluk bayannin tam metni asağuidaki internet adresinde mevcuttur: http://www.compliance.oryeu |
Location of the label
Laser Diode Properties
4.0 W, 80 Laser diodes (438 to 452nm )
2.9 W, 20 Laser diodes (458 to 472nm
Beam divergence angle from the lens of this unit
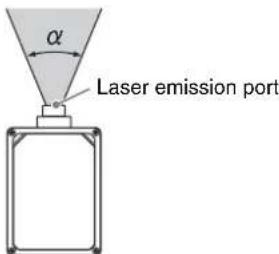
| Lens | Zoom maximum: α | Zoom minimum: α |
| VPLL-Z7008 64° | 53° | |
| VPLL-Z7013 43° | 20° |
For the Customers in Brazil only Apenas para clientes no Brasil
DESCARTE DE PILHAS E BATERIAS
For the customers in the U.S.A.
SONY LIMITED WARRANTY - Please visit http:// www.sony.com/psa/warranty for important information and complete terms and conditions of Sony's limited warranty applicable to this product.
For the customers in Canada
SONY LIMITED WARRANTY - Please visit http:// www.sonybiz.ca/pro/lang/en/ca/article/resourceswarranty for important information and complete terms and conditions of Sony's limited warranty applicable to this product.
For the customers in Europe
Sony Professional Solutions Europe - Standard Warranty and Exceptions on Standard Warranty. Please visit https://pro.sony/en_GB/support-services/warranty/support-professional-solutions-europe-standard-product-warranty for important information and complete terms and conditions.
For the customers in Korea
SONY LIMITED WARRANTY - Please visit http:// bpeng.sony.co.kr/handler/BPAS-Start for important information and complete terms and conditions of Sony's limited warranty applicable to this product.
Precautions
On safety
- Check that the operating voltage of your unit is identical with the voltage of your local power supply.
- Should any liquid or solid object fall into the cabinet, unplug the unit and have it checked by qualified personnel before operating it further.
- Unplug the unit from the wall outlet if it is not to be used for several days.
- To disconnect the cord, pull it out by the plug. Never pull the cord itself.
- The wall outlet should be near the unit and easily accessible.
- The unit is not disconnected to the AC power source (mains) as long as it is connected to the wall outlet, even if the unit itself has been turned off.
- Do not look into the lens while in use.
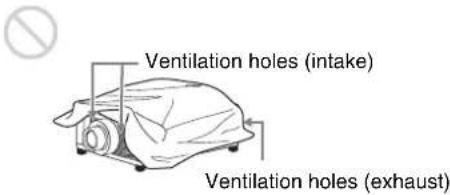
- Do not place your hand or objects near the ventilation holes. The air coming out is hot.
On preventing internal heat build-up
After you turn off the power with the I/ (ON/ STANDBY) button, do not disconnect the unit from the wall outlet while the cooling fan is still running.
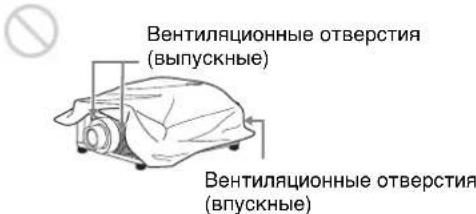
Caution
This unit is equipped with ventilation holes (intake/ exhaust). Do not block or place anything near these holes, or internal heat build-up may occur, causing picture degradation or damage to the unit.
On repacking
Save the original shipping carton and packing material; they will come in handy if you ever have to ship your unit. For maximum protection, repack your unit as it was originally packed at the factory.
On watching 3D video images
Safety precautions
- You should only use the 3D glasses for watching 3D video images.
- If you observe flickering or flashing, turn off the lighting in the room.
- Not for use by children without proper adult supervision.
- Be careful not to pinch your fingers in hinges of the 3D glasses when bending the temple frames.
- Do not drop or modify these 3D glasses.
- If these glasses are broken, keep broken pieces away from your mouth or eyes.
On inspection of light source related parts
Since the unit uses a laser, when performing maintenance or inspection of light source related parts, particular
attention and a safe environment are necessary. Be sure to consult with qualified Sony personnel (charged).
On heat dissipation
The temperature of the projector cabinet may increase during or immediately after use; however, this is not a malfunction.
On LCD Projector
The LCD projector is manufactured using high-precision technology. You may, however, see tiny black points and/or bright points (red, blue, or green) that continuously appear on the LCD projector. This is a normal result of the manufacturing process and does not indicate a malfunction.
Also, when you use multiple LCD projectors to project onto a screen, even if they are of the same model, the color reproduction among projectors may vary, since color balance may be set differently from one projector to the next.
On condensation
If the room temperature where the projector is installed changes rapidly, or if the projector is moved suddenly from a cold to a warm place, condensation in the projector may occur. As the condensation may cause malfunction, be careful in adjusting temperature settings of the air conditioner. If condensation occurs, leave the projector turned on for about two hours before use.
Notes on security
- SONY WILL NOT BE LIABLE FOR DAMAGES OF ANY KIND RESULTING FROM A FAILURE TO IMPLEMENT PROPER SECURITY MEASURES ON TRANSMISSION DEVICES, UNAVOIDABLE DATA LEAKS RESULTING FROM TRANSMISSION SPECIFICATIONS, OR SECURITY PROBLEMS OF ANY KIND.
- Depending on the operating environment, unauthorized third parties on the network may be able to access the unit. When connecting the unit to the network, be sure to confirm that the network is protected securely.
- From a safety standpoint, when using the unit connected with the network, it is strongly recommended to access the Control window via a Web browser and change the access limitation settings from the factory preset values (refer to "Using Network Features" in the Operating Instructions).
Changing the password regularly is also recommended.
- Do not browse any other website in the Web browser while making settings or after making settings. Since the login status remains in the Web browser, close the Web browser when you complete the settings to prevent unauthorized third parties from using the unit or harmful programs from running.
Notes
- Always verify that the unit is operating properly before use. SONY WILL NOT BE LIABLE FOR DAMAGES OF ANY KIND INCLUDING, BUT NOT LIMITED TO, COMPENSATION OR REIMBURSEMENT ON ACCOUNT OF THE LOSS OF PRESENT OR PROSPECTIVE PROFITS DUE TO FAILURE OF THIS UNIT, EITHER DURING THE WARRANTY PERIOD OR AFTER EXPIRATION OF THE WARRANTY, OR FOR ANY OTHER REASON WHATSOEVER.
- SONY WILL NOT BE LIABLE FOR CLAIMS OF ANY KIND MADE BY USERS OF THIS UNIT OR MADE BY THIRD PARTIES.
- SONY WILL NOT BE LIABLE FOR THE TERMINATION OR DISCONTINUATION OF ANY SERVICES RELATED TO THIS UNIT THAT MAY RESULT DUE TO CIRCUMSTANCES OF ANY KIND.
Notes on Installation and Usage
Unsuitable installation
Do not place the unit in the following situations, which may cause malfunction or damage to the unit.
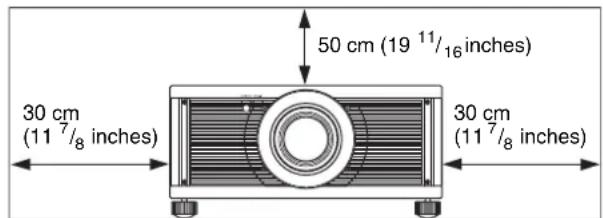
Near walls
To maintain the performance and reliability of the unit, leave space between walls and the unit as illustrated.
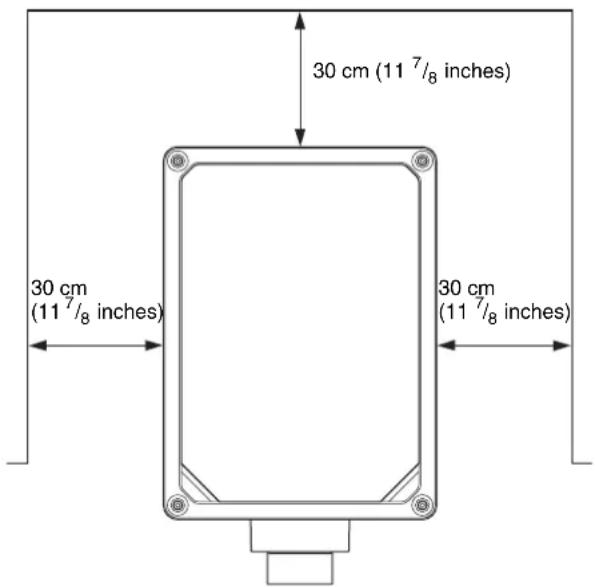
Note that the wall on the ventilation holes side may become hot.
Air from air conditioners or the ventilation holes of this unit or other devices, may cause oscillation on the screen. Be sure not to install this unit in the area where the air from air conditioners or the ventilation holes of these devices reach to the front side of this unit.
Poorly ventilated location
Leave space of more than 30cm (11^7 / 8 inches) around the unit.
Hot and humid
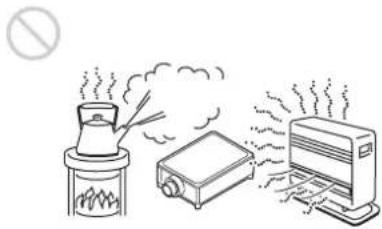
Locations subject to direct cool or warm air from an air-conditioner
Installing the unit in such a location may cause a malfunction of the unit due to moisture condensation or rise in temperature.

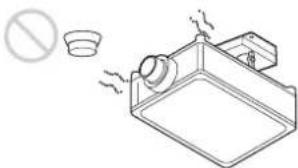
Near a heat or smoke sensor
Malfunction of the sensor may occur.
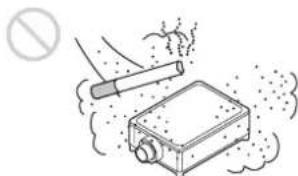
Very dusty and extremely smoky locations
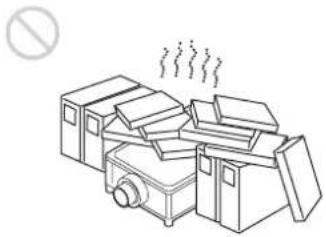
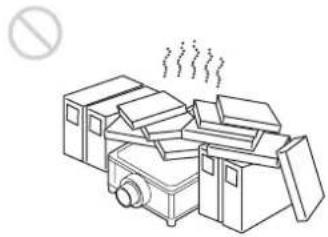
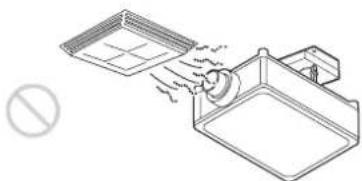
Unsuitable Conditions
Do not do any of the following while using the unit.
Blocking the ventilation holes (intake or exhaust)
When installing the unit at high altitudes
When using the unit at an altitude of 1,500m (approx. 4,900 ft) or higher, set "High Altitude Mode" on the Setup menu to "On". Failing to set this mode when using the unit at high altitudes could have adverse effects, such as reducing the reliability of certain components.
For dealers
- When the projector is mounted on the ceiling, a Sony bracket or recommended equivalent must be used for installation.
- Be sure to secure the cabinet cover firmly when installing to the ceiling firmly.
- When attaching or removing the lens, be sure to consult with qualified Sony personnel.
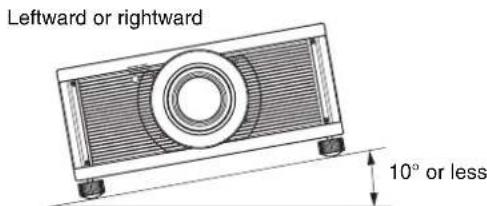
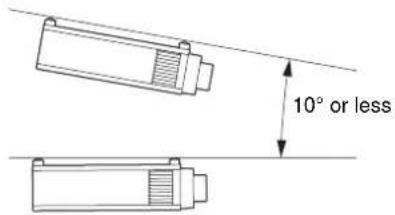
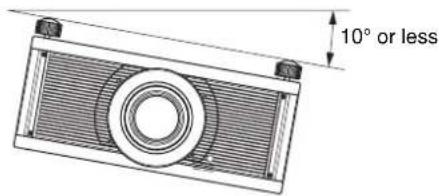
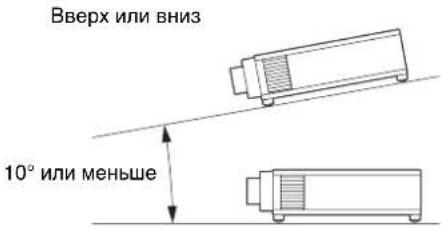
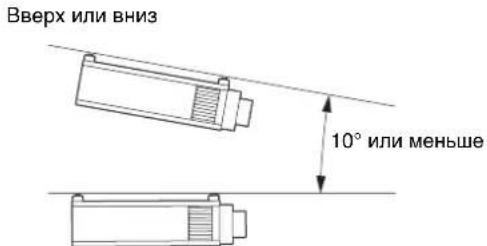
Caution
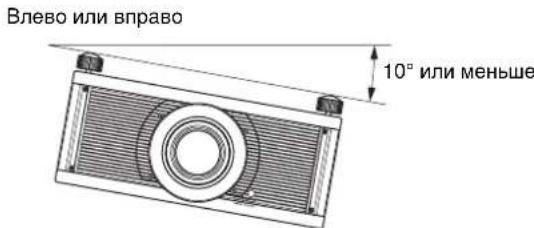
When projecting with the unit tilted vertically or horizontally, install the unit with the appropriate inclination angle as shown in the figure below.

When placing the unit horizontally
When installing the unit on a ceiling
Upward or downward
Leftward or rightward
Safety precautions for installing the unit on a ceiling
- Never mount the projector on the ceiling or move it by yourself. Be sure to consult with qualified Sony personnel (charged).
- When installing the unit on a ceiling, be sure to use a safety wire, etc., to prevent the unit from falling. Entrust the installation to an experienced contractor or installer.
Step 1
Preparing
Checking the Supplied Accessories
Check the carton to make sure it contains the following items:
- Remote control RM-PJ24 (1)
- Size AA (R6) manganese batteries (2)
- AC power cord (1)
- Plug holder (1)
- Quick Reference Manual (this manual) (1)
- Operating Instructions (CD-ROM) (1)
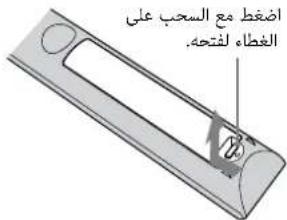
Inserting the Batteries into the Remote Control
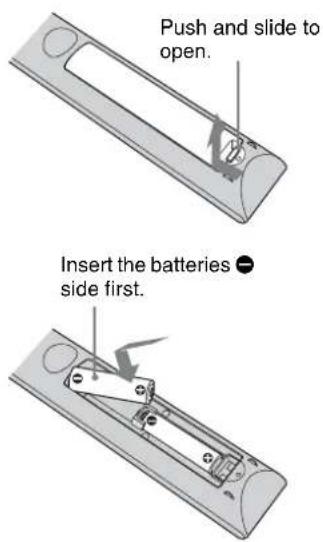
Caution about handling the remote control
- Handle the remote control with care. Do not drop or step on it, or spill liquid of any kind onto it.
- Do not place the remote control in a location near a heat source, a place subject to direct sunlight, or a damp room.
Using the CD-ROM manual
The manual can be read on a computer with Adobe Reader installed.
You can download Adobe Reader free from the Adobe website.
1 Open the index.html file in the CD-ROM.
2 Select and click on the manual that you want to read.
Note
If you have lost or damaged the CD-ROM, you can purchase a new one from your Sony dealer or Sony service counter.
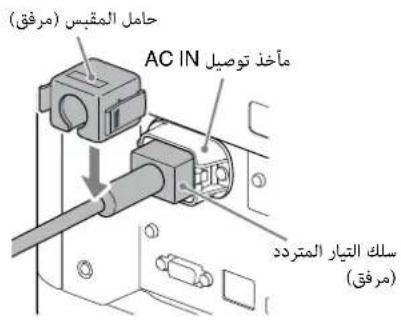
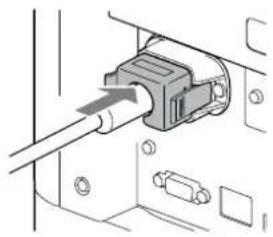
Connecting the AC Power Cord
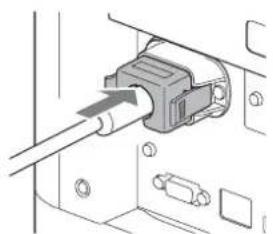
1 Plug the AC power cord into the AC IN socket, then attach the plug holder to the AC power cord.
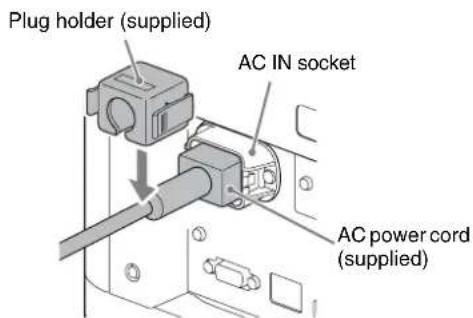
2 Slide the plug holder over the AC power cord to fix to the unit.
Step 2
Installing the Unit
1 Position the unit so that the lens is parallel to the screen.
2 After connecting the AC power cord to the unit, plug the AC power cord into a wall outlet.

Lights in red.
3 Press the I/ (On/Standby) button to turn on the unit.
Flashes in green for tens of seconds and then lights in green.
4 Project an image on the screen, then adjust the focus, size, and position.
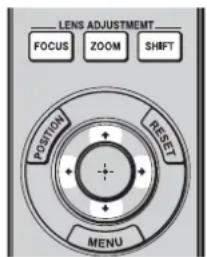
1Adjust the focus.
Press the LENS ADJUSTMENT (FOCUS) button to display the Lens Focus adjustment window (test pattern). Then adjust the focus of the picture by pressing the / / buttons.
Adjust the picture size.
Press the LENS ADJUSTMENT (ZOOM) button to display the Lens Zoom adjustment window (test pattern). Then adjust the size of the picture by pressing the / / / buttons.
Adjust the picture position.
Press the LENS ADJUSTMENT (SHIFT) button to display the Lens Shift adjustment window (test pattern). Then adjust to the proper position of the picture by pressing the / / / buttons.
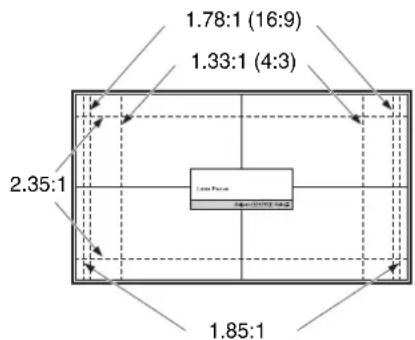
Lens adjustment window (test pattern)
The dashed lines show the screen sizes of each aspect ratio.
For more information, refer to "Connections and Preparations" in the Operating Instructions contained in the supplied CD-ROM.
Step 3
Connecting the Unit
When making connections, be sure to do the following:
- Turn off all equipment before making any connections.
- Use the proper cables for each connection.
- Insert the cable plugs properly; poor connection at the plugs may cause a malfunction or poor picture quality. When pulling out a cable, be sure to pull it out from the plug, not the cable itself.
Refer to the operating instructions of the connected equipment.
Connecting to a VCR
Right side of the unit Equipment with HDMI output connectors
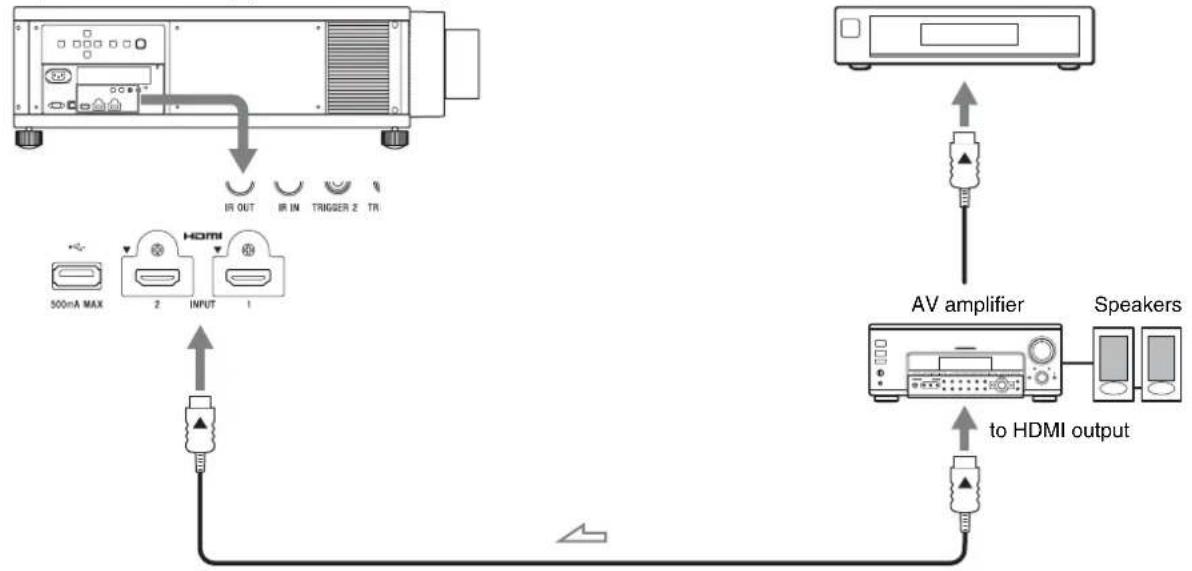
HDMI cable (not supplied)
Video signal flow Use a Premium High Speed HDMI cable on which the cable type logo is specified.
Connecting to a Computer
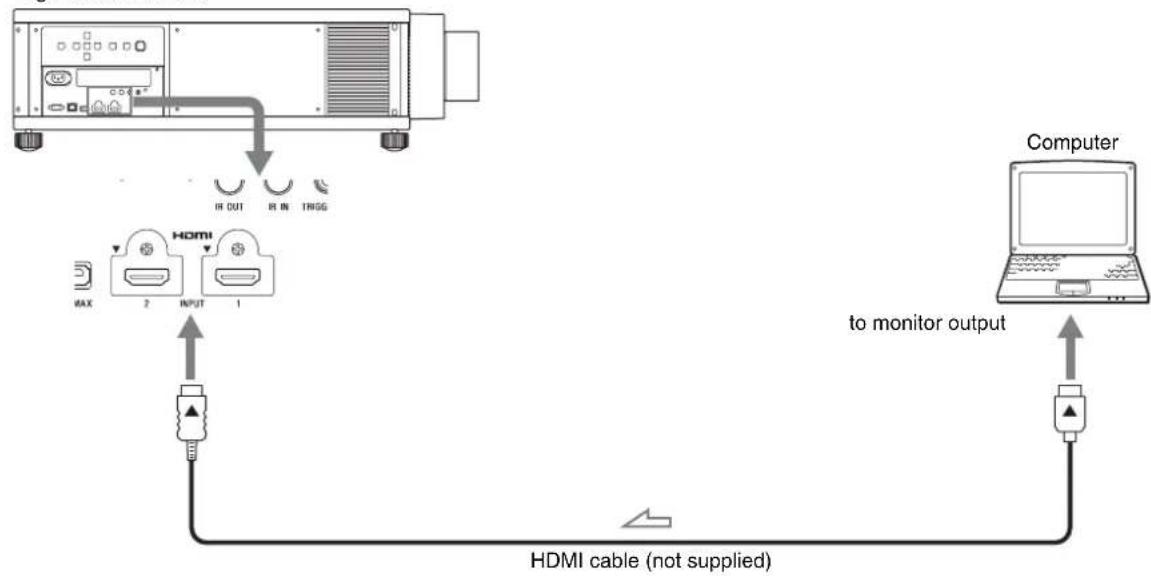
Right side of the unit

: Video signal flow Use a Premium High Speed HDMI cable on which the cable type logo is specified.
For more information, refer to "Connections and Preparations" in the Operating Instructions contained in the supplied CD-ROM.
Step 4
Selecting the Menu Language
The factory setting for the language for displaying menus, messages, etc. is English.
To change the on-screen language, proceed as follows:
1 Press MENU to display the menu.
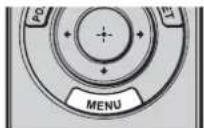
The menu window appears.
2 Select the menu language.
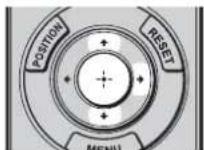
Press / to select the Setup menu, then press or
Press / to select "Language," then press or

Press / / / to select a language, then press or
3 Press MENU to turn off the menu window.
Projecting the Picture
1 Turn on both the unit and the equipment connected to the unit.
2 Press INPUT to display the input palette on the projection surface.
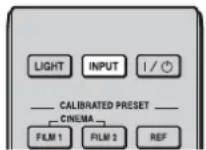
3 Select the equipment from which you want to display images. Press INPUT repeatedly or press / / (enter) to select the equipment from which to project.
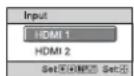
Example: To view the picture from the video equipment connected to the HDMI 1 connector of this unit.
Turning Off the Power
1 Press the I/ (On/Standby) button. The message "POWER OFF?" appears.
2 Press the I/On/Standby) button again before the message disappears. The ON/STANDBY indicator flashes in green and th fan continues to run to reduce the internal heat.
The fan stops and the ON/STANDBY indicator changes from flashing green to remaining red.
You can disconnect the AC power cord.
Note
Never disconnect the AC power cord while the unit is turned on.
You can turn off the unit by holding the I/On/Standby) button for about 1 second, instead of performing the above steps.
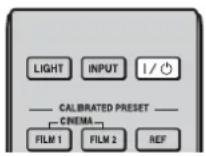
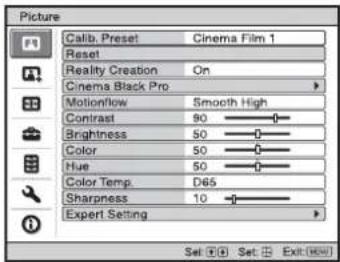
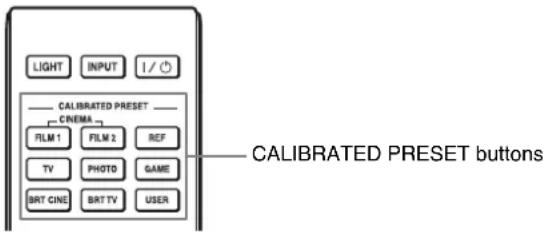
Selecting the Picture Viewing Mode
You can select the picture viewing mode that best suits the type of video source or room conditions.
You can save and use different preset modes for 2D/3D respectively.
Press one of the CALIBRATED PRESET buttons.
| Setting items Description |
| CINEMA FILM 1 Picture quality suited to reproducing the highly dynamic and clear images typical of master positive film. |
| CINEMA FILM 2 Picture quality suited to reproducing the rich tone and color typical of a movie theater, based on the Cinema Film 1. |
| CINEMA DIGITAL *1 Picture quality suited to reproducing digital cinema-like images resembling DCI specifications. |
| REF A picture quality setup suitable for when you want to reproduce faithfully the original image quality, or for enjoying image quality, without any adjustment. |
| TV Picture quality suited for watching TV programs, sports, concerts, and other video images. |
| PHOTO Ideal for projecting still images taken with a digital camera. |
| GAME Picture quality suited to gaming, with well-modulated colors and fast response. |
| BRT CINE Picture quality suited for watching movies in a bright environment. |
| BRT TV Picture quality suited for watching TV programs, sports, concerts, and other video images in a bright environment. |
| USER1, USER2, USER3 *2 Adjusts the picture quality to suit your taste then saves the setting. The factory default setting is the same as “REF.” |
1: The CINEMA DIGITAL mode is not available on the remote control.
2: The USER1 mode is selected by pressing the USER button. The USER2 mode and USER3 mode are not available on the remote control.
For more information, refer to "Projecting" in the Operating Instructions contained in the supplied CD-ROM.
Error Handling
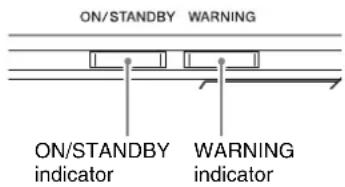
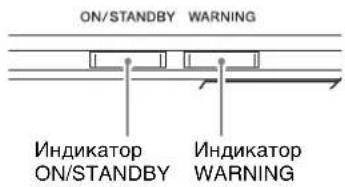
About Indicators
The ON/STANDBY or WARNING indicator lights up or flashes if there is any trouble with your projector.
| Flashing/Lighting indicators The number of flashes | Cause and Remedy |
| ON/STANDBY WARNING (Flashes in red)(Lights in red) | Three times The unit does not light properly due to an abnormality of the light source and light source power. Turn off, then turn on the power after a while. If the symptom persists, consult qualified Sony personnel. |
| Six times The unit detects a drop impact. If there is abnormality on the unit, consult with qualified Sony personnel. If there are no abnormalities on the unit, disconnect the AC power cord and check that the ON/STANDBY indicator turns off, then connect the AC power cord and turn the unit on. | |
| Eight times The lens is not securely attached. Consult with qualified Sony personnel. | |
| ON/STANDBY WARNING (Flashes in red)(Flashes in red) | Twice The internal temperature is unusually high. Check to ensure that nothing is blocking the ventilation holes and the unit is not being used at high altitudes. |
| Both indicators flash |
Note
If the indicator starts flashing in a way of other than the above, and the symptom persists even after carrying out the above methods, consult with qualified Sony personnel.
If there is any problem or an error message appears on the screen, refer to "Error Handling" in the Operating Instructions contained in the supplied CD-ROM.
Projection.. Page 15
Gestion des erreurs
PRODUIT LASER DE CLASSE 1

http://www.sonybiz.ca/pro/lang/en/ca/article/resources
LASERPRODUKT DER KLASSE 1
4,0 W, 80 diodi laser (da 438 a 452 nm)
2,9 W, 20 diodi laser (da 458 a 472nm
BbI6Op Ra3bika MeHIO. Ctp. 14
War 5.
PpoeunpoBaHne. Ctp. 15
YcTpaHHeNoOuN6ok
06 HndkaTopax. Ctp. 17
Pycckn
BndeonpoekTop VPL-VW5000
IpeqHcnoJIb3ObaHHem yctpoHCTBa BHNMaTeJIbHO IIPOuHTaHTe HAcTOnUeepyKOBOJcTBO HCOxpaHNTe erO IJIa IOnyuHeHH Heo6XoHMoN HOpMaunn B 6yduM.
PPEyPExKDEHNE
Длг chнжehн риcka BO3ropaHn И nopaxeHn
3ЛктчecKM TOKOM He DoNYckaIte
BO3dIeCTBnHa annapaT Bnarn N cbIpOCTn.
ЧTo6bl NCKJIIOuHTb pNCK NOPaxeHn
3ЛктчecKM TOKOM, He BCKpbIBaIte KOpNyc.
ОсчnxBaHne annapaTa DoJXHbI BblINOJIHrTb
ТольКВаИФИцPoBAHhIbe CneUaNtCbI.
PPEyIeHNE DAHHOE YCTPOIcTBO DOJIxHO BbITb 3A3EMJIeHO.
PPEyIPEXDEHNE
Pn yctAHOBc ycTPOcTBa HcNOJIb3yHtTe JeKoIOCTyINbI IpepbIBaTeJb IIHTaHHc
fHKcnpOBAHHo IPOBOIKo HJIN IOJKLIIOHTe
IPOBOID INTAHHN K JERKOIOCTYHOH NaCTeHHOHN
po3eTKa, pacIOJOKeHHo PdOM C yCTPOcTBOM.
EcIn B Ipocece 3KcIIyaTaUNB 6IOKa BO3HHKHeT
HeHCpaBHOCTb, c IIMOUbIO IpepbIBaTeJI
OTKJIIOHTe INTAHHe, HJIN OTcoEINHHTe IPOBOID
IIHTaHHN.
OCTOPOXHO
Pa3beM LAN
BueJx 06ecnueHn 6e3oIacHOCTn He IIOKIIIOuHaHTe K 3TOMy IIOpTy COeHHINTeJIbHbIE pa3beMbI 9JIeKTPoIIPOBOIKN IIepHΦepHuEcKHX ycTPOINCTB, KOToPbIE, BO3MOXHO, HMeIOT Ype3MepHO BBICOKOE HaIIpJxKeHHe.
PNEyPExEHeH
- HcnoJb3yIe pa3peHHHbc K npmchcHNO IIHyp IHTaHn (c 3-KnJIbHbIM CNIOBbIM IIPOBOJOM) / pa3bcM nn POIKJIIOUcHn6bITOBbIX IIpNoOpOB/ IITeIIceJIbHYO BNIJKY C 3a3emJIHOUMN KOHTaKTamn, COOTBeTCTBYIOINe DeIcTBYIOINM HOPMaM TexHNKn 6e3OIIacHOCTn KaJIOI ONeJIbHOI cTaPahbI/KaXIOrO OTJeJIbHO r peHOna.
- HcIOJIb3yIte IHHyp IIHTaHnra (c 3-KHJIbHbIM cnIOBbIM IIPOBOJOM) /pa3'beM IJIgIOJKIOUeHnRA 6bITOBbIX IIpN6OpOB /IITeINCeJIbHyIO BNIky, COOTBeTCTByIOUHe IOIIYCTUMbIM HOMHaJIbHBbIM XapaKTePncTHKaM (HaIIpyKeHne, ChJa TOka).
BcIyuae BOIIpOCOB OTHOCHTbHO HcIOJIb3OBAHnnyIOMAHyTBIX BblIe IHHpya IIITaHHy /pa3bemaIINIOIKJIIOUyeHnN6bITOBBX IIpH6OpOB /IIITeIICeJIbHOBNJKN,IOXKaJIyIcTa,06paIaIaTecbK
KBAJIHΦHIIHPOBaHHbIM CIIcIIHaJIHCTAm IIO CCpBHCOMY 06cIyKbAHIO.
YctaHOBka 6atapei
K nyIbTy nIcTaHnHOHHoro yIpaBJIeHNn npIaraiOTcIbe 6aTapePA3Mepa AA (R6).
YTO6bI H36eKaTb ONaacHocTH B3pb1Ba, HcIOJIb3yIte MapraHueBbIe HIN IIeIoUHbIe 6aTapeu pa3Mepa AA (R6).
BHIMAHNE
- IIph HeIpaBnJIbHOJ 3aMeHe 3JIeMeHToB IITaHHBO3HNKaaeT OIIaCHOCTb B3PbIBa. HcIOJIb3yIte J1J3aMeHbI TOJIbKO IJIeHTNtHbIE HIN 9KBnBaJIeHTHbIE 3JIeMeHtB1 IITaHH, peKOMeHdYembIe H3rTOBOTJEJM.
-ПиутчнлзаиakKуМЛЯТОраHINH3ДeJIH NJIeJYeT CO6JIIOIaTb 3aKOHbI COOTBeTcTBYIOIeN CTpaHb HINCOOTBeTcTBYIOIeRpeHOna. He yTNIN3npynte aKKyMЛЯTOP HIN H3JIeJIne BOrHe HINBROPaeyIeH, He yHNUTOJaTe Hx MExaHnueckm IYTeM Hc pa3pe3aHTe aKKyMЛЯTOp. OHMOKeT B3OpBaTbC8 HINIIpHBecTH K IOXapy. He NOIbEpraITc aKKyMЛЯTOp BO3dEICCTBNU Ope3BbIuaHNO Hn3KOFO aTMOCΦepHO TAbJIeHH, KOToPOe MOKeT IIpNBecTH K B3pbIBy HIN yTeUKe BOCIIJaMeHЯIOIeHcKJIKOCTH HIN BOCIIJaMeHЯIOIeROc Ra3a. - He pa3meiuaTe aKKyMyJITOp B MeCTax C BBICOKO TeMnepaTpyoH,HaIPnMEp IOI BO3JeCTBHeM IIPmBX COJIHeuHbIX JIyEe HII IN BO3JE OTH. OH MOKeT 3aRopeTbcra, B3OpBaTbcra HII IN PnHBecTH K IIoxKapy. He IIOBepraHTe aKKyyJITop BO3JeIcTBHIO BObl. 3TO MOKeT IPrNBecTH K IIOPaKeHHO 3JIeKTPnueckHM TOKOM.
O 3D-oqkax
3D-ouKN B3aHMOeIcTBYIOCTC IIPOeKTopOM IO texHOJOrn Bluetooth IINr OTObpaKeHHN 3DCHRHaJIOB.
a)pa6oTaOuIINBⅡnIa3OHe 2400-2483.5MΓ
b) MaKcHMaJIbHyIO BbIXOJHyIO MOIuHOCTb 4.30 dBm (E.I.R.P.)
JIA3EPHAR ANIAPATYPAKJIACCA1
RG2 IEC 62471:2006

BhimaHne
Bo3MOxHIO OaacHoe ONTHueeCKoe H3JyuYeHe
MeTKn paIOJIOKeHbI cJIeBOI cTOpOHbI. 3TO H3JeJIne OTHOCHTcK IpyIIpe pNcKa 2B COOTBeTCTBHN co CTAHApTOM IEC 62471:2006.
PNEyPPEKDEHNE
HeJIb3a CMOTpeTb CKB03b IHH3y npn HcIOJIb3ObaHH.
BHIMAHHe
HcnoJb3ObaHne ycTpoNCTB ynpabJIeHHa, peryJnPoBOK n npTynx IIpoIeIpy MoKer IpnBecTH K ONaCHOI KcIO3Hnn H3JIyehHH.
OctopoxHo!
HcIOJIb3OBAHHe OITNueCKNX HnCTpyMeHTOB c IaHHbIM N3JeJIHem IpnBeTeK yBeyIeHNIOIaCHORO BO3JeICTBna Ha rJa3a.
SONY
COnn KopnopeHH
1-7-1, KOHaH, MmHaTo-Ky, TokNo, JIOHOHn, 108-0075
CneJiaHO B IIOHNI
HMIIOPTep Ha TeppHTOpHH cTpaH TaMOXKeHHORO COHO3a
AO «CoHH ΘJIeKTpOHHKc», Pocchry, 123103, MockBa, KapamblieBckn IIpOe3I, 6
To yctpoNCTBO ABJIAETCIIPOeKTOPOM III IPOeIINPOBAHn H3O6paXKeHH CIOJIKNIOUeHHORO KOMIBIOTePA HIN BHNDEOO6OpyDObAHn.
OpraHn3aIIy, yIOJIHOMOeHHa IIpHIMaTb IIpeTeH3HOr OT IIOJIb3OBaTeJIe Ha TeppHTOpHn Ka3axCTHa:
AO COHN 3JIeKTPoHnKC IpeIcTaBHTeJIbCTBO Ka3axCTaHe 050059 AImatbl, yJHua HBaHHIOB
Iata H3rTOOBJIeHHyka3aHa Ha H3JeJINH yNaKOBKe Ha 3TNKeTKe CO IITpHX-KOJOM B CJIeJyIOIIeM fOpMaTe:YYYY-MM, rIe MM-Mecn, YYYYY- roN H3rTOOBJIeHH.
To ycTPOIcTBIOIOJIepKHNBaET TexHOJIOHn 6ccnpoBOHOCB83N JIAYacTOHorO HnAHA3OHa 2,4ΓI.
PacnoIoxKeHne HakJIeKn
YrOJ pacxOIMOCn nyka OT obbektna yCTPOIcTBA
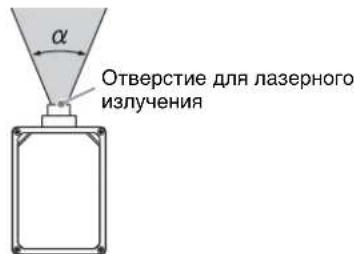
| Оьъektов | Мakсимальhoe увелочи: α | Минимальhoe увелочи: α |
| VPLL-Z7008 64° 53° | ||
| VPLL-Z7013 43° 20° | ||
XapaKTepeNCTnKn Ja3epHoro DnOda
4,0 Bt. 80 JIa3epHbIX IIOIOB (OT 438 IO 452 H)
2,9BT,20Jaa3epHbIXIIOIOB (OT 458 IO 472HM)
Mepbl npedoctopoXhOCTn
Бeэ�асноctb
IIpoBepbTe,cooTBeTcTByeTJn pa6Oooe HaIipjKeHHe BaIIero yCTpOcTBA HAnpIKeHHIO IHTAHm MeCTHOH 3JIeKtPnueckOeCtN.
Bcnyae IOnaHnBHytpb KOpNyca KaKnx-Jn60
KIOKCTe HIN IOCTOPOHNX IIpeJMeTOB
OTCOEINHHTe YCTPOHCTBO OT JIeKTPHueCKO CETH N
OBpaHTTEc b KBAJIHΦHnIPoBAHHOMy IepcoHaJy
JIIraero IPOBepKn Ipej NaJIbHeHIIe
EKCIJIyataune.
- BbIKJIOUHTe yCTPOINCTBO H3 CEteBOI PO3eTKN, ecJIH He IIaHHPyTe HcIOJIb3OBaTb erO B TeueHHe HECKOJIbKHX JHeI.
- PnH OTKJIIOUeHHI HHypa TReHHTe eO 3a BHIky. HNKoIgA He TReHHTe HENOCpeIcTBEHNO 3a IHHyp.
- CeTeBa pO3eTka DOJIxHa HaxoIHTbcr BO3Je yCTpoIcTBn 6bITb JcTKO IOCTyINHOH.
- Ioka yctpoIcTBO NOIKJIIOUeHO K HcToHHKy IepMeHHOro ToKa, Ha HeRo II-No-IPcXHcMy IOnaTeC3JIeKTPoINHTaHHe, JaXe ecJH caMo ycTPOIcTBO BbIKJIIOUeHO.
HeJIb3a CMOTpeTb CKB03b JHH3y Iprn HcIOJIb3OBAHH.
HeIOHOCHTe pyKn HJIN IpeIMeTbIK BEHTNJIAIOHOHHbIM OTBepCTnM. H3 HNX BbIXOINT TOpAHN BO3IyX.
HeDOnyCTnMbIe BapnaHTbI yCTaHOBKn
He pa3MeiHaTe yCTPOHcTBO B CJIeIyHOUHX yCJIOBHX, KOtOpbIE MOrY T IIpNBecTH K HeHCIIpaBHOCT HJIN IOBpeKJdeHIO yCTPOHcTBA.
PraomcoCTeHaMn
Дя obecneueHЯ npOH3BOJNTeJIbHOCTn HaIeKHOCTHaIIapaTa OCTaBtMeCTo MeKJy Hm H CTeHaMn, KaK IOKa3aHo Ha pHyHKe.

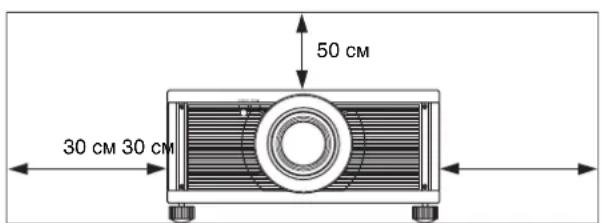
IMeTe B BuIy, YTO cTeHa co cToPOHbI BEHTNJIAIOHOHBIX OTBepCTn MOKeT HaIpeBaTbcr. Bo3JyX H3 KOHNIIIOHOhepa HIN BeHTNJIAIOHOHBIX OTBepCTn IaHHoro aIIIapata HJN IpyTHx yCTPOcTB MoKe TpNBecTH K KOJIe6aHnM 3KpaHa. He yCTaHaBJIIBaHTe JAAHbI aIIIapat B MeCte, IJe BO3JyX H3 KOHNIOHOhepa HIN BeHTNJIAIOHOHBIX OTBepCTn TaKHX yCTPOcTB IIOnIaAet Ha eRO IpePeHIOO CTOPOHY.
PomecheHne c PIOXoB BeHTnlauee
OCTaBBTe BOKpyr yCTPOHCTBa MHHMaJIbHOe IIPOCTpAHCTBOB30cm.
Xapkoe u BlaJxHoe nOmeueHne

PomeuHn, NOBepKHeHbIe BO3deNcTBnIO nOTOKa XoJIoHOrO uN TEnIoro BO3dUxa N3 KOHNiNoHepa
YcTaHOBka B TaKOM MecTe MOXeT IpnHBecTH K HcHcPiPaBHOCTn aIIIapapaTbCJIcIcTBHe KOHJcHcaHH BJIaH NIIIOBblIeHn TeMIIepaTypbl.
PdOM c DaTynKOM TeNna nn Dbima
TO MOKeT IIpHBeCTN K JIOXHOMy cpaBaTBaHHIO daTuHaKa.

CnIbHO 3aIbJIeHHbIe NIIcNJIbHO 3aDbIMJIeHHbIe NOMeueHn

He donyctnmbie ycnoBna 3Kcnpnyatau
PnHcIOJIb3OBAHHJaHHOro yCTpOHTBa 3aIpeIaeTcBbIIIOJIHrTBcJeIyIOHne OepaHn.
Блорва BeHTnJIaHcNoHHbIX OTBepCTN (Bnyckhoe N Bblnyckhoe)
YcTaHOBka yCtpoiCTBa Ha 6OJbWoB BbICote HaD yPOBHeM MOpA
IIpn HcIOJIb3OBAHH yCTPOINCTBa Ha BbICote 1500 M
HIN BbIe yCTaHOBInTe IJIaIpaMeTpTa "PexHM
BbIC.IoJ"BMehIO"HAcTPOINKa"MaueHne"BkJI".
EcIN He ycTAHOBnTB 9OT pEXHM IIpH HcIOJIb3OBAHH
yCTPOINCTBa BBICOKO HAIpYPOBHeM MOpR, 9TO MOKeT
IIpHBecTH K He6JIaTOINTHbIM IOcJIeCTBnM,
HaIIpIMep K yMeHbIeHHIO HaJeXHOCTN HeKOTOpbIX
KOMIOHEHTOB.
HΦopMaunIaIaJIepeOB
Iy cTaHOBKn IpoeKTopa Ha IIOToJIke HcO6XoHMo HcIOJIb3OBaTb KpOHITcH HPOH3BOJCTBa KOMIIaHH Sony HIN aHaJIOTnHOe peKOMeHIOBaHHoe KpeIIJeHHe.
- Pn yctaHOBKe Ha IIOTOJOK IIIOTHO 3aKpbBaIte KpbIHKy Kopnyca.
IIpn IIOIcoeHHeHH HJIN CHHTTN O6bekTHBa 063aTeJIbHO 06paHTTEcK KBaJIHΦHnPOBAHOMy cneuaJIHCTy KOMIIaHHN Sony.
OctopoXHo
EcHn HcHIOJIb3OBAHHI IpOeKTOp HyxHO HAKJOHNTHB BepTHKaJbHO HINrROPHTaJIbHO, yCTaHaBJIbAHTe ero IIOI IIpaBUNbHBIM yTJOM, KaK IOKa3aHO Ha pncyKe HIXke.
YcTaHObKa yCTpoiCTBa rOpN3OHTaJIbHo
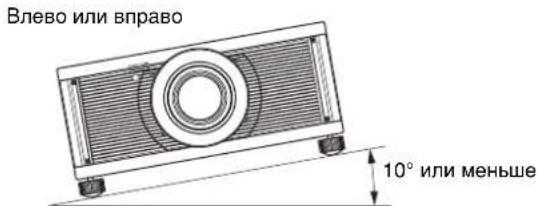
YctaHOBka yCTpoNCTBa Ha NotoJKe
Mepbl npedoctopoxhoctn npnyctaHOBKe yCTpoiCtBa Ha NOTOLke
He IIbTaIteCb yctaHOBnTb IpoeKToP Ha IIOToJIke HIN IepEmecTHb eO CaMOCToTeJIbHO. O63aTeJIbHO IPOKOHcyJIbTHpyIteCb c KBaJHΦHHPoBAHHbIM IepCOHaJIOM KOMIIaHHN Sony, KOMIIeTeHTbIM B JaHHOM BOIIpOce.
YCTaHaBJIbBa yCTPOHcTBo Ha IIOToJKe, 063aTeJIbHO HcIOJIb3yIte CTPaxOBOuHbI IHHyp IIN dpyrHe cpeCTBa IIN ppeIOBTpaIeHNn IaIeHnIy yCTPOHcTBa. IOBepbTe yCTaHOBky ONbITHomy cIeIIHaJIHcTpy IIO MOHTaKy.
Поберка akceccyapов n3 KOMпктабoctaВК
IPOBepbTe ynaKOBky Ha haJIInuHe cJeIyIOINX 3JCMCHTOB.
-Пульт дисанционногу npabJIeIMR RM-PJ24 (1)
MapraHicBbIc 6aTapeKn pa3Mcpa AA (R6) (2)
KaBeJIb IepemEnHOro ToKa (1)
-Держатильштесера(1)
KpaTKoe cnpaBOuHoe pyKOBOCTBO (naHHoe pyKOBOCTBO) (1)
- Hnctpykunno 3KcnIyataunn (KOMnakT-nck) (1)
YcTaHOBKa 6aTapeB B nyIbT DnCTaHcNoHHOrO ynpaBHeHnA
PpeynpekdeHne OTHOCHTeBHO nCNoJIb3OBAHnI PyIbTa DnCTaHcNHOHor oypabJeHH
BepexHo 6paHaaTecb c nyJBtOM HnCTaHnOHHoro ynpabJIeHna. He 6pocaTe ero, He HactyNaTc Ha Hcro n HC npoJHbaNTc Ha Hcero HnKaKHe KnDkoCTH.
He octabJrnte NyJBt JnctaHIOHOHorO ynpabJIeHHB6JIH3N HCTOHHKOB TeJIa HIN B MecTe, IOJIbEPKeHHOM IpyMOMy BO3JeCTBIO COJIHeYHbIX JIyueH, HIN BO BJaXHOM IOMEIIeHH.
HIIKATOP ON/STANDBY HIN WARNING 3aropaetc HIN MHRaET Pn HaJIuHn KaKoJ-JIb6 HeHCpabHOCTN IPOCKTOPa.
a a a a a a a a a a a a a a a a a a a
aalll 0rall glgagall plai
Adobe Reader 1000000000000000000000000000000000000000000000000000000000
1
2
边 an 为等差数列,前 n 项和为 Sn . 求证: Sn < a1 + a2 + a3 + a4 + a5 + a6 + a7 + a8 + a9 + a10 + a11 + a12 + a13 + a14 + a15 + a_16
Jg j 10000000000000000000000000000000000000000000000000000000000000000000
jai jil uu Jogi
ACIN 1000000000000000000000000000000000000000000000
1
2
a#
aaii aiee eae iie 10
(1) RM-PJ24 1
(2) jiaai (R6) AA
(1)AC
(1)
(1) ()
(1) (20
5001 j4 1
e aall gao bdoi
a
·
aegsgln
jSog
1
aai jie oogll uSjiu
aalall aggll alglal sso aalall alglal sso aalall gdo y do ydo ydo ydo ydo ydo ydo ydo ydo ydo ydo ydo ydo ydo ydo ydo ydo ydo ydo ydo ydo ydo ydo ydo ydo ydo ydo ydo ydo ydo ydo ydo ydo ydo ydo ydo ydo ydo ydo ydo ydo ydo ydo ydo ydo ydo ydo ydo ydo ydo ydo y
.oo0g01gaiol
8JUJU
000gJ Juaowll Lai jzj j j jzss 000
-
-
-
-
-
-
-
- 1.
-
-
-
-
-
-
LCD
sddgagdallalccpaLcLCD sgsjggsa 1 (ggl gglg) aabla glg dolgblg 11ll alaae bae g ylllLCD jg jg jy
S OBC = S ABC + S_ CDF
LCD 0j 0j 0j 0j 0j 0j 0j 0j 0j 0j 0j 0j 0j 0j 0j 0j 0j 0j 0j 0j 0j 0j 0j 0j 0j 0j 0j 0j 0j
#
jSb.25y.00g0 1uogue.0ggl JUgoggl 4
dally alalall oogll plaowwie iie aolly aaleoall aol w no 1
yogg yogaae yeg sall o idl l gogll oag
plaoiwlggj) abgacnll giaaoll qno uoggl oololc!
grall aals kuy bgy. (Jzaiil Claas
1
J 1 J 1 J 1 J 1 J 1 J 1 J 1 J 1 J 1 J 1 J 1 J 1 J 1 J 1 J 1 J 1 J 1 J 1 J 1 J 1 J 1 J 1 J 1 J 1 J 1 J 1 J 1 J 1 J 1 J 1 J 1 J 1 J 1 J 1 J
.
山
51056
Joost J. Gold
e Uds Jn 1000000000000000000000000000000000000000000000000000000000000000000
15
gEg jn 1uBnJn Jn gsssONYdJus
aIbI ypaiay g oagol oia gaoiaa Ipaiaia 1 aiaaa Jn dao aygai n aegyssy ANSY aJw laaui j 1 Jn aggbl Bgy
.89
aLb10
a 100000000000000000000000000000000000000000000000000000000000000000000000000000000000
CLASS1 LASER PRODUCT
CAUTION
Possibly hazardous optical radiation. emitted from this product
RG2 IEC 62471:2006

y
.IEC 62471:2006 J 2 2 2 2 2 2 2 2 2 2 2 2 2 2 2 2 2 2 2 2
y
J 1
CLASS1RG2
2
IEC60825-1:2014
JIS C6802:2014
RG2 IEC 62471:2006
ACHTUNG
CLASS 3R LASER PRODUCT
WAVE LENGTH:440-480nm
MAX OUTPUT < 245mW
IEC60825-1:2007

4-585-125-018
(duall qial) galo
CAUTION - Class 3R LASER RADIATION WHEN OPEN AVOID DIRECT EYE EXPOSURE
ATTENTION - RAYONNEMENT LASER DE CLASSE 3R - EN CAS D'OUVERTURE EVITER L'EXPOSITION DIRECTE DES YEUX
CLASS 3R PRODUCT LABEL
LASER APERTURE
.5g 11
y 3R aai jn
4
4
20 1
Joo
jlll lssy y. aaiyysclauo g u g u b jg juall .llg jalll
j 1
j 1
Jg 1
Jg 1
Jg 1
Jg 1
Jg 1
Jg 1
Jg 1
Jg 1
4
LAN 1090 109
gai 1i jyjll jglal lalw JI yog Jwgi qiaJdwl Jn .iaial liq wjl ag
jglal Jogo/(g3 gdlw)aollll lwl pluclly 1
.12g j 12h2u/12g
a a a a a a a a a a a a a a a a a a a a a a a
8 1
9 0
10 8
12 a
13 1
1 pddgbs
2 pj 8g
3 pddgbs
4
5 pddgbs
14
1