— Bluetooth speaker — Mode d'emploi PDF")
LIFE P61202 (MD 44102) - Bluetooth speaker MEDION - Free user manual and instructions
Find the device manual for free LIFE P61202 (MD 44102) MEDION in PDF.
| Product type | TV Soundbar / Bluetooth Speaker |
| Brand | MEDION |
| Model | LIFE P61202 (MD 44102) |
| Dimensions (assembled soundbar) | 799 x 92 x 62 mm |
| Dimensions (speaker towers) | 122 x 416 x 150 mm (per tower) |
| Power supply | 220-240 V ~ 50/60 Hz |
| Power consumption | 30 W max. |
| Output power | 2 x 25 W RMS |
| Connectors | AUX 3.5 mm, digital optical input, HDMI (ARC), Bluetooth 4.2 |
| Bluetooth profiles | A2DP, AVRCP, NFC |
| Bluetooth range | 8 m max. |
| Sound settings | Music, Movie, Flat effects; bass (Bass) and treble (Treble) adjustment |
| Remote control | Yes, with included CR2025 button cell battery, range ~6 m |
| Wall mounting | Possible, wall mount supplied |
| Batteries | CR2025 button cell for remote control |
| Cleaning | Dry cloth, avoid solvents and corrosive detergents |
| Safety | Do not open the casing, use on stable surface, avoid moisture |
| Package contents | Soundbar, remote control, 3.5 mm audio cable, power cord, 2 stands, rubber feet, manual |
| Warranty | See manual for after-sales conditions |
| After-sales service | Hotline, email, Medion website |
| Protection class | II (double insulation) |
Frequently Asked Questions - LIFE P61202 (MD 44102) MEDION
User questions about LIFE P61202 (MD 44102) MEDION
0 question about this device. Answer the ones you know or ask your own.
Ask a new question about this device
Download the instructions for your Bluetooth speaker in PDF format for free! Find your manual LIFE P61202 (MD 44102) - MEDION and take your electronic device back in hand. On this page are published all the documents necessary for the use of your device. LIFE P61202 (MD 44102) by MEDION.
USER MANUAL LIFE P61202 (MD 44102) MEDION
www.medion.com/conformity.
Bluetooth Profile: A2DP, AVRCP, NFC
Chere cliente, cher client,
www.medion.com/conformity.
- Information about this user manual 145
1.1.Explanation of symbols 145
-
Proper use
-
Safety information
3.1. Ensure that the device is mounted securely 148
3.2. Power supply 149
3.3. Handling batteries
3.4. Repairs 151
-
Package contents
-
Device overview
5.1. Remote control 153
-
Inserting batteries in the remote control 154
-
Installing the soundbar 155
7.1. Vertical variant, as standing loudspeakers 155
7.2. Horizontal variant
7.3. Wall-mounted soundbar 156
-
Connecting the soundbar to the mains 158
-
Connecting audio devices 158
9.1. Connecting the device via AUX 158
9.2. Connecting devices via the optical connection 159
9.3. Connecting devices via HDMI (ARC) 159
- Setting up a Bluetooth connection 159
10.1. NFC-enabledsmartdevice 160 - Switching on the soundbar 161
- Selecting the audio source 161
- Setting the volume 161
- Audio playback in Bluetooth mode 162
- Setting sound effects 162
- Maintenance 162
- Cleaning 163
- Troubleshooting 163
- Declaration of conformity 163
19.1. Trademark information 163 - Disposal 164
- Technical specifications 164
- Service information 165
- Privacy statement 166
- Legal Notice 166
1. Information about this user manual

Thank you for choosing our product. We hope you enjoy using this device.
Please read the safety instructions and the user manual carefully before using the device for the first time. Note the warnings on the device and
in the user manual.
Always keep the user manual close to hand. If you sell the device or give it away, please ensure that you also pass on this user manual. It is an essential component of the product.
1.1. Explanation of symbols
If a block of text is marked with one of the warning symbols listed below, the hazard described in that text must be avoided to prevent the potential consequences described there from occurring.

DANGER!
Warning: risk of fatal injury!

WARNING!
Warning: risk of possible fatal injury and/or serious irreversible injuries!

CAUTION!
Warning: risk of minor and/or moderate injuries!

WARNING!
Warning: risk of electric shock!

NOTICE!
Follow these instructions to prevent damage to the device!

More detailed information about using the device!

Follow the instructions in the user manual!
- Bullet point/information on steps during operation
Instruction to be carried out
Safety instructions to be performed

Protection class II
Electrical devices in protection class II are devices that have double and/or reinforced insulation throughout, and do not have an option for connecting a protective earth. The housing of an electrical device in protection class II, with surrounding insulating material, might either form all of the additional or reinforced insulation, or part of it.

Declaration of Conformity (see "Declaration of Conformity" section): Products that feature this symbol meet the requirements of the EC directives.
2. Proper use
This device is designed to output audio signals. The soundbar is designed to be connected to televisions and can also be connected to other devices, such as portable CD or MP3 players, computers/notebooks, smartphones and stereo systems.
The device is only intended for private use and not for industrial/ commercial use.
Please note that we shall not be liable in cases of improper use:
- Do not modify the device without our consent and do not use any auxiliary equipment that we have not approved or supplied.
-
Only use replacement parts or accessories that we have supplied or approved.
Comply with all the information in this user manual, especially the safety information. Any other use is considered improper and can cause personal injury or property damage. -
Do not use the device in potentially explosive atmospheres. This includes petrol stations, fuel storage areas and areas where solvents are processed, for example. This device must also not be used in areas with particle-laden air (for example flour or wood dust).
-
Do not expose the device to extreme conditions. It is designed exclusively for use indoors.
Avoid:
high humidity or wet conditions
extremely high or low temperatures
- direct sunlight
- naked flames
3. Safety information

WARNING! Risk of injury due to improper use!
This device is not suitable for use by people (including children) with reduced physical, sensory or mental capabilities or with insufficient experience or knowledge unless properly supervised by a person responsible for their safety or these people have been instructed in how to use the device safely and have fully understood the possible dangers.
- Never leave children unattended near electrical equipment. Children are not always able to recognise and avoid possible dangers.
3.1. Ensure that the device is mounted securely
WARNING! Risk of injury due to electric shock!
There is a risk of electric shock due to live cables and wiring.
Install the device in a suitable location, and take care not to hit any hidden electrical cables or pipework when drilling.
- Do not place containers that are filled with liquid, e.g. vases, on or near the device and its mains cable. Such containers may tip over and the liquid may impair the electrical safety of the device.
-
Protect the device and all other devices connected to it from dampness, water drops or water spray. To prevent malfunctions, keep the device dust-free, away from sources of heat, and out of direct sunlight.
-
Do not place open flames such as lit candles on or near the device.
-
Do not cover the device (with newspapers, covers etc.) to prevent overheating.
-
Do not place any objects on the cables as they may be damaged.
To prevent the device from falling, only install and operate it and its components on a sturdy, level, vibration-free surface.
All multimedia devices that are connected to the device must comply with the requirements of the Low Voltage Directive.
3.2. Power supply
DANGER!
Risk of injury due to electric shock!
Install the device close to power sockets, which must always be easily accessible. Position the cables so that no one can tread on them or trip over them.
- To disconnect the device from the power supply, remove the plug from the mains socket. Always hold the plug firmly when unplugging it. To prevent damage, never pull on the cable.
- Only operate the device from an earthed 220 - 240 ~V 50 / 60 Hz outlet. Contact the local energy supplier if you have any questions about the power supply at the installation location.
- Stop using the device's plug if the housing or the cord connecting it to the device are damaged.
- Never open the device housing. Touching live parts or attempting to modify the device's electrical or mechanical functionality puts you at risk, and may also damage the device.

Unplug the device from the power socket if it is not going to be used for a longer period of time, or during a thunderstorm.
If the device is not in use, unplug the plug from the power socket or use a master/slave extension lead to prevent the device from using electricity when it is switched off.
3.3. Handling batteries
The remote control is battery-operated. Please note the following:
- Keep new and used batteries out of the reach of children. Do not swallow batteries as they can cause chemical burns.

WARNING!
Risk of chemical burns!
The remote control contains a button cell battery. If this battery is swallowed, it can cause serious internal chemical burns within 2 hours, which may prove fatal.
- Seek medical help immediately if you think that batteries may have been swallowed or secreted in any part of the body.
-
Stop using the remote control if you cannot close the battery compartment securely, and keep it well away from children.
Always use new batteries of the same type. Never use old and new batteries together.
Pay attention to the polarity (+ / -) when inserting the batteries.
There is a risk of explosion if batteries are replaced incorrectly! Only replace batteries with those of the same or an equivalent type. -
Never try to recharge non-rechargeable batteries. Risk of explosion!
-
Never expose the batteries to excessive heat (such as direct sunlight, fire or similar).
- Store batteries in a cool, dry place. Strong direct heat can damage batteries. Do not expose the device to sources of intense heat.
Never short-circuit batteries.
Never throw batteries into a fire.
Remove leaking batteries from the device immediately. Clean the contacts before inserting a new battery. Avoid contact with the skin, eyes and mucous membranes. In the event of contact with battery acid, rinse the affected areas immediately with plenty of clean water and consult a doctor as soon as possible. Risk of chemical burns from battery acid!
Always remove flat batteries from the device.
If the device is not going to be used for long periods, remove the batteries.
3.4. Repairs
Please contact our Service Centre if you have technical problems with your device.
4. Package contents
When you unpack the package, check that the following parts have been supplied:
Soundbar
- Remote control incl. battery (3 V CR2025 button cell, already installed)
- Mains cable
Audio cable (3.5 mm)
2x base
Rubber feet
- User manual, including warranty card

DANGER!
Risk of choking and suffocation!
Plastic wrapping can be swallowed or used improperly, creating a risk of suffocation!
- Keep the plastic wrapping out of the reach of children.
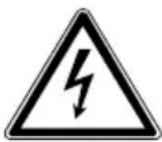
5. Device overview
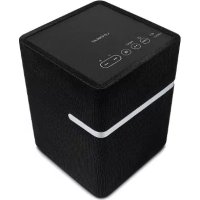
1 Loudspeaker
2 NFC (Near Field Communication) zone
3: Switching on/off
4 SOURCE: Selecting the audio source
5 LED operating displays
6 VOL+/VOL-: Setting the volume
7 AUX: Connection socket for TV and other audio devices
8 OPTICAL: Optical input for TV and other audio devices
9 HDMI: Input for (ARC-enabled) TVs, computers and other audio devices
10 AC\~: Connection socket for power cable
11 Remote control sensor
5.1. Remote control
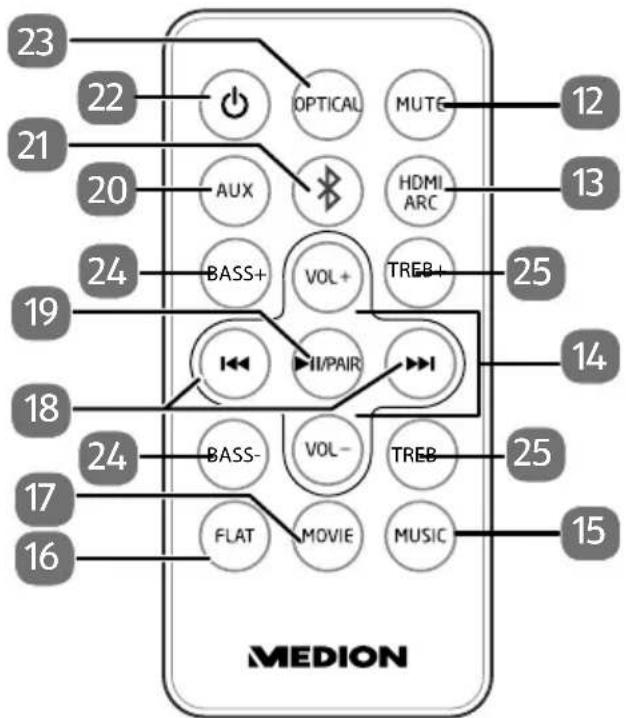
12 MUTE:Mute function
13 HDMIARC:SelectHDMIARCinput
14 VOL+/VOL-: Setting the volume
15 Set the MUSIC sound effect
16 Deactivate the FLAT sound effects
17 Set the MOVIE sound effect
18 Previous track/next track
19 I/PAIR: Start/pause audio playback;
PAIR: Setting up a Bluetooth connection
20 AUX: Select the AUX input
21 BT: Select Bluetooth operation
22 Switching on/off
23 OPTICAL: Select optical input
24 BASS+:/:Amplify/reduce bass
25 Treb +/-: Amplify/reduce treble
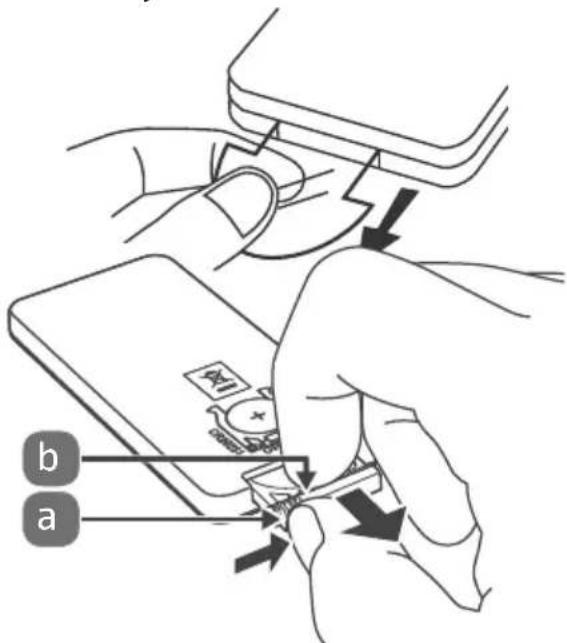
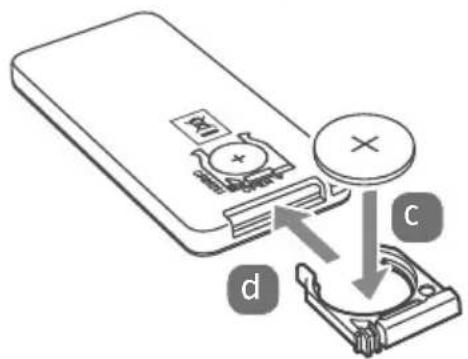
6. Inserting batteries in the remote control
The remote control contains a CR2025 3V lithium battery.

The first time you use the remote control, pull off the transparent film without opening the battery compartment.
Replace the battery if the device fails to react to commands from the remote control properly. Then follow these steps:
- Press down the locking tab (b) and pull the battery holder with the battery (a) out from the remote control. Dispose of the old battery in accordance with legal regulations.
- Place a new CR2025-type 3 V battery in the holder (c), with the positive pole pointing upward. Check the battery polarity is correct.
Slide the holder with the new battery completely into the slot (d) in the remote control.
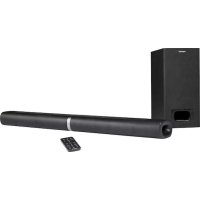
7. Installing the soundbar
The soundbar can be used in three different ways: vertically, as two loudspeaker towers, horizontally or wall-mounted.
7.1. Vertical variant, as standing loudspeakers
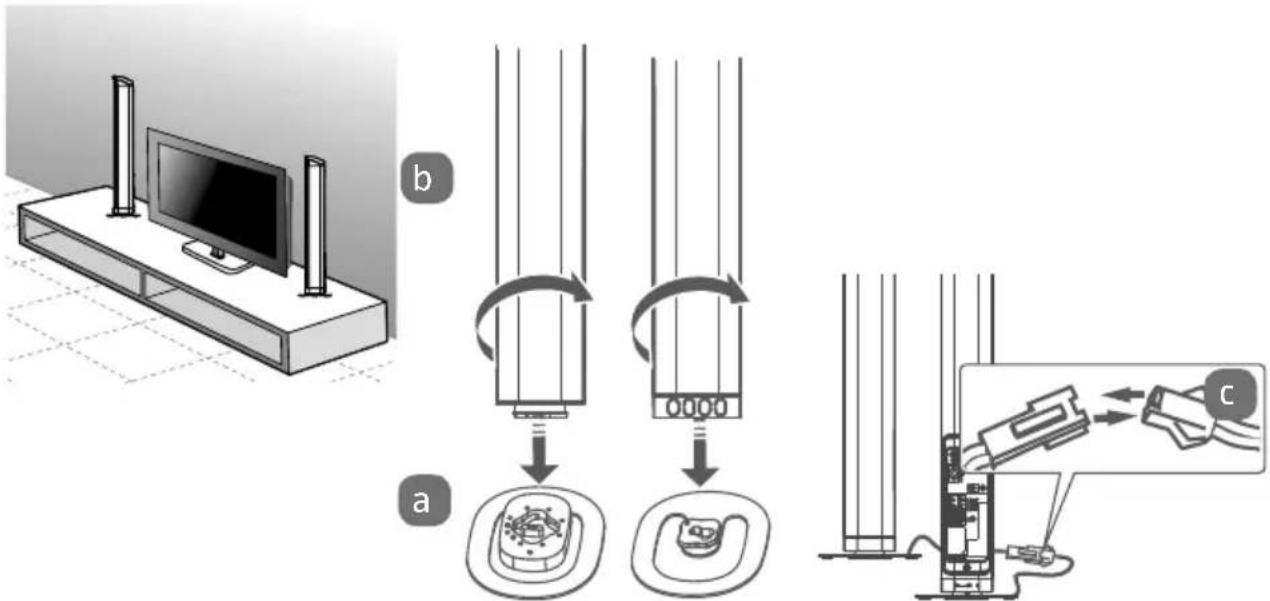
Connect each of the loudspeakers to its base.
- Check that the plug on the bottom of each loudspeaker fits securely into its base socket (see Fig. a).
- Holding the base firmly, rotate the loudspeaker in the direction of the closed padlock symbol.
Place the loudspeaker on a stable, level surface close to a power socket.
Connect the box cable on each loudspeaker as shown in Figure c.
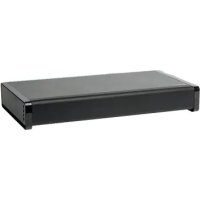
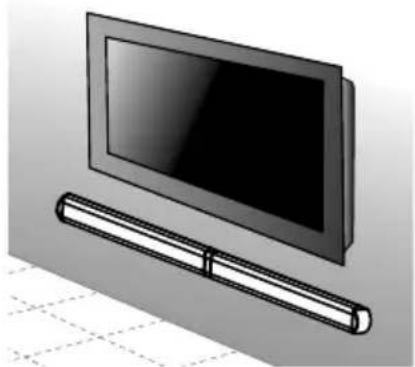
7.2. Horizontal variant
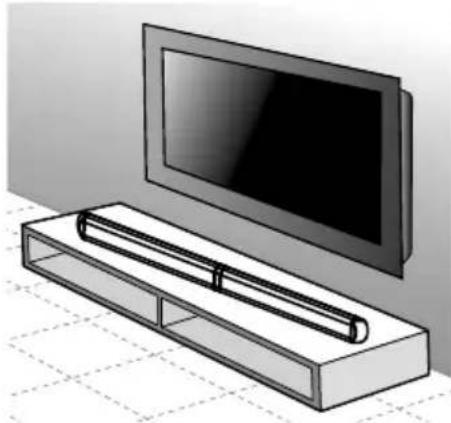
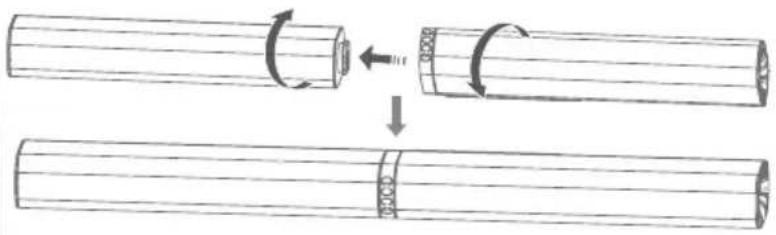
Connect the two loudspeakers as shown in the Figure.
- Check that the plug connection on one loudspeaker fits securely into the plug connection on the other loudspeaker.
- Holding one loudspeaker firmly, rotate the other loudspeaker in the direction of the closed padlock symbol.
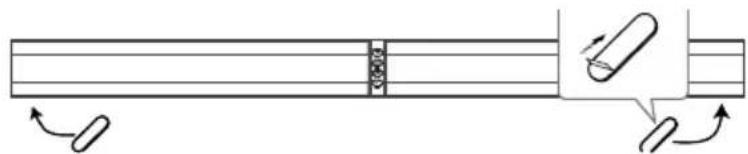
- Glue the rubber feet to the long side of the soundbar on the underside, as shown above.
Position the soundbar on a stable, level surface close to a power socket. Make sure that the soundbar cannot fall.
7.3. Wall-mounted soundbar

Before mounting on a wall, check that the wall has the required load bearing capacity. Medion AG shall not be liable for damage resulting from incorrect or non-professional mounting.
First connect the two loudspeakers as shown in 7.2.
WARNING!
Risk of injury due to electric shock!
There is a risk of electric shock due to live cables and wiring.
Install the device in a suitable location, and take care not to hit any hidden electrical cables or pipework when drilling.
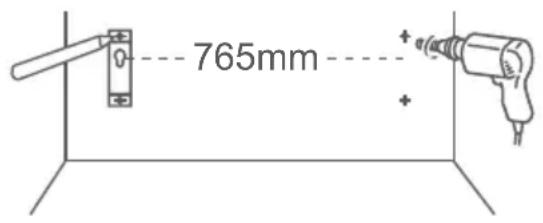
In each case, drill two holes into the wall, parallel to each other (diameter 6 mm, depending on the wall construction). The holes must be 765 mm apart.
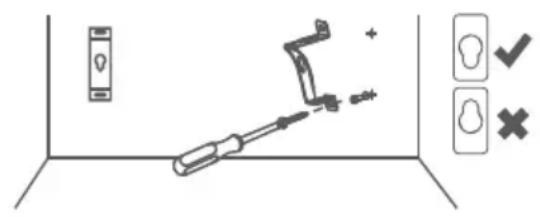
- Push the dowels into the drilled holes. Tighten the screws on the wall mount, as shown. Ensure that the eye for the soundbar has the narrow part pointing downward, see Fig. a. Use raised countersunk-head screws for this (e.g. 3.5mm× 45mm )
- Loosen both outer screws on the soundbar until it can be mounted on the wall bracket.
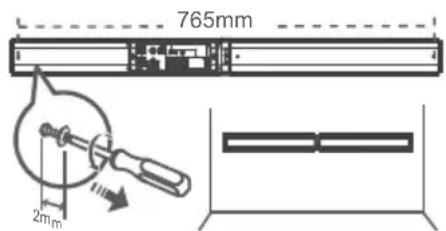
- Place the soundbar onto the wall brackets and then gently push the soundbar downwards until the screws engage in the wall brackets.
8. Connecting the soundbar to the mains
Plug the power cable into the AC~ power cable socket.
Check that all the devices you want to connect are connected.
Plug the power cable into a 220 - 240V 50 / 60Hz socket.
The on/off switch LED operating light lights up red.
9. Connecting audio devices
Comply with the notes in section 3. Sicherheitshinweise".
- Also comply with the information in the user manual for the devices to which you want to connect the soundbar.
- Switch off all the devices before connecting them to each other.
You can connect a wide range of different audio devices to the soundbar, for example, an MP3 and CD player, a receiver, a computer or even a television.
9.1. Connecting the device via AUX
9.1.1. Audio cable with a 2 × 3.5 mm diameter jack
You will need an audio cable with 2 × 3.5 mm diameter jack (supplied) to connect the headsets of CD or MP3 players.
Set the volume on the MP3 device to a medium level.
Then switch it off.
Insert the jack plug in the AUX socket on the soundbar.
The on/off LED operating light goes out, the "SOURCE" indicator lights up green.
Insert the plug in the headphone output socket on the MP3 device.
9.1.2. Audio cable with cinch plugs
You will need an audio cable with cinch plugs (1 x 3.5 mm jack -> 2 x cinch).
Set the volume on the audio device to a medium level.
Then switch it off.
Insert each jack plug in an AUX socket on a soundbar.
- Then insert the red and white cinch plugs at the other end of the cable in the audio output sockets of the same colour on the output device.

Devices, such as stereo receivers or televisions usually have one red and one white audio output socket. These are usually marked as OUT, AUDIO OUT, LINE OUT or similar.
9.2. Connecting devices via the optical connection
You can connect digital amplifiers or televisions via the OPTICAL connection. To do this, you will need an optical digital cable (fibre optic cable, not supplied with the soundbar, but available from specialist retailers).
Set the volume on the audio device to a medium level.
Then switch it off.
Remove the protective cap from the optical connector.
Insert the plug in the OPTICAL socket on the soundbar.
Insert the plug in the corresponding digital output socket on your digital receiver or television.

If no sound is output, switch the audio output format on your output device to PCM (Pulse Code Modulation) mode.
9.3. Connecting devices via HDMI (ARC)
You will need an HDMI cable. The HDMI cable is not supplied.
Set the volume on the audio device to a medium level.
Then switch it off.
Insert the HDMI connector in the HDMI IN socket on your television.
Enable the ARC and CEC functions and switch the sound output to PCM on the devices connected to the soundbar.
Comply with the operating instructions of the devices connected to the soundbar.
If two devices are connected, using ARC means not only that audio signals are received via HDMI, but that these signals can also be sent back along the same cable. Using CEC (Consumer Electronics Control), all the devices connected via HDMI can communicate with each other. This connection then means you can use the remote control to adjust the volume on the television, or mute it.

ARC only works for devices that are HDMI ARC-enabled and have an HDMI 1.4 cable (and higher).
10. Setting up a Bluetooth connection
Using Bluetooth, you can receive audio signals wirelessly from an external Bluetooth-enabled audio output device. Make sure the two devices are not more than 8 metres apart.
To connect a Bluetooth-enabled audio output device:
- Switch the soundbar on, either by pressing the button, or with the remote control.
- Then press the SOURCE button on the soundbar or the BT button on the remote control until the operating display (in this case VOL +) slowly flashes blue.
If the device is not already in search mode, press and hold down the PAIR button on the remote control for approximately three seconds.
This switches the device to search mode. - Now switch on the Bluetooth function on your audio output device and enable search mode to pair the two devices with each other.

You will find more information about the Bluetooth function on your audio output device in its user manual.
The soundbar's device name is displayed as soon as it finds a signal.
If you are prompted to enter a password, enter 0000.
When you hear "PAIRED" and the operating display lights up blue, this means the two devices are synchronised with each other.
If the connection is interrupted, you will hear "DISCONNECTED".
10.1. NFC-enabled smart device
The NFC (Near Field Communication) function enables Bluetooth connections to be established quickly and easily.
-
Switch the soundbar on, either by pressing the button, or with the remote control.
-
Then press the Source button on the soundbar or the BT button on the remote control until the operating display slowly flashes blue.
- Switch on the NFC function on your smart device.
This switches the device to search mode.
- Hold your NFC-enabled smartphone close to the soundbar, over the marked area.
- Confirm the prompt Verbinden mit your smart device with Ja. Wait for five to eight seconds before moving your smart device away from the loudspeaker. When you hear "PAIRED" and the operating display lights up blue, this means the two devices are synchronised with each other.
Select a medium volume and start playing the sound over your smart device.
To disconnect the connection, hold your smart device over the marked area again until you hear "DISCONNECTED".
11. Switching on the soundbar
- Switch the soundbar on either by pressing its button or with the remote control.
Switch on your audio device.
Select a medium volume and start playback.

If a TV or an external device is connected via the AUX or HDMI sockets, the soundbar will switch on automatically a few seconds after the television or the external device is switched on.
If the TV or the external device is disconnected or switched off, the soundbar will switch off automatically after approximately 15 minutes.
If the volume of the television or external devices is too low, the soundbar will also switch off after approximately 15 minutes (but only if the devices are connected via AUX).
ARC button on the remote control to select the audio source you want: AUX, BT, HDMI ARC or Optical.
Coloured LED operating displays show which operating mode has been selected:
| Operating display Flashing/lights up Operating mode | ||
| "On/off" LED display Lights up red Standby mode | ||
| "Vol+" LED display Flashes blue Bluetooth search mode | ||
| "Vol+" LED display Lights up blue Bluetooth mode | ||
| "Source" LED display Lights up green AUX operating modes | ||
| "Vol -" LED display | Lights up orange | HDMI operating modes |
| "Source" LED display | Flashes green | Optical in operating modes |
13. Setting the volume
Press the VOL+/VOL- buttons on the soundbar or on the remote control to set the volume:
- increase volume
-- reduce volume
Press the MUTE button on the remote control to set the volume to mute.
Press the MUTE button again to restore the sound.
14. Audio playback in Bluetooth® mode
If you have connected the soundbar to a device that supports the A2DP and AVRCP profiles (Audio Video Remote Control), the soundbar is used as an output medium and the audio signals are only output through the soundbar.

If you have connected the soundbar with your Bluetooth-enabled mobile phone, the music playing through the soundbar is interrupted when you receive a call, and only continues when you finish the call.
Start or stop audio playback using the button on the remote control.
Press the kuiis on the remote control to select the track you want to hear:
press next track
press previous track
15. Setting sound effects
Press the FLAT, MOVIE or MUSIC buttons on the remote control to switch the MOVIE or MUSIC sound effects on and off (FLAT).
Use the BASS/TREB buttons on the remote control to set playback or treble and bass sounds.
Press BASS+ / BASS- Amplify/reduce bass
Press TREB+ / TREB- Amplify/reduce treble
16. Maintenance
WARNING Risk of injury due to electric shock!
Never, under any circumstances, attempt to open or repair the device yourself. There is a risk of electric shock!
Please contact our Service Centre if you have technical problems with your device. Repairs must only be performed by our authorised service partners.
Contact customer service if...
- Liquid has penetrated the device.
The device is not operating correctly. - The device has been dropped or its housing is damaged.
17. Cleaning
- Do not use solvents, corrosive or gaseous cleaning agents. Only use a dry cloth/ microfibre cloth to avoid damaging the surface.
Furniture is often coated with varnishes or plastics which are cleaned with a wide range of cleaning agents. Some of these cleaning agents contain ingredients which might damage the loudspeaker's base material, and cause it to become soft.
If necessary, place an anti-slip mat under the loudspeaker's base.
18. Troubleshooting
If the device stops working properly, please refer to the troubleshooting table shown below to see if you can resolve the problem yourself.
- Never attempt to repair the device yourself. If a repair is necessary, please contact our Service Centre or a suitable authorised repair workshop.
| Cause Troubleshooting | |
| Faulty connections and cables | Check all the cable connections for damage, ensure the correct cables have been used and check that the Bluetooth connection is running. Check that all the connected devices have an adequate electricity supply. |
| No sound can be heard | Check the volume level on the output device. If necessary, increase the volume. |
| Distorted sound | Move the position of the soundbar to avoid disruptive external influences. Move the objects responsible for the distortion (mobile phone or similar) away from the device. |
19. Declaration of conformity
Medion AG hereby declares that this device complies with the fundamental requirements and the other relevant provisions of the following:
EMC Directive 2014/53/EU
- Ecodesign Directive 2009/125/EC
RoHS Directive 2011/65/EU.
Complete Declarations of Conformity are available at www.medion.com/conformity.
19.1. Trademark information
The Bluetooth® word mark and logos are registered trademarks of Bluetooth SIG, Inc. and are used by Lenovo/Medion under license.
Other trademarks are the property of their respective owners.
20. Disposal

PACKAGING
Your device has been packaged to protect it from damage in transit. The packaging is made of materials that can be recycled in an environmentally friendly manner.

DEVICE
Do not dispose of old devices in normal household waste.
In accordance with Directive 2012/19/EU, these devices must be disposed of correctly at the end of their service life.
This involves separating the materials in the devices for the purpose of recycling and minimising the environmental impact.
Take old devices to a collection point for electrical scrap or a recycling centre.
Contact your local waste disposal company or your local authority for more information on this subject.
BATTERIES
Do not dispose of used batteries with normal household rubbish. Batteries must be disposed of correctly. For this purpose, retailers that sell batteries and local collection points provide containers in which you can dispose of them. Contact your local waste disposal company or your local authority for more information.
21. Technical specifications
Mains connection 220 - 240V 50 / 60Hz
Power output: Loudspeaker: 2 × 25 W RMS
Input power: Max. 30 W
Connections: 1 × 3.5 ~mm jack audio input
1 digital audio input (optical)
HDMI (ARC) with CEC
Power cable connection
Bluetooth specification: V4.2, Class II
Bluetooth Profile: A2DP, AVRCP, NFC
Maximum transmission -2.1 dBm
power:
(Bluetooth)
Bluetooth frequency: 2402MHz 2480MHz
Range: Max. m (depending on the ambient conditions)
Dimensions (W x H x D) 799 x 92 x 62 mm as soundbar
122 × 416 × 150 ~mm as standing loudspeaker
122× 150mm base
Remote control: 1 × 3V battery, CR2025 button cell type
(supplied)
Range: approximately 6 m
22. Service information
Please contact our Customer Service team if your device ever stops working the way you want or expect it to. There are several ways for you to contact us:
- In our Service Community, you can meet other users, as well as our staff, and you can exchange your experiences and pass on your knowledge there.
You will find our Service Community at community.medion.com.
- Alternatively, use our contact form at www.medion.com/contact.
- You can also contact our Service team via our hotline or by post.
Opening times Hotline number UK
Mon - Fri: 08.00 - 20.00
Sat - Sun: 10.00 - 16.00
0
0333
3213106
Hotline number Ireland
① 1800992508
Service address
MEDION Electronics Ltd.
120 Faraday Park, Faraday Road, Dorcan
Swindon SN3 5JF, Wiltshire
United Kingdom

You can download this and many other sets of operating instructions from our service portal at
www.medion.com/gb/service/start/.
You will also find drivers and other software for a wide range of devices there.
You can also scan the QR code on the side of the screen, to download the operating instructions onto your mobile device from the service portal.
23. Privacy statement
Dear Customer,
We wish to inform you that we, MEDION AG, Am Zehnhof 77, 45307 Essen, Germany process your personal data as a data controller.
For matters regarding data protection, we are supported by our company data protection officer, who can be contacted at MEDION AG, Datenschutz, Am Zehnhof 77, D - 45307 Essen; datenschutz@medion.com. We process your data for the purpose of warranty processing and associated processes (e.g. repairs) and rely on the sales contract concluded with us when processing your data.
Your data will be provided to repair service providers contracted by us for the purpose of warranty processing and associated processes (e.g. repairs). We generally store your personal data for a period of three years in order to fulfil your legal warranty rights.
You have the right to be informed of the personal data concerned as well as the right to rectification, erasure, restriction of processing, the right to object to processing and the right to data portability.
In the case of the right to be informed and the right to erasure, restrictions apply according to paragraphs 34 and 35 of the BDSG (Federal Data Protection Act) (Art. 23 of the GDPR). In addition, there is a right of appeal to a competent data protection supervisory authority (Article 77 of the GDPR in conjunction with paragraph 19 of the BDSG). For MEDION AG, this is the state official for data protection and freedom of information North Rhine-Westphalia, PO box 200444, 40212 Düsseldorf, Germany, www.ldi.nrw.de.
The processing of your data is necessary for warranty processing: it is not possible to process the warranty without the provision of the required data.
24. Legal Notice
Copyright © 2021
Date: 10.02.2021
All rights reserved.
These operating instructions are protected by copyright.
Mechanical, electronic and any other forms of reproduction are prohibited without the written permission of the manufacturer.
Copyright is owned by the company:
MEDION AG
Am Zehnhof 77
45307 Essen
Germany
Please note that you cannot use the address above for returns. Please always contact our Customer Service team first.