
Astro - Electric bike KETTLER - Free user manual and instructions
Find the device manual for free Astro KETTLER in PDF.
| Product type | Indoor bike (Exercise bike / Cross) |
| Brand | Kettler |
| Model | Astro |
| Training computer | Digital display with automatic change (SCAN) |
| Computer power supply | 2 batteries 1.5 V LR6 AA (AA) |
| Pulse measurement | Via ear clip, hand pulse sensors or chest strap |
| Pulse range | 50 – 199 beats/min |
| Speed range | 0.0 – 99.9 km/h |
| Time range | 0:00 – 99:59 min:sec |
| Distance range | 0.0 – 99.9 km |
| Energy expenditure range | 0 – 9999 kJ |
| Ambient temperature range | 0 – 40 °C |
| Pedaling frequency | 20 – 199 rpm |
| Preselection functions | Time, distance, energy expenditure, pulse limit |
| Recovery function | Pulse measurement after exercise for 60 s with fitness score (F1.0 – F6.0) |
| Displays | Speed, distance, time, revolutions, pulse, kilojoules, odometer |
| Safety | Consult a doctor before any exercise; do not exceed maximum heart rate (200 – age) |
| Maintenance | Check batteries if anomaly; clean with a dry cloth |
| Use | Indoor bike: 60 rpm = 21.3 km/h; Cross bike: 60 rpm = 9.5 km/h |
Frequently Asked Questions - Astro KETTLER
User questions about Astro KETTLER
0 question about this device. Answer the ones you know or ask your own.
Ask a new question about this device
Download the instructions for your Electric bike in PDF format for free! Find your manual Astro - KETTLER and take your electronic device back in hand. On this page are published all the documents necessary for the use of your device. Astro by KETTLER.
USER MANUAL Astro KETTLER
Operating instructions for the training computer with digital display (ST2701-8) / (ST2703-8) / (ST2705-8)
Features
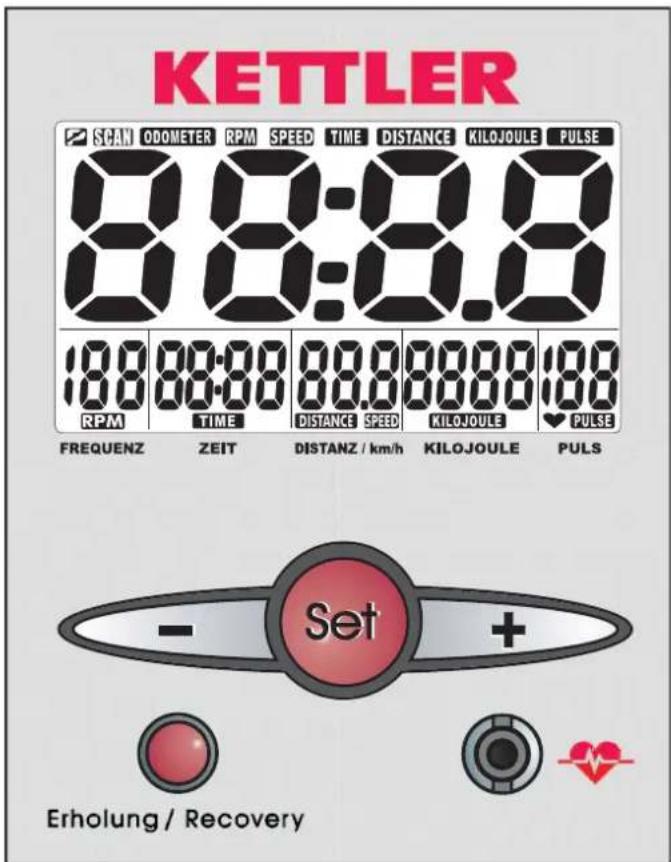
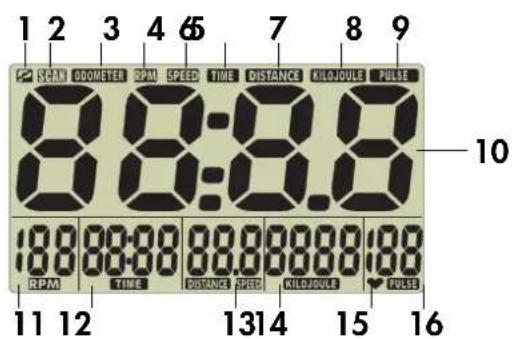
Symbols:
-
P no training: ready to accept set values
-
SCAN automatic change of display
-
ODOMETER display of total kilometres covered
-
RPM display of pedal rotations / step frequency
-
SPEED display of speed
-
TIME display of training time
-
DISTANCE display of training distance
-
KILOJOULE display of energy consumption
-
PULSE display of current pulse
-
Heart will flash in accordance with pulse
Values:
-
Large display room temperature [0 - 40^] odometer [0 - 9999km] fitness value [F1.0-F6.0]
-
Pedal rotations 20 - 199 [Rotations/min] Step frequency
-
Time 0:00 - 99:59 [min:sec]
-
Distance 0.0-99.9 [km] Speed 0.0-99.9 [km/h]
-
Energy consumption 0-9999 [KJ]
-
Pulse 50-199 [Beats/min]
Buttons:
Minus button reduce values (Count down display range)
Set button function button [Set value, change, reset of display]
Plus button increase values (Display range forward)
Recovery button function button [Fitness value determination]
Connections (at front)
Jack (4 poles) for the ear clip
Connections (at rear)
Jack (4 poles) for the hand pulse sensors
Jack (2 poles) for the speed pickup
Battery compartment 2 batteries: Mignon1,5 Volt, LR6, AA,
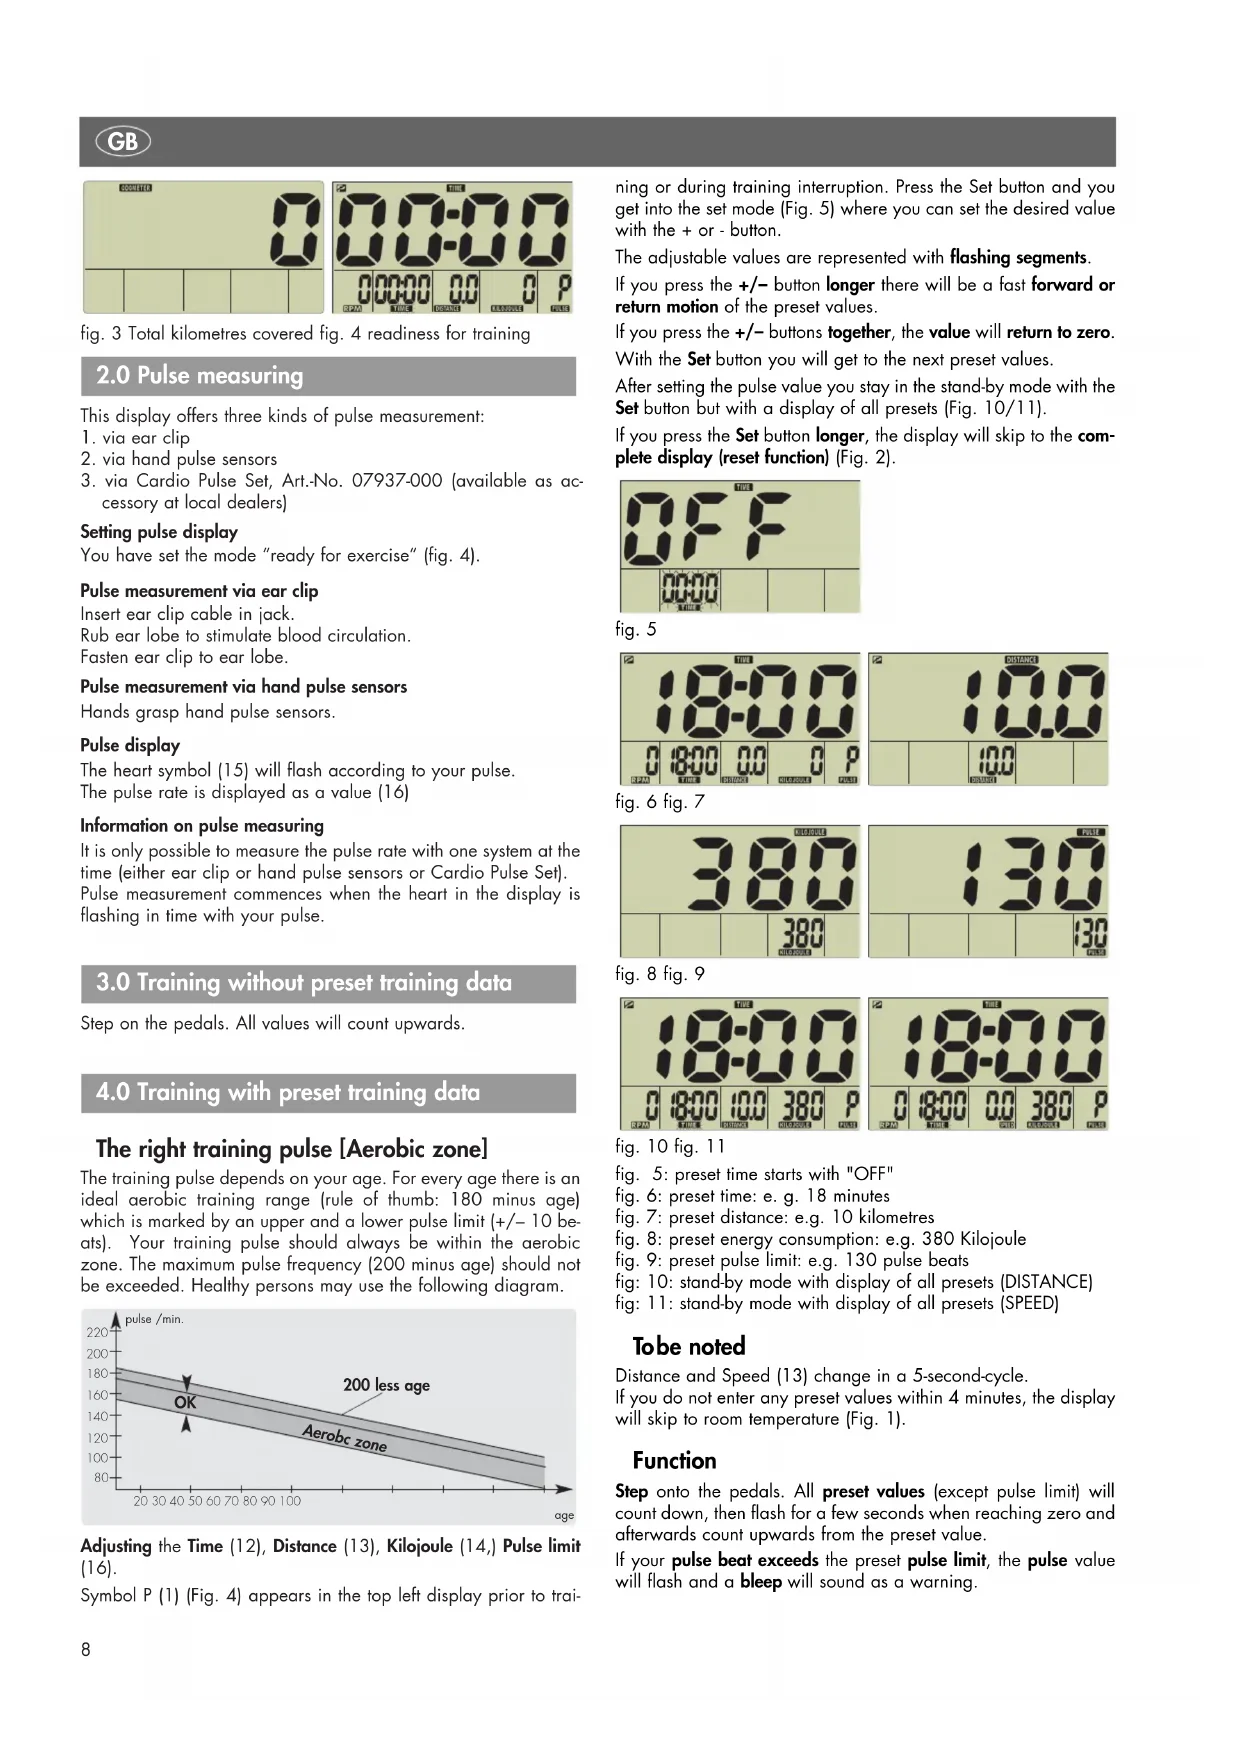
1.0 Displays before starting the training
- Room temperature fig. 1 [prior to and after training]
- Complete display fig. 2 [after pedal rotation or pressing a button, 1 sec]
- Total kilometres covered fig. 3 [display term:10 seconds or button]
- fig. 4 readiness for training
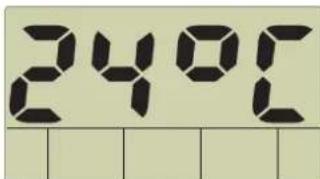
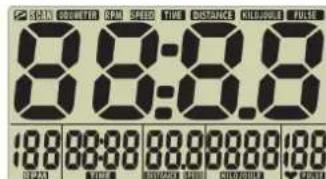
fig. 1 Room temperature
fig. 2 Complete display
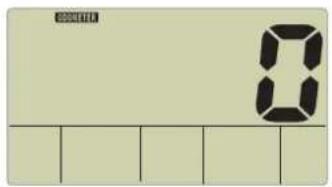
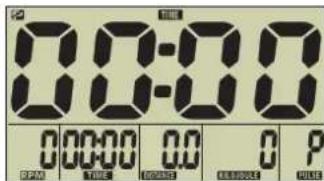
fig. 3 Total kilometres covered fig. 4 readiness for training
2.0 Pulse measuring
This display offers three kinds of pulse measurement:
- via ear clip
- via hand pulse sensors
- via Cardio Pulse Set, Art.-No. 07937-000 (available as accessory at local dealers)
Setting pulse display
You have set the mode "ready for exercise" (fig. 4).
Pulse measurement via ear clip
Insert ear clip cable in jack.
Rub ear lobe to stimulate blood circulation.
Fasten ear clip to ear lobe.
Pulse measurement via hand pulse sensors
Hands grasp hand pulse sensors.
Pulse display
The heart symbol (15) will flash according to your pulse.
The pulse rate is displayed as a value (16)
Information on pulse measuring
It is only possible to measure the pulse rate with one system at the time (either ear clip or hand pulse sensors or Cardio Pulse Set).
Pulse measurement commences when the heart in the display is flashing in time with your pulse.
3.0 Training without preset training data
Step on the pedals. All values will count upwards.
4.0 Training with preset training data
The right training pulse [Aerobic zone]
The training pulse depends on your age. For every age there is an ideal aerobic training range (rule of thumb: 180 minus age) which is marked by an upper and a lower pulse limit (+ / - 10 beats). Your training pulse should always be within the aerobic zone. The maximum pulse frequency (200 minus age) should not be exceeded. Healthy persons may use the following diagram.
![KETTLER Astro - The right training pulse [Aerobic zone] - 1](/content/2026/03/476151/images/7820081d9bbc7ebd8ee68fd6e98be7297e8a45a9fe7ab8cb6f30806f72bea753.jpg)
Adjusting the Time (12), Distance (13), Kilojoule (14,) Pulse limit (16).
Symbol P (1) (Fig. 4) appears in the top left display prior to tra
ning or during training interruption. Press the Set button and you get into the set mode (Fig. 5) where you can set the desired value with the + or - button.
The adjustable values are represented with flashing segments
If you press the + / - button longer there will be a fast forward or return motion of the preset values.
If you press the + / - buttons together, the value will return to zero.
With the Set button you will get to the next preset values.
After setting the pulse value you stay in the stand-by mode with the Set button but with a display of all presets (Fig. 10/11).
If you press the Set button longer, the display will skip to the complete display (reset function) (Fig. 2).
![KETTLER Astro - The right training pulse [Aerobic zone] - 2](/content/2026/03/476151/images/8df8ba29291996ed40b86f3726e53edcec51a7ad082824fd8446c35ffe18506a.jpg)
fig. 5
![KETTLER Astro - The right training pulse [Aerobic zone] - 3](/content/2026/03/476151/images/0790a43d5c43cc163c0013691b1e0c81d2e9a241213b4c5f2504a40f9740740c.jpg)
![KETTLER Astro - The right training pulse [Aerobic zone] - 4](/content/2026/03/476151/images/92c44d962c91588866c825dcbb8f5f7339f22804617e4fb063b7ab4d38a0075c.jpg)
![KETTLER Astro - The right training pulse [Aerobic zone] - 5](/content/2026/03/476151/images/fb3084cfb394ba60f0f67229ba15beaf597f6cb54eeb7570bb8e42e96b1a282a.jpg)
fig.6 fig.7
![KETTLER Astro - The right training pulse [Aerobic zone] - 6](/content/2026/03/476151/images/7a4cef1d42e3ba8cb41c9a3e17baacd9f7bfdcc432176a09d39d33f83d542fb6.jpg)
![KETTLER Astro - The right training pulse [Aerobic zone] - 7](/content/2026/03/476151/images/008349a7f7009be20ac4c502146d971e8d56a4de2484ef4e6e7bd04044f2b64d.jpg)
fig. 8 fig. 9
![KETTLER Astro - The right training pulse [Aerobic zone] - 8](/content/2026/03/476151/images/ff30a53a87cef3f4933e569690b18505ee8aaa940d37403046549ab6870c5443.jpg)
fig. 10 fig. 11
fig. 5: preset time starts with "OFF"
fig. 6: preset time: e.g. 18 minutes
fig. 7: preset distance: e.g. 10 kilometres
fig. 8: preset energy consumption: e.g. 380 Kilojoule
fig. 9: preset pulse limit: e.g. 130 pulse beats
Fig: 10: stand-by mode with display of all presets (DISTANCE)
fig: 11: stand-by mode with display of all preset (SPEED)
Tobe noted
Distance and Speed (13) change in a 5-second-cycle.
If you do not enter any preset values within 4 minutes, the display will skip to room temperature (Fig. 1).
Function
Step onto the pedals. All preset values (except pulse limit) will count down, then flash for a few seconds when reaching zero and afterwards count upwards from the preset value.
If your pulse beat exceeds the preset pulse limit, the pulse value will flash and a bleep will sound as a warning.
5.0 Display during training
If you step in the pedals for more than 20 rotations, an automatic display change SCAN (symbol 2 in the display) will take place in a 5-second cycle. With the Set button you can switch it off. With the +/- button you can then skip one display range forward or backward.
Tobe noted
Distance and Speed (13) change in a 5-second-cycle.
If a preset value (except the pulse limit) is reached, it will immediately be shown in the large display (10).
6.0 Display prior to training, at an interruption of training, at the end of training
If you stay below 20 rotations, the electronic system will recognise an interruption of training. The automatic display change will stop, the SCAN symbol disappears, P will be displayed and the current range remains standing still in the large display. If you do not continue training within 4 minutes, the display will change to room temperature (Fig. 1). In this case, the distance is added to the total kilometres covered. All other values will not be stored.
Tobe noted
Distance and Speed (13) change in a 5-second-cycle.
With the + / - button you can skip one display range forward or backward. With the Set button you get back into the input mode. In this case, all previous training data and preset values are deleted.
7.0 Display after continuation of training
Step on the pedals. The values will count on.
8.0 Recovery pulse measuring
The training computer is equipped with a recovery pulse function that enables you to measure your recovery pulse at the end of your training.
At the end of your training press the recovery pulse button. The computer will count down for 60 seconds and measure your pulse (Fig. 12). Afterwards, a fitness value with (F) is displayed (Fig. 13) the calculation of which is explained in 9.0 General. If pulse measuring is interrupted, (E) is displayed instead of a value. If you press the recovery button, the current training display will appear again.
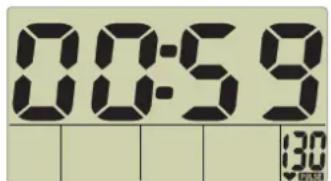
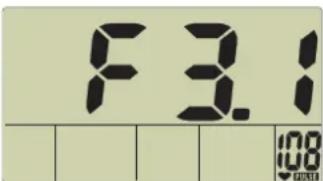

fig. 12 fig. 13
fig. 14
fig.12:Recovery pulse measuring with count down (0:60 - 0:00)
fig.13: Fitness value display
Fig.14: No pulse recognition (E) during recovery pulse measuring
Tobe noted
If no pulse value is displayed, no recovery pulse function will be performed.
After pressing the recovery button, quickly grasp the hand pulse sensor again since otherwise pulse measuring will be interrupted.
9.0 General
Home trainer
Speed calculation
60 pedal rotations per minute result in a speed of 21.3km / h
Kilojoule calculation
From the view of sports physicians there is the following energy consumption during cycling: 1 hour cycling at 24km / h requires 1680kJ
1 kilometre results in 70kJ
This calculation is based upon a medium training intensity and is only changed by a variation of the pedalling frequency.
Cross trainer
Speed calculation
60 pedal rotations result in a speed of 9.5km / h
Kilojoule calculation
From the view of sports physicians there is the following energy consumption during cross training: 1 hour training at 9.5km / h requires 3344kJ
1 kilometre results in 352kJ (with medium training intensity)
Fitness value calculation
The computer calculates and assesses the difference between load pulse and recovery pulse and your resulting "fitness value" on the basis of the following formula:
$$ \text {N o t e} (\mathbf {F}) = 6 - \left(\frac {1 0 \times (\mathrm {P} 1 - \mathrm {P} 2)}{\mathrm {P} 1}\right) ^ {2} $$
P1 = load pulse P2 = recovery pulse
Value 1 = very good Value 6 = unsatisfactory
The comparison of load and recovery pulse is a simple and fast method to control your physical fitness. The fitness value is a value of orientation with regard to your ability to recover after physical load. Before you press the recovery pulse button (15) and have the computer calculate your fitness value you should train in your load range for a longer time, this means for at least 10 minutes. With regular cardiovascular training you will notice that your "fitness value" will improve.
Information on pulse measuring
Pulse measuring starts when the heart in the display flashes according to the beat of your pulse.
Pulse measurement via ear clip
Teh pulse sensor works with infrared light and measures the changes in the light transmission of the skin caused by your pulse frequency. Before fitting the ear clip the ear lobe should be rubbed
10 times to stimulate blood circulation.
Avoid interfering impulses
Fasten the ear clip carefully to your ear lobe, searching for the best point to get signals (heart symbol fashing without interruption).
Avoid exercise in full light, e.g. neon lamps, halogen lamps, spot lights or direct sunlight.
Furthermore avoid vibration and moving the ear clip or its cable. Always fix the cable to your clothes or better still to a headband, using the provided clip.
Pulse measurement via hand pulse sensors
The contraction of the heart produces an extra-low voltage which is detected by the hand sensors and evaluated by the electronic system.
Always grasp the contact surfaces with both hands.
- Avoid any jerky grasping.
- Hold your hands steady and avoid any contractions and friction on the contact surfaces.
With Cardio Pulse Set
Please follow the respective set of instructions.
Failures in the pulse display
Should there once be any problems with pulse detection, please check the above mentioned points once again.
Check the battery voltage.
Failures in the training computer
In case of strange behaviour of the training computer remove the batteries, check battery voltage and insert batteries again. Previously record the kilometres covered. The stored total value of kilometres covered will be lost during an exchange of batteries.
10.0 Training instructions
For Your Safety:
Before beginning your program of exercise, consult your doctor to ensure that you are fit enough to use the equipment. Base your program of exercise on the advice given by your doctor. Incorrect or excessive exercise may damage your health.
This training device has been particularly developed for leisure time sportsmen. It is excellently suited for cardiovascular training. The training method must be based on the principles of stamina training. This will predominantly cause changes and adaptations of the cardiovascular system. This includes the reduction of the resting pulse frequency and of the load pulse.
This gives the heart more time for filling the ventricles and for the blood circulation of the cardiac musculature (through the coronary vessels). Moreover, depth of breathing and the volume of air that can be breathed in (vital capacity) are increased. Further positive changes take place in the metabolic system. In order to achieve these positive changes, the training has to be planned according to certain guidelines.
Intensity of training (exercise bike)
When training with the exercise bike, the intensity of training on the one hand is regulated through the pedaling frequency and on the other hand through the resistance. The training person can adjust the resistance via the braking force regulation at the steering column. Always pay attention to the fact not to overstrain yourself
with regard to intensity of training and to avoid overstress. Wrong or excessive training may be prejudicial to health.
Training intensity (home trainer)
The intensity of training with the home trainer on the one hand is regulated through the pedalling frequency and on the other hand through the pedalling resistance. The training person can set the pedalling resistance with the braking force regulation at the steering column.
Training intensity (cross trainer)
The intensity of training with the cross trainer on the one hand is regulated through the step frequency and on the other hand through the step resistance. The training person can set the step resistance with the 10-step gear.
Always pay attention to the fact not to exaggerate the training intensity and to avoid overstrain. Wrong or excessive training may lead to injuries to your health.
For this reason, during training check with your pulse frequency whether your training intensity is appropriate. Rule of thumb for an appropriate pulse frequency:
180 minus age
This means that a 50 year old person, for example, should organise his/her training at a pulse frequency of 130.
Training recommendations on the basis of this calculation are considered to be favourable by numerous recognised sports physicians. According to them you should determine your pedalling frequency and the pedalling resistance in such a way that you achieve your optimal pulse frequency according to the above mentioned rule of thumb.
These recommendations, however, only apply to healthy persons and are not valid for cardiovascular patients!
Exercise and load scope
Beginners should increase the load and intensity of their training only step by step. The first training units should be relatively short and organised in intervals.
Sports physicians consider the following load factors to be positive for fitness:
Frequency Duration
daily 10 min
2-3 times weekly 20-30 min
1-2 times weekly 30-60 min
Beginners should not start with training units of 30 to 60 minutes.
Frequency Length of exercise blocks
1st week
three times a week 2 minutes training
1 minute break for gymnastics
2 minutes training
1 minute break for gymnastics
2 minutes training
2nd week
three times a week 3 minutes training
1 minute break for gymnastics
3 minutes training
1 minute break for gymnastics
2 minutes training
3rd week
three times a week 4 minutes training
1 minute break for gymnastics
3 minutes training
1 minute break for gymnastics
3 minutes training
4th week
three times a week 5 minutes training
1 minute break for gymnastics
4 minutes training
1 minute break for gymnastics
4 minutes training
A beginner training could be organised as follows during the first four weeks:
In order to have a personal training documentation, you can enter the training values achieved in the performance table.
Prior to and after every training unit gymnastic exercises lasting approx. 5 minutes serve for warming up and/or cooling down. There should be a day without training between two training units,
if you later on prefer to train three times a week for 20 - 30 minutes each. Otherwise nothing can be said against a daily training.
Sequence of motions (cross training)
Through the elliptical rotation of the step boards and the arrangement of the grip bars the sequence of motions during cross training is already predetermined. Nevertheless, pay attention to the following items:
Prior to training always pay attention to the correct installation and positioning of the device.
- When mounting the device one step board has to be in the bottom most and the other in the top most position. Grasp the grip bars with both hands and mount the lower step board first. When dismounting from the device, first relieve the upper board.
- Set the step boards at your optimal distance to the grip bars. Pay attention to having sufficient leg-room towards the grip bars.
Train with appropriate sports shoes and pay attention to having a safe foothold on the step boards.
Hold tight at the grip bracket between the movable grip bars, if you only want to train the lower part of your body. (Do not train no-handed.)
Try to achieve a uniform, round sequence of motions.
- Set the brake resistance at the control knob under the cockpit according to your individual requirements.
During training vary between forward and backward motions of the step boards in order to strain leg and gluteal muscles in a different manner.
A regular training can increase your stamina, your force and thus also your well-being. Training success is optimised by a healthy way of life which is determined by a well-balanced, high-quality nourishment.
Performance table
| Date | Restpulse | Stress pulse | Recovery pulse | Slope | Time (min) (km) | Distance (Kcal) | Energy consumption | Fitness | Mark |
5.0 Weergaveijdens de training
2-3 x per week 20-30 min
1-2 x per week 30-60 min
3 x per week 3 minutes trainen
Odometer [0 - 9999 km]
Fitness ocena [F1.0 - F6.0]
- Stevilo obratov pedalov 20 - 199 [vrtljaji/min] Pedalna frekyvenca
- Cos 0:00 - 99:59 [min:sec]
13.Razdalja 0.0-99.9 [km]
Hitrost 0.0 - 99.9 [km/h]
- Poraba energia 0-9999 [KJ]
16.Pulz 50-199 [utripi/min]
Tipke:
Zmanjsanje vrednosti (obmocje prikazaj)
SetTipka Funkcijska tipka [normiranje,menjava, postavljanje prikaza nazaj (reset)]
Plus-tipka Povecanje vrednosti (obmocje prikazanaprej)
Recovery-tipka FunkcijskTipka [dolocitev fitness]

- Features
- Symbols:
- Values:
- Buttons:
- Connections (at front)
- Connections (at rear)
- Displays before starting the training
- Pulse measuring
- Setting pulse display
- Pulse measurement via ear clip
- Pulse measurement via hand pulse sensors
- Pulse display
- Information on pulse measuring
- Training without preset training data
- Training with preset training data
- The right training pulse [Aerobic zone]
- Tobe noted
- Function
- Display during training
- Display prior to training, at an interruption of training, at the end of training
- Display after continuation of training
- Recovery pulse measuring
- General
- Home trainer
- Speed calculation
- Kilojoule calculation
- Cross trainer
- Fitness value calculation
- Avoid interfering impulses
- With Cardio Pulse Set
- Failures in the pulse display
- Failures in the training computer
- Training instructions
- For Your Safety:
- Intensity of training (exercise bike)
- Training intensity (home trainer)
- Training intensity (cross trainer)
- minus age
- Exercise and load scope
- 1st week
- 2nd week
- 3rd week
- 4th week
- Sequence of motions (cross training)
- Weergaveijdens de training
- Tipke:
Brand : KETTLER
Model : Astro
Category : Electric bike