
V 4060 BK - Cooker NODOR - Free user manual and instructions
Find the device manual for free V 4060 BK NODOR in PDF.
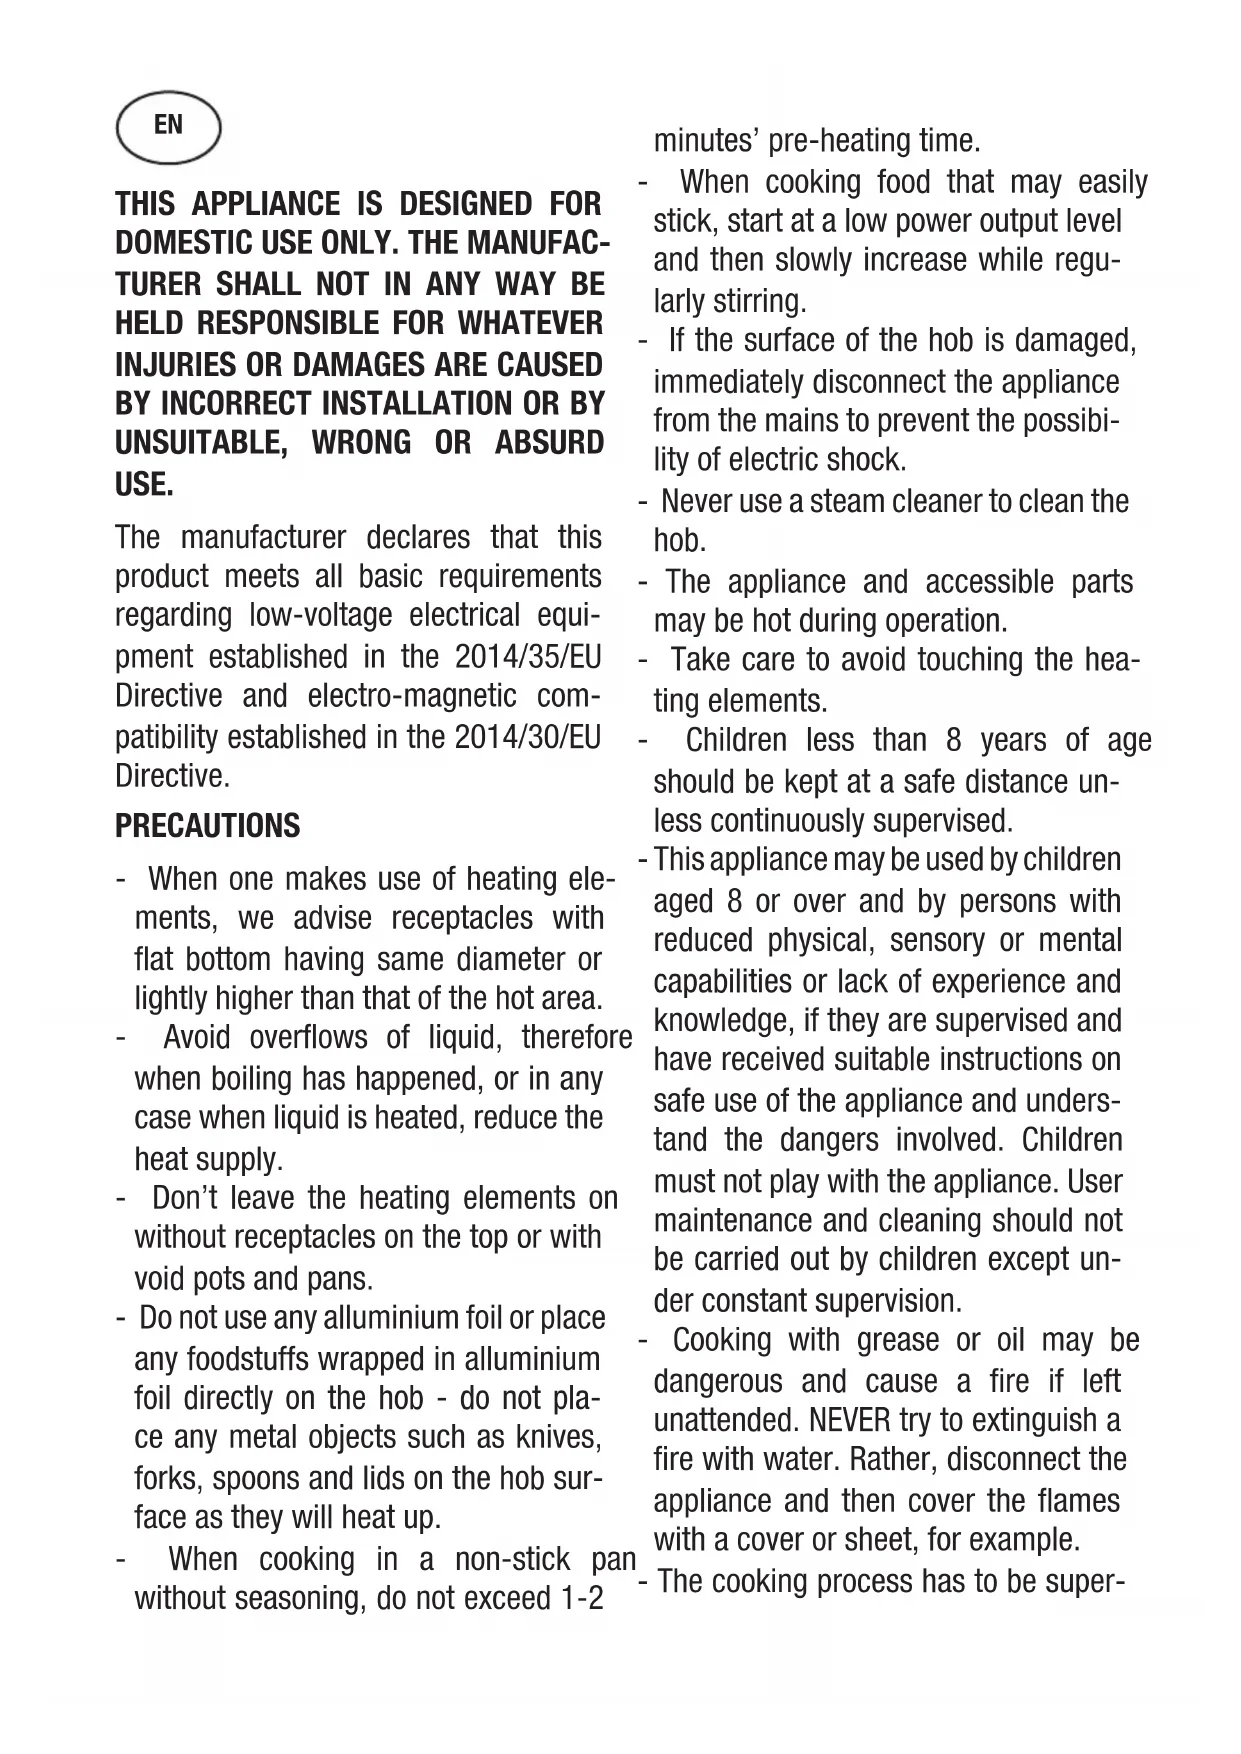
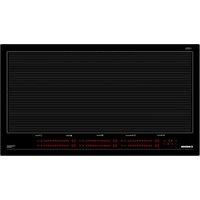
| Product Type | Ceramic hob with touch controls |
| Brand | Nodor |
| Model | V 4060 BK |
| Power supply | 230 V ~ 50 Hz (according to applicable standards) |
| Number of cooking zones | 4 cooking zones |
| Control type | Touch Control (capacitive sensors) |
| Power levels | 9 levels (from 1 to 9) |
| Special functions | Double/triple circuit, automatic shut-off, child lock, residual heat indicator |
| Installation | Built into a worktop (see diagram) |
| Surface material | Ceramic glass |
| Recommended cleaning | Scraper, suitable product, absorbent paper; do not use abrasive sponges |
| Child safety | Key lock (display 'L') |
| Automatic shut-off | Yes, depending on the power level and inactivity |
| Overflow protection | Stops if key is blocked for more than 10 seconds |
| Residual heat indicator | Display 'H' until cool (below 60°C) |
| Operating temperature | Heating elements with recommended supervision |
| Electrical connection | By qualified personnel, with mandatory grounding |
| Dimensions (W x D) | Not specified in the manual |
Frequently Asked Questions - V 4060 BK NODOR
User questions about V 4060 BK NODOR
0 question about this device. Answer the ones you know or ask your own.
Ask a new question about this device
Download the instructions for your Cooker in PDF format for free! Find your manual V 4060 BK - NODOR and take your electronic device back in hand. On this page are published all the documents necessary for the use of your device. V 4060 BK by NODOR.
USER MANUAL V 4060 BK NODOR
Operating and maintenance instructions for hobs
FR
THIS APPLIANCE IS DESIGNED FOR DOMESTIC USE ONLY. THE MANUFACTURER SHALL NOT IN ANY WAY BE HELD RESPONSIBLE FOR WHATEVER INJURIES OR DAMAGES ARE CAUSED BY INCORRECT INSTALLATION OR BY UNSUITABLE, WRONG OR ABSURD USE.
The manufacturer declares that this product meets all basic requirements regarding low-voltage electrical equipment established in the 2014/35/EU Directive and electro-magnetic compatibility established in the 2014/30/EU Directive.
PRECAUTIONS
- When one makes use of heating elements, we advise receptacles with flat bottom having same diameter or lightly higher than that of the hot area.
- Avoid overflows of liquid, therefore when boiling has happened, or in any case when liquid is heated, reduce the heat supply.
- Don't leave the heating elements on without receptacles on the top or with void pots and pans.
- Do not use any aluminium foil or place any foodstuffs wrapped in aluminium foil directly on the hob - do not place any metal objects such as knives, forks, spoons and lids on the hob surface as they will heat up.
- When cooking in a non-stick pan without seasoning, do not exceed 1-2
minutes' pre-heating time.
- When cooking food that may easily stick, start at a low power output level and then slowly increase while regularly stirring.
- If the surface of the hob is damaged, immediately disconnect the appliance from the mains to prevent the possibility of electric shock.
- Never use a steam cleaner to clean the hob.
- The appliance and accessible parts may be hot during operation.
- Take care to avoid touching the heating elements.
- Children less than 8 years of age should be kept at a safe distance unless continuously supervised.
- This appliance may be used by children aged 8 or over and by persons with reduced physical, sensory or mental capabilities or lack of experience and knowledge, if they are supervised and have received suitable instructions on safe use of the appliance and understand the dangers involved. Children must not play with the appliance. User maintenance and cleaning should not be carried out by children except under constant supervision.
- Cooking with grease or oil may be dangerous and cause a fire if left unattended. NEVER try to extinguish a fire with water. Rather, disconnect the appliance and then cover the flames with a cover or sheet, for example.
- The cooking process has to be super
vised. A short term cooking process has to be supervised continuously.
- Unattended cooking on a hob with fat or oil can be dangerous and may result in a fire.
- Fire hazard: do not store elements on cooking surfaces.
- Only counter top protectors designed for use with the cooking appliance and listed in the manufacturer's instructions should be used as suitable protection for the counter top incorporated in the appliance. Use of unsuitable protectors may cause accidents.
- WARNING: Accessible parts will become hot when in use. To avoid burns and scalds children should be kept away.
Insert in the fixed wiring a mean for disconnection from the supply mains having a contact separation in all poles that provide full disconnection under overvoltage category III conditions, in accordance with the wiring rules. The plug or omnipolar switch must be easily reached on the installed equipment.
This appliance is not intended to be used via an external timer or a remote control system.
The manufacturers decline any responsibility in the event of non-compliance with what is described above and the accident prevention norms not being respected and followed.
To avoid all risk, if the power cable becomes damaged, it must only be repla
ced by the manufacturer, by an authorised service centre, or by a qualified electrician.
User's Instructions
Installation
All operations relative to installation (electric connection) should be carried out by skilled personnel in conformity with the rules in force.
As for the specific instructions see part pertaining to installer.
Use
Touch sensitive keys
All operations can be performed using touch sensitive keys (capacitive sensors) located on the front of the control board; each key has a corresponding display. All actions are confirmed by an audible signal.
TOUCH CONTROL (Fig. 2)
1 ON/OFF
2 Minus -
3 Plus +
4 Double / Triple Circuit
5 Cooking zone
6 Setting level display
7 Dual circuit pilot light
8 Illuminated Segment Multiple Circuits
Switching the Touch Control on/off
After mains voltage is applied, the touch control initialises for approximately one second before it is ready for use.
All displays and LEDs flash for approximately one second after resetting. Once this period is complete, all displays and LEDs switch off and the touch control is in standby mode.
Press the ON/OFF (1) button to switch the touch control on. The cooking zone displays indicate "0". If a cooking zone is in "hot" (high temperature) mode, the display will alternately indicate "H" and "0".
After switching the touch control on, it will remain active for 20 seconds. If no cooking zone is selected, the touch control automatically switches back to standby mode.
The touch control can only be switched on by pressing the ON/OFF (1) button.
Pressing the ON/OFF (1) button at the same time as other buttons will have no effect and the touch control will remain on standby.
The touch control can be switched off at any time using the ON/OFF (1) button. This is even the case when the control has been locked by the child safety feature.
The ON/OFF (1) button always takes priority in the switching off function.
Automatic off
Once switched on, the touch control automatically switches off after 20 seconds of inactivity. After selecting a cooking zone, the automatic off time is divided into 10 seconds, after which the zone is deselected and, after another 10 seconds, the touch control switches off.
Switching a cooking zone on/off
If the touch control is switched on, the cooking zone can be selected by pressing the button (5) of the corresponding zone.
The display (6) of the zone selected lights up, while the remaining displays are dimmed. If the cooking zone is "hot", "H" and "0" are alternately displayed.
Press the PLUS (3) or MINUS (2) button to select a setting and the zone will begin to heat up.
Once the cooking zone has been selected, the setting can be selected by keeping the PLUS (3) button pressed down. The setting begins at level 1 and increases by 1 level every 0.4 seconds. When setting "9" is reached, the setting will not be changed further.
If the setting level has been selected using the MINUS (2) button, the start level is "9" (maximum level). Keep the button pressed down to lower the active level by 1 every 0.4 seconds. When setting "0" is reached, there will be no further setting changed. The setting can only be changed by pressing the MINUS (2) or PLUS (3) button again.
Switching a cooking zone off
Select the zone to be switched off using the corresponding button (5). The display (6) of the zone selected lights up, while the remaining displays are dimmed. Press the PLUS (3) and MINUS (2) buttons at the same time and the setting level of the zone is changed to 0. Alternatively, the MINUS button (2) can be used to reduce the setting level to 0.
If a cooking zone is "hot", "H" and "0" will be alternately displayed.
Switching all cooking zones off
Press the ON/OFF (1) button to immediately switch off all zones at any time. In standby mode, an "H" is displayed in all cooking zones that are "hot". The remaining displays will be switched off.
Setting level
The cooking zone can be set to 9 levels that are indicated by the numbers "1" to "9" on the seven-segment LED displays (6).
Residual heat indicator
This informs the user that the glass is at a dangerous temperature in the event of touching the area located around the cooking zone. The temperature is determined by a mathematical model and any residual heat is indicated by a "H" on the corresponding 7-segment display.
Heating and cooling are calculated based on:
The selected setting level (between "0" and "9")
The ON/OFF time.
After switching off the cooking zone, the corresponding display will indicate "H" until the temperature in the zone has dropped below the critical level (≤ 60^)
Automatic off function (operating time limitation)
In terms of the setting level, if no operation occurs each cooking zone switches off after an established maximum time. Each operation in the cooking zone condition (using the PLUS (3) and MINUS (2) or dual zone) restarts the maximum operating time of the zone by resetting it to its initial value.
Protection against unintended switching on
- If the electronic control detects a button being held down for approx. 10 sec. it will switch off automatically. The control sends out an audible error signal to warn the user that the sensors have detected the presence of an object. The displays indicate error code "E R 0 3 ". If the cooking zone is in "hot" mode, "H" will be indicated alternately on the display with the error signal.
- If no cooking zone is activated within 20 seconds after switching on the touch control, it will return to standby mode.
- When the control is switched on, the ON/OFF button has priority over all other button and, therefore, the control can be switched off at any time, even when several buttons are pressed at the same time or a button is kept held down.
- In standby mode, no effect will be caused by buttons being kept held down. However, before the electronic control can be switched back on, it has to detect that no button is pressed down.
Button lock (child safety feature)
- Child safety feature:
Button lock:
To activate the child safety feature after having switched on the Touch control, press de rear left cooking zone selection button at the same time as the MINUS button (2) for 3 seconds, followed by just the rear left cooking zone selection button. An "L" standing for LOCKED (child safety feature preventing unintended switch on) will be indicated on all displays. If a cooking zone is in "hot" mode, "L" and "H" will be alternately displayed.
This operation must take place within a 10 successive seconds and no button other than those described must be pressed. Otherwise, the sequence will be interrupted and the hob will not be locked.
The electronic control remains locked until it unlocked by the user, even if it has been switched off and back on meanwhile. Not even touch control resetting (after a voltage drop) will interrupt the button lock.
Cancelling the button lock:
After switching the touch control on, the child safety feature can be disabled. Press the rear left cooking zone selection button and the MINUS button (2) for 3 seconds, followed by
just the MINUS button (2). If all operations are carried out in the right order within 10 seconds, the button lock will be cancelled and the touch control switched off. Otherwise, the sequence will be considered incomplete and the touch control will remain locked and will switch off after 20 seconds. Switch the touch control back on using the ON/OFF button and all displays will be indicate "0", the decimal points will flash and the touch control will be ready for cooking. If a cooking zone is in "hot" mode, "0" and "H" will be alternately displayed.
Control of multiple circuits
Hobs without double or triple circuit, see Fig. 2A
Hob with double zone. (Fig. 2B)
When a dual cooking zone is activated, the two circuits are switched on at the same time. Activation of the external circuit is indicated by a pilot light (7) in the bottom right corner of the display. If only the internal circuit is to be switched on, the external circuit can be switched off using the dual circuit button (4). Press the dual circuit button (4) again to re-activate the external circuit and the corresponding pilot light (7) will switch on.
Hob with triple zone. (Fig. 2C) / Hob with double and triple zone. (Fig. 2D)
When a dual / triple cooking zone is activated, the 3 circuits are switched on at the same time. The activation / deactivation of each circuit is done with button 4 and it is indicated with an illuminated segment (8).
Sound signal (buzzer)
The following activities are indicated by a buzzer during use:
- Normal button pressing by a short sound.
- Buttons kept pressed down for more than 10 sec. by a long, intermittent sound.
Maintenance (Fig. 4)
By means of a scraper immediately remove any aluminium foil bits, food spills, grease splashes, sugar marks and other high sugarcontent food from the surface in order to avoid damaging the hob.
Subsequently clean the surface with some towel and appropriate product, rinse with water and dry by means of a clean cloth. Under no circumstance should sponges or abrasive cloths be used; also avoid using aggressive chemical detergents such as oven sprays and spot removers.
Installer's Instructions
Installation
These Instructions are for the qualified technician, as a guide to installation, adjustment and maintenance, according to the laws and standards in force. These operations must always be carried out when the appliance has been disconnected from the electric system.
Positioning (Fig. 5)
1 Front view
2 Front side
The appliance can be fitted into a working area as illustrated on the figure. Apply the seal supplied over the whole perimeter of the working area.
Electrical connection
Prior to carrying out the electrical connection, please ensure that:
the plant characteristics are such as to follow what is indicated on the matrix plate placed at the bottom of the working area;
- that the plant is fitted with an efficient earth connection, following the standards and law provisions in force.
- The earth connection is compulsory in terms of the law.
Should there be no cable and/or plug on the equipment, use suitable absorption material for the working temperature as well, as indicated on the matrix plate. Under no circumstance must the cable reach a temperature above 50^ of the ambient temperature.
CE PRODUIT EST CONC U EXCLUSIVEMENT POUR UN USAGE DOMESTIQUE. LE CONSTRUCTEUR DÉCLINE TOUTERESponsABILITÉ DANS LE CAS DEDOMMAGES ET BLESSURES CAUSESPAR UNE INSTALLATION INCORRECTOU PAR UN USAGE INAPPROPRIÉ,ERRONÉ OU ABSURDE.
VOORZORGSGMAATREGELEN
- BBi6paHHbI yPOBeHb MOIIHOCTn (ot 0 do 9);
BpcMa paObTbl.
IocJIe BbIKJIOUcHnB BApOuHO 3OHbHa HcIIIEe 6yJeT OTo6paKaTbCnMBOJI «H》,Noka pacYeTHaTeMInepaTypa 30HbHe ONyCTHTcI Do 6e3oNaChOrO yPoBHn (≤ 60^) BCOTBeTCTBHH C MaTeMaTHueckoM MoJeJIbIO.
ФункинabTOMaTHueckoro OTKJIIOyeHH (orpaHnueHHe BpeMeHH pa6OtbI)
B 3aBHCIMOCTH OYcTaHOBJIeHHORO yPOBnMoIIOHOCTH KaJDA BApOuHa 3oHa OTKJIIOHaTeCn IIO HCTeueHHN OIIpeJeJIeHHoro BpMeHN, ecJIN B TeueHHe 3aJaHHORO IIpOMeKytKa BpMeHN 3oHa He peRyJIInpoBAJIocb.
KaJIOe H3MeHeHHe COCTOHHN 30HbI pIn IOMOII KHOIOK «JIIOC》(3),«MHHYC》(2) IN KHOIIKN BKIOUeHn IBOHHO 30HbI HaRpeBa IpHBODHT K TOMy, YTO IIpeJIbHoe Bpempa6OTbI HaHHaET OTCHTBtBaTc8 3aHOBO.
3aHTa oT cIyauHOr BkJIOueHH
-ПиДЛNTeJIbHOM HaKaTHN Ha KHOIIKy (JOJIbIe 10 c)HarpeB 6yIeT aBTOMaTHueCKN OTKJIIOyeH.EcJIN Ha ceHCOPHOH KHOIIKe HaxOHTcKaKOH-JIN6o IIpeIMet, ycTpoIcTBO H3dAcT 3ByKOBo CnIHaJI OIN6KN.Прн 3OTOM Ha INCIIIEE OTO6pa3HTc KaO IN6Kn «ER03». EcJIN 3OHa TOpYaH, Ha INCIIIEe 6byT INONEpeMeHHO OTO6paKaTbc KaO INH6KN H CMBOJI «H»
BcIyuee cIIN B TeueHne 20 cKyuHIOscIE BKIOUeHHN ceHCOPHO yIpaBJIeHHN He 6yIeT aKTHBnPOBaHa Hn OJHa H3 BapOuHbIX 3OH, IIHTa aBTOMaTHUeCKN IpeKJIIOHTcB PcKHM OKJaHHN.
-При BKJIIOUcHHom cCHCOPHOM yIpaJIICHH KHOIIKA BKJIIOUcHn HAeCT IIpHOpHTET HaI BCEMH OCTaJIbHbIMN KHOIIKAMN. 3TO IIO3BOJIACT BBIKJOUYtB IIINTy B JIO6OIMOMeHT,ДЯKEВСЛУЧAC OДНOBPcMCHHOrO HIN JIINTCJIbHOHaKaTHRAHCKOJIbKHX KHOIIOK.
BpcKHMcOKNHAAHHIINHJINTCJBHOMHaKaTHN KHOIOK HIIPOHCXODHT HHKAKHX H3MeHCHN. BJIHO6OM cIyHAc IITTOI TOObl CHOBA BKIOHTb 3JIckTPOHHOC yipabJIeHNC, y6eIHTccb, YTO6bl Hn OJa Ka HC 6bIJA HAKATA.
BIOKHPOBKa KHOHOK (3aHTa oT JeTei)
-ФункиязaintbIOTJeTei:
Блорвка Кногк
Дя BKJIOueHЯ ΦyHKIJIa 6e3OIIacHOCTn DeTei, IocJIe BkJIIOueHЯ ceHCOPHO yIpaBJIeHЯ,HaKMHTe KHOIIky Bb6opa JIeBOI 3aIHeI 3OHbI IIpHIOTOBJIeHЯ OINHOpeMeHHo c KHOIIKOJ MINUS (MHNyc) (2)В TeueHHe 3ceKHyI cpa3y Jke IocJIe KHOIIKN Bb6opa JIeBOI 3aIHeI 3OHbI IIpHIOTOBJIeHЯ. Ha BCex IINcIIIEx OTO6pa3HTcI cHMBoI «L», o6O3HaiaIOIH N 6JIOKHPOBKY (6JIOKHPOBKaOT CJyauHOrO BkJIIOueHЯ). EcIn KaKaJa-ⅡIbO 30Ha ropJuaI, 6yUyt IOnepMeHHO OTO6paKaTbc cHMBOJIb «L» n «H».
BpeM OINHOpeMeHHORo HaxaTHRe He JIOJHKHO
IpeBBHATb 10 cekyH. Pn EToM HeJIb3a HaKHMATb
HNkHX KHOIOK, KpOme OINcAHHBIX BBIIe. B
IpoTHBHom Cnyae IocJIeIOBaTeJBHoCTb DeIcTBNI
6yET IpeBaHa H IIHTa He 3a6IOKHyetc.
3JIeKtpoHHoe yIpaBJIeHHe 6yIeT 3a6IOKpOBAHO JaKe IIpn BBIKJIOUeHH HIOcJIeDyIOIIeM BKJIOUeHH
IO MOMcHTa CHrTHN 6JIOKHPOBKN IIOJIb3OBaTeJIcM. IOBTOpHOC BKJIHOChHn IIINTbI (IOcJIe OTKJIHOChHn IINTaHH) He cHmaeT 6JIOKHPOBKN yIpabJIeHHN.
CHTHE 6JOKUPOBKNKHOHOK ynpabJeHH
IocJIe BKIOUOHeHnCeHCOPHO yIpabJIeHnIyHKnH 3aHTbIOTDeTeIMoKet6bIT DeaKTINBHpOBaHa. IJr OTOrO Heo6xOINMO OINHOpeMeHHo HauKaTb H ydepKHBaTb B TeueHHe 3 cekyHKnpaHHIOJeByIO KHOIIky BB6opabaPouHoi 30hHi KNOHKy MHHVC(2), a 3aTeM eHPe pa3 HaKaTb KHOIIky MHHVC(2). EcII BCE OTN ONepaunn BblIOJIHeHb B yka3AHHom IopAKe B TeueHHe 10 cekyH, 6IOKNPOBkA KHOIOK 6yET CHrTa, N ceHCOPHoe ynpabJIeHne 6yET BbIKIOUeHO. B IpOTNBHom CInyae IpoUeCC ChrTHN 6IOKNPOBKn 6yEt IpepBaH Ka He3aBePHEHHbI, 6IOKNPOBkA OCTaHETcA kTINBHOn, N ceHCOPHoe ynpabJIeHne OTKIIIOHTcA Hepe3 20 cekyH. IIpn IocJIeDyIOUeM BKIOUeHHn CeHCOPHO ynpabJIeHn IIpn IIOMOUHN KHOIIKN BKLIOUeHHn Ha BceX IIncIIeX OTO6pa3NTc3 HAueHne 0 , DecrTHNbIE TOKn HaHyT MHRaTb, a IIInTa 6yEt rOTOBa IIra HCIOJB3OBaHHN. EcJIN KAKaJ-JIN6O 30Ha rOpua, Ha IIncIIiEe 6yIyt IOIpcMeHHO OTO6paKaTbc3 HAueHHN 0 n H
YIIpaBJIeHHe HeCKOJIbKHMN KOHTypaMH
KoHΦopKN 6e3 IBOHOrO HJIN TpoHOrO KOHTypa, CM. pnc.2A
KoHΦopKa c IBOHoi 30HOi. (Pnc.2B)
AKTHBaIIHaIBOHOBAPOuHOI 3OHbI
O3Haayet, YTO IBA HArpeBaTeJIbHbIX CeIMHTa
6yDyT BkJIIOUeHbI OJIOHBpeMeHHo. BKJIIOUeHHe
BHeIIHeRo HArpeBaTeJIbHbO CcEMHeTa
OTOpaKaAcTc CBtOBbIM HINdIKaTOPOM
(7) BHNKHeM IIpaOB yIpy IINcIIJIeE. Ecln
HCO6XoIHMO BkJIIOUHTb TOJIbKO BHyTPcHHN
HArpeBaTeJIbHbI CcIMCT, BHCIIHH N CcIMeHT
MOJKHO BbIKJIIOHTb, HaxKaB KHOIIKY IBOHoi
3OHbI HaIPCBA (4). IOBtOPHOC HAXKaTHC KHOIIKN
IBOHoi 3OHbI HaIPCBA (4) cHOBA aKTHBHPcyET
BHCIIHH HaPCBaTeJIbHbI CcIMCT, IIpn 3TOM
KoHΦopKa c TPOHoi 3OHOi. (Pnc.2C)/KoHΦopKa c
IBOHoi N TPOHoi 3OHOi. (Pnc.2D)
IIpn aKTHBaIIHH IBOHoi/ TPOHoi 3OHbI
IIpHIOTOBJIeHHa 3 KOHTypa BKJIIOUaIOTcR
ODHOBpeMeHHo. BKJIIOUeHHe/OTKJIIOUeHHe
KaKJOrO KOHTypa OcyIeCTBJIaeTcR KHOIIKO 4 N
IIOITBePKJaTeC TIOcBceHHbIM CeImHTOM (8).
3BykoBoi cHrHaJ (3yMMep)
Pn HcIOJIb30BaHHI JIHTbI 3BYKOBbIE CHTHaJIb pa3JaIOTCB BCJeIyIOUHX CJIyuaX: KpaTKOBpeMeHHoe HaKaTHe KHOIOK - KopoTKn cHrHaJ;
JIITeJIbHoe HaKaTHe KHOIIKN (6oJIee 10 ceKyH) - IINHHbI IIpepbIBNCTbI cHTHaJI.
YxoD(Pnc.4)
Ipn IIOIaHaHH Ha KOHΦopKn ocTaTKa aIIOMHHeBOH OJIbH, oCTaTKOB IIuH, KHPbIX IITeH HIN 6pb3r Knpa, caxapa HIn OueHb caxapnctbIX
IPOJyKTOB, CJIcIyEcT HX HeMcIICHHO yJaJIHTb C BapOuHOH IOBcpxHOCTHI
IOcpeIcTBOM cIeIHaJIbHOrO CKpe6Ka BO H36eKaHHe
IapaIIaHnBaPoyHOH IOBepxHocTH. IocJIe 3ToT O
IpOMbITb IOBepxHocTB cIeIHaJIbHbIM IPOJyKTOM C HCIOJIb3OBAHNEM
6ymaxHOrO IIOJIoTeHua, 3aTeM cIOJIOChHyTB BOIoH N BbCyIHtB YHCToH TpIIOUkOH. KaterOpHueCKN
3aIpeIIaETcR hCIOJIb3OBAbTa abpa3HBhIE rY6Kn HIN IIeTKH, a TaKKe
3aIpeIIaETcR IIOJIb3OBAtbcra arpeccHBHbIMN XHMNUeCKHMn YHCTraIIMn CpEICTBaMH HIN IITHOBBIOBDHTeJIaMH.
HctpyKHHI MoHTaKHHka
Mohrak
HactoIHe HhctpyKuHH PpeHa3HaYeHbI IJIa HCIOJIb3OBAHn
B IIepHOJ MOHTaKa H IJIa MOHTaKHnKa, 3TO
pYKOBOCTBO IJIa
MOHTaKa, peryINHpOBKn H yXoJa 3a IJIHTOIB COOTBeTCTBHe C
cyIeCTByIOUHMn HopMaTHBaMn. He 3a6bIbAaTe O TOM, YTO
HC06XODMO OTKJIIOHTb IJIHTy IJIa BBIIIOJIHCHNk KaKHX-JIbO
OIIcpaun.
YcTaHOBka (Pnc.5)
1BnCnepeH
2IpcdHyaactb
JaHHb anInapa IpcHa3HaueH JIA yCTaHOBKn B COOTBcTCTByIOuIe 3OHe TaK, KaK 3TO yKa3aHO Ha PnCyHKc. OChb BaJHo IOIITGOTOBHTb JIA yCTaHOBKn BECb IIcPnMctp IOBepxHOCTN C HIOJIb3OBAHHem BOIOHCIIPOHHuaCMO IIIEHKN, BXOJIHcB KOMUICKT IOCTaBKn.
3Jektpnueckne noKIOeHHN
IpeEIIIOIKJIIOHcHHeM K cETN IHTaHHy, y6eINTecb B TOM, YTO:
-XapaKTepHCTKN yCTaHOBKn COBIIaIaOT c
XapaKTepHCTNKAMN, IIpHBeDEHHbIMN Ha yCTaHOBOUHOI
IIaCTINHe, HaxOJIaIeICsHa IHe IIaHEJIN IJIa BApKN;
- YcTaHOBKn IIpeDyCMOTpeHO IOCTaTOHOMOIIHoe 3a3EmJIeHHe, B COOTBeTCTBHN C HopMaTHBaMNI Tpe6OBAHnM NdeCTByIOIeRO 3aKOHOJaTeJIbCTBa.3a3EMJIeHHe IIpeDyCMOTpeHO B yCTaHOBJeHHbIX HopMaTHBaX.
B TOM cIyuae, ecII nIaI IapapaTHe IIpeDyCMOTpeH IIIHyp H - IIIN pO3eTKa BKJIIOueHHN, Heo6XoJIMHOHCIOJB3OBaTB MaTePnaI, IIpHIoIbHbI IJIa 3HaueHHN 3JIeKtpnueCKORTOka, IIpHBeDEHHbIX Ha ycTaHOBOUHOI IIJaCTHHe C xapaKTepHCtHKamH, H IIaIaHHoPa6OueH TeMIIepaTypbl.
3aIIpeIaTcHcIOJIb3OBaTb IIHyp B cIyuae erO IpeIepBaHHn IIpyBbIIeHHN 50^ TeMIIepaTypbI OKpyKaIOIIeI cpeIbI.


CATA ELECTRODOMÉSTICOS, S.L.
C.Ter, 2 - 08570 TORELLO (Barcelona) SPAIN
Tel. +34 938 594 100 - Fax +34 938 594 101
www.cnagroup.es - e-mail: cna@cnagroup.es


- THIS APPLIANCE IS DESIGNED FOR DOMESTIC USE ONLY. THE MANUFACTURER SHALL NOT IN ANY WAY BE HELD RESPONSIBLE FOR WHATEVER INJURIES OR DAMAGES ARE CAUSED BY INCORRECT INSTALLATION OR BY UNSUITABLE, WRONG OR ABSURD USE.
- PRECAUTIONS
- User's Instructions
- Installation
- Use
- TOUCH CONTROL (Fig. 2)
- Switching the Touch Control on/off
- Automatic off
- Switching a cooking zone on/off
- Switching a cooking zone off
- Switching all cooking zones off
- Setting level
- Residual heat indicator
- Automatic off function (operating time limitation)
- Protection against unintended switching on
- Button lock (child safety feature)
- - Child safety feature:
- Button lock:
- Cancelling the button lock:
- Control of multiple circuits
- Sound signal (buzzer)
- Maintenance (Fig. 4)
- Installer's Instructions
- Positioning (Fig. 5)
- Electrical connection
- CE PRODUIT EST CONC U EXCLUSIVEMENT POUR UN USAGE DOMESTIQUE. LE CONSTRUCTEUR DÉCLINE TOUTERESponsABILITÉ DANS LE CAS DEDOMMAGES ET BLESSURES CAUSESPAR UNE INSTALLATION INCORRECTOU PAR UN USAGE INAPPROPRIÉ,ERRONÉ OU ABSURDE.
- VOORZORGSGMAATREGELEN
- ФункинabTOMaTHueckoro OTKJIIOyeHH (orpaHnueHHe BpeMeHH pa6OtbI)
- 3aHTa oT cIyauHOr BkJIOueHH
- BIOKHPOBKa KHOHOK (3aHTa oT JeTei)
- -ФункиязaintbIOTJeTei:
- Блорвка Кногк
- CHTHE 6JOKUPOBKNKHOHOK ynpabJeHH
- YIIpaBJIeHHe HeCKOJIbKHMN KOHTypaMH
- 3BykoBoi cHrHaJ (3yMMep)
- YxoD(Pnc.4)
- HctpyKHHI MoHTaKHHka
- Mohrak
- YcTaHOBka (Pnc.5)
- 3Jektpnueckne noKIOeHHN
Brand : NODOR
Model : V 4060 BK
Category : Cooker