2926 - Bike trailer Prophete - Free user manual and instructions
Find the device manual for free 2926 Prophete in PDF.
| Technical Features | Prophete 2926 bike trailer, maximum load capacity of 40 kg, compact dimensions for easy transport. |
|---|---|
| Usage | Ideal for transporting children or goods, compatible with most bikes thanks to its standard hitch. |
| Maintenance and Repair | Regularly check wheels and brakes, lubricate moving parts, and ensure the hitch is securely fastened. |
| Safety | Equipped with reflectors for better visibility, it is recommended to wear a reflective vest when using it. |
| General Information | Trailer weight: approximately 15 kg, 2-year warranty, available in several colors. |
Frequently Asked Questions - 2926 Prophete
User questions about 2926 Prophete
0 question about this device. Answer the ones you know or ask your own.
Ask a new question about this device
Download the instructions for your Bike trailer in PDF format for free! Find your manual 2926 - Prophete and take your electronic device back in hand. On this page are published all the documents necessary for the use of your device. 2926 by Prophete.
USER MANUAL 2926 Prophete
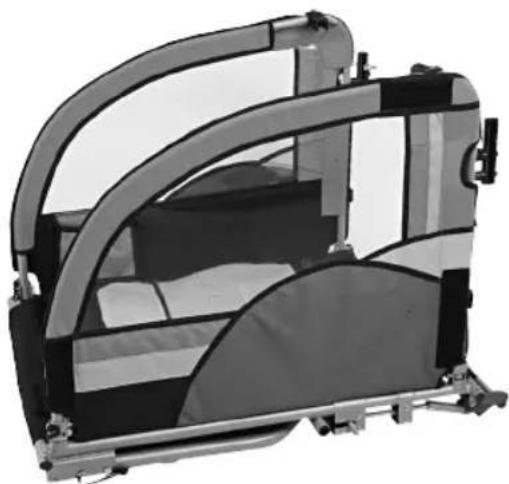
Your new child trailer is characterised by outstanding quality, operating compatibility, a high safety standard and great variability.
The 2 in 1-system enables you to go for walks with your children, to take them jogging or cycling without buying an entire fleet.
PERFORMANCE FEATURES
Admissible total weight 34kg
Max. age of the children 4 years
Min. age of the children 18 months
Max. seat height approx. 50~cm
Maximum speed 16 km/h
Tyre pressure 1.7 - 2.0 bar
PURPOSE
Intended use
The vehicle is intended for transporting children within the above specifications in the private area and during the day on public streets and paved paths.
Additional transport of luggage is possible in the intended luggage compartments if the children are not endangered by this.
If the vehicle is to be used as a bicycle trailer in bad visual conditions, at twilight or in darkness, switch on the light-technical equipment.
Non-intended use
Any use exceeding this is deemed non-intended.
Non-intended use is mainly transport of persons together with animals, use of the trailer on unpaved paths, commercial use, overload, too high speed and improper removal of defects.
The user shall bear the risk for damage from non-intended use and shall not assume any liability.
ASSEMBLY & OPERATING INSTRUCTIONS AND SAFETY NOTES
- Instruction and notes 62
- Spare parts list 68
Assembly of the side parts and the frame 70
Assembly of the connection rod and the seat cover. 70
Assembly of the wheels 71 - Removal of the wheels 71
Use notes for the seat belts 72
Installation of the cover 72
Installation of the lighting 73
Installation of the safety flag 73
Installation of the connection between the trailer and the bike at the axle 74
Assembly of jogger wheel 75
Assembly of pushing bracket. 75 - Attach the parking brake 76

Please read the operating instructions attentively and observe the notes listed. This warrants reliable operating and a long service life of the trailer. Keep the packaging and operating instructions safely so that you can pass them on to the new owner if you sell the trailer.
- Quick and simple assembly, handling and space-saving storage
- Stable pipe frame with roll bar, side protection and cover with fly mesh
Cover with window that can be rolled open
Space for 1 or 2 children - Sitting direction in riding direction
- Five-point safety belts
Quick-release wheels
TUV/GS-tested
BEST CARE
All parts are to be cleaned with a moist rag and then dried.
All textiles should be cleaned with a fine detergent and cold water.
- Screws, rivets and nuts should be regularly inspected for tight fit and damaged parts should be replaced.
ALWAYS OBSERVE THE INSTRUCTIONS AND SAFETY NOTES!
Children always have to wear a helmet.
- Always buckle up children during the ride.
The child bicycle trailer is approved for no more than 2 children. - Ensure that the children do not reach into the spokes, do not lean out and cannot touch the street with their legs.
- Scarves and similar objects hanging out may be caught in the spokes and become a fatal trap. Do not use any scarves in the trailer.
- Do not leave children in the trailer unsupervised.
- Ensure sufficient ventilation at high temperatures.
- Observe the generally valid rules of the national road traffic regulations. Always act carefully in traffic to avoid danger.
- The minimum age of the driving person is be 16 years. The person should be in good physical condition.
- Only bikes for which the manufacturer expressly permits this in the operating instructions must be used as a tractor unit. If in doubt, see your bicycle dealer for consultation.
- Since the running properties change with a trailer, it is recommended to adjust to this by taking test rides without children.
Put weights in the trailer (max. payload) to familiarise yourself with the changed running conduct of the train in a safe area.
Particularly practice going around bends, riding on drops and rises, braking in case of danger and starting a ride with the train on different surfaces.
Observe the following items as well:
I) The bake path of the vehicle extends.
The specialist dealer should check the deceleration of the train to ensure compliance with the following values.
Deceleration of the train (with full deceleration) with a total mass of 140kg .
Front-wheel braking: a 3.4m / s 2 (dry) a 2.2m / s^2 (wet).
Rear wheel brake: a 2.2m / s (dry) a 1.4m / s^2 (wet).
II) Observe balanced weight distribution.
To ensure the safety of the children, as well as the product's longevity, perform the following inspections at regular intervals:
I) Visual inspection
II) Function inspection
- No children must be in the trailer when converting the vehicle from a bicycle trailer to jogging mode or vice versa, as well as during maintenance and repair work.
- Make no changes to the child trailer and the coupling. No liability can be assumed for third-party accessories.
- No additional loads must be attached to the child trailer or the tow bar.
- If possible, attach a rearview mirror to the towing bike.
- Do not use the trailer on rocky or otherwise dangerous roads. Do not park the trailer near trenches or dangerous roads.
- The cover must be closed at all times during a ride to protect the children from injury by road dirt and small stones.
- The light always must be switched on in twilight.
- Check whether the batteries still have enough energy before each drive with your child trailer.
- The packaging must be kept away from children. There is a danger of suffocation.
- Observe the operating instructions of the tyre patching kit in case of tyre damage.
To facilitate routine with daily handling of the trailer, observe the following check list before each start:
- Are the children buckled up?
- Is the total weight no more than 34kg ?
- Do the children with helmets not exceed the limit line on the seat cover?
- Is the trailer coupling firmly engaged?
- Do the children not touch the tyres?
- Is the light system fully functional? (rechargeable batteries charged?)
- Are the wheels firmly latched?
- Is there enough air in the tyres?
- Is the weight distributed evenly?
- Are no more than 2 children in the trailer?
- Are all parts of the trailer firmly connected?
If you have any questions about this product, contact our service centre:
Or contact the closest bicycle dealer.
SPARE PARTS LIST
| No. | Designation Number | ||
| 1 | Base frame with side parts and seat | 1 | |
| 2 | Connection rod | 1 | |
| 3 | Plastic angle for connection rod | 1 | |
| 4 | Wheel | 2 | |
| 5 | Wheel protection | 2 | |
| 6 | Tow bar | 1 | |
| 7 | Trailer coupling | 1 | |
| 8 | Cover | 1 | |
| 9 | Front reflector (white) | 2 | |
| 10 | Rear reflector (red) | 2 | |
| 11 | Spoke reflector (yellow) | 4 | |
| No. Designation Number | |||
| 12 | Battery headlight | 1 | |
| 13 | Battery rear light | 1 | |
| 14 | Safety flag | 1 | |
| 15 | Safety pin (small) | 8 | |
| 16 | Safety pin (large) | 1 | |
| 17 | Jogger wheel with axle | 1 | |
| 18 | Wheel boom | 1 | |
| 19 | Attachment screw | 1 | |
| 20 | Pushing bracket | 1 | |
| 21 | Holder | 2 | |


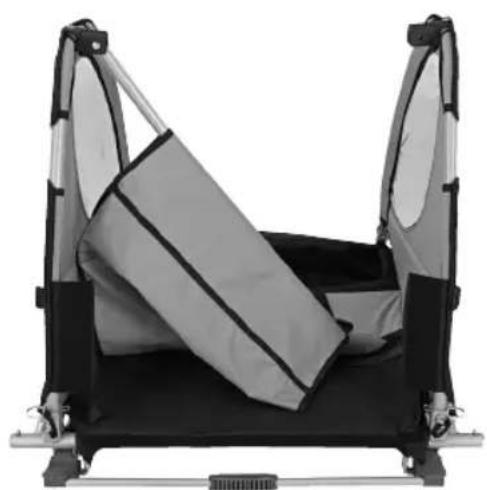
ASSEMBLY OF THE SIDE PARTS AND THE FRAME
- Fold open the side covers and push the safety pins into the holders at the bottom of the side parts. Close them.
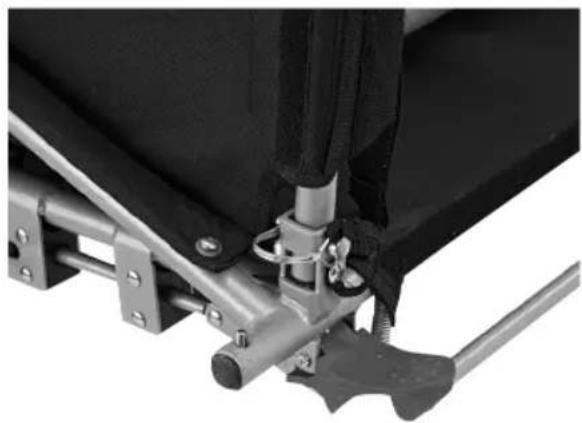
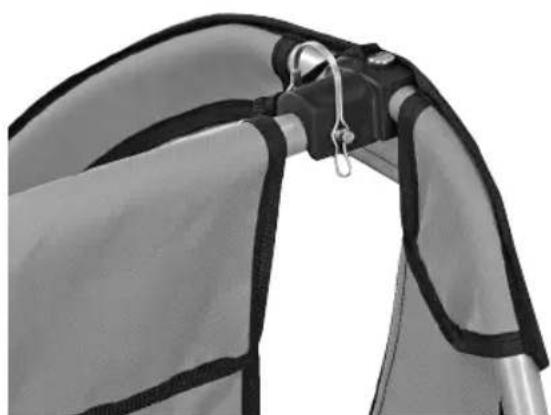
ASSEMBLY OF THE CONNECTION ROD AND THE SEAT COVER
- Pull the connection rod through the loop of the backrest.
- Secure the connection rod with the safety pin as shown in the figure.


ASSEMBLY OF THE WHEELS
- Insert the wheels into the axles and latch them. Push the wheel latch for this. Insert the wheel protection into the holder by pushing the spring buttons and latch it.
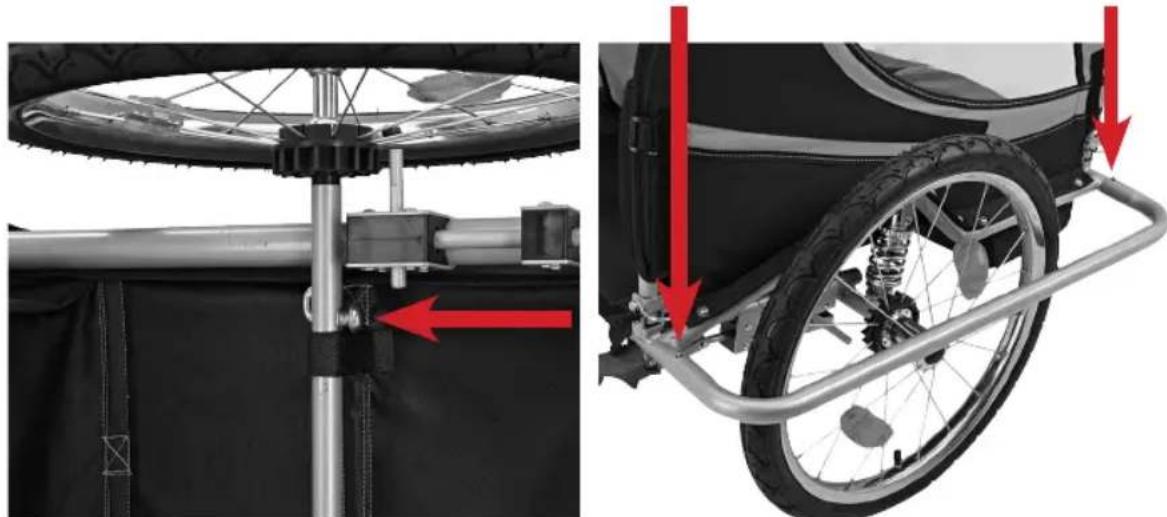
REMOVAL OF THE WHEELS
- Pull the wheel protection from the holders by pushing the spring buttons.
- Pull the wheels from the axle by loosening the wheel latch.
- Check the tyre pressure before every run.

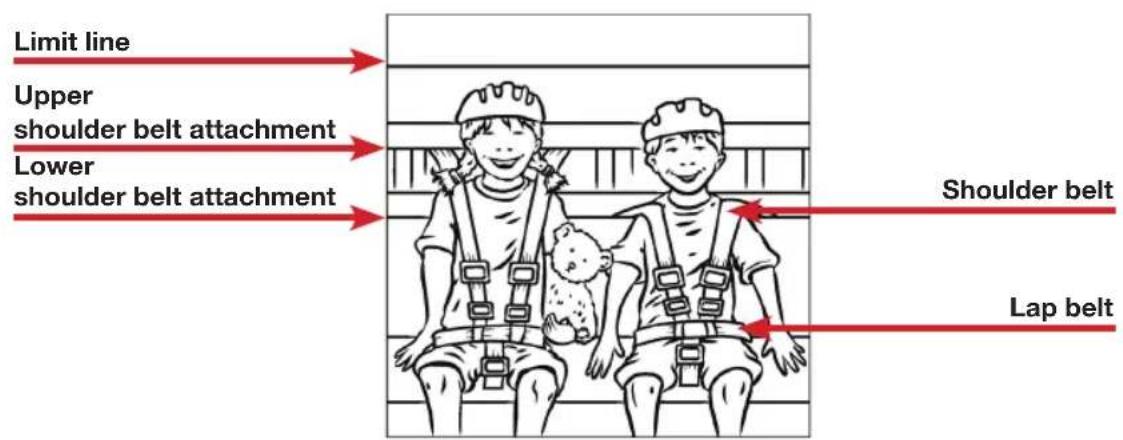
USE NOTES FOR THE SEAT BELTS
When using with 1 child:
- Connect the two upper middle belts to the lower middle belt.
- Pull one end of the lap belt through the loop of the lower belt and close it.
- Then tighten the belts.
When using with 2 children:
- Connect the two outer upper belts to the lower belts.
- Pull one end of the lap belt through the loops of the lower belt and close it.
- Then tighten the belts.
The children with helmets must not exceed the limit line.
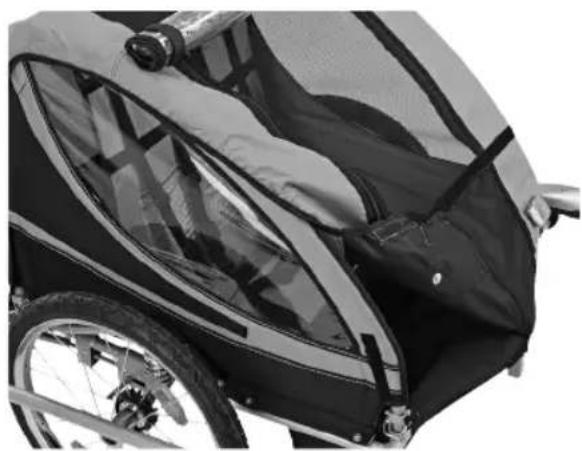
INSTALLATION OF THE COVER
- Put on the cover and attach it safely with hook-and-loop tape at the attachment points.
- Never use the trailer with the cover open.


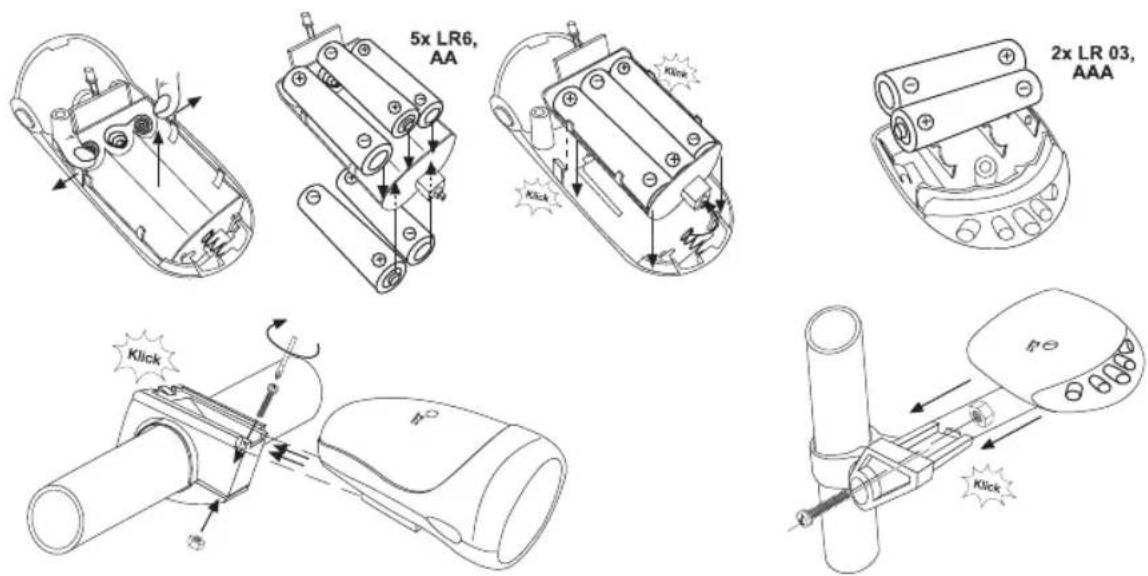
INSTALLATION OF THE LIGHTING
The cover has 2 white reflectors in front and 2 red ones at the rear.
The wheel spokes have 2 yellow reflectors each.
- Attach the battery headlight and the battery rear light to the left wheel protection (observe installation instructions).
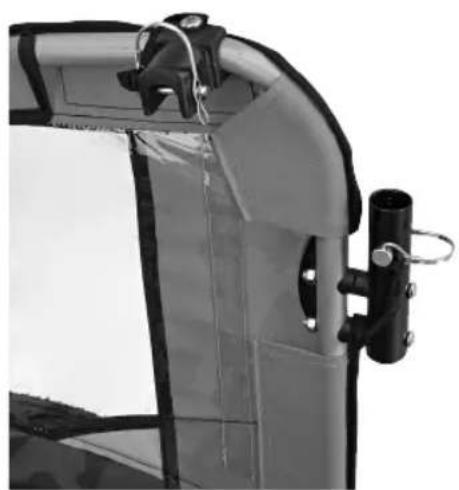
INSTALLATION OF THE SAFETY FLAG
- Connect the safety flag to the extension rod and insert it into the flag pocket through the eyelet at the cover.

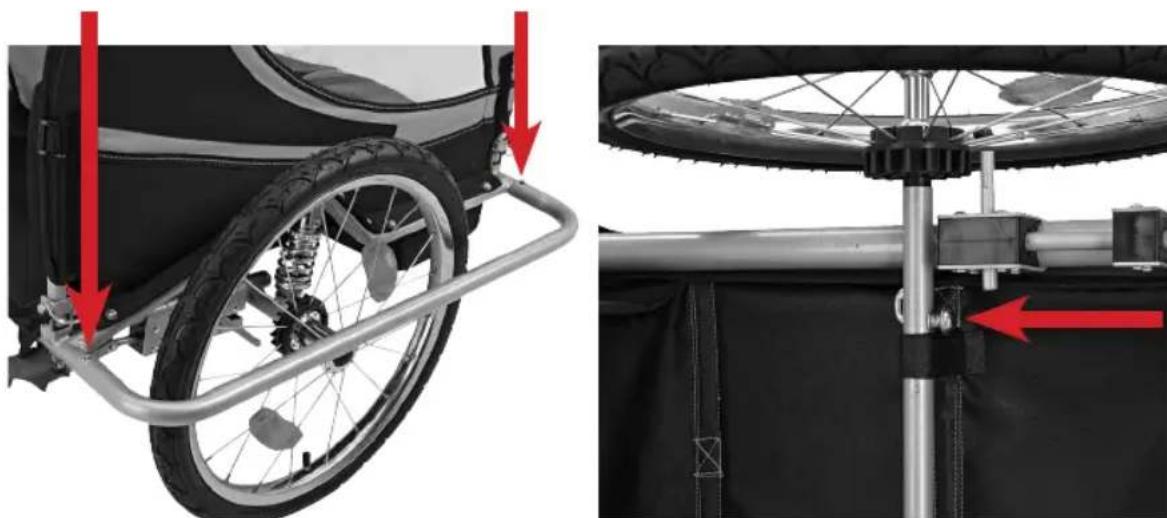
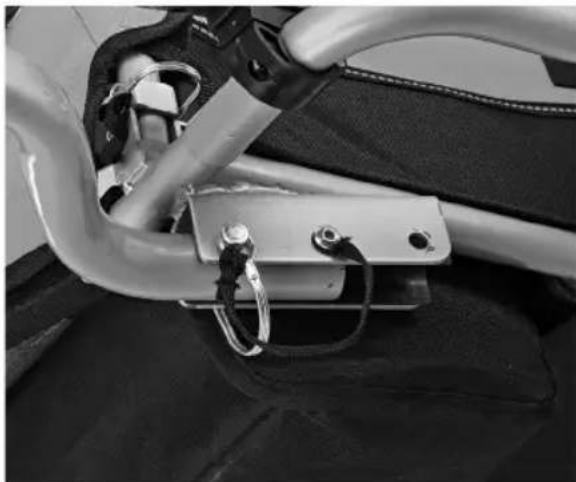
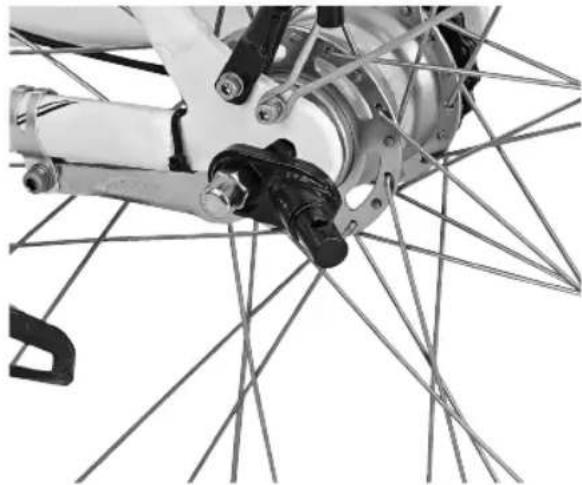
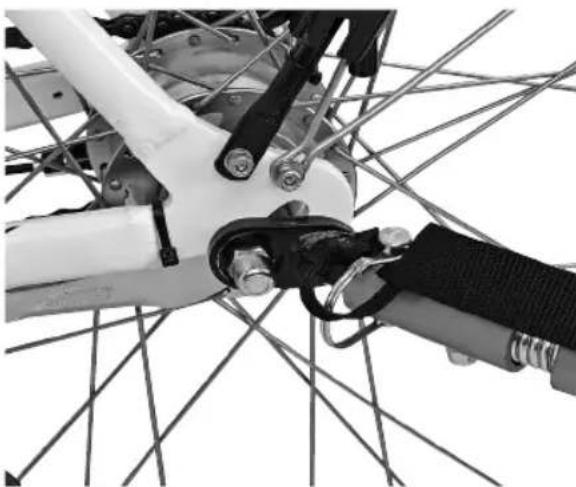
INSTALLATION OF THE CONNECTION BETWEEN THE TRAILER AND THE BIKE AT THE AXLE
- Screw the towbar to the middle hole of the towbar holder with its rear hole. Put the towbar in the movement position and insert and attach the safety pin through the front holes.
- Unlock the front coupling part by pulling out the safety pin and attach it to the left side of the rear wheel axle. Before starting your ride, connect the coupling part of the tow bar to that of the bike and secure it with the safety pin. Guide the safety belt around the strut of the rear wheel and attach it to the safety eyelet of the towbar.


ASSEMBLY OF JOGGER WHEEL
- Insert the jogger wheel into the wheel holder and tighten it with the quick clamp. Push the wheel boom into the holder at the frame and tighten it with the attachment screw.

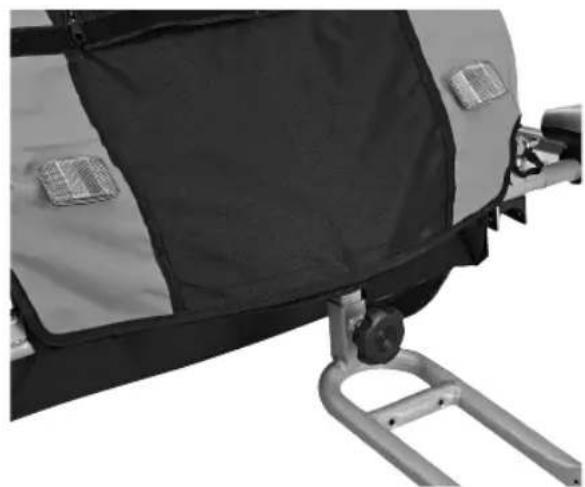
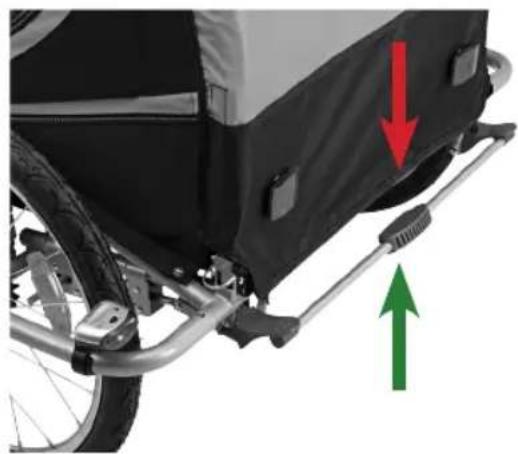
ASSEMBLY OF PUSHING BRACKET
- Push the pushing bracket into the holder at the frame and secure it with the safety pins.

- To fasten the wheels, push the bracket down. To loosen them, pull it up again.
Disposal of packaging:
Dispos of the packaging of the child trailer according to the current provisions. For information on this, contact the municipal collection point.
MONTAZ CZESCI BOCZNYCH I RAMY
Presiunea in pneuri 1,7-2,0 bar