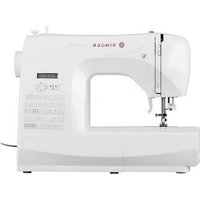
S1478 - Sewing machine SINGER - Free user manual and instructions
Find the device manual for free S1478 SINGER in PDF.
| Technical Features | Mechanical sewing machine with 97 stitch patterns, including utility, decorative, and overlock stitches. |
|---|---|
| Bobbin Type | Horizontal bobbin for easy threading and better thread tension control. |
| Automatic Threading | Automatic needle threading for time saving and ease of use. |
| Stitch Width and Length | Adjustable stitch width up to 5 mm and adjustable stitch length up to 4 mm. |
| Included Accessories | Standard presser foot, buttonhole foot, zipper foot, and several needles. |
| Usage | Ideal for beginner and intermediate sewists, suitable for various fabric types. |
| Maintenance | Regular cleaning of the machine and lubrication of moving parts recommended for optimal operation. |
| Safety | Equipped with a needle guard to prevent injuries and automatic shut-off in case of overheating. |
| General Information | Lightweight for easy portability, 2-year warranty, and technical support available. |
Frequently Asked Questions - S1478 SINGER
Questions des utilisateurs sur S1478 SINGER
0 question sur cet appareil. Repondez a celles que vous connaissez ou posez la votre.
Poser une nouvelle question sur cet appareil
Download the instructions for your Sewing machine in PDF format for free! Find your manual S1478 - SINGER and take your electronic device back in hand. On this page are published all the documents necessary for the use of your device. S1478 by SINGER.
USER MANUAL S1478 SINGER
Instruction Manual GB IEThis household sewing machine is designed to comply with IEC/EN 60335-2-28 and UL1594.
IMPORTANT SAFETY INSTRUCTIONS
When using an electrical appliance, basic safety precautions should always be followed, including the following: Read all instructions before using this household sewing machine. Keep the instructions at a suitable place close to the machine. Make sure to hand them over if the machine is given to a third party. DANGER –TO REDUCE THE RISK OF ELECTRIC SHOCK:
- A sewing machine should never be left unattended when plugged in. Always unplug this sewing machine from the electric outlet immediately after using and before cleaning, removing covers, lubricating or when making any other user servicing adjustments mentioned in the instruction manual. WARNING –TO REDUCE THE RISK OF BURNS, FIRE, ELECTRIC SHOCK, OR INJURY TO PERSON:
- Do not allow to be used as a toy. Close attention is necessary when this sewing machine is used by or near children.
- Use this sewing machine only for its intended use as described in this manual. Use only attachments recommended by the manufacturer as contained in this manual.
- Never operate this sewing machine if it has a damaged cord or plug, if it is not working properly, if it has been dropped or damaged, or dropped into water. Return the sewing machine to the nearest authorized dealer or service center for examination, repair, electrical or mechanical adjustment.
- Never operate the sewing machine with any air openings blocked. Keep ventilation openings of the sewing machine and foot control free from the accumulation of lint, dust, and loose cloth.
- Keep fingers away from all moving parts. Special care is required around the sewing machine needle.
- Always use the proper needle plate. The wrong plate can cause the needle to break.
- Do not use bent needles.
- Do not pull or push fabric while stitching. It may deflect the needle causing it to break.
- Wear safety glasses.
- Switch the sewing machine off (“0”) when making any adjustment in the needle area, such as threading needle, changing needle, threading bobbin, or changing presser foot, etc.
- Never drop or insert any object into any opening.
- Do not use outdoors.
- Do not operate where aerosol (spray) products are being used or where oxygen is being administrated.
- To disconnect, turn all controls to the off (“0”) position, then remove plug from outlet.
- Do not unplug by pulling on cord. To unplug, grasp the plug, not the cord.
- The foot control is used to operate the machine. Avoid placing other objects on the foot control.
- Do not use the machine if it is wet.
- If the LED lamp is damaged or broken, it must be replaced by the manufacturer or its service agent or a similarly qualified person, in order to avoid a hazard.• If the cord connected with the foot control is damaged, it must be replaced by the manufacturer or its service agent or a similarly qualified person, in order to avoid a hazard.
- This sewing machine is provided with double insulation. Use only identical replacement parts. See instructions for Servicing of Double-Insulated Appliances.
SAVE THESE INSTRUCTIONS
FOR EUROPE ONLY: This appliance can be used by children aged from 8 years and above and persons with reduced physical, sensory or mental capabilities or lack of experience and knowledge if they have been given supervision or instruction concerning use of the appliance in a safe way and understand the hazards involved. Children shall not play with the appliance. Cleaning and user maintenance shall not be made by children without supervision. The noise level under normal operating conditions is less than 78 db. The machine must only be used with foot control of type 4C-316B (110-125V), 4C-326G (230V), 4C- 336G (240V) manufactured by Wakaho Electric Ind. Co. Ltd. (Vietnam). FOR OUTSIDE EUROPE: This sewing machine is not intended for use by persons (including children) with reduced physical, sensory or mental capabilities, or lack of experience and knowledge, unless they have been given supervision or instruction concerning use of the sewing machine by a person responsible for their safety. Children should be supervised to ensure that they do not play with the sewing machine. The noise level under normal operating conditions is less than 78 db. The machine must only be used with foot control of type 4C-316B (110-125V), 4C-326G (230V), 4C- 336G (240V) manufactured by Wakaho Electric Ind. Co. Ltd. (Vietnam).
SERVICING OF DOUBLE INSULATED PRODUCTS
In a double-insulated product, two systems of insulation are provided instead of grounding. No ground means is provided on a double-insulated product, nor should a means for grounding be added to the product. Servicing of a double-insulated product requires extreme care and knowledge of the system and should be done only by qualified service personnel. Replacement parts for a double-insulated product must be identical to those parts in the product. A double-insulated product is marked with the words ‘DOUBLE INSULATION’ or ‘DOUBLE INSULATED’.TABLE OF CONTENTS
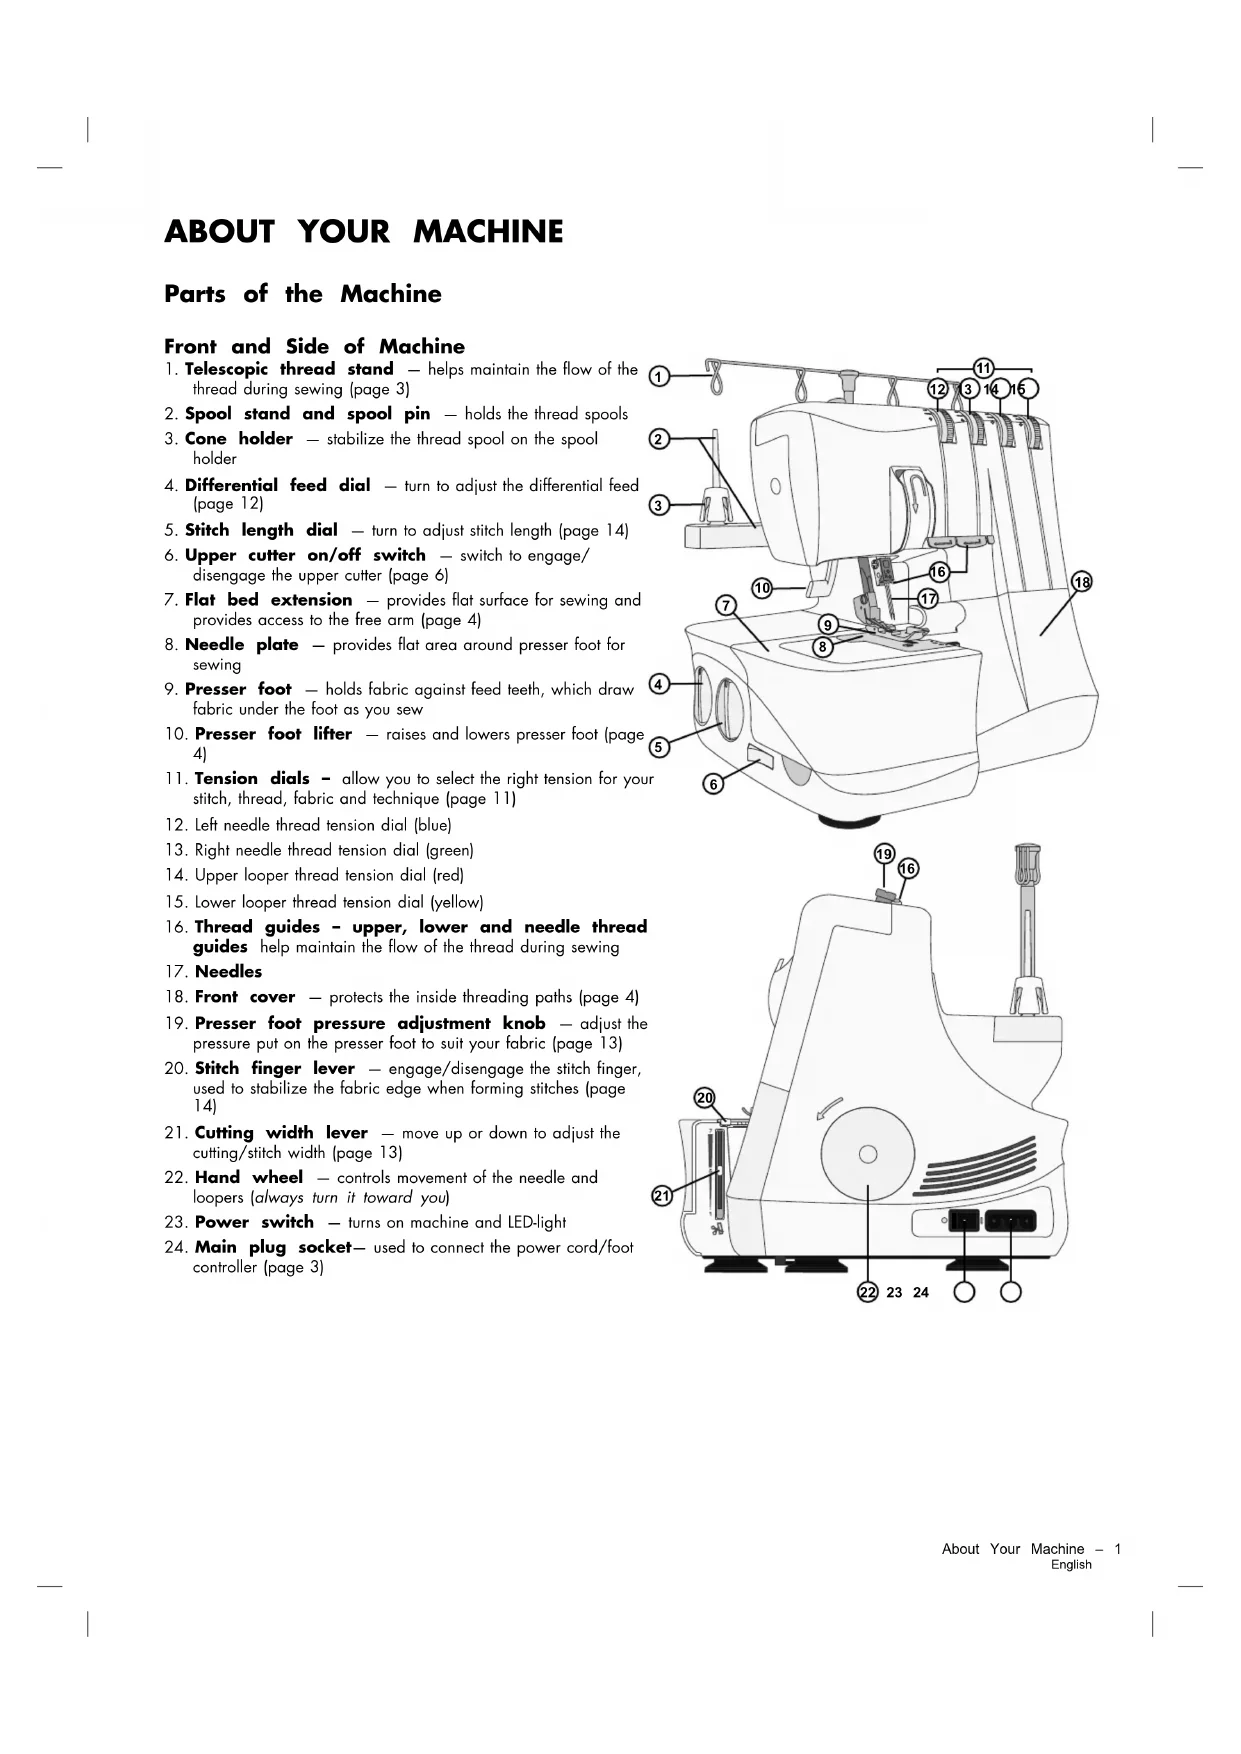
1. Telescopic thread stand — helps maintain the flow of the
thread during sewing (page 3)
2. Spool stand and spool pin — holds the thread spools
3. Cone holder — stabilize the thread spool on the spool
4. Differential feed dial — turn to adjust the differential feed
6. Upper cutter on/off switch — switch to engage/
disengage the upper cutter (page 6)
7. Flat bed extension — provides flat surface for sewing and
provides access to the free arm (page 4)
8. Needle plate — provides flat area around presser foot for
9. Presser foot — holds fabric against feed teeth, which draw
fabric under the foot as you sew
10. Presser foot lifter — raises and lowers presser foot (page
11. Tension dials – allow you to select the right tension for your
stitch, thread, fabric and technique (page 11)
12. Left needle thread tension dial (blue)
13. Right needle thread tension dial (green)
14. Upper looper thread tension dial (red)
15. Lower looper thread tension dial (yellow)
16. Thread guides – upper, lower and needle thread
guides help maintain the flow of the thread during sewing
18. Front cover — protects the inside threading paths (page 4)
19. Presser foot pressure adjustment knob — adjust the
pressure put on the presser foot to suit your fabric (page 13)
22. Hand wheel — controls movement of the needle and
loopers (always turn it toward you)
23. Power switch — turns on machine and LED-light
24. Main plug socket— used to connect the power cord/foot
controller (page 3) About Your Machine – 1EnglishInside of Machine
1. Lower cutter — when the upper cutter is engaged it trims
the fabric edge as you sew
2. Upper cutter — trims the fabric edge as you sew
3. Stitch finger — used to stabilize the fabric when forming
6. Lower looper threader — helps threading the lower
7. Upper looper thread guides — help maintain the flow of
the thread during sewing
8. Lower looper thread guides — help maintain the flow of
the thread during sewing Accessories
1. Needle pack including two needles,
4. Allen key to change needles
2 – About Your Machine EnglishConnecting the Foot Control and the Power Supply
C B Among the accessories you will find the power cord and the foot control. Note: Consult a qualified electrician if you are in doubt about how to connect the machine to the power source. Unplug the power cord when the machine is not in use. For this machine, foot control model 4C-316B (110-125V), 4C- 326G (230V), 4C-336G (240V) manufactured by Wakaho Electric Ind. Co. Ltd. (Vietnam) must be used. Before plugging your machine in, make sure the voltage is the same as indicated on the plate under the machine. Specifications vary from country to country.
1. Connect the foot control/electric power cord (A) to the socket
2. Plug the power cord plug into the electric outlet.
3. Push the power switch to "I" to turn on the machine (C).
4. Press the foot control to start sewing. Use the foot control to
adjust the sewing speed. The harder you press, the faster the machine will sew. To stop the machine from sewing, remove your foot from the control.
5. Push the power switch to "O" to turn off the machine.
Note: When the front cover is open the safety switch is activated and prevents the machine from sewing, even if the foot control is pressed. Note: Your machine is adjusted to provide the best stitch result at normal room temperature. Extreme hot and cold temperatures can affect the sewn result. Setting Up the Telescopic Thread Stand Extend the telescopic thread stand to its full height, then turn until it clicks into place. Place the thread spools or cones over the cone holders on the spool pin. If the machine is already threaded, straighten the threads to prevent tangling. About Your Machine – 3 EnglishOpen and Close the Front Cover Open the Front Cover First push the cover to the right as far as it will go and then pull it downward toward you. Close the Front Cover First pull the cover upward and then slide it to the left until it locks. Note: The front cover has a safety switch and the machine will not sew if the front cover is open. Remove and Replace the Flat Bed Extension Free Arm Sewing For free arm sewing, slide off the flat bed extension. The free arm makes it easier to sew small items and hard to reach areas such as armholes and overcasting trouser cuffs. Remove the Flat Bed Extension Insert a finger in the slot on the left side of the flat bed extension. Slide the flat bed extension to the left and remove it from the machine. Replace the Flat Bed Extension Align the projections on the flat bed extension with the grooves on the free arm and slide it to the right until it snaps into place. Presser Foot Lifter Raise the presser foot with the presser foot lifter (A) at the back of the machine. 4 – About Your Machine EnglishChanging the Needles Turn off the main power switch and unplug the machine.
1. Turn the hand wheel toward you until the needles are at the
clamp screw with the allen key while you are holding the needles.
3. Remove the left or right needle, depending on the stitch type
4. Hold the new needle(s) with the flat surface to the back.
5. Insert the needle(s) into the left and/or right needle clamp as
far as it/they will go.
6. Securely tighten the left (B) and/or right (A) needle clamp
screw. Note: When using both needles, the left needle is positioned a little higher up than the right needle (they are not supposed to be ‘level’, like a twin needle). Changing the Presser Foot Turn off the main power switch and unplug the machine.
1. Raise the presser foot.
2. Turn the hand wheel toward you until the needles are in the
3. Push the black button on the back of the presser foot holder
(A), and the foot will come off.
4. Place the new foot with the pin (B) right underneath the
groove of the ankle and lower the presser foot. Push the black button on the back of the presser foot bar (A) and the foot will snap into place. Note: Optional feet are not included. About Your Machine – 5 EnglishDeactivate the Upper Cutter R243
- Turn the hand wheel toward you until the upper cutter is in its lowest position.
- Turn off the upper cutter by switching the upper cutter switch to non-cutting position (A). Reactivate the Upper Cutter
- Turn on the upper cutter by switching the upper cutter switch to cutting position (B). Note: Always have the upper cutter in the cutting position when sewing, because this machine must trim off any excess fabric to form the stitch over the fabric edge. An exception to this is when sewing decorative flatlock seams. Then the upper cutter needs to be turned off. Attach the 2–thread Overlock Converter
2-thread overlock stitches are sewn using one needle thread and the lower looper thread. Before sewing, the two-thread converter must be attached to the upper looper, so the machine will sew with only two threads.
1. Open the front cover.
2. Bring the upper looper to its lowest position by turning the
hand wheel toward you.
3. Insert the tip of the converter (A) into the hole of the upper
4. Push the converter (C) down into the slot of the upper looper.
Remove the 2-thread Overlock Converter Remove the converter by tilting it toward you (D). 6 – About Your Machine EnglishGETTING READY TO SEW General Threading Information A color coded diagram is located inside the front cover for quick reference (see illustration to the right). Always start threading the loopers and then the needles from left to right (follow the order listed below).
Note: Always raise the presser foot before threading. Important: If the threads break during sewing, re-thread all thread paths in the order listed below.
1. Unthread the needle(s)
2. Unthread upper and lower looper
5. Thread the needle(s) from left to right
See the table below for recommendations on what needles and thread to use for different fabric weights. What Needle and Thread to Use with Different Fabrics Light Fabric (voile, crepe, georgette, etc.) Medium Fabric (cotton, chino, wool, satin, etc.) Heavy Fabric (denim, jersey, tweed, etc.) Needles size #12/80 needles, suitable for overlock machines (SINGER® Overlock needles #2022) Needles size #14/90 needles, suitable for overlock machines (SINGER® Overlock needles #2022) Needles size #14/90 needles, suitable for overlock machines (SINGER® Overlock needles #2022) Thread Thread suitable for overlock machines Getting Ready to Sew – 7 EnglishThreading the Upper Looper (Red) When threading the upper looper, follow the thread path marked with a red dot.
- Open the front cover. Raise the needle to highest position by turning the hand wheel toward you. Raise the presser foot. Pass the thread from back to front through the thread guide on the thread stand (1). Use the tweezers to make the threading easier.
- Pull the thread from right to left under the upper thread guide (2).
- While holding the thread with both hands, pass it between the tension discs and pull it down to make certain it is properly placed between the tension discs (3).
- Thread the looper area of the machine following the red color coded thread guides (4-6). Use the tweezers to make the threading easier.
- Use the tweezers to bring the thread behind the lower looper and thread into the hole in the upper looper from front to back (7).
- Pull about 10cm (4″) of thread through the looper and place it to the back of the stitch plate. 8 – Getting Ready to Sew EnglishThreading the Lower Looper (Yellow) When threading the lower looper, follow the thread path marked with a yellow dot.
- Pass the thread from back to front through the thread guide on the thread stand (1). Use the tweezers to make the threading easier.
- Pull the thread from right to left under the upper thread guide at the back on the top cover (2).
- While holding the thread with both hands, pass it between the tension discs and pull it down to make certain it is properly placed between the tension discs (3).
- Turn the hand wheel toward you until the lower looper is at the far right.
- Thread the looper area of the machine following the yellow color coded thread guides (4-7). Use the tweezers to make the threading easier.
- After thread guide 7, pass the thread from front to back through the hole in the lower looper (8).
- Pull about 10cm (4″) of thread through the looper and place it over the upper looper and to the back of the stitch plate.
- Hold the thread end with your left hand. Use the tweezers to place the thread behind the fingers of the lower looper threader (9).
- Pull the lever on the lower looper threader (10) gently upwards as far as it will go. Release the lever and the lower looper becomes fully threaded (11). Note: When both loopers are threaded, the threads should run as illustrated to the right (12). Getting Ready to Sew – 9 EnglishThreading the Left Needle (Blue) When threading the left needle, follow the thread path marked with a blue dot.
- Pass the thread from back to front through the thread guide on the thread stand (1). Use the tweezers to make the threading easier.
- Pull the thread from right to left under the upper thread guide at the back on the top cover (2).
- While holding the thread with both hands, pass it between the tension discs and pull it down to make certain it is properly placed between the tension discs (3). Lead the thread down and under thread guide 4, continue up and around thread point 5.
- Lead the thread down and place the it behind the thread guide above the needle(s) (6).
- Thread the eye of the left needle (7). Use the tweezers to make needle eye threading easier.
- Pull about 10 cm (4″) of thread through needle eye to hang free.
- Place the thread to the back, under the presser foot. Threading the Right Needle (Green) When threading the right needle, follow the thread path marked with a green dot.
- Pass the thread from back to front through the thread guide on the thread stand (1). Use the tweezers to make the threading easier.
- Pull the thread from right to left under the upper thread guide at the back on the top cover (2).
- While holding the thread with both hands, pass it between the tension discs and pull it down to make certain it is properly placed between the tension discs (3). Lead the thread down and under thread guide 4, continue up and around thread point 5.
- Lead the thread down and place the it behind the thread guide above the needle(s) (6).
- Thread the eye of the right needle (7). Use the tweezers to make needle eye threading easier.
- Pull about 10 cm (4″) of thread through needle eye to hang free.
- Place the thread to the back, under the presser foot. 10 – Getting Ready to Sew EnglishThread Tension Settings Set the thread tension to suit the type of fabric and thread used. As the number on the thread tension discs increases, the thread tension becomes tighter. See Stitch Overview, page 15 for thread tension recommendations for each stitch. Color Explanation Sheet Right side of fabric Right needle thread Upper looper thread Wrong side of fabric Left needle thread Lower looper thread Correct Thread Tension Lower looper thread and upper looper thread should be well balanced with the same tension (both looper threads should cross at the edge of the fabrics). Needle threads should not be too loose or too tight, but equally balanced tension. Upper Looper Thread Is Too Loose (A) The upper looper thread is unbalanced when it is pulled to the wrong side of the fabric. Tighten the thread tension of the upper looper or loosen the thread tension of the lower looper. Upper Looper Thread is Too Tight (B) The upper looper thread is unbalanced when it is pulling on the top side of the fabric. Loosen the thread tension of the upper looper or tighten the thread tension of the lower looper. Lower Looper Thread is Too Loose (C) The lower looper thread is unbalanced when it is pulled to the right side of the fabric. Tighten the thread tension of the lower looper or loosen the thread tension of the upper looper. Lower Looper Thread is Too Tight (D) The lower looper thread is unbalanced when it is pulling on the wrong side of the fabric. Loosen the thread tension of the lower looper or tighten the thread tension of the upper looper. Left Needle Thread Is Too Loose (E) If the left needle thread is too loose, tighten the thread tension of the left needle or loosen both looper threads. Left Needle Thread is Too Tight (F) If the left needle thread is too tight, loosen the thread tension of the left needle. Right Needle Thread is Too Loose (G) If the right needle thread is too loose, tighten the thread tension of the right needle. Right Needle Thread is Too Tight (H) If the right needle thread is too tight, loosen the thread tension of the right needle. Getting Ready to Sew – 11 EnglishDifferential Feed Adjustment The differential feed system consists of two sets of feed teeth arranged one behind the other (A). Both feed teeth work independently of each other to provide good results when sewing on speciality fabrics. When the amount of feed by the front feed teeth is changed in relation to the feed by the rear feed teeth it will "stretch" or "gather" the fabric. Use the differential feed to prevent stretching or distortion of knit fabrics and puckering of lightweight fabrics. For overlock stitching on normal fabric, set the differential feed to
Gathered Overlock (C)(Stretch, Knit Fabrics) When overedging stretch fabric, such as knits and jersey, adjust the differential feed to a number between 1.0 and 2.0. The setting depends on the fabric being sewn. Test sew with different settings before sewing on your project. Stretch Overlock (D)(Light Weight Fabrics) When overedging light woven or loosely knit fabrics, such as silk and silky knitwear, adjust the differential feed to a number between 0.7 and 1.0. When sewing, apply gentle tension to the fabric by holding the seam lightly in front and back of the presser foot. The setting depends on the fabric being sewn as well as the desired amount of stretching. Therefore, test sew with different settings before sewing on your project. Fabric Differential Feed Adjustment Result Stretch fabric (knit, jersey) 1.0–2.0 Non-stretch fabric (cotton, denim)
Light-weight fabric (Silk, silky knitwear) 0.7–1.0 12 – Getting Ready to Sew EnglishPresser Foot Pressure Adjustment 10mm 3/8" The presser foot pressure is pre-set for sewing on medium weight fabric. When sewing in different fabric weights, adjustment might be needed. Generally, decrease the presser foot pressure when sewing in light weight fabric and increase it when sewing in heavy weight fabrics. Always test sew on a sample of your fabric before sewing on your project. Increase or decrease the pressure in small increments by turning the presser foot pressure screw. Less pressure: Decrease the pressure by turning the adjustment knob in counter-clockwise direction towards the "-". More pressure: Increase the pressure by turning the adjustment knob in clockwise direction towards the "+". Back to standard setting: Turn the adjustment knob until the distance from the front cover to the “head” of the screw is 10mm (3/8"). Stitch Width Settings The stitch width can be increased or decreased by changing the needle position or with the cutting width lever. Width Adjustment by Changing Needle Position A) When only the left needle, or when both needles are used the stitch width is approx. 6mm (¼″). B) When only the right needle is used the stitch width is approx. 3mm (⅛″). Width Adjustment with the Cutting Width Lever By fine tuning the cutting width, using the cutting width lever, adjustments are possible within the range shown below: When only the left needle is used: 5 - 7mm When only the right needle is used: 3 - 5mm Move the lever up and down to adjust the stitch width, "7" is the widest and "1" is the most narrow setting. Getting Ready to Sew – 13 EnglishStitch Length Settings The stitch length dial should be set to "3" for most sewing. Adjust the stitch length to 4mm when sewing on heavy weight fabrics. Adjust the stitch length to 2mm when sewing on light weight fabrics. Stitch Finger Lever Setting The stitch finger lever should be set to "N" (Normal) for all standard overlock sewing. To sew rolled edge you need to retract the stitch finger by setting the stitch finger lever to "R" (Rolled Edge). When moving the stitch finger, be sure to push the lever as far as it will go in each direction. 14 – Getting Ready to Sew EnglishSEWING On your overlock machine, different stitches are obtained by combining different needle positions, threading methods, tension settings, and the use of the 2-thread overlock converter. See Getting Ready to Sew, page 7, for references on how to set your machine. Stitch Overview The settings shown in the table below are our recommendations based on normal conditions. It may be necessary to adjust the thread tension depending on the stitch, type of fabric and thread you are using. For best results make tension adjustments in small increments of no greater than half a number at a time. Always test sew on a sample of your fabric before sewing on your project. In the table below, different fabric weights and types are explained. For you to better understand how the stitches are formed, each of the threads are displayed in different shades of grey. Icon Explanation Sheet Woven light Chiffon, voile, organza, batiste, silk, etc. Needle position 2–thread overlock converter Woven medium Cotton, chino, wool, satin, etc. Differential feed Right needle thread Woven heavy Denim, canvas, terrycloth, etc. Stitch length Left needle thread Stretch light Charmeuse, nylon, tricot, single knit jerseys, etc. Cutting width Upper looper thread Stretch medium Double knit, velour, swimwear, etc. N/R Stitch finger position Lower looper thread Stretch heavy Sweater knits, fleece, etc. 4–Thread Overlock For all seams where stretch or give is needed, such as neck edges, side seams, sleeves, etc. Stitch/Fabric N/R Thread Tension Both
Sewing – 15 English3–Thread Overlock, Wide (and Narrow) For sewing two layers of stretchy fabric or overcasting a single layer of light to medium fabric. Use heavier threads in the loopers to create decorative edges. Note: Use the right needle instead for a narrow stitch. Recommended thread tension settings within brackets in the chart. Stitch/Fabric N/R Thread Tension Left
(5) 4~5 (4~5) 3–Thread Narrow Edge For sewing two layers of stretchy fabric or overcasting a single layer of light fabric. Popular for creating decorative tucks. Use decorative threads, such as 40 weight rayon, in the loopers and regular thread in the needle. Use different colors in the loopers to get an interesting effect. Note: Not recommended for heavy weight fabrics. Stitch/Fabric N/R Thread Tension Right
5~6 6 3 3–Thread Flatlock, Wide (and Narrow) For sewing fabrics together with a decorative effect either with the flatlock side or the ladder stitch side. Create varying effects by threading the loopers with decorative thread, such as 40 weight rayon. Note: Use the right needle instead for a narrow stitch. Recommended thread tension settings within brackets in the chart. Stitch/Fabric N/R Thread Tension Left
(8~9) 16 – Sewing English3–Thread Rolled Edge For edging lightweight fabrics. It gives a nice finish on silky scarves, pillow ruffles and napkins. For a beautiful rolled edge, thread the loopers with a decorative lightweight thread, such as 40 weight rayon, for a beautiful satin edge and the needle and lower looper with lightweight regular thread. Note: Not recommended for heavy weight fabrics. Stitch/Fabric N/R Thread Tension Right
4~6 7~9 2–Thread Overedge, Wide (and Narrow) For overcasting a single layer of light to medium weight fabrics (2-thread overlock converter required). Note: Use the right needle instead for a narrow stitch. Recommended thread tension settings within brackets in the chart. Stitch/Fabric N/R Thread Tension Left
5~8 (6~9) 2–Thread Wrapped Overlock, Wide (and Narrow) Gives a beautiful finish to lightweight fabrics (2-thread overlock converter required). Note: Use the right needle instead for a narrow stitch. Recommended cut width and thread tension settings within brackets in the chart. Stitch/Fabric N/R Thread Tension Left
1~3 (4~6) Sewing – 17 English2–Thread Rolled Edge For edging lightweight fabrics. It gives a nice finish on silky scarves, pillow ruffles and napkins. Thread the looper with a decorative lightweight thread, such as 40 weight rayon for a beautiful satin edge (2-thread converter required). Note: Not recommended for heavy weight fabrics. Stitch/Fabric N/R Thread Tension Right
4~6 Changing Thread The following is an easy way to change threads:
1. Cut the thread in near the spool, behind the guides on the
telescopic thread stand.
2. Remove the thread spool and place the new thread on the
3. Tie the end of the new thread to the end of the old thread. Cut
the thread tails to 2-3cm (approx. 1″) in length and firmly pull both threads to test knot security.
4. Raise the presser foot.
5. First note tension dial settings and then turn the tension dials
6. Pull the threads through the machine one at a time until the
knots are in front of the needle. If the threads do not pull easily, check for tangles on thread guides or looping under thread stand.
7. Cut the thread behind the knot and thread the needle.
8. Return tension dials to previous settings.
18 – Sewing EnglishStart Sewing
1. When the machine is completely threaded, close the front
cover and bring all of the threads over the stitch plate and slightly to the left under the presser foot.
2. Ensure that the upper blade moves against the lower blade
correctly by turning the hand wheel slowly toward you. If the upper cutter blade does not move correctly, check if there are any fabric or waste thread stuck between the blades.
3. Hold the threads and apply a slight tension.
4. Turn the hand wheel toward you 2 or 3 complete turns to start
making a thread chain. Check if all threads wind around the stitch finger of the stitch plate. If the threads do not wind around the finger, make sure each thread is threaded correctly.
5. Continue holding the thread chain while pressing the foot
control. Sew until the chain is 5-8cm (2″-3″) in length.
6. Place fabric under the front of the presser foot and sew a test
sample. Guide the fabric slightly with your left hand while sewing. Do not pull on the fabric as this may deflect the needle, causing it to break.
7. When you reach the end of the fabric, continue sewing while
drawing the finished fabric gently backwards and to the left. This is called chaining off. It prevents the threads from coming undone and prepares for next sewing.
8. Cut off the thread chain 2-5cm (1″-2″) behind the presser foot.
Pin Placement Insert straight pins to the left of the presser foot. The pins will be easy to remove and are away from the cutters.
Warning: Sewing over pins will damage and might destroy the
edge of the cutters. Securing Thread Chain
1. Thread the chain into a large eyed, hand sewing needle.
2. Insert the needle into the end of the seam and pull the chain
into the seam to secure the threads. Sewing – 19 EnglishCorded Overlock Corded overlock can be used to strengthen stitches when joining elastic fabrics such as knits. Cording prevents knit fabrics from stretching and also stabilizes the seams.
1. Insert the cord through the hole in the front of the foot.
2. Position the cord under the foot to the back of the machine
and sew the garment seam.
3. The cord is attached in the stitch as the seam is sewn.
Gathering Using the Differential Feed The differential feed can be used to gather lightweight fabrics. Use it for sleeves, making ruffles, and more. Set the differential feed between 1.5 and 2 to obtain the best gathering effect for your project. Always try on a scrap piece of your fabric first. See Differential Feed Adjustment, page 12, to learn how to adjust the differential feed. 20 – Sewing EnglishRolled Edge Sewing The rolled edge stitch is appropriate for light weight fabrics such as lawn, voile, organdy, crepe, etc. The rolled edge is achieved by adjusting the thread tension to make the fabric edge roll under the fabric while overlocking. Adjust the thread tension to change the degree of rolling. To sew rolled edge you need to set the stitch finger lever to "R". Tip: For a beautiful rolled edge, thread the upper looper with a decorative thread and the needle and lower looper with lightweight regular thread 2–Thread Rolled Edge (A)
1. Attach the 2-thread overlock converter (see page 6).
2. Use the right needle thread and lower looper thread.
3. Move the stitch finger lever to "R".
4. Set the stitch length dial to "1" for a fine seam.
5. Set the thread tension according to the stitch table on page
6. Make a thread chain and test sew on a sample of your fabric
before sewing on your project. Hold the thread chain while beginning to sew to keep it from curling into the seam. 3–Thread Rolled Edge (B) / Narrow Edge (C) A variant of the rolled edge stitch (B) is the narrow edge (C). It can be obtained by adjusting the thread tension according to “3– Thread Rolled Edge” (page 17) and/or ”3–Thread Narrow Edge” (page 16).
1. Use the right needle thread and the upper and lower looper
2. Move the stitch finger lever to "R".
3. Set the stitch length dial to "3-2" for a fine seam.
4. Set the thread tension according to “3–Thread Rolled Edge”
(page 17) or ”3–Thread Narrow Edge” (page 16).
5. Make a thread chain and test sew on a sample of your fabric
before sewing on your project. Hold the thread chain while beginning to sew to keep it from curling into the seam. Sewing – 21 EnglishFlatlock Sewing A Flatlock (A) is made by adjusting the tension of the 3-thread overlock stitch, sewing the seam and pulling the fabrics apart to flatten the seam. The tensions must be adjusted correctly for the fabric to pull flat properly. A Flatlock can be used both as a decorative construction stitch, sewing two pieces together (Standard Flatlock), or for decoration only on one piece of fabric (Decorative Flatlock). There are two ways to sew a Flatlock. Either with the wrong sides of the fabric together to create a decorative look, or with the right sides together, to create a Ladder Stitch. Standard Flatlock, Wide (B)
1. Use the left needle.
2. Thread the lower and upper looper and the left needle.
3. Set the thread tension according to “3–Thread Flatlock, Wide
(and Narrow)” on page 16.
4. Place the wrong sides of the two pieces of fabric together to
sew a decorative stitch on the right side of the project.
5. Sew the seam, trimming the excess fabric. The needle thread
will form a V on the underside of the fabric. The lower looper thread will pull into a straight line at the fabric edge.
6. Unfold the fabric and pull on opposite sides of the seam to
pull the stitches flat. Decorative Flatlock, Wide (C)
1. Place the upper cutter in the nonworking position (page 6).
The fabric should not be trimmed on this stitch.
2. Follow steps 1-3 above.
3. Fold the fabric piece, wrong sides together, to sew a
decorative stitch on the right side of the project.
4. Position the fabric so the seam is sewn with part of the stitch
extending off the fabric.
5. Unfold the fabric and pull on opposite sides of the stitch to
flatten. Tip: The upper looper thread is the prominent thread in the flatlock stitch. Place a decorative thread in the upper looper and regular threads in the lower looper and needle. Ladder Stitch (D) A ladder stitch is a flatlock stitch but sewn with the right sides of the fabric together. The needle thread will be the prominent thread that creates the ladder. 22 – Sewing EnglishMACHINE MAINTENANCE An overlock requires more frequent maintenance than a conventional sewing machine for two reasons:
- A lot of lint is produced when the cutters are cutting the fabric.
- An overlock runs at a very high speed and needs to be oiled frequently to lubricate the internal working parts. Cleaning Turn off the main power switch and unplug the machine. Open the front cover and remove all the lint using a lint brush. Oiling Turn off the main power switch and unplug the machine. To keep the machine running smoothly and quietly the moving parts, pointed out in the picture, must be lubricated often. We recommend lubricating after every 24 hours of use. Use sewing machine oil. Do not use any other oil, it could damage the machine. Wipe the machine surface to remove all excess oil before sewing. Replacing the Lower Cutter Turn off the main power switch and unplug the machine. The stationary lower cutter should be changed when it becomes blunt. Change it by following the below instructions. If you are having any difficulties, consult your service agent to make the necessary adjustments.
- Turn off the upper cutter (A). Open the front cover.
- Loosen the lower cutter set screw (B) and remove the stationary cutter (C).
- Place a new lower cutter in the groove of the lower cutter holder. The blade of the lower cutter shall be flush with the stitch plate.
- Tighten the lower cutter set screw (B).
- Turn the upper cutter (D) on again.
- Turn the hand wheel so the needles are in their lowest position. Machine Maintenance – 23 EnglishReplacing the Upper Cutter 0.2-0.5mm Turn off the main power switch and unplug the machine. The upper cutter should be changed when it becomes blunt. Change it by following the below instructions. If you are having any difficulties, consult your service agent to make the necessary adjustments.
- Place the upper cutter in its lowest position.
- Turn off the upper cutter (A). Open the front cover.
- Loosen the upper cutter set screw (B) and remove the upper cutter (C).
- Place a new upper cutter in the groove of the upper cutter holder. The front edge of the upper cutter is approx 0,2-0,5mm lower than the cutting edge of the stationary cutter (D).
- Tighten the upper cutter set screw (B).
- Turn the upper cutter (E) on again. Storage When the machine is not in use, be sure to keep it unplugged. Store the machine, so it is not exposed to direct sunlight or humidity. Servicing If you have any questions regarding service and/or operation, contact our Customer Care department. Trouble Shooting Machine Does Not Run Possible Cause: Machine not properly connected to power source. Solution: Check that machine has been properly connected to power source (page 3). Fabric Does Not Feed Well Possible Cause: Stitch length is set too short for the fabric being sewn. Solution: Increase the stitch length setting (page 14). Possible Cause: Differential feed is not set in the correct position for the fabric being sewn. Solution: Adjust the differential feed (page 12). Possible Cause: Presser foot pressure not correctly set for fabric being sewn. Solution: Adjust presser foot pressure (page 13). Needle Breaks Possible Cause: Needle may not be properly seated in the needle clamp. Solution: Insert needle so that it is all the way up in the needle clamp, then tighten the screw securely (page 5). Possible Cause: Manually pulling fabric from behind presser foot while sewing which causes needles to deflect. Solution: Refrain from pulling fabric manually; allow feed teeth to draw fabric under presser foot. Possible Cause: Needle may not be the correct size for the fabric being sewn. Solution: Use a needle size that is compatible for the fabric (page 7). 24 – Machine Maintenance EnglishThread Breaks Possible Cause: Machine may not be threaded correctly; threads threaded in the incorrect sequence. Solution: Check that machine is threaded in correct order (page 7). Possible Cause: Thread is not unreeling smoothly off the thread spool. Solution: Check the thread spool to ensure thread is not getting caught. Possible Cause: Needle(s) may have a bent, dull or broken point. Solution: Replace needle(s) (page 5). Possible Cause: The needle is inserted incorrectly. Solution: Insert the needle correctly (page 5). Possible Cause: Using thread that is poor quality or has uneven filament. Solution: Use good quality thread with a smooth, even filament. Possible Cause: Thread tension is set too tight. Solution: Loosen thread tension (page 11). Possible Cause: Thread is caught in one of the thread guides. Solution: Check threading path to ensure all threads are feeding smoothly. Stitches Skipping Possible Cause: Needle(s) may have a bent, dull or broken point. Solution: Replace needle(s) (page 5). Possible Cause: Needle may not be properly seated in the needle clamp. Solution: Insert needle so that it is all the way up in the needle clamp, then tighten the screw securely. Possible Cause: Needle may not be the correct size for the fabric being sewn. Solution: Use a needle size that is compatible for the fabric (page 7). Possible Cause: Machine may not be threaded correctly or threads were threaded in the incorrect sequence. Solution: Check that machine is threaded in correct order as shown in machine manual (page 7). Possible Cause: Using thread that is poor quality or has uneven filament. Solution: Use good quality thread with a smooth, even filament. Irregular Stitches Possible Cause: Stitches are not balanced. Solution: Adjust thread tensions and possibly cutting width (page 11/page 13). Possible Cause: Thread is not unreeling smoothly off the thread spool. Solution: Check the thread spool to ensure thread is not getting caught. Possible Cause: Machine may not be threaded correctly or threads threaded in the incorrect sequence. Solution: Check that machine is threaded in correct order as shown on (page 7). Fabric Puckers Possible Cause: Thread tensions are set too tightly. Solution: Loosen thread tensions (page 11). Possible Cause: Thread is not unreeling smoothly off the thread spool. Solution: Check the thread spool to ensure thread is not getting caught. Machine Maintenance – 25 EnglishPossible Cause: Using thread that is poor quality or has uneven filament. Solution: Use good quality thread with a smooth, even filament. Possible Cause: Stitch length is set too short. Solution: Adjust stitch length to a longer setting (page 14). Possible Cause: Differential Feed is not set in the correct position for the fabric being sewn. Solution: Adjust the differential feed (page 12). Irregular Trimming Possible Cause: Upper and lower fabric cutters are not in proper position. Solution: Check alignment of cutters (page 24). Possible Cause: Cutter(s) are damaged or worn out. Solution: Replace one or both cutters (page 23—page 24). Fabric Jams Possible Cause: Upper and lower fabric cutters are not in proper position. Solution: Check alignment of cutters (page 24). Possible Cause: Thread is not unreeling smoothly off the thread spool. Solution: Check the thread spool to ensure thread is not getting caught. Possible Cause: Too much fabric thickness. Solution: Compress thick layers with conventional sewing machine before sewing on your overlock machine. Technical Specifications Sewing Speed Maximum 1200 ± 100 rpm Stitch Length 1–4mm Needle Bar Stroke 25 ± 3mm Needles SINGER® EL #2022 #90/14 Stitch Width 2.3–7mm Presser Foot Rise 5–7mm Number of Needles 1–2 Differential Feed Ratio 0.7–2.0 Weight 6.3kg Number of Threads 2–4 Type of Lamp LED light Machine Dimensions Width: 334mm Depth: 286mm Height: 279mm Protection Class II (Europe) Power Rating Machine: 100Watt LED Light: 100mWatt Rated Voltage 120V/60Hz (North America) 230V/50Hz (Europe) 26 – Machine Maintenance EnglishWe reserve the right to change the machine equipment and the assortment of accessories without prior notice, or make modifications to the performance or design. Such modifications, however, will always be to the benefit of the user and the product. INTELLECTUAL PROPERTY SINGER, and the Cameo “S” Design, are exclusive trademarks of The Singer Company Limited S.à.r.l. or its Affiliates. Warranty This device is covered by a 3-year warranty from the date of purchase. The appliance has been manufactured with care and thoroughly inspected before delivery. Please keep your receipt as proof of purchase. In the event of a warranty claim, please contact our service hotline by telephone. This will ensure you will be able to return your product postage-free. Please keep the original carton so that your appliance can be transported safely in the event of a warranty claim. The warranty applies to faults in materials or manufacture only and not to damage to wear parts nor to damage to breakable parts. This product is intended for private, non-commercial use only. Any incorrect or improper use of the device, use of force and changes not performed by our authorized service branch will void the warranty. This warranty does not limit your legal rights. This warranty is only applicable to the initial purchaser and is not transferrable. Service Bogod & Company Ltd. Fortran Road, St Mellons, CF3 0WJ Cardiff, GB 0044-29-20774910 IAN 290240 Please have your receipt and the article number (e.g. IAN 12345) ready as your proof of purchase when enquiring about your product. Declaration of Conformity This appliance complies with the requirements of the relevant European and national guidelines. This is confirmed by the CE mark. The relevant declarations are held by the manufacturer. Please note that on disposal, this product must be safely recycled in accordance with relevant National legislation relating to electrical/electronic products. Do not dispose of electrical appliances as unsorted municipal waste, use separate collection facilities. Contact your local government for information regarding the collection systems available. When replacing old appliances with new ones, the retailer may be legally obligated to take back your old appliance for disposal free of charge. If electrical appliances are disposed of in landfills or dumps, hazardous substances can leak into the groundwater and get into the food chain, damaging your health and well-being. Manufacturer VSM GROUP AB, SVP Worldwide Drottninggatan 2, SE-56184, Huskvarna, SWEDENIAN 290240