CK3084R - Cooker Pelgrim - Free user manual and instructions
Find the device manual for free CK3084R Pelgrim in PDF.

| Technical Features | Gas stove with oven, 4 burners, stainless steel finish |
|---|---|
| Dimensions | Width: 60 cm, Depth: 60 cm, Height: 85 cm |
| Oven Capacity | 65 liters |
| Gas Type | Natural gas and propane |
| Usage | Ideal for cooking a variety of dishes, precise temperature control |
| Maintenance | Easy cleaning thanks to stainless steel surface, removable grates |
| Safety | Gas shut-off safety system, electronic ignition |
| General Information | 2-year warranty, user manual included |
Frequently Asked Questions - CK3084R Pelgrim
User questions about CK3084R Pelgrim
0 question about this device. Answer the ones you know or ask your own.
Ask a new question about this device
Download the instructions for your Cooker in PDF format for free! Find your manual CK3084R - Pelgrim and take your electronic device back in hand. On this page are published all the documents necessary for the use of your device. CK3084R by Pelgrim.
USER MANUAL CK3084R Pelgrim
natural_image
Pure geometric diagram with circles and rectangles on a dark background, no text or symbols presentCK3084R
CK3095R
Handleiding
Keramische kookplaat
Manual
Ceramic hob
text_image
Diagram showing a device with circular components and a numeric display panel, likely for measurement or testing purposes.text_image
Diagram showing hand gesture interacting with a digital display control panel, displaying icons and numeric values.Pannen
Minimale panbodem diameter

text_image
Diagram illustrating a hand interacting with a touchscreen display, showing progress from 0 to 8 states.text_image
Diagram illustrating a finger pressing a numeric display before and after adjustment, showing control buttons and display options.text_image
Diagram showing a hand interacting with a digital display control panel before and after transformation, with numeric display icons and control buttons.Warmhoudstand
text_image
Diagram illustrating a hand interacting with a digital display showing 0, 1, and 2 states before and after adjustment.text_image
0 2 0 0 0 2: 0text_image
Diagram showing a hand interacting with a digital display showing 0, 2, and 8 units, before and after adjustment.text_image
0 0 .00 2 0- De timer is ingesteld.
text_image
Diagram showing a hand interacting with a digital display showing 0, 1, 2, and 3 indicators before and after transformation.Pauzeren
text_image
0 8 98. 2 0 → 0 8 98.text_image
Diagram illustrating the process of a finger interacting with a touchscreen display, showing state transitions and display states.text_image
Diagram showing a hand interacting with a touchscreen and displaying a digital display showing 0, 2, and 10 units.natural_image
Symbol of a trash bin with crossed lines indicating no waste or discharge (no text or labels)text_image
Diagram showing a device with circular components and a numeric display panel, likely for measurement or labeling.text_image
Diagram showing hand gesture interacting with a digital display, with time scale and control buttons visibleCasseroles
text_image
Diagram illustrating a hand interacting with a touchscreen display, showing progress from 0 to 8 states.text_image
Diagram illustrating the process of a finger pressing on a digital display with control buttons and a progress bar.text_image
Diagram showing a hand interacting with a digital display control panel before and after transformation, with numeric display icons on the right.text_image
Diagram illustrating a hand interacting with a digital display showing 0s, 1s, and 8s states before and after adjustment.text_image
Diagram illustrating a hand interacting with a digital display showing 0, 2, and 0 states before and after adjustment.text_image
Diagram showing a hand interacting with a digital display showing 0, 1, 2, 3, 4, 5, and 6 units.text_image
88.00 2 8 0 → 88.00 2 8 0text_image
Diagram illustrating the process of a finger interacting with a touchscreen device, showing state transitions and display states.text_image
Diagram illustrating a hand interacting with a touchscreen and displaying a digital display showing 0, 2, and 10 units.text_image
Diagram showing a hand interacting with a digital display showing 0, 2, and 3 units, before and after transformation.natural_image
Symbol of a trash bin with crossed lines indicating no waste or discharge (no text or numbers present)text_image
Diagram showing a device with circular components and a numeric display panel, likely for measurement or labeling.text_image
Diagram illustrating a hand interacting with a touchscreen and displaying a numeric display, likely for digital navigation or interface adjustment.text_image
Diagram illustrating the process of inserting a numeric display into a digital display, with hand pointing to the display.text_image
Diagram illustrating a hand interacting with a digital display showing 0, 1, and 2 states before and after adjustment.Warmhaltestufe
text_image
Diagram illustrating a hand interacting with a digital display showing 0s, 1s, and 2s states before and after adjustment.text_image
Diagram illustrating a hand interacting with a digital display showing 0, 2, and 0 states before and after transformation.text_image
Diagram showing a hand interacting with a digital display showing 0, 2, and 0 indicators before and after adjustment.text_image
Diagram showing a hand interacting with a digital display showing 0, 1, 2, and 3 indicators.text_image
Diagram illustrating a hand interacting with a touchscreen display, showing progress from 2x2 to 2x2 with icons for function selection.text_image
Diagram illustrating a hand interacting with a touchscreen and displaying a digital display showing 0, 2, and 10 units.text_image
Diagram showing a hand interacting with a digital display showing 0, 2, and 3 units, before and after transformation.natural_image
Symbol of a trash bin with crossed x-marks and a blank rectangular base (no text or numbers)| First use 7Cooking-time limiter | 7 |
Use
| How to use the slide control and touch keys | 8 | |
| Pans | 8 | |
| Power levels | 9 | |
| Stay-warm zone 9 | ||
| Automatic heat up | 9 | |
| Stop & go (pause) function | 10 | |
| Indications in the display | 10 | |
| Cooking power settings | 11 |
Operation
| How to use the Ceramic hob | 12 | |
| How to use the (kitchen) timer | 14 | |
| Start the Automatic heat-up function | 15 | |
| Pause cooking | 15 | |
| Use the child safety lock | 16 | |
| Recall function | 16 |
Settings
| _______ | Adjusting the acoustic signal and lock parameters 17 | |
| Maintenance | Cleaning | 19 |
Faults
| General | 20 |
| Troubleshooting table 20 |
Environmental aspects
| Disposal of packaging and appliance | 21 |
Introduction
This hob has been designed for the real lover of cooking. The hob is equipped with ‘Cooklight’ elements. These are very rapid-heating, radiant elements with a high efficiency, which is very favourable for heating-up times. What’s more, these elements also have very good heat distribution. The ample space between the cooking zones makes cooking comfortable.
Cooking on a ceramic hob is different from cooking on a traditional appliance. Ceramic cooking makes use of heat radiation through the glass top.
For optimum safety the ceramic hob is equipped with a child lock, a cooking time limiter and a residual heat indicator, which shows which cooking zones are still hot.
This manual describes how you can make the best possible use of the ceramic hob. In addition to information about operation, you will also find background information that can assist you in using this product.
Read the manual thoroughly before using the appliance, and store these instructions in a safe place for future reference.
The manual also serves as reference material for service technicians. Please, therefore, stick the appliance identification card in the space provided, at the back of the manual. The appliance identification card contains all the information that the service technician will need in order to respond appropriately to your needs and questions.
Enjoy your cooking!
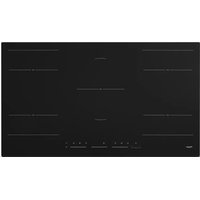
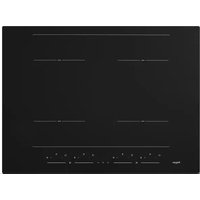
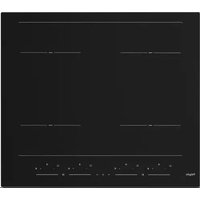
Ceramic hob
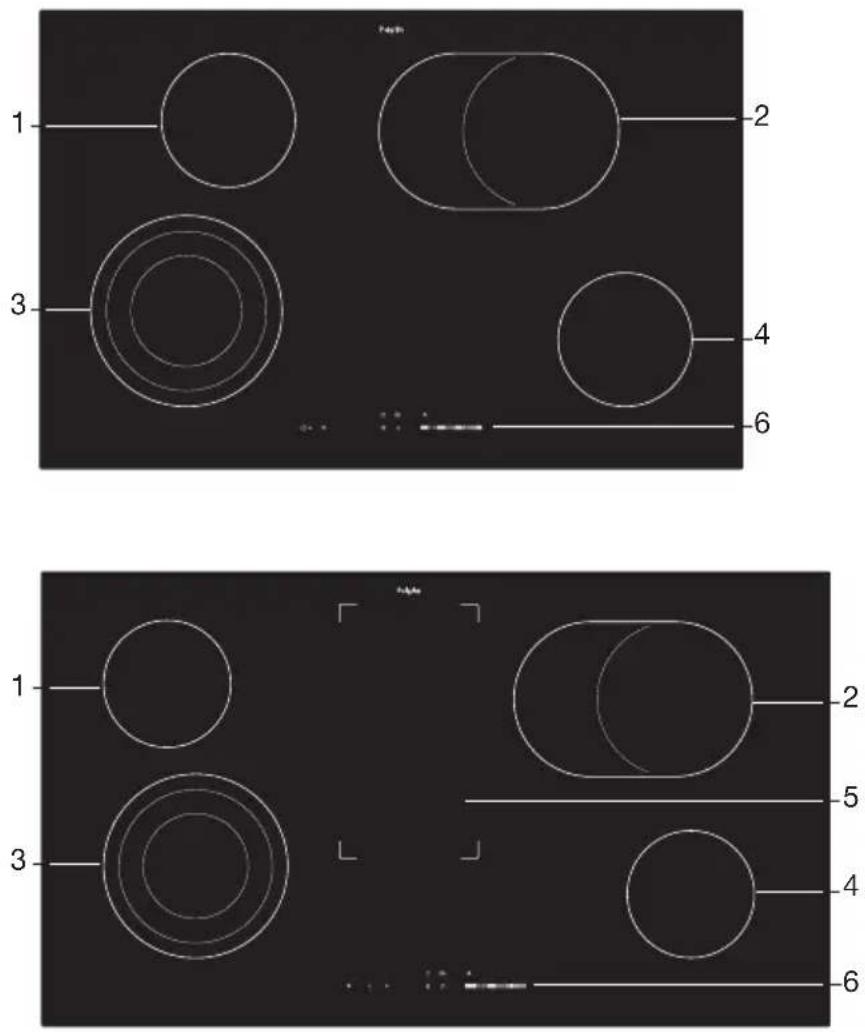
- Cooking zone ∅ 145 / 1200 W
- Oval cooking zone ∅ 170x265 / 2400-1500 W
- Expandable (triple) cooking zone ∅ 210-175-120 / 2300-1600-800 W
- Cooking zone ∅ 145 / 1200 W
- Stay-warm zone
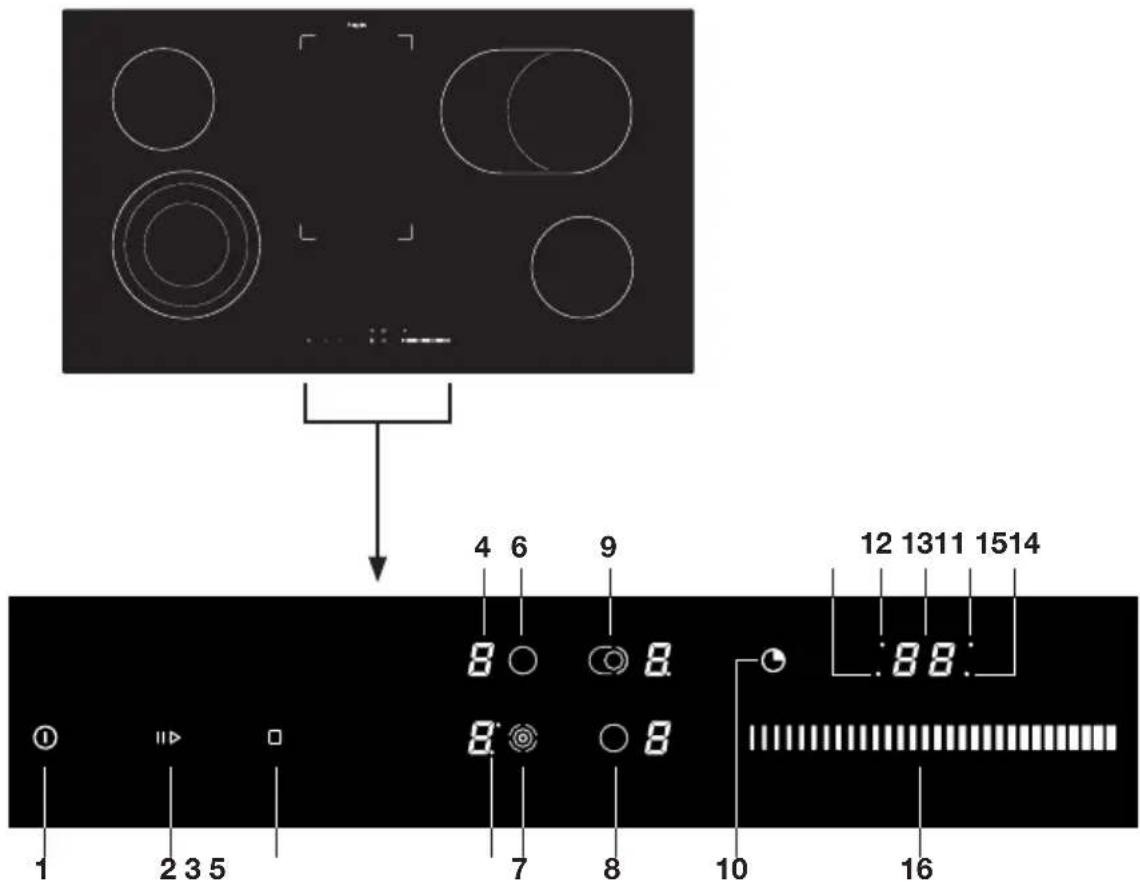
- Control panel
Control panel
text_image
Diagram showing a device with circular components and a numeric display panel, likely for measurement or labeling.- On/off key / Child safety lock key
- Pause key
- On/off key stay-warm zone
- Display cooking power levels
- Indicator second/third circle expandable cooking zone
- Cooking zone rear left key
- Cooking zone (expandable) front left key
- Cooking zone front right key
- Cooking zone (expandable) rear right key
- Timer key
- Timer indicator zone front left
- Timer indicator zone rear left
- Timer display
- Timer indicator zone rear right
- Timer indicator zone front right
- Slide control (9 cooking levels + stay-warm level)

Before use, read the separate safety instructions first!
First use

When connecting the hob to the power supply, the hob performs a self-check.
All indicator lights and LEDs come On briefly. The residual heat indication 'H' may go flashing for some cooking zones. The indication lights goes out automatically after a while. This is a normal procedure when connecting the hob to the power supply.
Cooking-time limiter

The cooking-time limiter is a safety function of your ceramic hob. It will operate if you forget to stop your hob. Depending on the cooking power level you have chosen, the cooking time will be limited as follows:
| Cooking level The cooking zone switches off automatically after: | |
| u 8 hours | |
| 1 8 hours | |
| 2 8 hours | |
| 3 6 hours | |
| 4 6 hours | |
| 5 4 hours | |
| 6 4 hours | |
| 7 2 hours | |
| 8 1.5 hours | |
| 9 1.5 hours | |
| Stay-warm zone 4 hours | |
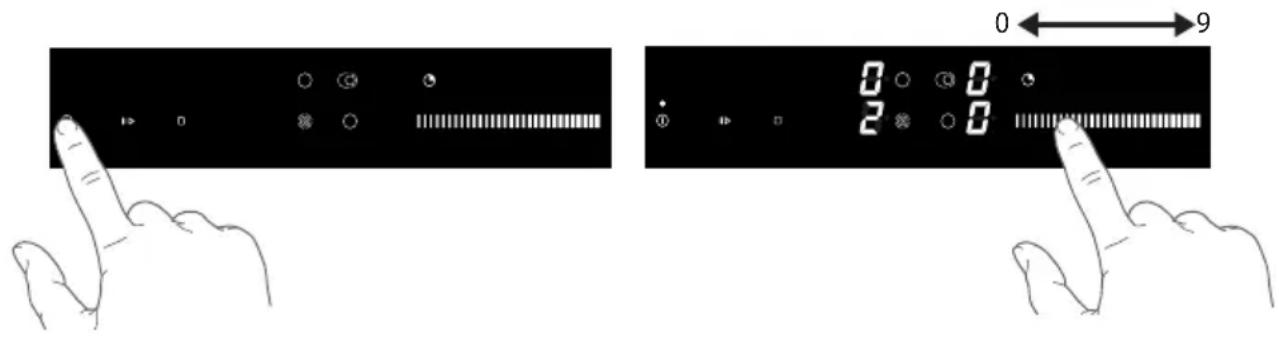
How to use the slide control and touch keys
Touch keys.
Put the tip of your finger flat on the touch key. Do not apply pressure. The touch keys react to a light fingertip touch. Do not use an object to operate the touch key. The touch key gives a short audio signal when it engages.
Slide control.
Use the slide control to adjust the power level or time. Move your fingertip along the slide control to the power level or time you require.
- Move to the left to decrease the power level or time and to the right to increase the power level or time.
text_image
Diagram showing two hand gestures interacting with a digital display, labeled with numeric values 0 and 2.Pans
Always place a pan in the middle of a cooking zone.
Pans for ceramic cooking
Ceramic cooking requires a particular quality of pan.
- Only use pans that are suitable for electric cooking with:
▶a thick base (minimum 2.25 mm);
▶a flat base.

Be careful with enamelled sheet-steel pans! The enamel may chip (the enamel comes loose from the steel). When start the hob at a high power level and the pan is (too) dry; the base of the pan may warp due to overheating.
Minimal pan base diameter

Do not use pans that are smaller than the cooking zone. This will prevent food remains ending up on the red-hot cooking zone. Burnt-on food remains are difficult to remove. In addition, the handles may become too hot and a lot of energy is lost.
- Tempered glass cookware with special ground bottom may be used on the cooking zones if its diameter fits that of the cooking zones. Cookware with larger diameter may crack due to thermal tension.
- Pans that have been used for cooking on a gas hob are no longer suitable for use on a ceramic hob.
- Sliding pans can cause scratches that cannot be removed.
- Only place pans with clean, dry bottoms on the cooking surface. This will avoid causing stains that are difficult to remove.
• Always keep the lid on the pan when cooking, in order to avoid energy loss. - Slide the bottom of the pan over a slightly damp cloth, before placing the pan on the cooking zone. This prevents dirt getting on to the cooking surface.
Power levels
The cooking zones have 9 power levels. Beside it there is a stay-warm level. The stay-warm level is intended to keep food warm. If you have started the hob the required cooking zone can be chosen within 10 seconds otherwise the hob switches Off.
Stay-warm zone (some models do not have a stay-warm zone)
The stay-warm zone is intended to keep food warm.

Do not touch the stay-warm zone when it is in use to prevent any burns. Do not place any heat-sensitive objects onto it.
Automatic heat up
This function preheats the cooking zone on maximum power in order to bring it rapidly up to the required temperature. After a given time interval, the power level returns spontaneously to the established setting. It may be switched On in any of the zones for all power settings except for setting "9" where power is set at maximum all the time.
| Cooking level The cooking zone stops automatically after (seconds): | |
| u | 30 |
| 1 | 60 |
| 2 180 | |
| 3 288 | |
| 4 390 | |
| 5 510 | |
| 6 150 | |
| 7 210 | |
| 8 270 | |
Pause function
The pause function can only be used when at least one zone is switched On.
The maximum break duration is 10 minutes. After 10 minutes at pause, the hob stops.
Touch within 10 minutes the pause key to start the cooking zone.
While the Pause function is active:
- Any Timer (also Alarm timer) set before the pause will be stopped during the pause and continue when you stop pause function.
Indications in the display
| In display | Status |
| 1 9 | Power levels cooking zone; 1 = low level / 9 = high level |
| A | Automatic heat-up function selected |
| U | Stay warm function selected |
| L | Child lock function selected |
| H | Residual heat indicator; The hob has a residual heat indicator for each cooking zone to show those which are still hot. Although the hob is switched off, the indicator ‘H’ will remain On for as long as the cooking zone is hot!Avoid touching them when this indicator is lit. Danger! Risk of burns. |
| J | Fault code; See ‘Troubleshooting table’ |
| F | Fault code; See ‘Troubleshooting table’ |
Cooking power levels
Because the power level depend on the quantity and composition of the contents of the pan, the table below is intended as a guideline only.
Use level 9 to:
- sear meats;
- cook fish;
- cook omelettes;
- fry boiled potatoes;
- deep fry foods.
Use level 7 and 8 to:
- fry thick pancakes;
- fry thick slices of breaded meat;
- fry bacon (fat);
• cook raw potatoes; - make French toast;
- fry breaded fish;
- cook through pasta;
- fry thin slices of (breaded) meat;
Use level 4-6 to:
• complete the cooking of large quantities;
• defrost hard vegetables;
- fry thick slices of breaded meat.
Use level 1-3 to:
- simmer bouillon;
- stew meats;
- simmer vegetables;
- melt chocolate;
- poach;
- melt cheese;
How to use the ceramic hob
- Touch the On/Off key until you hear a signal.
The hob is in standby mode.
The indicator light above the On/Off key comes On.
The cooking zone power level displays come On.
- If you take no further steps, the hob stops automatically within 10 seconds.

text_image
Diagram illustrating a hand interacting with a touchscreen display, showing progress from left to right with icons and numeric display.- Touch the cooking zone key of a cooking zone.
The cooking zone power level display flash.

text_image
Diagram illustrating a finger pressing a digital display with control buttons and playback controls, before and after transformation.- Move your fingertip along the slide control to set a power level (see 'How to use the slide control and touch keys).
The cooking zone starts automatically at the set power level.
There are 9 power levels and a stay-warm level (see 'Cooking power levels').

text_image
Diagram showing a hand interacting with a digital display control interface, before and after transformation.Stay-warm level
- Touch the slide control to set power level 1, and then (while power level flashing) move your fingertip along the slide to the left until symbol 'u' shows on the display.

text_image
Diagram illustrating a hand interacting with a digital display showing 0s, 1s, and 8s states before and after adjustment.Expandable cooking zone
-
Touch the expandable cooking zone key two times to start the second zone circle from the expandable cooking zone.
-
Touch the expandable cooking zone key three times to start all three zone circles.
The indicator light adjacent to the display comes On (one for the second zone and two for the second and triple circle). Touch the key to stop the extra zone circles.

text_image
Diagram showing a hand interacting with a digital display showing 0, 2, and 0 indicators before and after transformation.Adjust the cooking power levels
- Touch the cooking zone key for the cooking zone you require.
The power level indication flash.
- Move your fingertip along the slide control to adjust the power level.
Stop a cooking zone
The power level of a cooking zone is shown.
-
Touch the cooking zone key.
-
Move your fingertip along the slide control to set the power level to '0' (Off). The cooking zone stops.
The hob stops after 10 seconds when all cooking zones are set to '0'.
Stop all cooking zones at the same time
One or more cooking zones operate.
- Touch the On/Off key until you hear two signals.
▶All displays go Off and the hob stops.
Start the Stay-warm zone
-
Touch the stay-warm zone On/Off key. The indicator light comes On.
-
To stop the stay-warm zone, touch the stay-warm zone On/off key again.

If the stay-warm zone is still hot when it is stopped, the indicator light above the stay-warm zone On/Off key is flashing.
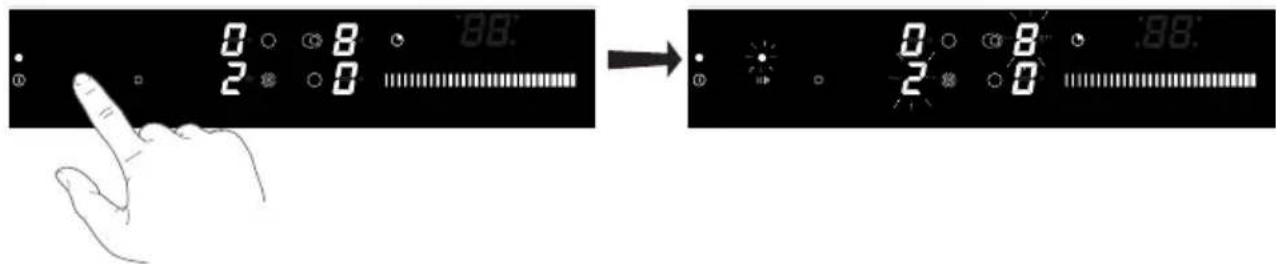
How to use the (kitchen) timer
-
Put the hob in standby mode and select the cooking zone and power level that you require.
-
To start the timer touch the timer key.
▷'00' flashes in the timer display.
To start the kitchen timer don't select a cooking zone and power level.
- Touch again the timer key.
A indicator light adjacent to the timer display comes On and the time flash.
▶ Touch the timer key as many times as necessary, to select the cooking zone of which you want to set the timer.

text_image
Diagram showing a hand interacting with a digital display showing 0, 2, and 8 units, before and after adjustment.- Move your fingertip along the slide control to set the time.
- Move your fingertip along the slide control more times to set the timer for a longer period.

text_image
0.00 2.00 → 0.32 2.00- The timer is in operation.
The indicator light adjacent to the timer display from the corresponding cooking zone flashes.
The cooking zone stops automatically when the set time ends.
▶You hear a signal when the set time ends.
▶Touch the timer key to stop the signal.
Change a set cooking time
Cooking time can be changed during operation.
- Touch the timer key as many times as necessary, to select the cooking zone of which you want to adjust the time.
The zone is identified by a indicator light adjacent to the timer display. The time flashes in the display.
- Move your fingertip along the slide control to adjust the time.
Check the remaining cooking time
The different timer settings are shown clockwise in turn in the display.
- Touch the timer key and continue to touch the key, to select the cooking zone to check the time remaining.
The zone is identified by a indicator light adjacent to the timer display. The timer display shows the remaining time.
Stop the timer
How to stop the timer before the end of set time:
-
Touch the timer key and continue to touch the key, to select the cooking zone for which you want to stop the timer.
-
Move your fingertip along the slide control to set the timer to '00'.
The indicator light adjacent to the timer display goes Off.
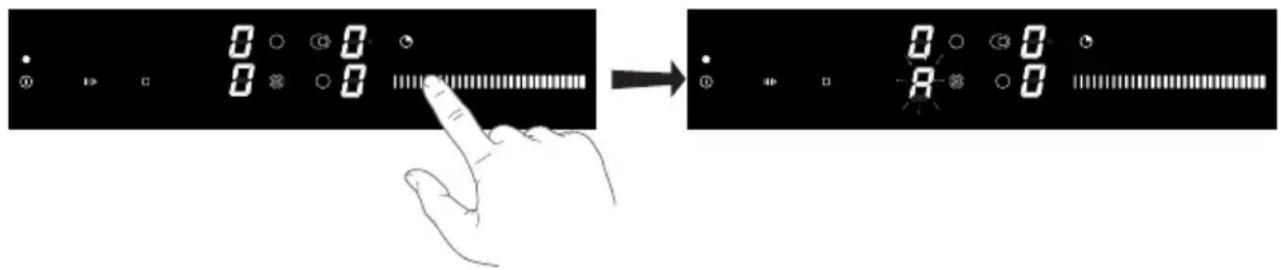
Start the Automatic heat-up function
- Put the hob in standby mode and select a cooking zone.
- Touch and hold the slide control until an 'A' shows in the display. Move your fingertip along the slide control to set a power level.
'A' and the set power flash in the display.
text_image
Diagram showing a hand interacting with a digital display showing 0, 1, 2, and 3 indicators before and after adjustment.Pause cooking (see pause function)
- Touch the pause key.
The indicator light above the pause key and the power levels flashes.
text_image
0 8 2 0 → 0 8 2 0 .98- Touch the pause key again to stop the pause.
Use the child safety lock
- Touch the On/Off key to stop the hob.
- Touch and hold the On/Off key till you heard two short signals.
First the hob comes in standby mode. You hear a first signal. Keep holding the On/Off key until you hear a second signal.

text_image
Diagram illustrating a finger pressing a button on a digital display, showing state transitions from left to right.▶All displays show 'L'.
The ceramic hob is locked.
After 5 seconds, the hob stops automatically.
- To unlock the hob, touch and hold the On/Off key again until you heard two short signals. The ceramic hob is unlocked.

If child lock is set default On in the settings menu (see chapter settings) the hob will automatically be locked every time it is stopped.
Recall function
If the hob stopped accidentally all settings can be restored with the recall function.
- Touch the On/Off key within 5 seconds after the hob stopped.
The indication light above the pause key flash.
- Touch the pause key within 5 seconds to continue.
The ceramic hob shows all settings as they were before the hob was accidentally stopped.
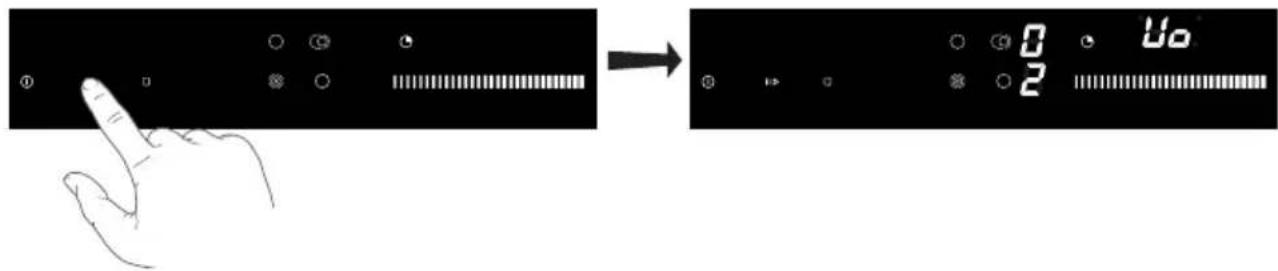
Adjust the acoustic signal and child safety lock parameters
You can adjust the volume and duration of the acoustic signal. You can also adjust the automatic lock settings.
Start the settings menu:
-
Stop the hob.
-
Touch and hold the pause key till you hear a signal.
The first parameter "Uo" is shown on the timer display, indicating the volume (loudness) of acoustic signals.
text_image
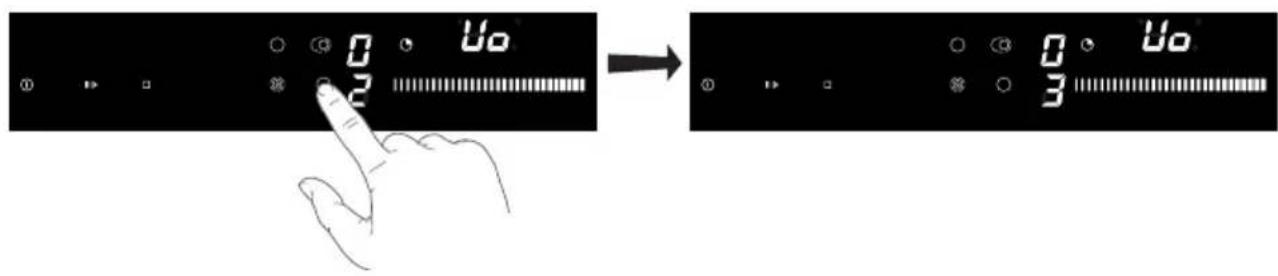
Diagram illustrating a hand interacting with a touchscreen and displaying a digital display showing 0, 2, and 10 units.- Touch the timer key to select the type of parameter:
▶Uo - acoustic signal and alarm volume (loudness)
So - alarm duration
▶Lo - Automatic lock

text_image
Uo 0 Uo 2The currently set value is shown on the right cooking zone power level displays.
- Touch the cooking zone front right key (and cooking zone left right key for alarm duration) to set the value.
text_image
0 2 → 0 3 0 2- Touch and hold the pause key for 2 second to confirm and store the parameters.
▶You hear two long signals.
- Touch the On/off key if you do not wish to store the new parameter settings.
▶You hear two short signals.
Acoustic signal and alarm volume (loudness) 'Uo'
The following values can be set:
▶ 00 on the display = off (does not apply to alarm and error acoustic signal)
▶01 on the display = minimum volume
▶02 on the display = medium volume
03 on the display = maximum volume (default)
- You hear a signal with every change.
Acoustic alarm duration 'So'
The following values can be set:
0.5 on the display = 5 seconds
▶1.0 on the display = 1 minute
▶2.0 on the display = 2 minutes (default)
Child safety lock 'Lo'
If the automatic lock function is activated in the user settings mode, the cooking hob will be automatically locked every time it is switched off.
00 on the display = off (default)
▶01 on the display = on
Cleaning

Start the child lock before you clean the hob.
Daily cleaning
- Use special cleaning agents for ceramic hobs. These cleaning agents leave a thin layer on the glass surface. This prevents over-cooked food and lime scale to burn into the ceramic glass surface.
- Clean the hob after cool down.
- Removed Over-cooked food containing a lot of sugar and acids, such as apple sauce, rhubarb or red cabbage immediately with a damp dish cloth. This prevent that over-cooked food burns into the hob. Be careful! The cooking zone can be hot! This can cause you injury.
- Best for daily cleaning is a damp cloth with a mild cleaning agent. Dry with kitchen paper or a dry towel.
Stubborn stains
- Stubborn stains can also be removed with a mild cleaning agent such as washing-up liquid.
- Remove water marks and lime scale with vinegar.
- Metal marks (caused by sliding pans) can be difficult to remove. Special agents are available.
- Use a glass scraper to remove food spills. Melted plastic and sugar is also best removed with a glass scraper.

Never use
- Never use abrasives. They leave scratches in which dirt and lime scale can accumulate.
- Never use anything sharp such as steel wool or scourers.
General
If you notice a crack in the glass top (however small), switch the hob off immediately, unplug the hob, turn off the (automatic) fuse switch(es) in the meter cupboard or, in the event of a permanent connection, set the switch in the power supply lead to zero.) Contact the service department.
Troubleshooting table
If the appliance does not work properly, this does not always mean that it is defective.
Try to deal with the problem yourself first by checking the points mentioned below or check for more information the website ‘www.pelgrim.nl’.
| Symptom Possible cause Solution | ||
| The display lights up when the hob is activated for the first time. | This is the standard set-up routine. | Normal operation. |
| A slight smell is noticeable the first few times the hob is used. | The new appliance is heating up. This is normal and will disappear once it has been used a few times. Ventilate the kitchen. | |
| The pans make a noise while cooking. | This is caused by the energy flowing from the hob to the saucepan. | At high settings this is perfectly normal for some pans. It will not damage either the pans or the hob. |
| A cooking zone suddenly stops working and you hear a signal. | The preset time has ended. Stop the bleep by pressing the timer key. | |
| The hob is not working and nothing appears in the display. | There is no power supply due to a defective cable or a faulty connection. | Check the fuses or the electric switch (if there is no plug). |
| A fuse blows as soon as the hob is switched On. | The hob has been wrongly connected. | Check the electrical connections. |
| Error code ↗ | The control panel is dirty or has water lying on it. | Clean the control panel. |
| You have pressed two or more keys at the same time. | Do not operate more than one key at the same time. | |
| Software failure. Reset the appliance by disconnecting it from the power supply. Remove the plug from the socket or switch the automatic circuit breaker to Off. | ||
| Error code F Other defect Contact the service department. | ||
Disposal of packaging and appliance
In the manufacturing of this appliance durable materials were used. Make sure to dispose of this equipment responsibly at the end of its lifecycle. Ask the authorities for more information regarding this.
The appliance packaging is recyclable. The following may have been used:
- cardboard;
- polythene film (PE);
• CFC-free polystyrene (PS hard foam).
Dispose of these materials in a responsible manner and in accordance with government regulations.
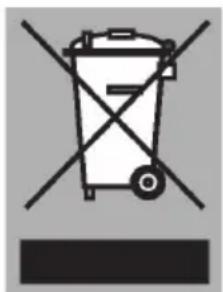
natural_image
Symbol of a trash bin with crossed lines indicating no waste or discharge (no text or labels)As a reminder of the need to dispose of household appliances separately, the product is marked with the symbol of a crossed-out wheeled dustbin. This means that at the end of its working life, the product must not be disposed of as urban waste. It must be taken to a special local authority differentiated waste collection centre or to a dealer providing this service.
Disposing of a household appliance separately avoids possible negative consequences for the environment and health deriving from inappropriate disposal and enables the constituent materials to be recovered to obtain significant savings in energy and resources.
Declaration of conformity
CE We declare that our products meet the applicable European Directives, Decisions and Regulations and the requirements listed in the standards referenced.

text_image
Warning symbol with exclamation mark inside a triangleThe appliance identification card is located on the bottom of the appliance.
Stick the appliance identification card here.
When contacting the service department,
have the complete type number to hand.
You will find the addresses and phone numbers of the service organisation on the guarantee card.
text_image
Black and white barcode image with vertical lines above and below the bars715742
Pelgrim