IAN 96716 - Tent CRIVIT - Free user manual and instructions
Find the device manual for free IAN 96716 CRIVIT in PDF.
| Technical Features | 2-person tent, dimensions: 210 x 130 x 100 cm, weight: 2.5 kg |
|---|---|
| Materials | Waterproof polyester fabric, fiberglass frame |
| Usage | Ideal for camping and hiking, easy to set up |
| Maintenance | Clean with a damp cloth, store in a dry place |
| Safety | Avoid open fires nearby, check the condition of the seams |
| General Information | Delivered with pegs and tension cords, 2-year warranty |
Frequently Asked Questions - IAN 96716 CRIVIT
User questions about IAN 96716 CRIVIT
0 question about this device. Answer the ones you know or ask your own.
Ask a new question about this device
Download the instructions for your Tent in PDF format for free! Find your manual IAN 96716 - CRIVIT and take your electronic device back in hand. On this page are published all the documents necessary for the use of your device. IAN 96716 by CRIVIT.
USER MANUAL IAN 96716 CRIVIT
TENTE IGLOO DOUBLE-TOIT
Assembly instructions
()()()
()

()
Befare und, yield out the illustrate pages and go to know oil of the functions of your unit.
GS Instructions and Safety Notice Page 16
DE AT CH
Lieferumfang 6
Technische Daten 6
cifications techniques 103
ation conforme 10
Type of Delivery 163
nical data 16
ded use 16
ty instructions 16-17
mbly 17
assembly 17-18
Intence 183
18
page 183
es for disposal 186
ears warranty 183
Specifications techniques
With your purchase you have decided on a high-quality product. Get to know the product before you start to use it. Carefully read the following assembly instructions. Use the product only as described and only for the given areas of application. Keep these instructions safe. When passing the product on to a third party, always make sure that the documentation is included.
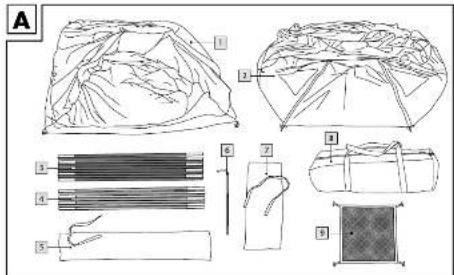
Scope of Delivery (Fig. A)
(1) - Inner tent 1 x
(2) - Outer tent sheet 1 x
(3)-Tent poles,black 2×
(4) - Tent poles, grey 1 x
(5)-Tent pole bag 1 x
(6)-Tent pegs 20×
(7)-Tent peg bag 1 x
(8)-Packsack1x
(9) - Storage net 1 x
Assembly instructions 1 x
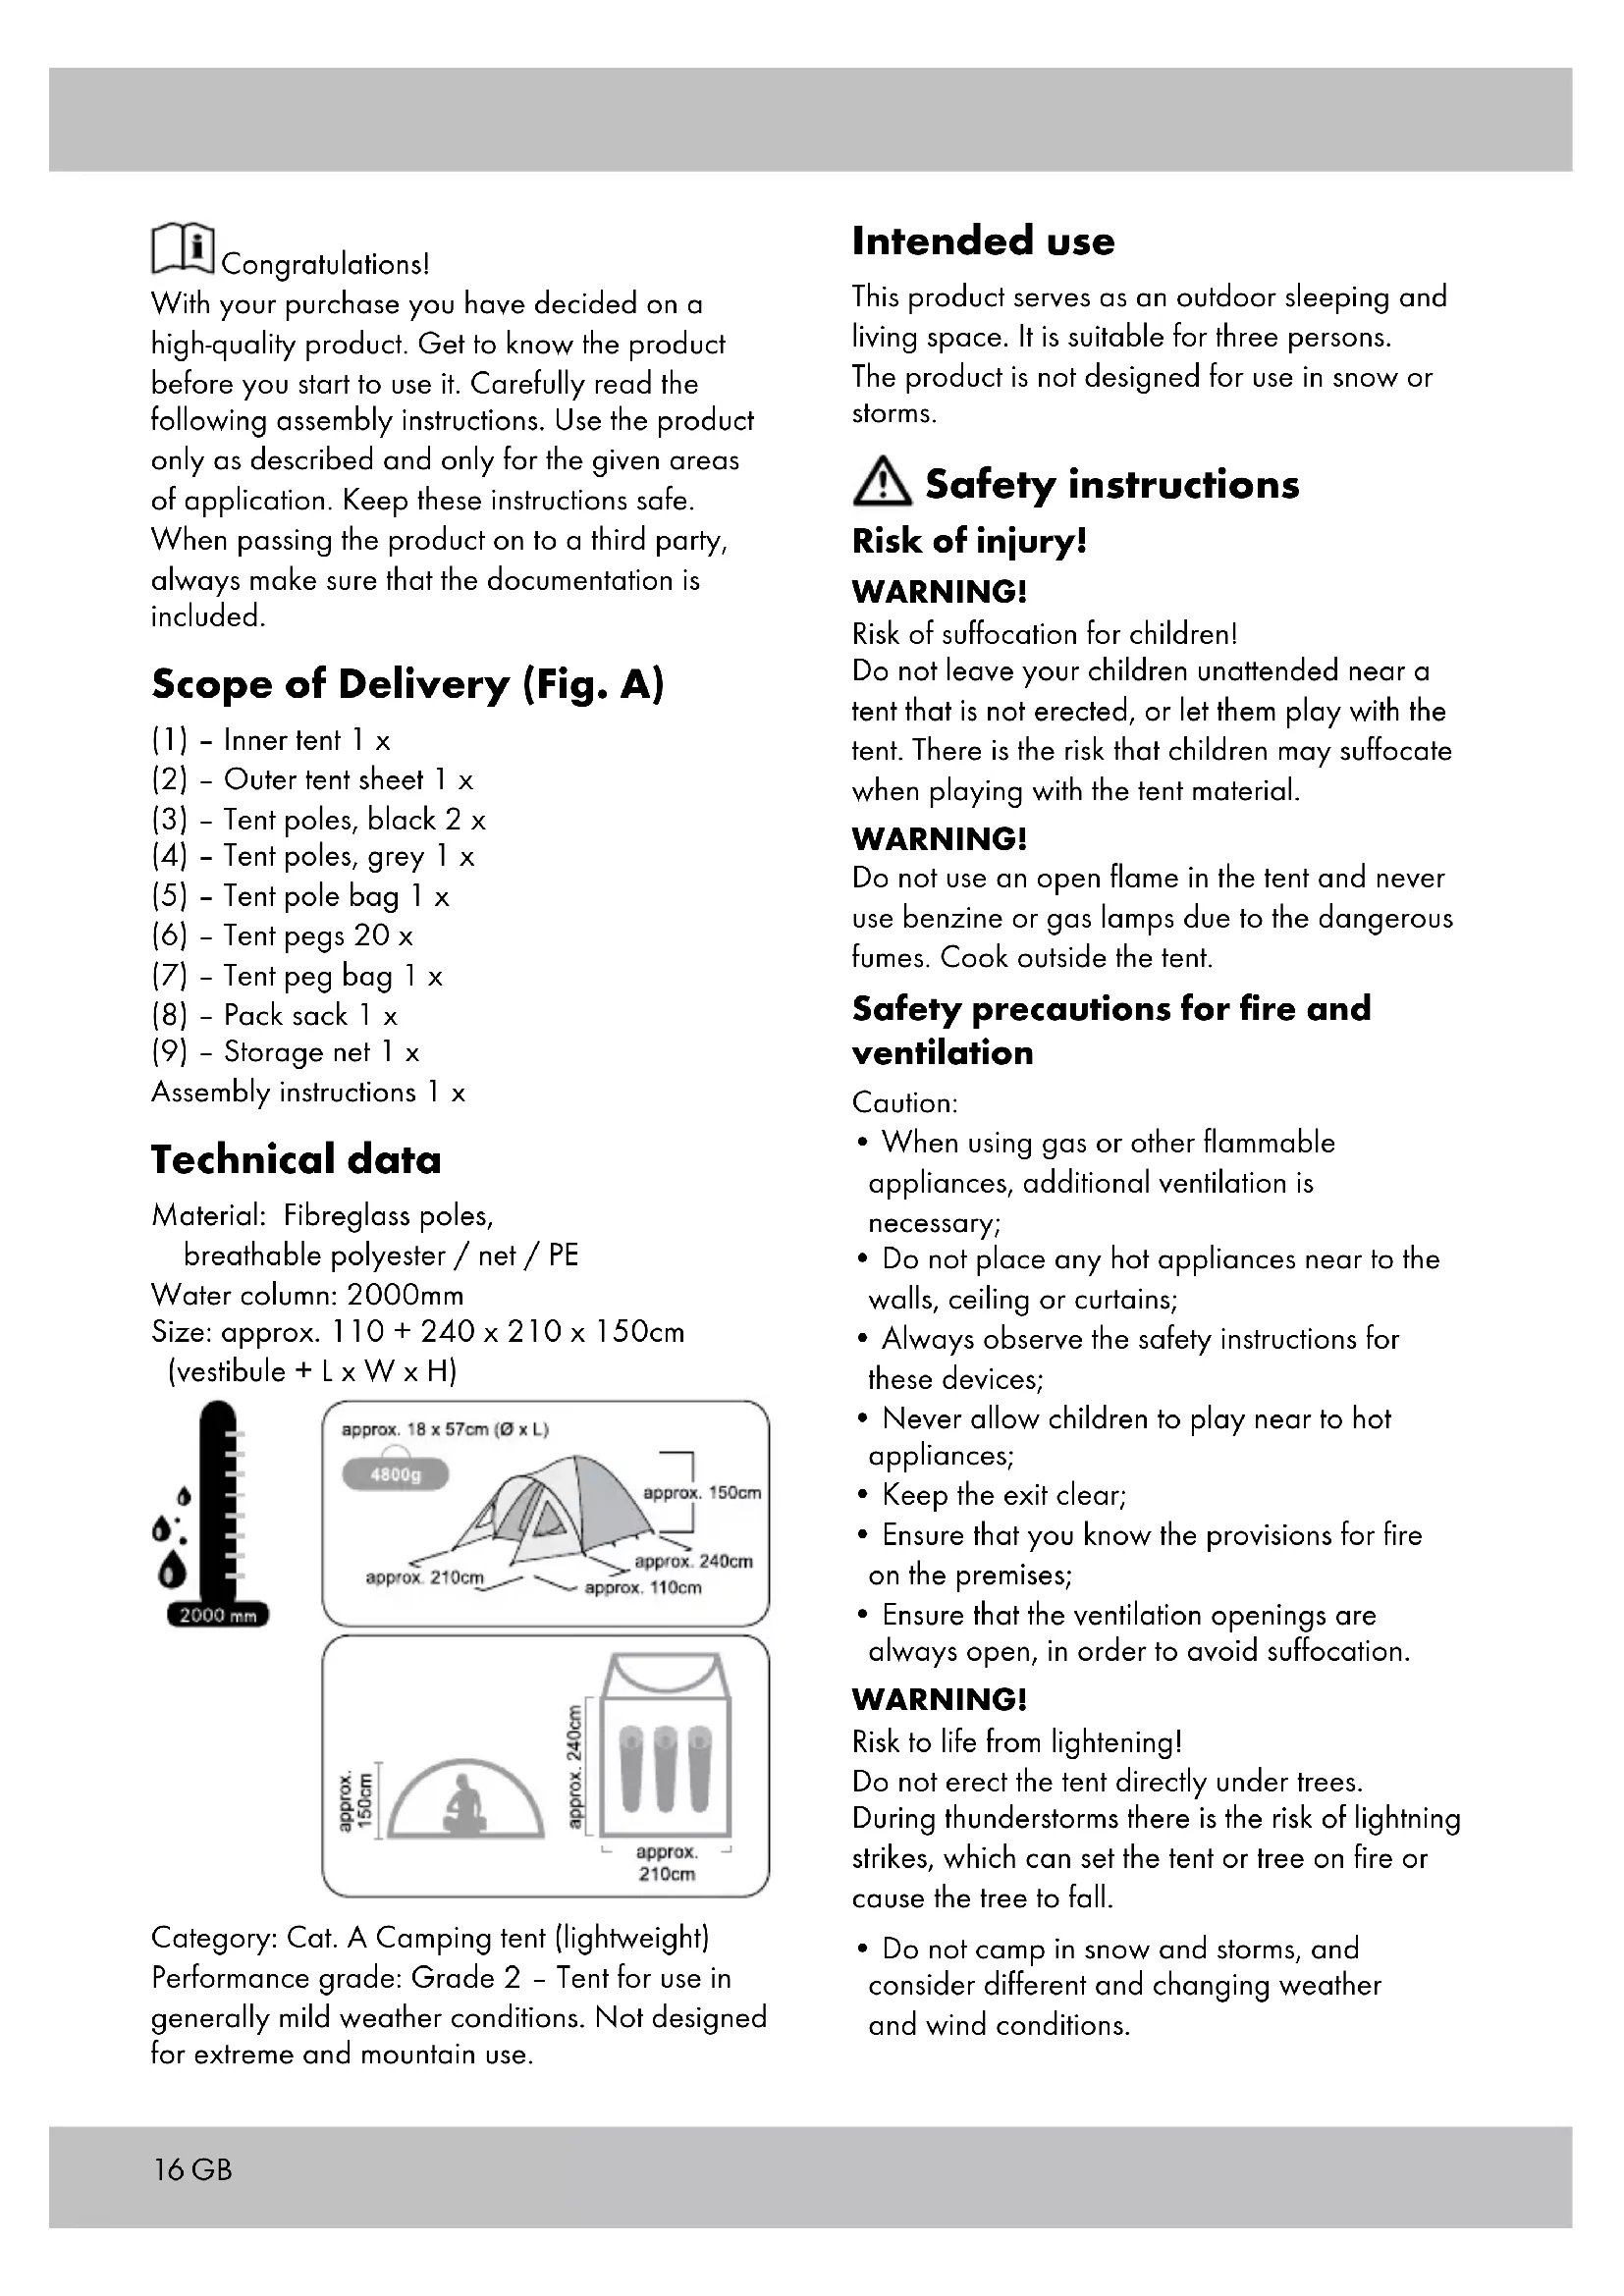
Technical data
Material: Fiberglass poles, breathable polyester / net / PE
Water column: 2000mm
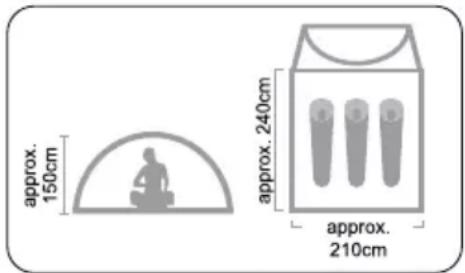
Size: approx. 110 + 240 × 210 × 150cm
(vegetibule + L × W × H)

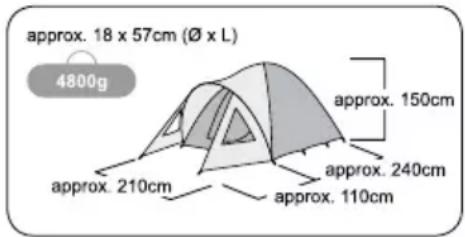
Category: Cat. A Camping tent (lightweight) Performance grade: Grade 2 - Tent for use in generally mild weather conditions. Not designed for extreme and mountain use.
Intended use
This product serves as an outdoor sleeping and living space. It is suitable for three persons.
The product is not designed for use in snow or storms.
Safety instructions
Risk of injury!
WARNING!
Risk of suffocation for children!
Do not leave your children unattended near a tent that is not erected, or let them play with the tent. There is the risk that children may suffocate when playing with the tent material.
WARNING!
Do not use an open flame in the tent and never use benzine or gas lamps due to the dangerous fumes. Cook outside the tent.
Safety precautions for fire and ventilation
Caution:
- When using gas or other flammable appliances, additional ventilation is necessary;
- Do not place any hot appliances near to the walls, ceiling or curtains;
- Always observe the safety instructions for these devices;
- Never allow children to play near to hot appliances;
- Keep the exit clear;
- Ensure that you know the provisions for fire on the premises;
- Ensure that the ventilation openings are always open, in order to avoid suffocation.
WARNING!
Risk to life from lightening!
Do not erect the tent directly under trees.
During thunderstorms there is the risk of lightning strikes, which can set the tent or tree on fire or cause the tree to fall.
- Do not camp in snow and storms, and consider different and changing weather and wind conditions.
Avoid damage to property!
- Do not erect the tent so that the tent entrance is in the direction of the wind. Wind could damage the tent.
- All the tent materials suffer material fatigue and bleaching if they are exposed to prolonged, strong sunlight. For this reason, when the tent is to be used over longer periods, erect it in a shady position. Do not leave the tent assembled unnecessarily.
Assembly
NOTE!
Perform a test assembly before the camping trip. In doing so, ensure that all the accessories are present.
Selecting a location for placing the tent
Choose a place that is as flat and clean as possible. Avoid dips in the ground. Remove stones, branches and other sharp objects in order to prevent damage to the tent floor. Use natural shade, such as hedges, rocks, etc. Use the appropriate pegs for sandy ground in order to prevent accidental loosening of the tension.
NOTE!
Insert the pegs into the ground at a slight angle to achieve good strength but without causing tension in the tent surface. The tent material and tension points should only be slightly taut, so that it can compensate for pressure from the wind. Ensure that there is not too much pressure on the tent. Check the tent tension according to weather condition.
NOTE!
Water condensation occurs basically in every tent, however particularly during strong fluctuations in temperature. After a night in the tent, there will be drops of condensation on the inner wall. Condensation is not evidence of leakiness. Good ventilation reduces condensation in the tent.
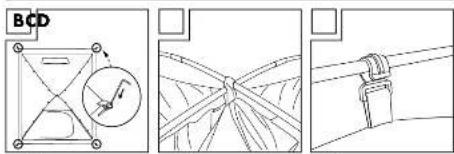
- Spread the base of the inner tent flat on the ground, close the zips for the entrance and fix the loops at all four corners with the pegs (Fig. B).
- Build together the segments of the tent poles (3) and (4). Slide the two black tent poles (3) diagonally through the loops in the middle of the inner tent (Fig. C). Secure the inner tent on the tent poles using the clips (Fig. D).
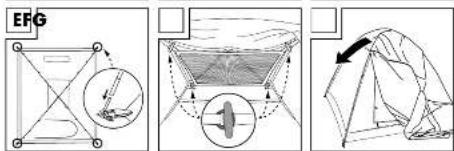
- Turn the tent around and insert the metal pins at the corners of the inner tent into the end of the tent poles so that these are under tension (Fig. E).
- The storage net (9) can now be hooked onto the roof ridge in the interior of the inner tent (Fig. F).
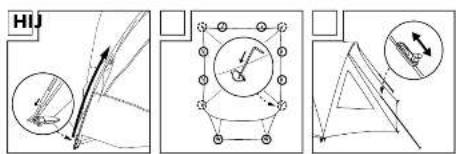
- Place the outer tent over the inner tent (Fig. G). Secure the outer tent using the bands to the tent poles and at the crossing point in the frame. Push the grey tent poles (4) through the frame tunnel in the outer tent (Fig. H). Right the frame up and insert the metal pins from the corners of the inner tent into the end of the tent poles. Secure the outer tent with 10 pegs and ensure that the loops at the four corners are fixed with the pegs of the inner tent (Fig. I).
- Secure each of the 6 guy ropes with a peg. The length of the guy ropes can be adjusted with the tensioner (Fig. J).
Disassembly
NOTE!
Disassemble the tent, if possible, when clean and dry to prevent the formation of mould and mildew. After disassembling in rain, immediately dry the tent. Clean all the parts thoroughly before packing them away.
- Remove the pegs and guy ropes.
- Remove the tent poles, fold them together and disassemble the inner and outer tents.
Folding scheme
- Fold the outer and inner tent into squares and adjust the sizes to match the maximum width of the packsack.
- Place the tent poles and pegs into the respective packaging.
- Place the inner tent onto the outer tent.
- Place the tent peg bag and tent pole bag in the middle of the inner tent and finally roll up the inner and outer tents.
- Place the tent, tent pole bag and tent peg bag in the packsack and close the zip.
Maintenance
In the case of small tears and holes, use a repair kit from a specialist shop. Immediately replace broken tent poles. Oil the zips a little if they become stiff.
Care
Brush dirt off the dry tent surface; if necessary treat with clean water. Do not use a chemical cleaning product. Seal the tent seams from time to time. For this, use a commercial seam sealer.

Storage
Store the product in a dry place to prevent the mould and weather marks. If it is not used for a longer period, take the product out of the packsack and store it in a dry place out from direct sunlight.
Notes for disposal
Please dispose of the packaging and product separated according to materials and in an environmentally-friendly manner! Dispose of the product through an approved waste disposal firm or by using your local municipal administration. Observe the current applicable legislation.
3 years warranty
The product was produced with great care and under constant supervision. You receive a three-year warranty for this product from the date of purchase. Please retain your receipt.
The warranty applies only to material and workmanship and does not apply to misuse or improper handling. Your statutory rights, especially the warranty rights, are not affected by this warranty.
With regard to complaints, please contact the following service hotline or contact us by e-mail.
Our service employees will advise as to the subsequent procedure as quickly as possible.
We will be personally available to discuss the situation with you.
Any repairs under the warranty, statutory guarantees or through goodwill do not extend the warranty period. This also applies to replaced and repaired parts. Repairs after the warranty are subject to a charge.
IAN:273711
GB Service Great Britain
Tel.: 08715000720
(£ 0.10/Min.)
E-Mail: deltasport@lidl.co.uk
You can also find spare parts for your product at: www.delta-sport.com, category Service - Lidl Spare Parts Service