HBA7608W - Hand blender BEKO - Free user manual and instructions
Find the device manual for free HBA7608W BEKO in PDF.
| Features | Details |
|---|---|
| Product type | Hand blender |
| Power | 800 W |
| Speed | 2 speeds |
| Included accessories | Whisk, chopper, beaker |
| Body material | Plastic |
| Cord length | 1.5 m |
| Weight | 1.2 kg |
| Dimensions | 25 x 6 x 6 cm |
| Maintenance | Dishwasher-safe accessories |
| Safety | Overheat protection |
| Warranty | 2 years |
Frequently Asked Questions - HBA7608W BEKO
User questions about HBA7608W BEKO
0 question about this device. Answer the ones you know or ask your own.
Ask a new question about this device
Download the instructions for your Hand blender in PDF format for free! Find your manual HBA7608W - BEKO and take your electronic device back in hand. On this page are published all the documents necessary for the use of your device. HBA7608W by BEKO.
USER MANUAL HBA7608W BEKO
natural_image
Product photo of a hand mixer with three kitchen utensils (bake, whisk, and stand) arranged in a row (no text or symbols visible)HBA7608W
EN DE FR TR ES PL IT | | | RO
Please read this user manual first!
Dear Customer,
Thank you for preferring a Beko product. We hope that you get the best results from your product which has been manufactured with high quality and state-of-the-art technology. Therefore, please read this entire user manual and all other accompanying documents carefully before using the product and keep it as a reference for future use. If you handover the product to someone else, give the user manual as well. Follow all warnings and information in the user manual.
Meanings of the symbols
Following symbols are used in the various section of this manual:

Important information and useful hints about usage.

WARNING: Warnings for dangerous situations concerning the safety of life and property.

Suitable for contact with food.

Do not immerse the appliance in water.

Protection class for electric shock.

This product has been produced in environmentally-friendly, state-of-the-art facilities.
CONTENTS
ENGLISH 4-15
DEUTSCH 16-31
FRANÇAIS 32-46
TÜRKÇE 47-59
ESPAÑOL 60-75
POLSKI 76-94
ITALIANO 95-109
1 Important safety and environmental instructions
This section contains safety instructions that will help protect from risk of personal injury or property damage.
Failure to follow these instructions invalidates the granted warranty.
1.1 General safety
- This appliance complies with the international safety standards.
- This appliance may be used by children and the people whose physical, perceptive or mental skills are impaired or who are inexperienced or not knowledgeable about the appliance as long as they are supervised or informed and made understood the safe use of the appliance and the encountered dangers. Children should not play with the appliance.
- This appliance shall not be used by children.
- Keep the appliance and its cord out of the reach of children.
- Do not use it if the power cable, blades or the appliance itself is damaged. Contact an authorised service.
1 Important safety and environmental instructions
- Only use the original parts or parts recommended by the manufacturer.
- Do not attempt to dismantle the appliance.
- Your mains power supply should comply with the information supplied on the rating plate of the appliance.
- Do not use the appliance with an extension cord.
- Do not pull the power cable when unplugging the appliance.
- Wait for moving accessories to stop and unplug the appliance when left attended, while installing/removing accessories or before cleaning.
- Do not touch the plug of the appliance with damp or wet hands.
- Do not use the device for hot food.
- To prevent overheating, do not use the appliance continuously for more than 10 seconds. Leave to cool for 1 minute in between each 10 seconds of operation.
- Use the appliance only with the supplied rubber base and glass container.
1 Important safety and environmental instructions
- Do not operate the appliance without the ingredients in the bowl.
- Remove bones and stones from food to prevent the blades and the appliance from getting damaged.
- This appliance is not suitable for dry or hard foods as this will quickly cause the blades to become dull.
- Follow all warnings to prevent injuries due to incorrect use.
- When emptying the container, during cleaning and grabbing chopping blades with bare hands serious injuries could result due to incorrect use. Use the plastic section trying to hold the chopping blade.
• After cleaning, dry the appliance and all parts before connecting it to mains supply and before attaching the parts. - Do not immerse the appliance, power cable, or power plug in water or any other liquids.
- Do not operate or place any part of this appliance or its parts on or near hot surfaces.
- If you keep the packaging materials, store them out of the reach of children.
1
Important safety and environmental instructions
1.2 Compliance with the WEEE Directive and Disposing of the Waste Product:
This product complies with EU WEEE Directive (2012/19/EU). This product bears a classification symbol for waste electrical and electronic equipment (WEEE).
This product has been manufactured with high quality parts and materials which can be reused and are suitable for recycling. Do not dispose of the waste product with normal domestic and other wastes at the end of its service life. Take it to the collection center for the recycling of electrical and electronic equipment. Please consult your local authorities to learn about these collection centers.
1.3 Compliance with RoHS Directive
The product you have purchased complies with EU RoHS Directive (2011/65/EU). It does not contain harmful and prohibited materials specified in the Directive.
1.4 Package information

Packaging materials of the product are manufactured from recyclable materials in accordance with our National Environment Regulations. Do not dispose of the packaging materials together with the domestic or other wastes. Take them to the packaging material collection points designated by the local authorities.
2 Your Hand Blender
2.1 Overview
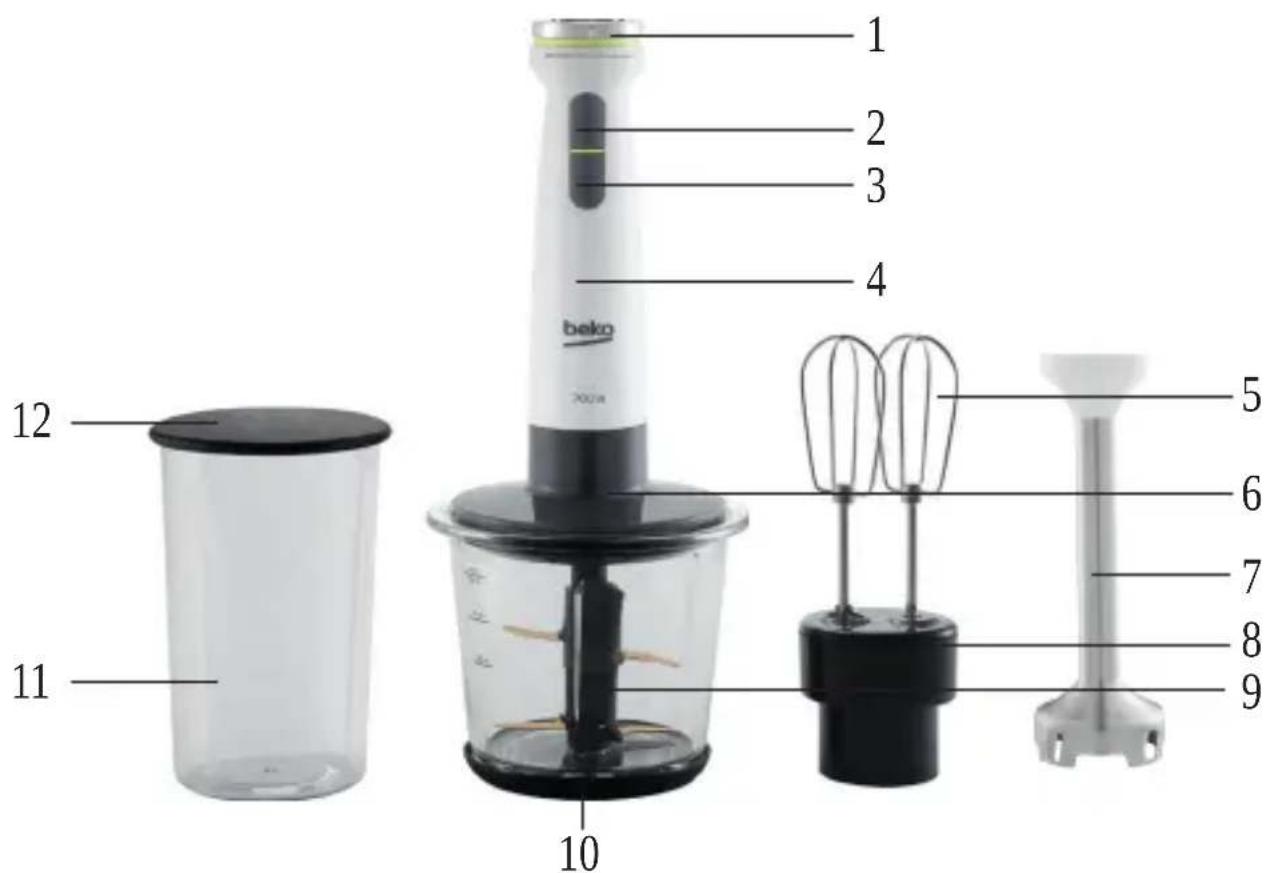
- Speed adjustment button
- Operat ng sw tch
- Turbo button
- Motor un t
- Balloon wh sk
- Chopp ng l d
- Blend ng Shaft
- Wh sk holder
- Chopp ng blade
-
Chopp ng bowl
-
Measur ng beaker
- Non-sl p rubber base (cover)
2.2 Technical data
Voltage:220-240 V\~,
50-60 Hz
Power: 700 W
Technical and design modifications reserved.
The values which are declared in the markings affixed on your product or the other printed documents supplied with that represent the values which were obtained in the laboratories pursuant to the pertinent standards. These values may vary according to the usage of the appliance and ambient conditions.
3 Operation
3.1 Intended use
This appliance is intended only for household use; it is not suitable for professional use.
It is designed for chopping and whisking small amounts of solid food only.
3.2 Maximum quantities and processing time
• Refer to the table for processing time and maximum quantities.
| Attachments Ingredients | |
| Blender leg 150g | carrot (cut-into 1.5cm cubes) and 300ml water |
| Mini Chopper 200g | meat |
| Whisker 4 egg whites | |
3 Operation
3.3 Initial use
- Clean the appliance parts before initial use (see 4.1).
- Use the appliance upright on a balanced, flat, clean, dry and non-skid surface.
- Do not use the appliance continuously for more than 10 seconds. Turn off the device when used for more than 10 seconds and wait for 1 min. before operating again.

When you do not exceed 10 seconds in intermittent uses, you can operate the appliance until the end of the process by waiting for a couple of seconds.
3.4 Blending and chopping with the blending shaft
- Attach the blending shaft (7) to the end of the motor unit (4) by turning it anti-clockwise "
-Fit it into its place, do not apply too much force. - Put processed ingredients (in small pieces) in measuring container or a container that you will use.
- Immerse blending shaft (13) into the container.
- Plug in the appliance.
- Run the appliance by pressing operation button (2).

Turn speed adjustment button (1) to gradually increase speed.

Start mixing in low speed while mixing ingredients. Ingredients may be spattered when you start with high speed.
3 Operation

You can get better results if you make circular movements with the appliance during processing.
- Release the operation switch (2) when the operation is finished. Unplug the appliance and wait for it to stop completely.
- Remove the blending shaft (7) from the motor unit (4) by turning it clockwise "m

WARNING: Do not touch the blades with your bare hands.
3.5 Chopping

Do not chop extremely hard items such as coffee beans, ice cubes, nutmeg, grains or bones. Remove stalks from herbs, shells from nuts and bones, tendons and gristle from meat.

Cut the food in small pieces.
- Put the chopping bowl (8) on an even surface.
- Place the chopping blade (9) onto the fixed shaft in the chopping bowl (8).

WARNING: Be careful when inserting the chopping blade (9) as it is very sharp.

WARNING: Do not touch the chopping blade (9) with bare hands.
3 Operation
- Place the ingredients in the chopping bowl (8).
- Put the chopping lid (6) on the chopping bowl (8).
-Make sure that the claws on the chopping lid are firmly locked on the bowl.

WARNING: Never operate the appliance if the chopping lid (6) is not properly seated on the chopping bowl (8), as this could damage the chopping blade (9).
- Put the motor unit (3) on the chopping lid (6). Make sure the motor unit is securely attached to the chopping lid.

During operation always hold the chopping bowl (8) with one hand to prevent it from tipping over.
-
Insert the plug into the wall socket.
-
Press and hold down the operation button (2).
- The appliance starts operating.
- Use the speed adjustment button (1) to select a speed.

Do not use the appliance continuously for more than 10 seconds.

To achieve the best results press the operation button (1) intermittently.
- When your work is done, switch off the operating button (2) and unplug the appliance. Rotate the motor unit (4) anticlockwise to remove it from the chopper head (6). Remove the chopped head. Take the chopping blade (9) out of the chopping bowl (8) carefully prior to removing the chopped food.
3 Operation
Mixture Butter + Honey
Butter taken from the freezer (should be kept in the freezer for min. 4 hrs. and cut into pieces of sizes approximately 10-15 mm x 35-40 mm) and honey taken from the refrigerator (should be kept in the refrigerator min. 1 day).
3.6 Whisking
- You can use the balloon whisk (4) for whipping cream and beating eggs.
-
Never process more than 4 egg whites or 200 ml cream.
-
Insert the balloon whisk (4) into the whisk holder (7) until it clicks into place.
- Rotate the whisk holder (8) clockwise "to fit it to the motor unit.
- Put the ingredients that you would like to process in the measuring beaker (5) or a similar bowl.
- Insert the power plug into the wall socket.
-
Hold the balloon whisk (4) into the mixture to be processed.
-
Press and hold the operation button (2).
-The appliance starts operating. - Use the speed adjustment button (1) to select a speed.
- Move the appliance slowly up and down and in circles to whisk the ingredients.
- Remove the motor unit from the whisk holder (8) by turning it anticlockwise "
4 Cleaning and care
4.1 Cleaning

WARNING: Never use gasoline, solvent, abrasive cleaning agents, metal objects or hard brushes to clean the appliance.

WARNING: Do not touch the chopping blades (9) with your bare hands. The blades are very sharp. Use a brush!

WARNING: Never put the motor unit (3) or power cord in water or any other liquids and never hold them under running water.
- Unplug the appliance before cleaning.
- Make sure the appliance is at complete stop and remove blending shaft (13).
-
Wipe appliance motor unit (3) with a damp cloth.
-
Immediately after using, clean the blending attachment, chopping lid (6), and whisk holder (7) with warm, soapy water and dry them thoroughly. Never wash them in dishwasher.
- Dry all parts of the appliance after cleaning.

WARNING:
Do not wash the blending shaft (13) in dishwasher.

WARNING: Never immerse inner part of blending shaft (13), the motor unit (3) or power cable in water or in any other liquid.
4.2 Storage
- If you do not intend to use the appliance for a long time, store it carefully.
- Unplug the appliance before lifting it.
- Store the appliance in a cool and dry place.
- Keep the appliance and cable out of the reach of children.
4 Cleaning and care
4.3 Handling and transportation
- During handling and transportation, carry the appliance in its original packaging. The packaging of the appliance protects it against physical damages.
- Do not place heavy loads on the appliance or the packaging. The appliance may be damaged.
- Dropping the appliance may render it non-operational or cause permanent damage.
natural_image
Symbol of a trash bin crossed with a diagonal line, no text or numbers presentCERTIFICAT DE GARANTIE
natural_image
Symbol of a trash bin crossed out by a diagonal line, with no text or labels present.natural_image
Product photo of a digital kitchen brush with a stand mixer and two whiskers (no text or symbols visible)HBA7608W
AR
beko