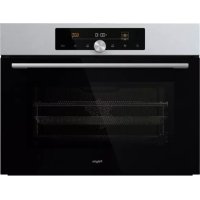
OKW698 - Oven Pelgrim - Free user manual and instructions
Find the device manual for free OKW698 Pelgrim in PDF.

| Features | Details |
|---|---|
| Oven type | Built-in oven |
| Capacity | 70 liters |
| Heat type | Convection |
| Maximum temperature | 250��C |
| Cooking functions | Grill, conventional heat, convection |
| Energy | Electric |
| Dimensions (W x H x D) | 60 x 60 x 55 cm |
| Weight | 35 kg |
| Energy consumption | Energy class A |
| Cleaning system | Catalytic cleaning |
| Included accessories | Grill rack, roasting pan |
| Safety | Door lock, thermal insulation |
| Warranty | 2 years |
Frequently Asked Questions - OKW698 Pelgrim
User questions about OKW698 Pelgrim
0 question about this device. Answer the ones you know or ask your own.
Ask a new question about this device
Download the instructions for your Oven in PDF format for free! Find your manual OKW698 - Pelgrim and take your electronic device back in hand. On this page are published all the documents necessary for the use of your device. OKW698 by Pelgrim.
USER MANUAL OKW698 Pelgrim
bedieningspanel type OKW693-695-696
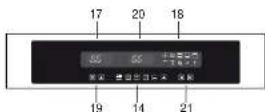
bedieningspaneel type OKW698
Touch control oven OKW698
Solo-oven 693/695/696/698
When you have read these instructions for use, you will quickly be aware of all the facilities the appliance can offer you. You can read about safety and how you should look after the appliance. In addition you will find environmental tips and instructions that can help to save energy.
Keep the instructions for use and the installation instructions. Any later user of this appliance could benefit from them.
Enjoy your cooking!
Table of contents
Appliance description 24-25
For your safety 26
Things to watch for 26
Before use of the oven 26
Use 27-35
Cookers 27
Switch-off timer 27
Electronic timer 28
Oven functions 29
Touch control oven OKW698 32
Oven functions OKW698 35
Possibilities 36-38
Baking tips 36
Roasting 37
Grilling 38
Browning 38
Drying 38
Thawing 38
Maintenance 39
Cleaning 39
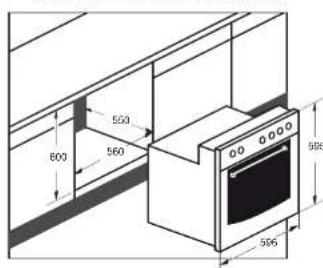
Installation 40-43
Disposal of packaging and appliances . 44
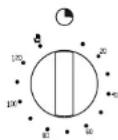
1-control knob oven function
2 - control knob oven temperature
3-indicator light oven temperature
4-indicator light oven
5 - control knob front left cooking zone
6 - control knob rear left cooking zone
7 - spark ignition gas hob
8 - control knob rear right cooking zone
9 - control knob front right cooking zone
0-upper heating element for heating/ grilling
1-ledges on four levels
2 - oven door
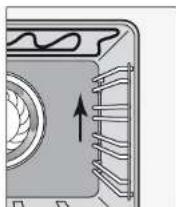
13-fan
15-indicator light electric hob/ceramic hob
16-switch-off timer
Appliance description - OKW
1 - control knob oven function
2 - control knob oven temperature
3-indicator light oven temperature
4-indicator light oven
5 - control knob front left cooking zone
6 - control knob rear left cooking zone
7 - spark ignition gas hob
8 - control knob rear right cooking zone
9 - control knob front right cooking zone
10- upper heating element for heating/ grilling
11 - ledges on four levels
12 - oven door
13-fan
14 - electronic timer
15-indicator light electric hob/ceramic hob
17 - display oven temperature
18 - display oven functions
19 - temperature setting
20 - display electronic timer
21 - oven function setting
Things to watch for
The appliance should only be connected by a qualified fitter (see electrical connection).
- Disconnect the appliance before starting with cleaning or reparation. Preferably by taking the plug out of the socket or by turning off the mains switch.
The glass oven door can heat up when using the oven at maximum temperature for a long time (e.g. during grilling). Act with care if children are nearby.
Grease and oil are flammable when overheated. Stay near the cooker when preparing dishes.
Cords to electrical appliances - e.g. a mixer - can get caught between the door of the convector oven or may accidentally touch the cooking zones.
Always cool the oven with a closed oven door.
Always grill with a closed oven door.
Never cover the base of the oven with aluminium foil and do not put baking tins on the base of the oven. The foil will block the heat, damaging the enamel, and the baking result will therefore not be satisfactory.
Before use of the oven
Prepare for use
Remove all accessories from the oven and clean them thoroughly using a dishwashing detergent. Switch on the closed, empty oven at the maximum temperature for about thirty minutes, after which the grilling element should be switched on for a period of fifteen minutes. Let the oven cool off and clean it with warm water.
Please note:
When the oven is heated to a high temperature for the first time, you will smell a "new appliance" odour. This is to be expected.
Clean immediately
Spilled foods with sugar or fruit juices, such as prune juice or rhubarb, may affect the colour of the enamel. Spills of this type should be cleaned immediately.
Setting the time of day (if applicable)
When the appliance is connected for the first time or when the power supply has been interrupted, 3 zeros blink on the display. You have to set the time of day.
- Press the end but at the same time.
- Press the - / + buttons until the correct time is reached.
The daytime set is automatically saved after a few seconds.
Cookers
Combi-oven 673 can only be combined with a Pelgrim electrical cooker or a Pelgrim ceramic cooker. Combi-oven 653 can be combined with a Pelgrim gas cooker. These cookers have separate operating instructions.
Tip
Switch on the cooker zones one at a time at the highest setting before using for the first time. This will remove the "new appliance" odour.
Using pans
Use only pans with a solid, oven, preferably thick bottom, especially when cooking or frying at high temperatures (deep-fat frying, for example). Uneven pan bottoms will extend the cooking periods and require more energy.
Always use lids
When cooking without a lid, energy is wasted.
Points to pay attention to when cooking on an electric or ceramic hob
Salty water and wet pan bottoms will damage the cooker. Make sure the cooker zones are always dry. If food boils over, always clean immediately.
Heat is optimally transferred when the pan and the cooker zone are the same size.
Switch-off timer (if applicable)
Use without switch-off timer
Turn the timer knob to the left to position.
The oven can be used without switch-off timer.
Automatic switch off with the switch-off timer
The oven switches off automatically when the cooking time has elapsed.
- Select the oven function and the temperature by turning the function knob and the temperature knob (see "Oven functions").
Turn the timer knob clockwise all the way to 120 minutes. This way you tighten the spring.
Turn the timer knob back (anti-clockwise) to the desired time.
The oven has been switched on and it gives a signal when the cooking time has elapsed. The oven then switches off automatically.
Turn the timer knob to setting farmaual use of the oven.
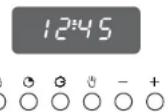
Electronic timer (if applicable)
1245


Cooking timer
The timer only gives a signal when the time has elapsed. It does not switch the oven off. Press the button.
- Set the time with the -j+ buttons.
lights up. The time appears five seconds after release of the button. - Press the button to see the remaining time. The remaining time is displayed in the display for 5 seconds.
The alarm goes off after the time set has elapsed. The symbol the display disappears. Use the key turn the alarm off.
Automatic switch off with cooking time
The oven switches off automatically when the cooking time has elapsed.
- Select an oven function by turning the knob to the required symbol.
- Select the temperature required.
Press the button. 0.00 appears in the display and 'AUTO' lights up. - Press the - / + buttons until the correct cooking time has been reached. The time appears again five seconds after release of the button. "AUTO" and light up.
The oven has been switched on and it gives a signal when the cooking time has elapsed. The oven then switches off automatically. The symbol the display disappears.
- Use the key to turn the alarm off.
Automatic switch off with ending time
The oven switches off automatically when the ending time has elapsed.
- Select an oven function by turning the knob to the symbol required.
- Select the temperature required.
- Press the button. 0.00 appears in the display and 'AUTO' lights up.
- Press the - / + buttons until the correct finish time has been reached. The time appears again five seconds after release of the button. 'AUTO' and 'Ctrl up.
- The oven has been switched on and it gives a signal when the finish time is reached. The oven then switches off automatically. The symbol the display disappears.
- Use the key to turn the alarm off.
Delaying the start time/setting the finish time Put a dish in the oven. Set the cooking time and the time at which the dish has to be ready.
The oven calculates the start time itself and switches off automatically when the cooking time has elapsed.
- Select an oven function by turning the knob to the required symbol.
- Select the temperature required.
Press the button. 0.00 appears in the display and "AUTO" lights up. - Press the -f+ buttons until the correct cooking time has been reached. The time appears again five seconds after release of the button. 'AUTO' and 'light up'. The oven has been switched on.
- Press the button and keep it pressed. The display shows the earliest possible finish time.
- Press the - / + buttons until the correct finish time has been reached. "AUTO" and light up. The oven switches on and off automatically. A signal can also be heard.
- Use the key to turn the alarm off.
Switching the oven off during cooking
- Turn the function and temperature knobs to 0. The indicator lights go out and the appliance has been switched off.
- Press the button. The appliance is set to manual control.
Oven functions
Conventional
The dish is heated by the radiation heat of the upper and lower elements. Because the heat comes both from the upper and the lower element, the position in the oven is important. Usually the dish should be put in the middle of the oven. Do not open the door at the beginning of the process. Chancs are the freshly risen pastry subsides. When preparing recipes such as cream puffs, meringue pastries, soufflés, breads, cakes, pizzas and biscuits, the best results will be achieved by using the upper and lower heating elements.
Condensation
When roasting or baking, condensation will develop, in particular when preparing bread, pizzas, pre-fried chips, etc. When baking or roasting on multiple levels simultaneously, more condensation will develop.
Bottom heat
This function is advised for dishes of which the bottom need good cooking. The bottom of the dishes are thoroughly cooked. Before the end of the cooking process is reached (when there is still a quarter of the cooking time left), turn the function knob to bottom heat. Turn the temperature knob to its maximum setting. The dish will then be heated mainly by the bottom element, but will continue to brown on.
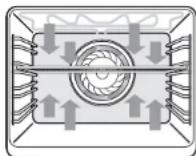
The fan in the rear wall distributes the hot air in the oven. This is used to heat the dishes. You can use several levels at the same time, thus saving energy. The hot air system is highly suitable for baking cakes, cookies and apple tarts. You can bake on multiple levels simultaneously if desired, in which case the tins should be aligned directly under one another. Baking sheets with cookies should be positioned on the first and third levels.
Grill
For grilling of dishes. The dishes are heated by the radiation heat of the combined grill/backing element. Flat pieces of meat, chicken or other poultry may be grilled directly on the grid shelf. This grill setting is also suitable for toasting bread.
The thermostat also sets the grill. The element will not continuously light, but only from time to time. The dishes get a crispy brown crust. When grilling, you should set the temperature knob to the maximum setting.
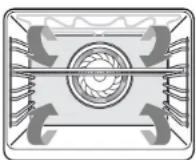
By setting the knob of the hot air oven to the grill position above, you can grill with the fan on. The radiated heat will be circulated around the dish by the blower. This setting is suitable for thin pieces of meat and chicken halves.
The glass oven door can heat up (to a max. of 100^ ) when using the oven at maximum temperature for a long time (e.g. during grilling). Act with care if children are nearby.
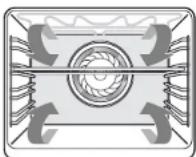
Turbo-grill
Food is heated by the radiant heat of the large grill; both grill elements are turned on; the ventilator is off. For this, see "Ventilation + grill" setting.
Always grill with a closed oven door.
Oven lighting
The oven lighting will switch on. This is the best setting for cleaning the oven.
± Ventilation ^+ bottom heat
This setting is ideal for baking pastries with a wet topping, fruit tarts and moist pastries in moulds or on a plate. Place the dish on the first or second oven shelf from the bottom.
图 Thawing
You can thaw food using the convector oven blower. Remove the wrapping and put the frozen food in a dish. Slide the dish onto the shelf on the lowest runner. Set the mode switch to ventilator now blows cold air.
Conventional + ventilation
The dish is heated by the radiation heat of the upper and lower elements. The heat will be circulated around the dish by the ventilator. This setting is suitable for bread, pizza and lasagna.
Housing cooling
The housing cooling is equipped with a temperature controlled cooling fan. After use of the oven at high baking or frying temperatures, the cooling fan continues to operate for a while - even if the oven has been switched off - in order to cool the oven sufficiently. After some time, the cooling fan automatically switches itself off. It is automatically switched on again if the temperature in the oven rises too much as a result of the heat still present in the oven.
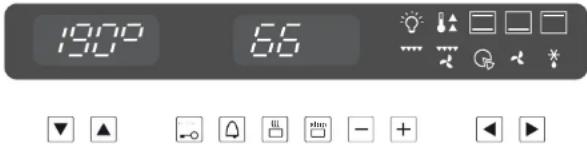
Touch control oven OKW698
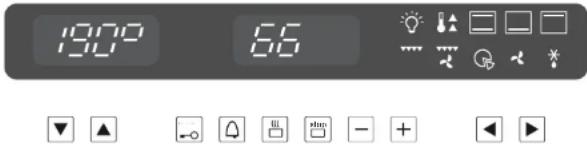
Setting the time of day
When the appliance is connected for the first time or when the power supply has been interrupted, 4 zeros blink on the display. You have to set the time of day.
- Press the and buttons at the same time.
- ":" blinks on the display. Press the -f+ buttons until the correct time is reached.
The daytime set is automatically saved after 3 seconds.
Setting the audible signal
You can select an alternative audible signal by repeatedly pressing the button while the oven is turned off. You can choose from 2 different audible signals.
Child lock
You can enable the child lock to prevent the oven from being turned on by accident.
- Press button for 5 seconds until -3 appears on the display. The child lock is switched on.
To switch off the child lock: Press button again for 5 seconds until disappears. The display shows the time a day.
Manual operation of the oven
- Press button. A signal can be heard.
- The display shows "ON", lights up and the oven lighting is switched on.
- Select an oven function with the buttons and
The temperature display shows the recommended oven temperature for the function chosen. You can modify this temperature with the buttons and
After the oven is turned on, the symbol flashes in the display while the oven is warming up. - As soon as the set temperature has been reached, the symbol stops flashing and the audible signal goes off.
- Use the key to turn the oven off.
Cooking timer
The timer only gives a signal when the time has elapsed. It does not switch the oven off. -Switch on the oven with button
- Press button . 600 appears on the display and : " blinks.
- Set the time with the - / + buttons. The maximum time that you can set is 23 hours and 59 minutes.
The alarm goes off after the time set has elapsed. The symbol 0 the display blinks.
- Use key, [a], [b] to turn the alarm off.
Automatic switch off with cooking time
The oven switches off automatically when the cooking time has elapsed.
- Switch on the oven with button
- Press button .A" appears on the display.
- Press the - / + buttons until the correct cooking time has been reached. The maximum cooking time that you can set is 10 hours.
A signal can be heard and the display shows the time of day. Select an oven function with the buttons and . The symbol appears on the display.
The temperature display shows the recommended oven temperature for the function chosen. You can modify this temperature with the buttons - The oven has been switched on and it gives a signal when the cooking time has elapsed. The oven then switches off automatically. The display shows the time of day and symbols A and Bink.
-Use key, to turn the alarm off.
- The symbol lights up and the oven lighting is switched on.
- Switch off the oven with button
Automatic switch off with ending time
The oven switches off automatically when the ending time has elapsed.
- Switch on the oven with button
- Press button. "A" appears on the display.
- Press the -f+ buttons until the correct ending time has been reached.
A signal can be heard and the display shows the time of day. Select an oven function with the buttons and . The symbol appears on the display.
- The temperature display shows the recommended oven temperature for the function chosen. You can modify this temperature with the buttons mD.
- The oven has been switched on and it gives a signal when the finish time is reached. The oven then switches off automatically. The display shows the time of day and symbols A and Bink.
-Use key, to turn the alarm off.
- The symbol lights up and the oven lighting is switched on.
- Switch off the oven with button
Delaying the start time/setting the finish time Put a dish in the oven. Set the cooking time and the time at which the dish has to be ready.
The oven calculates the start time itself and switches off automatically when the cooking time has elapsed.
- Switch on the oven with button
-Press button.
- Press the - / + buttons until the correct cooking time has been reached. A signal can be heard and the display shows the time of day.
- Press button.
- Press the - / + buttons until the correct finish time has been reached. Another signal sounds and "..." stops blinking.
- Select an oven function with the buttons and
The temperature display shows the recommended oven temperature for the function chosen. You can modify this temperature with the buttons and
The oven switches on and off automatically. A signal can also be heard. The display shows the time of day and symbols A and Blink.
-Use key,or turn the alarm off.
- The symbol lights up and the oven lighting is switched on.
- Switch off the oven with button
Attention:
The Pre-heat and Defrost oven functions cannot be used in combination with the automatic functions.
Oven functions OKW698
Oven lighting
The oven lighting will switch on. This is the best setting for cleaning the oven.
While the oven is being used, the lighting is turned on until 3 minutes after the set temperature has been reached. Then the lighting is turned off automatically.
Press one of the buttons or
The oven lighting is turned on for 1 minute.
Preheating
In this setting the oven is heated extra quickly. After the set temperature has been reached, you can use another oven function in the usual way.
Conventional
The dish is heated by the radiation heat of the upper and lower elements.
Bottom heat
This function is advised for dishes of which the bottom need good cooking.
Top heat
This setting is suitable for a giving a short extra burst of heat to souffles, meringues, etc., to thoroughly cook them.
Grill
Flat pieces of meat, chicken or other poultry may be grilled directly on the grid shelf. This grill setting is also suitable for toasting bread.
Grill + ventilation
The heat from the grillement will be circulated around the dish by the blower.
This setting is suitable for thin pieces of meat and chicken halves.
Pizza function
This setting is suitable for preparing pizzas.
Hot air
The fan in the rear wall distributes the hot air in the oven. This is used to heat the dishes. You can use several levels at the same time.
Thawing
You can defrost food more quickly in this setting. The ventilator blows cold air. The temperature display shows "dEF".
Baking tips
Oven levels
Depending on the height of the pastry or cookies, place the baking sheet on the first or second level from the bottom. Tins should be placed on a rack on the first or second level from the bottom.
Tins are important
In particular in ovens with upper and lower heating elements, the material from which the tin is made is extremely important. The best tins are made from black tin or are lined with a special synthetic material: these tins absorb the heat the quickest and can shorten the baking time.
How to test whether or not a cake is cooked
Prick a skewer into the cake at its thickest point about 10 minutes before the end of the given baking time. If the skewer remains dry and no cake mixture sticks to it you can turn off the oven and use the residual heat to let the cake cook thoroughly.
The cake has not risen proper.
Use less liquid next time or set the temperature 10^ lower or cook for a longer period of time. You should adhere exactly to the mixing times given in your cookery book.
The cake has sunk in the middle
The cake has risen beautifully at the edges but sunk in the middle. Do not grease the sides of the cake tin. Loosen the cake carefully with a knife after baking.
The cake is too dark on the top
Put the cake on a lower ridge in the oven, set a lower temperature, bake the cake for a little longer and, perhaps, use black baking tins.
The cake is too dark on the bottom
Put the cake on a higher ridge in the oven and set a lower temperature.
Colour difference
You have been baking at two or three different levels. The cakes or biscuits on the top tray are darker than those on the bottom tray: Food on baking trays which are put into the oven at the same time will not always be cooked at the same time. Select a lower temperature, the food will then cook more evenly. Leave the bottom tray in for 5-10 minutes longer or put it in the oven 5-10 minutes sooner.
The souffle is much too dark on top
Remove the crust. Grill the top for a moment to give a golden brown crust to the souffle. Do not use Parmesan cheese; this type of cheese browns too quickly and will taste bitter. Next time put the dish a little lower in the oven and set the temperature 10^ lower.
The biscuits stick to the baking sheet
Slide the baking sheet back into the oven for a moment and then remove the biscuits immediately.
The cake will not turn out of the tin
Carefully loosen the edge with a sharp knife. Turn the tin upside down again and cover with a cold, damp cloth a couple of times. Next time grease and flour the tin well.

Roasting
If the meat is covered when roasted, e.g. in a casserole, it will retain its juices and little or no smoke will develop. When roasted in an open roasting tin it will brown and crisp more quickly.
The table below applies only when you put the dishes into a cold oven.
The oven's roasting tin is ideal for roasting large joints, weighing over 1 kg.
Roasting table
| Meat weight in kg temp in °C time in mins. | ||
| Sirloin beef 1 180 - 200 100 - 120 | ||
| Fillet of beef 1 190 - 210 35 - 45 | ||
| Roastbeef 1 190 - 210 35 - 45 | ||
| Pork 1 170 - 190 100 - 120 | ||
| Cured side of pork 1 150 - 160 80 - 100 | ||
| Game 1 180 - 200 90 - 120 | ||
| Veal 1 170 - 190 100 - 120 | ||
| Lamb 1,5 170 - 190 90 - 120 | ||
| Poultry | 1 170 - 190 50 - 60 | |
| 2 170 - 190 120 - 150 | ||
| 4 160 - 180 150 - 180 | ||
| Fish | 1,5 | 160 - 180 35 - 55 |
The figures in this table are guidelines.
Hot air grilling
Place the roasting sheet on the first level in the oven.
Place the grill sheet in the middle of the oven (see table).
Time table for grilling
| Meat weight in kg ridge level time in mins. | |||
| Schaschlik 317-20 | |||
| Chicken 1235-40 | |||
| Rolled meat 1250-60 | |||
| Cassolar rib 260-70 | |||
The figures in this table are guidelines.
Browning
To brown and crisp the outside of meat, switch the grill element on for a few moments. Wait until the top is golden brown.
Small pieces of meat
Grilled meat will retain its natural flavour if it is not coated with oil before grilling.
Large pieces of meat
These are best brushed with a thin coating of oil or butter to prevent the surfaces exposed to the heat from drying out.
Drying
To dry fruit, vegetables and herbs well, set a temperature of 60 - 80^
Thawing
You can thaw food using the convector oven blower. Remove the wrapping and put the frozen food in a dish. Put the dish on ridge 1. Set the function knob of the hot air oven to the setting and the temperature to zero (the fan now blows cold air).
Thawing periods for frozen products
| Food being thawed time in mins. | |
| 1000 grs fish or 500 grs meat 60 - 90 | |
| 1000 grs poultry or meat 90 - 120 | |
| 500 grs sausage 30 - 50 | |
| 300 grs fruit (strawberries) 30 - 45 | |
| 500 grs short pastry 20 - 30 | |
| 500 grs bread 30 - 40 | |
The figures in the table are guidelines.
Cleaning
Enamelled parts
The inside of the oven door, the side panels, the base of the oven, the baking sheet and the roasting tin are all completely enamelled. These are best cleaned with hot, soapy water or a little liquid detergent; rinse well with clean water.
Chrome
Clean the ridges, the rack and the control panel with hot soapy water or a little liquid detergent, rinse with clean water.
Plastic/glass
Clean the handle and knobs with soapy water or Glassex.
Sealing rubber
Clean with hot soapy water and rinse with clean water.
A tip
Cleaning the oven regularly will prevent stubborn stains.
If you want to thoroughly clean the oven, the ledges can be removed by pushing the edges upwards and lift them from the hook.
Installation
General
When the appliance does not have a connecting cable and plug, then it may be connected to the mains only by an approved installer.
Please note:
The power rating and required mains voltage are shown on the rating plate at the back of the oven. Connection should take place according to national and local regulations. After installation the wall socket and plug must be accessible at all times.
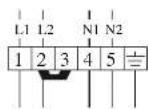
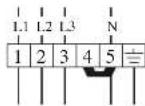
To connect the appliance a fixed connection has to be made. The wire which is coloured green and yellow must be connected to the terminal which is marked by the letter E or the earth symbol or which is coloured green, or green and yellow. The wire which is coloured blue must be connected to the terminal which is marked by the letter N or which is coloured black. The wire which is coloured brown must be connected to the terminal which is marked by the letter L or which is coloured red. If the input of the appliance exceeds 3kW , the appliance has to be connected to an outlet with a rated current exceeding 13 Amp.
Electrical connection
230V-50Hz
The appliance should always be earthed.
Use good quality cable for connecting e.g. H05RRF, 1,5 or 2,5mm^2 with 3 or 5 cores, depending on the regulations.
With following colour code:
brown = phase L
blue = phase N
green/yellow = earth (12)
black = neutral or phase
Depending upon the wiring diagram, you can use the black cores for neutral or a phase.
The cable must have a plug suitable for a nominal load of at least 15 A.
If you want to make a fixed connection, ensure that a multi-pole switch with a distance between contacts of 3mm is installed in the supply cable.
Wiring diagrams
There is a label showing the wiring diagrams on the underside of the appliance.
Supply terminals
The terminal block is at the back on the right, on top of the oven casing. You can reach the terminals after removing the terminal block cover.
You can make the cross connections needed using the jumpers on the terminal block. Do not forget to secure the cable with the cable clamp.
Electrical connection
Two or three phases.
Technical data
| oven type 693 | 695 69 | 673 65 | 3 | ||
| 696 | |||||
| model | |||||
| salo-oven | - | - | |||
| combi-oven with cooker | |||||
electrical connection
| 230 V | |||||
| 230 V - 380 V/400 V - | - | - | |||
| 50 Hz | |||||
| nominal power kW | 2,2 | 2,5 | 3,4 | 9,2 | 2,2 |
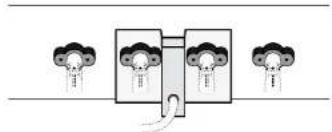
Combination of oven 653 with Pelgrim cooker
Connect the oven to the electricity supply.
Slide the oven 2/3 into the cupboard.
Remove the protective devices that secure the cardan joints during transport.
Slide the cardan joints onto the oven's tap pins and snap them in place.
First fit the plastic caps in the holes of the oven frame and then screw the oven to the kitchen cabinet.
Check that the cardan joint is working.
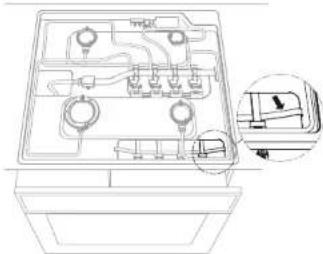
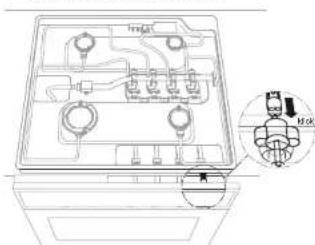
Combination of the 653 oven with the Pelgrim GKV106 gas hob
When the oven is built in under the GKV106 gas hob, the spark ignition box of the hob must be fitted to the attachment plate at the back of the dashboard of the oven.
- Remove the middle control knobs of the dashboard by pulling them towards you (1).
- Remove the screws (2), in order to detach the cardan holders and the attachment plate.
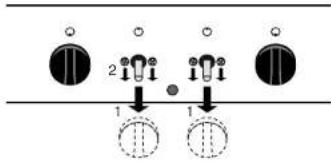
- Remove the decorative knob from the attachment plate.
- Fit the spark ignition box to the attachment plate.
- Screw the attachment plate and the cardan holders firmly onto the dashboard again. Take care that the cardan holders are fitted in the correct position.
- Replace the control knobs.
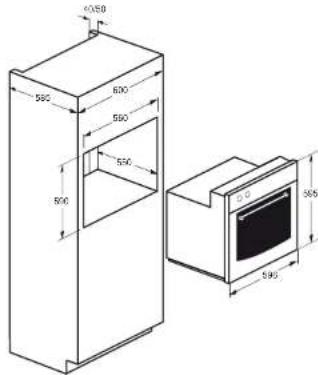
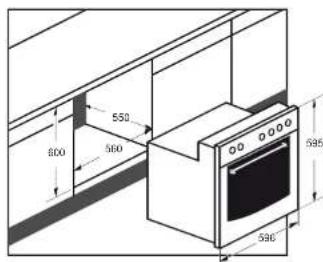
Solo-oven 693/695/696/698
Connect oven to the electrical mains.
Slide the oven into the cupboard.
Open the oven door and fasten the oven with two screws on each side wall.
Combination of the 673 oven and the Pelgrim electrical or ceramic cooker
After the electrical or ceramic cooker has been installed in accordance with the instructions supplied with the appliance:
Connect the oven to the electrical mains and connect the cooker's 15-pole plug to the oven's counter-plant.
Now slide the oven into the cupboard.
First fit the plastic caps in the holes of the oven frame and then screw the oven to the kitchen cabinet.
Disposal of packaging and appliances
In the manufacturing of this appliance use has been made of durable materials. The appliance packaging is recyclable. The following may have been used:
- cardboard;
- polythene film (PE);
- CDC-free polystyrene (PS hard foam);
Dispose of these materials in a responsible manner and in accordance with government regulations.
On the data plate is put the symbol of a crossed-out wheeled dustbin.

This means that at the end of its working life, the product must not be disposed of as urban waste. It must be taken to a special local authority differentiated waste collection centre or to a dealer providing this service.
Disposing of a household appliance separately avoids possible negative consequences for the environment and health deriving from inappropriate disposal and enables the constituent materials to be recovered to obtain significant savings in energy and resources.
Introduction
Fonctions four OKW698
Eclairage du four
Four solo 693/695/696/698