
OAS560ZWA - Oven Pelgrim - Free user manual and instructions
Find the device manual for free OAS560ZWA Pelgrim in PDF.

| Brand | Pelgrim |
| Model | OAS560ZWA |
| Product type | Built-in oven |
| Power supply | 230 V / 50 Hz (to be confirmed on the rating plate) |
| Water tank capacity | Approximately 1.3 dl |
| Number of cooking levels | 5 (wire guides) |
| Cooking modes | Fan-forced, fan-forced + bottom heat, AirBake, dual grill, natural convection, slow cooking, large fan grill, etc. |
| Special functions | Steam injection (Steam+), gratin, automatic programs, professional mode, automatic mode, Sabbath mode |
| Temperature probe | Yes, BAKESensor probe for core temperature measurement |
| Oven lighting | Halogen lamp G9, 230 V, 25 W |
| Cleaning system | AquaClean (steam cleaning), manual cleaning, automatic descaling of the steam circuit |
| Child safety | Yes, key lock |
| Door type | Door with soft-close mechanism, removable glass panes (three panes) |
| Included accessories | Rack, shallow baking tray, AirBake perforated tray, water tank, temperature probe |
| Spare parts and repairability | Replaceable halogen lamp, temperature probe, telescopic guide. Authorized after-sales service required for repairs. |
| General information | User manual available in French. Weight and dimensions: refer to the rating plate. |
Frequently Asked Questions - OAS560ZWA Pelgrim
User questions about OAS560ZWA Pelgrim
0 question about this device. Answer the ones you know or ask your own.
Ask a new question about this device
Download the instructions for your Oven in PDF format for free! Find your manual OAS560ZWA - Pelgrim and take your electronic device back in hand. On this page are published all the documents necessary for the use of your device. OAS560ZWA by Pelgrim.
USER MANUAL OAS560ZWA Pelgrim
Halogenlamp:G9,230V,25W
Informations, consels, astuces, ourecommendations

ATTENTION!
Attention-danger

Nousvousrecommandonsvivementdelireattentivementcettenotice.
Tablesdesmatieres
Interrupteursurlaportedufour
(selonlemodele)
Instructions for use Oven
Wethankyouforyourtrustandthepurchaseofourappliance.
Thisdetailed instruction manualissuppliedtomaketheuseofthisproducteasier.The instructionsshouldallowyoutolearnaboutyournewapplianceasquicklyaspossible.
Makesureyouhavereceivedanundamagedappliance.Ifyoudofindtransportdamage, pleasecontactthesellerfromwhichyoupurchasedtheappliance,ortheregional warehousefromwhichtiwassupplied.Thetelephonumbercanbefoundonthe invoiceoronthedeliverynote.
Instructions for installation and connection are supplied on separate sheet.
Thefollowingsymbolsareusedthroughoutthemanualandtheyhavethefollowingmeanings:

INFORMATION!
Information, advice, tip, or recommendation

WARNING!
Warning-generaldanger

Itisimportantthatyoucarefullyreadtheinstructions.
Contents
Safety precautions 4
Other important safety warnings 7
Appliance description 9
Rating plate - product information 9
Control unit 10
Appliance equipment 11
Control lights 11
Guides 11
Oven door switch 12
Cooling fan 12
Oven equipment and accessories 12
Before first use 14
Switching on for the first time 15
Testing water hardness 15
Choosing the settings 16
PROFESSIONAL MODE (pro bake) 16
AUTOMATIC MODE (auto bake) 24
27CHOOS
Child lock 27
Starting the cooking process 29
30Endofco
Choosing the general settings 31
General tips and advice for baking 34
Cooking with a temperature probe 35
37Recomm
Cleaning and maintenance 38
Cleaning the evaporating tray 40
Cleaning the steam system 41
41Removing
Replacing the bulb 43
Troubleshooting table 44
Special warnings and fault reporting 44
Disposal 45
Cooking test 46
Safety precautions

IMPORTANTSAFETYPRECAUTIONS-CAREFULLYREAD THEINSTRUCTIONSandSAVETHEMFORFUTURE REFERENCE.
Appliance must be connected to fixed wiring which has incorporated means of disconnection. Fixed wiring must be made in accordance with the wiring rules.
Meansfordisconnectionmustbeincorporatedinthefixed wiringinaccordancewiththewiringrules.
Theappliance mustnotbeinstalledbehindadecorativedoor inordertoavoidoverheating.
If the supply cord is damaged, it must be replaced by the manufacturer, its service agents similarly qualified persons in order to avoid a hazard (only for appliances supplied with connection cord).
Duringusetheappliancebecomeshot.Careshouldbetaken toavoidtouchingtheheatingelementsinsidetheoven.
Thisappliancecanbeusedbychildrenaged8yearsandabove, andbypersonswithreducedphysical,sensoryormental capabilitiesorlackofexperienceandknowledge,iftheyhave beengivensupervisionorinstructionconcerningtheuseofthe applianceinasafeway,andiftheyunderstandthehazards involved.Childrenshallnotplaywiththeappliance.Cleaning andusermaintenanceeshallnotbedonebychildrenwithout supervision.
WARNING: Accessible parts may become hot during use. Young children should be kept away.
WARNING: The appliance and some of its accessible parts may become very hot during use. Careshouldbetakentoavoid touching heating elements. Children less than 8 years of age shall be kept away unless continuously supervised.
Theapplianceisnotintendedtobecontrolledbyexternaltimers orseparateremotecontrollsystem.
Onlyusethetemperatureproberecommendedforuseinthis oven.
Donotuseharshabrasivecleanersorsharpmetalscrapersto cleantheovendoorglass/theglassofhingedlidsofthehob (asappropriate),sincetheycansscratchthesurface,whichmay resultinshatteringoftheglass.
Donotusesteamcleanersorhigh- pressurecleanerstoclean theapplianceasthismayresultinanelectricshock.
WARNING: Before replacing the lightbulb, makes sure the appliance has been disconnected from the mainspower, in order to prevent the hazard of an electric shock.
Neverpourwaterdirectlyonthebottomoftheovencavity. Temperaturedifferencescouldresultindamagetotheenanel coating.
Otherimportantsafty warnings
Theapplianceisintendedforhouseholduse.Donotuseitforanyotherpurpose,suchasroomheating, dryingofpetsortheranimals,paper,fabrics,herbsetc.Asthismayleadtoinjuryorfirehazard.
Appliance must be connected to fixed wiring which has incorporated means of disconnection. Fixed wiring must be made in accordance with the wiring rules.
Donotlifttheappliancebyholdingitbythedoorhandle.
Ovendoorhingesmaybedamagedwhenunderexcessiveload.Donotstandorsitontheopenoven door,anddonotleanagainstit.Also,donotplaceanyheavyobjectsontotheovendoor.
If the powercord sother appliances placed near this appliance getentangled in the ovendoor, they can be damaged, which turns result in short circuit. Therefore, makes sure the powercord of other appliances are always satasafedistance.
Ovendoorbecomeveryhotduringoperation.Athirdglassisinstalledforextraprotection,reducing thetemperatureoftheoutsidesurface(onlywithsomemodels).
Makesuretheventsarenevercoveredobstructedinanyotherway.
Donotlinetheovencavitywithaluminiumfoil, anddonotplaceanybakingtraysorthercookware ontheovenbottom. This wouldobstructandreduceaircirculationintheoven,slowdownthebaking process, anddestroytheenameelcoating.
Werecommendyouavoidopeningtheovendoorduringbaking,asthisincreasespowerconsumption andincreasescondensateaccumulation.
Attheendofthebakingprocess, and during baking, be careful when opening the ovendoor, asthere is dangerofscalding.
Topreventlimescaleaccumulation,leavetheovendooropenafterbakingorusingtheoven,toallow theovencavitytocooldowntoroomtemperature.
Cleantheovenwhenithascompletelycooledown.
Eventualmismatchesincolourshadesbetweendifferentappliancesorcomponentsswithasingldeignlinemayoccurdetovariousfactors,suchasdifferentanglesunderwhichtheappliancesareobserved,differentcolouredbackgrounds,materials,androomillumination.
Neverpourwaterontotheovencavitybottom.Temperaturesdifferencescouldresultindamagetothenamelcoating.
Donotusetheapplianceifitisdamaged.Callanaauthorizedservicecentre.
Beforeconnecting the appliancetothepowermains,leaveitatroomtemperatureforsometimeto allowalcomponentstoadapttoroomtemperature.Iftheovenwasstoredatatemperaturecloseto freezingpointorbelowit,thiscouldbehazardoustosomecomponents,particularlythepump.
Donotoperatetheapplianceinanenvironment colderthan 5^ . If the appliance isswitched on in such conditions, the pump could be damaged.
Donotusedistilledwater,tapwaterwithhighchlorinecontent,orthersimilarliquids.
When baking with steam injection, always fully opentheovendoor when the baking process is completed. If you don't do so, these are going from the evencavity could affect the operation of the control unit.
Onlyremoveandreplacetheevaporatingtraywhentheovenhascompletelycooledown.

WARNING!
Carefullyreadtheinstructionsforusebeforeconnectingtheappliance.Repairorany warrantyclaimresultingfromincorrectconnectionoruseoftheapplianceshallnotbe coveredbythewarranty.
Appliancedescription

INFORMATION!
Appliancefunctionsandequipmentdependonthemodel.
Basicequipmentofyourapplianceincludeswireguides,shallowbakingtray,andawirerack.
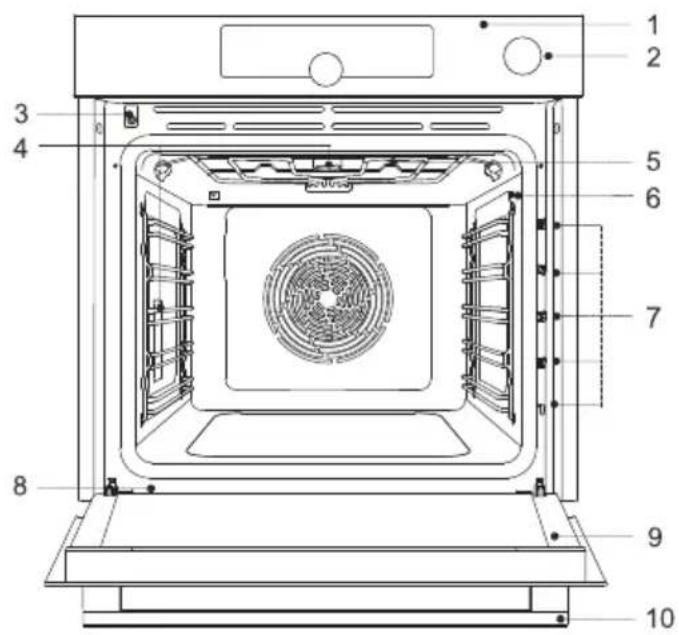
6Temperatureprobesocket1Controlunit
7Guides-cookinglevels2Watertankknob
8Ratingplate3Doorswitch
9Ovendoor4Lighting
10Doorhandle5Evaporatingtray
Ratingplate-productinformation
Aratingplatewithbasicinformationabouttheapplianceisattachedtotheedgeoftheoven.Precise informationonappliancetypeandmodelcanalsobefoundonthewarrantysheet.

6QRcode(dependently)2Model
7Technicalinformation3Type
8Complianceindications/symbols4Brand
Controlunit
(dependentlymodel)
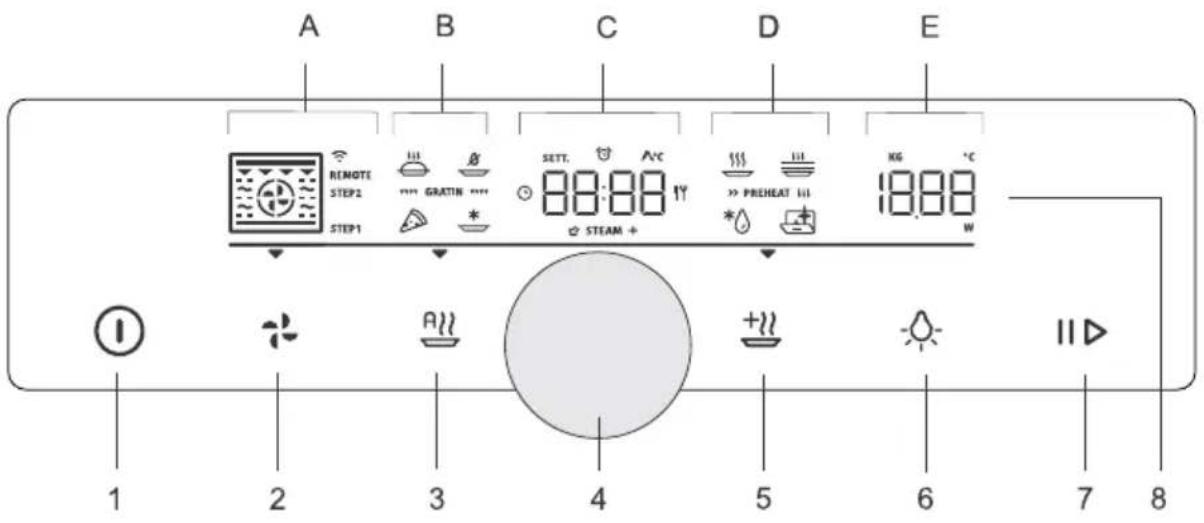
1.onloffkey
2.(probake)professionalmodekey
3.(autobake)automaticmodekey
4.settingsselectionandconfirmationknob -rotatetheknobtochooseasetting -presstheknobtoconfirmthesetting
5.(extrabake)keyforextrafunctionsandgeneralappliancesettings
6.(light)keyforswitchingtheovenlightingonandoff
7.startStopkeyforstartingorpausing,andconfirmingsettings
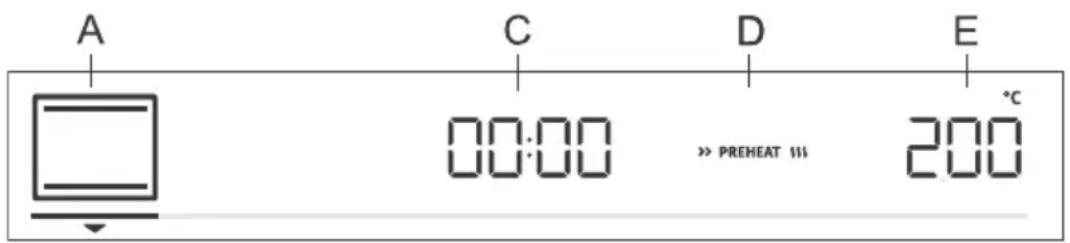
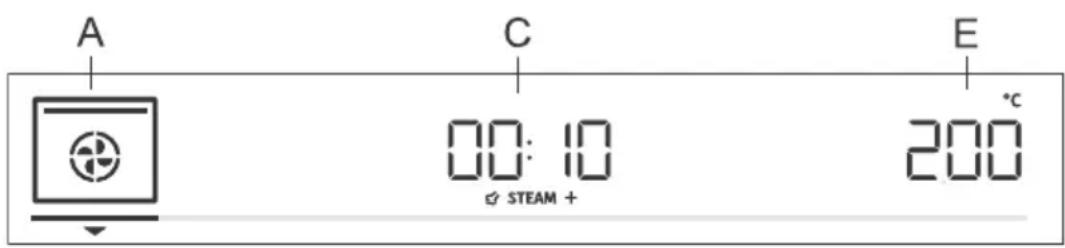
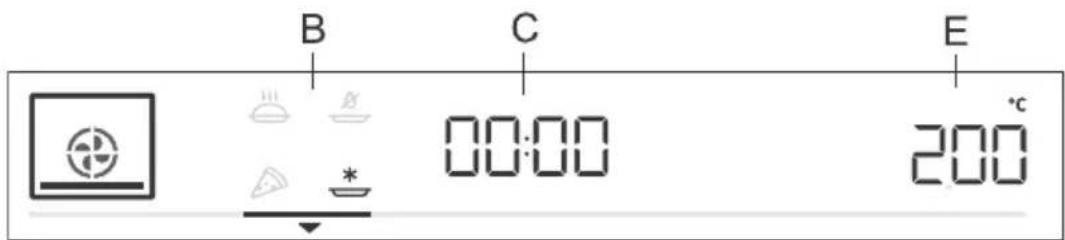
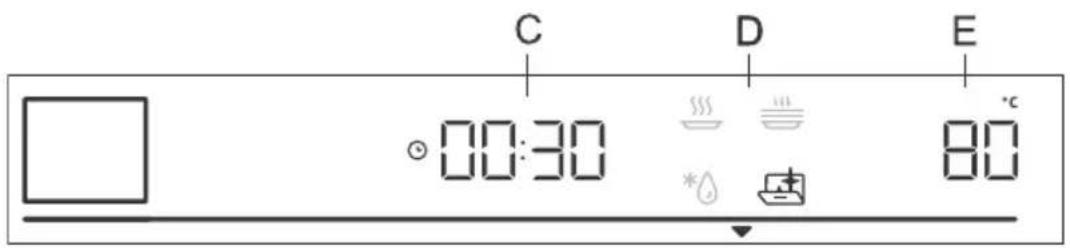
8.Displayunit:
A.bakingsystems,stepmode(STEP),connectivity(WIFI,REMOTE)
B.specialbakingsystems,automaticprograms,gratins
C.clock,timerfunctions,temperatureprobe,bakingtime
Dpecialprograms,preheating
E. temperature, weight

INFORMATION!
Forbetterkeyresponse, touchthekeyswithlargeareaofyourfingertip.Eachtimeyoupress akey, thiswillbeacknowledgedbyashortacousticsignal(ifthefunctionisavailable).
Applianceequipment
Controllights
Oven light: oven light is switched on when you open or close the oven door, when you switch on the oven, at the end of the baking process, and when you touch the ovenlight key on the control unit.
Guides
Theguidesallowcookingorbakingon5racklevels.
The height levels of guides into which the racks can be inserted shall be counted from bottom up.
- Guidelevels4and5areintendedforgrilling/broiling.
- When inserting equipment, it should be correctly rotated.
Wireguides
Incaseofwireguides,alwaysinsertthewire rackandthebakingtrayintotheslotbetween theupperandlowerpartofeachguidelevel.
Fixedpull-outguides
(dependentlymodel)
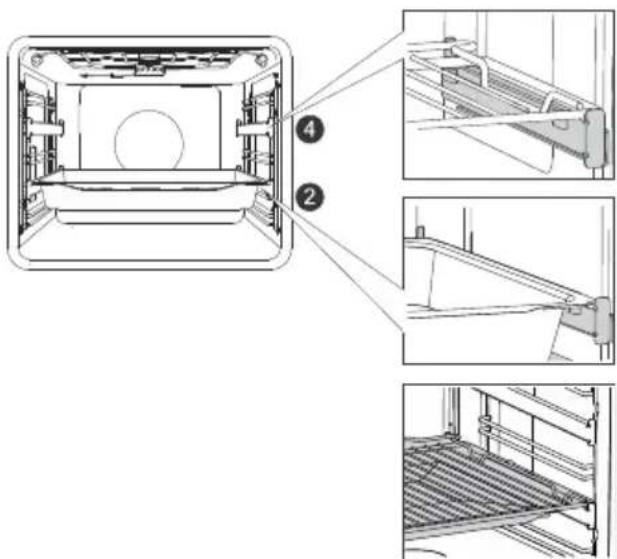
Pull-outguidesmaybefittedforthe2ndand 4thlevel.
Incaseoffixedpull-outguides,placetherack orbakingtrayontotheguide.Youcanplace thewirerackdirectlyontoabakingtray(shallow ordeepall-purposebakingtray)andplaceboth ontothesameguide;inthiscase,thebaking trayactsasadripray.
Click-onpull-outguides
(dependentlymodel)
Theclick-onpull-outguidecanbeinsertedinto anyspacebetweentwowireguides.
Placetheguidesymmetricallyontothewireguidesontheleftandtherightsideoftheoven cavity.First, hooktheupperclipoftheguide underthewireofthewireguide. Then,press thelowercliptotherightpositionuntilyou hearaCLICK.
NOTE: The guidescanbeattachedtoany heightbetweentwolevelsof wireguides.

INFORMATION!
Theclick-onpull-outguidescannotbemountedontoguideswithfixeddouble-levelpartial extension. They can, however, be mounted on single-level partially extendibleguides, to levels 3-4 and 4-5.
Makesurethepull-outguideiscorrectlyrotatedandthatitextendsoutwards,i.e.outfromthe oven.
Ovendoorswitch
Dependingonthemodel)
Iftheovendoorisopenedduringovenoperation,theswitchturnsoftheaterandfanintheoven cavity. Whenthedoorisclosed,theswitchturnstheapplianceoperationbackon.

WARNING!
Usingtheovenwiththedooropenandthedoorswitchengaged(closed)isnotallowed. Theovenwillsignalanerror, anditwillhavetobereset.
Coolingfan
Theapplianceisfittedwithacoolingfanthatcoolsthehousing,thedoor,andtheappliancecontrol unit. Aftertheovenisswitchedoff, the cooling fan continuesto operate forashortwhileinorderto cooldowntheoven.
Ovenepartmentandaccessories
Dependingonthemodel)

TheWIRERACKisusedforgrilling/broilingorassupportforapan,bakingtrayorbakingdishwiththefoodyouarebaking.


INFORMATION!
Thereisasafetylatchonthewirerack. Therefore,thewirerackhastobelifted slightlyatthefrontwhenpullingitoutfrom theoven.
SHALLOWBAKINGTRAYisusedforflatand smallpastry.Itcanalsobeusedasadriptray.

WARNING!
Theshallowbakingtraymaydeformas
itheatsupintheoven.Onceitcools
down,itreturnstotheinitialshape.
Suchdeformationdoesnotaffectits
function.

TheAIRFRYBAKINGTRAYisusedforcooking withsystemsthatfeaturesteaminjectionand forAirBake.TheperforationimprovesAirBake aroundthefoodforacrispiercrust. Whencookingfoodwithhighliquidcontent (water,fat),placetheshallowbakingtrayor all-purposedeepbakingtrayoneracklowerto serveasdriptyr.

TemperaturePROBE(BAKESensor).

WARNING!
The applianceandsomeoftheaccessiblepartstendtoheatupduringcooking.
Beforefirstuse
- Removeovenaccessoriesandanypackaging_cardboard.polystyrenefoam)fromtheoven.
- Wipetheovenaccessoriesandinteriorwithadampcloth.Donotuseabrasiveoraggressive clothsorcleaners.
- Heatanemptyovenforapproximatelyonehourwiththetopandbottomheatersystemata temperatureof250°C. The characteristic "newovenscent" willbereleased; therefore, ventilated theroomthoroughlyduringthisprocess.
Switchingonforthefirsttime
Afterconnectingyourapplianceorafteranextendedpoweroutage,12:00willflashonthedisplay.
First,chooseandconfirmthefollowingbasicsettings.

INFORMATION!
Change them by rotating the KNOB. To confirm the desired setting, press the KNOB or touch the key.

1.CLOCKSETTING
Settheclock/timeofday.First,setandconfirmtheminutes;thenset andconfirmthehours.

INFORMATION!
Tosetoradjusttheclocklateron,seechapterExtrafunctions.

2.ACOUSTICSIGNALVOLUME
Mediumvolumeisthedefaultsetting.ThesignVoLandthecurrenlyset valuefortheacousticsignalvolumewillappearonthedisplayunit.Rotate theKNOBtoincreaseordecreassethekeyvolume.

3.DISPLAYDIMMER
Mediumlightintensityisthedefaultsetting.Thesignbrhtandthecurrentlysetvalueforthedisplaylightintensitywillappearonthedisplayunit.RotatetheKNOBtoincreaseordecreaselightingintensity.
Afteryouconfirmtheselectedsettings, theclockwillappearthedisplayunit. The applianceisin standbymode.
Testingwaterhardness
Cleaning of the steam system depends on both frequency of baking with steam injection and the hardness of the water used.
Soakthetestpaperstrip(suppliedwiththeappliance)inwaterforone(1)second.Waitoneminute, thennotethenumberofstripesonthepaper.
Settingthehardnesslevel-numberofcolouredbarsonthestrip:
-4greenstripesHrd1
-1redstripeHrd2
-2redstripesHrd3
-3redstripesHrd4
-4redstripesHrd5
Choosingthesettings
Theinterfaceallowschoosingseveraloperatingsmodes:
Professionalmode(probake)
Automaticmode(autobake)
-Extrafunctions(extrabake)
- Stepprogram(STEP)intheprofessionalmode(probake)
Automaticprogramsinautomaticmode(autobake)

INFORMATION!
- RotatetheKNOBtoscrollthroughesettings.
- First, confirm these selected setting by pressing the KNOB; then, changethe setting.
- ConfirmeachsettingbypressingtheKNOB.
- Alineandanarrowindicatethelocationoftheparameterthatyouarelookingtoset.
PressthekeTostarttheprogram.
Operationofthekey
-brieftouch:switchtheovenonoroff,stopthesbakingprocessorfunction.
-longtouch:theovenswitchestolowpowerconsumption(powersaving)mode.
NokeyorKNOBareactive,exceptforthekey.Toswitchthontheoven,long-touchthis key.

PROFESSIONALMODE(probake)
This function allows setting the baking parameters - baking system, temperature, fast preheating, and bakingtime-freely, attheuser's discretion.
Touchthekeyandsetthefollowing:
A.bakingsystem
C.programduration
D.preheating
E. temperature
Additionally, the following canbeset:
-timerfunctions(seechapterTimerfunctions)
-stepbakingmode(STEP)(seechapterStepprogram)
-gradin(GRATIN)(seechapterStartingthecookingprocess)
-steaminjection(STEAM+)(seechapterStartingthecookingprocess)
Fastpreheat
Usethefastpreheatingfunctionifyouwishtoheattheoventothedesiredtemperatureasquicklyas possible.
Toactivatefastpreheating,rotatetheKNOBtothesetting(seeimage,LabelD).Confirm theselection.RotatetheKNOBtoselectthefullylitsignandconfirmmit.Thefunctionisnowactivated.
When the selected temperature is reached, the preheating process stops and an acoustic signal is emitted. The door will appear on the display unit. Open the door and insert the food. The program will automatically continue baking with selected settings.

INFORMATION!
Whenthefastpreheatfunctionisactivated,delayedstartfunctioncannotbeused.
Appliancefunctionsandequipmentdependonthemodel.
| UseSymbol | |
| HOTAIR Hotairallowsbetterflowofhotairaroundthefood.Thisway, itdriesoutthesurface andcreatesathickercrust. Usethissystemtocom cookmeat,pastryandvegetables, andtodryfoodonasinglerackormultiplerackssimultaneously. | |
| HOTAIRANDBOTTOMHEATER Thissystemisoptimalforbakinghomemadepizzaandpastrywithhigherwater content.Useitobakeonasinglerack,whenyouwantthefoodtobedonefast andtobecrunchy. | |
| HOTAIRANDTOPHEATER 1) hiscookingmethodresultsinacrunchycrustwithoutaddedfat.Thisisahealthy versionofffast-foodfrying,withfewercaloriesinthecookedfood.Suitable for smallercutofmeat,fish,vegetables,andfrozenproductsreadyforfrying(French fries,chickennuggets). Additionofsteamwillresultinmoreintensivebrowningandcrispiercrust. | |
| GRILLWITHHOTAIR Hotairallowsbetterflowofhotairaroundthefood.Thiswilldryoutthesurface. Incombinationwiththegrillheater/broiler,thiswillalsoresultinamoreintensive colour. For fasterbakingofmeatandvegetables. | |
| TURBOBAKE Fondisheswhereeverncrispinessfromallsidesisdesirable.Thesystemisalso suitableasthefirststepinthestepbakingmode,asitallowsquickbrowningof the surfaceinthefirststageandslowbakinginthesecondstage.Themeatwillbe juicywithanicallybrownedcrust. | |
| LARGEGRILL Usethissystemtogrilllargeamountsoftflat-shapedfoodliketooast,open sandwiches,grillsausages,steaks,fish,skewersetc.,aswellasforcookingau gratinandforbrowningthecrust.Theheatersmountedonthetopoftheovencavity evenlyheattheentiresurface. Maximumallowedtemperature:240°C | |
| TOPANDBottomHEATER Usethissystemforconventionalbakingonasinglerack,makingsoufflés,and bakingatlowtemperatures(slowcooking). | |
| GENTLEBAKING Forgentleandcontrolledslowcookingofdelicatefood(softcutsofmeat)and bakingpastrywithacrunchybottom. |
Tablecontinuedfromlastpage
| UseSymbol | |
| STEAM + | TOPANDBottomHEATERWITHFAN 1) Usethissystemforevenbakingonasinglerackandformakingsouflés. Steaminjectionresultsinbetterbrowningandacrunchiersurface. |
| STEAM + | LARGEGRILLWITHFAN 1) Forbakingpoultryandlargecutsofmeatonthegrill. Additionofsteamwillresultinmoreintensivebrowningandcrispiercrust. |
| LARGEGRILLANDBOTTOMHEATER Forfasterbakingonasinglerackandforcrisplybrowningthetopofyourpastry. | |
| GRILLWITHBottomHEATERANDFAN Foroptimumbakingofyeast-leaveneddough,alltypesofbread,andfor preservation. |
1) Thesystemsalsoallowsteaminjectionduringbaking(seechapterStartingthecookingprocess).

INFORMATION!
Inthesesystems,itispossibletousethegratinfunction(seechapterStartingthecooking process).
Touchthekey to start the cooking process. Selected settings will appear on display unit.
TIMERFUNCTIONS
RotatetheKNOBtoselectthetimerfunctions.


Timedcooking
Inthismode,youcanspecifythedurationofovenoperation(cooking time).
Thecookingdurationssymbolwillappearthedisplayunit.Rotate theKNOBtosetthedesiredcookingtime.Confirmthesettingbypressing ontheKNOB.
Touchthekeytostartbaking.

Settingthedefayedstart

INFORMATION!
Delayedstartisnotpossiblewhenthepreheatingfunctionis activated.
Usethisfunctionwhenyouwishtostartcookingthefoodintheoven afteracertainperiodoftime.Placethefoodintotheoven,thensetthe systemmandtemperature.Then,settheprogramdurationandthetime whenyouwishyourfooddone.
Example:
Currenttime:12:00(soon)
Cookingtime:2hours
Endofcooking:at18:00(6p.m.)
Thecookingdurationssymbolwillappearthedisplayunit.Choose thesettingandconfirmitbypressingtheKNOB(inourcase,2:00).Press theKNOBagainandrotateittoselectthesymbol.Confirmhandset thetimewhenyouwishyourfoodtobedone(inourcase,thisis18:00, or6p.m.).Desiredcookingendtimewillappearonthedisplayunit (18:00).ConfirmthesettingbypressingontheKNOB.
Touchthekeytostartbaking.
Whilewaitingtobebactivated, theovenswitchestoapartialstand-by (thedisplayunitgoesdark).Theovenwillswitchwiththeselected settingsautomatically(inourcaseat16:00,or4p.m.). Theovenwill switchoffatthesetime(inourcase, this is 18:00, or 6p.m.).

INFORMATION!
Cookingendtimeandtheclockwillalternateonthedisplayunit.
Afterthesetimeexpires, the oven will automatically stop operating.
Sign End and 00.00 will alternate on the display unit. An acoustic signal will be emitted, which can be turned off by touching any key. After one minute, the acoustics signal will beswitched off automatically.

WARNING!
Thisfunctionisnotsuitableforfoodrequiringfastpreheating.
Perishablefoodshouldnotbekeptintheovenforalongtime. Beforeusingthismode,checkwhethertheclockonthe applianceisaccuratelyset.

Minutemindersetting
Theminitemindercanbeusedindependentlyofovenoperation.The longestpossiblesettingis24hours.Duringthelastminute,theminite minderisdisplayedinseconds. RotatetheKNOBtoselectthesymbolandconfirmyoursetting. RotatetheKNOBbandsettheminiteminderduration.Confirmthesetting bypressingontheKNOB.

INFORMATION!
Theselecttimerfunctioncanberesetto00:00bylong-pressingtheKNOB.

INFORMATION!
Themostrecentlyusedtimerfunctionvaluescanbestoredandofferedespresetvaluesthe nexttimeyouusethetimer.Asafactorysetting,thisfunctionisoff,butitcanbeactivated(see chapterSelectingextrafunctions,Adaptivefunction).
STEPPROGRAM
Thisfunctionallowsbakingintwostepsorstages(twoconsecutivebakingstepsarecombinedina singlecookingprocess).
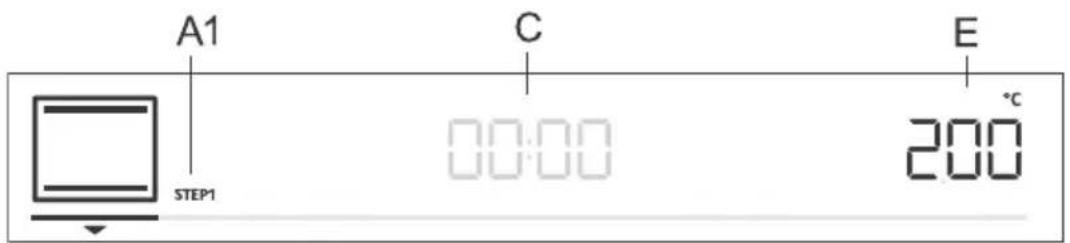
A1.firstcookingstepSTEP1,(STEP2)
C.programduration/endofprogram(seechapterTimerFunctions)
E. temperature
Step:STEP1
Inthemode,setthebakingsystemtemperature.Youcanalsochoosetherapidpreheating function.Then,setthebakingdurationforSTEP1(seechapterTimerFunctions).Confirmthesetting bypressingontheKNOB.

INFORMATION!
InSTEP1,youcansetthedelayedstart;however,ifyoudoso,youcannotactivatefastpreheating.
Step:STEP2
Pressandholdthekey.STEP2(secondcookingstep)willappearthedisplayunit(thefirst onehasalreadybeenset).Setthebakingsystem,temperature,andduration.Confirmthesettingby pressingontheKNOB.
Ifyouwish,youcanalsomodifySTEP1orSTEP2beforestartingthem.
TouchthekeyandselectSTEP1.Nowyouanchangethesettings.Then,dothesamefor STEP2.
Todeletesthestepmode,pressandholdthekey.

Touchthekey to startbaking. The oven first startsto operate with the settings selected for STEP1. WhentheSTEP1 is done, STEP2 is activated.
STEAMINJECTIONDURINGBAKING
Steaminjectionresultsinbetterbrowningandacrunchiercrust.
Waterfromthetankdripsinacontrolledmannerintoatraynexttoupperheaters. This way, just the right amount of steam is generated, resulting in betterbrowning andcrunchiercrust, while the crumb orcorer remains springy and fluffy. Werecommendusingsteaminjectionwhen baking bread, fresh rolls, spongerrolls, cakes, aswellassmallercutsof poultry and vegetables.
Steaminjectionduringthebakingprocessisavailablewithconventionalbakingsystemwithafan, largegrillwithfan,andAirBake.Inadditiontothesesectedbakingsystem,thesymbol STEAM + willalsoappearonthedisplayunit.

INFORMATION!
Thesteaminjectionssymbolwill appear on the displayunitifyyouhaveselectated temperaturehigherthan 150^ .
STEAM +
Activatingthesteaminjection
Toactivatesteaminjectionduringthebakingprocess,rotatetheKNOB tomenuC(seeimage)andconfirmyourselection.RotatetheKNOBto thesign.Confimtheselection.RotatetheKNOBagain, selectthefullylitsign,andconfimThefunctionisnow activated.(Ifyoudonotselectthefullylitsign,thefunctionwillnotbe active).
Startthebakingprocessbytouchingthekey.
Fillwillappearonthedisplayunit.Fillthewatertank(seechapter"Filling theWaterTank"below),thenpresstheKNOBtoconfirm.

INFORMATION!
Whentheovenreachesattemperatureofover150°Cand10 minuteshavepassed,thesymbolwillappearthe displayunitandthesteaminjectionprocesswillstart.

INFORMATION!
Thefunctioncanalsobeswitchedoffwhileitisinprogress.RotatetheKNOBtothesetting STEAM + andpressontheKNOBtoconfirm.Choosethedimmedsignandconfirmitby pressingontheKNOB.
Fillingthewatertank
Thewatabertankallowsforindependentwatersupplytotheamoven.Watertankcapacityis approximately1.3dl.
Alwaysfillthetankwithcleantapwaterorbottledwaterwithoutadditives.Waterpouredintothewater tankshouldbeatroomtemperature,i.e.approximately 20^ ( +- 10^ ) .
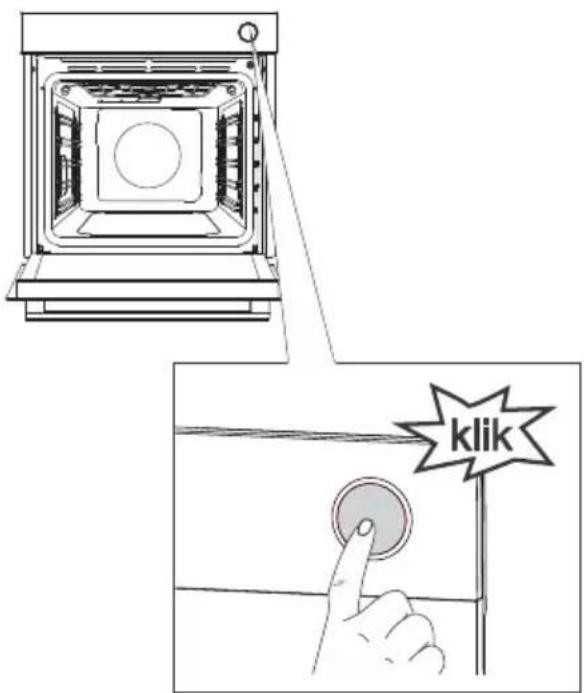

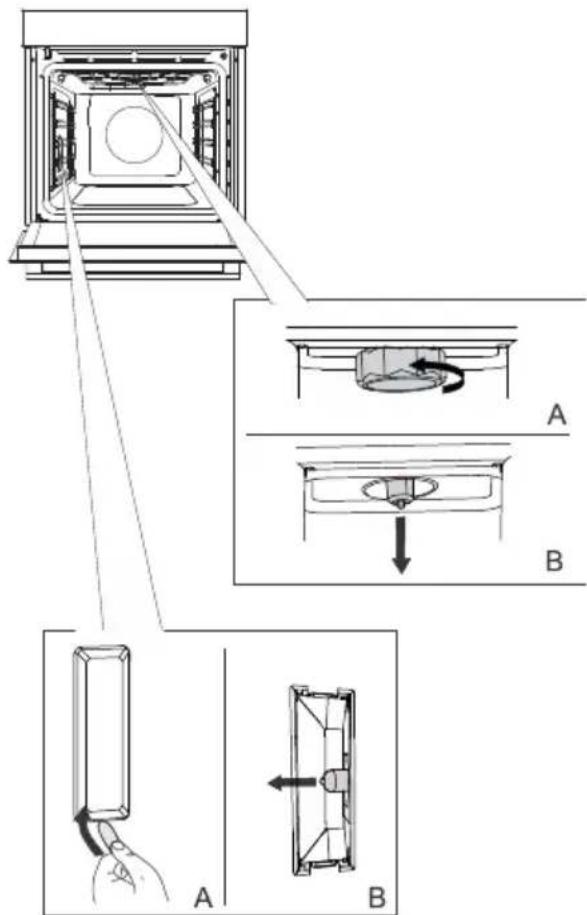
1 Removethewatertankfromthehousing bypressingtheknob.Whenyoupressthe knob,thetankjumpsout.
2 PourthewateruptotheMAXmarkonthe watertank.
3Pressthewatertankbacktothehousing asfarasitwillgo(itwillclickintoplace).
Afteruse, theremainingwaterisdrainedinto theevaporatingtrayintheoven,fittedunder theovencavityceiling,attachedtotheheater andthegrill(infrared)heater/broiler.(For cleaning,seechapterRemovingandcleaning theevaporatingtray.)
INFORMATION!
Thewatertankcannotberemovedfrom theappliance.
WARNING!
IfyoufailtoobservevetheMAXmarkon thewatertankandaddtocomuchwater, theexcessivewatermayflowout throughaslotbetweenthewatertank lidandthewatertank,anddriptothe floor.
Donotusedistilledwater,tapwater withhighchlorinecontent,orother similarliquids.Useonlyfreshtapwater, softenedwaterornon-carbonated mineralwater.


AUTOMATICMODE(autobake)
Inthismode,youmaychoosebetweenspecialbakingsystemsarotomaticprograms(presetprograms forparticulartypesoffood).
Specialbakingsystems
Touchthekeyandsettthefollowing:
B.specialbakingsystems
C.programduration(seechapterTimerfunctions)
E. temperature
RotatetheKNOBandchooseyoursettings.Presetvalueswillbedisplayed:Youcanchangethe temperatureandprogramduration.
| UseSymbol | |
| * | BAKINGFROZENFOOD 1) Thismethodallowsbakingfrozenfoodinashorterperiodoftimewithout pre-heating.Optimumforpre-bakedfrozenproducts(bakeryproducts,croissants, lasagne,Frenchfries,chickennuggets),meatandvegetables. |
| PIZZASYSYSTEM 1) Thissystemisoptimalforbakinghomemadepizzaandpastrywithhigherrwater content.Useitobakeonasinglerack,whenyouwantthefoodtobedonefast andtobecrunchy. | |
| SLOWBAKING 2) Forgentle,slowandevencookingofmeat,fishandpastryonasinglerack.This cookingmethodwillleavethemeatwithahigherwatercontent,makingitjuicier andmoretender,whilepastrywillbeevenlybrowned/baked.Thissystemisused inthetemperaturerangebetween140°Cand220°C. | |
| AIRBAKE 1) Thiscookingmethodresultsinacrunchycrustwithoutaddedfat.Thisisahealthy versionoffast-foodfrying,withfewercaloriesinthecookedfood.Suitable for smallercutsofmeat,fish,vegetables,andfrozenproductsreadyforfrying(French fries,chickennuggets). |
1) Inthesesystems,itispossibletousethegratinfunction(seechapterStartingthecookingprocess).
2) ThisfunctionisusedfordeterminingtheenergyefficiencyclasspursuanttotheEN60350-1standard.
Fastpreheat
Cooking proceduresforsomedishesintheautobakemodealsooincludethefastpreheatingfunction. Thesignwillbefullylit.Whentheselectedtemperatureisreached,thepreheatingprocessstopsand an acoustic signal is emitted. door will appear on the display unit. Open the door and insert the food. Theprogramwillautomaticallycontinuebakingwithselectedsettings.
Automaticprograms
Intheautomaticmode(autobake),youmaychoosebetweennumerousautomaticprograms(the appliancewillrecommendtheoptimumcookingmethod,temperature,andcookingdurationdepending onthetypeoffoodspecified).
Pressandholdthekeydisplaythecomputersonthedisplayunit(seetable).
Suggestedbakingsystem,temperatureanddurationcanalsobechangedatyourdiscretion.Where possible,youcanalsosetheweightofthefood.
ConfirmyoursettingbypressingtheKNOB.Touchthekeytostartbaking.Presetvalueswill appearonthedisplayunit.
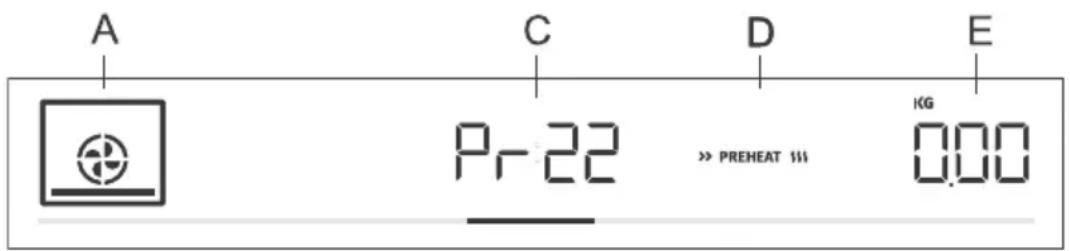
A.bakingsystem
Cautomaticprogramindication/programduration
D.fastpreheating
Eselectedamount
| TurningPreheatingl hallowbal hallowbal bakingpan hallowbal bakingpan | |||||
| noyes3s | |||||
| noyes3s | |||||
| Pr03 | spongecake | wirerack | noyes2b | ||
| Pr04 | smallpastry | noyes2s | |||
| noyes2s | |||||
| Pr06 | applepie | wirerack | 2bakingpan/dishon | no | |
| Pr07 | apple strudel | shallow baking tray | 2 | no | no |
| Pr08 | chocolatesoufflé | wirerack | noyes3b | ||
| Pr09 | rising and proofing | shallow baking tray | 2 | no | no |
| noyes2s | |||||
| Pr11 | porkroast | wirerack | 2smallbakingdishon | no | |
| Pr12 | roastedbeef | wirerack | 2smallbakingdishon | no | |
| Pr13 | poultry-whole | tray | 2wirerackwithadrip | after2/3of cooking time | |
Tablecontinuedfromlastpage
| TurningPreheatingl | |||||
| Pr14 | poultry-smaller pieces | tray | no3wirerafter2/3adfip cooking time | ||
| meatloafPr15 | wirerack | nono2bakingpan/ | |||
| Pr16 | oven-bakedbeef steak | tray | no4wirerafter2/3adfip cooking time | ||
| Pr17 | meat-slow cooking | wirerack | noyes2smallbakin | ||
| baked/grilledfishPr18 | tray | no4wirerafter2/3adfip cooking time | |||
| Pr19 | wedges | nono3shallowbak | |||
| VegetablesouffléPr20 | wirerack | nono2bakingpan/ | |||
| lasagnePr21 | wirerack | nono2bakingpan/ | |||
| shallowbal |

INFORMATION!
Gratinfunctioncanbeusedwithsomeautomaticprograms(seechapterStartingthecooking process).

CHOOSINGEXTRAFUNCTIONS(extrabake)
Touchthekey to displayextrafunctions with theirrespectivepresetvalues on the displayunit.
C.cookingduration
D.program
E.presettemperature
RotatetheKNOBandselecttheprogram.Presetvalueswillbedisplayed:Someprogramsallow settingthetemperatureandcookingtime.

INFORMATION!
RotatetheKNOBtoscrolthroughtheprograms.ConfirmeachsettingbypressingtheKNOB.

Aquaclean
Thisprogramallowseasyremovalofstainsfromtheoven(seechapter CleaningandMaintenance.)

Defrosting
Usethisfunctiontoslowlydefrostfrozenfood(cakes,pastry,bread, rolls,anddeep-frozenfruit).Presetprogramvaluesmaybechanged (temperature,cookingduration).
Halfway through the defrost time, the piece should be turned over, stirred and separated if they were frozentogather.

Reheating
Thisisusedto keepwarmthefoodthathasalreadybeencooked. You mayset the temperature and reheating start and end time.

Platewarming
Usethisfunctiontoreheatyourdinnerware(plates,cups)beforeserving foodinittokeepthefoodwarmlonger.Youmaysethetemperature andreheatingstartandendtime.
Childlock
To activate the child lock, press and hold (for 5 seconds) the light key . Loc will appear on the displayunit.Whenyoulong-pressthelightkeyagain,thechildlockisdeactivated.
If the child lock is activated with no timer function engaged (only clock is displayed), then the oven willnotoperate.
- If the child lock is activated after a timer function has been set, then the oven will operate normally; however, it will not be possible to change the settings.
- When the child lock is activated, cooking or baking systems (modes) or additional functions cannot bechanged. Thecooking/baking/roastingprocessscanonlybestoppedorswitchedoff.
- Child lock will remain active after the oven is switched off. To select a new system, the child lock must first bedeactivate.
Startingthecookingprocess
11
StartthecookingprocessbypressingeThekey.
Until the set temperature is reached for the first time, the current and the set temperature will alternate on the display unit. The temperatures symbol flashes at first. Whenthe desired temperature is reached, it goes off.

INFORMATION!
Ifnotimerfunctionisselected, cookingtimewillappearonthedisplayunit. Ashortacoustic signalisemittedwhentheovenreachesthestelectedtemperature.
GRATIN
Extragratin
Youmayonlyactivatethisfunction10minutesafterthestartofthe cookingprocess(thesymbolwillapparantochondisplay unit).
PresstheKNOBtoopensettings.RotatetheKNOBtothesign
GRATIN and confirmyourselection.RotatetheKNOBagainand selectthefullylitsign.Confirmyourselection.Thefunctionisnow activated.Cookingtimeof10minutes(10:00)willappearonthedisplay unit.
Tochangetheduration,pressontheKNOBtwiceandrotateittoadjust thetime(max.30min).Confirmyourselection.
Thefunctionisusedinthelaststageofthecookingprocesswhenyou addsauce/wetrubordryrubontothefood,orwhenyouwishto additionallybrownthecrust.Agolden-browncrustwillformonthedish duringthegratinprocess,whichprotectsthefoodfromdryingout,while alsoimpartingamorepleasantappearanceandbetterflavour.

INFORMATION!
Thefunctioncanalsobeswitchedoffwhileitisinprogress.Rotate theKNOBtosetting.Choosethedimmedsignand confirmbypressingontheKNOB.
STEAM +
Steaminjectionduringthebakingprocess

INFORMATION!
Thisfunctionwillbeactiveifyouhavenselectedasystemwithsteam injectionduringthebakingprocess.Ifyouhavenotsetthisfunction, youcanstillactivateitduringoperation.
PresstheKNOBtoopensettings.RotatetheKNOBandselectthesignsothatfullylit,andconfirmit(seechapter
ChoosingtheSettings,ProfessionalMode,SteamInjectionDuring theBakingProcess).
Thefunctioncanalsobeswitchedoffwhileitisinprogress.Rotate theKNOBtothesettingandpresenttheKNOBto confirm.Choosethedimmedsignandconfirmbypressingon theKNOB.
Endofcookingandswitchingofftheoven
Stopthecookingprocessbytouchingthekey. End appearsondisplayunitandanacoustic signalisemitted.

Steaminjectionduringthebakingprocess
STEAM +
If you have used steam injection during the baking process, STEAM + thenthesignUnFilwillappearonthedisplayunitoncetheovenhas cooleddown, asking the user whether the water tank should be emptied or not. RotatetheKNOBtoselectNoorYES.
Removethefoodfromtheoven.
-IfyouselectYES,thenthewatertankwillbeemptiedimmediately.
Placetheall-purposedeepbakingtrayintothe5thracklelevel.Rotatethe KNOBandselectYES.Theprocessofemptyingthewatertankwillstart.
Whentheprocessiscomplete,removethebakingtraywithwaterfrom theovenandwipeatheovendry.
-If you select No, then the processof emptyingthewatertank will be postponed (see chapter Choosing the General Settings).

INFORMATION!
If youdonotselectYESwhenUnFilappearsonthedisplayunit, thispromptwillreappearonthedisplayunitthenexttimeyouuse theoven.

INFORMATION!
Afteruse, clean the evaporating tray and the steam system (see chapters "Cleaning the Evaporating Tray" and "Cleaning the Steam System").

INFORMATION!
Aftertheoperationiscompleted, alltimersettings arealsostoppedanddeleted, except for the minuteminder. Timeofday(clock)willbedisplayed. Thecoolingfan will continue to operate for awhile.
Aftertheuseoftheoven,somewatermaybeleftinthecondensatechannel(underneaththedoor).Wipethechannelwithaspongeoracloth.
Choosing the general settings
Press and hold the + key. SEt t will appear on the display unit for a few seconds. Then, the general settingsmenuwillappear.

INFORMATION!
RotatetheKNOBtoscrolthroughesettings.ConfirmeachsettingbypressingtheKNOBor thekey.

Clockdisplay
RotatetheKNOBtosettheclock.CLocwillappearonthedisplayunit. Afterconfirming,youcanchoosebetweenthe12hand24hclockdisplay. Confirm,thensettheclock/timeofday.First,settheminutes.Confirm, andthensetthehoursandconfirmagain.

Acousticsignalvolume
Choosebetweenthreeacousticsignalvolumelevels.RotatetheKNOB tochoosetheVoLsetting.Confirmthesettingandsetthevolume.There arefouravailablevolumelevels(zerobars-OFF,one,twoorthreebars).

Displayillumination
Choosebetweenthreelevelsofdisplaylightintensity.RotatetheKNOB toselectthebrhtsetting.Confirmyourselectionandchooseloweror higherintensity.Therearethereavallableilluminationlevels(one,twoorthreebars).

Displayunit-nightmode
Thisfunctionwillautomaticallydimthedisplay(switchfromhightolow displayilluminationlevel)duringnighttime(8:00p.m.to6:00a.m.). ChoosethenGhtsetting.RotatetheKNOBtoswitchOnorOFF.

Standby
Thisfunctionswithestheclockdisplayonoroff.SelectthehidEsetting. RotatetheKNOBtoswitchOnorOFF.

Adaptivefunction
Thefunctionallowsadjustingthesetcookingtemperatureandthe cookingtime.Asafactorydefault,thisfunctionisdeactivated,butyou canactIVATEit.
Whenthefunctionisactivated,themostrecentcookingtimeisdisplayed. Settingsforthemostrecentcookiningsessionlastingatleast1minute aretakenintoaccount.
AdPtwillappearthedisplayunit.Todeactivatethefunction,rotate theKNOBtopositionOFF.Followthesameproceduretoactivatethe function.Select"On"onthedisplayunit.

Automaticfastpreheating
Thisfunctionallowsautomaticadditionoffastpreheatingtothebaking systemsthatallowit.
RotatetheKNOBtoselecttheAutosetting.ChooseOnorOFF.

Sabbath
TheSabbathfunctionallowskeepingthefoodwarmtinehovenwithout havingtoswitchtheovenonoroff.
RotatetheKNOBtoselectSAbb.ChooseOnorOFF.
Setttheduration(between24and72hours)andtemperature. Confirm eachsettingbypressingtheKNOB.
Ifyouwishtheovenlighttobeanallthetime,switchitonbytouching thesymbol.
Touchthekey to start the countdown. SAbbwill appear on the displayunit.
Allsoundsandoperation,exceptforthekey,willbedeactivated.

INFORMATION!
Incaseofapoweroutage,theSabbathmodewillbedeactivated andtheovenwillreturntotheinitialstate.

Factorysettings
Thisfunctionallowsresettingtheappliancetofactorysettings.FActwill appearonthedisplayunit.RotatetheKNOBtoselectrES.Pressthe
II> keyuntiltheendoftheanimationtoconfirm.

Waterhardness
RotatetheKNOBtochoosebetweenfivewaterhardnesslevels.The defaultsettingislevel5.
Whr1isthelowestwaterhardnesslevel.
Whr5isthehighestwaterhardnesslevel.

Emptythewatertank
Thisfunctionallowemptyingthewatertankafterthebakingprocess, whenyouhaveusedthesteaminjectionduringthebakingprocess function.UnFilwillappearonthedisplayunit.RotatetheKNOBtoselect andconfirmNotoexitthesetting.
Toemptythewatertank,firstremovethefoodfromtheoven.Placethe all-purposedeepbakingtrayintothe5thracklevel.SelectYESonthe displayunitandconfirm.Thewatertankemptyingprocesswillbegin. Whentheprocessiscomplete,removethebakingtraywithwaterfrom theovenandwipeatheovendry.

Dscaling
You can activate the scaling function yourself, or it can be suggested by the oven after acertainumber of steamfunction use cycles (dEcL will appear on the display unit).
Toactivate the function, rotatetheKNOBtoselect YES; todeactivate it, select OFF.

WARNING!
Afterapoweroutageoraftertheapplianceisswitchedoff,additionalfunctionsettings willremainstoredformomorethanafewminutes.Then,allsettings,exceptfortheacoustic signalvolumeanddisplaydimmerwillberesettofactory defaults.
Generaltipsandadviceforbaking
- Removeallunnecessaryquipmentfromtheovenduringbaking
- Use equipment made of heat-resistant non-reflective materials (supplied baking trays and dishes, enamel-coatedcookware,temperedglasscookware).Bright-colouredmaterials(stainlesssteel oraluminium)materialsreflectheat. Asaresult, thermal processingoffoodinthemislesseffective.
- Always insert the baking sheets and trays to the end of the guides. When baking on the wire rack, placethebakingdishesortraysinthemmiddleoftherack.
- For optimum food preparation, werecommendobservingtheguidelinessspecifiedinthecooking table.Choosethelowerspecifiedtemperatureandtheshortestspecifiedcookingtime.Whenthis timeexpires,checktheresultsandthenadjustthesettingsasnecessary.
- Unlessitisabsolutelynecessary, donotopentheovendoorduringbaking.
- Donotplatzebakingtraysdirectlyontotheovencavitybottom.
- Do not use the all-purpose deep baking tray on the 1st guide level while the appliance is operating.
- Donotcovertheovencavitybottomormthewirerackwithaluminiumfoil.
- Withlongercookingprograms,youcanswitchchofftheovenapproximately10minutesbefore the endofcookingtimetomakeuseoftheaccumulatedheat.
- Alwaysplacethebakingdishesontothewirerack.
- When baking on several levels at the same time, insert the all-purpose deep baking tray into the lowerlevel.
- Whencookingaccordingtonorecipesfromoldercookbooks,usethebottomandtopheatersystem (asinconventionalovens)andsetthetemperature 10^ Clowerthanspecifiedintherecipe.
- If you are using parchment paper, make sure it is resistant to high-temperatures. Always trim it accordingly. Parchmentpaperpreventsthefoodfromstickingtothebakingtrayandmakesiteasiertoremovethefoodfromthebakingtray.
- Whencookinglargercutsofmeatorpastrywithhigherwatercontent,alotofsteamwill be generatedinsidetheoven,whichturnmaycondenseonteovendoor.Thisisanormal phenomenonwhichwillnotaffecttheoperationoftheappliance. Afterthecookingprocess,wipe thedoorandthedoorglassdry.
- When baking directly on the wire rack, insert the all-purpose deep tray one level lower to serve asadripray.
Fast preheating of the oven: If you are using the fast preheating function, do not insert the food into the oven until the oven is fully heated. Temperature has as substantial effect on the final result. Fast preheating is recommended for delicate cutof meat (sirloin), and for yeast-leavened and sponge dough that require as shortter baking time. Heating an empty oven consumes a lot of energy. Therefore, if possible, were recommend cooking several dishes in succession, or making several dishes simultaneously.
GentleBake: Allows slow and controlled cooking at a low temperature. The meat juices are distributed evenly, and themeatremainsjuicyandtender. The GentleBakeslowcookingmethodissuitable for delicatebonelessmeatcuts. Beforeslowcooking, searthemeathoroughlyfromallsidesinafrying pan.
Cookingwithatemperatureprobe (BAKESENSOR)
(dependentlymodel)
The temperature probe allows for accurate monitoring of the core temperature of the food during cooking.

WARNING!
Thetemperatureprobeshouldnotbeindirectvicinityoftheheatingelements.
1 Stickthemetalendoftheprobeinto the thickestpartofthefood.
2Plugtheprobleplugintothesocketlocated intheupper-rightcorneratthefrontoftheoven cavity(seefigure).SEnSwillappearonthe displayunit.Toactivatethefunction,rotatethe KNOBtopositionOn.Followthesame proceduretodeactivatethefunction.Selected Offonthedisplayunit.
NOTE:ToentertheSEnSmenu,stopthe currentcookingprocessandconnecttheprobe tothesocket.Whenyouinserttheprobeinto thesocket,thepreviouslyselectedorpreset functionsontheovenaredeleted.
3 Choosethedesiredsystemandcooking temperature (in the temperature range of up to 230^ ). Probe operations symbol and the preset temperature will appear on the display unit. To changethe temperature, rotate the KNOB. Select the desired final core temperature of the food (in the temperature range between 30 and 99^ ).
NOTE: When using the probe, setting the cookingtimeisnotpossible.
4 Confirmthesettingbypressing the key.
5 Whenthesetcoretemperatureisreached, theovenwillstopoperating.Endwillappear onthedisplayunit.Anacousticsignalwill be heardwhichyoumayturnoffbytouchingany key. Afteroneminute, theacousticsignalwill beswitchedoffautomatically.

INFORMATION!
During the cooking process, set and current food core temperature alternate on the display unit. You may change the cooking temperature or the target food core temperature during the cooking process.
Correctuseoftheprobe,bytypeoffood:
- poultry:sticktheprobeinthethickestpartofthebreast;
- redmeat:sticktheprobeintoaleanpartthatisnotmarbledwithfat;
- smallerchunkswithbone:stickthemintoanareaalongthebone;
- fish:sticktheprobebehindthehead,towardsthespine.

WARNING!
Afteruse, carefully remove the probe from the food, unplugfromthesocketintheoven cavity, and clean it.
IfSEnSappearsonthedisplayunitwhenthetemperatureprobeisnotconnected,cleanthesocket.Tryconnectinganddisconnectingthetemperatureprobeseveraltimesina row.

INFORMATION!
If youdonotusetheprobe,removeitfromtheoven.
Recommendeddonenesslevelsfordifferenttypesofmeat
| Typeoffood | blue (raw) | medium rare | medium | medium well | welldone |
| BEEF | |||||
| 68-7359-6553-584 | |||||
| 63-6658-6254-574 | |||||
| 63-6658-6254-574 | |||||
| 71-7466-6860-635 | |||||
| VEAL | |||||
| 63-6658-6254-574 | |||||
| 63-6658-6254-574 | |||||
| PORK | |||||
| 75-8565-70//roast | |||||
| /60-69//pork,loi meatloaf | |||||
| 80-85///meat | |||||
| LAMB | |||||
| 77-8072-7666-716 | |||||
| MACHINE | |||||
| 77-8072-7666-716 | |||||
| GOATMEAT | |||||
| 77-8072-7666-716 | |||||
| POULTRY | |||||
| 82-90///poultry,wh poultry,br | |||||
| 62-65///poultry | |||||
| FISHANDSEAFOOD | |||||
| /62-65///trout | |||||
| /55-60///tuna | |||||
| /52-55///salmon | |||||
Cleaningandmaintenance

WARNING!
Beforecleaning,unplugtheappliancefromthepowermainsandwaitfortheapplianceto cooldown.
Children should not clean the appliance or perform maintenance tasks without proper supervision.
Foreasiercleaning,ovencavityandbakingtrayarecoatedwithspecialenamelforassmoothandresistantsurface.
Regularlycleantheapplianceanduseawarmwaterandhanddishwashingliquidtoremovelarger impuritiesandlimescale.Useacleanssoftclothspongecloth.
Appliance exterior: use hot soapsuds and a soft cloth to remove impurities, then wipe the surfaces dry.
Appliance interior: for stubborn dirt and grime, use conventional oven cleaners. When using such cleaners, thoroughly wipethe appliancewithawetclothremoveallcleanerresidue.
Accessoriesandguides:cleanwithhotsoapsudsandadamcpcloth.Forstubborndirtandgrime, werecommendpriorsoakinganduseofabrush.

INFORMATION!
Neveruseaggressiveorabrasivecleanersandaccessories(abrasivespongesanddetergents, stainandrustremovers,scrapersforglassceramicplates).
Ovenepquipmentisdishwasher-safe.
Foodresidue(fat,sugar,protein)canigniteduringtheuseoftheappliance.Therefore,remove largerchunksofdirtfromtheoveninteriorandaccessoriesbeforeeachuse.
UsingtheAquacCleanprogramtocleantheoven
Thisprogrammakesiteasiertoremoveanystainsfrominsidetheoven.
Thefunctionisthemosteffectiveifusedregularly,aftereachuse.
Beforerunningthecleaningprogram,removeallargevisiblechunksofdirtandfoodresiduesfrom theovencavity.
1 Inserttheshallowbakingtrayintothefirst guidelevelandpour0.4litresofhotwaterinto it.
2 Touchthekeyedisplayextra functionsonthedisplayunit.RotatetheKNOB tothesymbol.Presetvalueswillappear onthedisplayunit.
3Theprogramwilloperatefor30minutes. Whentheprogramiscomplete,Endwillappear onthedisplayunit.
4 Whentheprogramiscompleted, carefully removed the bakingtray, using ovenmitts (there can still besomewateronthe bakingtray). Wipedownthestainswithdampcloth and soapsuds. Thoroughly wipetheappliance with awetclothto remove all cleanerresidue.

WARNING!
UsetheAquaCleansystemwhentheovenhasfullycooledown.
Cleaning the evaporating tray

WARNING!
Afteruse, the evaporating tray can be hot, and there can still besomewaterinit. To avoid scalding, wait for the eventocouldn't completely.
Removethetrayandmanuallycleantheevaporatingtraywithahandwashingupliquidorinthe dishwasher.lftherearelimescaledepositsinthetray,soakitinlinescaleremover(usethelimescale removeraccordiingtotheinstructionsprovidedbyitsmanufacturer)orinspiritvinegar.Aftercleaning andbeforeraplacingit,thoroughlyrinsethetray.


1 Theevaporatingtrayisattachedontheright-handsbetweentheupperheaters.
2Pushtheevaporatingtrayleverslightly to theback(byapproximately2cm)tounlatch thetray.
3Cleantheevaporatingtraywithwater and detergents.
4 Before using the oven again, replace the evaporating tray. Attach the tray to the bent parts or wires of the heater and pull towards yourself until it clicks into place (you will feel somewhat stronger resistance).
NOTE: If the tray is not replaced, then water will drip on the food when baking with steam injection.

INFORMATION!
Duetoitspositionclosetotheheaters, theevaporatingtraycoulddiscour.This doesnotaffectitsfunctionorusability.
Cleaningtheamsystem
Cleaningdependsonhowoftenyousuethesteaminjectionfunctionandonthehardnessoftthewater used.
1.Inserttheall-purposedeepbakingtrayintothe5th(top)guideveltoallowthewaterdripintoit.
2. In the extra functions menu, select descending (dEcL). Confirm your selection by pressing on the KNOB. Then, rotate it until Yes appears on the display unit. Confirm these selection again by long-pressing on the KNOB. The descaling process is started, and it cannot be terminated or cancelled.
3. Fill will appear on the display unit. Add limescale remover into the water tank. Confirm the setting bylong-pressingontheKNOB.
4.Descalginginprogress.
5. When the process is complete, the sign Fill will reappear on the display unit. Pour fresh water for rinsingintothewatertank.Confirmthesettingbylong-pressingontheKNOB.
6. After the insing process, End will appear on the display unit.
7. Removethebakingtraywithwaterfromtheovenandwipe theovendryifnecessary.

INFORMATION!
If youdonotwishtocleanthesteamsysteminthemomentwhenproposedbytheoven, this canbeterminatedbyselectingOFF. Youmaycancelthedescalingsprogramuptothreetimes. Afterthat, theovenwill disabletheoperationofthesteamfunction.
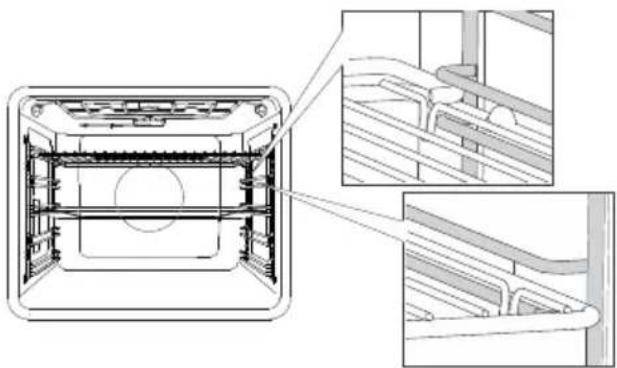
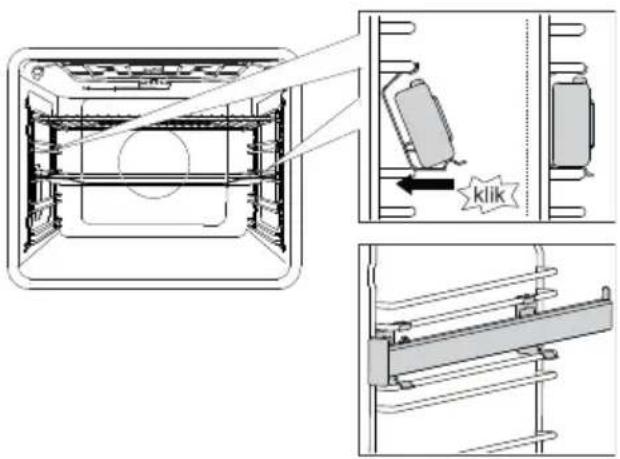
Removingwireandfixedpull-out(extendible)guides
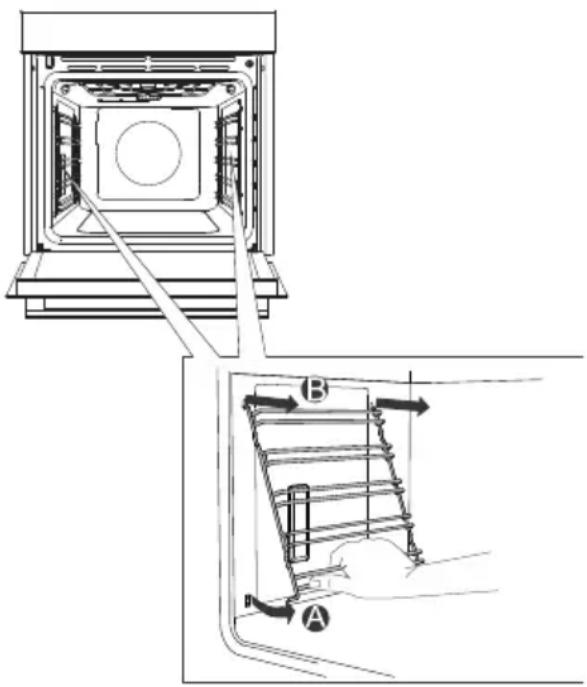
AHoldtheguidesbythebottomsideand pullthemtowardsthecenteroftheovencavity.
BRemovethemfromtheopeningsatthetop.

INFORMATION!
Whenremovingtheguides,takecarenot todamagetheenamelcoating.
Removingandreplacingtheovendoorglasspanes
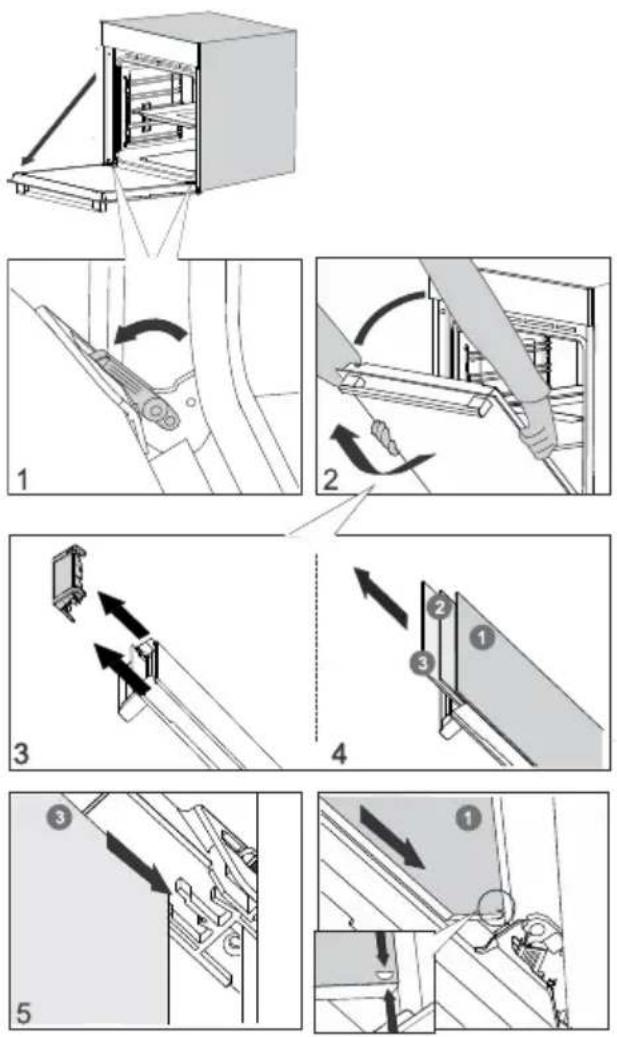
1 First, fullyopenthedoor(asfarasitwillgo).
2Ovendoorisattachedtotheingeswith specialsupportsthatalsoincludesaftetylevers. Rotatethesafetyeverstowardsthedoorby 90^ .Slowlyclosethedoortoa45°angle (relativetothepositionofthefullycloseddoor); then,liftthedoorandpullitout.
Ovendoorglasspanecanbecleanedfrom theinside,butithastoberemovedfromthe appliancedoorfirst.First,proceedasdescribed underitem2,butdonotremoveit.
3Removetheairguide.Holditontheleftandright-handsideofthedoorwithyourhands.Removeitbyslightlypullingittowardsyou.
4Holdthedoorglassattheupperedgeand removeit.Tothesameforthesecondthird glasspane(dependingonthemodel).
5Toreplacetheglasspanes,observethe reverseorder.

INFORMATION!
Toreplacethedoor, followthereverseorder. If the doordoesnotopenorcloseproperly, make surethenotchesonthehingesarealignedwiththehingebeds.

WARNING!
Theovendoorhingecanclosewithconsiderableforce.Therefore,alwaysrotateboth safetyleverstothesupportwhenfittingorremovingtheappliancedoor.
Softdoorclosingandopening
(dependentlymodel)
Ovendoorisfitted with asystemthatdampenshedoorclosingforce,startingatthea75°angle.It allowssimple,quiet,andgentleopeningandclosingofthedoor.Agentlepush(toa15°anglerative tothecloseddoorposition)isenoughforthedoortocloseautomaticallyandsoftly.

WARNING!
If the force applied to closethedooristoostrong, the effect of the system is reduced or the system will be bypassedforsafety.
Replacingthebulb
Thebulbisconsumableandthereforenotcoveredbywarranty.Beforereplacingthebulb,remove allaccessoriesfromtheoven.
Halogenlamp:G9,230V,25W

1 Unscrewandremovethecover(in anti-clockwisedirection).Removethehalogen bulb.
2 Useaflatplastictooltoremovethecover. Removethehalogenbulb.
- INFORMATION!
Takecarenottodamagetheename coating. Useprotectiontoavoidburningyourself.

WARNING!
Onlyreplacethelightbulbwhentheapplianceisdisconnectedfrompowersupply.
Troubleshootingtable
Special warningsandfaultreporting
Duringthewarrantypeperiod,onlyaservicecenterauthorizedbythemanufaturermaycarryout anyrepairs.
Beforemakinganyrepairs,makesuretheapplianceisdisconnectedfromthepowermainseitherby removingthefuseorbydisconnectingthepowerplugfromthewalloutlet.
Anyunauthorizedrepairsoftheappliancemayresultinelectricshockandshortcircuithazard;therefore, donotperformthem.Leavesuchworktoanexpertoraservicetechnician.
Incaseofminorproblemswithapplianceoperation,checkthismanualtoseeifyoucanfixtheproblem yourself.
Iftheapplianceisnotoperatingsproperlyoratalduetoinappropriateoperationorhandling,avsit fromaservicetechniciansshallnotbefreeofcharge,evenduringthewarrantyperiod.
Savetheinstructionsforfuturereferenceandpassthemontoanysubsequentownersorsusersofthe appliance.
Followingissomeadviceonrectifyingsomecommonproblems.
| CauseProblem-error | |
| Callaservicetechnician. Themainfuseinyourhometripsoften. | |
| Theovenlightingdoesnetwork. | Theprocessofchangingthelightbulbintheovenis describedinthechapterReplacingthebulb. |
| Controlunitisnotresponding, the screenisfrozen. | Disconnecttheappliancefromthepowermainsforafew minutes(undotheuseorswitchoffthemainsswitch); then,reconnecttheapplianceandswitchiton. |
| ErrorCodeErrXisdisplayed. Incaseofadouble-digiterrorcode, ErXXwillbedisplayed. | Thereisanerrorintheelectricmoduleoperation. Disconnecttheappliancefromthepowermainsforafew minutes. Iftheerroristillindicated, callaservicetechnician. |
If the problems persist despite observing the above advice, call an authorized servicetechnician. Repairoranywarranty claim resulting from incorrect connection or use of the appliances shall not be covered by the warranty. In this case, the user will cover the cost of repair.
Disposal

Ourproductpackagingismadeofenvironmentallyfriendlymaterialsthat canberecycled,disposedof,ordestroyedwithoutanyhazardtothe environment.Tothisend,packagingmaterialsarelabelledappropriately.
Thesymbolontheproductoritspackagingindicatesthattheproduct shouldnotbetratedasnormalhouseholdwaste.Taketheproductto anauthorizedcollectioncentreforwasteelectricandelectronic equipmentprocessing.
Correctdisposal of the product will help prevent any negative effects on the environment and health of people, which could occur in incorrect product removal. Ford detailed information on removal and processing of the product, please contact therelevant municipal body in charge of waste management, your wasted disposalservice, or the store where you bought the product.
Wereservetherighttoanychangesanderrorsintheinstructionsforuse.
Cookingtest
EN60350-1:Onlyuseequipmentssuppliedbythemanufacturer. Alwaysinsertthebakingtrayallthewaytotheendpositiononthewireguide.Placepastryorcakes bakedin mouldsasshowninthemeasure.
Preheattheapplianceuntilitreachesettemperature.Donotusetherapidpreheatmode.
Preheattheappliancefor10minutes.Donotusetherapidpreheatmode.
**Turnafter2/3ofcookingtime.
| BAKING | ||||||
| EquipmentDish | mould placement | °C | min | |||
| biscuits/cookies -slingerack | 25-401503shallow | owbaking | ||||
| biscuits/cookies -slingerack | 35-50135*3shallow | baskin | ||||
| cookies-two racks/levels | 25-40140*2,4shallow | baskin | ||||
| cookies-three racks/levels | 45-601351,4,5shallow | baskin | ||||
| cupcakes-slingerack | 3shallowbakingtray | 160-170 | 20-30 | |||
| cupcakes-slingerack | 20-30155*3shallow | baskin | ||||
| cupcakes-two racks/levels | 30-45140*1,5shallow | baskin | ||||
| cupcakes-three racks/levels | 30-50140-1501,8,5shallow | |||||
| spongecake | roundmetalmould,diameter26cm/wirerack | 45-551502 | ||||
| spongecake | roundmetalmould,diameter26cm/wirerack | 45-551602 | ||||
| spongecake-two racks/levels | 2×roundmetalmould,diameter26cm/wirerack | ○○ | 2,4 | 170* | 45-55 | |
| applepie | 2×roundmetalmould,diameter20cm/wirerack | ○○ | 160**2 | 70-120 | ||
| applepie | 2×roundmetalmould,diameter20cm/wirerack | ○○ | 1602 | 70-120 | ||
| BROILING | ||||||
| EquipmentDish | mould placement | °C | °C min | |||
| 4-7max5wireracktoasted | ||||||
| pljeskavica (mincedmeat patty) | wirerack+shallowbaking sheetasdTripray | 5 | 230 | 25-40 *** | ||

The appliance rating label is located on the inside of the appliance.
When contacting the service department, have the complete type number to hand.
You will find the addresses and phone numbers of the service organisation on the guarantee card.
Pelgrim


- ATTENTION!
- Tablesdesmatieres
- Interrupteursurlaportedufour
- INFORMATION!
- WARNING!
- Contents
- Safety precautions
- IMPORTANTSAFETYPRECAUTIONS-CAREFULLYREAD THEINSTRUCTIONSandSAVETHEMFORFUTURE REFERENCE.
- Otherimportantsafty warnings
- Appliancedescription
- Ratingplate-productinformation
- Controlunit
- Applianceequipment
- Controllights
- Guides
- Wireguides
- Fixedpull-outguides
- Click-onpull-outguides
- Ovendoorswitch
- Coolingfan
- Ovenepartmentandaccessories
- Beforefirstuse
- Switchingonforthefirsttime
- 1.CLOCKSETTING
- 2.ACOUSTICSIGNALVOLUME
- 3.DISPLAYDIMMER
- Testingwaterhardness
- Choosingthesettings
- PROFESSIONALMODE(probake)
- Fastpreheat
- TIMERFUNCTIONS
- Timedcooking
- Settingthedefayedstart
- Minutemindersetting
- STEPPROGRAM
- STEAMINJECTIONDURINGBAKING
- Activatingthesteaminjection
- Fillingthewatertank
- AUTOMATICMODE(autobake)
- Specialbakingsystems
- Automaticprograms
- CHOOSINGEXTRAFUNCTIONS(extrabake)
- Aquaclean
- Defrosting
- Reheating
- Platewarming
- Childlock
- Startingthecookingprocess
- Extragratin
- Steaminjectionduringthebakingprocess
- Endofcookingandswitchingofftheoven
- Choosing the general settings
- Clockdisplay
- Acousticsignalvolume
- Displayillumination
- Displayunit-nightmode
- Standby
- Adaptivefunction
- Automaticfastpreheating
- Sabbath
- Factorysettings
- Waterhardness
- Emptythewatertank
- Dscaling
- Generaltipsandadviceforbaking
- Cookingwithatemperatureprobe (BAKESENSOR)
- Correctuseoftheprobe,bytypeoffood:
- Cleaningandmaintenance
- UsingtheAquacCleanprogramtocleantheoven
- Cleaning the evaporating tray
- Cleaningtheamsystem
- Removingwireandfixedpull-out(extendible)guides
- Removingandreplacingtheovendoorglasspanes
- Softdoorclosingandopening
- Replacingthebulb
- - INFORMATION!
- Troubleshootingtable
- Special warningsandfaultreporting
- Disposal
- Cookingtest
Brand : Pelgrim
Model : OAS560ZWA
Category : Oven