
VCH 9731 - Vacuum Cleaner GRUNDIG - Free user manual and instructions
Find the device manual for free VCH 9731 GRUNDIG in PDF.
| Product Type | Rechargeable stick vacuum cleaner |
| Brand | Grundig |
| Model | VCH 9731 |
| Power supply | Rechargeable lithium-ion battery (non-removable) |
| Rated voltage | 28.8 V |
| Maximum voltage | 32 V |
| Adapter input voltage | 100-240 V~, 50-60 Hz |
| Adapter output voltage | 34 V, 350 mA |
| Maximum runtime | 75 minutes (ECO mode) |
| Charging time | Up to 8 hours |
| Suction power | 3 modes: ECO, CARPET, TURBO |
| Filter | Washable HEPA filter and foam filter |
| Brush type | Removable and cleanable turbo brush |
| Protection class | II |
| Intended use | Household use only |
| Maintenance | Cleaning of dust bag, cyclone, filters and brush |
| Safety | Do not use on wet surfaces; unplug before cleaning |
| Repairability | Contact an authorized professional; use original Grundig accessories |
Frequently Asked Questions - VCH 9731 GRUNDIG
User questions about VCH 9731 GRUNDIG
0 question about this device. Answer the ones you know or ask your own.
Ask a new question about this device
Download the instructions for your Vacuum Cleaner in PDF format for free! Find your manual VCH 9731 - GRUNDIG and take your electronic device back in hand. On this page are published all the documents necessary for the use of your device. VCH 9731 by GRUNDIG.
USER MANUAL VCH 9731 GRUNDIG
natural_image
Exterior view of a modern vacuum cleaner (no visible text or symbols)
natural_image
Abstract grayscale illustration of a curled paper corner (no text or symbols)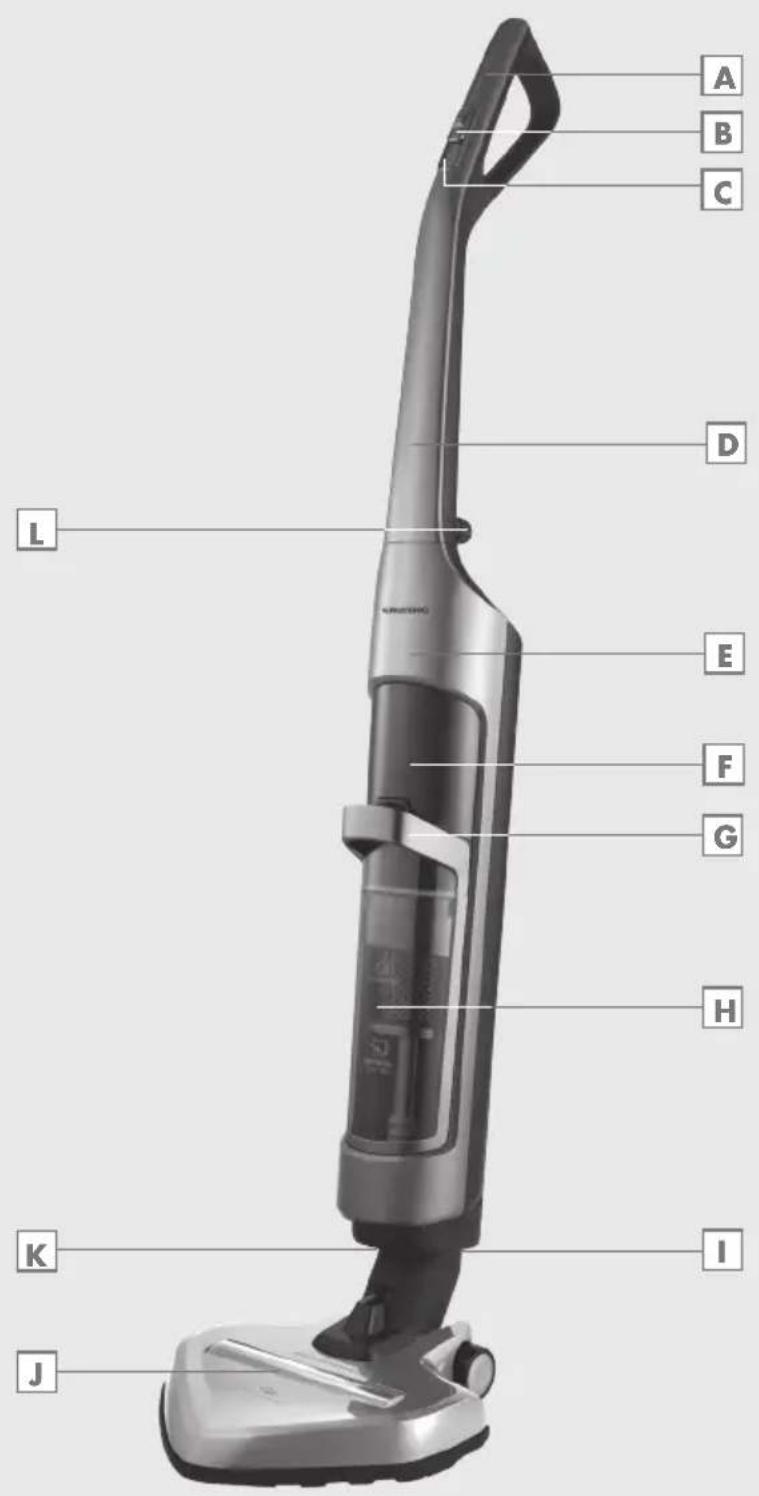
DEUTSCH 05 - 13
ENGLISH 14 - 21
TÜRKÇE 22-29
ESPAÑOL 30-37
FRANÇAIS 38-46
HRVATSKI 47-54
POLSKI 55-63
NORSK 64-71
SUOMI 72-79
natural_image
Technical diagram showing mechanical components with arrows indicating motion (no text or symbols)natural_image
Technical line drawing of a robotic device with a downward arrow indicating motion or assembly (no text or symbols present)Gerät aufladen
natural_image
Diagram of a hand holding a firearm with an arrow indicating motion (no text or symbols present)natural_image
Two mechanical components with arrows indicating motion, no text or symbols presentnatural_image
Technical line drawing of a mechanical device with internal components and a hand holding a knob (no text or symbols)natural_image
Technical line drawing of a mechanical component with exploded view, showing internal structure and assembly (no text or symbols)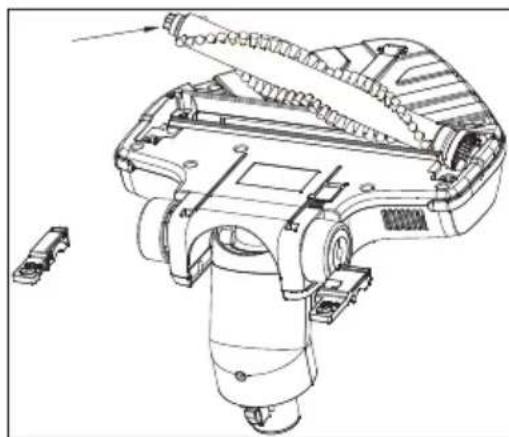
natural_image
Technical line drawing of a mechanical device with internal components and a separate connector (no text or symbols)Please read this instruction manual thoroughly prior to using this appliance! Follow all safety instructions in order to avoid damages due to improper use!
Keep the instruction manual for future reference. Should this appliance be given to a third party, then this instruction manual must also be handed over.
■ Always keep hair, clothing and any other utensils away from the appliance during operation in order to prevent injury and damages.
■ The appliance is designed for domestic use only. Warranty will be voided if the appliance is used for industrial or commercial purposes.
- Observe these instructions in order to prevent damage to the appliance or danger arising from improper use.
■ Do not use on wet surfaces and do not attempt to use on wet objects.
■ Do not use the appliance in wet surroundings.
■ Do not use the appliance with wet hands.
■ This appliance is designed for vacuuming dirt and dust particles. Do not attempt to use it on large objects which could block and damage the appliance.
- Do not use to clean cigarette stubs, ash from a fireplace or matches. This could cause a fire.
■ This appliance is not designed for cleaning people or animals.
■ Do not insert any foreign objects into the suction intake. Always keep the suction intake free of all objects.
■ Never operate the appliance without the filter.
■ Clean the filter when necessary.
■ Only use original GRUN-DIG accessories when replacing parts.
- Check if the mains voltage on the rating label corresponds to your local mains supply.
■ Always pull out the power cord after the charging process, before cleaning or carrying out any maintenance on the appliance or the charging unit.
- Avoid using extension cables or multipoint connectors. Plug the appliance directly in a wall socket if possible.
■ For additional protection, this appliance should be connected to a household residual current device with a maximum rating of 30 mA. Consult your electrician for advice.
■ Do not disconnect the plug by pulling on the cable.
■ Never use the appliance if it or the power cord is visibly damaged. This also applies if the appliance has accidentally become wet. Please contact a service centre in this case.
- Our GRUNDIG Household Appliances meet all applicable safety standards; thus if the appliance or the power cord is damaged, it must be replaced by the dealer, a service centre or a similarly qualified and authorised service person to avoid any danger arising. Faulty or unqualified repair work may cause danger and risk to the user.
- Keep the appliance away from children.
This appliance can be used by children aged from 8 years and above and persons with reduced physical, sensory or mental capabilities or lack of experience and knowledge if they have been given supervision or instruction concerning use of the appliance in a safe way and understand the hazards involved. Children shall not play with the appliance. Cleaning and user maintenance shall not be made by children without supervision.
- Do not dismantle the appliance under any circumstances. No warranty claims are accepted for damage resulting from improper handling.
- Do not use the appliance if the air duct and the ventilation slot are blocked. Always keep the air duct and ventilation slot free of dirt, hair and any other elements which could obstruct or block the air flow. - Only use the power cord provided.
Esteemed Customer,
Congratulations for purchasing the new VCH 9731 vacuum cleaner.
Please read the following instructions carefully in order to enjoy the use of your product with the GRUNDIG quality for many years.
A responsible approach!

GRUNDIG aims to provide social working conditions accepted by a contract that presents fair payment for both the employees and suppliers; efficient use of the raw material; reducing plastic waste amount for a few tons each year and ensuring that the accessories produced by it are used for 5 years minimum.
For a future worth living.
Grundig.
Controls and parts
See the figure on page 3.
A
Handle
B
Control button
C
Control panel
D
Upper body
E
Lower body
F
Charging indicator
G
Dust container handle
H
Dust container
1
Suction nozzle
J
Brush
K
Brush removal button
L
Dust container removal button
M
Upper body connection screw
Intended use
This appliance is intended for domestic use. It is not suitable for industrial use.
Installation
Installation of upper and lower bodies
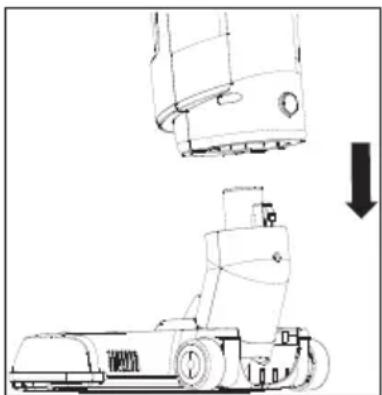
1 Fix the upper body onto the lower body.
2 Rotate the upper body connection screw clockwise to fix it.

natural_image
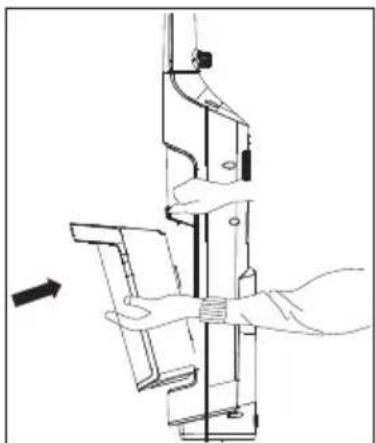
Technical diagram showing mechanical components with arrows indicating motion (no text or symbols)Installation of the lower body and the brush
Attach the brush to the suction nozzle.
natural_image
Technical line drawing of a mechanical device with an arrow indicating downward motion (no text or symbols present)Charging the appliance
1 Plug the adapter into the charging socket at the back of the appliance and connect the plug to the wall socket.
- The charging indicator will turn on and the appliance will switch to the charging mode. The charging indicator will flash.
- The charging indicator will remain on after charging is complete.
Notes
It takes up to 8 hours for the appliance to be fully charged.
Warning
■ Appliance cannot be operated during the charging process.
Operating the appliance
1 Push the control button forward and move it to the desired level to operate the appliance.
2 Pull back the control button and move it to "OFF" level to switch off the appliance.
Adjusting the suction power
You can adjust the suction power by using the control panel C on the appliance.
1 Use the "ECO" level to clean curtains, table cloths and sofas.
2 Use the "CARPET" level to clean carpets.
3 Use the "TURBO" level to clean hard floors.
Notes
■ Icon of the selected level will be shown on the display during operation.
It can be used up to 75 minutes with 100% charge at the minimum level.
The charging indicator will be on during operation. As charging level decreases, these indicators will gradually go off and the appliance will stop working when all indicators are off.
Switch off and unplug the appliance before cleaning it.
Warning
■ Never use gasoline, solvent, abrasive cleaning agents, metal objects or hard brushes to clean the appliance.
Cleaning the dust container
Empty the dust container H when the dust container full LED "under the charging indicator F turns red with the appliance switched on.
Note
It is recommended to clean the dust container after each use.
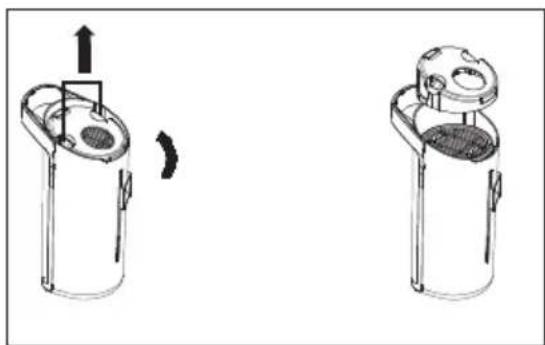
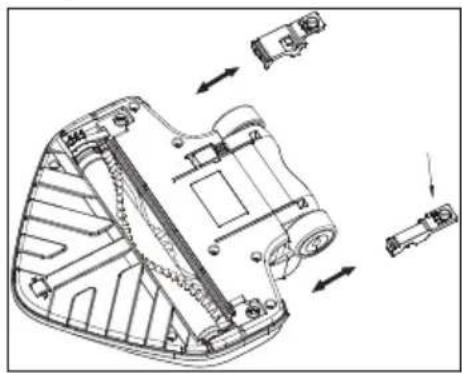
1 Press the dust container removal button and pull the handle of the dust container to remove it.
natural_image
Diagram of a hand operating a mechanical device with a directional arrow indicating motion (no text or symbols present)2 Grab and pull the cyclone from its handles and take it out from the dust container H.
natural_image
Two identical mechanical components with arrows indicating motion, no text or symbols present3 Empty the dust container.
4 Place the cyclone to its housing according to the arrow mark on it.
5 Place the dust container into the body of the appliance.
Cleaning the cyclone
1 Press the dust container removal button and pull the handle of the dust container to remove it.
2 Grab and pull the cyclone from its handles and take it out from the dust container H.
3 Rotate the cyclone cap counterclockwise to remove it.

4 Remove the HEPA filter on the cyclone.
5 Clean the cyclone by washing it under running water.
6 Follow the steps above in reverse order to assemble the parts together again.
Cleaning the HEPA filter
1 Press the dust container removal button and pull the handle of the dust container to remove it.
2 Grab and pull the cyclone from its handles and take it out from the dust container H.
3 Rotate the cyclone cap counterclockwise to remove it.
4 Remove the HEPA filter on the cyclone.
5 You can wash the filter under running water after shaking it off.
6 If you wash the HEPA filter, dry it at room temperature (for 24 hours minimum). Do not use them before ensuring that they are completely dry.
7 Install the HEPA filter to the cyclone housing and fit the cyclone into the dust container H.
8 Attach the dust container to the body again.
Cleaning the foam filter
1 Press the dust container removal button and pull the handle of the dust container to remove it.
2 Grab and pull the cyclone from its handles and take it out from the dust container H.
3 Rotate the cyclone cap counterclockwise to remove it.
4 Remove the HEPA filter on the cyclone.
5 Remove the foam filter under the HEPA filter.
6 You can wash the filter under running water after shaking it off.
7 If you wash the HEPA filter, dry it at room temperature (for 24 hours minimum). Do not use them before ensuring that they are completely dry.
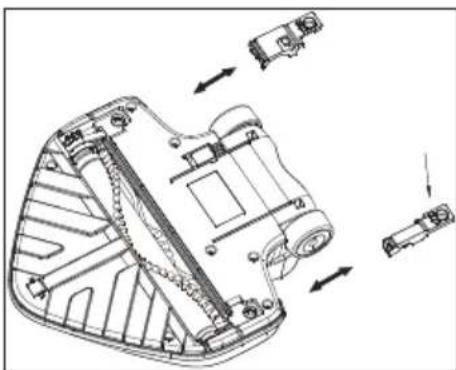
Cleaning the turbo brush
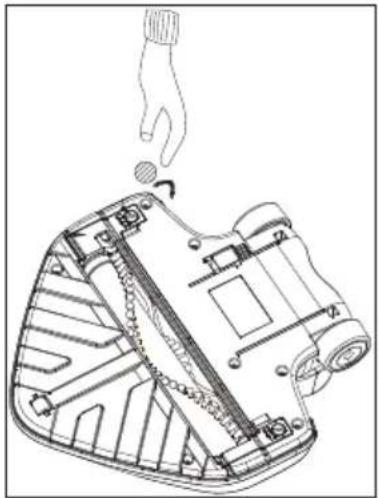
1 Twist the removal button of the turbo brush cylinder lid with the help of a screwdriver or a coin and unlock the lid of the brush cylinder.
natural_image
Technical line drawing of a mechanical device with a hand holding a tool, showing internal components and a rotation arrow (no text or symbols)2 Open the lid of the brush cylinder, remove and clean the brush.
natural_image
Technical line drawing of a mechanical device with internal components and directional arrows indicating assembly (no text or symbols)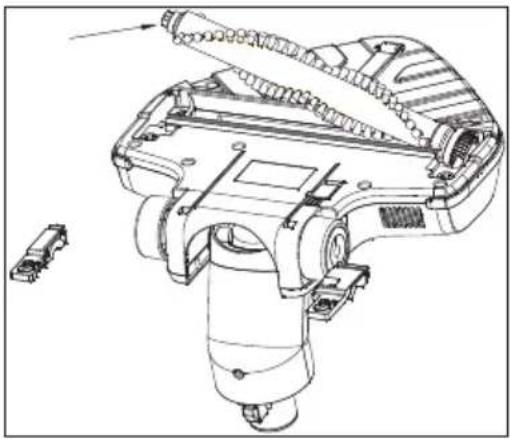
natural_image
Technical line drawing of a mechanical device with internal components and a separate connector (no text or symbols)3 Clean the brush roller with a damp cloth, attach it to its place and lock the tab.
Storage
If you do not intend to use the appliance for a long time, please store it carefully.
Please make sure that the appliance is unplugged, cooled and totally dry.
■ Store the appliance in a cool and dry place.
- Keep the appliance out of the reach of children.
Moving and transportation
During handling and transportation, carry the appliance in its original packaging. The packaging of the appliance protects it against physical damages.
- Do not place heavy loads on the appliance or on the packaging. The appliance may get damaged.
■ Dropping the appliance may render it non-operational or cause permanent damage.
Compliance with the WEEE Directive and Disposing of the Waste Product:
This product complies with EU WEEE Directive (2012/19/EU). This product bears a classification symbol for waste electrical and electronic equipment (WEEE).
This product has been manufactured with high quality parts and materials which can be reused and are suitable for recycling. Do not dispose of the waste product with normal domestic and other wastes at the end of its service life. Take it to the collection center for the recycling of electrical and electronic equipment. Please consult your local authorities to learn about these collection centers.
Compliance with RoHS Directive
The product you have purchased complies with EU RoHS Directive (2011/65/EU). It does not contain harmful and prohibited materials specified in the Directive.
Information on Waste Batteries
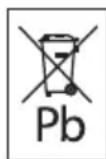
This symbol on rechargeable batteries/batteries or on the packaging indicates that the rechargeable battery/battery may not be disposed of with regular house hold rubbish. For certain rechargeable batteries/batteries, this symbol may be supplemented by a chemical symbol. Symbols for mercury (Hg) or lead (Pb) are provided if the rechargeable batteries/batteries contain more than 0,0005 % mercury or more than 0,004 % lead.
Rechargeable batteries/batteries, including those which do not contain heavy metal, may not be disposed of with household waste. Always dispose of used batteries in accordance with local environmental regulations. Make enquiries about the applicable disposal regulations where you live.
Package information

Packaging materials of the product are manufactured from recyclable materials in accordance with our National Environment Regulations. Do not dispose of the packaging materials together with the domestic or other wastes. Take them to the packaging material collection points designated by the local authorities.
Technical data

Rated voltage : 28.8 V
Maximum power : 32 V
Adaptor input :
100-240V\~50-60Hz
Adapter output : 34 V 350 mA
Protection class : II
Rights to make technical and design changes are reserved.
natural_image
Technical diagram showing mechanical components with arrows indicating motion (no text or symbols)natural_image
Technical line drawing of a mechanical device with a downward arrow indicating motion or assembly (no text or symbols present)natural_image
Diagram of a hand operating a mechanical device with a directional arrow indicating motion (no text or symbols present)natural_image
Two identical mechanical components with arrows indicating motion, no text or symbols presentnatural_image
Technical line drawing of a mechanical device with internal components and a hand holding a knob (no text or symbols)natural_image
Technical line drawing of a mechanical component with internal channels and directional arrows indicating assembly (no text or symbols)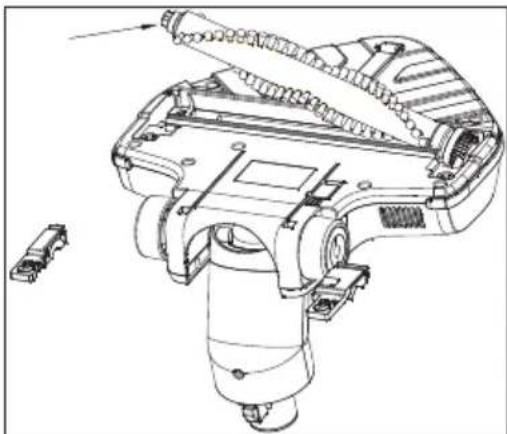
natural_image
Technical line drawing of a mechanical device with internal components and a separate connector (no text or symbols)natural_image
Technical diagram showing mechanical components with arrows indicating motion (no text or symbols)natural_image
Technical line drawing of a robotic device with a downward arrow indicating motion or assembly (no text or symbols present)Carga del aparato
natural_image
Diagram of a hand operating a mechanical device with a directional arrow indicating motion (no text or symbols present)natural_image
Diagram showing two mechanical components with directional arrows indicating motion (no text or symbols)natural_image
Technical line drawing of a mechanical device with a hand holding a tool, showing internal components and motion arrows (no text or symbols)natural_image
Technical line drawing of a mechanical component with exploded view, showing internal structure and assembly (no text or symbols)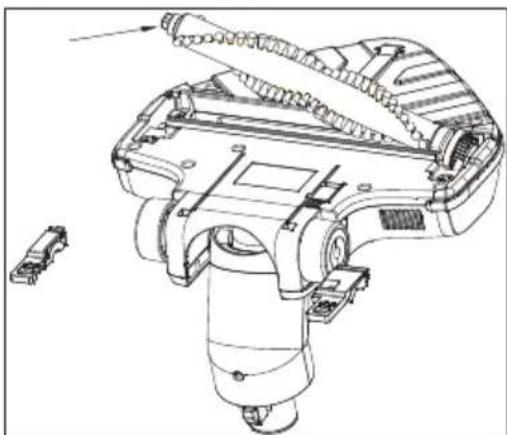
natural_image
Technical line drawing of a mechanical device with internal components and a small inset component (no text or symbols)natural_image
Technical diagram showing mechanical components with arrows indicating motion (no text or symbols)natural_image
Technical line drawing of a mechanical device with a downward arrow indicating motion or assembly (no text or symbols present)natural_image
Diagram of a hand operating a mechanical device with a directional arrow indicating motion (no text or symbols present)natural_image
Two identical mechanical components with arrows indicating motion, no text or symbols presentnatural_image
Technical line drawing of a mechanical device with a hand holding a knob, showing internal components and motion (no text or symbols)natural_image
Technical line drawing of a mechanical component with multiple directional arrows indicating assembly or movement (no text or symbols present)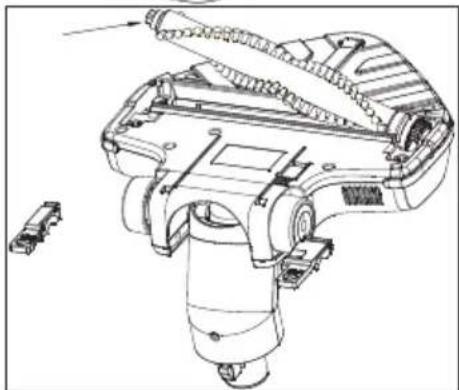
natural_image
Technical line drawing of a mechanical device with exploded view and component details (no text or symbols)natural_image
Technical diagram showing mechanical components with arrows indicating motion (no text or symbols)natural_image
Technical line drawing of a robotic device with a downward arrow indicating motion or assembly (no text or symbols present)Punjenje uređaja
1 Uključite adapter u otvor za punjenje na stražnjoj strani uređaja i uključite utikač u zidnu utičnicu.
- Uključit će se indikator punjenja i uređaj će prijeći u način rada za punjenje. Treperit će indikator punjenja.
- Indikator punjenja ostat će uključen i nakon dovršetka punjenja.
Napomene
Potpuno punjenje uređaja traje do 8 sati.
Upozorenje
natural_image
Technical line drawing of a mechanical assembly with hand and base components (no text or symbols)2 Uhvatiti i izvucite ciklonski sklop iz ručki i izvadi- te ga iz spremnika za prašinu H.

natural_image
Two identical mechanical components with arrows indicating motion, no text or symbols present3 Ispraznite spremnik za prašinu.
natural_image
Technical line drawing of a device with a hand holding a knob, showing internal components and motion arrows (no text or symbols)2 Otvorite poklopac cilindra četke, uklonite četku i očistite je.
natural_image
Technical line drawing of a mechanical device with internal components and directional arrows indicating motion (no text or symbols)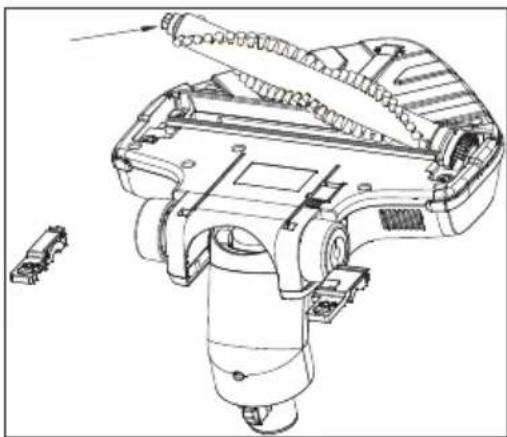
natural_image
Technical line drawing of a mechanical device with internal components and a small inset component (no text or symbols)natural_image
Technical diagram showing mechanical components with arrows indicating motion (no text or symbols)natural_image
Technical line drawing of a robotic device with a downward arrow indicating motion or assembly (no text or symbols present)natural_image
Technical line drawing of a mechanical assembly with hand operating a shaft (no text or symbols)natural_image
Two identical mechanical components with arrows indicating motion, no text or symbols presentnatural_image
Technical line drawing of a mechanical device with exploded and assembled views (no text or symbols)natural_image
Technical diagram showing mechanical components with arrows indicating motion (no text or symbols)natural_image
Technical line drawing of a robotic device with a downward arrow indicating motion or assembly (no text or symbols present)Lade apparatet
natural_image
Diagram of a hand holding a mechanical component with an arrow indicating motion (no text or symbols present)natural_image
Diagram showing two mechanical components with directional arrows indicating motion (no text or symbols)3 Tøm støvkammeret.
natural_image
Technical line drawing of a mechanical device with a hand holding a knob, showing internal components and motion arrows (no text or symbols)natural_image
Technical line drawing of a mechanical component with internal parts and directional arrows indicating assembly (no text or symbols)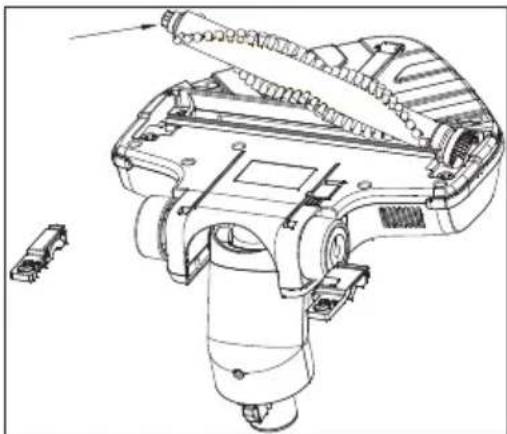
natural_image
Technical line drawing of a mechanical device with internal components and a separate connector (no text or symbols)natural_image
Technical diagram showing mechanical components with arrows indicating motion (no text or symbols)natural_image
Technical line drawing of a mechanical device with an arrow indicating downward motion (no text or symbols present)Laitteen lataaminen
natural_image
Diagram of a hand operating a mechanical device with a directional arrow indicating motion (no text or symbols present)natural_image
Two technical line drawings of a cylindrical device with internal components, showing a left-hand and right-hand assembly (no text or symbols)natural_image
Technical line drawing of a mechanical device with internal components and a hand holding a tool (no text or symbols)natural_image
Technical line drawing of a mechanical component with exploded view, showing internal structure and assembly (no text or symbols)
natural_image
Technical line drawing of a mechanical device with internal components and a separate connector (no text or symbols)


- Gerät aufladen
- A responsible approach!
- Controls and parts
- Intended use
- Installation
- Installation of upper and lower bodies
- Installation of the lower body and the brush
- Charging the appliance
- Notes
- Warning
- Operating the appliance
- Adjusting the suction power
- Cleaning the dust container
- Note
- Cleaning the cyclone
- Cleaning the HEPA filter
- Cleaning the foam filter
- Cleaning the turbo brush
- Storage
- Moving and transportation
- Compliance with the WEEE Directive and Disposing of the Waste Product:
- Compliance with RoHS Directive
- Information on Waste Batteries
- Package information
- Technical data
- Carga del aparato
- Punjenje uređaja
- Napomene
- Upozorenje
- Lade apparatet
- Laitteen lataaminen
Brand : GRUNDIG
Model : VCH 9731
Category : Vacuum Cleaner