
Mini 10029193 - Oven Klarstein - Free user manual and instructions
Find the device manual for free Mini 10029193 Klarstein in PDF.

| Product type | Electric oven with hotplates |
| Dimensions (approx.) | 50 x 38 x 35 cm (L x W x H) |
| Net weight | 10 kg |
| Power supply | 230 V ~ 50 Hz |
| Total power | 4100 W (oven 2500 W, left hotplate 1000 W, right hotplate 600 W) |
| Temperature range | 100 °C to 230 °C |
| Oven capacity | 4 to 6 slices of bread, 6 muffins or 6 waffles |
| Cooking functions | Top heat, bottom heat, convection, rotisserie, top+bottom combination |
| Hotplates | 2 hotplates (left 1000 W, right 600 W) |
| Timer | Mechanical, with audible signal |
| Interior light | Yes, lights up with the timer |
| Door | Reinforced safety glass |
| Included accessories | Grid, baking tray, rotisserie, handle |
| Material | Steel, glass |
| Cleaning | Do not use abrasives or metal sponge; clean with soapy water |
| Maintenance | Unplug and let cool before cleaning |
| Safety | Do not touch hot surfaces, do not use outdoors, do not cover with aluminum |
| Recycling | Complies with European Directive 2002/96/EC |
| Certification | CE, RoHS |
Frequently Asked Questions - Mini 10029193 Klarstein
User questions about Mini 10029193 Klarstein
0 question about this device. Answer the ones you know or ask your own.
Ask a new question about this device
Download the instructions for your Oven in PDF format for free! Find your manual Mini 10029193 - Klarstein and take your electronic device back in hand. On this page are published all the documents necessary for the use of your device. Mini 10029193 by Klarstein.
USER MANUAL Mini 10029193 Klarstein
natural_image
Row of white icons representing kitchen appliances including blender, kettle, refrigerator, washing machine, fan, air conditioner, and microwave (no text or symbols)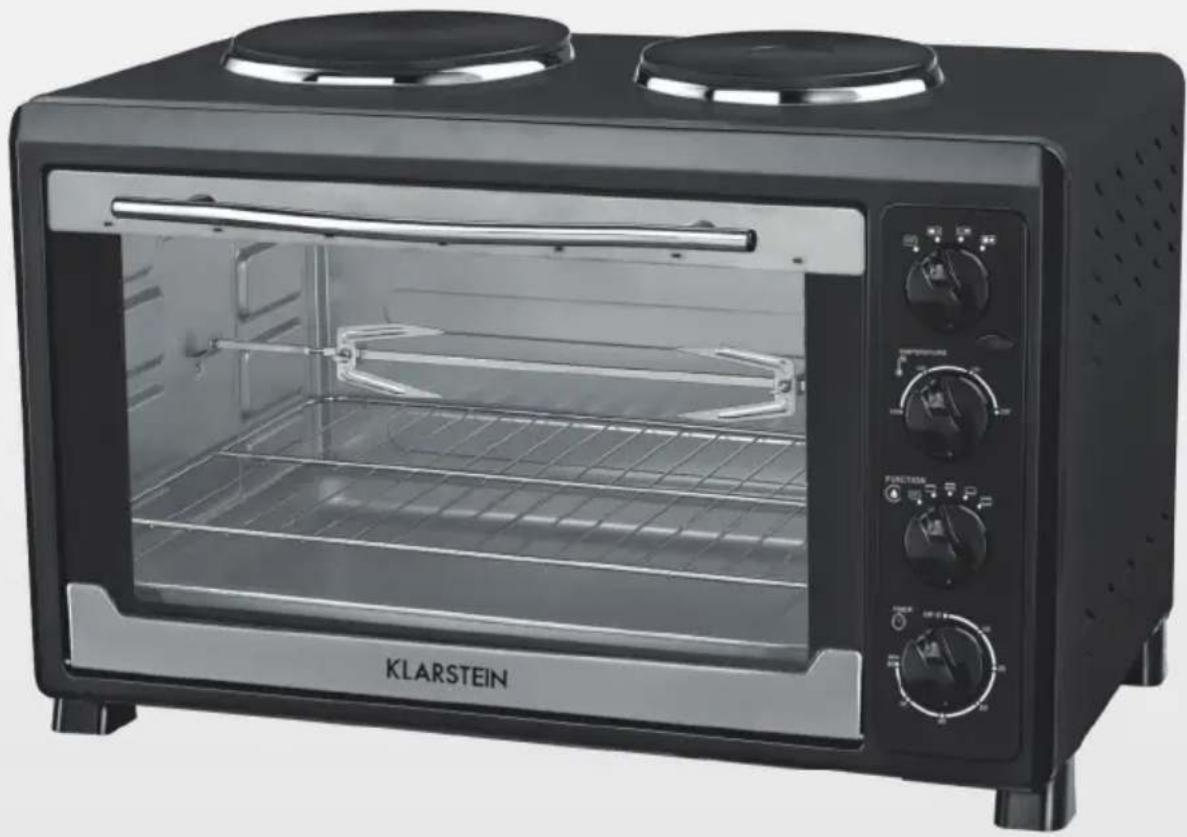
natural_image
Exterior view of a KLARSTEIN 3-wheeled toaster oven with two top ovens and control knobs (no visible text or symbols on the device itself)natural_image
Symbol of a trash bin crossed with a diagonal line, no text or numbers presentCongratulations on purchasing this equipment. Please read this manual carefully and take care of the following hints to avoid damages. Any failure caused by ignoring the mentioned items and cautions mentioned in the instruction manual are not covered by our warranty and any liability.
Contents
Technical Data 8
Safety Instructions 8
Product Description and Accessory 9
Use and Operation 10
Cleaning and Care 12
Hints on Disposal 13
Declaration of Conformity 13
Technical Data
| Item number 10029192, 19929193 | |
| Power supply 230 V ~ 50 Hz | |
| Power consumption 4100 W (25 | 00 W oven / 100 W left plate / 600 W right plate) |
Safety Instructions
- Read all the safety and operating instructions carefully and retain them for future reference.
- Do not touch hot surfaces. Always use handles or knobs.
- Close supervision is necessary when any appliance is used by or near children.
• To protect against electric shock, do not immerse cord, plug or any parts of the oven in water or any other liquids. - Do not let cord hang over edge of table or counter, or touch hot surfaces.
- Do not operate appliance with damaged cord or plug or after the appliance malfunctions or has been damage in any manner. Return appliance to it's authorized agent for repair, as special purpose tools are required
- The use of accessory attachments not recommended by the appliance manufacturer may cause hazard or injury.
- Do not place on or near a hot gas or electric burner.
- When operating the oven, keep at least four inches of free space on all sides of the oven to allow for adequate air circulation. Unplug from outlet when not in use and before cleaning.
- Allow to cool before putting on or taking off parts, and before cleaning.
- To disconnect, turn the time control to OFF, then remove the plug. Always hold the plug, and never pull the cord. Do not cover crumb tray or any part of the oven with metal foil. This may cause the oven to overheat.
- Use extreme caution when removing the tray, racks or disposing of hot grease or other hot liquids.
- Do not clean the inside of the oven with metal scouring pads, pieces can break off the pad and touch electrical parts, creating a risk of electric shock.
- Oversized foods or metal utensils must not be inserted in a toaster oven as they may create a fire or risk of electric risk.
- A fire may occur if the oven is covered or touching flammable material, including the curtains, draperies,
-
walls, and the like, when in operation. Do not store any item on top of the appliance when in operation.
-
Extreme cautions should be exercised when using cooking or baking containers constructed of anything other than metal or ovenproof glass.
- Be sure that nothing touches the top or bottom elements of the oven.
- Do not place any of the following materials in the oven: cardboard, plastic, paper, or anything similar.
- Do not store any materials other than manufacturer's recommended accessories in this oven when not in use.
• Always wear protective, insulated oven gloves when inserting or removing items from the hot oven. - This appliance has a tempered, safety glass door. The glass in stronger than ordinary glass and more resistant to breakage. Tempered glass can still break around edges. Avoid scratching door surface or nicking edges.
- This appliance is OFF when the Timer Control button is in the "OFF" position.
- Do not use outdoors. Do not use appliance for other than intended use.
Product Descriptin and Accessory
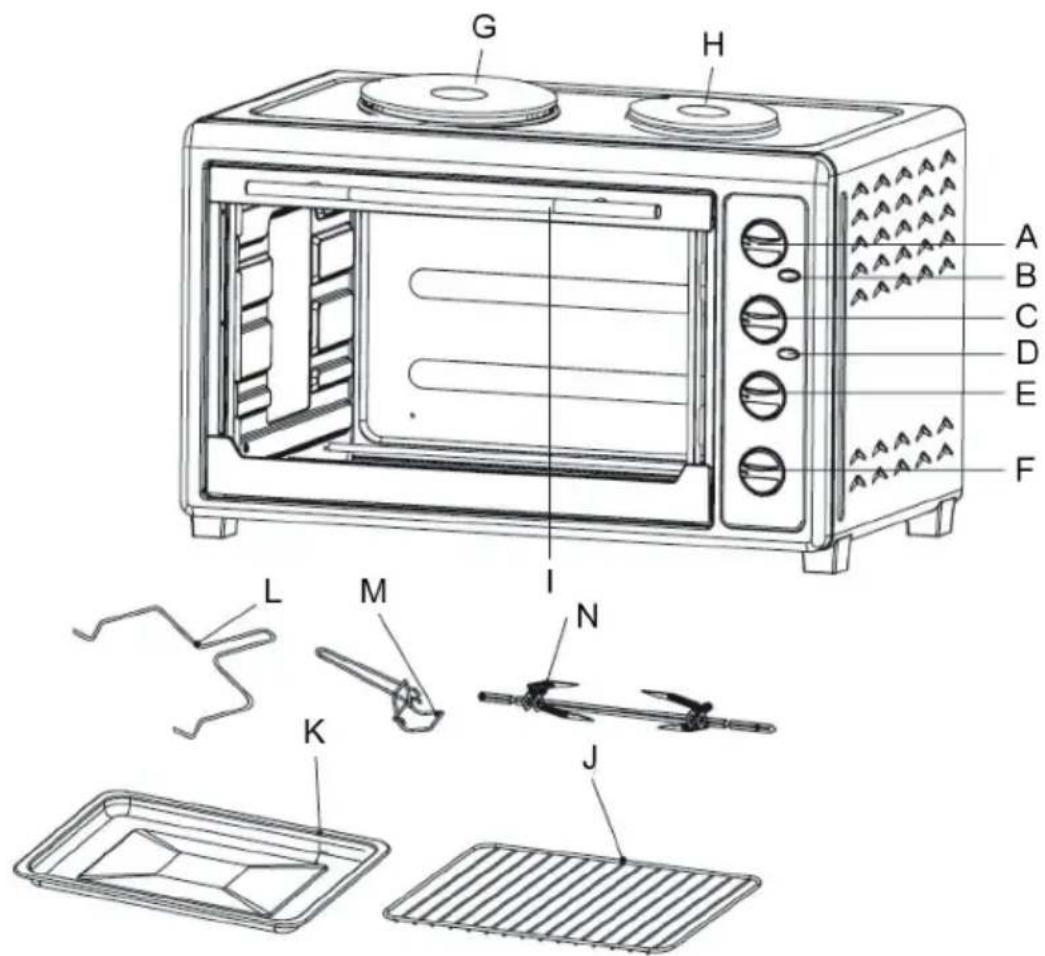
| A Hotplate control E Function control I Handle M Tray handle | |
| B Indicator light F Timer J Wire rack N Rotisseries | |
| C Temperature control G Left hotplate K Bake tray | |
| D Indicator light H Right hotplate L Rotisserie handle |
Use and Operation
Before first Use
Wash all the accessories in hot, soapy water or in the dish washer. Thoroughly dry all accessories and re-assemble in oven, plug oven into outlet and you are ready to use your new toaster oven. After re-assembling your oven, we recommend that you run it at the highest temperature (230 °C) on the toast function for approximately 15 minutes to eliminate any packing residue that may remain after shipping.
Please familiarize yourself with the following oven functions and accessories prior to first use:
- Hotplate Control: on „OFF“ the hotplate does not work;on „LEFT“ the left hotplate can work;on „RIGHT“ the right hotplate can work;on „LEFT&RIGHT“ two hotplates work together.
• Temperature Control:
Choose the desired temperature from 100 ^ to 230 ^ for cooking.
- Main Function Control:
: this oven is equipped with five positions for a variety of cooking needs:
| Off The device doesnt work. | |
| Upper heater On this position, the upper two heating elements work. | |
| Upper heater & Rotisserie On this position, the upper two heating elements and rotisserie can work together. | |
| Upper and Lower heater On this position, upper and lower heating elements work together. | |
| Lower heater On this position, the lower two heating elements work. | |
- Timer:
When you turn activate the timer segment of the control, turn to the right (clockwise) to toast or use as a timer. This function also has a bell rings at the end of the programmed time. - Convection fan: The convection fan works automatically when the function knob is turned on.
- Indicator light: It will light when the linkheating element is turned on.
- Bake Tray: For use in broiling and roasting meat, poultry, fish and various other foods.
- Tray Handle: Allows you to pick up the wire rack, and bake tray when they are hot.
- Wire Rack: For toasting, baking, and general cooking in casserole dishes and standard pans.
- Inner Light: The inner light works automatically when the function knob is turned on.
How to use the Convection Function
Convection cooking combines hot air movement by means of a fan with the regular features (broil, bake and toast). Convection cooking provides faster cooking in many cases than regular radiant types toaster oven. The convection fan works when you turn the first knob to Convection Function ☐ Convection & Rotisserie Function . The convection fan works automatically when the function knob is turned on
How to use the Rotisserie
We recommend that you do not cook a roast larger than 4-5 lbs. on the rotisserie set. Chicken should be bound in a string to prevent the chicken legs or wings from unraveling during roasting so that rotisserie assembly will rotate smoothly. For best results we recommend that you preheat the oven for 15 minutes on 230^ .
- Set the temperature control to desired heat.
- Insert the meat or poultry that you are going to cook onto the rotisserie skewer. Making sure that the meat or poultry is secured tightly with the skewer clamps and thumbscrews. Make sure that the meat or poultry is centered onto the skewer.
- Insert the pointed end of the rotisserie skewer into the drive socket, located on the right hand side of the oven wall. Make sure that the square end of the rotisserie skewer rests on the rotisserie skewer support located on the left hand side of the oven wall.
- Slide the bake tray onto the lowest position to catch the food drippings.
- Turn function control to „Upper heater&Rotisserie“.
- Turn the time control to your desired cooking time.
- When the cooking is completed, the oven bell will ring turn the function control to „OFF“.
- Remove the rotisserie skewer from the oven by placing the hooks of the rotisserie handle under the grooves on either side of the rotisserie skewer, lift the left side of the rotisserie skewer first by lifting it up and out. Then pull the rotisserie skewer out of the drive socket and carefully remove the roast from the oven.
- Take the meat or poultry off the rotisserie skewer and place on a cutting board or platter.
How to Broil
For best results, it is recommended that your preheat the oven for 15 minutes on 230 °C.
- Place food on the wire rack and slide into the top rack position. Food should be placed as close as possible to the top heating element without touching it.
- Put bake tray at the lowest rack position to catch possible dripping.
- To prevent fire hazards, it is suggested to wrap food with aluminum foil.
- Set temperature knob to appropriate temperature.
- Brush food with sauces or oil, as desired.
- Set function knob to Broil Function.
- Turn time knob to your desired cooking time.
- Turn food over midway through the prescribed cooking time.
- When broiling is complete, turn the third knob to "OFF" position.
How to Bake
Please note that the BAKE function uses only the bottom heating elements. For best results, it is recommended that you preheat the oven for 15 minutes on 230 °C.
- Place food on the wire rack or bake tray and slide into the lowest rack position.
- To prevent fire hazards, it is suggested to wrap food with aluminum foil.
- Set temperature knob to appropriate temperature.
- Brush food with sauces or oil, as desired.
- Set function knob to Bake Function.
- Turn time knob to your desired cooking time.
- Turn food over midway through the prescribed cooking time.
- When baking is complete, turn the third knob to "OFF" position.
Positioning of the Wire Racks
Cookies – Use bottom and middle Support Guides.
Layer Cakes – Use bottom Support Guide only (bake one at a time).
Pies - Use bottom and middle Support Guides.
How to Toast
Please note that the TOAST function uses all the heating elements. Large capacity oven allows for toasting 4 to 6 slices of bread, 6 muffins, frozen waffles or frozen pancakes. When toasting only 1 or 2 items, place food on the bake rack in the center of the oven.
- Set the Temperature Control Knob to desired temperature.
- Turn the function control to „Upper & Lower Heater“
- Place food to be toasted on the wire rack.
- Ensure the tray is in place.
- When toasting is complete, turn function control to „OFF“.
How to use the right Hotplate
- Place food to be cooked on the hotplate.
- Turn the main function switch knob to the right hotplate “” selector.
- Turn the timer control to your desired cooking time, and the hotplate can work. (600 W)
- When cookie is complete, turn the selector to "OFF". Finally turn the timer control to "OFF".
How to use the left Hotplate
- Place food to be cooked on the hotplate.
- Turn the main function switch knob to the right hotplate “” selector.
- Turn the timer control to your desired cooking time, and the hotplate can work. (1000 W)
- When cookie is complete, turn the selector to "OFF". Finally turn the timer control to "OFF".
ATTENTION: Always use extreme care when removing bake tray, wire rack or a any hot container from a hot oven. Always use the rack handle, or an oven mitt when removing hot items from the oven.
Cleaning and Care
- Clean the appliance every time after use.
- Remove the plug from the wall socket and allow the appliance to cool down completely.
- Use warm water with a small amount of washing-up liquid to clean the baking tray, the grille and the removal tool. Rinse the items with plenty of water and dry them thoroughly.
- Use a damp cloth to clean the interior and exterior of the oven and the door. Dry them thoroughly.
- Place all the items back in the oven and store the oven.
IMPORTANT:
Never use corrosive or scouring cleaning agents or sharp objects (such as knives or hard brushes) to clean the appliance. Never immerse the appliance, the power cord or the plug in water or any other fluid.
Hints on Disposal

natural_image
Symbol of a trash bin crossed out by a diagonal line, with no text or labels present.According to the European waste regulation 2002/96/EC this symbol on the product or on its packaging indicates that this product may not be treated as household waste. Instead it should be taken to the appropriate collection point for the recycling of electrical and electronic equipment. By ensuring this product is disposed of correctly, you will help prevent potential negative consequences for the environment and human health, which could otherwise be caused by inappropriate waste handling of this product. For more detailed information about recycling of this product, please contact your local council or your household waste disposal service.
Declaration of Conformity
Producer: Chal-Tec GmbH, Wallstraße 16, 10179 Berlin, Germany.
CE
This product is conform to the following European Directives:
2014/30/EU (EMC)
2014/35/EU (LVD)
2011/65/EU (RoHS)
Estimado cliente:
natural_image
Symbol of a trash bin crossed with a diagonal line, representing no waste or discharge (no text or labels)natural_image
Symbol of a trash bin crossed with a diagonal line, no text or numbers presentnatural_image
Symbol of a trash bin crossed with a diagonal line, no text or numbers present

- Contents
- Technical Data
- Safety Instructions
- Use and Operation
- Before first Use
- How to use the Convection Function
- How to use the Rotisserie
- How to Broil
- How to Bake
- Positioning of the Wire Racks
- How to Toast
- How to use the right Hotplate
- How to use the left Hotplate
- Cleaning and Care
- IMPORTANT:
- Hints on Disposal
- Declaration of Conformity
- Estimado cliente:
Brand : Klarstein
Model : Mini 10029193
Category : Oven