
CR 7.220 - Garden hose Kärcher - Free user manual and instructions
Find the device manual for free CR 7.220 Kärcher in PDF.



| Product type | Automatic hose reel |
| Brand | Kärcher |
| Model | CR 7.220 |
| Use | Domestic |
| Installation | Wall-mounted with supplied wall bracket |
| Swivel range | Up to 180°, adjustable in 30° steps |
| Hose length | 20 m (estimated) |
| Maximum water pressure | 6 bar (estimated) |
| Winding function | Automatic by pulling the hose |
| Length lock | In 50 cm steps |
| Weight | Approx. 4.5 kg |
| Material | Robust plastic with metal bracket |
| Tap connector | Included with reducer |
| Maintenance | No maintenance required; external cleaning |
| Repairability | Repairs only by authorized service center; original parts |
| Safety | Use by children prohibited; lockable with padlock |
| Included accessories | Wall bracket, fixing materials, connection hose, nozzle |
| Warranty | According to distributor's conditions |
| Compliance | European directives, EN ISO 12100 |
Frequently Asked Questions - CR 7.220 Kärcher
User questions about CR 7.220 Kärcher
0 question about this device. Answer the ones you know or ask your own.
Ask a new question about this device
Download the instructions for your Garden hose in PDF format for free! Find your manual CR 7.220 - Kärcher and take your electronic device back in hand. On this page are published all the documents necessary for the use of your device. CR 7.220 by Kärcher.
USER MANUAL CR 7.220 Kärcher
Chairman of the Board of Management
S. Reiser Director Regulatory Affairs & Certification
71364 Winnenden (Germany)
Tel.: +49 7195 14-0
Fax: +49 7195 14-2212
Winnenden, 2018/10/01
Contents
Contents. EN .1
General notes. EN...1
Safety instructions EN.1
Operation EN.2
Maintenance. EN .2
Transport EN.3
Storage. EN.3
Accessories and Spare Parts EN . . .3
EU Declaration of Conformity EN . . .3
General notes
Dear Customer,

Please read and comply with these original operating instructions prior to the initial operation of your product and store them for later use or subsequent owners.
Please read and comply with these original operating instructions prior to the initial operation of your product and store them for later use or subsequent owners.
Proper use
This product has been designed for use in private households and is not intended for commercial use.
The manufacturer is not responsible for any damages that may occur on account of improper use or wrong operations.
This product is an automatic hose box that allows for even unrolling of the garden hose. After use, the hose can be recoiled automatically by one simple pull. The box is mounted to the wall with the enclosed wall mount. It has a variable swivel range of up to 180 degrees.
Please observe the requirements of EN 1717 when connecting this product to the drinking water network and contact your sanitation specialists if you have any questions.
Environmental protection

The packaging material can be recycled. Please do not place the pack into the ordinary refuse for disposal, but arrange for the proper recycling.

Old appliances contain valuable materials that can be recycled. Please arrange for the proper recycling of appliances. Please dispose your old appliances using appropriate collection systems.
Notes about the ingredients (REACH)
You will find current information about the ingredients at:
www.kaercher.com/REACH
Warranty
The warranty terms published by our competent sales company are applicable in each country. We will repair potential failures of your product within the warranty period free of charge, provided that such failure is caused by faulty material or defects in fabrication. In the event of a warranty claim please contact your dealer or the nearest authorized Customer Service center. Please submit the proof of purchase.
Symbols in the operating instructions
CAUTION
Possible hazardous situation that could lead to mild injury to persons or damage to property.
Safety instructions
CAUTION
The non-compliance with safety instructions may lead to damages of the product and to dangers for the operator and other persons.
To avoid risks, all repairs and replacement of spare parts may only be carried out by the authorised customer service personnel. This product is not intended for use by persons (including children) with limited
physical, sensoric or mental capacities or lack of experience and/or skills, unless such persons are accompanied and supervised by a person in charge of their safety or if they received precise instructions on the use of this product. Children should be supervised to prevent them from playing with the product.
Operation
Product description
1 Hose coupling 2 Stopper / retract 3 Hose 4 Stopper 5 Metal bow 6 Handle 7 Wall mount 8 Fastening material 9 Tap connection with reduction fitting 10 Padlock (not included in the delivery) 11 Accessory compartment 12 Connection hose 13 Carrying handle 14 Spray nozzle
Preparing the Appliance
Illustration A
Mark the bores to mount the wall mount and place dowels into the drilled bores. Fasten the wall mount using the included washers and screws.
Illustration 3
Place the hose box flush with the metal bow and hook it in. Make sure that all 4 screw heads protrude from the hook holes.
Slide the metal bow downwards vertically all the way.
Illustration
Attach the accessories holder to the bottom side of the metal bow.
Illustration D
To change the swivel range, pull the left or the right stop toward the outside and
swivel the hose box into the desired position.
(The swivel range of the hose box can be swivelled in 30°-steps.)
Let the stop lock in the desired position.
Illustration E
Loosen both screws on the stopper. Slide the stopper to the desired position and screw it in.
Illustration
The product can be protected against theft. Use the padlock for this.
Operation
NOTICE
Make sure the hose has free return play. It should not be too dirty when it is coiled to ensure the proper function of the automatic retraction/recoiling.
→ Connect the connecting hose to the water tap. → Open tap.
Unroll the hose
→ Pull the hose out to the desired length. The stop function of the hose box can be activated in < 50 cm-steps and can be noticed by a clicking sound. → Attach the Kärcher garden accessories to the hose coupling.
Coil the hose
→ Trigger the automatic recoiling function by briefly pulling on the hose. The garden hose is coiled up evenly.
Finish operation
→ Turn off tap.
Maintenance
CAUTION
The hose box may not be opened.
Repair work on the product may only be performed by the authorized customer service.
Proceed as follows to replace the connecting hose:
Remove the side panel and loosen the hose clamp using a screwdriver. Then pull out the hose.
The product is maintenance-free.
Transport
CAUTION
To prevent accidents or injuries, keep in mind the weight of the appliance when selecting a storage location for it.
When transporting by hand
Lift the appliance at the handle, remove it from the wall mount, and transport it.
Storage
Illustration C
If the connecting hose is separated from the water source, it can be coiled around the extracted hose holder. If necessary, store Karcher garden accessories directly on the accessory holder.
Ensure that the hose is completely drained prior to storing it. The water is best drained by uncoiling the entire hose. The sprayer must be open during this procedure.
Storing the Appliance
CAUTION
To prevent accidents or injuries, keep in mind the weight of the appliance when selecting a storage location for it.
Store the appliance in a frost-free area.
Accessories and Spare Parts
Only use original accessories and spare parts, they ensure the safe and trouble-free operation of the device.
For information about accessories and spare parts, please visit www.kaercher.com.
EU Declaration of Conformity
We hereby declare that the machine described below complies with the relevant basic safety and health requirements of the EU Directives, both in its basic design and construction as well as in the version put into circulation by us. This declaration shall cease to be valid if the machine is modified without our prior approval.
Product: Hose box
Type: 2.645-xxx
Relevant EU Directives
2006/42/EC (+2009/127/EC)
Applied harmonized standards
EN ISO 12100
Applied national standards
The signatories act on behalf of and with the authority of the company management.
H.Jenner
Chairman of the Board of Management
S. Reiser
Director Regulatory Affairs & Certification
Documentation supervisor:
S. Reiser
Alfred Kärcher SE & Co. KG
71364 Winnenden (Germany)
Tel.: +49 7195 14-0
Fax: +49 7195 14-2212
Winnenden, 2018/10/01
Table of contents
Table of contents. . . . . EN . . . 1
General notes . . . EN . . .1
www.kaercher.com/REACH
Warranty
2006/42/EC (+2009/127/EC)
Chairman of the Board of Management
S. Reiser
Director Regulatory Affairs & Certification
Responsible for documentation:
S. Reiser
Alfred Kärcher SE & Co. KG
71364 Winnenden (Germany)
Tel.: +49 7195 14-0
Fax: +49 7195 14-2212
Winnenden, 2018/10/01
Index
Index IT .1
General warnings . . . . . . . . . . . . . . . . . . . . . . . . . . . . . . . . . . . . . . . . . . . . . . . . . . . . . . . . . . . . . . . . . . . . .
Safety regulations . IT .1
Use. IT .2
Maintenance. IT .3
Transport IT.3
Support. IT .3
Accessories and spare parts. IT.3
www.kaercher.com/REACH
Warranty
2006/42/EC (+2009/127/EC)
Chairman of the Board of Management
S. Reiser
Director Regulatory Affairs & Certification
71364 Winnenden (Germany)
Tel.: +49 7195 14-0
Fax: +49 7195 14-2212
Winnenden, 2018/10/01
Table of contents
Table of contents EN...1
www.kaercher.com/REACH
Warranty
Chairman of the Board of Management
S. Reiser Director Regulatory Affairs & Certification
71364 Winnenden (Germany)
Tel.: +49 7195 14-0
Fax: +49 7195 14-2212
Winnenden, 2018/10/01
Table of contents
Table of contents ES...1
www.kaercher.com/REACH
Warranty
2006/42/EC (+2009/127/EC)
Chairman of the Board of Management
S. Reiser Director Regulatory Affairs & Certification
Documentation Manager:
S. Reiser
Alfred Kärcher SE & Co. KG
71364 Winnenden (Germany)
Tel.: +49 7195 14-0
Fax: +49 7195 14-2212
Winnenden, 2018/10/01
Index
Index. PT...1
www.kaercher.com/REACH
Warranty
Chairman of the Board of Management
S. Reiser
Director Regulatory Affairs & Certification
71364 Winnenden (Germany)
Tel.: +49 7195 14-0
Fax: +49 7195 14-2212
Winnenden, 2018/10/01
Table of Contents
www.kaercher.com/REACH
Warranty
2006/42/EC (+2009/127/EC)
H.Jenner Chairman of the Board of Management
S. Reiser Director Regulatory Affairs & Certification
71364 Winnenden (Germany)
Tel.: +49 7195 14-0
Fax: +49 7195 14-2212
Winnenden, 2018/10/01
Table of contents
www.kaercher.com/REACH
Warranty
Relevant EU directives
2006/42/EC (+2009/127/EC)
Chairman of the Board of Management
S. Reiser
Director Regulatory Affairs & Certification
71364 Winnenden (Germany)
Tel.: +49 7195 14-0
Fax: +49 7195 14-2212
Winnenden, 2018/10/01
www.kaercher.com/REACH
Warranty
H.Jenner Chairman of the Board of Management
S. Reiser Director Regulatory Affairs & Certification
Authorized for documentation: S. Reiser
Alfred Kärcher SE & Co. KG
71364 Winnenden (Germany)
Tel.: +49 7195 14-0
Fax: +49 7195 14-2212
Winnenden, 2018/10/01
Table of contents
Table of contents FI .1
www.kaercher.com/REACH
Warranty
Chairman of the Board of Management
S. Reiser
Director Regulatory Affairs & Certification
71364 Winnenden (Germany)
Tel.: +49 7195 14-0
Fax: +49 7195 14-2212
Winnenden, 2018/10/01
www.kaercher.com/REACH
Eyyunon
Chairman of the Board of Management
S. Reiser
Director Regulatory Affairs & Certification
YTεuθuvoc εyypáφwv TεkμnpiωσηS. Reiser
Alfred Kärcher SE & Co. KG
71364 Winnenden (Germany)
Tel.: +49 7195 14-0
Fax: +49 7195 14-2212
Winnenden, 2018/10/01
Içindekiler
Table of Contents TR.1
www.kaercher.com/REACH
Warranty
71364 Winnenden (Germany)
Tel.: +49 7195 14-0
Fax: +49 7195 14-2212
Winnenden, 2018/10/01
Ornablenne
OrnaBJIeHne RU...1
O6uye yka3aHnra. RU...1
Yka3aHnno no TexHnke 6e3oNa-CHOCTn .RU...2
UnpaBneHne RU.2
TexHnueckoe 6cbnyKbHaHne RU . .3
TpaHcnpTnpoBka RU.3
XpaHeHne. RU..3
Spare parts RU.4
Declaration of Conformity EU RU . .4
General instructions.
Dear customer!

Before first use of your product, please read
this original instruction manual and act accordingly. Keep it for future use or for the next owner.
Intended use
This product is designed for household use and is not intended for professional use.
The manufacturer is not liable for possible damages arising from use other than intended or from incorrect maintenance.
The term "product" refers to the automatic wall-mounted soap dispenser that ensures even dispensing of liquid soap. After applying the soap, the dispenser automatically dispenses with one movement. The dispenser is attached to the wall using the included wall mounting. It can be installed at various angles, up to 180 degrees.
www.kaercher.com/REACH
Warranty
In each country, the applicable warranty conditions issued by our authorized distributor apply. Possible malfunctions of the product during the warranty period will be repaired free of charge if they are due to material defects or manufacturing errors. In case of a claim during the warranty period, please contact, with the purchase receipt, the retailer who sold you the product or the nearest authorized customer service.
The date of manufacture is indicated on the type plate in coded form.
The following values apply to the technical data:
Example: 30190
3rd digit of issue: 0 century issue 1 decade issue 9 second digit of month issue 0 first digit of month issue
Thus, in this example, code 30190 indicates the issue date 09/2013.
Symbols in the operating manual
CAUTION
For a potentially hazardous situation that could result in minor injury or property damage.
Safety instructions
CAUTION
Failure to follow safety instructions may result in product damage and pose risks to service personnel and others.
To avoid danger, repair and installation of spare parts must be performed only by authorized service centers. This product is not intended for use by persons (including children) with reduced physical, sensory, or mental capabilities, or lack of experience and knowledge, unless they are supervised or instructed by a person responsible for their safety.
Supervise children to ensure they do not play with the product.
Control
Product description
1 Universal connector 2 Stop / plug 3 Handle 4 Support 5 Metal bracket 6 Handrail 7 Wall mounting 8 Mounting materials 9 Thread-cutting chuck with adapter 10 Hanging lock (not included in delivery) 11 Switch accessories 12 Connecting cable 13 Handle of the device 14 Spray gun
Preparation
Figure A
Mark the hole for the wall mounting and install the dowel in the drilled holes. Secure the wall mounting using the included sealing washers and screws.
Figure
→ Using the metal bracket, position the winding drum horizontally and hang it. Make sure that all 4 screw heads protrude from the hanging holes.
Slide the metal bracket vertically down the guide.
Figure
→ Install the accessory holder on the lower part of the metal bracket.
Figure
→ To change the tilt angle, move the left or right stop to the outside and set the winding drum to the desired position.
The product does not require maintenance.
Transport
CAUTION
To avoid accidents or damage, when choosing a storage location, take into account the weight of the device.
Transport
Spare parts
Use original spare parts - only they guarantee safe, trouble-free operation of the device.
Information about spare parts can be found on the website www.kaercher.com.
EU Declaration of Conformity
We hereby declare that the product described below, in its design and construction, as well as in the version we put on the market, complies with the relevant basic safety and health requirements of the EU Directives. This declaration becomes invalid if the product is modified without our approval.
Product: Hose reel
Type: 2.645-xxx
Applicable EU Directives
2006/42/EC (+2009/127/EC)
Chairman of the Board of Management
S. Reiser
Director Regulatory Affairs & Certification
Authorized documentation representative:
S. Reiser
Alfred Kärcher SE & Co. KG
71364 Winnenden (Germany)
Tel.: +49 7195 14-0
Fax: +49 7195 14-2212
Winnenden, 2018/10/01
Table of contents
Table of contents .HU.1
www.kaercher.com/REACH
Warranty
Chairman of the Board of Management
S. Reiser Director Regulatory Affairs & Certification
71364 Winnenden (Germany)
Tel.: +49 7195 14-0
Fax: +49 7195 14-2212
Winnenden, 2018/10/01
Contents
Table of contents. EN...1
www.kaercher.com/REACH
Warranty
2006/42/EC (+2009/127/EC)
Chairman of the Board of Management
S. Reiser
Director Regulatory Affairs & Certification
71364 Winnenden (Germany)
Tel.: +49 7195 14-0
Fax: +49 7195 14-2212
Winnenden, 2018/10/01
Table of contents
Table of contents..EN.1
General notes. .EN.1
Safety instructions. .EN.1
Use SL.2
www.kaercher.com/REACH
Warranty
Relevant EU directives:
2006/42/EC (+2009/127/EC)
Chairman of the Board of Management
S. Reiser Director Regulatory Affairs & Certification
Authorized person for documentation: S. Reiser
Alfred Kärcher SE & Co. KG
71364 Winnenden (Germany)
Tel.: +49 7195 14-0
Fax: +49 7195 14-2212
Winnenden, 2018/10/01
Table of contents
Table of contents. PL.1
www.kaercher.com/REACH
Warranty
2006/42/EC (+2009/127/EC)
71364 Winnenden (Germany)
Tel.: +49 7195 14-0
Fax: +49 7195 14-2212
Winnenden, 2018/10/01
Table of contents
Table of contents. EN .1
Dear customer,

www.kaercher.com/REACH
Warranty
Applicable EU directives:
2006/42/EC (+2009/127/EC)
Harmonized standards used:
EN ISO 12100
National application standard:
H.Jenner Chairman of the Board of Management
S. Reiser Director Regulatory Affairs & Certification
71364 Winnenden (Germany)
Tel.: +49 7195 14-0
Fax: +49 7195 14-2212
Winnenden, 2018/10/01
Table of contents
Table of contents. SK...1
www.kaercher.com/REACH
Warranty
2006/42/EC (+2009/127/EC)
Applied harmonized standard:
EN ISO 12100
71364 Winnenden (Germany)
Tel.: +49 7195 14-0
Fax: +49 7195 14-2212
Winnenden, 2018/10/01
Table of contents
www.kaercher.com/REACH
Warranty
In each country, the warranty conditions issued by our responsible distributor apply. We will remedy any faults on the product free of charge during the warranty period if the cause is a material or manufacturing defect. In the event of a warranty claim, please contact your dealer or the nearest authorized service center, presenting the proof of purchase.
Symbols in the operating instructions
CAUTION
2006/42/EZ (+2009/127/EZ)
Applied harmonized standards:
EN ISO 12100
Applied national standards:
Chairman of the Board of Management
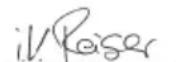
S. Reiser
Director Regulatory Affairs & Certification
Authorized for documentation: S. Reiser
Alfred Kärcher SE & Co. KG
71364 Winnenden (Germany)
Tel.: +49 7195 14-0
Fax: +49 7195 14-2212
Winnenden, 2018/10/01
Table of contents
www.kaercher.com/REACH
Warranty
In every country, the warranty conditions issued by our responsible distributor apply. We will rectify any faults on the product free of charge during the warranty period, provided that the cause is a material or manufacturing defect. In the event of a warranty claim, please contact your dealer or the nearest authorized service center with your proof of purchase.
Symbols in the operating instructions
CAUTION
Indicates a potentially dangerous situation that may lead to minor physical injuries or cause material damage.
Safety notes
CAUTION
Failure to observe the safety notes may result in damage to the product and danger to the operator and other persons.
To prevent hazards, repairs and installation of spare parts must only be carried out by an authorized service center. This product is intended for use by persons (including children) with reduced physical, sensory, or mental capabilities, or with limited experience and knowledge, unless they are supervised or instructed in the use of the product by a person responsible for their safety.
Children must be supervised to ensure they do not play with the product.
Operation
Product description
1 Hose connector 2 Stopper / retractor 3 Hose 4 Limit stop 5 Metal hook 6 Handle 7 Wall bracket 8 Fastening material 9 Valve connection with reducing nipple 10 Padlock (not included in delivery) 11 Accessory holder 12 Connection hose 13 Carrying handle 14 Nozzle
Preparation
Figure A
→ Mark the holes for fastening the wall bracket, then insert dowels into the drilled holes. → Attach the wall bracket with the supplied washers and screws.
Figure
Place the hose holder together with the metal hook against the surface and hang it. Ensure that the heads of all four screws protrude through the hanging holes. Push the metal hook straight down to the end.
Figure C
Place the accessory holder on the underside of the metal hook.
Figure D
To change the swivel range, pull the left or right stop outward and then turn the hose guide to the desired position.
(The swivel range of the hose guide can be adjusted in 30° increments.) Release the stop so it locks into the desired position.
Figure
Loosen both screws on the stop. Push the stop into the desired position and tighten.
Figure F
The product can be secured against theft. To do this, attach a padlock.
Operation
TIP
Make sure the hose returns without braking. The hose must not be very dirty so that it can be wound up automatically without obstruction.
Connect the hose to the tap. Open the water tap.
Unwinding the hose
Pull out the hose to the desired length. The hose guide blocking function can be activated in steps of less than 50 cm with a noticeable click. Attach Kärcher garden accessories to the hose connection.
Winding up the hose
Pull the hose briefly to activate automatic rewinding. The garden hose is rewound evenly.
End of operation
2006/42/EZ (+2009/127/EZ)
Applied harmonized standards:
EN ISO 12100
Chairman of the Board of Management
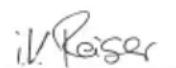
S. Reiser
Director Regulatory Affairs & Certification
Authorized for documentation: S. Reiser
Alfred Kärcher SE & Co. KG
71364 Winnenden (Germany)
Tel.: +49 7195 14-0
Fax: +49 7195 14-2212
Winnenden, 2018/10/01
Contents...1
Instructions...1
Safety instructions...1
Maintenance...2
Adjustment...3
Transport...3
Storage...3
Disposal of the device...3
EC Declaration of Conformity...3
Instructions
Dear customer,

Before first use of your product, please
read these operating instructions carefully and keep them for future reference and for subsequent use.
Intended use
This product is designed for domestic use and is not intended for commercial use. The manufacturer does not accept any liability for damage caused by improper use or incorrect maintenance. This product is a stapler for automatic staple insertion, which ensures even stapling of documents. After use, the staples can be removed with a single movement. The stapler is mounted on the wall with the supplied wall mount. It can be used in the stapling area up to 180 degrees.
Please observe the national regulations of EN 1717 when connecting this product to the drinking water supply. If you have any questions, please contact your sanitary service.
www.kaercher.com/REACH
Warranty
In every country, the warranty conditions issued by our authorized distributor apply. Possible malfunctions of your product will be rectified free of charge within the warranty period, provided they are due to material or manufacturing defects. In case of a warranty claim, please contact your dealer or the nearest authorized customer service center, presenting the purchase receipt.
Symbols in the operating instructions
CAUTION
For a possible dangerous situation that could lead to minor injuries or damage to property.
Safety instructions
CAUTION
If the safety instructions are not observed, damage to the product and dangers to the operator and other persons may occur.
To avoid complications, repairs and installation of spare parts should only be carried out by authorized customer service.
This product is not intended for use by persons (including children) with limited physical, sensory or mental capabilities, or lacking experience and/or knowledge, unless they are supervised by a person responsible for their safety or have received instructions on how to use the device. Children must be supervised to ensure they do not play with the product.
Maintenance
Product description
1 Handle 2 Holder / bracket 3 Handle 4 Swivel joint 5 Metal bracket 6 Holder 7 Wall mount 8 Fastening material 9 Hose connection with union nut 10 Filter (not included in delivery) 11 Holder for accessories 12 Handle for carrying 13 Carrying handle 14 Spray lance
→ Mark the holes for drilling for fixing the wall brackets and place the brackets in the drilled holes. Fix the wall brackets with the supplied washers and screws.
Figure
→ Lift the bracket for marking with the metal bracket. Make sure that all 4 screw heads pass through the holes for adjustment. Push the metal bracket vertically to the end.
Figure C
→ Place the bracket for attachment on the flat side of the metal bracket.
Figure D
For adjustment of the turning area, pull the yellow or black end part out and turn the marking bracket to the desired position. (The turning area of the marking bracket can be changed by steps of 30°.) Fix the end position in the desired position.
Figure
Turn the two screws of the stopper. → Move the stopper to the desired position and tighten it.
Figure F
→ The product can be protected against theft. For now, place the cable
Bhumabaune, Mapkybmda umac6o6o- den obopehen xod. Ppedu pa3ueane moHe mpa6ea da 6bde cunho 3ambpceH, 3a da ce zapaumipa aemomamuHomo pa3- ueane.
→ CbpxTe npncbeHnHTeHnMa MapKyu KbM KpaHa 3a Boda OTBopete KpaHa 3a BOnaTa.
Pa3BnBaHe Ha Mapkyua
→ N3TerIeTe MapKyuTa Do JeHaHaTa DbJI-XnHa.ФyHKUraTa 3aФИKcHpaHe Ha KyTnTa 3a MapKyu MoXe Da ce aKTnBnpa Ha CTbKNOT<50cm n ce 3a6eJr3Ba NO KJIINKBaHETO. → NocTaBete rpaDnHcKInTe npHaIeJX-HoCTn Ha Karcher KbM KynIyHra Ha Mapkyua.
HabibaeHa Mapkyua
3aDéηcTbaIte aBTOMaTnUHOTO HABINBaHe c KpaTko dPbNBAHe Ha Mapkyua. →「paHncknT Mapkyu ce HaBnBa paB-HOMEpHO.
Kpaɪ ha pa6oTaT
3aTBOpTe KpaHa 3a BOJaTa.
PoiapbJka
ПЕДПАЗЛИВОСТ
Kymura 3a Mapkyu He 6uea da ce omeapra.
PemohmHume deuHocmu no npodykma da ce u3ebpweam eduHcmeHo om omopuzupaH cepu3.
3a da cmeHnTe npncbeHNHTeHnMa MapKyu, noctbneTe KaKTo CNeDBA:
→ CbaIeTe cTpaHnUHnKa nKuN OcBO6oDeTe KJIeMaTa 3a MapKyuCa COTBepTKa. → I3TeIeTe Mapkyua.
IpoodykTbT He ce Huykdae oT noDpBxka.
To avoid malfunctions or damage when choosing a storage location, take into account the temperature of the device.
Transport
Pull the carrying handle up, release it from the wall bracket, and transport it.
Storage
Figure G
If the marking device is removed from the water source, it can be placed near the marking device. If necessary, attach the Karcher accessories directly to the accessory holder.
Before storing the marking device, ensure it is completely empty. Water is drained most easily when the entire marking device is unfolded. The tap must be open for this.
Storing the device
CAUTION
To avoid malfunctions or damage when choosing a storage location, take into account the temperature of the device. The device should be stored in a place where it cannot freeze.
Accessories and spare parts
Use only original accessories and original spare parts. They ensure the safe and trouble-free operation of the device. You can find information about accessories and spare parts at www.kaercher.com.
EC Declaration of Conformity
This declaration of conformity is issued under the sole responsibility of the manufacturer. The product described above complies with the relevant basic health and safety requirements of the applicable EU Directives. If the machine is modified without our consent, this declaration loses its validity.
Product: Marking paint
Type: 2.645-xxx
Applicable EU Directives:
2006/42/EC (+2009/127/EC)
Applied harmonized standards:
EN ISO 12100
Applied standards
The signatures are valid from the date and the authorized signatories.
Chairman of the Board of Management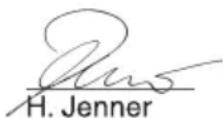
S. Reiser Director Regulatory Affairs & Certification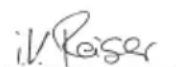
Documentation officer:
S. Reiser
Alfred Kärcher SE & Co. KG
71364 Winnenden (Germany)
Tel.: +49 7195 14-0
Fax: +49 7195 14-2212
Winnenden, 2018/10/01
Table of Contents
Table of Contents ET.1
General Notes ET.1
Safety Notes .ET.1
Handling ET.2
Maintenance. ET...2
Transport ET 3
Storage ET.3
www.kaercher.com/REACH
Warranty
Chairman of the Board of Management
S. Reiser
Director Regulatory Affairs & Certification
71364 Winnenden (Germany)
Tel.: +49 7195 14-0
Fax: +49 7195 14-2212
Winnenden, 2018/10/01
Table of contents
Table of contents .LV.1
www.kaercher.com/REACH
Warranty conditions
Chairman of the Board of Management
Director Regulatory Affairs & Certification
Authorized to compile the documentation: S. Reiser
Alfred Kärcher SE & Co. KG
71364 Winnenden (Germany)
Tel.: +49 7195 14-0
Fax: +49 7195 14-2212
Winnenden, 2018/10/01
Table of contents
Table of contents. EN .1
General instructions. EN .1
www.kaercher.com/REACH
Warranty
Chairman of the Board of Management
S. Reiser
Director Regulatory Affairs & Certification
71364 Winnenden (Germany)
Tel.: +49 7195 14-0
Fax: +49 7195 14-2212
Winnenden, 2018/10/01
3MiCT UK...1
3araJIbHi Bka3iBKn. .UK...1
IpaBnla 6e3neKn. .UK...1
EknpnyataiUK.2
Texhihe 06cnyroByBaHHa. UK...3
TpaHcnpTyBaHHa UK...3
36epirahnna UK.3
Ppnilaandny 3anachi Detani UK...3
3aBa npn BiDnoBicHicTb
Cbponeckboro
cniBTOBapnCTBa UK...4
3araJIbHi Bka3iBKN
ShaohBn nokyneCb!

Ipepe npuim 3acToCyBaHHaBaworo npOdykTu npouHTaTe
IIO opnirHaBHy iHCTpyKciio 3 eknnyatauii, nicna zboRo diiTe BiNoIho Hei Ta 36epexitb II dIra Ioanbwo KOpncTyBaHHa 60 dIy NaCTynHoro Bnachnka.
Application
This product is intended for industrial use.
The manufacturer is not liable for damage caused by improper or incorrect use of the device.
The term "product" refers to the automatic drum for winding the hose, which ensures even winding of the hose. After applying the hose, it is automatically wound with one motion. The drum is attached to the wall using the included mounting hardware. It can be installed at various angles, up to 180 degrees.
When connecting this product to the drinking water supply, comply with standard EN 1717. If in doubt, contact a specialized sanitary engineering company.
Environmental protection

Packaging materials can be recycled. Please do not dispose of packaging waste with household waste, but recycle them.
Old devices contain valuable materials that can be recycled.

Therefore, please dispose of old devices through specialized collection systems.
Instructions on components (REACH)
Current information on components is available on the website at:
Information about the components is provided on the website at the address:
Warranty
In every country, the warranty conditions published by the responsible sales organization apply. We will repair potential malfunctions of your device free of charge within the warranty period, provided they are caused by material or manufacturing defects. In case of a warranty claim, please contact your dealer or the nearest authorized customer service center.
Signs in the manual
CAUTION
Failure to comply with the safety instructions may result in minor injuries and material damage.
Safety rules
CAUTION
If the safety instructions are not followed, there is a risk of damage to the product, as well as danger to the user and other people.
To avoid danger, repairs and installation of spare parts must be performed only by authorized service centers. This product is not intended for use by persons (including children) with limited physical, sensory, or mental abilities, or with a lack of experience and/or knowledge, unless they are supervised by a person responsible for their safety or have received instructions on the use of the product. It is necessary to supervise children to ensure they do not play with the product.
Operation
Product description
1 Power cord 2 Stop / start button 3 Switch 4 Support 5 Metal bracket 6 Handle 7 Wall mounting 8 Mounting material 9 Razor cartridge with replaceable head 10 Visible lock (not included in delivery) 11 Additional handle attachment 12 Connection cable 13 Handle 14 Spray nozzle
Preparation
Manual A
Mark the location for the holes for the wall mounting and install the dowels in the drilled holes. Secure the wall mounting using the supplied screws and tighten.
Manual
Adjust the metal bracket horizontally to position the winding drum and raise it. It is recommended that all 4 bolts protrude from the holes in the brackets. Slide the metal bracket vertically down to the stop.
Figure
Install the drive for the initial tension of the lower part of the metal bracket.
Figure
To change the angle of rotation, move the left or right stop to the desired position and reposition the winding drum accordingly. (Changing the angle of rotation of the winding drum is done with a step of 30°.) Fix the stop in the desired position.
Figure
Loosen the bolts on the stop. Slide the stop to the desired position and tighten.
Figure
The product may be protected by a cover. For these cases, a hanging lock is provided.
Operation
Warnings
Ensure the possibility of free activation of the valve. Before activating the valve, make sure it is free of strong contaminants that could interfere with automatic activation.
Connect the hose connection to the water supply tap. Open the water supply tap.
Startup
Pull the lever on the tank fully. The blocking function of the winding drum can be activated from a height of < 50 cm. Activation of the function is accompanied by a click. Connect the hose connection to the water supply tap.
For automatic unfolding, slightly pull the handle by the handlebar. → The unfolding occurs automatically.
Locking
→ Close the water tap.
Maintenance
CAUTION
Do not use the device with open drums for washing or drying.
Repair work on the product may only be carried out by authorized service personnel.
To replace the spare handle, perform the following steps:
Remove the cover cap and loosen the clamp using a screwdriver. → Remove the handle.
The product does not require maintenance.
Transport
CAUTION
To avoid accidents and damage when choosing a storage location, consider the weight of the device.
Transport in the original packaging.
Raise the device by the opening, remove the cover from the part and move it.
Storage
Handle
The special hose has been removed, the water connection can be screwed to the bent handle of the hose. If necessary, the Karcher can be placed on the handle for balanced handling.
Before folding the hose, make sure it is completely empty. It is best to drain it with the hose fully unrolled. The nozzle must be open.
Storage
SURFACE
For cleaning and maintenance when choosing a storage location, take the device's weight into account.
Chairman of the Board of Management
S. Reiser
Director Regulatory Affairs & Certification
Authorized representative for document management:
S. Reiser
Alfred Kärcher SE & Co. KG
71364 Winnenden (Germany)
Tel.: +49 7195 14-0
Fax: +49 7195 14-2212
Winnenden, 2018/10/01

THANK YOU!
MERCI! DANKE! iGRACIAS!

Register your product and benefit from many advantages.
www.kaercher.com/welcome


Rate your product and tell us your opinion.
www.kaercher.com/dealersearch
Alfred Kärcher SE & Co. KG
Alfred-Karcher-Str. 28-40
71364 Winnenden (Germany)
Tel.: +49 7195 14-0
Fax: +49 7195 14-2212




- CONTENTS
- GENERAL NOTES
- DEAR CUSTOMER
- PROPER USE
- ENVIRONMENTAL PROTECTION
- NOTES ABOUT THE INGREDIENTS (REACH)
- WARRANTY
- SYMBOLS IN THE OPERATING INSTRUCTIONS
- CAUTION
- SAFETY INSTRUCTIONS
- OPERATION
- PRODUCT DESCRIPTION
- PREPARING THE APPLIANCE
- ILLUSTRATION A
- ILLUSTRATION
- ILLUSTRATION D
- ILLUSTRATION E
- NOTICE
- UNROLL THE HOSE
- COIL THE HOSE
- FINISH OPERATION
- MAINTENANCE
- TRANSPORT
- WHEN TRANSPORTING BY HAND
- STORAGE
- ILLUSTRATION C
- STORING THE APPLIANCE
- ACCESSORIES AND SPARE PARTS
- EU DECLARATION OF CONFORMITY
- TABLE OF CONTENTS
- INDEX
- EYYUNON
- IÇINDEKILER
- ORNABLENNE
- GENERAL INSTRUCTIONS
- INTENDED USE
- SYMBOLS IN THE OPERATING MANUAL
- CONTROL
- PREPARATION
- FIGURE A
- FIGURE
- TO AVOID ACCIDENTS OR DAMAGE, WHEN CHOOSING A STORAGE LOCATION, TAKE INTO ACCOUNT THE WEIGHT OF THE DEVICE
- SPARE PARTS
- SAFETY NOTES
- FIGURE C
- FIGURE D
- FIGURE F
- TIP
- UNWINDING THE HOSE
- WINDING UP THE HOSE
- END OF OPERATION
- INSTRUCTIONS
- PA3BNBAHE HA MAPKYUA
- HABIBAEHA MAPKYUA
- KPAꞮ HA PA6OTAT
- POIAPBJKA
- ПЕДПАЗЛИВОСТ
- FIGURE G
- STORING THE DEVICE
- EC DECLARATION OF CONFORMITY
- WARRANTY CONDITIONS
- ARAJIBHI BKA3IBKN
- SHAOHBN NOKYNECB
- APPLICATION
- CURRENT INFORMATION ON COMPONENTS IS AVAILABLE ON THE WEBSITE AT
- IN EVERY COUNTRY, THE WARRANTY CONDITIONS PUBLISHED BY THE RESPONSIBLE SALES ORGANIZATION APPLY. WE WILL REPAIR POTENTIAL MALFUNCTIONS OF YOUR DEVICE FREE OF CHARGE WITHIN THE WARRANTY PERIOD, PROVIDED THEY ARE CAUSED BY MATERIAL OR MANUFACTURING DEFECTS. IN CASE OF A WARRANTY CLAIM, PLEASE CONTACT YOUR DEALER OR THE NEAREST AUTHORIZED CUSTOMER SERVICE CENTER
- SIGNS IN THE MANUAL
- SAFETY RULES
- POWER CORD 2 STOP / START BUTTON 3 SWITCH 4 SUPPORT 5 METAL BRACKET 6 HANDLE 7 WALL MOUNTING 8 MOUNTING MATERIAL 9 RAZOR CARTRIDGE WITH REPLACEABLE HEAD 10 VISIBLE LOCK (NOT INCLUDED IN DELIVERY) 11 ADDITIONAL HANDLE ATTACHMENT 12 CONNECTION CABLE 13 HANDLE 14 SPRAY NOZZLE
- MANUAL A
- MARK THE LOCATION FOR THE HOLES FOR THE WALL MOUNTING AND INSTALL THE DOWELS IN THE DRILLED HOLES. SECURE THE WALL MOUNTING USING THE SUPPLIED SCREWS AND TIGHTEN
- WARNINGS
- STARTUP
- LOCKING
- TRANSPORT IN THE ORIGINAL PACKAGING
- HANDLE
- SURFACE
- THANK YOU
- MERCI! DANKE! IGRACIAS
Brand : Kärcher
Model : CR 7.220
Category : Garden hose