WD 914 NB - Warming drawers and cabinets HOTPOINT - Free user manual and instructions
Find the device manual for free WD 914 NB HOTPOINT in PDF.

| Brand | Hotpoint |
| Model | WD 914 NB |
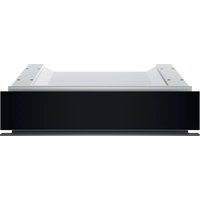
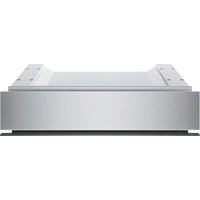
| Product Type | Warming drawer (heated cabinet) |
| Dimensions (W x H x D) | 595 x 141.5 x 526 mm (approx.) |
| Maximum Load Capacity | 25 kg |
| Power Supply | 220-240 V, 50/60 Hz (check rating plate) |
| Power | Not specified (estimated 600-800 W) |
| Exterior Material | Tempered glass, steel, plastic |
| Drawer Bottom | Tempered glass |
| Main Functions | Warming dishes, keeping warm |
| Temperature Setting | Yes, continuous (rotary knob, up to about 80°C) |
| Usage | Preheating required before first use (2 hours at max temperature) |
| Installation | Built-in, mandatory furniture fixing, can be installed under certain appliances (max 60 kg) |
| Power Cable Type | H05RR-F 3x0.75 mm² or equivalent |
| Earthing | Mandatory |
| Safety | Do not use by children without supervision, do not cover the bottom, max capacity 25 kg |
| Maintenance and Cleaning | Damp cloth, non-abrasive products, avoid steam cleaner |
| Included Accessories | 4 feet with washers (for installation in niche height 595 mm) |
| Repairability | Authorized after-sales service, original parts |
| Service Code | On the rating plate (right outer edge of the runner) |
| Standards | Low Voltage Directive 2006/95/EC, EMC 2004/108/EC, EC Regulation 1935/2004 |
Frequently Asked Questions - WD 914 NB HOTPOINT
User questions about WD 914 NB HOTPOINT
0 question about this device. Answer the ones you know or ask your own.
Ask a new question about this device
Download the instructions for your Warming drawers and cabinets in PDF format for free! Find your manual WD 914 NB - HOTPOINT and take your electronic device back in hand. On this page are published all the documents necessary for the use of your device. WD 914 NB by HOTPOINT.
USER MANUAL WD 914 NB HOTPOINT
natural_image
Simple black-and-white sketch of a four-leaf clover tree on a hill (no text or symbols)natural_image
Diagram of a mechanical component with a directional arrow indicating movement or force (no text or symbols present)EINBAU DES GERÄTES
natural_image
Technical line drawing of a screw and its assembly (no text or symbols)Einbaumaße
IMPORTANT SAFETY INSTRUCTIONS 17
BEFORE USING THE WARMING DRAWER 19
APPLIANCE FITTING 20
ELECTRICAL CONNECTION 22
CLEANING AND MAINTENANCE 24
TROUBLESHOOTING GUIDE 25
AFTER-SALES SERVICE 25
SAFEGUARDING THE ENVIRONMENT
Disposal of packing
- The packing material is 100% recyclable and marked with the recycling symbol.
- Therefore the various parts of the packing must not be dispersed in the environment, but disposed of in compliance with the local regulations.
The symbol on the appliance or the accompanying documentation indicates that this product should not be treated as household waste but must be taken to an appropriate collection point for recycling WEEE.
For further information on the treatment, recovery and recycling of this product, contact the competent local authority, the household waste collection service or the shop where the product was purchased.
Disposal of old electrical appliances
- This appliance is marked in conformity with European Directive 2002/96/EC on Waste Electrical and Electronic Equipment (WEEE).
By ensuring that this appliance is correctly disposed of, the user can help prevent potentially negative consequences for the environment and the health of people.

natural_image
Simple black-and-white sketch of a tree with four rounded canopy and a curved trunk (no text or symbols)IMPORTANT SAFETY INSTRUCTIONS
THE IMPORTANCE OF YOUR SAFETY AND THAT OF OTHERS
This manual and the appliance itself provide important safety messages, to be read and observed at all times.

This is the danger symbol, regarding safety, warning of potential risks to users and others.
All safety messages will be preceded by the danger symbol and the words:

DANGER
Indicates a hazardous situation which, if not avoided, will cause serious injury.

WARNING
Indicates a hazardous situation which, if not avoided, could cause serious injury.
All safety messages indicate the potential hazard to which they refer, how to reduce the risk of injury, and point out what can happen if the instructions are not followed.
- The appliance must be disconnected from the power supply before carrying out any installation operation.
- Installation and maintenance must be carried out by a specialized technician, in compliance with the manufacturer's instructions and the local safety regulations in force. Do not repair or replace any part of the appliance unless specifically indicated in the user manual.
-
The warming drawer must not be used by children or infirm persons without supervision.
-
Make sure children do not play with the appliance, as they could accidentally press the On button, thereby activating the dish warming drawer: danger of scalding.
- Accessible parts of the warming drawer can become hot during use, therefore keep children away from the appliance.
- Do not use abrasive materials or substances to clean the GLASS.
- The warming drawer is designed exclusively for household use to warm dishes. No other use is allowed. The Manufacturer declines any liability for uses different from those specified or for incorrect setting of the controls.
- Any repairs or maintenance must only be carried out by a qualified technician.
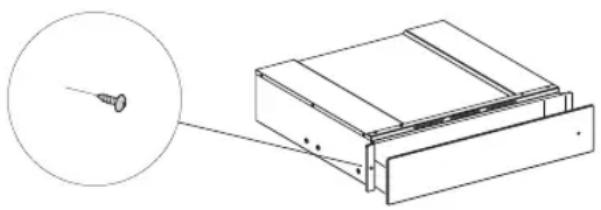
- Make sure the appliance is properly fixed to the cabinet with the appropriate screws supplied.
- Avoid exposure of the warming drawer to atmospheric agents.
- Do not lean or sit on the open drawer, otherwise the telescopic carriage will become damaged.
- The max. load capacity of the drawer is 25 kg.
- Do not cover the bottom of the warming drawer with aluminum foil or other materials.
- Do not pour water directly into the warming drawer.
- Dragging dishes in the warming drawer can scratch the bottom.
-
If the tempered glass surface breaks or cracks due to a violent impact (falling objects, etc.), do not use it: contact the After-Sales Service immediately.
-
Residual condensate could eventually damage the warming drawer and surrounding cabinets. It is advisable to: - dry the wet parts when the warming drawer is cool.
- Do not touch the warming drawer with wet parts of the body and do not use it when barefoot.
- Do not pull the power cable to unplug it.
- Keep children away from the product and the packing materials, to avoid interaction with them, if not properly supervised.
- Make sure the electrical cables of other appliances used near the warming drawer do not come into contact with its hot parts.
- Do not store plastic or flammable objects in the warming drawer. When operating the appliance, such objects can melt or catch fire.
• To remove the dishes, use suitable gloves.
- Never insert anything (e.g. screwdrivers, pointed objects, paper, etc.) through the openings of the heating element and fan protection grilles.
- This appliance must not be used by people (including children) with reduced physical, sensory or mental capabilities, or by inexperienced users, unless they have been adequately trained in this regard by a person responsible for their safety.
BEFORE USING THE WARMING DRAWER
To open and close the drawer, push the middle of the panel as shown in the figure.
At first use, clean the appliance as follows:
- clean the surface with a damp cloth and then dry.
- Preheat the empty drawer for at least two hours: turn the temperature knob to maximum in order to eliminate any residuals of fat, oil or manufacturing resins that can create unpleasant odors during the warming of dishes. Air the room.
-
After completing these operations, the appliance is ready for first use.
-
Before use, remove:
- stickers placed on the front and door of the warming drawer, except the rating plate;
- keep children away from the product and the packing materials, to avoid interaction with them, if not properly supervised;
- any stickers from accessories when present.
natural_image
Diagram of a mechanical component with a directional arrow indicating flow or movement (no text or symbols present)APPLIANCE FITTING
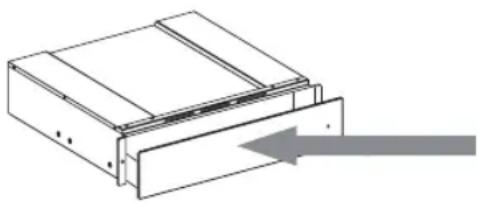
Safety instructions for fitting the drawer
IMPORTANT: The drawer must be immediately fixed to the cabinet, following the instructions given below. The coupled appliance cannot be installed before fixing the drawer to the cabinet.
This appliance must only be fitted and installed by qualified personnel who ensure conditions for its safe use.
Fix the drawer as shown in the figure.
Before electrically connecting the appliance, make sure the rating plate data matches the mains power supply, otherwise the appliance could become damaged.
Make sure the connection to the power supply is easily accessible after the appliance has been fitted.
The dish warmer can only be fitted in combination with other appliances with maximum weight of 60 kg and provided with adequate cooling ventilation. To install the appliance that can be combined with the dish warmer, follow the instructions given in the relevant use and installation handbook.
Important: The the same brand coffee maker or combi microwave oven, sized as shown on the following page, can be installed above the dish warmer. For installation, carefully follow the directions given in the instruction handbooks supplied with the coffee maker and the combi microwave oven.
natural_image
Technical line drawing of a screw assembly with a magnified inset showing the screw detail (no text or symbols)Fitting dimensions
The size of the recess is obtained from the size of the dish warmer plus the size of the appliance combined with it.
All measurements are in mm.
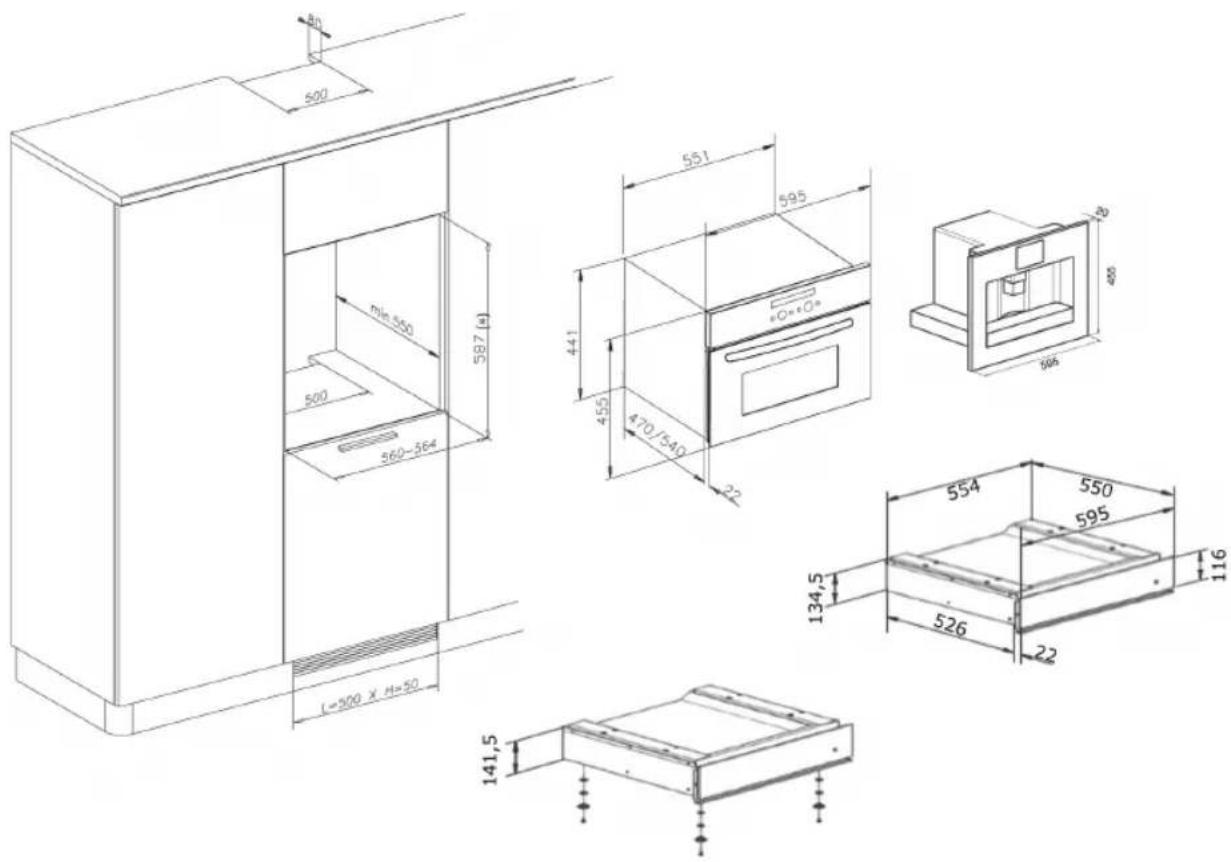
text_image
500 min 500 500 560-564 L=300 X H=50 587 (m) 551 595 441 455 470/540 22 595 400 554 550 595 134,5 526 22 141,5(*) In case of 595 cabinet recess height, the drawer must be installed with the 4 feet and respective 1 mm washers (included in the packaging) in the lower part.
ELECTRICAL CONNECTION
Contact a qualified technician to carry out the appliance electrical connection.

WARNING
Before connecting the warming drawer to the household electrical system to check its operation, always make sure the drawer power cable is correctly fitted and that it is NOT pinched or caught under or behind the drawer or any coupled appliance.

WARNING
Power cable replacement must be done by the After-Sales Service or a qualified technician, with a cable having the same characteristics as the one provided by the manufacturer (H05RR-F 3x0.75 mm ^2 or higher).
Before electrically connecting the appliance, make sure the mains power supply matches the rating plate data.
If in doubt, contact a qualified technician. Contact a qualified technician familiar with the local regulations and the additional regulations issued by the local utility company, and that the work is carried out in compliance with the same. Important: Make sure the appliance is connected to an approved ground wire, to ensure electrical safety. If necessary, have the system checked by a specialized technician.
The manufacturer declines any liability in case of injury or damage resulting from the lack of or disconnection of the ground wire.

WARNING
Grounding is compulsory by law.
The appliance is designed to be used only when correctly fitted.
Never open the appliance enclosure. In case of contact with live wires or if the electrical and mechanical structure is changed, malfunctioning of the appliance may occur when in use.
If installation, maintenance or repairs are not carried out correctly, there can be risks for the user.
The manufacturer declines any liability for such damage or injury.
During the warranty period, repairs can only be carried out by the authorized after-sales service, otherwise the right to warranty will be lost.
Installation, repair and cleaning should be done only after making sure the appliance is disconnected from the power supply. The appliance is disconnected from the power supply in the following cases:
- operating the main electrical system omnipolar switch.
- operating the main electrical system safety switch.
For connection to the power supply, a separation device for each pole must be arranged by the installer.
Separation devices are switches with contact gap of at least 3 mm.
The data necessary for replacement with the connection is given on the rating plate. This data must match that of the power supply.
The manufacturer declines any liability in case of injury or damage resulting from incorrect installation, improper or incorrect use of the appliance.
The manufacturer also declines any liability for damage (e.g. electric shock) caused by the lack of or disconnection of the ground wire.
| TYPES AND MINIMUM DIAMETER OF CABLES | |
| SASO | |
| H05RR-F 3x0.75 mm ^2 H05 | RR-F 3x1.5 mm ^2 |
| H05VV-F 3x0.75 mm ^2 H05 | VV-F 3x1.5 mm ^2 |
| H05RN-F 3x0.75 mm ^2 H05 | RN-F 3x1.5 mm ^2 |
| H05V2V2-F 3x0.75 mm ^2 H | V2-V2-F 3x1.5 mm ^2 |
CLEANING AND MAINTENANCE

WARNING
Avoid using steam cleaners.
IMPORTANT: Do not use detergents containing soda, acids or chlorides, abrasive detergents (powder or cream), abrasive sponges (e.g. scouring pads) or sponges containing residuals of abrasive detergents, detergents that dissolve scale, dishwasher detergents, oven sprays.
Warming drawer exterior
- Clean with a damp cloth. If very dirty, add a few drops of washing up liquid to the water. Dry with a dry cloth.
- Do not use corrosive or abrasive detergents, otherwise dull areas will form. If one of these products accidentally comes into contact with the warming drawer, clean it immediately with a damp cloth.
- Slight differences in color on the front of the appliance are due to the use of different materials, such as glass, plastic and metal.
For drawers with iXelium treatment, proceed as follows:
- Use a soft cloth (preferably microfiber) with water or a normal glass cleaning detergent.
- Do not use paper towels, which could leave traces of paper and streaks on the surface.
- Do not use abrasive or corrosive products, chlorine-based products or scouring pads.
- Do not use flammable steam cleaning devices.
- Do not leave acid or alkaline substances, such as vinegar, mustard, salt, sugar or lemon juice, on the surface.
For glass surfaces, proceed as follows:
- use a neutral detergent and lukewarm water, then dry with a soft cloth.
- Do not leave acid or alkaline substances, such as vinegar, mustard, salt, sugar or lemon juice, on the surface.
Tempered glass drawer base
It is advisable to clean the bottom of the drawer after each use, making sure to let it cool. This will prevent the build-up of dirt and make cleaning easier.
- Use a clean cloth, paper towels and washing up liquid, or specific products for cleaning the tempered glass.
- Do not use abrasive products, bleach, oven cleaner spray or metallic scouring pads.
TROUBLESHOOTING GUIDE
If the dishes are not warm enough, check that:
• the appliance is switched on
• the right temperature has been set
• ventilation openings are not covered by plates or large bowls
- the dishes were not heated long enough.
- the mains switch has not been turned off.
Different factors affect the warming time, for example:
- material and thickness of the dishes, the load and its arrangement, temperature setting.
- The optimum times for warming dishes vary, therefore it is advisable to do tests to establish them according to needs.
AFTER-SALES SERVICE
Before contacting the After-Sales Service:
- See if you can solve the problem yourself with the help of the "Troubleshooting guide".
- Switch the appliance off and then on again to see if the problem has been eliminated.
For the following problems, contact a qualified technician or the After-Sales Service:
If the dishes do not get warm:
- the electrical power cable could be disconnected or damaged.
If the dishes get too hot:
- the temperature controller could be faulty.
The On/Off switch does not activate when the appliance is turned on:
- the switch control indicator is faulty.
If the problem persists after the above checks, contact the nearest After-Sales Service.
Always specify:
- a brief description of the fault;
- the warming drawer type and exact model;
- the Service number (the number after the word Service on the data plate), located on the outer right edge of the drawer runner. The Service number is also given in the warranty booklet;
- your full address;
- your telephone number.
SERVICE
00 0000 00000
If any repairs are required, contact an authorized After-Sales Service Center (to ensure the use of original spare parts and correct repairs). Failure to comply with these instructions can compromise the safety and quality of the product.
DECLARATION OF CONFORMITY C€
- This warming drawer is intended to come into contact with foodstuffs and complies with Regulation (EC) no. 1935/2004.
- It is designed to be used only as an appliance for warming dishes or for keeping them hot. Any other use (e.g. for room heating) is deemed improper and therefore hazardous.
- It has been designed, manufactured and marketed in conformity with:
- the safety objectives of "Low Voltage" Directive 2006/95/EC (which replaces 73/23/EEC as amended);
- the protection requirements of "EMC" 2004/108/EC.
MODE D'EMPLOI
Page
CONSEILS POUR LA PROTECTION DE L'ENVIRONNEMENT 27
CONSIGNES DE SÉCURITÉ IMPORTANTES 28
AVANT D'UTILISER LE TIROIR CHAUFFANT 30
ENCASTREMENT DE L'APPAREIL 31
RACCORDEMENT ÉLECTRIQUE 33
NETTOYAGE ET ENTRETIEN 35
DIAGNOSTIC DES PANNES 36
SERVICE APRÈS-VENTE 36
CONSEILS POUR LA PROTECTION DE L'ENVIRONNEMENT
natural_image
Simple black-and-white sketch of a four-leaf clover tree on a hill (no text or symbols)CONSIGNES DE SÉCURITÉ IMPORTANTES
L'IMPORTANCE DE VOTRE SÉCURITÉ ET CELLE DES AUTRES
natural_image
Diagram of a mechanical component with a directional arrow indicating flow or movement (no text or symbols present)ENCASTREMENT DE L'APPAREIL
natural_image
Technical line drawing of a screw assembly with a magnified inset showing the screw detail (no text or symbols)natural_image
Simple line drawing of a four-leaf clover tree on a hill (no text or symbols)BELANGRIJKE VEILIGHEIDSINSTRUCTIES
HET BELANG VAN UW VEILIGHEID EN DIE VAN ANDEREN
natural_image
Diagram of a mechanical component with a directional arrow indicating motion (no text or symbols)INBOUW VAN HET APPARAAT
natural_image
Technical line drawing of a screw assembly with a magnified inset showing the screw detail (no text or symbols)natural_image
Simple black-and-white sketch of a tree with four rounded canopy and a curved trunk (no text or symbols)natural_image
Diagram of a mechanical component with a directional arrow indicating flow or movement (no text or symbols present)natural_image
Technical line drawing of a screw assembly with a magnified inset showing the screw detail (no text or symbols)natural_image
Simple line drawing of a four-leaf clover tree on a hill (no text or symbols)WAŻNE INSTRUKCJE DOTYCZĄCE
BEZPIECZEŃSTWO UŻYTKOWNIKA I OSÓB POSTRONNYCH
natural_image
Diagram of a mechanical component with a directional arrow indicating motion (no text or symbols present)MONTAŻ URZĄDZENIA
natural_image
Technical line drawing of a screw assembly with a magnified inset showing the screw detail (no text or symbols)Wymiary do zabudowy
GUIDA RICERCA GUASTI 80
SERVIZIO ASSISTENZA 80
CONSIGLI PER LA SALVAGUARDIA DELL'AMBIENTE
natural_image
Simple line drawing of a four-leaf clover tree on a hill (no text or symbols)ISTRUZIONI IMPORTANTI PER LA SICUREZZA
IMPORTANZA DELLA SICUREZZA PER SÉ E PER GLI ALTRI
natural_image
Diagram of a mechanical component with a directional arrow indicating flow or movement (no text or symbols present)INCASSO DELL'APPARECCHIO
natural_image
Technical line drawing of a screw assembly with a magnified inset showing the screw detail (no text or symbols)Misure dell'incasso
GUIDA RICERCA GUASTI
INSTALLATION AV PRODUKTEN 86
ELEKTRISK ANSLUTNING 88
RENGÖRING OCH UNDERHÅLL 90
FELSÖKNING 91
KUNDSERVICE 91
MILJÖSKYDDSRÅD
natural_image
Simple black-and-white sketch of a tree with four rounded canopy and a small leaf on the ground (no text or symbols)VIKTIG SÄKERHETSINFORMATION
natural_image
Diagram of a mechanical component with a directional arrow indicating flow or movement (no text or symbols present)INSTALLATION AV PRODUKTEN
natural_image
Technical line drawing of a screw assembly with a magnified inset showing the screw detail (no text or symbols)Inbyggnadsmått
natural_image
Simple black-and-white sketch of a four-leaf clover tree on a hill (no text or symbols)VIKTIG SIKKERHETSINFORMASJON
natural_image
Diagram of a mechanical component with a directional arrow indicating flow or movement (no text or symbols present)MONTERE APPARATET
natural_image
Technical line drawing of a screw assembly with a magnified inset showing the screw detail (no text or symbols)Monteringsmål
INDBYGNING AF APPARATET 108
TILSLUTNING TIL STR∅MFORSYNINGEN 110
RENG∅RING OG VEDLIGEHOLDELSE 112
FEJLFINDINGSOVERSIGT
113
SERVICE
113
MILJ∅BESKYTTELSE
natural_image
Simple black-and-white sketch of a tree with four rounded canopy and a curved trunk (no text or symbols)VIGTIGE ANVISNINGER VEDR∅RENDE SIKKERHEDEN
VIGTIGHEDEN AF DIN OG ANDRES SIKKERHED
natural_image
Diagram of a mechanical component with a directional arrow indicating flow or movement (no text or symbols present)INDBYGNING AF APPARATET
natural_image
Technical line drawing of a screw assembly with a magnified inset showing the screw detail (no text or symbols)Indbygningsmål
natural_image
Simple black-and-white sketch of a four-leaf clover tree on a hill (no text or symbols)natural_image
Diagram of a mechanical component with a directional arrow indicating flow or movement (no text or symbols present)LAITTEEN ASENTAMINEN PAIKALLEEN
natural_image
Technical line drawing of a screw assembly with a magnified inset showing the screw detail (no text or symbols)Asennusmitat
natural_image
Simple black-and-white sketch of a tree with four rounded leaves and a curved trunk, enclosed in a square frame (no text or symbols)DŮLEŽITÉ BEZPEČNOSTNÍ POKYNY
VAŠE BEZPEČNOST I BEZPEČNOST DALŠÍCH OSOB JE VELMI DŮLEŽITÁ
natural_image
Diagram of a mechanical component with a directional arrow indicating flow or movement (no text or symbols present)INSTALACE SPOTŘEBIČE
natural_image
Technical line drawing of a screw assembly with a magnified inset showing the screw detail (no text or symbols)Instalační rozměry
natural_image
Simple black-and-white sketch of a tree with four rounded canopy and a curved trunk (no text or symbols)DÔLEŽITÉ BEZPEČNOSTNÉ POKYNY
DÔLEŽITOST Š VAŠEJ BEZPEČNOSTI A INÝCH OSÔB
natural_image
Diagram of a mechanical component with a directional arrow indicating flow or movement (no text or symbols present)MONTÁŽ SPOTREBIČA
natural_image
Technical line drawing of a screw and its assembly with a bracket (no text or symbols)Rozmery pri montáži
natural_image
Simple black-and-white sketch of a tree with four rounded canopy and a curved trunk (no text or symbols)natural_image
Diagram of a mechanical component with a directional arrow indicating motion (no text or symbols)ВСТРАИВАНИЕ ПРИБОРА
natural_image
Technical line drawing of a screw assembly with a magnified inset showing the screw detail (no text or symbols)natural_image
Simple black-and-white sketch of a tree with two rounded canopy and a small leaf (no text or symbols)natural_image
Diagram of a mechanical component with a directional arrow indicating flow or movement (no text or symbols present)КУРЫЛФЫНЫ ОРНАТУ
natural_image
Technical line drawing of a mechanical assembly with a magnified inset showing a screw (no text or symbols)Орнату өлшемдері
natural_image
Simple line drawing of a four-leaf clover tree on a hill (no text or symbols)natural_image
Diagram of a mechanical component with a directional arrow indicating flow or movement (no text or symbols present)natural_image
Technical line drawing of a screw assembly with a magnified inset showing the screw detail (no text or symbols)natural_image
Technical line drawing of a mechanical component with a magnified inset showing a pin detail (no text or symbols)natural_image
Diagram of a mechanical component with a directional arrow indicating movement or force (no text or symbols present)natural_image
Simple black-and-white sketch of a tree with four rounded canopy and curved trunk (no text or symbols)تعليمات الاستعمال
صفحة
text_image
DGBFNLEPL I S NUDKREFIN CZ SK RUS KZcod. 2.006.39.0.2'ed


02/16