
TO 2020 - Mini oven SEVERIN - Free user manual and instructions
Find the device manual for free TO 2020 SEVERIN in PDF.
| Product Type | Mini oven |
| Brand | Severin |
| Model | TO 2020 |
| Cooking functions | Top heat, bottom heat, both combined |
| Timer | Up to 60 minutes, automatic shut-off with audible signal |
| Temperature selector | Yes, with indicator light |
| Included accessories | Grill, pan, reflector plate, handle |
| Maintenance | Clean with a damp cloth; do not immerse or use abrasive detergents |
| Cleaning the reflector plate | Removable for washing, reinstall correctly under the heating elements |
| Safety - Hot surfaces | Do not touch the door or surfaces during use; burn hazard |
| Safety - Reflector plate | Mandatory: install the plate under the heating elements before use |
| Safety - Supervision | Do not leave the appliance unattended; keep out of reach of children |
| Warranty | 2 years against material defects and manufacturing faults |
| After-sales service | Addresses at the end of the manual; repairs by qualified personnel |
| First use | Clean the appliance, then heat empty for 10 minutes |
Frequently Asked Questions - TO 2020 SEVERIN
User questions about TO 2020 SEVERIN
0 question about this device. Answer the ones you know or ask your own.
Ask a new question about this device
Download the instructions for your Mini oven in PDF format for free! Find your manual TO 2020 - SEVERIN and take your electronic device back in hand. On this page are published all the documents necessary for the use of your device. TO 2020 by SEVERIN.
USER MANUAL TO 2020 SEVERIN
Before using the appliance, the user should read the following instructions carefully.
Connection to the mains supply
The appliance should only be connected to an earthed socket installed in accordance with the regulations.
Make sure that the supply voltage corresponds with the voltage marked on the rating label. This product complies with all binding CE labelling directives.
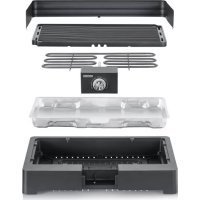
Familiarisation
- Main unit
- Temperature control knob
3.4-position switch - Timer
- Baking tray
- Handle
- Baking rack
- Reflector sheet
- Door
- Power cord with plug
- Rating label (at the rear)
Important safety instructions
The appliance operates at very high temperatures.
Warning! the door and housing of the appliance become hot during operation. Burns can occur from touching the hot parts.
- Do not touch the heating elements.
Before using the appliance, the reflector sheet must be fitted in its proper position underneath the bottom heating elements.
- Great care is necessary in using any electrical appliance, especially near children. Keep children away. Do not operate without supervision.
- Do not position or operate the appliance close to or underneath any wall-cupboards or hanging objects such as
curtains or any inflammable materials, and do not position any objects on top of the appliance.
- During operation, the appliance must be placed on a heat-resistant surface, impervious to splashes and stains. Do not position the appliance on or near hot surfaces, open flames or inflammable vapours.
- Do not allow the power cord to touch hot surfaces.
- Do not let the power cord hang free.
- Do not operate if the appliance or its power cord show any signs of damage.
- Always switch the appliance off after use and remove the plug from the wall socket and also
- in case of any malfunction and
- during cleaning.
- When removing the plug from the wall socket, never pull on the power cord.
- In order to comply with safety regulations and to avoid hazards, repairs of electrical appliances must be carried out by qualified personnel, including the replacement of the power cord. If repairs are needed, please send the appliance to one of our customer service departments. The address can be found in the appendix to this manual.
This appliance is intended for domestic use only and not for commercial applications.
Temperature control
- Set the temperature control knob to the desired temperature setting (the indicator lamp lights up).
- Once the pre-set temperature has been reached, the indicator lamp switches off; the toast oven is now ready for use.
4-position switch settings
0 Both heating elements switched off
Upper heat
Upper heat and lower heat
Lower heat
The heating elements will only be switched
on after the timer is activated.
Timer
By using the timer, the cooking time can be selected (max. 60 minutes). The indicator lamp will be on while a heating element is in operation. After the pre-programmed time has elapsed, an acoustic signal indicates that the heating elements are switched off. To switch off the oven, the heating elements must be switched off as well.
Before first use
- Clean the appliance (see 'General cleaning and care') and completely remove any packing materials.
Before using the appliance for the first time, let it heat up for 10 minutes with both heating elements switched on. When the appliance is switched on for the first time, a slight smell may be emitted. This is normal and will only last for a very short time. Ensure sufficient ventilation.
Operation
Before using the appliance, make sure that the reflector sheet is fitted in its proper position underneath the heating elements.
- Pre-heat the oven compartment for several minutes with the door closed, using both heating elements. Set the temperature control knob to the required temperature level and use the timer control knob to select the desired preheating time.
- Place the food to be cooked on the baking rack. When cooking food containing fat or moisture, use the baking tray to stop any dripping into the interior of the appliance.
- The baking tray must always be placed on the baking rack and inserted into one of the leading rails.
- Close the glass door, set the temperature control knob to the required temperature level and use the timer knob to select the
desired cooking time.
- For overhead baking or grilling, the upper heating element should be used.
- Use only the lower element if the dish being cooked is so close to the upper element as to cause burning or excessive browning.
- The switch settings (upper heat/ lower heat) may be changed during the cooking process.
- After the pre-programmed cooking time has elapsed, the timer will automatically switch off the heating elements. To switch off the appliance earlier, set the control switch to the '0' position.
- When opening the hot glass door after operation, always use the handle. To remove the baking tray, always use the handle provided with the appliance and an oven cloth. Always place the baking tray on a heat-resistant surface.
- After use, set the 4-position switch to it's '0' position and remove the plug from the wall socket.
General Care and Cleaning
- Before cleaning the appliance, ensure it is disconnected from the power supply.
When cleaning the appliance, observe the following instructions:
- ensure that the appliance has cooled down completely.
- To avoid the risk of electric shock, do not clean the appliance with water and do not immerse it in water.
- The appliance may be wiped with a slightly damp lint-free cloth. Do not use abrasives or harsh cleaning solutions.
The baking tray may be cleaned with a mild household detergent.
If necessary, the reflector sheet may be removed before cleaning. Make sure that the reflector sheet is fitted in its proper position underneath the heating elements after cleaning.
Disposal
Do not dispose of old or defective appliances in domestic garbage, but only through public collection points.
Guarantee
This product is guaranteed against defects in materials and workmanship for a period of two years from the date of purchase. Under this guarantee the manufacturer undertakes to repair or replace any parts found to be defective, providing the product is returned to one of our authorised service centres. This guarantee is only valid if the appliance has been used in accordance with the instructions, and provided that it has not been modified, repaired or interfered with by any unauthorised person, or damaged through misuse.
This guarantee naturally does not cover wear and tear, nor breakables such as glass and ceramic items, bulbs etc. If the product fails to operate and needs to be returned, pack it carefully, enclosing your name and address and the reason for return. If within the guarantee period, please also provide the guarantee card and proof of purchase.
F Mini four rechauffeur
Chère Cliente, Cher Client,
Czech Republic / Slowak
Republic
ARGO spel. s r.o.
Zihobce 137
CZ 342 01 Sušice
Tel.: +376 597 197
Fax: +376 597 197
Pikk 1B, tel: 45 55 978
Bahar Administration and
Commercial Center
No. 668, 7th Floor, Ave.
South Bahar
TEHRAN-IRAN
Tel.: 009821-7516483
e-mail: info@iranseverin.com
Internet: www.iranseverin.com
Italia
via Dino Col 52r-54r-56r,
I-16149 Genova
Green Number: 800240279
Tel.: 010/6451102-010418609
Fax: 010/6425009
e-mail: videoelettronica@panet.it
Jordan
F.A. Kettaneh
P.O.Box 485
Amman, 11118, Jordan
Tel: 00962-6-4398642
e-mail: app@kettaneh.com.jo
Korea
Euko Trading
Namho B/D 3F,194-6
Neungpyeong-Ri
Opo.Eup, Gwangju-Si,
Kyunggi-do
Korea 464892
Tel: +82-31-714 5394
Fax: +82-31-714 8394
Service Hotline: 080-001-0190
Latvia
SERVO Ltd.
Mr. Janis Pivovarenoks
Tel: +371 7279892
servo@apollo.lv
Lebanon
The Right Angle S.A.L.
Boulos Building
Hazmieh-Damascus Highway
P.O.Box 1656-09
BEIRUT, Lebanon
Tel.: 05-952 162 and 3
Fax: 05-950190
e-mail: rightangle@inco.com.lb
Luxembourg
Ser-Tec
Serbia and Montenegro
tel: +381-21-524-638
tel: +381-21-553-594
fax: +381-21-522-096
Finland
Oy Harry Marcell Ab
Rälssitie 6, PL 63
01511 Vantaa
Tel.: 0035/89870870
Fax: 0035/8987087803
Svenska
Rakspecialisten HS
Mollevangsgatan 34
214 20 Malmö
Fax: 040/6 11 03 35
Slovenia
SEVTIS d.o.o.
Smartinska 130
1000 Ljubljana
Tel: 00386 1542 1927
Fax: 003861542 1926
Slovenská Republika
Ambos
Ambos Slovakia s.r.o.
Surianska cesta 62
94001 Nove Zamky
Tel: 00421 35 6424 280
Fax: 00421 903 747 227
c-mail: ambosslovakia@stonline.sk
Stand: 09.2006

- Connection to the mains supply
- Familiarisation
- Important safety instructions
- Temperature control
- 4-position switch settings
- Timer
- Before first use
- Operation
- General Care and Cleaning
- Disposal
- Guarantee
- F Mini four rechauffeur
- Chère Cliente, Cher Client,
- Latvia
- Lebanon
- Luxembourg
- Finland
- Svenska
- Slovenia
- Slovenská Republika
Brand : SEVERIN
Model : TO 2020
Category : Mini oven