CNL 6815 PLUS - Basket TEKA - Free user manual and instructions
Find the device manual for free CNL 6815 PLUS TEKA in PDF.
User questions about CNL 6815 PLUS TEKA
0 question about this device. Answer the ones you know or ask your own.
Ask a new question about this device
Download the instructions for your Basket in PDF format for free! Find your manual CNL 6815 PLUS - TEKA and take your electronic device back in hand. On this page are published all the documents necessary for the use of your device. CNL 6815 PLUS by TEKA.
USER MANUAL CNL 6815 PLUS TEKA
Before using your device for the first time, please carefully read the installation and maintenance instructions that come with it.
FRANÇAIS

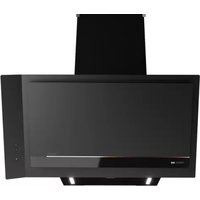
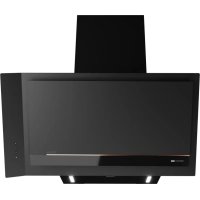
Black and White models
6

7
Sicherheitshinweise
Carefully read the instructions before installing and using the equipment. The manufacturer is not liable for improper installation and use of the equipment that may cause injuries and damage. Always keep the instructions at hand, so they can be easily referred to during use.
Children and Vulnerable people safety
- This appliance can be used by children aged from 8 years and above and persons with reduced physical, sensory or mental capabilities or lack of experience and knowledge if they are supervised by an adult or a person who is responsible for their safety.
- Children should be supervised to ensure that they do not play with the appliance.
- Cleaning and user maintenance shall not be made by children without supervision.
General Safety
- There shall be adequate ventilation of the room when the range hood is used at the same time as appliances burning gas or other fuels (not applicable to appliances that only discharge the air back into the room).
- Do not flambe under the range hood.
- CAUTION: Accessible parts may become hot when used with cooking appliances.
Installation
- The installation instructions are defined on the images at the beginning of this user manual.
- First, remove the protective foil from the back of the appliance and, following installation, remove the foil completely.
- The electrical installation is to be set up so that the appliance can be isolated from the mains with a minimum 3mm all-pole contact separation. Suitable separation devices include e.g.
cutouts, RCD's and contactors. This installation must comply with current regulations.
-
If the electrical connection is done through a plug and this remains accessible after installation, then it is not necessary to provide the mentioned separation device.
-
The air must not be discharged into a flue that is used for exhausting fumes from appliances burning gas or other fuels (not applicable to appliances that only discharge the air back into the room).
-
The lower part of the extractor must be located at a minimum height of 50~cm above the hob for electric cookers and 65~cm for gas cookers. If the instructions of a gas cooker indicate a greater distance these must be observed.
-
Before installing the extractor consult the local rules and regulations in force with respect to the discharge of air and fumes.
-
When the extractor is working at the same time as other nonelectrical cooking equipment, the outlet air pressure must not exceed 4 Pa (4x10 ^-5 bar).
-
Before connecting the extractor to the mains, check that both the voltage and the frequency conform to that shown on the characteristics label located inside the extractor.
-
To achieve optimum performance the length of the outlet hose should not exceed 4 meters or include more than two 90^ angles (elbows).
-
Although venting to the outside is recommended, activated carbon filter may be used to allow the gas to be returned to the kitchen through the outlet pipe.
Cleaning
-
There is a fire risk if cleaning is not carried out in accordance with the instructions.
-
Do not allow grease to accumulate in any part of the extractor, especially in the grease filters as this COULD PRODUCE A FIRE RISK!
-
The grease filters and the internal part of the extractor must be cleaned at least once a month depending on how often the extractor is used. Note that grease is deposited in the extractor when cooking, whether it is switched on or not.
- We recommend the use of gloves and caution when cleaning the inside of the extractor.
Repairs
- If the supply cord is damaged, it must be replaced by the manufacturer, its service agent or similarly qualified persons in order to avoid a hazard.
- Do not switch on the extractor if the supply cord is worn or has cuts or if there are signs of deterioration around the control panel.
- If the LED module is malfunctioning, it must be replaced by the manufacturer, its service agent or similarly qualified persons in order to avoid a hazard.
- If the extractor stops working or functions abnormally, unplug it from the mains and contact the technical service.
- Please contact the nearest Qualified Technical Assistance Service for any repairs always using original spare parts. Repairs and modifications carried out by others could damage the extractor or cause it to malfunction and cause safety risks.
Description of the appliance (Fig. 1-6)
A Motor push control that allow 6 speeds to be selected

Intensive

5
^th Speed

4
^th Speed

3
Speed

2
nd Speed

1
^st Speed
B Lamp push control

C Lighting by means of lamps
D Filters located over cooking area, easily withdrawn for cleaning
E Extractable group that allows a greater gas capture area
F Possibility of incorporating activated charcoal filter (Fig. 2)
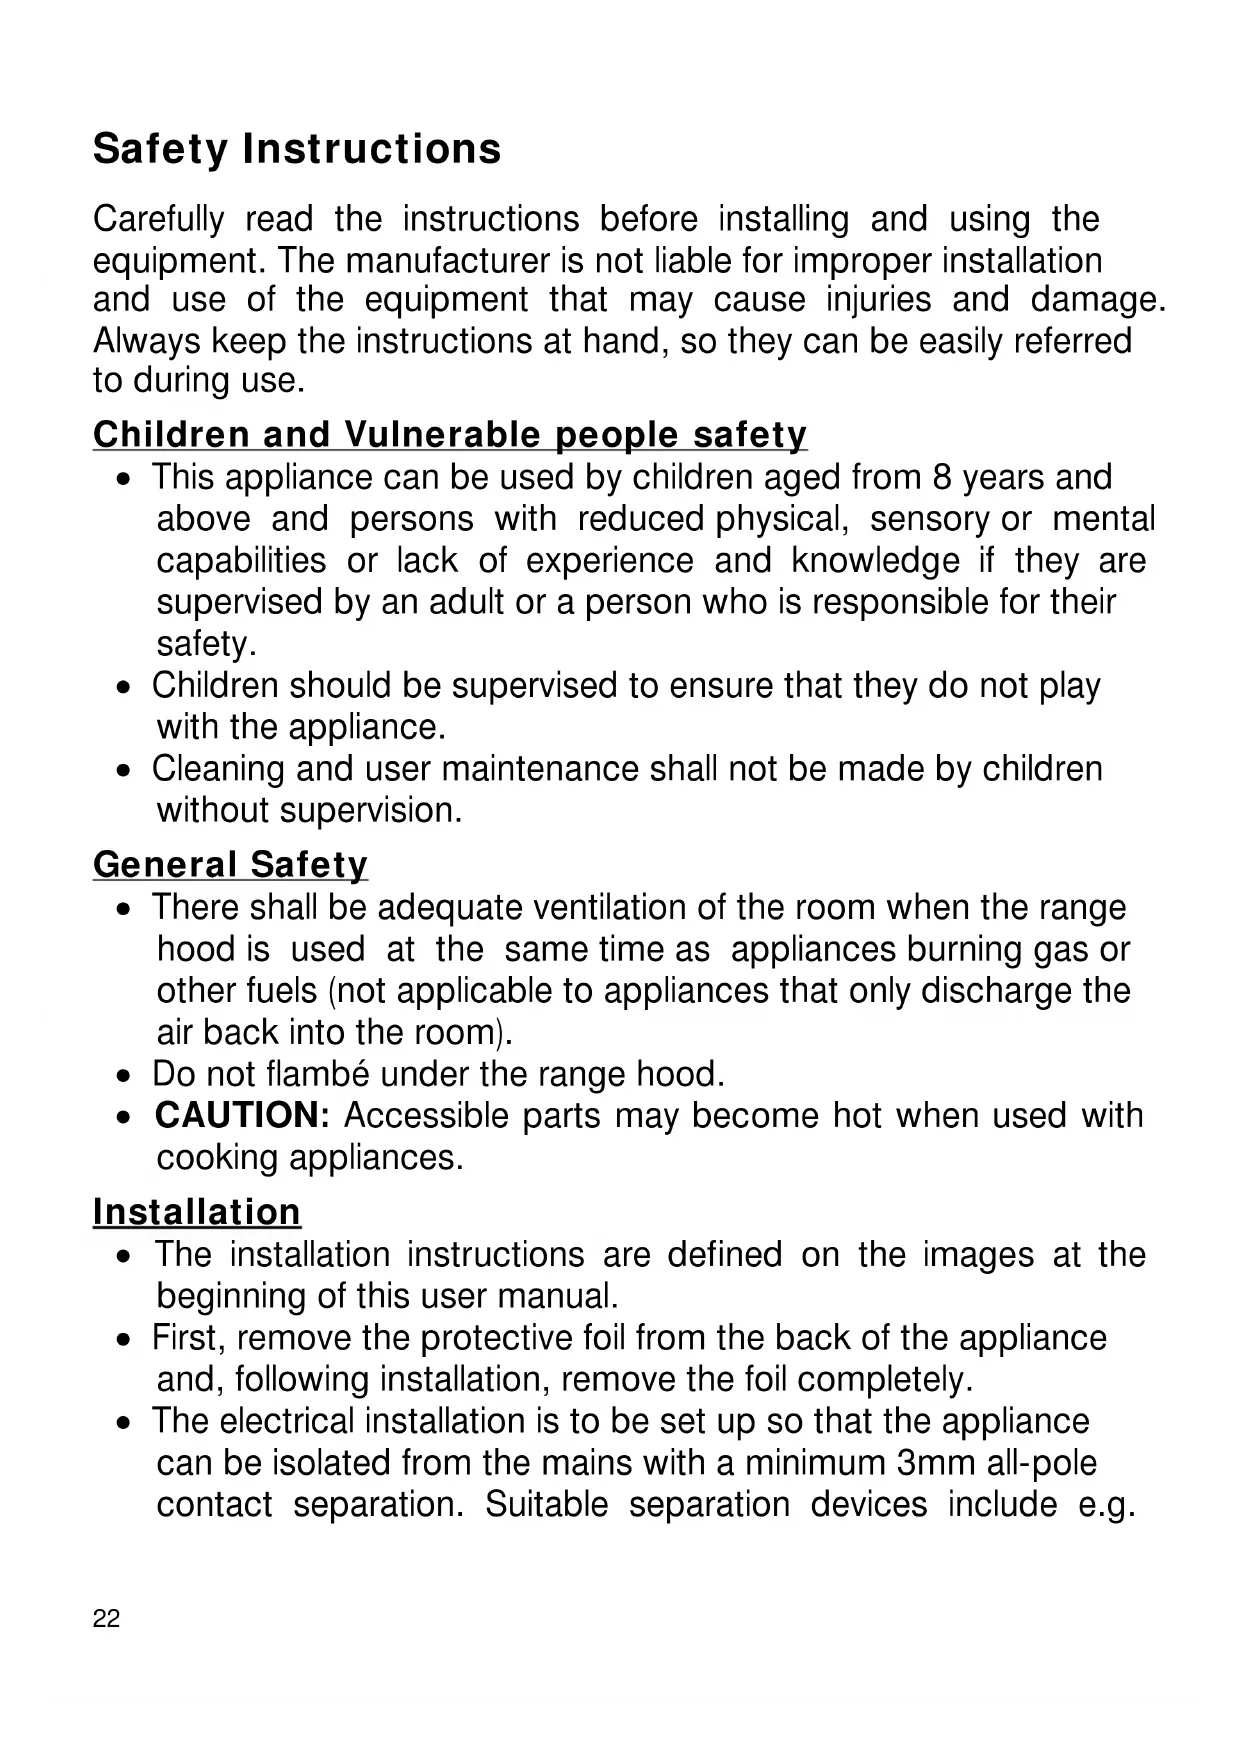
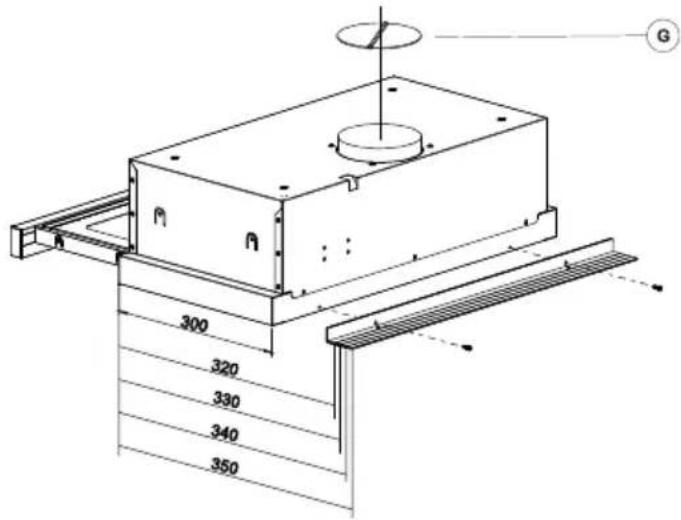
G Anti return tabs to be located in the outlet mouth, locating their ends in the holes provided (Fig.6).
Instructions for use
To achieve better extraction, we recommend switching on the extractor a few minutes before starting to cook (3 - 5 minutes) so that the air flow is continuous and stable when extracting the fumes.
Likewise, keep the extractor switched on for a few minutes when cooking is complete to allow all fumes and odours to be expelled.
Operating settings
- When the tray is opened, the hood starts operating at the last speed, depending on how it was used the last time.
- To increase speed gradually, press the "A" key as many times as necessary, until maximum speed is set.
- The sixth speed is timed, so the cooker hood will automatically reduce speed after seven minutes.
- To reduce the speed gradually, press the key as many times as needed.
- To turn off the cooker hood directly at any speed, keep the "key pressed for 3 seconds.
Programming stop delay timer
- Programming Timer
a. Open Tray with motors switched on or off
Cleaning and maintenance
Before carrying out any cleaning or maintenance activities, ensure that the extractor is disconnected from the mains.
To carry out cleaning and maintenance, follow the Safety Instructions.
Fire risk exists in case that cleaning does not take place according to the instructions.
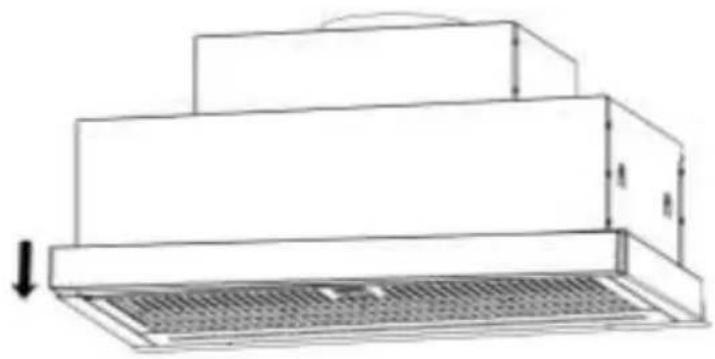
Filter cleaning
To withdraw the filters from their locations release the anchoring points. Clean the filter,
b. pressed "uk"alkeyEDs flicker quickly.
c. Press "or" keys to select aspiration time. Each LED represents 5 minutes of operating time. The maximum operating time is 30 minutes (the LED corresponding to the intensive speed starts flickering fast).
d. 5 seconds after pressing the keys, the LED corresponding to the time stops flickering fast and the LED corresponding to the selected speed starts flickering slowly.
e. In stop delay timer Mode, speed can be adjusted by pressing "or keys.
2. Cancellation of Stop Delay Timer:
Maintain key pressed until the motors switch off or close the tray.
Lighting
The lighting can be switched on and off by pressing the key "
When tray is opened, the lighting is switched on or off, depending on how it was used the last time.
either by putting it in the dishwasher (see notes) or leaving it standing in hot water to simplify the removal of grease or, if wished, by means of special sprays (protecting the non metallic parts). Once clean, leave it to dry.
To replace the filters, proceed in the reverse way to their removal. Make sure that the filter latch is securely attached to the housing to prevent untimely drops of the filters.
Attention: the cooker hood will not work until the main filter was reinstalled.
Notes: cleaning in the dishwasher with aggressive detergents may blacken the surface of metallic parts, without this affecting its gas retaining properties.
N.B. The filter must be cleaned at least once a month depending on how often the extractor is used. It must be remembered that grease is deposited in the extractor when cooking, whether it is switched on or not.
Cleaning of the extractor body
The use of warm (40^ approx.) soapy water is recommended. A cloth moistened in this water is used for cleaning the extractor, paying special attention to the grids. Afterwards, dry it using a lint-free cloth.
Note:
- Never use metallic scouring pads or abrasive products that could damage the surface.
- Do not use scrapers with metallic surfaces such as knives, scissors etc.
Technical Information
Electrical characteristics:
REFER TO RATING PLATE
This appliance has been designed, tested and manufactured according to:
- Safety: EN/IEC 60335-1; EN/IEC 60335-2-31, EN/IEC 62233.
Installation
To fix the cooker hood please choose one of the following options:
a) Fixing to the upper part of the furniture:
Figure 4 must be used where the position of the holes is indicated.
b) To the internal side of the furniture:
When the body hood fits within the furniture, fasten with two screws on each side from the inside of the body hood, using their side holes.
Cleaning method for external glasses
Use microfaser and water, in case of need, add mild soap.
Aggressive cleaning material or detergent should not be used.
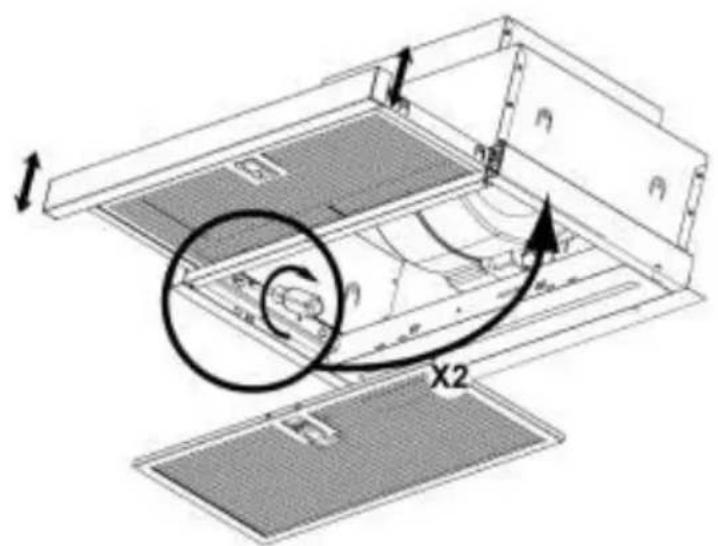
Activated charcoal filter
- To install the charcoal filter, the motor anchorage is made to coincide with the anchor points of the activated charcoal filter and turn it clockwise.
- The carbon filter lasts from three to six months depending on the particular conditions of use.
- The activated carbon filter can neither be washed nor regenerated. Once it is exhausted, it must be changed.
- To replace exhausted filters with new ones, withdraw the old one in the reverse order to that of installation.
- A reduction in the extraction flow rate may be observed in the hood with the installation of carbon filters.
Performance: EN/IEC 61591; ISO 5167-1; ISO 5167-3; ISO 5168; EN/IEC 60704-1; EN/IEC 60704-2-13; EN/IEC 60704-3; ISO 3741; EN 50564/IEC 62301.
EMC: EN 55014-1 / CISPR 14-1; EN 55014-2 / CISPR 14-2; EN/IEC 61000-3-2; EN/IEC 61000-3-3.
The lower part of the extractor must be located at a minimum height of 50~cm above the hob for electric cookers and 65~cm for gas cookers. If the instructions of a gas cooker indicate a greater distance these must be observed.
To achieve optimum performance the length of the outlet hose should not exceed 4 meters or include more than two 90^ angles (elbows).
Although venting to the outside is recommended, activated carbon filters may be
used, which allow the gas to be returned to the kitchen through the outlet pipe. If you wish to exchange the front for one matching the kitchen units, follow the following instructions (Fig. 3):
- Withdraw the movable group.
- Remove the screws (T) that support the front.
- Install the new front fixing it with the same screws that held the old one.
If something does not work
Before seeking technical assistance carry out the following checks first:
| Defect | Possible cause | Solution |
| The extractor does not work | The cable is not connected | Connect the mains cable |
| No current is reaching the plug | Revise/repair the electricity circuit | |
| The extractor does not blow enough or vibrates | Filter saturated with grease | Clean or substitute the filter |
| Outlet obstructed | Eliminate obstructions | |
| Inadequate air conduit | Contact the installer and follow instructions of this manual | |
| The lamps do not light | Lamp broken | Contact the Customer Service 6815 PLUS: ILCOS D Code: DSL-12-S-500 6415 PLUS ILCOS D Code: DSL-12-S-500 9415 PLUS ILCOS D Code: DSL-12-S-500 9815 PLUS ILCOS D Code: DSL-12-S-700 |
Special U.K. Requirements
Height above gas hob: 75 mm minimum.
This appliance must be connected by a competent person, using fixed wiring via a DOUBLE POLE SWITCHED FUSED SPUR OUTLET.
Special Australia Requirements
This appliance is not intended for use by young children or infirm persons without supervision.
Young children should be supervised to ensure that they do not play with the appliance.
Electrical connection
We recommend that the appliance is connected by a qualified electrician, who is a member of the N.I.C.E.I.C. and who will comply with the I.E.E. and local regulations.
Should the colour of the wires in the mains lead for the appliance not correspond with the coloured markings identifying the terminal in your spur box proceed as follows:
The wire which is coloured blue must be connected to the marked N (Neutral) or coloured Black.
The wire which is coloured brown must be connected to the marked L (Live) or couloured Red.
Where avialable (see installation), the wire which is coloured yellow/green must be connected to the marked or coloured Yellow/Green.
If the cooker hood is installed for use above a gas appliance then the provision vor ventilation
must be in accordance with the Gas Safety (Installation & Use) Regulations 1984 and the relevant Building Regulations. Detailed recommendations are contained in the following British Standard Codes of Practice BS6172, BS5440 and BS6891 Current Edition.
Environmental protection
Saving Energy
This appliance is energy-efficient but there are some tips on how to save even more energy:
-
During cooking, ensure that there is a sufficient supply of air to enable the extractor hood to work efficiently and with a low level of operating noise.
-
Adjust the fan speed to the amount of of steam produced during cooking. Only use intensive mode when required. The lower the fan speed, the less energy is consumed.
-
If cooking produces large amounts of steam, select the higher fan speed in good time. If the cooking steam has already spread around the kitchen, the extractor hood will need to be operated for longer thus consuming more energy.
-
Switch off the extractor hood if you no longer require it.
-
Switch off the lighting if you no longer require it.
-
Clean and (if required) replace the filter at regular intervals to increase the effectiveness of the ventilation system and to prevent the risk of fire.
-
Put the lid on pans to reduce cooking steam and condensation.
Disposal of the packaging

The packaging bears the Green Point mark.
Dispose of all the packaging materials such as cardboard, expanded polystyrene and plastic wrapping in the appropriate bins. In
this way you can be sure that the packaging materials will be re-used.
Dismantling the equipment:
- Disconnect the mains power.
- Remove the duct cover above the hood.
- Disconnect the duct.
- Supporting the equipment, remove the srews that fix it to the wall.
5.For waste disposal, proceed according to the appropriate environmental protection guidelines.
Disposal of equipment no longer used

According to European Directive 2012/19/EU on the management of waste electrical and electronic equipment (WEEE), home electrical appliances should not be put into the normal systems for disposal of solid urban waste.
Outdated appliances should be collected separately to optimize component material recovery and re-cycling rates and to prevent potential harm to human health and the environment. The symbol of a rubbish container superimposed by a diagonal cross should be put on all such products to remind people of their obligation to have such items collected separately.
Consumers should contact their local authorities or point of sale and request information on the appropriate places to leave their old home electrical appliances.
Before disposing of your appliance, render it non-usable by pulling out the power cable, cutting this and disposing of it.
Ybara: BNTJkKa He 6ynde npaIOBaTu, NOKn BN He nepeBCTaHOBiTb OCHOHN IbTp.
Ppimitkn: MTTy y nocydomnHi MaunHi 3 BHKOpNCtAHNm arpeCUBHX MNIOUx 3acO6iB MOKe PpN3BeCTn Do NOTeMHHH NOBepXHi MeTaNebux Yactn, aIe ue He BnNBaEc Ha BNaCTNbOcTi fIbtpy 0oDo 3aTpMaHHa Xnpy.
Ybara: pijbtp Heo6xidno qnCTNTn He MeHwe OndHO pa3y Ha MicraB, B 3anexHoCTi BiD TORO, k yacto BNKOpNCTOByEcBcB BVtJkKa. CniD nam'rTaTn, 0o Xnp BiKnaadaTbcR Ha BVtJkCi He3anExHOb BiD TORO, yBIMKHeHa BOHa Yn Hi.
YnueHHa KopnyCy KxOHHOI BNTJXKIN
Для чишениpekomehdyeTbcra
BnKOpncTObByBaTN Tenny (np6n. 40^ )
MnIbHy BODy. UnCTITb BNTJxKy 3a
DOnOMOrOTo raHcIPKn, 3BOJoxeHOi y zuin BOdi,
PnpdiJnooc6blny yBaIy pewiTkam.
PiCnlaCboro Hacyxo BntpItb BNTJxKy
raHcIPKOIO, kA He 3aIIuHaE BOJOKOH.
Pnmuitka:
Hikon He BnKOpNCTObynte MeTaJIeBi ry6Kn a6o Nopwn Ta a6pa3NBHi MaTepiAn, kI MoKyTb NOsKOJNTn NOBepxHIO.
He ckpe6itb BNTJkKy npedMeTaMn 3 MeTaNBeBIMN NOBepxHAMN, TaKIMN JK HOKi, HOKnCi TOIO.
Cnoci6 ouHsEHHra 3OBHiuHix cTeKOJI
BnKOpncToByTe Mikpophi6pOBy noJipyBaIbHy cepBeTky Ta Body, npn Heo6XiHocTi DoaaiTe M'JaKe MInNo.
TexhiHi daHi
EneKtpnHi xapaKTepeNtIKN:
INB.TABJIYKU 3 DAHIMN
Ueien npnna6yno po3po6neHo, Bnnpo6yBaHO Ta BnroTOBNeHO BiNObiDHO Do HxKueHaBeDeHnx CtaHndapTIB:
- Правида 6e3neuHOro BnKOpncTaHHa: EN/IEC 60335-1; EN/IEC 60335-2-31, EN/IEC 62233.
BctaHOBJIeHHJ
Ioo6 BCTaHOBtIN BNTJkky 6ydb Nacka, o6epitb OOnH 3 HAcTyHNx BapiaHTiB:
a) KpiinneHnJa Do BepxHbOi YactuHn Me6nib: MaIOHOK 4 NOBHeH 6yTN BkOpNCtAHN, KOJI N MlCSe OTBOpIB Bka3aHo.
b) Do BnytpiunHboi CTopoHn Me6nib: KOnn Kopnyc MOHTyETbcra B cepeHy Me6nib, KpInneHHa 3a DonomoroDBox RBnHTiB 3 KOxHOrO 60ky BiD BnytpiunHboi
He cnid BnKOpncToBvBaTn arpeCnBHi MmIoChi 3acobn.
ΦiNbTpN 3 akTINBOBaHoro ByrɪnJIa
-Дя BCTaHOBHeHHЯ φiNbTpY 3 aKTHBOBaHOrO ByrIJIra HATnCHiTb φikCaTopn Ha KoxHi CTOpOHi DBuRyHa n NOBepHItb 3a CTrpIKoIO rOdINHHnka.
Byrilbhi fInbtpn Heo6xidHO 3amHOBaTH Upee3 KOxHi TpN-uiCTb MicraB, B 3aIexXHocTi BiD OCO6JIINBnx yMOB ekCnIyatauii.
- Φиьтprn 3 akTNBOBaHOro ByrInnЯ He MoXHa MNTn a6o BiIDHOBJIbOBatn ДЯ NOBTOpHOrO BIKOPNCtAHNЯ. BiDnpaцBoBaHi φiNbTpPrn cnId 3amHHTn.
- Κοδ 3amHHTn BiIDnpaζbObaHi φiNbTpNa Hα HOBi, BmMiTb CTapi φiNbTpN y 3BOPOTHi NOCπIIOBHOCTi BiHOCHO NOCπIIOBHOCTi BCTaHOBJeHHA.
- PnBCTaHOBHeHHI ByrIbHnx φiNbTpib y BNTJXMOKe CNOCTepiraTncb 3MeHWeHHpaIBHa BNTJXHOITaH.
- EKcnpnyatauihi kocti: EN/IEC 61591; ISO 5167-1; ISO 5167-3; ISO 5168; EN/IEC 60704-1; EN/IEC 60704-2-13; EN/IEC 60704-3; ISO 3741; EN 50564/IEC 62301.
EMC: EN 55014-1 / CISPR 14-1; EN 55014-2 / CISPR 14-2; EN/IEC 61000-3-2; EN/IEC 61000-3-3.
YactHnH KOpNcy, BnKOpNCTOByUOu iX 6iHi OTBOpN.
BnTjKky Heo6xIDHO BCTaHOBIOBaTH TaK, 06 BiDcTaHb Bi KOHΦOpOK Do HNXHbOi YactHHn BNTJKKN CKnaDana: DnEeKtpuHnx PnIT - He MeHwe 60 cm, Dnra3OBHX PnIT - He MeHwe 65 cm. (KaTO B IHCTpyKci 3 MOHTaKy Ra3OBOI PnITN BkA3aHO 6iNbSy BiDcTaHb, To TakoI 6ilbWoI BiDcTaHi Heo6xIDHO DoTPMMyBaTnc).
Дяdoягнгону ONTIMaJIbHOI NOTYXHOCTi DOBXINHa BVBiDHorO NOBITPOBOy BNTJxKn He NOBHHa nepeBNUsUyBaTu 4 MeTpN, i y HbOMy He NOBHHo 6yTu 6JIbUe DBOX 3rNHIB nID Kytom 90^
He3BaJauOuHa Te, 10 BnBID NOBITpeKOMeHdUcTbCpOBNTaMexi KxHi,MOXHa BnKOpNCTOByBaTNΦIbTpN3AKTINBOBaHOro ByrInlJRAki DO3BOJATBBNBOHTn NOBITpycheE BnBIDHn NaTPy6OKHa3ad y npIMiueHHa KxHi.
KoIII Oocb He npaIoo
Kuio Bn XoueTe 3miHHTn nepeHIO nHaHeJIb KuxOHHOI BNTJxKKN, DOTpIMyIteCb IHCTpyKci (MaI.3):
BnIMtbypyxomyyactnHynepeHboi naHeni.
BnBepHiTb 乌pyu(T),Ha kKx KpiINtbcnpeednaHeIb.
BCTaHOBiTb HOBy nAHeNb, 3akpinNB II TMMX WypynAmN.
Ipeed TmM, k 3BepHyTncb y cnyk6y TexHiHOi niIDTpumMkn, nepeBipTe HaCTynHe:
BHMaHHe: BbITJxKa He 6yJeT pa6oTaTb, NOKa Bbl He nepeycTaHOBnTe OCHOBHOn fNJIbTp.
PpmeaHn: MbItbe ΦnIbTp aB nocydomoeyHO MaunHe c arpeccNBbIMN
OcbeHne
IOpCBeKy MOxHO BKNIOHTb IIN BBIKIOHTb npN NOMOUN KHONKn
EcnBbIDBnHyTb KO3bIpEK, NOcCBeTKa 6ydet BIIouHeHa NIN BbIKIOUHeHa B 3aBNCIMOCTN OT TORO, KAK OHa IcNoIb3OBaJacb B NocJeHni pa3.
MOUIMN CpeCTBAMN MOXET Bbl3BaTb NOTEMHHe MeTAPINueCKO NOBepxHOCTN, UTO HnKaK He cKa3bIBaETCa Ha KInpONOrlouOauoX KaueCTBax fNilbTpa.
BHHMaHHe: YnCTKa QnIbTpOB DoJXHa npOn3BOAnTbcr He pExe OndHOpa3a B MEcA, B 3aBnCmOCTN OT NOpb3OBaHnB bItjKoN. CneDyET nMeTb B BVdy, yTo npn PnPirotOBJIeHN NiU Ha NOBepXHOCTN DaJKe Hepa6oTaIOSei BbITJxKn I Ha QnIbTpE hAkApIIBaOTc JnPbl.
Ynctka Kopnyca BbITaJkN
PekomeHdyetcnaNoIb3OBAb paCTBOp MOUeRo cpeIcTBa TemnepaTypoN OKoIO 40°C. PpOTpuTe np6op caNΦeTKoN, CMOueHHo B paCTBOpe MOUeero cpeIcTBa, Oco6eHNO TuaTeJIbHO OuNCTInTe Na3bl N I ueII. Pocne 3TOrO BbICyUnTe np6Op TKaHbIO.
BHHMaHHe:
He nCnoJIb3yIte MeTaJIInueckne MoaJIKN I a6pa3nBHbIe CpeIcTBA, KOTOpbIe MOrYr NOBpeIuNTb NOBepXHOCTb BbITJxKNI.
He cko6nTe BbITXKc C NOMOuTO TBepdbIX npeMeTOB kaK, HApnpMep, HOKN, HOKHUcbl N T.D.
Cnocob ouHCTKN BHeuHnx CTeKOJI
NcnoJb3yIte MnkpoΦn6pOByIO nOpOBaJIbHyU caΦeTky I BODy, pni Heo6xOIMOCrI Do6aBbTe MmKoe MbIIO.
He cIeNyET nCNoIb3OBA Tb arpeCCNBHbIe YnCTaUne IIN MOUune CpeDCTBa.
ΦnIbTp n3 aKTHBnPoBaHHOro yrJra
- ΦильтпьnomeшаOTсЯ NO CTOPOHAM naTpубka,прглмдержateMuMOTopa n yroIbHbIXФильтpoBdoJxHbI COBnaCTb,пocNe 3TOrO NOBepHyTb IN NO qacobОВ CTpeJIke.
Cpok cnyk6bl qnIbTpna n3 aKTHBnPOBaHHOrO yrJn KJIe6JIeTcra OT Tpex Do IWeCTN MeCraUeB N 3aBNCHT OT INHTehCNBHOCTN NOJIb3OBAHnRA BbITJXKOJ.
TexHnueckaIHHΦopMaζη
3JIeKTpUeCKne xapaKTepnCTnKn:
CM. IACNOPTHYIO TABJIINCKY
Данhoe yctpoicTBO pa3pa6oTaHo, ИспыТанИ N3ROTOBJIeHO B COOTBeTCTBUN C:
Tpe6oBaHnA M 6e30nacHoCTN: EN/IEC 60335-1; EN/IEC 60335-2-31, EN/IEC 62233.
MOHTAX
CnocobI KpeJIeHnBbITJxKn K KyXOHbIM
Ukaam:
a) K BepxHne YacTn uKaΦa:
IcnoJb3yIte 7a6JIOH, n3O6paXeHHbI Ha pnc. 4, rDe yKa3bIbAeTcR MeCTOnONoXeHHe CKBO3HbIX OTBepCTn.
b) K BHyTpEHHe N CTeHKe Me6eJbHoro MOdUyra (6e3 Kpenexa):
Ecnn Kopnyc BbITJxKn HaxOHTcBHyTp n Me6eJIbHOro MoDyJn, 3aKpeNtPe no 2 BInTa Ha KaXdYIO CTeHky N3HyTpN Kopnyca BbITJxKn, INcNoJIb3yR OTBepCTnA DnI Hnx B CTeHKe Kopnyca.
HnKnaCTb BbITJXKn DOJIxHa HaxOHTbcn Ha BbICote He MeHee 65 cm OT ra3OBoB BapOuHOI paHEIN 50 cm OT aJIeKtpUeCKoB BapOuHOI paHEIN. EcIn B INHCTpyKcNn NO MOHTaXY Ra3OBoB BapOuHOI paHEIN yKa3aHO 6OJIbWeepacCToRHe,TO OHO DOJIxHo 6bITb co6JIHO
- Φильtp n3 akTNBnpoBaHHoro yrIa
HeIb3Я MbITb nIIb BOCCTaHaBnBaTb.
Поспе okOHuaHЯ cPOKa cIyK6bl
Фильtp cIeДуET 3aMeHITb.
ДЯЗAMeHbI NcNoJIb3OBaHHbIXФИЛБТРОВ cNeDyIte INHCTpyKUЯM NOMOHTaKy B O6paTHOM NOPaKe.
B BbITJXKe C yrolhblIMN fHJIbTpamn MoKET HabIIOaTbcra CHHXeHne CKOpOCTn IcXODAUErO NOTOKa.
Tpe6oBaHnA M K 3000EeKTHBHOCTN: EN/IEC 61591; ISO 5167-1; ISO 5167-3; ISO 5168; EN/IEC 60704-1; EN/IEC 60704-2-13; EN/IEC 60704-3; ISO 3741; EN 50564/IEC 62301.
- Tpe6oBaHnIaMn K əJIeKTpOMaHnTHoH COBMeCTHmOCTu: EN 55014-1 / CISPR 14-1; EN 55014-2 / CISPR 14-2; EN/IEC 61000-3-2; EN/IEC 61000-3-3.
ДЯ Han60JIbWe npOu3BOUInTeJbHOCTN BbITJKKI DnIHa Tpy6bl BO3dYXOBoDA DOJXHa IMeTb He 6OJee YETbIPEX MeTpOB, a TaKke He 6OJee dByx KoJeH (u3rN6OB) B 90^
PekomeHdyemblpeximpa60tblBbITJKKN 3TO OTBOD DbIMa HnapOB HapyKy,HO MOryt 6bITb yCTaHOBHeHbI yROJIbHbIe QnJIbTpbl,C KOTOpBM OUnUeHHbI BO3dYX BO3BpAuaTcraHa KyXHUpYepe3 BO3dYXOBoD XOTPeKOMeHdyETc BbIBoIDtB Ra3bl 3a NpeJebl 3daHnR,MOrYT YCTaHABnBaTbc TaKKe QnJIbTpbl n3 aKTINBnPOBaHHoro yrI, KOTOpbl DeNaOT BO3MOxHbIM BO3BpaUeHne ra3OB B NOMeUeHne KyXHn Yepe3 BbIXoDHyIO Tpy6y.
EcnBbIXOTnTe 3aMeHnTb JInCeByIO nAHeJIb BbITXHHOro KOnnaka, Ha Dpyryo nAHeJIb, BoIee COyTaIOUycs C KyxOHHO Me6eIbIO, TOrDa CNeDyIte CNeDyUOUM INCTpyKcIyM (pnc.3):
- CHIMITE JERKO CHIMAEMBLE YACTN.
BbikpyTnte wypnbl (T), KOtOpbIMKpeNTbcra NueBa ra NaHeIb.
- YctaHOBNTe HOByIO NaHeJIb N 3aKpeNITe eE Temn Xe Uypynamn.
B clyuae HeoJaKn
Ipejde, yem obpaataBcB LcHtp texnueckoro o6cnykBaHnra, npoBeiTe npoBepKy cornacho cneyuoue Ta6nue:
TOJIKOBa IbTN, KOJIKOTO e Heo6xOdNMO, DOKaTo He DoCTnHete MaKcImaJIHaTa CKOpocT.
- Shectata ckopocTe nporpaMnpaHa 3a nepnoD OT BpeMe 7 MInHyTN, CneI KOITo abcop6aTopa aBTOMaTnUH No HamaJIraBaHe Ha ckopocT.
DΦnItpn,pa3noJoxeHnHaI npoctpaHCTBOTO 3a rotBeHe n NO3BOJIyBaUJI JeCHO N3BaXJaHe INoYnCTBaHe.
E N3dIbPnBaUc ce nIb3raU, yBEnuHaBaU, o6uata nloU ha a6copbnpaHe.
F Bb3MOxHocT 3a nocTaBraHe Ha qnItpn c aKTHBeH BbrJIeH (Φnr.2).
G AntnBb3BpBuaTeIeH Knaan, YNtO Kpna Tpa6Ba Da 6bDaT NoCTaBeHN B IpeHa3HaueHHe 3a ZeJTA OTBOpN B abcop6atopa Ha n3XoJa 3a Bb3dyxOBOda (Phr.6).
4.3a NOCTeNEHHOTO HaMaJIyBaHe Ha
CKOPOCTTa, HATNCHETe CUMBOJa
TOJIKOBA IIbTN KOJIKOTO e Heo6xOIMO.
5.3a da n3KJIIOUHTe InpeKTHO
a6cop6aTopbT, 3aDpBxKTe cMBOJna
HaTnucHaT 3a nepno OT BpeMe 3 cekyn.
MOUHOCT (CKOPOCT) 3aNoUHe Da Mnra 6bp30
e. Korato ypeda e B peXIM Ha OTIOXeHO n3KIIIOUBAHe, CKOpocTTa Ha acnnpaunr MOKe Da ce HacTPOBb NocpeDCTBOM 6yToHa "nn"
2. OTka3BaHe Ha ΦyHKunra Ta OTIOKeHo N3KJIIOUBaHe:
a. HATnCHeTe n 3aApbXTe 6byToHa " DOKaTO MOTOpNTe ce N3KJIHOuAT n 3aTBopTe NaHeNa Ha a6cop6aTopa.

Почистваши подрьжka
Ipei Da 3aOnuHHe Te KaKBaTo I da e pa6oTa
No NOUcTBAHe N IOdPbXka Ha
a6cop6aTopa ro N3KIOUeTe OT
eNeKTpUueckaTa MpeJa.
Ipn NouctBaHeto N NOdIbpxKaHTo Cn3BaTe HcTpyKuNTe 3a 6e30NaChOCT.
CbueCTByBa pNCK OT NOXap, aKO IOuHCTBaHeTo Ha ypeDa He e B CbOTBeTCTBnE C NOCOueHnte INHcTpKcUN.
NouchBaHe Ha qnItpTe
3a da n3BaInte fIJItpnTe OT MeCTaTaN, rN OCBo6OJeTe OT 3aKOpUaJIkNTe, KOnTO rN NOdIbPjKAT. N3MnIte fIJItpnTe B CbDOMNHa MaunHa (BIXTe 3aBeJExKNTe) IINrN OCTaBeTe Da NoCToR T B RopeuA BODa, TaKa Ye Da ce YIeCNH IpEmaXbaHeTo Ha Ma3HNHTe, a aKO XeJaTe, IN3NoJ3BaIte CneuaJIen CnpE (na3eTe HeMeTaJIHnte IM qactn). CpeI NOUcTBaHETo rN OCTaBeTe da IN3CbXHaT.
3a Da NpDMeHnTe fNtPnTe, npOdbJxKeTe NO 6bpaTHnRA TbT KbM T8XHOOTCTpaHnBaHe. YBepTe ce, ye pe3eTo Ha fNtBpa e 3dpaBO 3akpeNeHO KbM Kopnyca, 3a Da npeDnTbpATnTe HeHaBPemEHn KaKN OT fNtPnTe.
BHMaHne: acnnpatopa Hma da pa6oTn, DOKaTo He npenHCTaJnpaTe OCHOBHnTe fntbP
OcbetJIeHne
OcbetneHneto Ha ypea MoKe da 6bde BKIOUBOHO IN3KIOUBOHOOT6yTOHa
Korato n3dbpnaTe deepneKTOpHaTa nNoya, OCBetIeHHeTo ige ce BkIIOUa aBTOMaTnHO IIN ige Ce N3KIOUH, B 3aBNCIMoCT OT TOBa, KOJIko DbIro e 6nI n3noJ3BaH a6cop6aTopa NocJeHNr PbT.
3a6eJexka: MneHeTO B CbDOMnJaHamaunHa C,arpeCInBeH" (cIneH) NOuchTbaU npenapat MoKe Da NOTbMHN NOBbpXHOCTTa Ha MeTaNHTe YactN Ha cNtPNTe, 6e3 ToBa Da NOBJIRe Ha CNOCO6HOCTTa NM Da yJaBrt N3napeHnra.
BHMaHHe: PnItpnte Tp6Ba Da ce NOuHCTBaT Ha-MaIKO BeHNbX MeceHNO B 3aBNCIMOCT OT YecToTaHa H3NoJ3BaHETo Ha a6cop6aTopa. NomHete, Ye no BpeMe Ha RotBeHe Ma3HHInTe Ce HaTpynBaT B a6cop6aTopa, He3aBNCmO DaJI N Toi e BKJIouyen He.
IounctBaHe Ha Kopnyca Ha a6cop6aTopa
3a NOUcTbaHe ce npenOpbYBa
H3noJ3BaHeTo Ha Kbpna, HanoEHa B ropea
Boda (okono 40^) cbc canyH, kaTO
O6bpHeTe CneuaJIHO BHIMaHne Ha bIInTe.
CleTdoba nocyuWeTe c cyxa KbPna
3a6eJexka:
Hnkora He n3noJ3BaIte KyxHeHcKa TeI nn YETKN, KaKTo N a6pa3NBn npenapATN, KOITo MOra T da HapaHrT NOBbpxHOCTNe Ha a6cop6aTopa.
He n3noJ3BaITe OCTpN MeTaJIHn npeDMETN, KaTO HOXOBe, HOXUN I npytn.
METOД 3A NOUHCTBAHE 3A BbHsHn CTbKJIa
I3noJ3BaITe MnkpoΦnbPHa KbPna N Boda n, aKo e HxKHO, do6aBeTe MeK canyH.
He Tp86Ba Da ce n3noJ3BaT arpeCnBn nouchBaun MaTePnaI INnn nouchBaun npenapatn.
ФиNTpn cakTNBeH BbIJIeH
3a Da NOCTaBnTe fHNTpHte c aKTINBeH BbIeH, NOCTaBete TexHnTe 3axBaUaUu ChTn B PpeBnDeHnTe 3a TOBa OTBOpN Ha DnIgAteJI, KaTO 6bDaT 3aBbPTeH N O NocOKa Ha YacOBHNKOBaTa CTpeJIka.
TexHnueckn DaHHN
EneKtpnueckn xapaKTepeNCTnKn:
YKA3AHN CA HA CTNIKEPA C
EJEKTPNUECKN NOKA3ATEJIIN
To3n ypeD e npoeKtnpaH, TecTbaH n npoN3BeDeH B cbOTBETCTBne C:
- Be30napocT: EN/IEC 60335-1; EN/IEC 60335-2-31, EN/IEC 62233.
Инстация
3a da moHTnpuTe a6cop6aTOpbT B KuxHraTa, MoJr n36epTe eHa oT cNeHNte OOnuN:
a) KbM ropHaT auct Ha Me6eInte:
CneBaIe yka3aHnraHaΦn.4,KbTeTo No3nurTa Ha Dynknte e OTo6enlaHa.
b) KbM BbTpewHaTa CtpaHa Ha uKaΦa (cbccko6nte):
Korato NOCTaBNTe TAnOTo Ha a6cop6aTopa BbTpE B ShkaΦa, 3akpenete rO C DBA BnHTa KbM BCa Ka OT BbTpEShHnTe cTpaHn Ha ShkaΦa, n3NoJ3BaIKN TexHnTe cTpaHnHn OTBOpN.
ДоннataчacT ha abcopbataopa Tp6Ba da e Ha BncounHa Hau-MaNko 60 cm OT eNeKtpuYeCKnte KOTLOHn Nn Ha 65 cm OT ra3OBn. Ako B INHCTpyKcNtTe 3a TExHaTa yNoTpe6a ce npenOpbYBa NO-ROJMaO pa3ctoHHe, To cIeDbA da 6bDe cna3eHO.
- ΦИЛТРИTE C aKTINBEH BbIJIeH Ca rOДH N O T 3do6 Meceua B 3aBnCmOcT OT ynotpe6ata Ha a6cop6atopa.
- ΦИЛТРИTE C AKTINBEH BbRIeH He Ce MnI, HnTO Bb3CTaHOBRAbT. CneI TExHaTa yNoTpe6a Tp6Ba Da ce 3aMeHrT C HOBn.
3a Da CBAHTE n3nON3BaHNTe 0nItpn, cneDbaTe o6paTHata npoceDypata Ha Ta3n pnp NOCTABREHO M. -
Пи мот tak Ha BьглерODи ФиNTри може да ce 3a6eJexn HamaJIЯBaHe Ha MOUHOCTTa Ha 3acMyKBaHe Ha abcop6aTopa.
-
Празиюптелноct: EN/IEC 61591; ISO 5167-1; ISO 5167-3; ISO 5168; EN/IEC 60704-1; EN/IEC 60704-2-13; EN/IEC 60704-3; ISO 3741; EN 50564/IEC 62301.
EMC: EN 55014-1 / CISPR 14-1; EN 55014-2 / CISPR 14-2; EN/IEC 61000-3-2; EN/IEC 61000-3-3.
3a da 6bnde abcopbupaHTo onTImaJIHo,
n3XODaIaHT Bb3dUxOBoD He Tp8Ba Da
npebuwaBa 4 MeTp a DblJxHa n da He
BKNIOyBa NOBeYe ot 2 UynKc bYb90o.
BbnpeknueepenopbunTeHNO n3BeKdaHe Ha napte HaBbH,MOKe da ce N3N0J3BaT cakTNBEH BbIeH, KOITOBpUaT npueNCTeHnB3dYX B KyxHra.
BHNMAHNE: OocbHnTe yactn Morat da ce HaropeuT, KOraTo ce n3NoJ3Ba c rOtBapcKn ypeiN.
Ako JeJaTe Da 3aMeHnTe npedHnaHeI C dpyr, KOITo Da CbOTBcTBA Ha KxHcKata Me6eI, Hapabete cneHoto (PnR. 3):
- I3dþpnaIe nIb3raça.
- OTBnIte BnHTOBete (T), KOnTo IbPkaT npedHnaHeJ.
- Пocтавete HOBЯ панел сnomоцта насьиTe BnHTObe.
Ipei Da nOtBpcnte TexHnuecka nOMoU npN Bb3HnKHaJ npo6JeM, MoJr npOBepTe:
J 1 J 1 J 1 J 1 J 1 J 1 J 1 J 1 J 1 J 1 J 1 J 1 J 1 J 1 J 1 J 1 J 1 J 1 J 1 J 1 J 1 J 1 J 1 J 1 J 1 J 1 J 1 J 1 J 1 J 1 J 1 J 1 J 1 J 1 J
.
aaleal y
()
jll pabll 111
"” 150000000000000000000000000000000000000000000000000000000000000000000
e" 120 cla 120 bai 120 4 aal 120
ae y ay jaiy 120 blaiy 5
3 120 120 120
a
1
i g j 1
)
i 1
aaiiai i 1000
ylls jilaae bai puiuily aie (ii)
.
山
auii, biu 1ui
ii
Jiaiieai 1
.
.
()
aill 1
acllll jie o
Lle 152
L 1
sllginall 1
yai (jie)
Aolai
y 1
A
Lle 1
e 1
它恰好 m ≤ m 或 m
e 1
jll jll jll jll jll jll
ailllll lalil dlll
1
Laiill
()
blaiy jy
Jz JnL! (jla) zrrll 1y jki y
4aai (c) 100
j 1 j 1
aJzlaal) 1
j j j j j j j j j j j j j j j j j j j j j j j j j j j j j j j j j j j j j j j j j j
aill aoc 1nlae
aIeal aiejll jol Jil
y
J
aiee eee
cbw 4y gll y gall lalbiall aliswi ly
L
jillybliaxlglc
()
alilil jki jao glc laiiej gaii
g j 1 j j j j j j j j j j j j j j j j j j j j j j j j j j j j j j j j j
J 1
iia iag
1-5167 EN/IEC 61591
EN/IEC 60704-1:5168 3-5167
EN/IEC 60704-3 EN/IEC 60704-2-13
JEN50564/IEC62301:3741
EN 55014-1 /
:EN 55014-2/CISPR 14-2:CISPR 14-1
.EN/IEC61000-3-3:EN/IEC61000-3-2
:
jlll 1000000000000000000000000000000000000000
4
EN/IEC 60335- EN/IEC 60335-1
2-31·EN/IEC62233
Jg jy Jn J 4 aal g
y
jll jll lill jll jll jll jll jll jll jll jll jll jll jll jll jll jll jll jll jll jll jll jll jll jll jll jll jll jll jll jll jll jll jll jll jll jll jll jll jll jll jll jll jll jll jll jll jll jll jll jll jll jll jell jll jll jll jll jll jll jll jll jll jll jll jll jll jll jll jll jll jll jll jll jll jll jll jll jll jll jll
aaiyaiyaiyaiyaiyaiyaiyaiyai

aaiiie
yjll 8 jg
aill lllnollll 1
a 1
2012/19/EU
.(WEEE)
J 1