
CompactPower EDBS7146GR - Iron ELECTROLUX - Free user manual and instructions
Find the device manual for free CompactPower EDBS7146GR ELECTROLUX in PDF.
| Product type | Steam generator |
| Brand | Electrolux |
| Model | CompactPower EDBS7146GR |
| Soleplate | Ceramic CARESSIUM™ |
| Power | ~2400 W |
| Water tank capacity | ~1.2 L |
| Steam pressure | ~6 bar |
| Steam functions | Continuous steam, steam jet, vertical steam, ECO mode |
| Steam control | Adjustable: low, medium, high |
| Safety | Grounding, use by children aged 8 and above under supervision |
| Maintenance | Descaling recommended every 2 months with EUD5 descaler |
| Boiler cleaning | Accessible via safety cap with supplied flat wrench |
| Power supply | 220-240 V, 50/60 Hz |
| Weight | ~4.5 kg |
| Handle | Ergonomic |
| Cord storage | Yes, wrapped around the base |
| Indicators | Temperature light, on/off light, steam level light |
Frequently Asked Questions - CompactPower EDBS7146GR ELECTROLUX
User questions about CompactPower EDBS7146GR ELECTROLUX
0 question about this device. Answer the ones you know or ask your own.
Ask a new question about this device
Download the instructions for your Iron in PDF format for free! Find your manual CompactPower EDBS7146GR - ELECTROLUX and take your electronic device back in hand. On this page are published all the documents necessary for the use of your device. CompactPower EDBS7146GR by ELECTROLUX.
USER MANUAL CompactPower EDBS7146GR ELECTROLUX
Thinking of you Electrolux
CompactPower™ EDBS7146GR
BG БРОШУРА С ИНСТРУКЦИИ
CS PŘÍRUČKA K POUŽITÍ
DA VEJLEDNING
DE ANLEITUNG
EE KASUTUSJUHEND
EN INSTRUCTION BOOK
WE'RE THINKING OF YOU
Thank you for purchasing an Electrolux appliance. You've chosen a product that brings with it decades of professional experience and innovation. Ingenious and stylish, it has been designed with you in mind. So whenever you use it, you can be safe in the knowledge that you'll get great results every time.
Welcome to Electrolux.

Visit our website to:

Get usage advice, brochures, trouble shooter, service information:
www.electrolux.com

Register your product for better service:
www.electrolux.com/productregistration

Buy Accessories and Consumables for your appliance:
www.electrolux.com/shop
CUSTOMER CARE AND SERVICE
When contacting Service, ensure that you have the following data available.
The information can be found on the rating plate. Model, PNC, Serial Number.

Warning / Caution-Safety information

General information and tips

Environmental information
Subject to change without notice.

natural_image
Black and white illustration of a steam iron with visible steam covers and handle (no text or symbols)fig. 1
natural_image
Close-up of a mechanical component with curved surfaces and a clip (no visible text or symbols)fig. 2
natural_image
Close-up of a camera with a circular 'MAX' button and a cylindrical lens pouring liquid (no text or symbols on the lens itself)fig. 3
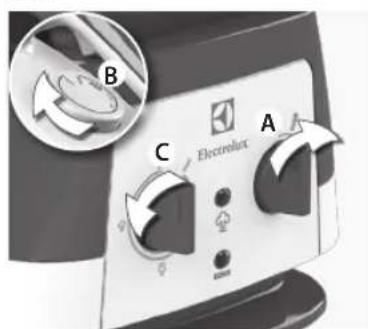
fig. 4
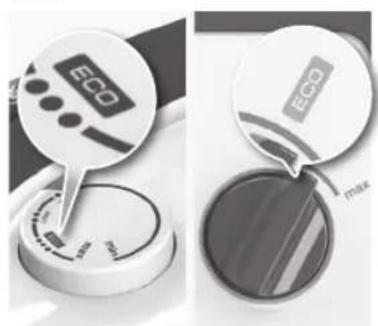
fig. 5
natural_image
Close-up of a black and white electric fan with a rotary knob (no visible text or symbols)fig. 6
natural_image
Two steam iron machines emitting steam, shown from different angles (no text or symbols visible)fig. 7
natural_image
Electric iron in motion, showing steam emission from a pipe outlet (no text or symbols visible)fig. 8
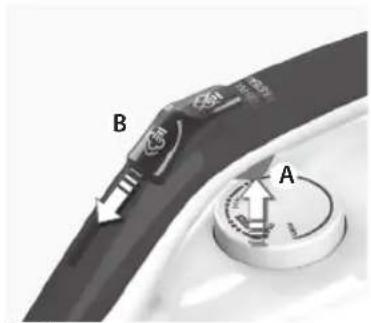
fig. 9
natural_image
Front view of an Electrolux appliance control panel with rotary dials and buttons (no readable text or symbols)fig. 10
natural_image
Close-up of a metallic tool tip pouring liquid into a container (no text or symbols visible)fig. 11
natural_image
Black and white photo of a steam iron with handle and cooling fan (no text or symbols visible)fig. 12
natural_image
Close-up of a white fabric or cable with a black strap, no visible text or symbols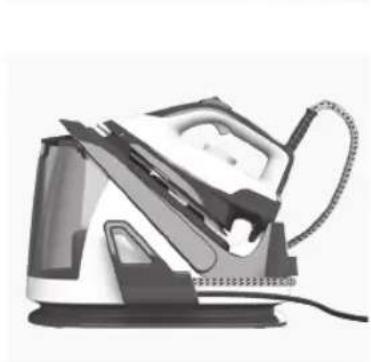
natural_image
Black and white photo of a steam iron with visible steam covers and handle (no text or symbols)fig. 16
natural_image
Close-up of a device with labeled parts A and B, showing a cartoon character and mechanical components (no readable text or symbols)fig. 14 fig. 13
natural_image
Close-up of a hand washing a small appliance with liquid flowing (no visible text or symbols)fig. 15
Read the following instruction carefully before using machine for the first time.
EN
- This appliance can be used by children aged from 8 years and above and persons with reduced physical, sensory or mental capabilities or lack of experience and knowledge if they have been given supervision or instruction concerning use of the appliance in a safe way and understand the hazards involved.
• Children shall not play with the appliance.
- Cleaning and user maintenance shall not be made by children without supervision.
- Keep the iron and its cord out of reach of children less than 8 years of age when it is energized or cooling down.
- The surfaces are liable to get hot during use ⚠.
- This product is appropriate for use with tap water. It is recommended to use Electrolux AquaSense filtered water, taking out impurities like limescale. Otherwise use distilled water. If the tap water is particularly hard, use a mix of 50% distilled water and 50% tap water.
- The appliance may only be connected to a power supply whose voltage and frequency comply with the specifications on the rating plate!
- The iron is not to be used if it has been dropped, if there are visible signs of damage on the iron or its cord or if it is leaking.
- The appliance must only be connected to an earthed socket.
- If the appliance or the supply cord is damaged, it must be replaced by the manufacturer, its service agent or similarly qualified person, in order to avoid hazard.
- The iron must be used and rested on a stable surface. When placing the iron on its stand, ensure that the surface on which the stand is placed is stable.
- Never leave the appliance unattended while connected to the supply mains.
- The appliance must be switched off and the mains plug withdrawn each time after use, before cleaning and maintenance.
- The plug must be removed from the socket outlet before the water reservoir is filled with water.
- The mains cable must not come into contact with any hot parts of the appliance.
- Do not immerse the appliance in water or any other liquid.
- Do not exceed the maximum filling volume as indicated on the appliances.
- The filling aperture must not be opened during use.
- Before refilling of the water reservoir, please remove plug from socket.
- This appliance is intended for domestic use only. The manufacturer cannot accept any liability for possible damage caused by improper or incorrect use.
- Do not pour vinegar, descalers or other scented substances into the tank. Otherwise the warranty may be revoked.
- Warning! Before cleaning, always disconnect the plug from the power point and allow the iron to cool down on its stand.
The appliance confirm to the Directive 2006/95/CE and to Directive EMC 2004/108/CE. ALWAYS KEEP THESE INSTRUCTIONS.

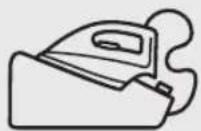
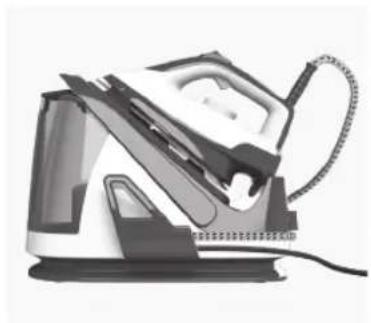
COMPONENTS
EN
A. Steam button
B. Soft handle
C. Temperature alignment mark
D. Temperature selector
E. Temperature indicator light
F. Steam pipe
G. Power cord
H. Power cord storage
I. Boiler unit
J. Water tank
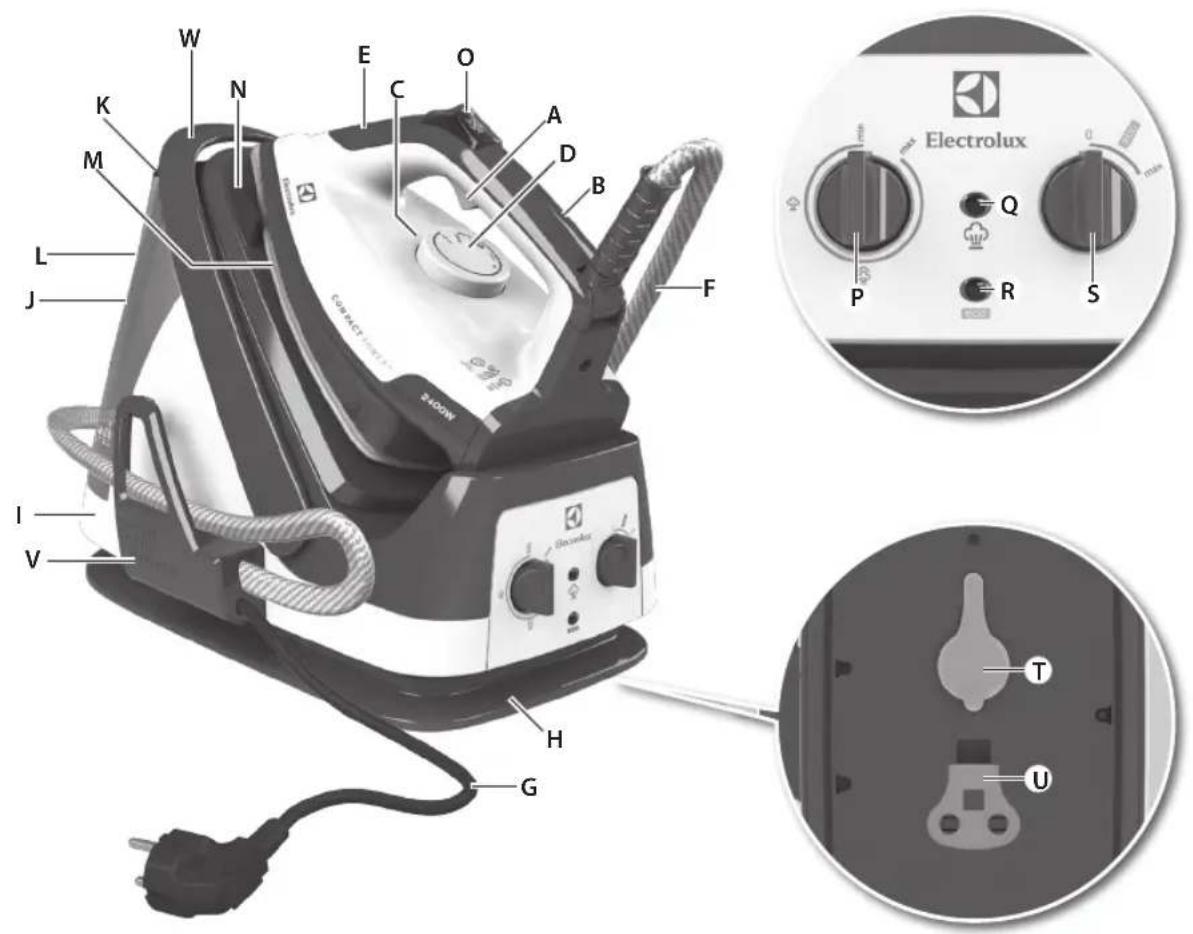
K. Water tank lid
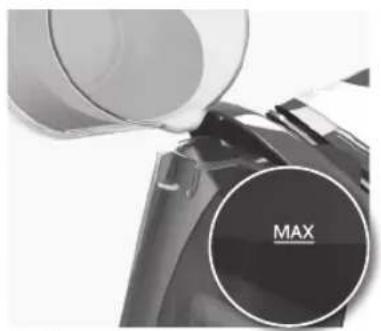
L. Maximum water level indicator
M. CARESSIUM ^TM ceramic soleplate
N. Iron rest
O. Steam activation slider (AUTO-MANUAL STEAM)
P. Steam level control knob
Q. Steam level indicator light
R. Power indicator light
S. Power knob
T. Boiler safety cap
U. Boiler flat key
V. Steam cord storage
W. Carry handle
IRONING CHART
| Fabric Temperature setting Ironing recommendation | ||
| Acrylic | ● | Dry iron on wrong side. |
| Acetate | ● | Dry iron on wrong side while still damp or use spray to dampen. |
| Nylon & Polyester | ● | Iron on wrong side while still damp or use spray to dampen. |
| Rayon | ● | Iron on wrong side of fabric. |
| Viscose | ● | Mainly dry iron. Steam can be used under manufacturer's instructions. |
| Silk | ● | Iron on wrong side. Use an ironing cloth to prevent shine marks. |
| Cotton blends | ●● | Check label and follow manufacturer's instructions. Use setting fo the fibre requiring lowest setting. |
| Wool & wool blends | ●● | Steam iron on wrong side or use ironing cloth. |
| Cotton | ●●● | Dry iron while still damp or use spray to dampen. Use steam medium to high. |
| Corduroy | ●●● | Steam iron on wrong side or use ironing cloth. |
| Linen | ●●●to "max" | Iron on wrong side or use ironing cloth to prevent shine marks, especially with dark colours. Dry iron while still damp or use spray to dampen. Use steam medium to high. |
| Denim | ●●●to "max" Use maximum steam. | |
| Varied ironing speed and fabric dampness might cause optimal setting to differ from that recommended in the table! | ||
GETTING STARTED
-
Before first use. Remove all adhesive remains and gently rub with a dampened cloth. Position the steam generator iron horizontally on the ironing-board or on a heat resistant, secure surface at the same height as an ironing-board. Unwind and straighten the power cord and the steam cord. When turned on for the first time, temporary vapours/odours may occur.
-
Open the water tank lid. Fill the water tank using cold water. It is recommended to use Electrolux AquaSense filtered water, taking out impurities like limescale. Otherwise use destilled water. If the tap water is particularly hard, use a mix of 50% destilled water and 50% tap water. Empty the water tank to rinse out any foreign particles which may remain from the manufacturing process.
-
Always refill the water tank to MAX level using cold water (A). Replace the water tank lid.
Caution! Never operate the appliance without any water in the tank.
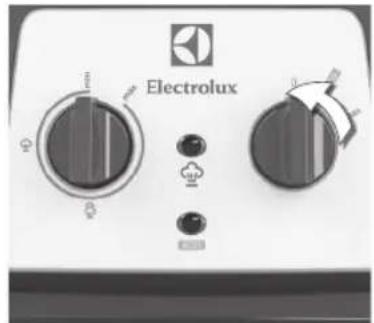
- Connect the steam generator iron to the mains supply. Turn the power knob (A) clockwise to MAX. Turn the temperature selector clockwise to maximum setting (B).
OPERATING INSTRUCTIONS
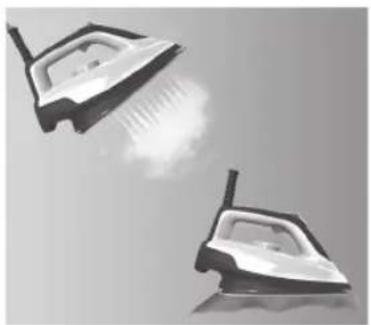
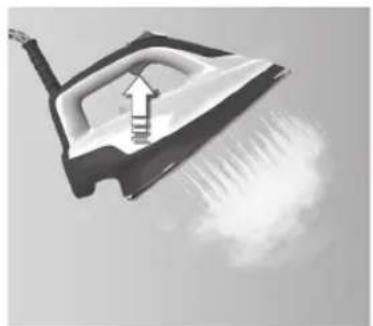
- To activate the steam function, press the steam button for 3-5 seconds, release the button to eject a concentrated jet of steam. When releasing the button, use up the steam before putting it back on the iron rest of the steam station. It is recommended that the steam button is used for short periods.
Caution! Never release steam while the iron is standing on its rest.
- Continuous (AUTO) steam function: Press and hold the steam button, and move the steam activation slider forward, to lock the steam button. Release both buttons. A jet steam will eject continuously and steadily (AUTO STEAM). To unlock the steam button and stop the continuous jet steam, press the steam activation slider backwards.
CLEANING
13. Always store iron on its heel rest.
To clean exterior surfaces, use a damp soft cloth and wipe dry.
Caution: Do not use any chemical solvents, as these will damage the surface.
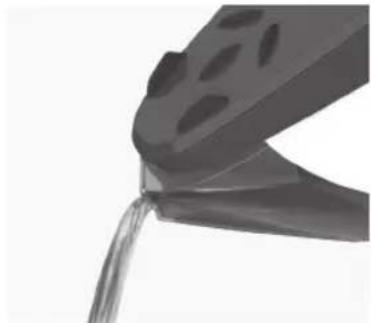
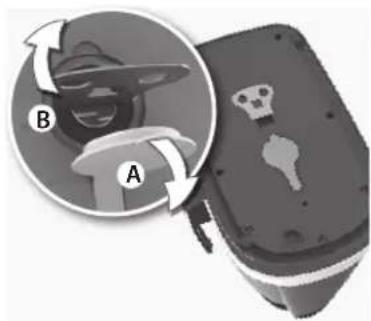
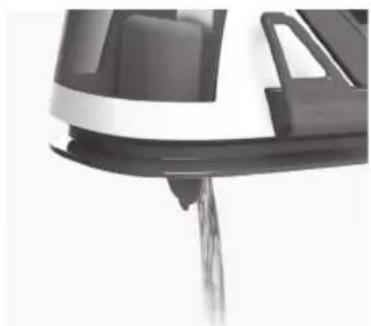
- Position the appliance so that the boiler safety cap is uppermost. Remove the rubber cover, unscrew the boiler safety cap using the flat key enclosed in the bottom. Turn the appliance upside-down over a sink and completely empty the boiler. Mix a descaler agent and water at the specified ratio, prepare at least 300ml descaler mixture. (Use recommended ratio for the mixture, if there is much scaling, properly increase the proportion of descaler.)
Note: We recommend to use the descaler EUD5 from Electrolux. The descaler bottle contains 4 uses (4 x 125ml) to be mixed with 375ml water at each use. We recommend to clean the boiler every 2 months.
The temperature indicator light on the iron will illuminate. Then, select a steam level by turning the steam level control knob between low - medium - high steam (C).
- The steam generator is equipped with ECO setting. Ironing on ECO setting (ECO setting needs to be selected on both temperature dial and control panel) instead of MAX setting saves up to 20% energy consumption. ECO setting is using lower pressure, producing lower steam rate but delivering faster heat-up time.
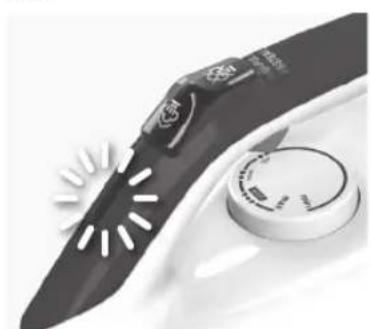
- When the temperature indicator light turns on, the steam station is pre-heating. When the light turns off, it is ready to be used. Press and hold the steam button for some seconds to get steam. Then hold for a few more seconds in order to clean the steam generating system.
-
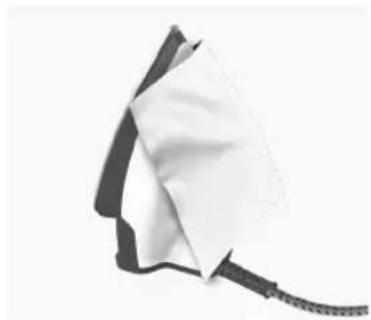
Iron an old towel, to ensure that any residues inside the iron are not transferred to the laundry. If necessary, wipe the soleplate with a slightly damp cloth.
-
Turn off the iron by turning the power knob counterclockwise.
- Always cool the iron fully on the iron rest before stowing away. Once the iron is cool, empty the water tank. Store the steam generator iron
-
Always store the cord by the cord storage on the generator base. NEVER wind the power cord around the iron.
-
Fill the mixture into the boiler and tighten the boiler safety cap. Soak for one to two hours under room temperature (increase the soaking time if necessary; max 8 hours). Pour out the mixture. Fill the boiler with clean water, then pour it out. Repeat this step for several times until the scales are removed and there is no longer a descaler smell. Place back one measuring cup of clean water in the boiler before reassembling.
THE WARRANTY DOES NOT COVER DAMAGE CAUSED BY CLOGGING DUE TO LIME. Once cleaning is done, do not keep the boiler completely empty but leave some water still there (before closing it again).
- When finished using the appliance, turn the temperature dial to the OFF ("MIN") position. Store the iron on the iron rest.
Note: Do not store the iron with water in the tank.
TROUBLESHOOTING
| Problem Possible cause Solution | ||
| Soleplate is not heating even though iron is turned on. | Connection problem Check main power supply cable, plug and outlet. | |
| Temperature control is in MIN position. Select adequate temperature. | ||
| Iron does not produce steam. Not enough | Water in tank. Fill water tank (see “Getting started”, no 2). | |
| Steam control is selected in non-steam position ('MIN'). | Set steam control between positions of minimum steam and maximum steam. | |
| Selected temperature is lower than that specified to use with steam. | Increase temperature to at least ●●● | |
| Steam jet and vertical steam jet function does not work. | Steam jet function was used very frequently within a short period. | Put iron on horizontal position and wait before using steam jet function. |
| Iron is not hot enough. Adjust the proper temperature to steam ironing (up to ●●● Put iron in vertical position and wait until temperature indicator light turns off. | ||
| Water leaks from the soleplate during ironing. | The iron is not hot enough. Set the temperature dial to a temperature (●●● do maximum) suitable for steam ironing. Put the iron on its heel and wait until the light has gone out before you start ironing. | |
| Flakes and impurities come out of the soleplate during ironing. | You have used hard water, which has caused scale flakes to develop in the water tank. | Press and hold the steam button for about one minute to get steam. Then hold one more minute in order to clean the steam generating system. Iron an old towel, to ensure that any residues inside the iron are not transferred to the laundry. |
| Water leaks from the soleplate while the iron is cooling down or after it has been stored. | The iron has been put in horizontal position while there is still water in the water tank. | Empty the water tank and set the steam control to position off before storing the iron. |
| Brown streaks come out of the soleplate while ironing and stain the linen. | You have used chemical descaling agents. | Do not use any descaling agents. |
| Fabric fibres have accumulated in the holes of the soleplate and are burning. | Clean the soleplate with a damp soft cloth. | |
| Fabrics might not be properly rinsed or the garments are new and have not been washed before ironing. | Please rinse the laundry properly again. | |
DISPOSAL
Recycle the materials with the symbol Put the packaging in applicable containers to recycle it. Help protect the environment and human health and to recycle waste of electrical and electronic appliances.
Do not dispose appliances marked with the symbol with the household waste. Return the product to your local recycling facility or contact your municipal office.

CONSERVEZ CES INSTRUCTIONS ET RESPECTEZ-LES.
ÉLÉMENTS
SACUVAJTE OVO UPUTSTVO.
KOMPONENTE
A. Duqme za paru
B. Mekana ručka
C. Oznaka za poravnanje temperature
D. Birač za temperaturu
E. Indikatorska lampica za temperaturu
F. Cev za paru
G. Kabl za napajanje
H. Skladište za kabl za napajanje
I. Bojler
J. Rezervoar za vodu
K. Poklopac rezervoara za vodu
L. Indikator maksimalnog nivoa vode
M. CARESSIUM™ keramička grejna ploča
N. Oslonac za peglu
O. Klizač za aktiviranje pare (AUTOMATSKA-RUČNA PARA)
P. Komandno dugme za nivo pare
Q. Indikatorska lampica nivoa pare
R. Lampica za napajanje
S. Dugme za podešavanje snage
T. Bezbednosni čep bojlera
U. Ravan ključ bojlera
V. Skladište za kabl za paru
W. Ručica za nošenje
TABELA PEGLANJA
| Materijal | Podešavanje temperature | Saveti za korišćenje pegle |
| Akril | ● | Peglajte na suvo sa obrnute strane |
| Acetat | ● | Peglajte na suvo sa obrnute strane dok je još vlažno ili koristite raspršivač za vlaženje. |
| Najlon i poliester | ● | Peglajte sa obrnute strane dok je još vlažno ili koristite raspršivač za vlaženje. |
| Rejon | ● | Peglajte sa obrnute strane tkanine. |
| Viskoza | ● | Uglavnom peglajte na suvo. Para se može koristiti uz pridržavanje uputstava proizvođača. |
| Svila | ● | Peglajte sa obrnute strane. Koristite krpu za peglanje da biste sprečili nastajanje sjajnih tragova. |
| Materijali od pamuka i mešanog prediva | ●● | Proverite podatke na etiketi i sledite uputstva proizvođača. Koristite podešavanje prema predivu koje zahteva najnižu vrednost. |
| Vuna i materijali od vune i mešanog prediva | ●● | Peglajte parom sa obrnute strane ili koristite krpu za peglanje. |
| Pamuk | ●●● | Peglajte na suvo dok je još vlažno ili koristite raspršivač za vlaženje. Koristite srednju do jaku paru. |
| Somot | ●●● | Peglajte parom sa obrnute strane ili koristite krpu za peglanje. |
| Lan | ●●●na “max” | Peglajte sa obrnute strane ili koristite krpu za peglanje da biste sprečili nastajanje sjajnih tragova, naročito kod tkanina tamnijih boja. Peglajte na suvo dok je još vlažno ili koristite raspršivač za vlaženje. Koristite srednju do jaku paru. |
| Džins | ●●●na “max” Koristite maksimalnu paru. | |
| Različita brzina peglanja i vlažnost tkanine mogu da prouzrokuju da se optimalni uslovi razlikuju od uslova preporučenih u tabelil | ||
POČETAK RADA
- Pre prve upotrebe. Uklonite sve lepljive ostatke i nežnim pokretima istrljajte peglu vlažnom krpom. Postavite peglu sa generatorom pare horizontalno na dasku za peglanje ili na sigurnu površinu otpornu na toplotu koja se nalazi na istoj visini kao i daska za peglanje. Odmotajte i ispravite kabl za napajanje i kabl za paru." Prilikom prvog uključivanju mogu da se pojave privremena isparavanja ili mirisi.
- Ótvorite poklopac rezervoara za vodu. Napunite rezervoar za vodu hladnom vodom. Preporučuje se korišćenje Electrolux AquaSense filtrirane vode iz koje su uklonjene nečistoće kao što je kamenac. U suprotnom, koristite destilovanu vodu ili mešavinu od 50% destilovane vode i 50% vode sa česme ako je voda sa česme naročito tvrda. Ispraznite sud sa vodom da biste isprali sve strane čestice koje su možda zaostale iz procesa proizvodnje.
- Uvek dopunjavajte rezervoar za vodu do nivoa MAX hladnom vodom (A). Vratite poklopac rezervoara za vodu. Oprez! Nikada nemojte da koristite uređaj ako nema vode u rezervoaru.
- Priključite peglu sa generatorom pare u mrežno napajanje. Okrenite dugme za podešavanje snage (A) u smeru kazaljke na satu do položaja MAX. Okrenite birač za temperaturu u smeru kretanja kazaljki na satu na maksimalno podešavanje (B).
UPUTSTVA ZA RUKOVANJE
natural_image
Color palette bar with grayscale shades and a central crosshair symbol (no text or labels)


natural_image
Color palette bar with grayscale shades and a central crosshair symbol (no text or labels)

www.electrolux.com/shop

Electrolux Appliances AB
St. Göransgatan 143
S-105 45 Stockholm
Sweden
Share more of our thinking at www.electrolux.com

Printed on recycled paper
3485EEDBS7146GFR02040315
CE

natural_image
Abstract geometric composition with two overlapping white circles on a gray background (no text or symbols)

- Thinking of you Electrolux
- WE'RE THINKING OF YOU
- Visit our website to:
- CUSTOMER CARE AND SERVICE
- Read the following instruction carefully before using machine for the first time.
- EN
- COMPONENTS
- GETTING STARTED
- OPERATING INSTRUCTIONS
- CLEANING
- Always store iron on its heel rest.
- DISPOSAL
- ÉLÉMENTS
- SACUVAJTE OVO UPUTSTVO.
- KOMPONENTE
- POČETAK RADA
- UPUTSTVA ZA RUKOVANJE
Brand : ELECTROLUX
Model : CompactPower EDBS7146GR
Category : Iron