USER MANUAL QuickSteam EDBS3340 ELECTROLUX
natural_image
Exterior view of a quick steam iron with digital display and control panel (no visible text or symbols)
GB INSTRUCTION BOOK
FR MODE D'EMPLOI
AR كتيب الإستخدم
BG БРОШУРА С ИНСТРУКЦИИ
cz NÁVOD K POUŽITÍ
natural_image
Exterior view of a quick vacuum cleaner (no text or symbols visible)

natural_image
Close-up of a kitchen vacuum cleaner with labeled parts (A and B), showing internal components and a directional arrow indicating motion (no text or symbols on the device itself)
natural_image
Close-up of a steam iron with a circular head and starburst pattern on the cover (no text or symbols visible)
natural_image
Illustration of two steam iron holders performing a hair ironing operation (no text or symbols)
natural_image
Illustration of a steam iron with an upward arrow indicating airflow or heat transfer (no text or symbols)
natural_image
Close-up of a white electric iron platter with control buttons and a cord, no visible text or symbols
natural_image
3D mechanical assembly diagram with a magnified inset showing internal components (no text or symbols)
natural_image
Exterior view of a quick steam iron with visible cord and power cord (no text or symbols)

natural_image
Close-up of a white steam iron with visible cord and strap, no text or symbols present
natural_image
Illustration of a steam cooker with control panel and air conditioner icons, showing internal components (no text or symbols)
natural_image
Exterior view of a quick vacuum steam iron (no text or symbols visible)
CONTENTS
| ENGLISH | 6 | SUOMI | 48 | PYCCKII 91 | |
| FRANÇAIS | 10 | HRVATSKI | 52 | SVENSKA | 96 |
| عربية | 15 | MAGYAR | 57 | SLOVENŠČINA | 100 |
| БЪЛГАРСКИ 19 | | ITALIANO | 62 | SLOVENČINA | 105 |
| ČEŠTINA | 24 | LIETUVIŠKAI | 67 | SRPSKI | 110 |
| DEUTSCH | 29 | LATVIEŠU | 72 | TŸRKÇE 115 | |
| DANSK | 34 | NORSK | 77 | УКРАÏНСЬКА 120 | |
| EESTI | 39 | POLSKI | 80 | | |
| فولى | | ROMÂNĂ | 86 | | |
WE'RE THINKING OF YOU
Thank you for purchasing an Electrolux appliance. You've chosen a product that brings with it decades of professional experience and innovation. Ingenious and stylish, it has been designed with you in mind. So whenever you use it, you can be safe in the knowledge that you'll get great results every time.
Welcome to Electrolux.
Visit our website to:

Get usage advice, brochures, trouble shooter, service information: www.electrolux.com

Register your product for better service: www.electrolux.com/productregistration

Buy accessories and consumables for your appliance: www.electrolux.com/shop
CUSTOMER CARE AND SERVICE
When contacting Service, ensure that you have the following data available:
- Model Number
- PNC number
- Serial number
The information can be found on the rating plate.
ENGLISH
Thank you for choosing an Electrolux product. In order to ensure the best results, always use original Electrolux accessories and spare parts. They have been designed especially for your product. This product is designed with the environment in mind. All plastic parts are marked for recycling purposes.
Dear Customer,
It may be possible that your steam station does not produce steam immediately after filling it with water for the first time or refilling the tank. The reason for this is that air trapped in the inner system can delay this function a few seconds. Please be patient and try it again by pressing the steam button. For your convenience the steam will appear after you release the steam button for a few seconds and it is not necessary to press the button all the time. Find out your rhythm for the best steaming result. Thank you for your kind attention and please enjoy your new steam station!
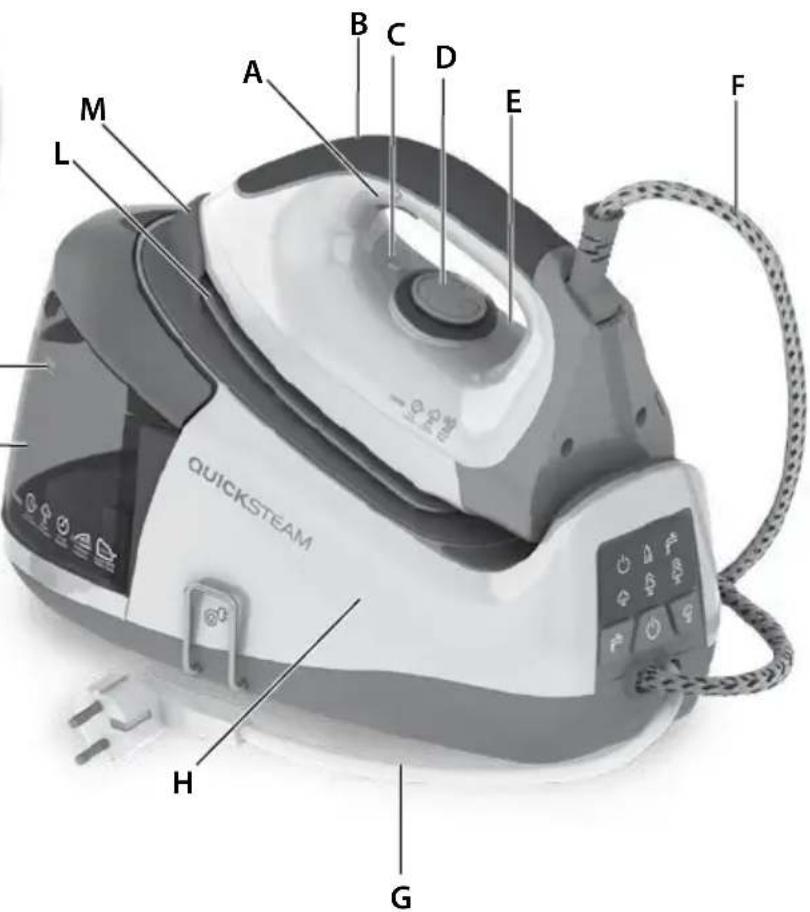
COMPONENTS
A. Steam button
B. Soft handle
C. Temperature alignment mark
D. Temperature selector
E. Temperature indicator light
F. Hot water pipe
G. Mains cable
H. Base unit
I. Anti-calc cartridge
J. Water tank
K. Maximum water level indicator
L. Stainless steel soleplate
M. Iron rest
N. Power indicator light
O. Descaling indicator light
P. Low level water indicator light
Q. Steam level indicator light (Low, Medium, High)
R. Refill reset button
S. Power button
T. Steam level control button
Picture page 2-3
GETTING STARTED
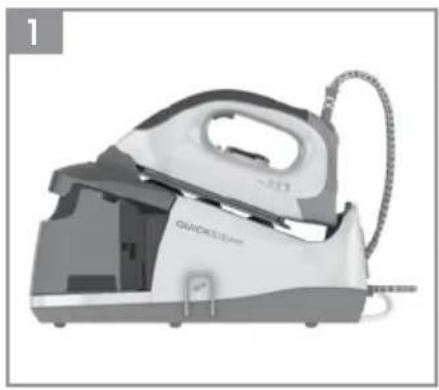
1 Before first Remove all adhesive remains and gently rub with a dampened cloth. Position the steam generator iron horizontally on the ironing-board or on a heat resistant, secure surface at the same height as an ironing-board. Unwind and straighten the power cord and the steam cord. When turned on for the first time, temporary vapours/odours may occur.
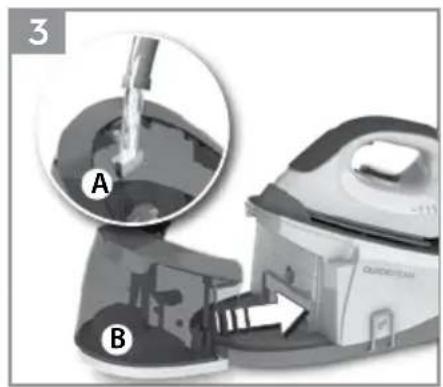
2 Remove the water tank by gripping the slot on the underside and pulling it gently away from the base unit. (A) Detach the anti-calc cartridge and then immerse it in water for more than one minute. (B) Insert the anti-calc cartridge back. Fill the water tank using cold water. It is recommended to use destilled water or a mix of 50% destilled, 50% tap water. Empty the water tank to rinse out any foreign particles which may remain from the manufacturing process.
3 Always refill the water tank to MAX level using cold water (A). Insert the water tank into the base unit (B). It is recommended to use destilled water or a mix of 50% destilled, 50% tap water. Ensure that the water tank latches securely into place.
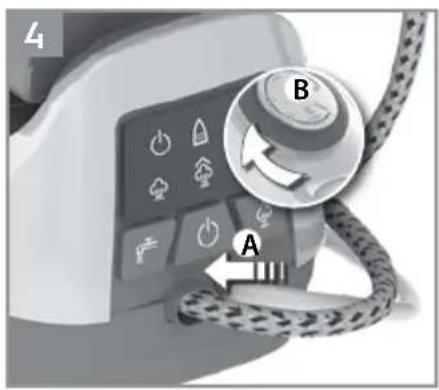
4 Connect the steam generator iron to the mains supply. Press the power button (A). Turn the temperature selector clockwise to maximum setting (B). The temperature indicator light on the iron will illuminate. Then, select a steam level on the control panel, from low - medium - high steam.
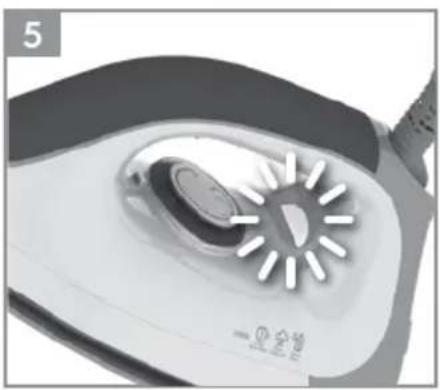
5 When the temperature indicator light turns on, the steam station is pre-heating. When the light turns off, it is ready to be used. Press and hold the steam button for about one minute to get steam. Then hold one more minute in order to clean the steam generating system.
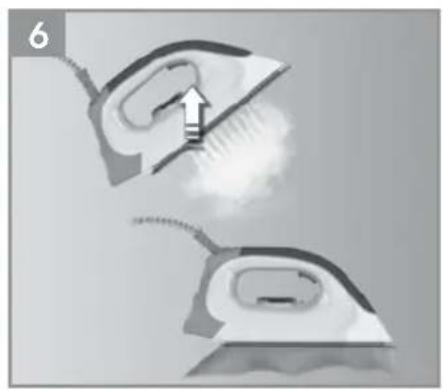
6 Iron an old towel, to ensure that any residues inside the iron are not transferred to the laundry. If necessary, wipe the sole plate with a slightly damp cloth.
OPERATING INSTRUCTIONS
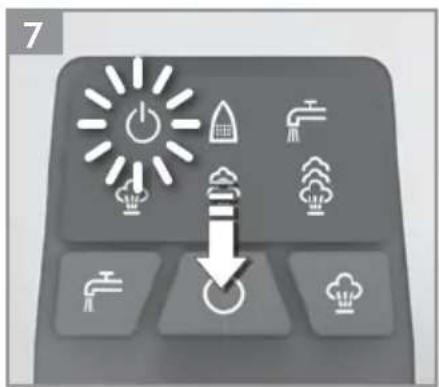
7 Connect the steam generator iron to the mains supply. Press the power button. When the power switch is pressed, the power indicator will illuminate. Wait for one to two minutes, until the steam lamp illuminates. Select the steam level between Low - Medium and High. See Ironing chart for ironing recommendation.
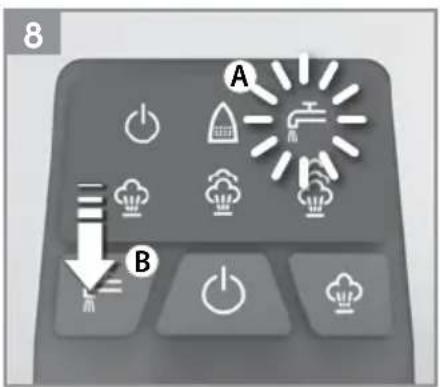
8 If the lower water level indicator is illuminated (A) (followed with two beep sounds), refill the water tank. After refilling the water tank, press the refill reset button (B). The refill reset button will be extinguished. Steam can now be used again.
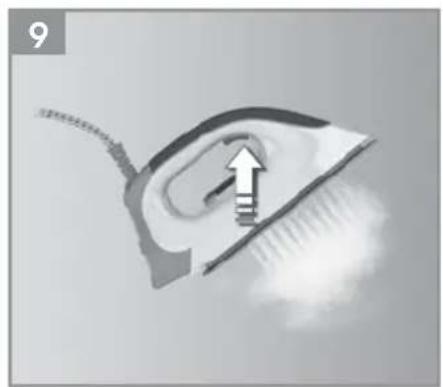
9 To activate the steam, press the steam button. When releasing the button, use up the steam before putting it back on the iron rest of the steam station.
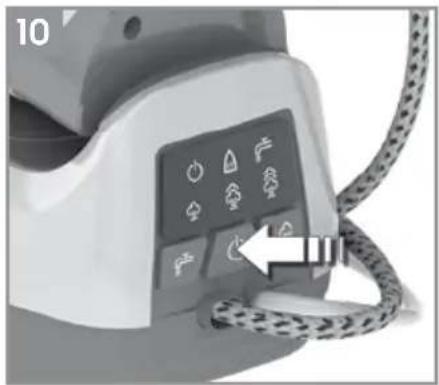
10 To turn off the iron by pressing the power button for a while, until a beep will sound. If the iron is left unattended on the iron rest, it turns automatically off after 10 minutes.
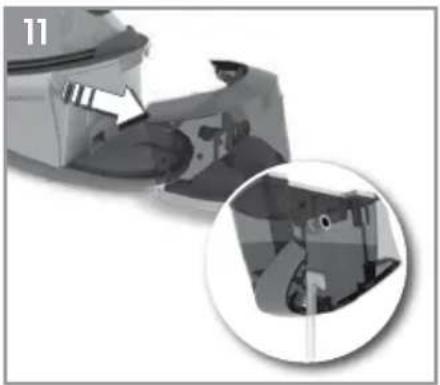
11 Always cool the iron fully on the iron rest before stowing away. Once the iron is cool, empty the water tank. Store the steam generator iron
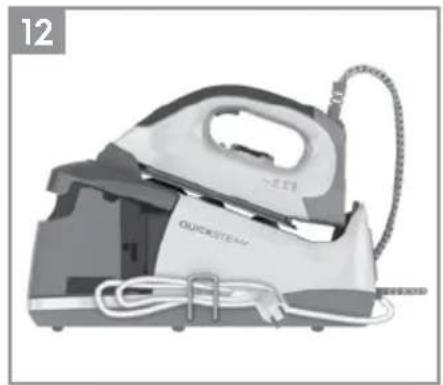
12 Always store the cord winded safely by the side of the iron. NEVER wind the power cord around the iron.
CLEANING (DO NOT USE ANY DETERGENT)
13 Always store the iron on its heel rest. To clean exterior surfaces, use a damp soft cloth and wipe dry. Caution: Do not use any chemical solvents, as these will damage the surface.
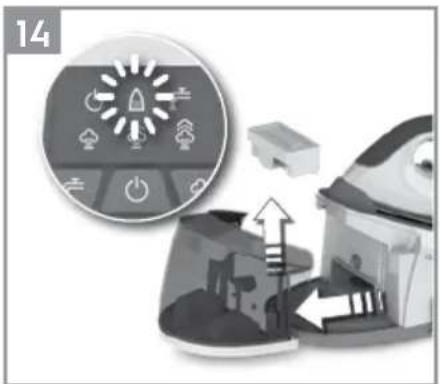
14 Replacing the de-calc box: If the descaling indicator is illuminated detach the water tank. Remove the de-calc box by pulling it upwards. Immerse a new de-calc box in water for more than one minute, then place it inside the water tank. Ensure the new de-calc box is correctly positioned, if not, the descaling indicator will keep flashing.
For the best performance we recommend cartridge from our range, reference number EDC06.
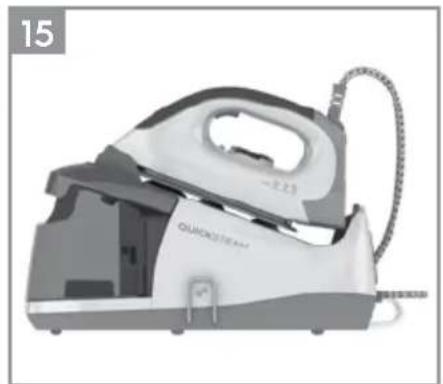
15 When finished using the appliance, turn the temperature dial to the OFF ("0") position. Store the iron on the iron rest. Note: Do not store the iron with water in the tank.
THERMOSAFE™ (\* CERTAIN MODELS ONLY)
16 Your appliance is equipped with ThermoSafe™ hot soleplate indicator which detects when the soleplate is hot by changing its colour from black to red. Once the temperature of the soleplate is < 40C^ , the colour changes back to black to show that the iron is ready to be stored away.
Enjoy your new Electrolux product!
SAFETY ADVICE
Read the following instruction carefully before using machine for the first time.
- This appliance can be used by children aged from 8 years and above and persons with reduced physical, sensory or mental capabilities or lack of experience and knowledge if they have been given supervision or instruction concerning use of the appliance in a safe way and understand the hazards involved.
• Children shall not play with the appliance.
- Cleaning and user maintenance shall not be made by children without supervision.
- Keep the iron and its cord out of reach of children less than 8 years of age when it is energized or cooling down.
• The surfaces are liable to get hot during use ⚠️.
- This product is appropriate for use with tap water. It is recommended to use distilled water or a mix of 50% destilled, 50% tap water.
- The appliance may only be connected to a power supply whose voltage and frequency comply with the specifications on the rating plate!
-
The iron is not to be used if it has been dropped, if there are visible signs of damage on the iron or its cord or if it is leaking.
-
The appliance must only be connected to an earthed socket. If necessary an extension cable suitable for 10 A can be used.
- If the appliance or the supply cord is damaged, it must be replaced by the manufacturer, its service agent or similarly qualified person, in order to avoid hazard.
- The iron must be used and rested on a stable surface. When placing the iron on its stand, ensure that the surface on which the stand is placed is stable.
- Never leave the appliance unattended while connected to the supply mains.
- The appliance must be switched off and the mains plug withdrawn each time after use, before cleaning and maintenance.
- The plug must be removed from the socket outlet before the water reservoir is filled with water.
- The mains cable must not come into contact with any hot parts of the appliance.
- Do not immerse the appliance in water or any other liquid.
- Do not exceed the maximum filling volume as indicated on the appliances.
- This appliance is intended for domestic use only. The manufacturer cannot accept any liability for possible damage caused by improper or incorrect use.
IRONING CHART
| FABRIC TEMPERATURE SETTING IRONING RECOMMENDATION | |
| Acrylic “nylon” Dry iron on the wrong side. | |
| Acetate “nylon” Dry iron on the wrong side while still damp or use spray to dampen. | |
| Nylon & Polyester “nylon” Iron on the wrong side while still damp or use spray to dampen. | |
| Rayon “nylon” Iron on the wrong side of fabric. | |
| Viscose “nylon” Mainly dry iron. Steam can be used under manufacturer’s instructions. | |
| Silk | ● Iron on the wrong side. Use an ironing cloth to prevent shine marks. | |
| Cotton blends | ● Check the label and follow the manufacturer’s instructions. Use setting for the fibre requiring lowest setting. | |
| Wool & Wool blends | ● Steam iron on the wrong side or use ironing cloth. | |
| Cotton | ●●● | Dry iron while still damp or use spray to dampen. Use steam medium to high. |
| Corduroy | ●●● | Steam iron on the wrong side or use ironing cloth. |
| Linen | ●●● to “MAX” | Iron on the wrong side or use ironing cloth to prevent shine marks, especially with dark colours. Dry iron while still damp or use spray to dampen. Use steam medium to high. |
| Denim to "MAX" Use maximum steam. | |
| Varied ironing speed and fabric dampness might cause optimal setting to differ from that recommended in the table! |
TROUBLESHOOTING
| PROBLEM POSSIBLE CAUSE SOLUTION | | |
| Soleplate is not heating even though iron is turned on. | Connection problem Check main power supply cable, plug and outlet. |
| Temperature control is in MIN position. | Select adequate temperature. |
| Iron does not produce steam. Not enough water in tank. Fill water tank (see "Getting started", no 2). |
| Steam control is selected in non-steam position. | Set steam control between positions of minimum steam and maximum steam (see "Ironing chart"). |
| Selected temperature is lower than that specified to use with steam. | Increase temperature to at least ● ●. |
| Steam jet and vertical steam jet function does not work. | Steam jet function was used very frequently within a short period. | Put iron on horizontal position and wait before using steam jet function. |
| Iron is not hot enough. | Adjust the proper temperature to steam ironing (up to ● ● Put iron in vertical position and wait until temperature indicator light turns off. |
| Water leaks from the soleplate during ironing. | The iron is not hot enough. | Set the temperature dial to a temperature (● ●to maximum) suitable for steam ironing. Put the iron on its heel and wait until the light has gone out before you start ironing. |
| Flakes and impurities come out of the soleplate during ironing. | You have used hard water, which has caused scale flakes to develop in the water tank. | Press and hold the steam button for about one minute to get steam. Then hold one more minute in order to clean the steam generating system. Iron an old towel, to ensure that any residues inside the iron are not transferred to the laundry. |
| Water leaks from the soleplate while the iron is cooling down or after it has been stored. | The iron has been put in horizontal position while there is still water in the water tank. | Empty the water tank and set the steam control to position off before storing the iron. |
| Brown streaks come out of the soleplate while ironing and stain the linen. | You have used chemical descaling agents. | Do not use any descaling agents. |
| Fabric fibres have accumulated in the holes of the soleplate and are burning. | Clean the soleplate with a damp soft cloth. |
| Fabrics might not be properly rinsed or the garments are new and have not been washed before ironing. | Please rinse the laundry properly again. |
DISPOSAL

This symbol on the product indicates that this product contains a battery which shall not be disposed with normal household waste.

This symbol on the product or on its packaging indicates that the product may not be treated as household waste. To recycle your product, please take it to an official collection point or to an Electrolux service center that can remove and recycle the battery and electric parts in a safe and professional way. Follow your country's rules for the separate collection of electrical products and rechargeable batteries.
Electrolux reserves the right to change products, information and specifications without notice.
FRANÇAIS
Cher/Chère client(e),

Q. Indikator for dampniveau (Low (Lav), Medium (Middel), High (Høj))
R. Reset knap for påfyldning
S. Tænd/sluk knap
T. Kontrolknap for dampniveau
Billede side 2-3
SÅDAN KOMMER DU I GANG
1
THERMOSAFE™ (\* SOLO PER ALCUNI MODELLI)
natural_image
Abstract geometric design with white circular and petal-like shapes on black background (no text or symbols)
3485 E EDBS3350/60/70 02 01 0118
Share more of our thinking at www.electrolux.com
electrolux.com/shop Electrolux Floor Care AB