IceWind - Air Conditioning Klarstein - Free user manual and instructions
Find the device manual for free IceWind Klarstein in PDF.
| Product type | Air cooler (evaporative air conditioning) |
| Brand | Klarstein |
| Model | IceWind |
| Power supply | 220-240 V ~ 50-60 Hz |
| Power consumption | 75 W |
| Water tank | Removable, with level indicator (MIN/MAX) |
| Ice tray | 2 ice trays included, for cooling up to 3 °C |
| Speeds | 3 levels: low, medium, high |
| Ventilation modes | Normal, strong, weak |
| Oscillation | Automatic horizontal |
| Timer | Adjustable auto-off up to 12 hours |
| Anion generator | Yes, to purify the air |
| Remote control | Yes, max range 6 m, batteries not included |
| Casters | 4 casters, 2 with brake |
| Air filter | Washable, removable |
| Cooling pad | Removable and washable wet foam |
| Maintenance | Clean filter and foam with neutral detergent; change water every 3 days |
| Safety | Auto shut-off when water level is low (indicator light); protection against excessive humidity |
| Usage | Indoor only, on stable horizontal surface |
| Weight | Approx. 6 kg (estimated) |
| Dimensions (approx.) | 30 x 30 x 80 cm (estimated) |
Frequently Asked Questions - IceWind Klarstein
User questions about IceWind Klarstein
0 question about this device. Answer the ones you know or ask your own.
Ask a new question about this device
Download the instructions for your Air Conditioning in PDF format for free! Find your manual IceWind - Klarstein and take your electronic device back in hand. On this page are published all the documents necessary for the use of your device. IceWind by Klarstein.
USER MANUAL IceWind Klarstein
text_image
QR code image containing encoded data, no visible human-readable textINHALTSVERZEICHNIS
Berlin Brands Group UK Ltd
PO Box 1145
Oxford, OX1 9UW
United Kingdom
SICHERHEITSHINWEISE
text_image
Exploded diagram of air conditioner components with numbered parts for identificationnatural_image
Symbol of a trash bin crossed with a diagonal line, no text or numbers presentMember of Berlin Brands Group
Handwerkerstr. 11
15366 Dahlwitz-Hoppegarten
Deutschland
Congratulations on purchasing this device. Please read the following instructions carefully and follow them to prevent possible damages. We assume no liability for damage caused by disregard of the instructions and improper use. Scan the QR code to get access to the latest user manual and more product information.

text_image
QR code image containing encoded data, no visible human-readable textCONTENTS
Safety Instructions 14
Product description 15
Installation 16
Start-up and Operation 17
Cleaning and Care 18
Troubleshooting 20
Disposal Considerations 20
TECHNICAL DATA
| Item number 10033496 | |
| Power supply 220-240 V ~ 50-60 Hz | |
| Power consumption 75 W |
MANUFACTURER & IMPORTER (UK)
Manufacturer:
Chal-Tec GmbH, Wallstrasse 16, 10179 Berlin, Germany.
Importer for Great Britain:
Berlin Brands Group UK Ltd
PO Box 1145
Oxford, OX1 9UW
United Kingdom
SAFETY INSTRUCTIONS
- Connect to a main power supplier of 220-240V\~50-60 Hz only.
- Keep the appliance and cable away from sources of heat, sharp objects or anything that may cause damage.
- Do not place the cord under carpets. Do not cover the cord with small clothes, shirts or other similar elements. Place the cord away from traffic areas in order to avoid any risk of tripping over.
- Do not operate the appliance if the cable or plug damaged.
- If the supply cord is damaged, it must be replaced by the manufacturer, its service agent or similarly qualified persons in order to avoid a hazard.
- Indoor use only.
- Do not cover the machine during using.
• Always operate on a stable flat horizontal surface. - Ensure the appliance is switched OFF before connecting to the mains power supply.
- Always ensure that hands are dry before operating or adjusting any switch on the product or touching the plug and mains supply connections.
- Do not leave this appliance unattended when it's in use. Turn off and disconnect the appliance when you leave the room for an extended period.
- Switch off the appliance and unplug from the mains socket when not in use, before filling, cleaning or other maintain.
- To disconnect the appliance, switch it "OFF", and then remove the plug from outlet. Do not pull the cord to disconnect the plug.
- This appliance can be used by children aged from 8 years and above and persons with reduced physical, sensory or mental capabilities or lack of experience and knowledge if they have been given supervision or instruction concerning use of the appliance in a safe way and understand the hazards involved. Children shall not play with the appliance.
- Cleaning and user maintenance shall not be made by children without supervision.
- Use the appliance only as described in this manual.
- Do not insert your fingers in the openings of the guard.
- Do not leave hair, tissue, tablecloths, clothes or curtains near all openings of the fan, they could be sucked into the fan and be taken within the internal moving parts that could cause injury or damage.
- Do not use the appliance in wet or damp locations such as bathrooms.
- Do not operate the appliance when it's not mounted on its wheels or if it's lying on the side.
• Make sure the cord is completely extended before use. -
Place the appliance on a flat horizontal surface. It must not be at an incline during use.
-
When in operation, evaporative coolers moisturize the ambient air. Over-humidification of residential rooms should be avoided. Recommendation: 40 – 50 % relative humidity. (Excessive humidity of the air can damage the home and cause health problems.)
- The appliance may only be set up on water- and moisture-proof flooring materials (spilling some drops of water is unavoidable when the content of the tank is changed).
- With each and every change of tank content, completely remove residual water from the equipment. To prevent nucleation, remove residual water from the equipment and water tank every time after three days of use.
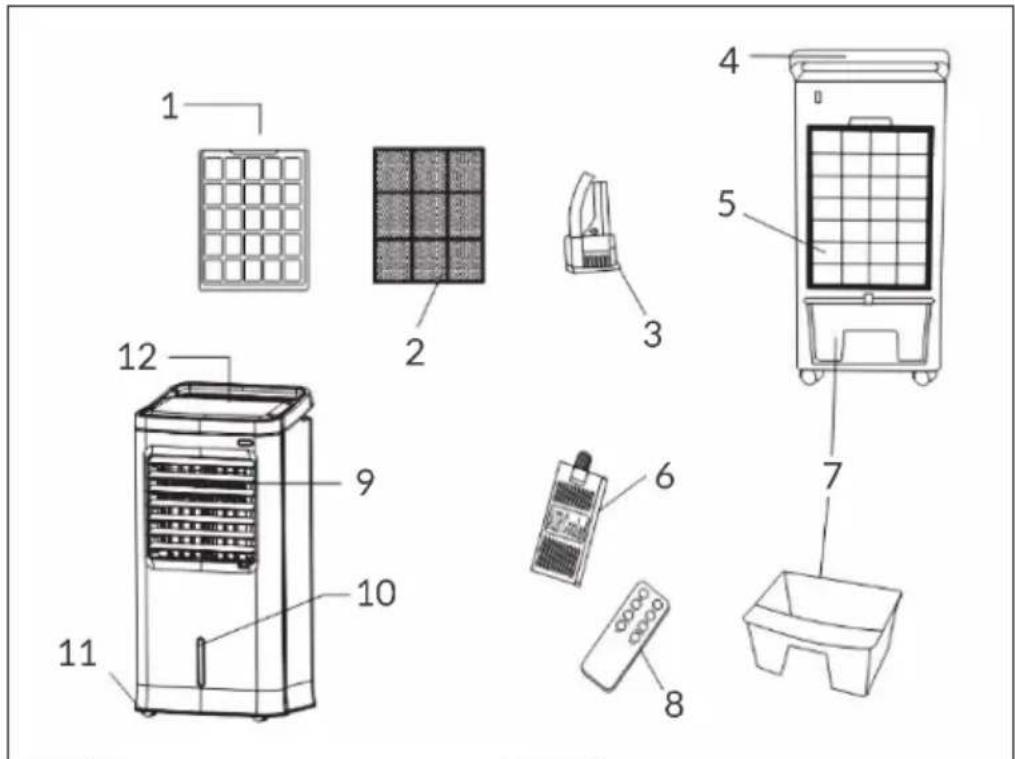
PRODUCT DESCRIPTION
text_image
Exploded diagram of air conditioner components with numbered parts for identification| 1 | Filter net | 7 | Water tank |
| 2 | Cooling pad | 8 | Remote control |
| 3 | Water pump | 9 | Air vent |
| 4 | Handle | 10 | Water level indicator |
| 5 | Back | 11 | Castors |
| 6 | Ice box | 12 | Control panel |
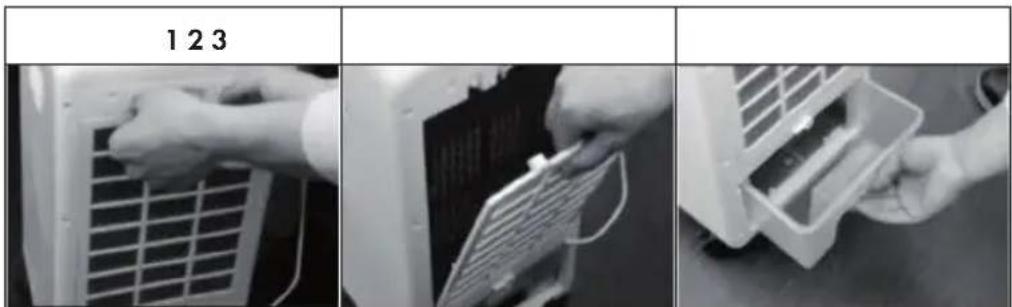
INSTALLATION
Assembling the castors
Put the appliance on a flat surface, take out the wrench from foam box, then assemble the castors.
Note: The back castors are with brake, but the front ones are without (see map 1).
Filling the water tank
- Draw out half of the water tank, then add water (see map 2).
• Pay attention to the level of water tank when add water.(map 3) - The level of water tank should not over "MAX" scale at any time, when humidifying, the total level of water tank should not below "MIN" scale.
- Put ice or frozen ice crystal box to the water tank if you want to strengthen the efficiency of cooling. But the total level of water tank should not over "MAX" scale.

text_image
1 2 3 brake no brake MAX MINSTART-UP AND OPERATION
Switching on/off
When the power plug of the unit is plugged into the wall outlet, the unit enters standby mode and a beeping sound is heard. Press the On/Off button to turn on the unit.
Speed adjustment
Press the Speed button to start the air conditioner. If you press this button several times, the speed changes from low to medium to high.
Mode
Press the Mode button to set the wind mode. You can choose between „normal“ „natural“ and „sleep“ wind. When „normal wind“ is selected, there is no indicator light, the other two modes have a corresponding indicator light.
Swing
When you press the Swing button, the air outlet automatically swings horizontally and the corresponding indicator light is on. You can stop this function by pressing the button again. If you want to change the lateral direction of the wind, you can adjust the air vents manually.
Anions
When you press the Anion button, the anion generator is activated. The corresponding indicator light will illuminate. Press the button again to deactivate the function.
Timer
The Timer button can be used to set the time until the unit switches off automatically. Press each time to add one hour. A maximum of 12 hours can be set.
Cooling / Humidifying
If you press the Cool/Humidify button, the air from the air outlet can be reduced by 3 °C within a few minutes if there is ice in the ice container. You can end this function by pressing this button again.
Using the Remote Control
- If you insert 2 batteries into the battery compartment of the remote control, it can be used.
- The remote control has the same functions as the control panel.
- Point the remote control toward the receiver of the unit. The maximum distance to the unit is 6 meters.
- Keep the remote control in a safe place when not in use.
- Do not mix old and new batteries.
- Remove the batteries from the remote control if you will not be using it for an extended period of time.
Using the ice container
The ice container has a special cooling function. It can absorb heat and reduce the water temperature to a temperature below the ambient temperature.
Methods of use:
- Place the ice container in the freezer compartment to ensure that it is completely frozen.
2 Pull out the water tank and place the ice container in it. - Two ice containers are included so that they can be used permanently alternately.
CLEANING AND CARE
Note: Ensure that the fan is switched off from the supply mains before removing the air filter screen.
text_image
1 2 3 123Clean the air filter screen
(map 1)
- Cut off the power supply, pull the handle of air filter screen, remove it from appliance.
- Clean the air filter screen with neutral detergent and banister brush, then clean it with clear water.
• Finally, reinstall to the appliance.
Clean the wetted pad
(map 2)
- Cut off the power supply, take down the air filter screen, then draw the wetted pad from support.
- Clean the wetted pad with neutral detergent and banister brush, then clean it with clear water.
• Finally, reinstall to the appliance.
Note: The wetted pad must be installed horizontally, in order to aviod leaking.
Clean the water tank
(map 3)
- Cut off the power supply.
- Take out half of the water tank, clean it with neutral detergent, and wash it with clear water.
- Then reinstall to the appliance.
Clean the shell
- Cut off the power supply when clean the appliance, as there have a high pressure in the body.
- Clean with neutral detergent and soft cloth.
Note: Do not leave any water on the surface of control panel.
TROUBLESHOOTING
| Problem Possible cause Suggested solution | ||
| The device does not work. | The unit is switched off or the remote control is too far away from the unit. | Plug the power plug into the wall outlet and approach the remote control to the unit. |
| You have forgotten to press the On/Off button on the control panel. | Press the On/Off button on the control panel. | |
| The air cleaning effect is poor. | The air filter cover is blocked by dust. | Clean the air filter cover. |
| The air inlet is blocked by a foreign object. | Remove the foreign object from the air inlet. | |
DISPOSAL CONSIDERATIONS
natural_image
Symbol of a trash bin crossed with a diagonal line, no text or numbers presentIf there is a legal regulation for the disposal of electrical and electronic devices in your country, this symbol on the product or on the packaging indicates that this product must not be disposed of with household waste. Instead, it must be taken to a collection point for the recycling of electrical and electronic equipment. By disposing of it in accordance with the rules, you are protecting the environment and the health of your fellow human beings from negative consequences. For information about the recycling and disposal of this product, please contact your local authority or your household waste disposal service.
This product contains batteries. If there is a legal regulation for the disposal of batteries in your country, the batteries must not be disposed of with household waste. Find out about local regulations for disposing of batteries. By disposing of them in accordance with the rules, you are protecting the environment and the health of your fellow human beings from negative consequences.
Estimado cliente:
text_image
QR code image containing encoded data, no visible human-readable textÍNDICE DE CONTENIDOS
Berlin Brands Group UK Ltd
PO Box 1145
Oxford, OX1 9UW
United Kingdom
text_image
Exploded diagram of air conditioner components with numbered parts for identificationnatural_image
Symbol of a trash bin crossed with a diagonal line, no text or numbers presenttext_image
QR code image containing encoded data, no visible human-readable textSOMMAIRE
Berlin Brands Group UK Ltd
PO Box 1145
Oxford, OX1 9UW
United Kingdom
CONSIGNES DE SÉCURITÉ
text_image
Exploded diagram of air conditioner components with numbered parts for identificationnatural_image
Symbol of a trash bin crossed with a diagonal line, no text or numbers presenttext_image
QR code image containing encoded data, no visible human-readable textINDICE
PRODUTTORE E IMPORTATORE (UK)
Produttore:
Chal-Tec GmbH, Wallstraße 16, 10179 Berlino, Germania.
Berlin Brands Group UK Ltd
PO Box 1145
Oxford, OX1 9UW
United Kingdom
AVVERTENZE DI SICUREZZA
natural_image
Symbol of a trash bin crossed with a diagonal line, no text or numbers presenttext_image
QR code image containing encoded data, no visible human-readable textINHOUDSOPGAVE
Unit 6 Riverside Business Centre
Brighton Road
Shoreham-by-Sea
BN43 6RE
Verenigd Koninkrijk
VEILIGHEIDSINSTRUCTIES
text_image
Exploded diagram of air conditioner components with numbered parts for identification| 1 | Filternet | 7 | Watertank |
| 2 | Coolpad | 8 | Afstandsbediening |
| 3 | Waterpomp | 9 | Ventilatiesleuven |
| 4 | Handvat | 10 | Waterstandindicator |
| 5 | Achterkant | 11 | Wieltjes |
| 6 | IJsemmer | 12 | Controlepaneel |
INSTALLATIE
INSTRUCTIES VOOR AFVOER