
VL 1138 CB - Fan BOMANN - Free user manual and instructions
Find the device manual for free VL 1138 CB BOMANN in PDF.

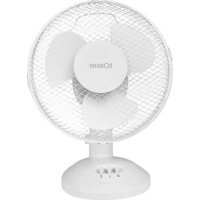
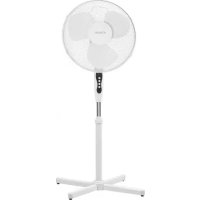
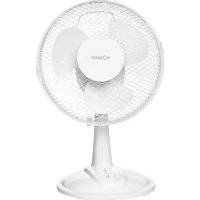
| Product type | Stand fan |
| Brand | Bomann |
| Model | VL 1138 CB |
| Power supply | 220-240 V~, 50/60 Hz |
| Power consumption | 40 W |
| Protection class | II |
| Net weight | Approx. 1.60 kg |
| Number of speeds | 3 |
| Available speeds | Low (1), Medium (2), High (3) |
| Oscillation function | Yes, with push button |
| Oscillation angle | 90 degrees |
| Adjustable tilt angle | Up to 30 degrees |
| Protective grille | Front and rear, removable for cleaning |
| Assembly required | Yes, tool required: Phillips screwdriver |
| Cleaning | Dry or slightly damp cloth, no abrasives |
| Use by children | From 8 years under supervision |
Frequently Asked Questions - VL 1138 CB BOMANN
User questions about VL 1138 CB BOMANN
0 question about this device. Answer the ones you know or ask your own.
Ask a new question about this device
Download the instructions for your Fan in PDF format for free! Find your manual VL 1138 CB - BOMANN and take your electronic device back in hand. On this page are published all the documents necessary for the use of your device. VL 1138 CB by BOMANN.
USER MANUAL VL 1138 CB BOMANN
Thank you for choosing our product. We hope you enjoy using the appliance.
Symbols in these Instructions for Use
Important information for your safety is specially marked. It is essential to comply with these instructions in order to avoid accidents and prevent damage to the machine:
WARNING:
This warns you of dangers to your health and indicates possible injury risks.
CAUTION:
This refers to possible hazards to the machine or other objects.
NOTE: This highlights tips and information.
General Notes
Read the operating instructions carefully before putting the appliance into operation and keep the instructions including the warranty, the receipt and, if possible, the box with the internal packing. If you give this device to other people, please also pass on the operating instructions.
- The appliance is designed exclusively for private use and for the envisaged purpose. This appliance is not fit for commercial use.
- Do not use it outdoors. Keep it away from sources of heat, direct sunlight, humidity (never dip it into any liquid) and sharp edges. Do not use the appliance with wet hands. If the appliance is humid or wet, unplug it immediately.
- When cleaning or putting it away, switch off the appliance and always pull out the plug from the socket (pull the plug itself, not the lead) if the appliance is not being used and remove the attached accessories.
- Do not operate the machine without supervision. If you leave the room you should always turn the device off. Remove the plug from the socket.
- The device and the mains lead have to be checked regularly for signs of damage. If damage is found the device must not be used.
- Use only original spare parts.
- In order to ensure your children's safety, please keep all packaging (plastic bags, boxes, polystyrene etc.) out of their reach.
WARNING!
Do not allow small children to play with the foil. There is a danger of suffocation!
Special safety instructions
- Never stick fingers or other objects through the protection grid.
- Watch out for long hair! It can be caught in the fan owing to the air turbulence!
- Use the appliance only with the protection grids on!
- If you need to remove the fan guard, first switch off the appliance and disconnect the mains plug.
- Select a stable base to avoid the tipping of the fan during use!
- Do not place the device immediately next to stoves or other sources of heat.
-
Do not try to repair the appliance on your own. Always contact an authorized technician. To avoid the exposure to danger, always have a faulty cable be replaced only by the manufacturer, by our customer service or by a qualified person and with a cable of the same type.
-
This appliance can be used by children aged from 8 years and above and persons with reduced physical, sensory or mental capabilities or lack of experience and knowledge if they have been given supervision or instruction concerning use of the appliance in a safe way and understand the hazards involved.
Children shall not play with the appliance. - Cleaning and user maintenance shall not be made by children without supervision.
- Do not immerse the device into water for cleaning. Please follow the instructions as stipulated in the chapter "Cleaning".
Overview of the Components
1 Hook
2 Propeller
3 Motor shaft
4 Motor
5 Adjustment knob for oscillation
6 Switch housing
7 Operating mode switch
8 Base
9 Rear protection grid
10 Fastening nut
11 Attachment ring for rear protection grid
12 Fastening screw
13 Fastening screw
14 Front protection grid
Not shown: crosshead screw
Unpacking the Device
- Remove the device from its packaging.
- Remove all of the packaging material such as foils, filling material, cable holders and cardboard packaging.
- Check the scope of delivery.
- Check the appliance for any transport damage to prevent a hazard.
NOTE:
There may still be dust or production residues on the surface of the device. We recommend that you quickly wipe off the housing with a damp cloth.
Assembly instructions
The device must be completely assembled before initial operation!
NOTE:
- You will need a Phillips screwdriver of medium size for the assembly.
- Screws not included with the accessories are pre-fitted on the individual parts.
-
Also observe the "Overview of the Components" on page 3.
-
Place the stand tube (6) in the base (8). Attach it on the bottom with the crosshead screw (Not shown).
- Unscrew the mounting ring (11) in an anticlockwise direction. Keep it ready to hand.
- Position the rear protection grid (9) in place in accordance with the recesses.
NC
Please ensure that the carrying handle is facing upwards.
- Turn the attachment ring (11) for the rear protection grid (9) slightly in a clockwise direction.
- Attach the propeller. Note the position of the guide pin on the motor shaft.
- Tighten the attachment screw (12) for the propeller in an anticlockwise direction.
- Remove the preassembled fastening screw (13) and nut (10) from the wire mesh guard. Keep it ready to hand.
- Hang the front protective guard (14) to the rear protective guard with the hook (1).
i NC
Ensure that the holes for the attachment screw in the front and rear protective grille are aligned one above the other.
- Secure the wire mesh guard with the fastening screw (13) and nut (10).
- Close the attachment hooks.
Position
The ideal position is a non-slip, flat surface.
Putting into Service
Electrical Connection
- Before inserting the plug into the socket. Make sure that the mains voltage to be used matches that of the device. You can find this information on the nameplate.
- Connect the device to a duly installed protective contact socket.
Use
Basic Settings
Set the blower inclination angle before starting the device.
- Hold the motor housing with both hands and tilt it carefully to the desired position. It clicks audibly into place.

CAUTION:
The tilting angle is about 30 degrees.
Operation
To select the speed, use the pressure switch on the front:
0 off
1 slow
2 medium
3 fast
To shut off the device, select the position 0.
Fan setting
You have two options:
Stationary
- Shut off the device.
- Pull the control knob upwards.
- Use the carrying handle to place the device into the desired position.
- Oscillating
- Shut off the device.
- Press the control knob.
NOTE:
The device rotates automatically in the range of about 90 degrees.
- To turn off the function, shut off the device and pull the control knob upwards.
Cleaning

WARNING:
- Always remove the mains plug before cleaning the device.
- If you need to remove the safety guard: Always switch the device off and remove the mains plug.
- Under no circumstances should you immerse the device in water for cleaning purposes. Otherwise this might result in an electric shock or fire.

CAUTION:
- Do not use a wire brush or any abrasive items.
-
Do not use any acidic or abrasive detergents.
-
Clean the outside of the device with a dry cloth without any additives.
- If the device is very dirty wet a cloth with water and then wipe the device dry once you have finished.
Maintenance and storage
- Clean the appliance as described.
We recommend that the appliance is kept in its original packaging if you do not intend to use it for long periods.
Always store the appliance out of the reach of children, in a well-ventilated and dry place. Noise development
Noise development
The workplace-related emission value is less than 70 dB(A).
Technical Data
Model: VL 1138 CB
Power supply: 220-240 V~, 50/60 Hz
Power consumption: 40 W
Protection class:
Net weight: approx. 1.60 kg
The right to make technical and design modifications in the course of continuous product development remains reserved.
This device has been tested according to all relevant current CE guidelines, such as electromagnetic compatibility and low voltage directives, and has been constructed in accordance with the latest safety regulations.
Disposal
Meaning of the "Dustbin" Symbol
Protect our environment: do not dispose of electrical equipment in the domestic waste.
Please return any electrical equipment that you will no longer use to the collection points provided for their disposal.
This helps avoid the potential effects of incorrect disposal on the environment and human health.
This will contribute to the recycling and other forms of reutilisation of electrical and electronic equipment.
Information concerning where the equipment can be disposed of can be obtained from your local authority.
Instrukcja obstugi
CTC Clatronic Sp. 20.0
Po3TaUyBaHHOprAHIBKepyBaHH
1 RaK
2 Pponenep
3 Bān MoTopsy
4BnH
5 PerynIOBaIbHa KOnKa 0yHKuKoINBaHHB EHTINrTopy
6 Kopnyc Bvmnkaa.
7 Pepemkaqu peximib npaui
8 CToRk
9 3aHa 3anobixha pewiTka
10 KpinnbHa raika
11 KpinnbHe KJIbue dIe 3aHbO IaNo6jXHO peWITKN
12 KpinnbHn TbHNT
13 KpinnnBnH TBNH
14 Pepedn3aio6kha pewiTka
Be3 pncyKky: TbHHT 3xXpeCTOBIM WlIiOM
PoznakyBaHH npJnay
1.ДоctаньтпрладуракOBК.
2. YcyHbTe Bcni NaKyBaIbHi MaTepiAni RaN PnIbKn, MaTepiAni3aNoBHIOBaHi, Ka6eJIbHi CkOBo Ta KapTOHHy ynaKOBky.
3. IpepebiTe KOMNIeKTHiCtB.
4.OrnHbTe npinad Ha npedMet NOUKOJxHe, 10 MoTIN 3'BAITNcR NiD Yac TpaHCnOpTyBaHH, UoB BNIIOHTN He6e3NeKy.
IIPIMITKA.
Ha npnnaMy MoKyTB 6yTN nIN a60 BnpoB6HnHi 3aIIuKIn. PekomeHdaiaBHTupatN KOpNc 3BOnOKeHO raHhipKOIO.
Bka3iBkn 3i cKnaaHn
Ipeed noatkom eknnnyatauipnlaad cnid nobHCIO cKnaCTI
IIPIMITKA.
- 3BOPOTHO-NOBOPTHM pyx
- BmKhHtB npnla.
2.Пупинштб руну Керувань.

TIPMIMITA.
PpnaI aBToMaTnHNo NOBepTaεTbCay MeKax PpN6n3Ho 90 rpaJyciB.
- Ⅲo6 BvMKNHyTn daHy cyHKIIO, BmMKHiTb npnnai i BNTaHIb pyKc KepyBaHHaDOrOpN.
OuHneHHa

PONEPEIXEHHI.
- Пераючишени m i Textичим обслуroyыням 3aBXДN BNTЯHITb BnIky 3 pO3eTkn.
KoII Bn yCyBaTe 3anobixkHy pewiTky: 3aBxdn BmNkaIte npiJa i BntraHITb BNkY 3 pO3eTKn.
Bxodomy pa3i He onyckaIte npnilad IJRA OUYeHNBA B Body. Lc MoXe npNBe3TN Do ydApY cTpyMOM a6o Do nOjExn.

yBAGA.
He BnKOpncToBMyTe DpoTaeHOi 1uTKn a6o IHux abpa3NB-Hnx npedmetib.
He BnKOpncToBnyTe roctpnx a6o abpa3nBnX 3ac06iB DnA OUYIeHHJ.
BNTnpaTe npnlaD 33OBHi cyXIOI rAnHIpKOIO,6e3 IOnaTkoBHX 3ac06IB.
- PnCinbHlOMy 3acMieHHI MOXHa 3JERKa 3BONOKTN raHcy.
Dorla i 36epiranHH
- UHCTbIe npHJIa IbiIOBiHO OHNCy.
- IIPOTROM IOBROI IPIOMIXKU yacy,III qac koro IIpHuaI He BHKOPHCOTOBYcTBcA,peKOMeHIOBaHO 36epiratN HOrO B opHiraHbHi ynaKOBuI.
3abKnn 36epiraTre npHn y cyxomy Micui, HeoctyTHOMy nIirTei, kne do6pe npOBitpOeTbCra.
TexhiHnnapaMeTpN
MoIeIb: VL 1138 CB
Подань.. 220-240 B\~,50/60 T
CIOXIBAHHNIOTyKHOCTi: 40 Br
Tpya eektpo63neuhoctri:
Bara HrTo: ..npr6J. 1,60 K
IpaBO HaTexHHi 3MINH Ta 3MINH y dN3aHHi 36epiraCTbcra IpoD0Bk npOuecy po3pO6Kn npOyKty.
Ie npctpi ceptiikOBaHO BiIOBIDHO Do iIOHx HOpM PC,HaipnKlaH Hopm eIEKTPomarHITHOI cymicHOCTI i H3bKOi HanpyTH, i CKOHCTpyIOBAHO BiIOBIDHO IO OCTAHIX XapaKTepHCTNK 13TexhIK6e3neKN.
PykoBoCTBO no 3Kcnnyatau
Cnacn6o 3a Bb6op Haewero npOykTa. Hadeemc, Bam noHpaBntc3KcnIpyaTnpOBaT yCTpoNCTBO.
Cnmbonbl npmeHemble B daHHOM pyKOBOCTBE noJIb-3OBaTeIa
BaxhIe peKOMHeaunn nIy o6ecneueHnaBaue 630NaHOCHTn 6o3Haehb IIO OcObeHHOMy. O63aTeJIbHO CNeYiTe 3TNM peKOMHeaunm, YTO6bl PpeOTbpaTNTb HeCHACTHbI CNyau nnI NIOJOMKy H3dJIIN:
PENPYNPEXEHENE:
PpeDynpexkdaet o6 onaCHOCTn dIra 3doPOBbI IN BO3MOXHOM pncke nOlyeHn TpaBMbl.
BHIMAHHE:
Yka3bIbaeHa BO3MOKHyIO ONaCHOCTb IJI N3dEINN IN dpynx OKpyKaIOUx INpeDMETOB.
PnoIroTobKa npnbopa Ka pa6oTe
TIOKJIIOUeHHe K 3JIeKTPoCetTu
- PapeI TEM KAK BCTABNTB BNTKY B PO3ETKY, y6eIITecb B TOM, YTO HApRKeHne CETN COOTBeTCTByeT HApRKeHnO pa60tI np6opa. INHOpMaUHIO K 3TOMy HaxoJITcRA Ha TINIOBOI Ta6NIuKe np6opa.
BknHHTe np6Op B 3a3emHeHHyIO po3ETky, yCTaHOBnEHHyIO B COOTBeTCTBm C npEINcAHHaMn.
PoiJb3OBAHne np6Opom
IodrotobnteBnha perynnpobka
Ipeed TEM kak BKIOuHTb npi6op, OtperynpyyTe yron Ha-KIOHA BEHTINrTopa.
Bo3bMITE KOpNc DnIraTeIa O6eIMn pykAmnIOCTopoKHO HAKIOHITc ERO B Tpe6yEmoe NIOJOKeHne. Pnp yCTaHOBeEeroHa MeTo 6yDet CblWeH 9eJIyOK.

BHIMAHNE:
Yron HakoHa DoJKeH 6bITb npImepHo 30 rpaDycob.
Pexmbpa60tbl
Дян actpoKn ckopocTn nCnoJb3yIte paCNoJoxeHHbI cnpeDi MmBpaHHbI nepeKnOuateJIb:
0 BbIKI
1MeIeHHO
2 cpeDne
3 6bICTpo
Дя OTKIOUHENI npi6opa BbIpaIte noIIOXeHne 0.
Hactpoika BENTUNITOPA
YBaCecTbDBABapnHaTa:
- HenoDbnKHOe nIOJoxHe
- OTKIIOUHTe np6op.
- Notaryte Bépex perylantop ynpablenia.
3.Ду yctaHOBKn npi6opBa Tpe6yEmoe noLoXeHne nCIOb3yIte pyKoTky dIry nepeHoca.
-Полжени packaunBaHn
- OTKIIOHIne npn6op.
- HaxmtepeyIaTOp ynpaBHeHna.
IIPIMMEUAHNA:
Pp6opBpaaaetcraBtOMaTnuecknB Dnaana3OHe 90 rpayncoB.
3.ДЯOTKHOUeHnDAHHOfYHKmNOTKHOHTe npIbOp nNotAHNTe BBepxpeyJrTOp ynpaBHeHn.
UncTka
I P E D U N P E X D E H N E:
-Перед чinctков BCeгда Вынмайт eштпсьную Вилky.
- Ecni Bam Huxho y6paTb 3aunTHyO cETky: Bcerda BbIKnUoAte np6op N BbIHMaIte cTeBOi WTEKePHyi pa3bEiM.
- Hn B koem cnyae He okyhaite dIy qnstkn npnbop B Body. 3To MoKet 6bITb npuHNOJ 3JIeKTPnueckoro ydapa nII nOxapa.

BHIMAHNE:
He nCnoJIb3yIte npOBOHbIe 1ETKn IIN dpYrne cApana- IOUne npEIMetbl.
He nCnoIb3yIte CnIbHbIe IINI capanaIOuIe YIcTIAUe cpeIcTBa.
-ПотураитЕ npибор сануки cyхоТ trяпков 6e3do6abJIeHnIчNTaIIxCpeIcTB.
CnIbHbIe 3aRpa3HeHHy ydaIne cIerka BnaKbIM nOToTeHcEM I NoCte 3TOro 06Ba3aTeNbHO npotpnte erO hAcyxo.
Iotppe6JIeMaMoUHocb: 40 BaTT
Klacc 3aunTbI:
Bec HeTTo: npn6n 1,60 K
CoXpaHeNo npaBO Ha TexHnueckne I KOHCTpyKlIOHHble n3-MeHeHnB pamkax npoDoJkaioUeIcra pa3pa6Otkn npoDykTa.
3To n3deneHne npoIIO BCE Heo6xOIMbIe n aKtYaIbHbIe npOBepKn, npEINcAHbIe dIpeKTHBOI CE, K npM. Ha 3JIekTPOMarHNTHyIO COBMecTmOCbI b COOTBeTCTBnE Tpe6oBaHnM K H3KOBoNtHOI TexHKe, OHO 6blIO TAkke cKOHCTpyIpOBAHO I NOcTpoEO C yUeTOM NocIeDHnx Tpe6oBaHn IO TexHKe 6e3OnaChOCTn.
jij 1
jieoll jieoi 1.1
sill jia 2
:
90 90
J 3
0g jzj 1
agall 1
x1,y1 x2,y2 x3,y3
jiesi jiee 1
2
gall gll jll gll jll jil
a
:
jll jii Jai Lai jil jil jil
j 1 j 1
1
A
VL 1138 CB.
60/50 240-220
1,40.
1
1.60 1
y jll 1i y aiaa aie i jai
iilaiial jaiuall
Jia aalll Cis aall CE gai jai all jai
aaii iis
aDwll gJg Jaa
:
abila 1a 1 a 1
j j 1100 a e 111 111 111 111
Ae Aae ae aee aeae ae ae eae ee ae ae ae ae ae ae ae ae ae ae ae ae ae ae ae ae ae ae ae ae ae ae ae ae ae ae ae ae ae ae ae ae ae ae ae ae ae ae ae ae ae ae ae ae ae ae ae ae ae ae ae ae ae ae ae ae ae ae ae ae ae ae ae ae ae ae ae ae ae ae ae ae ae ae ae ae ae ae ae ae aaee
#
.
aaiiie aiee iieae eae
A
J 1
4
jll jab
J 1
"
i
J (9) aal al al al al al al al al al al al .4
aclll jlae oljil
5
.
6 12
aculljieol
(10)(13)
Lagaiinj jy jaln Laoiia aai iai gie
14 8
(1)
·
aaii iiaai iiaai
.5j 11 g jg jol, jol jol jol jol jol jol jol jol
.(10) (13) 9
alal alalbla 10
j jn jn jnn n nn n nn n nn n nn n nn n nn n nn n nn n nn n nn n nn n nn n nn n nn n nn n nn n nn n nn n nn n nn n nn n nn n nn n nn n nn n nn n nn n nn n nn n nn n nn n nn n nn n nn n nn n nn n nn n nn n nn n nn n nn n nn n nn n nn
jiee jie
y
Cto glaolai oia jiall siay. jieiill 6j ydiy iisnil
=
1
2
1
gssll 1s 1s 1s 1s 1s 1s 1s 1s 1s
AilSa iJgai jai gao gao
4
30
alssy 2gall bcll all ciall aie gail jiny
J 0
1
2
3
sillie j
( xt^2 + x) = - 8( xt^2 + x) > 0
3
4
jia 5
6
7
ai a ai 8
aui 9
10
aaii aiee iiae 11
12
13
4ydi yds 14
)()
j_4 = 2^11 a_3 = 2^10 a_2 = 1
Aii 1
Jolg, gssal salsaag aiaaaal gil jll 100 Jus Jj.2
Aa
pailll 3
al jll elil 1 2 3 4
jblzda
i
Caaaagai. Cuiyll Lai yjie jiesll Cauuie
Ailio 1
C
1
:
aill baaiae aie
e jai 1ie liu aicjoll cliaalall po iaiaea yie jll
alaiial
.3 4
Jz.8) 6 (6) Jz.1
(204) (205)
Lai Lai, liai, jai, Jai, Jai, Jai, Jai, Jai, Jai, Jai, Jai, Jai, Jai, Jai, Jai, Jai, Jai, Jai, Jai, Jai, Jai, Jai, Jai, Jai, Jai, Jai, Jai, Jai, Jai, Jai, Jai, Jai, Jai, Jai, Jai, Jai, Jali, jali, jali, jali, jali, jali, jali, jali, jali, jali, jali, jali, jali, jali, jali, jali, jali
aalil aaii iia
y
1
1y
J 1
1
.
y 1
.
sllg jglal 1aai jil g 8 jac no kbd Jablck
y 1 y
aaii iiaaii gaiy
aiaaaai 15


GARANTIEKARTE
warranty card · garantiekaart · carte de garantie · scheda di garanzia · tarjeta de garantia · cartao de garantia · garantiokort karta gwarancyjna · zaru.cnli list · kartica jamstva · carte de garantie · FapaunnoHa KapTa · zaru.cnly list · garancijski list · garanciajegy · rapaHTINHmOpMynap · FapaHTINHbI TaON ·
VL 1138 CB
24 Monate Garantie gemäß Garantierklarung 24 months warranty according to warranty declaration 24 maanden garantie volgens garantieverklaring 24 mois de garantie selon la déclaration de garantie 24 messi de garanzia seconde la dichiarazione di garanzia 24 meses de garantie de acuero con la déclaracion de garantia 24 meses de garantia, de accordo a declaracion de garantia 24 manedes garanti i henhold til garantibetingensene 24 misesque gwarancj na podstawie owsiadczenia gwarancjnego zaruka 24 mesiou podle prohlasei o zaruke 24 mjesecno jamstvo u skladu s jamstvenom deklaracionj 24 luni garantie conform declarejie de garantie 24 meceua rapaunuB CbotetctBme c rapaHUNOHATA deknapaua 24-measa nara koda plya vhylasieno o zaruke 24-meseca gnarcija, skladn2 garancjsk zo jzavo 24 honap garancia a garanciafeletetekebken leirtak szerint rapaHTHa 24 micaui BldnoDIO 3aBni npO rapaTIOI rapaTNI 24 MeCA cornacho 3aABNHeBIM rapaNTHMnPabINAM
Kaufdatum, Handlsterwert, Unterschrift - date of purchase, dealer stamp, signature - aankoopdatum, dealerwert, handltempening - date d'chat, tampon du concessionaire, signature - data di acquisto, timboi der rivendatore, firma - fecha de compra, seello del distribuisor, firma - data de compra, carmbio do distribuisor, assinatua - kjopsdato, forhandlisterpul, signatur - data zakupu, pierciez 'spradawcy, podiss datum zukouopeni,raziko prodjece, podis - datum kupovine, zig trovica, potpis - datum o achiziigej, jmplami furnizilerui, seminitu - Data ha noekymata, Teneur ha Proedabana, Podnec - datum nskupu, peclacika obchodnka/ predajcu, podis - datum nakupa, zig trovica, podis +svalars datama, kerskedo belyegzje aliras -data prindobhna, nechata ko podabla, pniucn - Data prinobocopernia, Zharnn podobna, Podnisc
BOMANN®
www.bomann.de
BOMANN®
C. Bomann GmbH
Internet: www.bomann.de

- Symbols in these Instructions for Use
- WARNING:
- CAUTION:
- General Notes
- WARNING!
- Special safety instructions
- Overview of the Components
- Unpacking the Device
- NOTE:
- Assembly instructions
- NC
- i NC
- Position
- Putting into Service
- Electrical Connection
- Use
- Basic Settings
- Operation
- Fan setting
- Stationary
- - Oscillating
- Cleaning
- Maintenance and storage
- Noise development
- Technical Data
- Meaning of the "Dustbin" Symbol
- Instrukcja obstugi
- Po3TaUyBaHHOprAHIBKepyBaHH
- PoznakyBaHH npJnay
- IIPIMITKA.
- Bka3iBkn 3i cKnaaHn
- - 3BOPOTHO-NOBOPTHM pyx
- TIPMIMITA.
- OuHneHHa
- PONEPEIXEHHI.
- yBAGA.
- Dorla i 36epiranHH
- TexhiHnnapaMeTpN
- PykoBoCTBO no 3Kcnnyatau
- Cnmbonbl npmeHemble B daHHOM pyKOBOCTBE noJIb-3OBaTeIa
- PENPYNPEXEHENE:
- BHIMAHHE:
- PnoIroTobKa npnbopa Ka pa6oTe
- TIOKJIIOUeHHe K 3JIeKTPoCetTu
- PoiJb3OBAHne np6Opom
- IodrotobnteBnha perynnpobka
- BHIMAHNE:
- Pexmbpa60tbl
- Hactpoika BENTUNITOPA
- - HenoDbnKHOe nIOJoxHe
- -Полжени packaunBaHn
- IIPIMMEUAHNA:
- UncTka
- I P E D U N P E X D E H N E:
- a
- :
- #
- i
- ·
- jiee jie
- 1
- 4
- sillie j
- j_4 = 211 a_3 = 210 a_2 = 1
- C
- :
- aalil aaii iia
- GARANTIEKARTE
- VL 1138 CB
- BOMANN®
Brand : BOMANN
Model : VL 1138 CB
Category : Fan