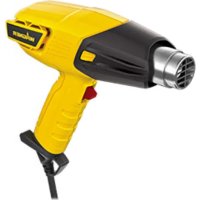
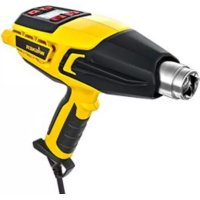
Furno F500 - Heat gun WAGNER - Free user manual and instructions
Find the device manual for free Furno F500 WAGNER in PDF.

| Product type | Heat gun |
| Brand | Wagner |
| Model | Furno F500 |
| Power | 2000 W (HIGH setting), 150 W (LOW setting) |
| Supply voltage | 220-240 V AC |
| Frequency | 50-60 Hz |
| Temperature range | 60 °C to 600 °C (depending on mode) |
| Weight | 0.9 kg |
| Housing material | Technical polymers resistant to impact, corrosion, and heat |
| Control panel | Touch with illuminated temperature guide display |
| Operating modes | Low air flow, High air flow, Cooling mode |
| Hands-free function | Integrated stand for workbench applications and cooling |
| Safety | Automatic shut-off after 3 minutes in Cooling mode, overheating protection |
| Included accessories | Concentrated jet nozzle, wide concentrated jet nozzle, glass protection nozzle, reflector nozzle, 5-in-1 scraper, carrying case (optional depending on version) |
| Cleaning and maintenance | Clean with a soft, dry brush; use only mild soap and a damp cloth for the housing |
| Warranty | 3 years + 1 additional year upon registration within 28 days |
| Main applications | Paint stripping, wall repair, drying, thawing, plastic bending, creative hobbies, electronics |
Frequently Asked Questions - Furno F500 WAGNER
User questions about Furno F500 WAGNER
0 question about this device. Answer the ones you know or ask your own.
Ask a new question about this device
Download the instructions for your Heat gun in PDF format for free! Find your manual Furno F500 - WAGNER and take your electronic device back in hand. On this page are published all the documents necessary for the use of your device. Furno F500 by WAGNER.
USER MANUAL Furno F500 WAGNER
GENERAL SAFETY INSTRUCTIONS
WARNING! Read all safety information, instructions, illustrations and technical data provided with this power tool. Failure to observe the following instructions may cause electric shock, fire and/or severe injuries. Keep all safety information and instructions for future reference. The term "power tool" used in this safety information refers to mains-operated power tools (with power cable) and to battery-powered power tools (without power cable).
This Heat Gun produces extremely high temperatures (as high as 600^ ). It must be used with caution to prevent combustible material from igniting.
- Take particular care when working near flammable materials. Remove flammable materials where possible from the work area.
- Always keep a bucket of water or fire extinguisher nearby for safety purposes.
- Keep the Heat Gun in constant motion. Do not stop or dwell in one spot.
- Do not block the ventilation openings and when working maintain a distance of at least 5cm between the nozzle and the surface so as not to overheat the device. An overheated device cannot be repaired.
- Do not use the device in atmosphere at risk of explosion.
- Be aware that heat may be transferred to flammable materials that are outside your field of vision.
- Always set the device down on its pedestal and allow it to
cool down completely before storing it.
- Never touch the nozzle while it is still hot.
- Do not leave the device unsupervised while it is switched on.
- This device may be used by children aged 8 years and over, as well as by persons with impaired physical, sensory or mental capacities or a lack of experience and knowledge if they are supervised or have been instructed in the safe use of the device and understand the dangers arising from it. Children must not play with the device. Cleaning and user maintenance must not be carried out by children without supervision.
- The heat gun and paint become very hot. Wear safety gloves and safety goggles while working to avoid burns.
- Do not direct the hot air flow towards people or animals.
- Do not use the Heat Gun as a hair dryer.

ATTENTION! When paint is heated, harmful gases and vapours may develop. Always wear suitable respiratory protection and ensure adequate ventilation of the work space.
- Old layers of paint may contain lead. Paint containing lead must not be removed with a heat gun. If in doubt, have the paint checked by an expert.
- Before every use, check the electrical tool, cable and plug. Do not use the electrical tool if it is damaged. Do not open the electrical tool yourself and only have it repaired by qualified specialist personnel using original spare parts.
- Do not misuse the power cord to carry the power tool, hang
EN
FURN0500
up the power tool or pull the plug out of the socket. Keep the power cord away from heat, oil, sharp edges or moving parts. Damaged or entangled power cords increase the risk of an electric shock.
- Keep power tools away from rain or moisture. Water penetrating into a power tool increases the risk of an electric shock.
- If the power tool must be used in a moist environment, use a ground fault circuit interrupter. Using a residual current operated circuit-breaker avoids the risk of electric shock.
- Only use suitable extension cables that are fully intact. A harmonised H05RR-F 3 x 1.0sq mm rubber type cord is required as a minimum for general use.
- Always disconnect the Heat Gun from the power supply when not in use.
- Store the heat gun in a dry location out of the reach of children.
- Keep your workplace clean and well lit.
- Do not over-reach, especially when working on ladders.
- Never use to thaw frozen pipes located inside walls or near combustibles.
MAINS CONNECTION (UK only)
This Heat Gun has been supplied with a fused cordset. This is identified by the fuse holder in the base of the plug. Please read the following safety instructions before use:
- If the cordset is damaged replace with a new cordset to avoid a safety hazard. Please contact Wagner customer services for
a replacement cordset.
- NEVER under any circumstances use the Heat Gun or cordset without the fuse cover fitted. This is the little cover fixed into the base of plug to hold the fuse in place.
- If you lose the fuse cover then please contact any electrical dealer for a replacement or ring our helpline.
- A replacement fuse must be rated at 13 Amps. This must be manufactured and approved to BS1362.
- IF IN ANY DOUBT PLEASE CONSULT A QUALIFIED ELECTRICIAN.
MAINS CONNECTION (Non-UK)
This Heat Gun has been supplied with a cordset. If the cordset is damaged replace with a new cordset to avoid a safety hazard. Please contact Wagner customer services for a replacement cordset.
IF IN ANY DOUBT PLEASE CONSULT A QUALIFIED ELECTRICIAN.
WARNING - Use an extension cord that will accept the plug on the product. Make sure your extension cord is in good condition. When using an extension cord, be sure to use one heavy enough to carry the current your product will draw. An undersized cord will cause a drop in line voltage resulting in loss of power and overheating. A harmonised H05RR-F 3 x 1.0sq mm rubber type cord is required as a minimum for general use.
FURN0 500
EN
Protective Cap
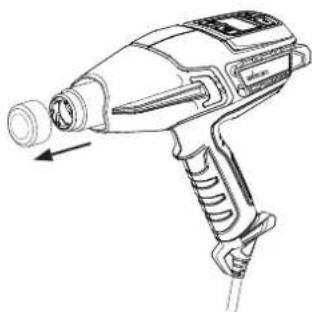
WARNING - Remove plastic cap and discard before using your heat gun.
Using the Heat Gun
General Description
This Heat Gun is a quality power tool. Like any power tool, it can be dangerous when misused. Read the following instructions carefully and follow all safety precautions. It is the responsibility of the owner to use the Heat Gun properly.
Specifications
| Housing Engineered high-impact corrosion and heat-resistant polymers | |
| Wattage 2000 Watts on HIGH, 150 Watts on LOW | |
| Voltage 220 - 240 V a.c. | |
| Frequency 50 - 60Hz | |
| Heat Output Approximately 600°C on HIGH, approximately 60°C on LOW | |
| Weight 0.9 kg | |
Features Fig. 1
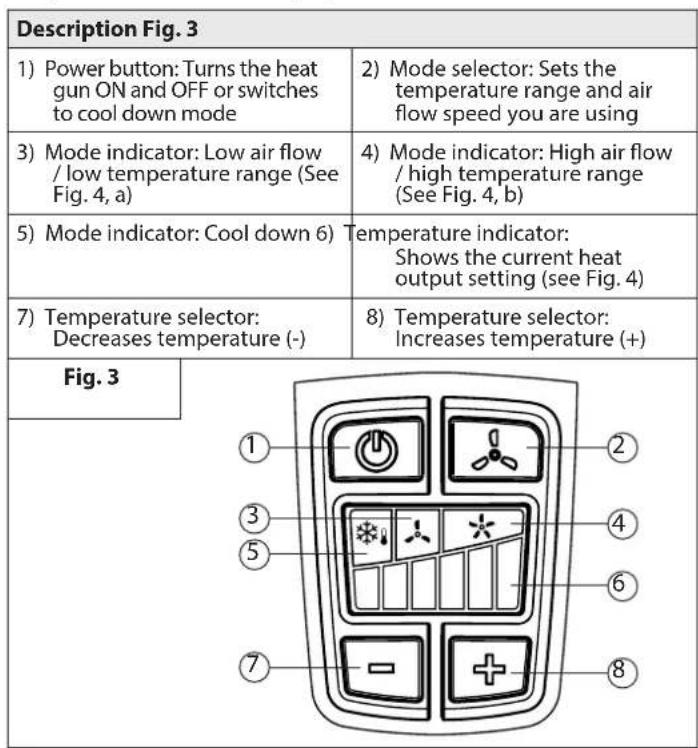
1) Control panel - temperature and fan speed
2) Hanging hook
3) Cordset with integrated stabilizers (removable with tool)
4) Rear stabilizer fins (upright standing)
5) Side bars to prevent nozzle touching surface
6) Nozzle Heat Shield
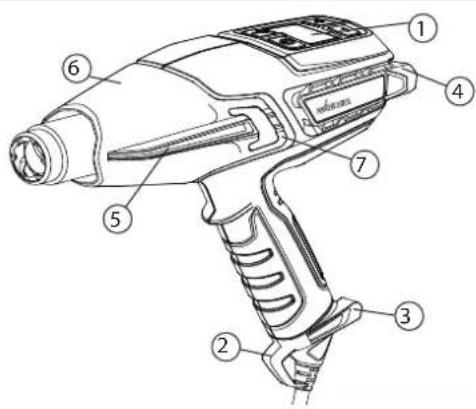
Fig. 1
Removing the barrel cover
The barrel cover can be removed when working in hard to reach locations. BE CAREFUL OF THE NOZZLE. Increased risk of burning exists when working without the barrel cover. To remove the barrel cover, use a small flat head screw driver to lift tab (Fig. 1, 7) over raised area.
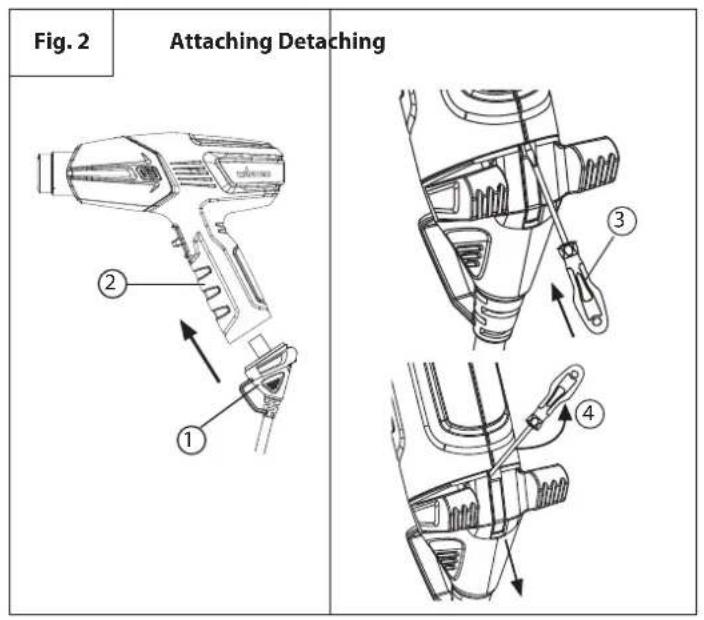
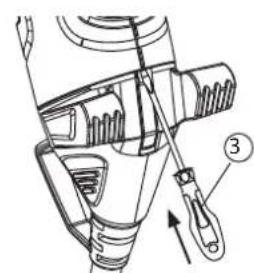
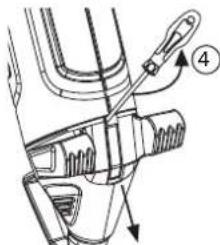
Attaching and Detaching the Cordset
The cordset (Fig. 2, 1) for the Heat Gun is delivered detached from the gun (Fig. 2, 2). To attach, line up the cord with the socket on the handle of the gun and press firmly together until you hear a click. The cord set does not need to be removed. If required to detach, insert a small flat head screwdriver (Fig. 2, 3) or, similar tool into the hole as shown. Firmly push the screwdriver and tilt it upward (4) towards the handle to release the cordset. Firmly pull the cordset away from the gun.
Touch Pad Control Panel
The heat gun gives you a wide temperature range to choose from, depending upon the type of project. Temperature can be adjusted via the Control Panel.
Temperature Guide LED display
FURN0 500
EN
| Description Fig. 4a & 4b | ||
| Air flow mode: LOW | Air flow mode: HIGH | |
| Temperature range: 60°C - 550°C | Temperature range: 100°C - 600°C | |
| Cycle temperatures: See Fig. 3, (7 & 8) __________ = Illuminated __________ = not illuminated | Cycle temperatures: See Fig. 3, (7 & 8) __________ = Illuminated __________ = not illuminated | |
| Fig. 4a Fig. 4b | ||
| 60°C 150°C 250°C 350°C 450°C 550°C | 1000°C 2000°C 3000°C 4000°C 5000°C 6000°C | |
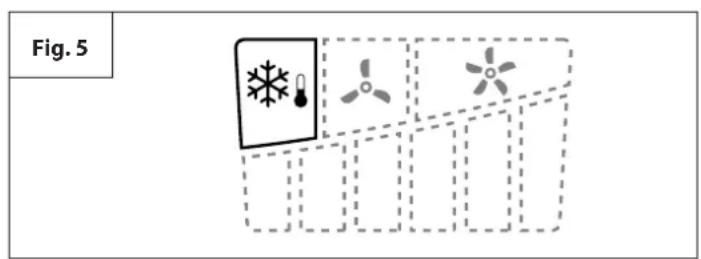
Cool Down Mode
During rest periods or when you are finished with your project, press the power button to enter cool down mode (Fig. 5). The blue cool down indicator light will turn on and the gun will continue to run with the element disabled, for cooling.
Start Up

Always read the safety information included in this manual before using the Heat Gun.
- Plug the Heat Gun into a standard socket-outlet.
- Turn on the heat gun by pressing the power button on the Control Panel (Fig. 3, 1). When the gun is turned on, it is automatically set in the low temperature range (Fig. 4, a) at 60^ and a low air flow setting.
- If you wish to continue working within the low temperature range, simply press the plus or minus button on the touch pad until your desired temperature setting is selected, this will be indicated by the temperature bar being lit.
- If you wish to operate within the high temperature range and high air flow setting, press the Mode selector button (Fig. 3, 2) once. The high temperature range indicator light will turn on. You can now simply press the plus or minus button on the control panel until you reach your desired temperature setting, this will be indicated by the temperature bar being lit.
IMPORTANT: If the blower motor in the heat gun does not turn on when the POWER button is activated, turn the switch OFF immediately. The heating element will burn out if it is not cooled by the blower.
- During rest periods or when you are finished with your project, press the power button to enter cool down mode (Fig. 5). The blue cool down indicator light will turn on and the gun will continue to run with the element disabled, for cooling.
- Set the gun down in an upright position. The heat gun will shut itself off after 3 minutes.
- To override cool down mode press and hold the power button for 2 to 3 seconds. The gun will power off immediately.

Following Cool down mode the barrel of the gun will still be hot.
Note: Smoke may appear during the first start up due to the burning of manufacturing oils. The smoke should disperse shortly after first start up.
Hands-free operation Fig. 6
The Heat Gun has an integrated stand (Fig. 1, 4) for bench top applications and for cooling down. Alternatively the optional heat gun carry case (Fig. 7) has been specifically designed to locate the heat gun in the upright position for work on uneven surfaces.
Fig. 6
FURN0500
EN
AngleLoc (carry case)* Fig. 7a & 7b
A: Insert the back of the heat gun so that the rear stabilizing fins locate themselves below the ridges on the side wall of the cavity in the top of the carry case.
B: Then slide the heat gun forward so that it naturally locks into place at a 135 degree angle. The heat gun should now be secure for upright use.
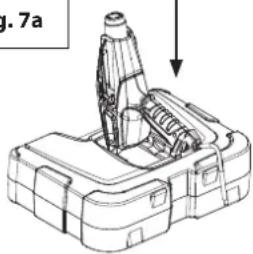
Fig. 7a
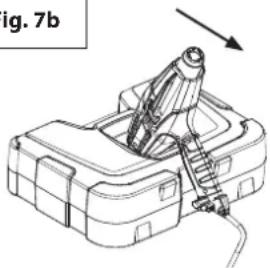
Fig. 7b
IMPORTANT: Always protect glass when working near windows.

Do not touch nozzle or any other tool being used when working. These become extremely hot and will cause severe burns. Wear gloves to protect hands from hot scrapings.
Many variables affect heating applications, such as the material being heated, ambient temperature, the distance from the gun to the substrate and the heating technique. For this reason Wagner has provided temperature guidelines for certain applications. Always start the heat gun at the lowest temperature in the range then raise the temperature until the optimum temperature is achieved. Always keep the heat gun in motion and at least 5cm from the substrate when applying heat.
*AngleLoc carry case can be purchased separately. See page 13
IMPORTANT: If the motor-driven fan in the Heat Gun does not turn on when the switch is set to either LOW or HIGH, turn the switch OFF immediately. The heating element will burn out if it is not cooled by the motor-driven fan.
Note: Always set the Heat Gun upright after it is turned off, either for a short break or for storage. Avoid laying the unit on the side after shutdown. The heat will remain in the unit and cooling will take longer. Store the unit only after the nozzle is cool. Unplug the unit before storing to prevent accidental start-up.
The F500 Heat Gun is one of the most versatile tools you can own. It can be used for a great variety of projects, from big DIY to small Art & Crafts jobs. For more details on multiple projects and 'how to' videos please visit our website www.wagner-group.com.
| Use Heat Nozzle Tip | Options | ||
| DIY | Stripping paint HIGH | Concentrator or Wide | |
| Wall repair LOW Open (no tip) | |||
| Drying paint LOW Open (no tip) | |||
| Soften adhesives to remove floor tiles | LOW | Wide concentrator | |
| Bend plastic, plexiglass, formica | LOW/HIGH Reflector Nozzle | ||
| Removing formica and linoleum | LOW | Wide concentrator | |
| Soften paint, caulking and putty for easier removal | HIGH | Concentrator or Wide concentrator | |
| Removing varnish LOW-MED | Wide concentrator | ||
| Shrink plastic film for wrapping or weatherproofing | LOW | Wide concentrator | |
| Small jobs (including repair) | Loosen rusted nuts, bolts and fittings | HIGH Open/ | Concentrator |
| Repairing jeans LOW | Wide concentrator | ||
| Burning weeds HIGH Concentrator | |||
| Removing adhesives LOW Open (no tip) | |||
| Waxing skis/snowboard LOW | Wide concentrator | ||
| Glass fibre work HIGH Concentrator | or Wide | ||
| Use Heat Nozzle Tip | Options | ||
| Unfreezing pipes and locks | LOW Reflector | nozzle | |
| Lighting a BBQ grill HIGH Concentrator / | Concentrator / | BBQ Nozzle | |
| Heat shrink tubing/ connectors | LOW-MED Reflectoctor nozzle | Concentrator | |
| Heat concrete prior to patching | LOW/HIGH | Concentrator | |
| Defrosting refrigerator / freezer | LOW Open (no tip) | tip) | |
| Art & Crafts | Making candles | LOW Open (no tip) | tip) |
| Making soap | LOW Open (no tip) | tip) | |
| Shrink wrapping presents | LOW Open (no tip) | tip) | |
| Forming foam | LOW Open (no tip) | tip) | |
| Cookie decoration | LOW/HIGH | Open (no tip) | |
| Automotive | Removing stickers, emblems and decals | LOW Open (no tip) | tip) |
| Removing dents | HIGH Open (no tip) | tip) | |
| Removing paint | HIGH | Concentrator or Wide | |
| Applying and removing window tint | LOW Open (no tip) | tip) | |
| Restoring bumpers | HIGH Open (no tip) | tip) | |
| Electronics | Smartphone & tablet repair | LOW Concentrator | tip) |
| PlayStation and Xbox repair | LOW Concentrator | tip) | |
FURN0500
EN
Stripping Paint
The Heat Gun heats up the surface and causes the paint to soften, at which time it can be scraped off easily without damaging the surface. Some paints may soften even though they do not blister; some may become rubbery, and some may require higher heat.
When working with several layers of paint, it speeds up the scraping process to heat the surface thoroughly, all the way to the wood., then all the layers can be scraped at one time.
A soft wire brush may be the best tool to use for very intricate surfaces. Mineral paints and finishes, such as cement paint and porcelain, do not soften with heat, so using a heating tool will not work for paint removal.
The best method of paint removal
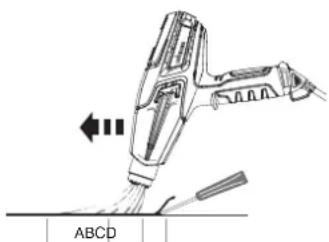
Move the Heat Gun slowly and steadily forward at an angle to the surface, pointing the nozzle in the direction of motion. This allows you to scrape safely outside the hot air stream and keeps the scraper and the scraped surface cooler.
A. Warm air preheats the surface.
B. Paint is softened by hot air.
A+B. Deep penetration of heat over total area.
C. Paint can be easily scraped off as soon as it is softened and the gun is moved forward.
D. Stripped surface allowed to cool.
Note: Do not use the Heat Gun on surfaces that can be damaged by heat, such as vinyl-coated panelling, vinyl-coated siding or vinyl-coated window frames.
When removing paint from window frames, the Heat Gun will soften the putty. Be careful not to gouge the putty with the scraper. The putty will firm up after it cools.
Do not use the Heat Gun on insulating laminated window glass such as Thermopane. The glass edge expansion may break the edge seal.
When scraping facia, do not overheat the edges of the asphalt shingles protruding over the edge of the sheathing. Too much heat will melt the asphalt.
IMPORTANT: The removal of paint by a Heat Gun is safe if the above guidelines are used, but always keep either a container of water or an ABC fire extinguisher (suitable against Class A, B and C type fires) within reach.
Cleaning and Maintenance
Keep the intake openings on the housing clean and free of obstructions. Use a soft, dry brush to clean the openings periodically. Use only mild soap and a damp cloth to clean the Heat Gun. Many household cleaners contain chemicals which could seriously damage the housing.
Do not use petroleum, turpentine, lacquer or paint thinner, dry cleaning fluids or similar products when cleaning the Heat Gun.
NEVER allow any liquid to get inside the tool or immerse any part of the tool into a liquid.
Cleaning and user maintenance shall not be made by children.
Storage
Allow the Heat Gun nozzle to cool to room temperature before placing in storage.
The nozzle will turn dark over time because of the high heat. This is normal and will not affect the performance or life of the unit.
EN
FURN0500
Accessories
The following accessories may come with the Heat Gun or may be purchased separately by visiting www.wagner-group.com/service. Alternatively see back of manual for your nearest Service Centre.
| Name Description Name Description | ||||
| Concentrator Nozzle P/N2366222 | Directs a concentrated heat flow to the work surface. Ideal for removing paint in awkward corners, crevices, mouldings, beading or architraves. | Glass Protection Nozzle P/N2366224 | Deflects the heat away from glass or other fragile areas. Ideal for window sills, ledges, frames and skirting boards. | |
| Wide Concentrator Nozzle P/N2366223 | Directs a long, narrow heat pattern to the work surface. Ideal for removing paint or varnish from large, flat surfaces such as skirting boards, doors, stairs, etc. It should be used in conjunction with a flat scraper. | Reflector Nozzle P/N2366225 | Disperses the heat flow evenly around the whole work surface. Ideal for thawing frozen pipes, solder pipe work, bending plastics or heat shrinking electrical insulating tubing. | |
FURN0 500
EN
| Name Description | |
| 5-in-1 Detailed Scraper Tool P/N2366227 | This tool has 5 functions. The blade is used to (1) scrape paint and (2) spread compound. The gouge point (3) is used to remove putty/caulk from open cracks. The curved area (4) is used to clean roller covers. The flat side (5) can be used to open paint tins. |
| Carry Case P/N2366226 | The heat gun carry case with AngleLoc has been specifically designed to locate the heat gun in the upright position for work on uneven surfaces. |
IMPORTANT: Always use gloves when handling the Heat Gun.
To attach an optional item to the Heat Gun:
- Set the Heat Gun upright on a level surface and wait until the tip is cool.
- Set the item onto the tip of the Heat Gun and push firmly into place by hand.
To remove an optional item from the Heat Gun:
- Set the Heat Gun upright on a level surface and wait until the tip is cool.
- Pull the item off the tip.
EN
FURN0 500
3 + 1 year guarantee on this WAGNER DIY product
In addition to the statutory warranty for this product, J. Wagner GmbH, based in 88677 Markdorf, Germany, grants you a guarantee (device guarantee) of 36 months for this product. This guarantee is extended by a further 12 months if the product is registered within 28 days of purchase on the Internet at https://go.wagner-group.com/3plus1.
The guarantee includes the free repair of defects which are demonstrably caused by the use of unsuitable materials in the product's manufacture or by assembly errors, as well as the free replacement of faulty components provided there are no guarantee exclusions.
The statutory material defect rights to which you as the purchaser are entitled for the intended purpose from the time of handover of the purchased itemarenotrestrictedbytheguardian.Theguarantee,along with your statutory warranty rights, will expire if the device has been opened by persons other than authorised WAGNER service personnel. The detailed guarantee conditions can be obtained on request from our authorised WAGNER partners (see website or operating instructions) or in text form on our website:
https://go.wagner-group.com/hf-warranty-conditions

- Modifications reserved -
INFORMATION ON THE DISPOSAL OF WASTE ELECTRICAL AND ELECTRONIC EQUIPMENT KNOWN AS WEEE

The device and all accessories and packaging have to be recycled in an environmentally friendly manner. Do not dispose of the appliance with household waste. Support environmental protection by taking the appliance to a local collection point or obtain information from a specialist retailer.
EU Declaration of conformity
We declare under sole responsibility that this product conforms to the following relevant stipulations:
2014/35/EU, 2014/30/EU, 2011/65/EU, 2012/19/EU
Applied harmonised norms:
EN 60335-1, EN 60335-2-45, EN 55014-1, EN 55014-2,
EN IEC 61000-3-2, EN 61000-3-3, EN 62233
The EU declaration of conformity is enclosed with the product.
If required, it can be re-ordered using order number 2389336.
UKCA Declaration of conformity
We declare under sole responsibility that this product conforms to the following relevant regulations:
Electrical Equipment (Safety) Regulations 2016
Electromagnetic Compatibility Regulations 2016
The Restriction of the Use of Certain Hazardous Substances in
Electrical and Electronic Equipment Regulations 2012
Applied harmonised standards
BS EN 60335-1:2012+A15:2021, BS EN 60335-2-45:2002+A2:2012
BS EN IEC 55014-1:2021, BS EN IEC 55014-2:2021, BS EN IEC 61000-3
2:2019+A1:2021, BS EN 61000-3-3:2013+A2:2021, BS EN 62233:2008
FURN0500
DE
https://go.wagner-group.com/hf-warranty-conditions

https://go.wagner-group.com/hf-warranty-conditions
https://go.wagner-group.com/hf-warranty-conditions

https://go.wagner-group.com/hf-warranty-conditions
https://go.wagner-group.com/hf-warranty-conditions

-Sujeto a cambios
INFORMACION SOBRE LA ELIMINACION DE RESIDUOS DE APARATOS ELECTRICOS Y ELECTRONICOS (DENOMINADOS COM RAAEE)

https://go.wagner-group.com/hf-warranty-conditions

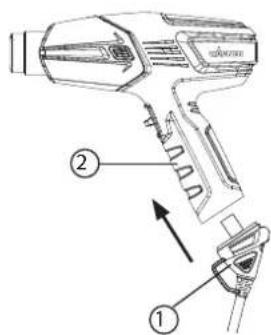
Fig 2 Montering Afromentering
Betjeningspanelets berøringstastatur
https://go.wagner-group.com/hf-warranty-conditions

-Forbehold for aendringer
OPLYSNINGER OM BORTSKAFFELSE AF ELEKTRISK AFFALD OG ELEKTRONISK UDSTYR KENDT SOM WEEE

https://go.wagner-group.com/hf-warranty-conditions

-Med reservation for andringar
INFORMATION OM AVFALLSHANTERING AV ELEKTRISK OCH ELEKTRIISK UTRUSTNING (WEEE-DIREKTIVET)

https://go.wagner-group.com/hf-warranty-conditions

- Med forbeshold om endringer -
INFORMASJON OM KASSASJON AV ELEKTRISK OG ELEKTRONISK UTSTYR (WEEE)

Silverstone Park, Silverstone
Northants NN12 8GX
T+44(0)1327368410

DINOCOOP KFT.
Radvany u.24.
1118 Budapest
T+3613193064
F+3613193066

MAKIMPORT
HERRAMIENTAS, S.L.
C/Mejico n°6
Not responsible for errors and changes.
Copyright by J.Wagner GmbH