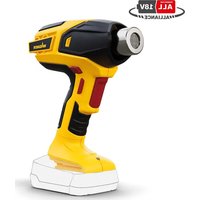
Furno 550 18V - Heat gun WAGNER - Free user manual and instructions
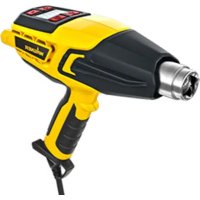
Find the device manual for free Furno 550 18V WAGNER in PDF.


| Product Type | Cordless Heat Gun |
| Brand | Wagner |
| Model | Furno 550 18V |
| Power Source | Li-Ion battery 18 V, 2.5 Ah (PBA 18V compatible with Bosch Power For All) |
| Temperature | 300 °C – 610 °C adjustable in 5 levels |
| Battery Life | Approximately 7 to 20 min depending on temperature |
| Charging Time | 120 min (80%), 154 min (100%) with AL 1810 CV charger |
| Total Weight (with battery) | 0.88 kg |
| Battery Weight | 0.37 kg |
| Hands-Free Function | Yes, via locking button |
| Work Light | Integrated LED |
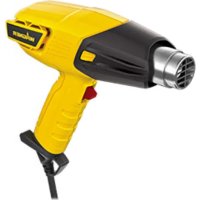
| Included Nozzles | Large concentrated jet nozzle (ref. 2366223) and reflector nozzle (ref. 2366225) |
| Optional Accessories | Concentrated jet nozzle, glass protection nozzle, 5-in-1 scraper, battery, charger, starter kit |
| Main Uses | Paint stripping, shrinking plastic film and heat shrink tubing, thawing pipes, lighting a barbecue, removing adhesives, etc. |
| Safety | Trigger lock, stable base, automatic shutdown in case of overheating (fan) |
| Maintenance | Clean the ventilation openings with a soft, dry brush; do not use liquids or abrasive products |
| Repairability | Use only original parts; have repairs done by a Wagner authorized service center |
| Warranty | 3 years + 1 additional year if registered within 28 days |
Frequently Asked Questions - Furno 550 18V WAGNER
User questions about Furno 550 18V WAGNER
0 question about this device. Answer the ones you know or ask your own.
Ask a new question about this device
Download the instructions for your Heat gun in PDF format for free! Find your manual Furno 550 18V - WAGNER and take your electronic device back in hand. On this page are published all the documents necessary for the use of your device. Furno 550 18V by WAGNER.
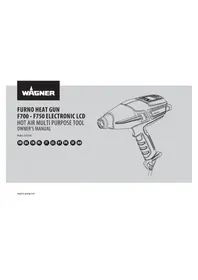
USER MANUAL Furno 550 18V WAGNER
natural_image
Line drawing of a handheld device with ports and control buttons (no text or symbols)FURNO 550 18V
HOT AIR MULTI PURPOSE TOOL
ORIGINAL-
BETRIEBSANLEITUNG

DE 1 - 13
EN 14-26
FR 27 - 39
NL 40 - 52
IT 53 - 65


●●●●●●●●●●●●●●●●●●●●●●●●●●●●●
HERZLICHEN DANK FÜR IHR VERTRAUEN
natural_image
Technical line drawing of a mechanical component with a labeled section (13), no readable text or symbols present.7. Laden

natural_image
Technical line drawing of a handheld device with labeled part '5' (no text or symbols beyond label)15. Umweltschutz

https://go.wagner-group.com/hf-warranty-conditions

Translation of the original operating instructions
MANY THANKS FOR PLACING YOUR TRUST IN US
We would like to congratulate you on purchasing this brand product from Wagner; we are sure that you will enjoy working with it greatly.
Please read the Operating Manual carefully and observe the safety information before starting the device. Store the Operating Manual in a safe place close to the product in case it needs to be used by someone else.
We would be happy to be of assistance if you have any questions, suggestions or requests.
Please contact us via the phone number included on the back page or via our homepage,
www.wagner-group.com/service.
Contents
- Explanation of symbols used .... 15
- General Safety Instructions .... 15
- Safety instructions for the charger and battery....16
- Field of application....18
- Technical Data.... 18
- Description.... 19
- Charging 20
- Start-up 20
- Application.... 21
- Recommended temperature settings 22
- Breaks and finishing work.... 23
- Cleaning and Maintenance 23
- Storage 23
- Accessories / Spare Parts.... 24
- Environmental protection.... 24
- Important Note regarding Product Liability! 25
1. Explanation of symbols used
 | This symbol indicates a potential danger for you or for the device. Under this symbol you can find important information on how to avoid injuries and damage to the device. |
 | Danger of electrical shock |
 | Indicates tips for use and other particularly useful information. |
2. General Safety Instructions
WARNING!

Read all safety information, instructions, illustrations and technical data provided with this power tool. Failure to observe the following instructions may cause electric shock, fire and/or severe injuries. Keep all safety information and instructions for future reference. The term “power tool” used in this safety information refers to mains-operated power tools (with power cable) and to battery-powered power tools (without power cable).
This Heat Gun produces extremely high temperatures (as high as 610^ C). It must be used with caution to prevent combustible material from igniting.
• Take particular care when working near flammable materials. Remove flammable materials where possible from the work area.
• Always keep a bucket of water or fire extinguisher nearby for safety purposes.
- Keep the Heat Gun in constant motion. Do not stop or dwell in one spot.
- Do not block the ventilation openings and when working maintain a distance of at least 5 cm between the nozzle and the surface so as not to overheat the device. An overheated device cannot be repaired.
- Do not use the device in at atmosphere at risk of explosion.
- Be aware that heat may be transferred to flammable materials that are outside your field of vision.
- Always place the unit on the support surface and allow it to cool completely before storing it.
- Never touch the nozzle while it is still hot.
- Do not leave the device unsupervised while it is switched on.
- This device may be used by children aged 8 years and over, as well as by persons with impaired physical, sensory or mental capacities or a lack of experience and knowledge if they are supervised or have been instructed in the safe use of the device and understand the dangers arising from it. Children must not play with the
device. Cleaning and user maintenance must not be carried out by children without supervision.
- The heat gun and paint become very hot. Wear safety gloves and safety goggles while working to avoid burns.
- Do not direct the hot air flow towards people or animals.
- Do not use the Heat Gun as a hair dryer.

ATTENTION! When paint is heated, harmful gases and vapours may develop. Always wear suitable respiratory protection and ensure adequate ventilation of the work space.
- Old layers of paint may contain lead. Paint containing lead must not be removed with a heat gun. If in doubt, have the paint checked by an expert.
- Check the power tool before each use. Do not use the electrical tool if it is damaged. Do not open the electrical tool yourself and only have it repaired by qualified specialist personnel using original spare parts.
- Keep power tools away from rain or moisture. Water penetrating into a power tool increases the risk of an electric shock.
• Always remove the battery when you have finished your work. - Store the heat gun in a dry location out of the reach of children.
- Keep your workplace clean and well lit.
- Do not over-reach, especially when working on ladders.
- Never use to thaw frozen pipes located inside walls or near combustibles.
3. Safety instructions for the charger and battery

Only use the tool with BOSCH POWER FOR ALL compatible PBA 18V batteries with at least 2.5 Ah and suitable chargers. The battery voltage must match the battery charging voltage of the charger. Do not charge non-rechargeable batteries. Otherwise there is a risk of fire and explosion.
- Only use the charger indoors and keep it away from moisture. Water penetrating into a power tool increases the risk of an electric shock.
- Keep the charger clean. There is a risk of electric shock due to contamination.
- Before every use, check the charger, cable and plug. Do not use the charger if it is damaged. Do not open the charger yourself and only have it repaired by qualified specialist personnel using original spare parts. Damaged chargers, cables and plugs increase the risk of electric shock.
- Do not operate the charger on easily combustible surfaces (e.g. paper, textiles, etc.) or in combustible environments. There is a risk of fire due to the heating of the charger during charging.
- Recharge only with the charger specified by the manufacturer. A charger that is suitable for one type of battery pack may create a risk of fire when used with another battery pack.
- The battery is delivered partially charged. To ensure full battery performance, fully charge the battery in the charger before first use.
- Use power tools only with specifically designated battery packs. Use of any other battery packs may create a risk of injury and fire.
- Only use the battery in the manufacturer's products. This is the only way to protect the battery from dangerous overloading.
- Keep batteries out of the reach of children.
- Do not open the battery. There is a risk of a short circuit.
- Vapours may also escape if the battery is damaged or used improperly. Take in fresh air and consult a doctor if you have any symptoms. The vapours may irritate the respiratory tract.
- Under abusive conditions, liquid may be ejected from the battery; avoid contact. If contact accidentally occurs, flush with water. If liquid contacts eyes, additionally seek medical help. Liquid ejected from the battery may cause irritation or burns.
- Do not use a battery pack or tool that is damaged or modified. Damaged or modified batteries may exhibit unpredictable behaviour resulting in fire, explosion or risk of injury.
- If the battery is defective, liquid may leak out and wet adjacent objects. Check affected parts. Clean them or replace them if necessary.
- When battery pack is not in use, keep it away from other metal objects, like paper clips, coins, keys, nails, screws or other small metal objects, that can make a connection from one terminal to another. Shorting the battery terminals together may cause burns or a fire.
- The battery can be damaged by sharp objects such as nails or screwdrivers or by external force. An internal short circuit may occur and the battery may burn, smoke, explode or overheat.
- Never service damaged battery packs. Service of battery packs should only be performed by the manufacturer or authorized service providers.
- Protect the battery from heat, e.g. also from permanent sunlight, fire, dirt, water and moisture. There is a risk of explosion and short circuit.
- Operate and store the battery only at an ambient temperature between -20^ and +50^ . Do not leave the battery in the car in summer, for example. At temperatures < 0^ , performance may be restricted depending on the unit.
- Charge the battery only at ambient temperatures between 0^ and +35^ . Charging outside the temperature range can damage the battery or increase the risk of fire.
- Lithium-ion batteries are subject to the Dangerous Goods Legislation requirements. The batteries are suitable for road-transport by the user without further restrictions. When shipping by third parties (e.g.: by air transport or forwarding agency), special requirements on packaging and labelling must be observed. For preparation of the item being shipped, consulting an expert for hazardous material is required. Dispatch battery packs only when the housing is undamaged. Tape or mask off open contacts and pack up the battery in such a manner that it cannot move around in the packaging. Please also observe the possibility of more detailed national regulations.
4. Field of application
The F550 offers a variety of possible uses:
- softening of paint, sealing compound and window putty for easier removal
- softening of adhesives for the removal of stickers and floor tiles
•shrinking of plastic film for packaging - working with shrink hoses
- handicrafts

For more details on multiple projects and 'how to' videos please visit our website www.wagner-group.com/furno
5. Technical Data
| Technical Data* | |
| Heat Output approx. 300°C - 610°C | |
| Rechargeable battery (PBA 18 V, 2.5 Ah): | Li-Ion, 18 V 2.5 Ah |
| Charger (AL 1810 CV): | |
| Input voltage | 220-240 V~ , 50-60 Hz; |
| Output voltage | 14.4-18 V |
| Charging current | 1000 mA |
| Protection Class (charger): | / II |
| Charging time: approx. 120 min (80%), | 154 min (100%) |
| Battery runtime** approx. 7-20 min. | |
| Weight: | |
| Rechargeable battery | 0.37 kg |
| Total | 0.88 kg |
* When using a PBA 18 V, 2.5 Ah battery and a charger AL 1810 CV
** Depending on the selected temperature level
6. Description
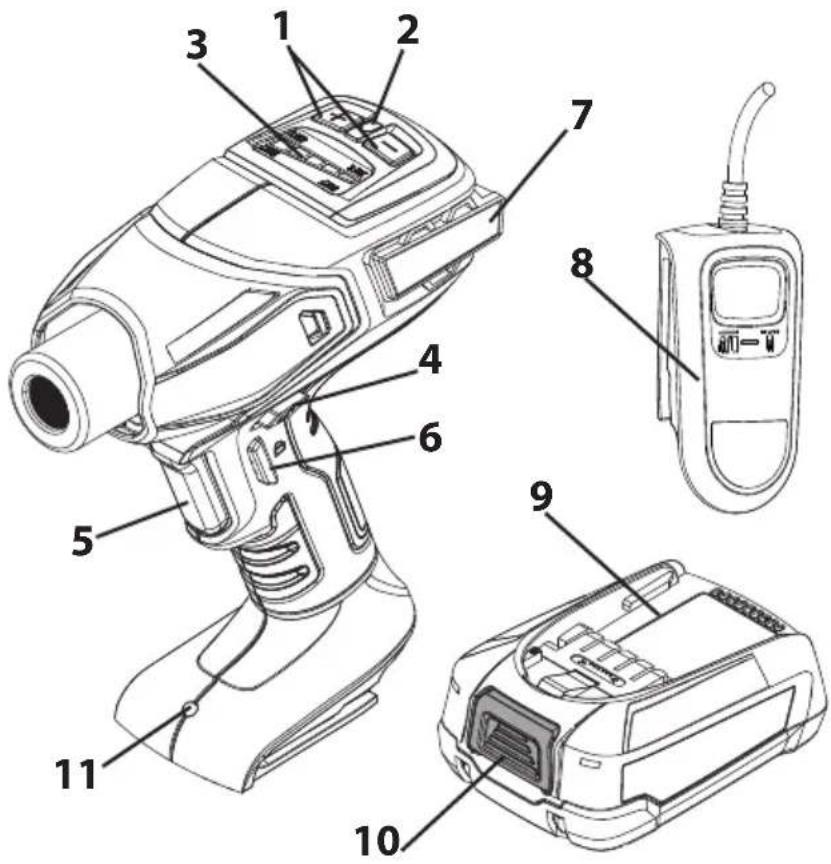
1) Temperature selector switch (+/-)
2) Battery indicator Green = Sufficient battery charge Orange= Only minor work still possible Flashing orange = Battery must be charged
3) Temperature display Stage 1 = 300°C Stage 2 = 370°C Stage 3 = 450°C Stage 4 = 520°C Stage 5 = 610°C
4) Trigger lock: Must first be pressed at switch-on to unlock the trigger.
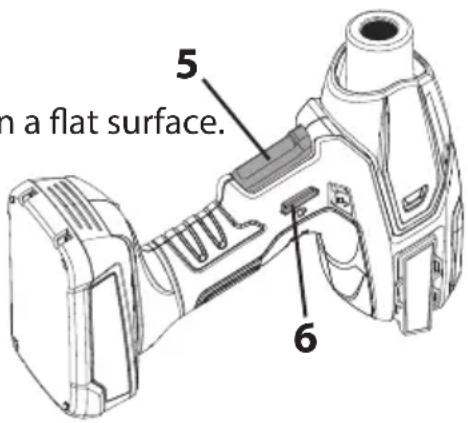
5) Trigger: Switches on the heat gun (must be held)
6) Locking button: Enables hands-free working. Press the trigger to release
7) Supporting surface for safe storage during freehand operation and in the cooling phase
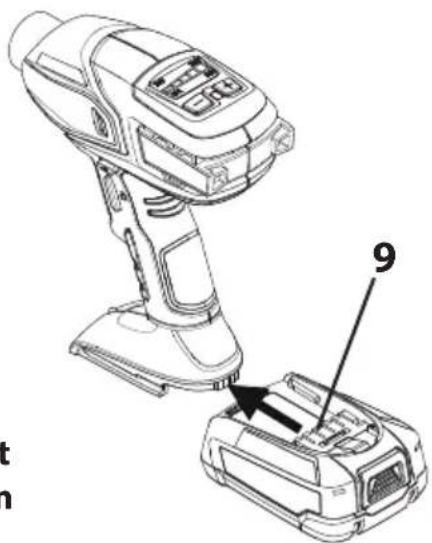
8 Charger* 9 Rechargeable battery*
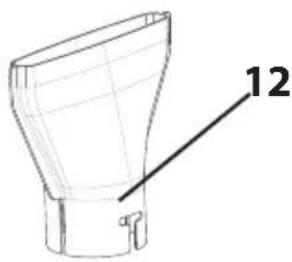
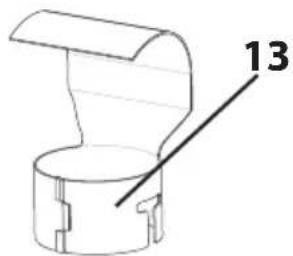
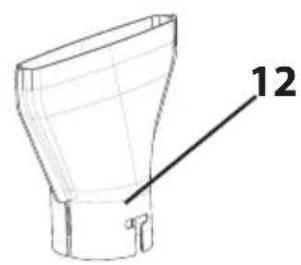
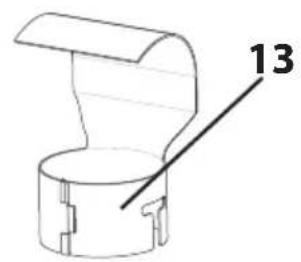
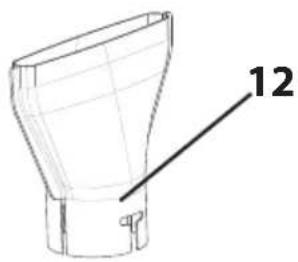
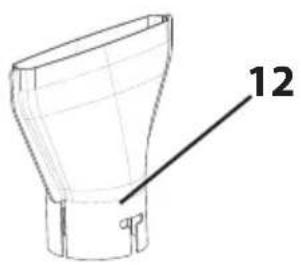
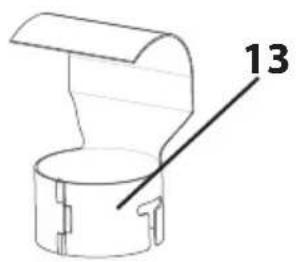
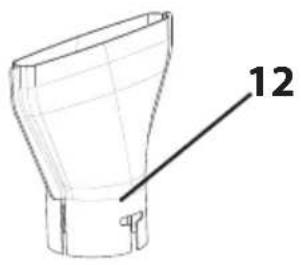
10 Battery lock* 11 Working light 12 Wide Concentrator Nozzle 13 Reflector Nozzle
* Not included in the delivery. A starter kit with charger and rechargeable battery is available with order No. 2448616 (EU) and 2448617 (UK).
natural_image
Technical line drawing of a mechanical component with a curved top and internal structure (no text or symbols)7. Charging
Before connecting to the mains, make sure that the mains voltage corresponds to the specification on the charger's rating plate.
-
Plug the mains plug of the charger into the socket (the battery charging indicator (14) lights up constantly).
-
Insert the battery into the charger, the battery charging indicator (14) starts flashing.
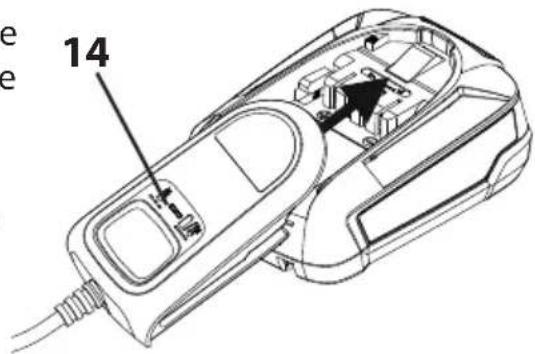

If the battery charge indicator lights up constantly when the battery is inserted, the battery is either fully charged or overheated and must first cool down.
- Once the battery is fully charged, remove the battery from the charger.
- Unplug the mains plug of the charger from the socket.
8. Start-up
- Insert battery (9).
- Press the temperature selector switch (1) to set the desired temperature level (the recommended temperature settings for individual applications can be found in the table in Section 10).
- Press and hold the trigger lock (4) and then the trigger (5) to switch on the heat gun. The motor-driven fan noise will indicate that the Heat Gun is running.
Caution: If the fan does not switch on, switch the heat gun off immediately (position 0). Without cooling from the fan, the heating element will burn out.

When you start the gun at the highest level, the fan turns on but runs a little slower to allow the gun to heat up faster. After 30 seconds, it speeds up again.

Smoke may appear during the first start up due to the burning of manufacturing oils. The smoke should disperse shortly after first start up.
- Continue to hold down the trigger (5) to work.
9. Application

Always read the safety information included in this manual before using the Heat Gun.
Hands-free operation
Press the locking button (6) while holding down the trigger (5) to activate continuous operation.
Place the heat gun on a flat surface.
To switch the heat gun off again, briefly actuate the trigger (3).
Stripping Paint

Always protect glass when working near windows.
Do not use the Heat Gun on surfaces that can be damaged by heat, such as vinyl-coated paneling, vinyl-coated siding or vinyl-coated window frames.
When removing paint from window frames, the Heat Gun will soften the putty. Be careful not to gouge the putty with the scraper. The putty will firm up after it cools.
Do not use the Heat Gun on insulating laminated window glass such as Thermopane. The glass edge expansion may break the edge seal.
The Heat Gun heats up the surface and causes the paint to soften, at which time it can be scraped off easily without damaging the surface. Some paints may soften even though they do not blister; some may become rubbery, and some may require higher heat.
When working with several layers of paint, it speeds up the scraping process to heat the surface thoroughly, all the way to the wood. Then all the layers can be scraped at one time.
A soft wire brush may be the best tool to use for very intricate surfaces. Mineral paints and finishes, such as cement paint and porcelain, do not soften with heat, so using a heating tool will not work for paint removal.
The best method of paint removal
Move the Heat Gun slowly and steadily forward at an angle to the surface, pointing the nozzle in the direction of motion. This allows you to scrape safely outside the hot air stream and keeps the scraper and the scraped surface cooler.
A. Warm air preheats the surface.
B. Paint is softened by hot air.
A + B. Deep penetration of heat over total area.
C. Paint can be easily scraped off as soon as it is softened and the gun is moved forward.
D. Stripped surface allowed to cool.

Shrink film
Wind heat-shrink plastic film around the object. Start heating the film from a safe distance while keeping the heat gun moving. Move the heat gun closer to the film until the film starts to shrink and becomes taut.
Shrink hose
This is commonly used to shrink the hose around electrical connections or to soften a plastic hose that needs to be bent at a specific point.
10. Recommended temperature settings
| Use Stage | ||
| DIY Stripping paint 5 | ||
| Wall repair (small holes) 3-4 | ||
| Soften paint, caulking and putty for easier removal 3-5 | ||
| Shrink plastic film for wrapping or weatherproofing 3 | ||
| Garden / Household | Removing weeds | 4-5 |
| Sterilising potting soil | 4 | |
| Welding together tarpaulins for flowerbeds | 4-5 | |
| Sealing rope ends | 4-5 | |
| Lighting the barbecue faster (for assistance) | 5 | |
| Cleaning the barbecue | 5 | |
| Defrosting the freezer | 4 | |
| Removing Window Color paints | 1-3 | |
| Drying modelling clay | 2-3 | |
| Removing adhesives | 3 | |
| Automotive | Removing stickers, emblems and decals | 3 |
| Freshening up car trims such as black mouldings | 3 | |
| Applying and removing window tint | 3-4 | |
| Electronics | Electronic repairs | 1-5 |
| Shrink hoses for electrical repairs | 4-5 | |
11. Breaks and finishing work

When the battery is switched off/removed, the current temperature setting is automatically saved for the next application.
- Release the trigger (5).

The nozzle must always point upwards. If the nozzle points downwards, the hot air will remain in the gun and its lifespan may be shortened. Do not place a hot gun on its side, since this will extend the cooling time.
- Place the heat gun on a flat surface.
- Let the heat gun cool down.
- Press the battery lock (9) and remove the battery when you have finished your work.
12. Cleaning and Maintenance
Keep the intake openings on the housing clean and free of obstructions. Use a soft, dry brush to clean the openings periodically. Use only mild soap and a damp cloth to clean the Heat Gun. Many household cleaners contain chemicals which could seriously damage the housing.
Do not use petroleum, turpentine, lacquer or paint thinner, dry cleaning fluids or similar products when cleaning the Heat Gun.
NEVER allow any liquid to get inside the tool or immerse any part of the tool into a liquid. Cleaning and user maintenance shall not be made by children.

The nozzle will turn dark over time because of the high heat. This is normal and will not affect the performance or life of the unit.
13. Storage

Only store the heat gun once it has completely cooled down.
14. Accessories / Spare Parts
| Pos. Designation Order No. | ||
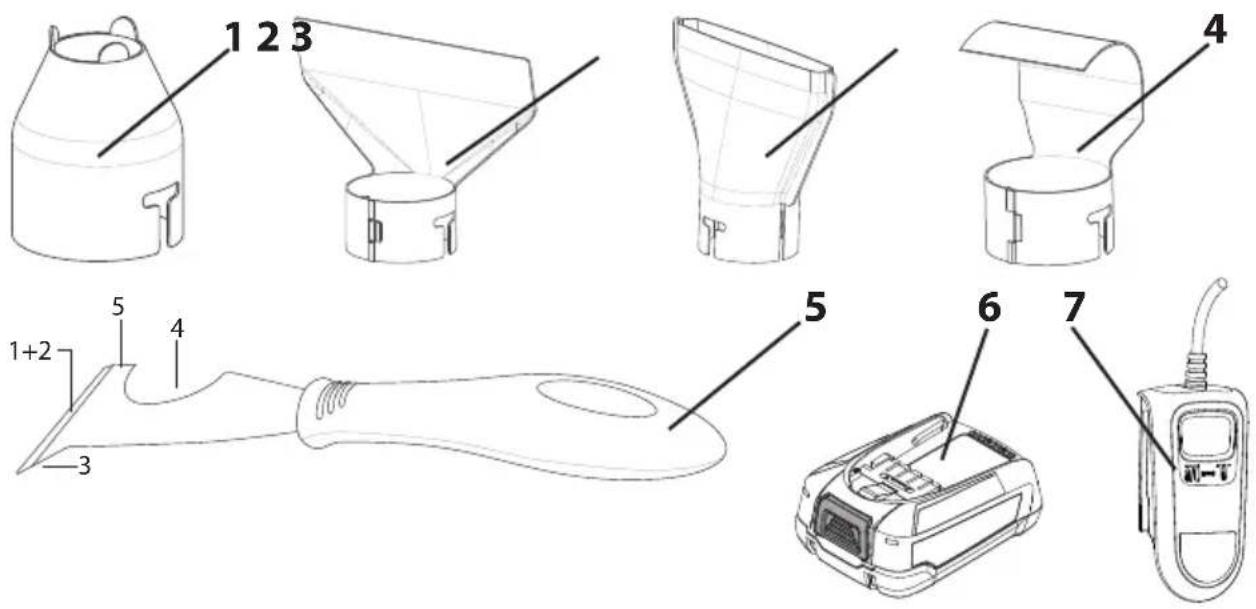
| 1 Con | Concentrator Nozzle: Directs a concentrated heat flow to the work surface. Ideal for removing paint from hard-to-reach places. | 2366222 |
| 2 Glass Protection Nozzle: Protects glass or other sensitive surfaces from heat. 2366224 | ||
| 3 W | de Concentrator Nozzle: Ideal for removing paint or varnish from large, flat surfaces such as skirting boards, doors, stairs, etc. It should be used in conjunction with a flat scraper. | 2366223 |
| 4 Ref | flector Nozzle: Ideal for thawing frozen pipes, solder pipe work, bending plastics or heat shrinking electrical insulating tubing. | 2366225 |
| 5 | 5-in-1 Detailed Scraper Tool: This tool has 5 functions. The blade is used to (1) scrape paint and (2) spread compound. The gouge point (3) is used to remove putty/caulk from open cracks. The curved area (4) is used to clean roller covers. The flat side (5) can be used to open paint tins. | 2366227 |
| 6 Re | chargeable battery (Li-lon, PBA 18 V, 2.5 Ah) 2432719 | |
| 7 Ch | arger EU (AL 1810 CV) Charger UK (AL 1810 CV) | 2432723 2432724 |
| Starter Kit 18V EU (contains items 6 and 7) Starter Kit 18V UK (contains items 6 and 7) | 2448616 2448617 | |
15. Environmental protection

At the end of its service life, the appliance, including accessories and packaging, must be recycled in an environmentally friendly manner. Separate packaging materials by type and put them in the recyclables collection. Old appliances and rechargeable batteries/batteries must not be disposed of with household waste. Help protect the environment by taking the appliance and the battery to a local disposal point, contact our customer service team or make enquiries at a specialist shop.
16. Important Note regarding Product Liability!
According to an EU directive, the manufacturer is only liable without limitation for faults in the product if all parts come from the manufacturer or have been approved by the manufacturer and have been mounted to the device and are operated properly. If third-party accessories or spare parts are used, the manufacturer is exonerated wholly or partly from his/her liability if use of the third-party accessories or spare parts have caused a defect in the product.
3 + 1 year guarantee on this WAGNER DIY product
In addition to the statutory warranty for this product, J. Wagner GmbH, based in 88677 Markdorf, Germany, grants you a guarantee (device guarantee) of 36 months for this product. This guarantee is extended by a further 12 months if the product is registered within 28 days of purchase on the Internet at https://go.wagner-group.com/3plus1.
The guarantee includes the free repair of defects which are demonstrably caused by the use of unsuitable materials in the product's manufacture or by assembly errors, as well as the free replacement of faulty components provided there are no guarantee exclusions.
The statutory material defect rights to which you as the purchaser are entitled for the intended purpose from the time of handover of the purchased item are not restricted by the guarantee. The guarantee, along with your statutory warranty rights, will expire if the device has been opened by persons other than authorised WAGNER service personnel. The detailed guarantee conditions can be obtained on request from our authorised WAGNER partners (see website or operating instructions) or in text form on our website:
https://go.wagner-group.com/hf-warranty-conditions

- Modifications reserved -
EU Declaration of conformity
We declare under sole responsibility that this product conforms to the following relevant stipulations:
2014/35/EU, 2014/30/EU, 2011/65/EU, 2012/19/EU
Applied harmonised norms:
EN 60335-1, EN 60335-2-45, EN 60335-2-29, EN 62133-2, EN IEC 55014-1,
EN IEC 55014-2, EN IEC 61000-3-2, EN 61000-3-3, EN 62233
The EU declaration of conformity is enclosed with the product.
If required, it can be re-ordered using order number 2428538.
UKCA Declaration of conformity
We declare under sole responsibility that this product conforms to the following relevant regulations:
Electrical Equipment (Safety) Regulations 2016
Electromagnetic Compatibility Regulations 2016
The Restriction of the Use of Certain Hazardous Substances in Electrical and Electronic
Equipment Regulations 2012
The Waste Electrical and Electronic Equipment Regulations 2013
Applied harmonised standards
BS EN 60335-1, BS EN 60335-2-45, BS EN IEC 60335-2-29, BS EN 62133-2,
BS EN IEC 55014-1, BS EN IEC 55014-2, BS EN IEC 61000-3-2, BS EN 61000-3-3,
BS EN 62233
natural_image
Technical line drawing of a funnel-shaped object with a labeled dimension (12), no text or symbols present.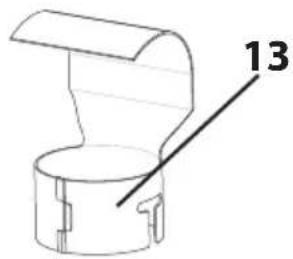
natural_image
Technical line drawing of a mechanical component with a labeled section (13), no readable text or symbols present.7. Chargement
natural_image
Technical line drawing of a handheld device with labeled part '5' (no text or symbols beyond label)https://go.wagner-group.com/hf-warranty-conditions

natural_image
Simple line drawing of a mechanical component with a curved top and internal structure (no text or symbols)7. Opladen
Strippen van verf

natural_image
Technical line drawing of a handheld electric gun with labeled part '5' (no text or symbols beyond label)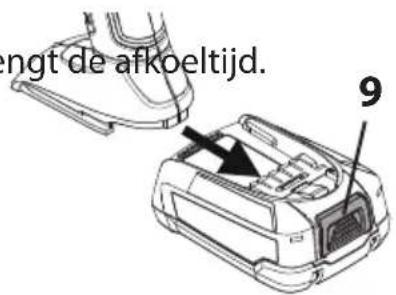
15. Milieu

https://go.wagner-group.com/hf-warranty-conditions

natural_image
Technical line drawing of a funnel-shaped object with a labeled dimension (12), no text or symbols present.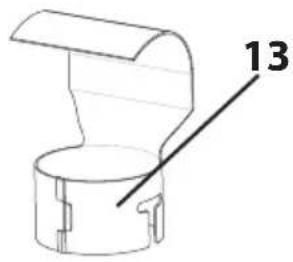
natural_image
Technical line drawing of a mechanical component with a labeled section (13), no readable text or symbols present.7. Carica
natural_image
Technical line drawing of a handheld device with labeled part '5' (no text or symbols beyond label)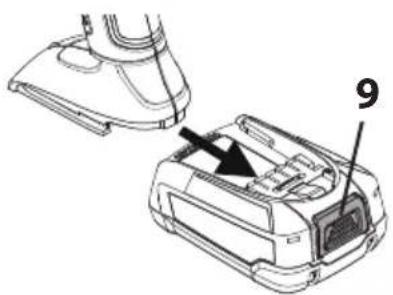
natural_image
Technical line drawing of a mechanical device with labeled parts (no text or symbols present)https://go.wagner-group.com/hf-warranty-conditions

Silverstone Park, Silverstone
Northants NN12 8GX
T + 44 (0) 1327 368410
DK
DVA A/S
Marielundvej 48 C
2730 Herlev
T+45 70 234 239
DK
ORKLA HOUSE CARE DANMARK A/S
Stationsvej 13
3550 Slangerup
Danmark
T +45 47 33 74 00
F +45 47 33 74 01
NOR
ORKLA HOUSE CARE NORGE AS
41-605 Swietochlowice
T+48/32/346 37 00
F +48/32/346 37 13
SCH
ORKLA HOUSE CARE AB
Box 133
564 23 Bankeryd
Sweden
T +46(0)36 37 63 00
info@anza.se
ROM
ROMIB S.R.L.

- FURNO 550 18V
- HOT AIR MULTI PURPOSE TOOL
- ORIGINAL-
- BETRIEBSANLEITUNG
- HERZLICHEN DANK FÜR IHR VERTRAUEN
- Laden
- Umweltschutz
- Translation of the original operating instructions
- MANY THANKS FOR PLACING YOUR TRUST IN US
- Contents
- Explanation of symbols used
- General Safety Instructions
- WARNING!
- ATTENTION! When paint is heated, harmful gases and vapours may develop. Always wear suitable respiratory protection and ensure adequate ventilation of the work space.
- Safety instructions for the charger and battery
- Only use the tool with BOSCH POWER FOR ALL compatible PBA 18V batteries with at least 2.5 Ah and suitable chargers. The battery voltage must match the battery charging voltage of the charger. Do not charge non-rechargeable batteries. Otherwise there is a risk of fire and explosion.
- Field of application
- Technical Data
- Description
- Charging
- Start-up
- Application
- Hands-free operation
- Stripping Paint
- The best method of paint removal
- Shrink film
- Shrink hose
- Recommended temperature settings
- Breaks and finishing work
- Cleaning and Maintenance
- Storage
- Accessories / Spare Parts
- Environmental protection
- Important Note regarding Product Liability!
- + 1 year guarantee on this WAGNER DIY product
- EU Declaration of conformity
- UKCA Declaration of conformity
- Chargement
- Opladen
- Strippen van verf
- Milieu
- Carica
- DVA A/S
- ORKLA HOUSE CARE DANMARK A/S
- ORKLA HOUSE CARE NORGE AS
- ORKLA HOUSE CARE AB
- ROMIB S.R.L.
Brand : WAGNER
Model : Furno 550 18V
Category : Heat gun